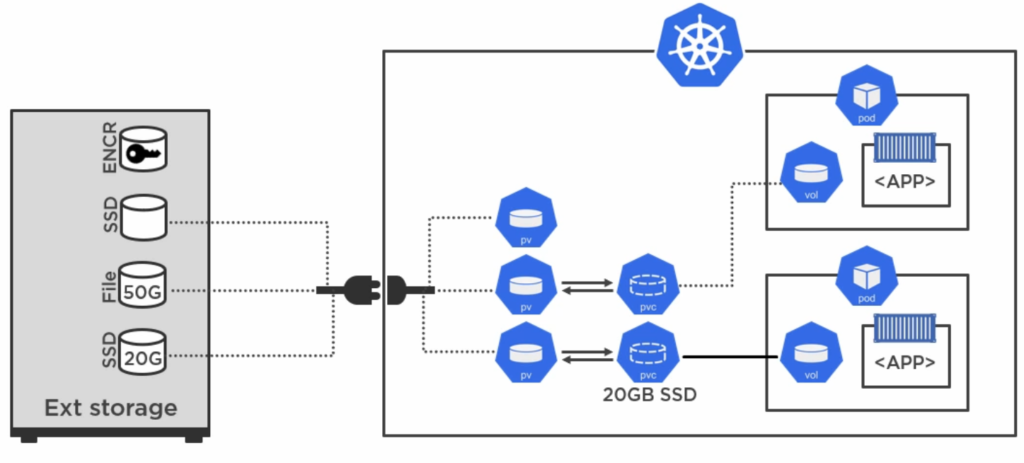
💡Managing Persistent Volumes in Kubernetes.
 Apurva Gargote
🎯 What is a Persistent Volume (PV)?
In Kubernetes, Persistent Volume (PV) is storage that keeps your data even if a pod is deleted or restarted.
A Persistent Volume Claim (PVC) is like a request that an application makes to use this storage.
Think of PV as a storage drive and PVC as asking for a piece of that drive for your app.
🛠️ Task 1: Adding a Persistent Volume to Your Todo App Deployment
📌 Step 1: Create a Persistent Volume (PV) - pv.yml
📌 What does it do?
- This file creates storage in Kubernetes using a folder on your machine.
apiVersion: v1
kind: PersistentVolume
metadata:
  name: todo-pv  # Name of the storage
spec:
  capacity:
    storage: 1Gi  # Total storage size (1 Gigabyte)
  accessModes:
    - ReadWriteOnce  # One node can write, multiple can read
  hostPath:
    path: "/mnt/data"  # Folder on your system to store data
✅ In simple terms:
It creates 1GB storage at
/mnt/dataon the host system.Only one node can write, but others can read.
👉 Run this command to apply:
kubectl apply -f pv.yml
📌 Step 2: Create a Persistent Volume Claim (PVC) - pvc.yml
📌 What does it do?
- The PVC requests storage from the PV for the app.
apiVersion: v1
kind: PersistentVolumeClaim
metadata:
  name: todo-pvc  # Name of the storage request
spec:
  accessModes:
    - ReadWriteOnce  # Must match the PV
  resources:
    requests:
      storage: 500Mi  # Asking for 500MB of storage
✅ In simple terms:
- It asks for 500MB of storage from the available 1GB PV.
👉 Run this command to apply:
kubectl apply -f pvc.yml
📌 Step 3: Update Deployment to Use PVC - deployment.yml
📌 What does it do?
- It mounts the storage so your app can use it.
volumes:
  - name: todo-storage
    persistentVolumeClaim:
      claimName: todo-pvc
containers:
  - name: todo-app
    volumeMounts:
      - mountPath: "/data"  # Inside the container
        name: todo-storage
✅ In simple terms:
- The storage is attached to the container at
/data.
👉 Run this command to apply:
kubectl apply -f deployment.yml

📌 Step 4: Verify That It Works
👉 Check if storage is created and connected:
kubectl get pv    # Check Persistent Volume
kubectl get pvc   # Check Persistent Volume Claim
kubectl get pods  # Check if the app is running
🛠️ Task 2: Access Data in the Persistent Volume
📌 Step 1: Open the Pod’s Terminal
👉 Run this command to enter the running pod:
kubectl exec -it <pod-name> -- /bin/bash
📌 Step 2: Save a File in the Persistent Volume
👉 Go to the storage folder inside the pod:
cd /data
👉 Create a test file:
echo "Hello Kubernetes!" > testfile.txt
📌 Step 3: Restart the Pod & Check if Data is Still There
👉 Delete the pod:
kubectl delete pod <pod-name>
👉 Check if a new pod starts:
kubectl get pods
👉 Enter the new pod and check the file:
kubectl exec -it <new-pod-name> -- /bin/bash
cat /data/testfile.txt
✅ If the file is still there, your Persistent Volume is working! 🎉
Subscribe to my newsletter
Read articles from Apurva Gargote directly inside your inbox. Subscribe to the newsletter, and don't miss out.
Written by

Apurva Gargote
Apurva Gargote
👨💻 Last-year student diving deep into DevOps, Cloud Engineering, and Infrastructure Automation. Passionate about building scalable, efficient, and secure systems. Let’s connect and build something amazing! 🚀