Setting Up Nginx for a Django Project Running in à Docker Container
 Sudeep Bogati
Table of contents

A step-by-step guide to configuring Nginx to serve a Django application running in a Docker container.
What is Nginx and Why Use It?
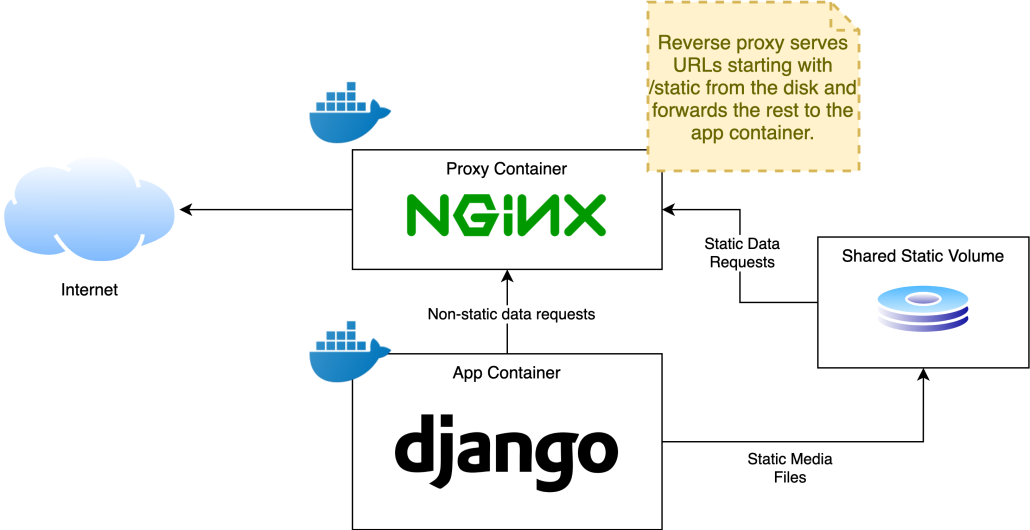
Nginx is a powerful, high-performance web server that serves both static and dynamic content. It’s widely used as a reverse proxy server to manage traffic between the client and application server.
Here’s why we use Nginx:
Reverse Proxy: It helps route incoming requests to your application, allowing the web server to handle multiple types of content (like static files, dynamic requests, etc.).
Load Balancing: Distributes traffic to multiple backend servers, improving scalability and reliability.
SSL Termination: Manages SSL certificates and HTTPS connections, securing the traffic between the client and the server.
Static File Serving: Efficiently serves static files like images, CSS, and JavaScript, offloading this task from the application server (e.g., Django).
Security: Provides an additional layer of security by acting as a buffer between external requests and the backend.
In this blog, we'll focus on using Nginx as a reverse proxy for a Django application running in a Docker container and configuring it to serve static and media files properly.
Prerequisites
Before starting, make sure you have the following:
A Django Application Running in a Docker Container
You should have a Django application running inside a Docker container. Yourdocker-compose.ymlfile should look something like this:services: web: image: your-django-image ports: - "8002:8000" # Exposing Django on port 8000 inside the container to port 8002 on the host volumes: - ./app:/app - ./static:/app/static - ./media:/app/media environment: - DJANGO_ENV=productionA Registered Domain Name with DNS Records Set in Cloudflare or Any Other DNS Platform
You should have a domain, such asapp.com, registered and properly configured with DNS records in platforms like Cloudflare or any other DNS provider. These records should point to the IP address of your Ubuntu VM where the application is hosted.Ubuntu VM
Ensure that your Ubuntu VM (or any server you are using) is set up and accessible over the internet. You will also need root privileges to configure Nginx and other necessary components.
Step 1: Install Nginx on the Ubuntu Server
Start by installing Nginx on your Ubuntu VM if it isn't already installed:
sudo apt update
sudo apt install nginx
Step 2: Nginx Configuration for Django Project
We’ll create a Nginx configuration file that will handle the reverse proxy and static/media file serving.
Nginx Configuration
Create the Nginx config file:
Create a new file under/etc/nginx/sites-available/app.comand add the following configuration:server { listen 80; server_name app.com; return 301 https://$host$request_uri; # Redirect HTTP to HTTPS } server { listen 443 ssl; server_name app.com; # SSL Configuration ssl_certificate /etc/letsencrypt/live/app.com/fullchain.pem; ssl_certificate_key /etc/letsencrypt/live/app.com/privkey.pem; location / { proxy_pass http://127.0.0.1:8002; # Points to Django app inside Docker container proxy_set_header Host $host; proxy_set_header X-Real-IP $remote_addr; proxy_set_header X-Forwarded-For $proxy_add_x_forwarded_for; proxy_set_header X-Forwarded-Proto $scheme; } # Serve Static Files location /static/ { alias /home/user/your-django-project/static/; } # Serve Media Files location /media/ { alias /home/user/your-django-project/media/; autoindex off; access_log off; } # Logs error_log /var/log/nginx/app_error.log; access_log /var/log/nginx/app_access.log; }Explanation of Key Sections:
proxy_passhttp://127.0.0.1:8002: This directs traffic to the Django app running inside the Docker container.alias /home/user/your-django-project/static/: This serves static files from the host machine’s static directory.ssl_certificateandssl_certificate_key: These point to the SSL certificate files for secure HTTPS connections.location /media/: This serves media files such as images, and thealiasspecifies the location on the server where they’re stored.
Step 3: Enable Nginx Configuration
After creating the configuration file, enable it by creating a symbolic link in the sites-enabled directory:
sudo ln -s /etc/nginx/sites-available/app.com /etc/nginx/sites-enabled/
Next, test the configuration to ensure there are no errors:
sudo nginx -t #test nginx for syntax errors
Finally, restart Nginx to apply the changes:
sudo systemctl restart nginx
Step 4: Setting Up SSL with Let's Encrypt
Let’s Encrypt offers a free SSL certificate that we can use to secure our domain. To set up SSL for your site, run the following commands:
Install Certbot:
Certbot is a tool that helps automate the process of obtaining and renewing SSL certificates from Let’s Encrypt.sudo apt install certbot python3-certbot-nginxObtain the SSL Certificate:
Use Certbot to automatically configure SSL for your Nginx server:sudo certbot --nginx -d app.comThis command will:
Automatically obtain an SSL certificate.
Configure Nginx to use HTTPS.
Test SSL:
Once the certificate is generated, test the SSL configuration by visitinghttps://app.com. The browser should show a secure connection.
Step 5: Verifying the Setup
Check Logs :
You can monitor Nginx’s logs to ensure everything is running smoothly:sudo tail -f /var/log/nginx/app_error.logTest the URLs :
Static files:
https://app.com/static/style.cssMedia files:
https://app.com/media/your-img-file.jpg
Step 6: Automating SSL Renewal
Let’s Encrypt certificates expire every 90 days. To automatically renew them, run:
sudo crontab -e
Add this line to the crontab:
0 3 * * * certbot renew --quiet
This runs daily at 3 AM to renew the certificate if necessary.
Conclusion
In this guide, we’ve set up Nginx as a reverse proxy for a Django application running inside a Docker container. We also configured Nginx to serve static and media files, and set up SSL with Let's Encrypt for secure HTTPS connections.
By following these steps, you'll have a secure, performant, and reliable setup for serving a Django application with Docker and Nginx.
Thank You
Subscribe to my newsletter
Read articles from Sudeep Bogati directly inside your inbox. Subscribe to the newsletter, and don't miss out.
Written by

Sudeep Bogati
Sudeep Bogati
Hello world, This is Sudeep Bogati. I am a full stack software engineer from Nepal, passionate about developing robust web applications. I focus on creating efficient, scalable solutions and continuously enhancing my skills in the ever-evolving tech landscape.