Setting Up Database Using Docker
 Amandeep Singh
Introduction to Docker and Containers
Docker is a powerful tool that simplifies software deployment by using containers—lightweight, self-sufficient environments that package everything an application needs to run. Unlike traditional installations, containers ensure consistency across different machines, making them ideal for managing databases.
Why Use Docker for Database Setup Instead of Installing Directly?
Setting up databases like MySQL, MongoDB, or PostgreSQL manually can be frustrating, especially when dealing with version conflicts, dependencies, and configurations. Docker solves this by:
Making setup effortless – Just a few commands, and your database is up and running.
Keeping things portable – Works seamlessly across Windows, macOS, and Linux.
Providing isolation – Runs in a container without affecting your system’s environment.
Ensuring data persistence – Stores data using volumes so that it’s not lost when containers stop.
Reducing system clutter – No need to install and manage multiple database versions directly on your machine.
Now, let's dive into setting up MySQL, MongoDB, and PostgreSQL using Docker.
Prerequisite
Docker should be installed.
Basic knowledge of how Docker works and common Docker commands.
Step-by-Step Database Setup
MySQL Setup
create a docker-compose.yml file and add the below configurations -
version: '3.8'

services:
  mysql:
    image: mysql:latest
    container_name: mysql
    ports:
      - "3306:3306" # Expose MySQL port
    environment:
      MYSQL_ROOT_PASSWORD: root # Root user password
      MYSQL_DATABASE: default_docker_db  # Default database to create
    volumes:
      - mysql_data:/var/lib/mysql # Persistent volume for MySQL data
    restart: always

volumes:
  mysql_data: # Define a named volume for data persistence
Lets breakdown each section one by one
image: mysql:latest – we are using latest version of mysql you can also mention a specific version this will pulls the corresponding MySQL image from Docker Hub.
container_name: mysql – Assigns a custom name to the container for easy identification.
ports: "3306:3306" – Maps MySQL’s default port inside the container to the host machine.
environment:
MYSQL_ROOT_PASSWORD – Sets the root password for MySQL.
MYSQL_DATABASE – Automatically creates a default database when the container starts.
volumes:
- mysql_data:/var/lib/mysql – Stores database data persistently to avoid data loss when the container restarts.
restart: always – Ensures the container restarts automatically if it stops unexpectedly.
to run MySQL on your local using docker container use below command (it may take sometime) -
docker-compose up -d
now you can check that MySQL container will start to show in your container list, to check that use below command
docker ps

MongoDB Setup
for setting up MongoDB create another docker-compose.yml file and add below code -
version: '3.8'

services:
  mongo:
    image: mongo:latest
    container_name: mongo
    ports:
      - "27017:27017" # Expose MongoDB port
    volumes:
      - mongo_data:/data/db # Persistent volume for MongoDB data
    restart: always
    environment:
      MONGO_INITDB_ROOT_USERNAME: root # Admin username
      MONGO_INITDB_ROOT_PASSWORD: root # Admin password

  mongo-express:
    image: mongo-express:latest
    container_name: mongo-express
    ports:
      - "8081:8081" # Expose Mongo-Express UI
    environment:
      ME_CONFIG_MONGODB_ADMINUSERNAME: root # Match MongoDB username
      ME_CONFIG_MONGODB_ADMINPASSWORD: root # Match MongoDB password
      ME_CONFIG_MONGODB_SERVER: mongo # MongoDB service name
    restart: always

volumes:
  mongo_data: # Define a named volume for MongoDB
Lets understand what’s inside this
mongo service: Runs the MongoDB database inside a container.
image: mongo:latest – Pulls the latest MongoDB image. Again you can mention the version here
container_name: mongo – Names the container for easy identification.
ports: "27017:27017" – Maps MongoDB’s default port.
volumes: mongo_data:/data/db – Stores database files persistently.
environment:
- MONGO_INITDB_ROOT_USERNAME & MONGO_INITDB_ROOT_PASSWORD – Sets up a root user for MongoDB authentication.
mongo-express service: (optional, you can skip this in case you want to use some other tool like mongodb-compass or studio-3t/robo-3t)
Provides a web UI to interact with the MongoDB database.
ME_CONFIG_MONGODB_SERVER: mongo – Connects Mongo Express to the MongoDB container.
to run MongoDB on your local using docker container use below command (it may take some time) -
docker-compose up -d
now you can check that Mongodb and mongo-express container will start to show in your container list, to check that use below command
docker ps

PostgreSQL Setup
for setting up PostgreSQL create another docker-compose.yml file and add below code -
services:
  db:
    image: postgres
    restart: always
    environment:
      POSTGRES_USER: root
      POSTGRES_PASSWORD: root
    healthcheck:
      test: ["CMD-SHELL", "pg_isready"]
      interval: 1s
      timeout: 5s
      retries: 10

  adminer:
    image: adminer
    restart: always
    ports:
      - 8080:8080
Lets understand what are configuration details -
Explanation
db service: Runs the PostgreSQL database.
image: postgres – Pulls the latest PostgreSQL image.
environment:
- POSTGRES_USER & POSTGRES_PASSWORD – Sets up the root credentials.
healthcheck: Ensures the database is ready before accepting connections.
adminer service: (Optional, you can skip this in case you want to use other tools like PgAdmin or dbeaver)
Provides a web UI for managing databases.
ports: "8080:8080" – Exposes Adminer UI on port 8080.
to run PostgreSQL on your local using docker container use below command (it may take some time) -
docker-compose up -d
now you can check that PostgreSQL and adminer container will start to show in your container list, to check that use below command
docker ps

Using Adminer for PostgreSQL
Adminer is a simple, lightweight database management tool with a web interface. It’s like phpMyAdmin but supports multiple databases, including MySQL and PostgreSQL. Once your PostgreSQL container is running, you can access Adminer at: http://localhost:8080 (you can define another port here if you have changed the port in yml file)
connection to different DB
I Mostly use adminer for SQL databases and for MongoDB I use studio3T. for the connection you need your system’s IP address. you can check your system’s ip using below commands
for ubuntu you can use command - “ip a”
for mac you can use command - “ipconfig getifaddr en0”
for windows you can use command - “ipconfig”
once you have your IP you can connect to db
connection to MySQL/PostgreSQL using Adminer
MySQL/PostgreSQL
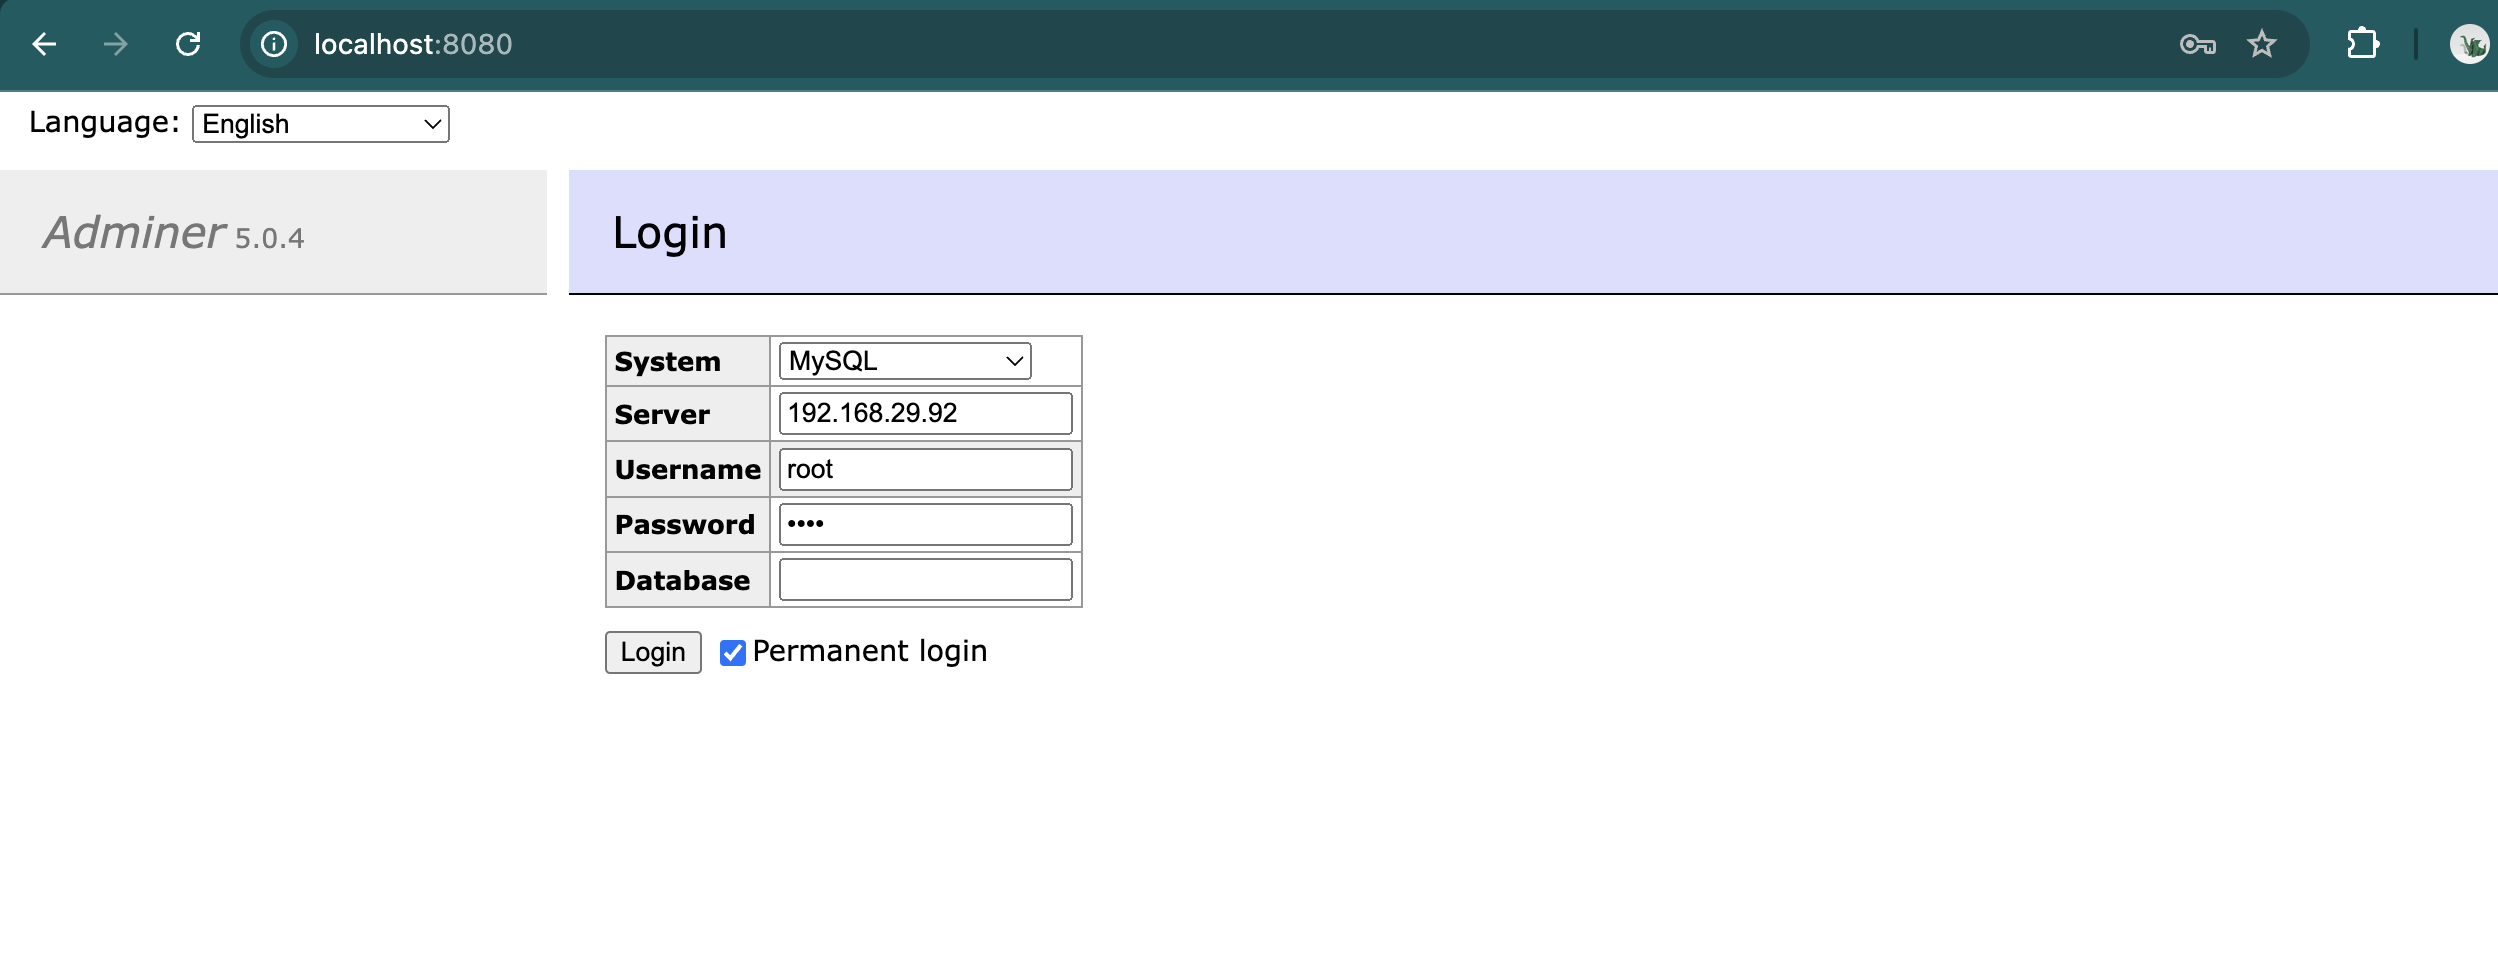
Open Adminer (http://localhost:8080), Below screen will appear,
select system “MySQL”/”PostgreSQL”
server “add your ip address”
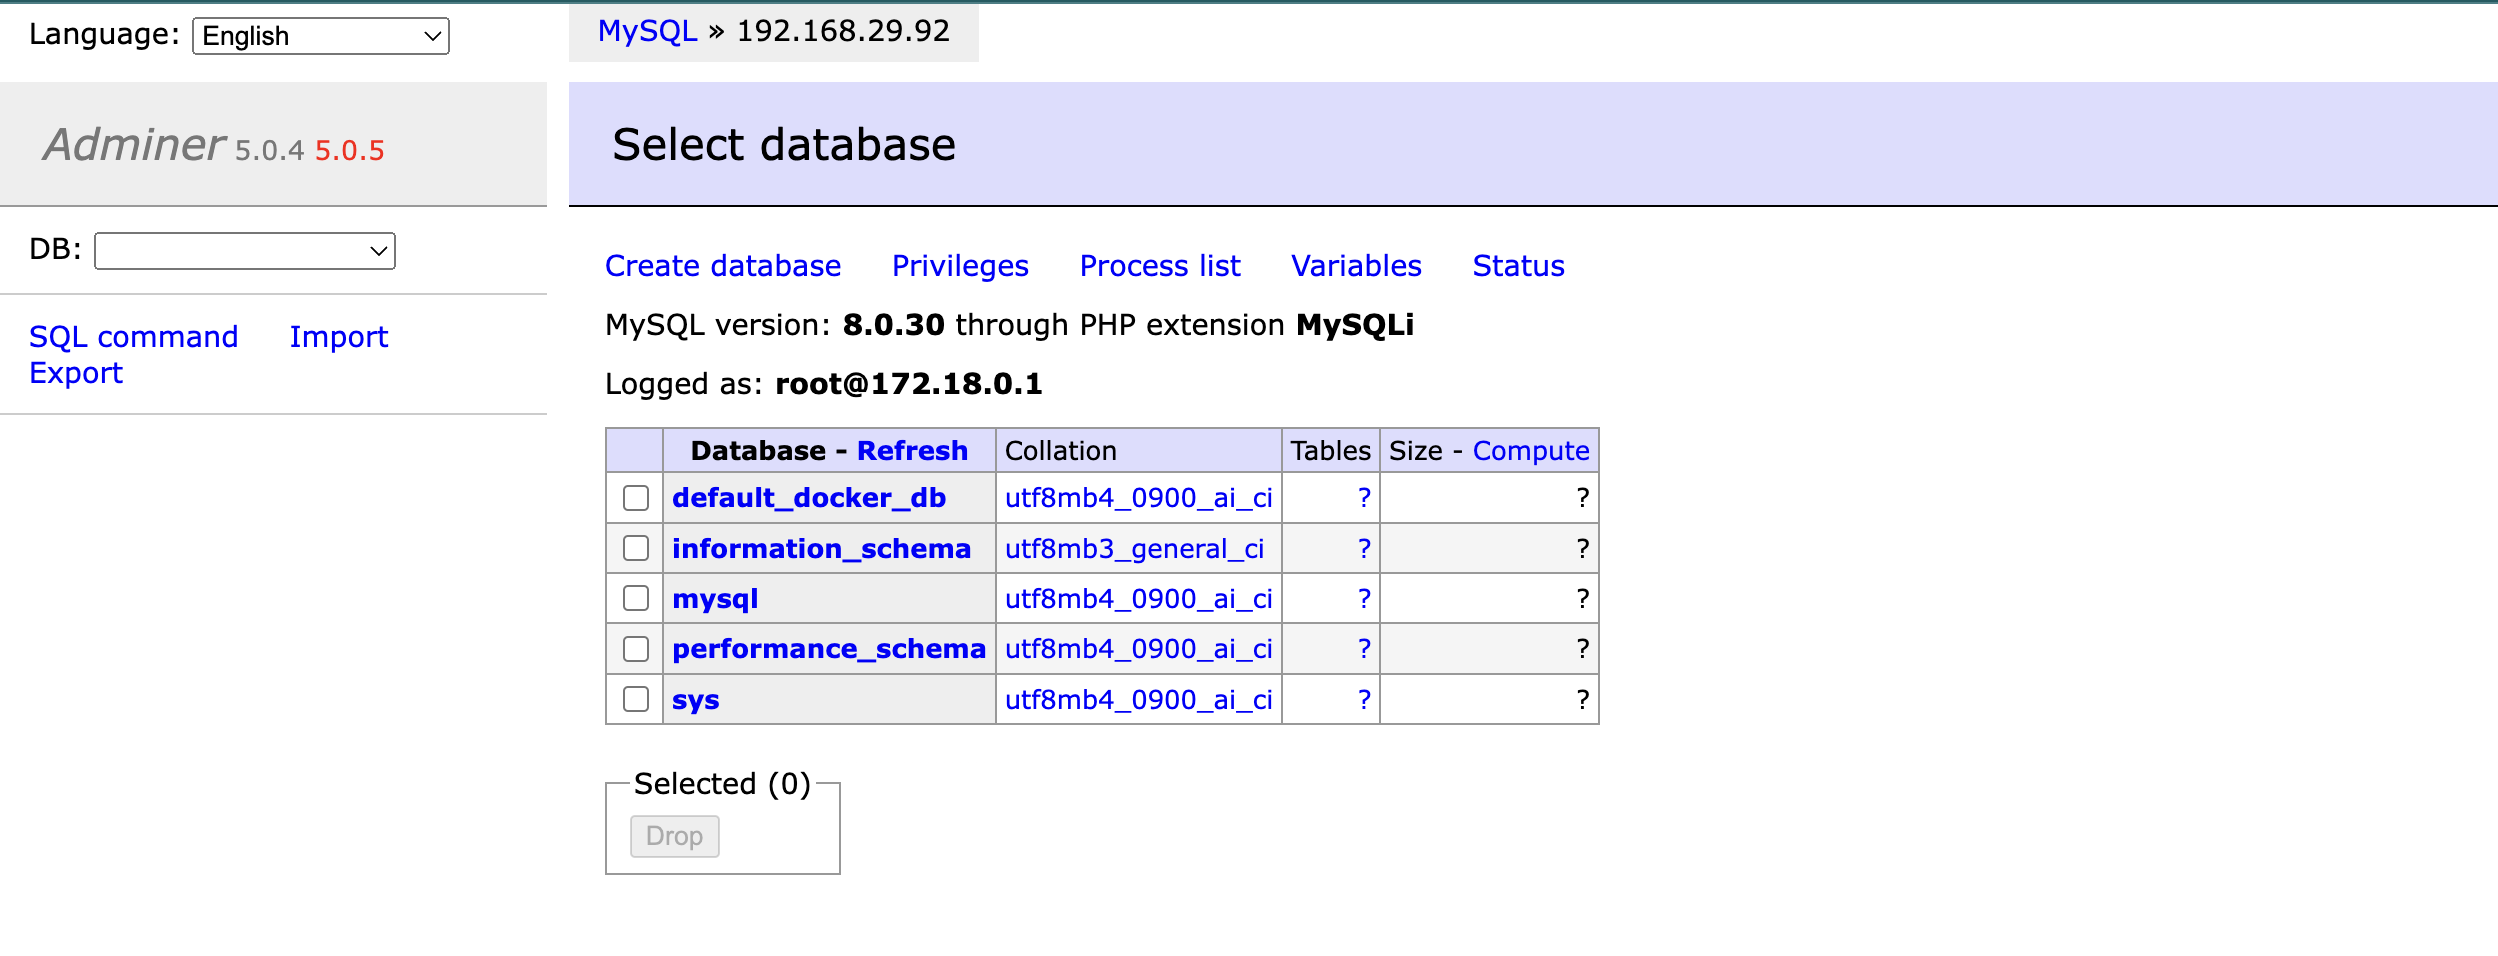
add username and password and click on login and after login you will see the list of database that you have access.


MongoDB
Open studio 3t and add the connection string as “mongodb://localhost:27017” or “mongodb://root:root@localhost:27017” (Here root:root is <username>:<password>)
your connection will be configured.
Conclusion
Using Docker for database management makes your setup process faster, cleaner, and more efficient. Instead of dealing with complex installations, you get a fully functional database in minutes. Hopefully, this guide helps you get started quickly and smoothly. Happy coding! 🚀
Subscribe to my newsletter
Read articles from Amandeep Singh directly inside your inbox. Subscribe to the newsletter, and don't miss out.
Written by

Amandeep Singh
Amandeep Singh
Proficient in a diverse range of technologies, I bring a dynamic skill set to every project I undertake. Whether it's optimising performance, implementing new features, or solving complex technical challenges, I thrive in dynamic environments where collaboration and creativity are paramount.