Implementing Face Liveness Detection in React Native with Amazon Rekognition
 Ayomide Bamigboye
In highly sensitive applications, such as fintech platforms, verifying user identities is crucial to maintaining security and preventing fraud. Know Your Customer (KYC) verification plays a key role by requiring users to provide details like their residential address and government-issued IDs. However, These traditional methods are not enough as they can be bypassed if users upload impersonated photos or pre-recorded videos.
To address this, face liveness detection ensures the user is physically present during authentication. scanning facial movements in real-time, it prevents spoofing attempts using printed images, digital photos, deepfakes, or video recordings.
To implement this, we’ll integrate Amazon Rekognition Face Liveness, a fully managed service that analyzes short selfie videos to detect spoofs. It requires no infrastructure management or machine learning expertise and scales automatically based on demand.
Prerequisites
To set up this integration, ensure you have:
Node.js runtime installed
An Expo app already scaffolded
A Next.js 14 app, which will be rendered inside an Expo WebView for seamless communication via window messages
Setting up AWS Cognito
AWS Cognito is a managed authentication and authorization service that helps you add user sign-up, sign-in, and access control to your applications. It consists of two main components: the user pool and the Identity Pool. The Identity Pool will be used to obtain temporary AWS credentials so users can interact with Rekognition without needing long-term IAM credentials or to be authenticated.
Note: All links and AWS resources mentioned in this article are based in the eu-west-1 region. If you're using a different AWS region, make sure to update the region in the URLs accordingly.
The below steps are needed to set the Identity pool in aws cognito:
- Visit AWS Cognito to create a new Identity pool and follow the image below to setup an identity pool ready to be used.

A guest access Identity Pool in AWS Cognito allows unauthenticated users (users without a signed-in account) to access certain AWS resources with temporary credentials. It exists to enable apps to provide limited access to AWS services without requiring user authentication.


Visit IAM and click on Roles

Click on the newly created role that was created in Step 1. On the permission tab, click on the add permissions button and select Attach policies. Search for AmazonRekognitionFullAccess and add it to the permissions.


Setting up NextJS
In this guide, we'll be using Next.js as a full-stack framework. This is necessary because Amazon Rekognition's Face Liveness feature requires a sessionId, which is generated on the backend and later used to retrieve the liveness result, including the verified image and confidence score. By leveraging Next.js API routes, we can securely handle this process within our application.
Scaffold a Next.js app by running:
npx create-next-app@14.2.4
We also need to install the additional packages below that we’d be using to build the application
npm install @aws-amplify/ui-react-liveness aws-amplify @aws-amplify/ui-react @aws-sdk/client-rekognition @aws-sdk/credential-providers
Let’s create an API route that will handle the creation of sessions and retrieval of session results. Create a new file in src/app/api/session/route.ts and paste the codes below.
import { v4 as uuidv4 } from "uuid";
import { type NextRequest } from "next/server";

async function getClient() {
  const { RekognitionClient } = await import("@aws-sdk/client-rekognition");
  const { fromCognitoIdentityPool } = await import(
    "@aws-sdk/credential-providers"
  );

  return new RekognitionClient({
    region: process.env.NEXT_PUBLIC_REGION,
    credentials: fromCognitoIdentityPool({
      clientConfig: { region: process.env.NEXT_PUBLIC_REGION },
      identityPoolId: process.env.NEXT_PUBLIC_IDENTITY_POOL_ID!,
    }),
  });
}

export async function POST() {
  const { CreateFaceLivenessSessionCommand } = await import(
    "@aws-sdk/client-rekognition"
  );

  try {
    const command = new CreateFaceLivenessSessionCommand({
      ClientRequestToken: uuidv4(),
    });
    const client = await getClient();
    const response = await client.send(command);
    return Response.json(
      { sessionId: response.SessionId as string },
      { status: 200 }
    );
  } catch (error) {
    console.error("Error:", error);
    return Response.json({ error: "Something went wrong" }, { status: 500 });
  }
}

export async function GET(request: NextRequest) {
  const { GetFaceLivenessSessionResultsCommand } = await import(
    "@aws-sdk/client-rekognition"
  );

  try {
    const searchParams = request.nextUrl.searchParams;
    const sessionId = searchParams.get("sessionId");

    const command = new GetFaceLivenessSessionResultsCommand({
      SessionId: sessionId as string,
    });
    const client = await getClient();
    const data = await client.send(command);

    return Response.json({ data });
  } catch (error) {
    return Response.json(
      { error: "Something went wrong" },
      {
        status: 500,
      }
    );
  }
}
POST /api/session: Creates a liveness session by callingCreateFaceLivenessSessionCommand, generating asessionIdthat will be used for verification.GET /api/session?sessionId=...: Retrieves the liveness session results usingGetFaceLivenessSessionResultsCommand, returning verification data.
getClient uses Cognito Identity Pools to obtain temporary AWS credentials, ensuring that API calls to AWS services like Rekognition are secure and made with appropriate permissions, without exposing any sensitive credentials.
Why use dynamic imports?
You'll notice that AWS SDK modules like CreateFaceLivenessSessionCommand and GetFaceLivenessSessionResultsCommand are dynamically imported using await import(). This is necessary because some AWS SDK modules require a server environment to function properly. If they were imported statically at the top of the file, Next.js might attempt to load them in a client-side context, causing errors during build or runtime.
By dynamically importing these modules inside the request handler, we ensure:
They are only loaded when the API route is executed (after the server environment is established).
Next.js does not attempt to load them in a browser environment, preventing module resolution issues.
The API remains optimized by loading only the necessary parts of the AWS SDK, reducing cold starts in serverless environments.
Ensure you have a .env file in the root folder of your project. my current region where my cognito has been set up is
eu-west-1. Identity pool Id can be seen by following this Link where you’ll see the list of the Identity pools that have been created.

NEXT_PUBLIC_IDENTITY_POOL_ID=eu-west-1:dfabb48e-25bb-4501-9c1a-90f9a392b1c2
NEXT_PUBLIC_REGION=eu-west-1
Setting up NextJS Client
Create a new folder in the src folder called component and create a liveness.tsx file, the file tree should look like src/components/liveness.tsx. and paste the below code
"use client";

import "@aws-amplify/ui-react/styles.css";
import React from "react";
import { Loader, ThemeProvider } from "@aws-amplify/ui-react";
import { Amplify } from "aws-amplify";
import { FaceLivenessDetector } from "@aws-amplify/ui-react-liveness";
import type { GetFaceLivenessSessionResultsCommandOutput } from "@aws-sdk/client-rekognition";

const credentials = {
  aws_project_region: process.env.NEXT_PUBLIC_REGION,
  aws_cognito_identity_pool_id: process.env.NEXT_PUBLIC_IDENTITY_POOL_ID,
  aws_cognito_region: process.env.NEXT_PUBLIC_REGION,
};

Amplify.configure(credentials);

export const Liveness = () => {
  const [loading, setLoading] = React.useState<boolean>(true);
  const [sessionId, setSessionId] = React.useState<string | null>(null);
  const [createLivenessApiData, setCreateLivenessApiData] =
    React.useState<GetFaceLivenessSessionResultsCommandOutput | null>(null);

  React.useEffect(() => {
    const fetchCreateLiveness: () => Promise<void> = async () => {
      try {
        setLoading(true);
        const response = await fetch("/api/session", { method: "POST" });
        const data = await response.json();
        setSessionId(data.sessionId);
      } catch (error) {
        console.error("Error:", error);
      } finally {
        setLoading(false);
      }
    };

    fetchCreateLiveness();
  }, []);

  const handleAnalysisComplete = async () => {
    if (!sessionId) return alert("Session ID not found");

    try {
      const response = await fetch(`/api/session?sessionId=${sessionId}`);
      const { data } = await response.json();
      setCreateLivenessApiData(data);
      console.log("data", data);
    } catch (error) {
      console.error("Error:", error);
    } finally {
      setSessionId(null);
    }
  };

  return (
    <ThemeProvider>
      {loading ? (
        <Loader />
      ) : (
        <>
          {createLivenessApiData ? (
            <>
              <div>Confidence: {createLivenessApiData.Confidence}</div>
              <div>SessionId: {createLivenessApiData.SessionId}</div>
            </>
          ) : (
            <FaceLivenessDetector
              sessionId={sessionId!}
              region={process.env.NEXT_PUBLIC_REGION!}
              onAnalysisComplete={handleAnalysisComplete}
              onError={(error) => {
                console.error(error);
              }}
            />
          )}
        </>
      )}
    </ThemeProvider>
  );
};
In src/app/page.tsx , replace the content with the below codes:
import { Liveness } from "@/components/liveness";

export default function Home() {
  return <Liveness />;
}
We are literally done with what we currently have assuming we were building for only frontend.
Setting up NextJS to communicate with React Native (Expo)
Before Next.js can communicate with Expo, we need to set up a messaging channel between them, and we will be using window.postMessage.
Setting Up the Messaging Channel
The website (Next.js) can send messages to the Expo app using window.ReactNativeWebView.postMessage(). The Expo app, in turn, listens for these messages and responds accordingly.
Sending Messages from Next.js to Expo
To send a message from the website to the WebView app, we define a function like this:
function postMessageToExternalListeners(data: any) {
  if (!window.ReactNativeWebView) return;
  window.ReactNativeWebView.postMessage(JSON.stringify(data));
}
This function first checks if
window.ReactNativeWebViewexists (to ensure the website is running inside a WebView).It then sends a JSON-formatted message to the WebView app.
Since window.ReactNativeWebView is not a standard browser API, we need to extend the Window interface in TypeScript:
declare global {
  interface Window {
    ReactNativeWebView: {
      postMessage: (data: string) => void;
    };
  }
}
This prevents TypeScript errors and makes the communication process smoother. The full code of the next.js app is rewritten below
"use client";

declare global {
  interface Window {
    ReactNativeWebView: {
      postMessage: (data: string) => void;
    };
  }
}

import "@aws-amplify/ui-react/styles.css";
import React from "react";
import { Loader, ThemeProvider } from "@aws-amplify/ui-react";
import { Amplify } from "aws-amplify";
import { FaceLivenessDetector } from "@aws-amplify/ui-react-liveness";
import type { GetFaceLivenessSessionResultsCommandOutput } from "@aws-sdk/client-rekognition";

const credentials = {
  aws_project_region: process.env.NEXT_PUBLIC_REGION,
  aws_cognito_identity_pool_id: process.env.NEXT_PUBLIC_IDENTITY_POOL_ID,
  aws_cognito_region: process.env.NEXT_PUBLIC_REGION,
};

Amplify.configure(credentials);

function postMessageToExternalListeners(data: any) {
  if (!window.ReactNativeWebView) return;
  window.ReactNativeWebView.postMessage(JSON.stringify(data));
}

export const Liveness = () => {
  const [loading, setLoading] = React.useState<boolean>(true);
  const [sessionId, setSessionId] = React.useState<string | null>(null);
  const [createLivenessApiData, setCreateLivenessApiData] =
    React.useState<GetFaceLivenessSessionResultsCommandOutput | null>(null);

  React.useEffect(() => {
    const fetchCreateLiveness: () => Promise<void> = async () => {
      try {
        setLoading(true);
        const response = await fetch("/api/session", { method: "POST" });
        const data = await response.json();
        setSessionId(data.sessionId);
      } catch (error) {
        console.error("Error:", error);
        const data = {
          event: "Error_Creating_Session",
          data: error,
        };
        postMessageToExternalListeners(data);
      } finally {
        setLoading(false);
      }
    };

    fetchCreateLiveness();
    postMessageToExternalListeners({
      event: "Liveness_SDK_Initialized",
      meta: "Callback called when the SDK is initialized successfully",
    });
  }, []);

  const handleAnalysisComplete = async () => {
    if (!sessionId) return alert("Session ID not found");

    try {
      const response = await fetch(`/api/session?sessionId=${sessionId}`);
      const { data } = await response.json();
      setCreateLivenessApiData(data);
      const eventToSend = {
        event: "Analysis_Complete",
        data,
      };
      postMessageToExternalListeners(eventToSend);
    } catch (error) {
      console.error("Error:", error);
      const eventToSend = {
        event: "Error_Fetching_Result",
        data: error,
      };
      postMessageToExternalListeners(eventToSend);
    } finally {
      setSessionId(null);
    }
  };

  return (
    <ThemeProvider>
      {loading ? (
        <Loader />
      ) : (
        <FaceLivenessDetector
          sessionId={sessionId!}
          region={process.env.NEXT_PUBLIC_REGION!}
          onAnalysisComplete={handleAnalysisComplete}
          onUserCancel={() => {
            const data = {
              event: "User_Cancel",
              meta: "Callback called when the user cancels the flow. This callback is also called when users click the, Try Again button in the default error modal",
            };
            postMessageToExternalListeners(data);
          }}
          onError={(error) => {
            console.error(error);
            const data = {
              event: "OnError",
              meta: "Callback called when there an error occurred on any step.",
              data: error,
            };
            postMessageToExternalListeners(data);
          }}
        />
      )}
    </ThemeProvider>
  );
};
Setting up React Native (Expo)
Now that we’ve set up Next.js to communicate with Expo, the next step is to bootstrap an Expo app, embed the Next.js website inside a WebView, and listen for messages from the website.
Bootstrapping an Expo App
First, create a new Expo project:
npx create-expo-app@latest face-liveness-expo
cd face-liveness-expo
Next, install the required dependencies:
npx expo install expo-camera
Configure the camera config plugin in app.json
       [
        "expo-camera",
        {
          "cameraPermission": "Allow $(PRODUCT_NAME) to access your camera",
          "microphonePermission": "Allow $(PRODUCT_NAME) to access your microphone",
          "recordAudioAndroid": true
        }
      ]
Why do we need an expo camera
When opening the WebView on Android, the camera permission prompt inside the WebView may not appear as expected. This can cause the WebView to get stuck on "Waiting for permission" when attempting to access the camera.
To fix this, we explicitly request camera permissions using expo-camera before opening the WebView. This ensures the necessary permissions are granted upfront, allowing the WebView to function properly.
Configuring Navigation with expo-router
Since we’re using expo-router, let’s configure it by modifying app/_layout.tsx:
import {
  DarkTheme,
  DefaultTheme,
  ThemeProvider,
} from "@react-navigation/native";
import { useFonts } from "expo-font";
import { Stack } from "expo-router";
import * as SplashScreen from "expo-splash-screen";
import { StatusBar } from "expo-status-bar";
import { useEffect } from "react";
import "react-native-reanimated";

import { useColorScheme } from "@/hooks/useColorScheme";

// Prevent the splash screen from auto-hiding before asset loading is complete.
SplashScreen.preventAutoHideAsync();

export default function RootLayout() {
  const colorScheme = useColorScheme();
  const [loaded] = useFonts({
    SpaceMono: require("../assets/fonts/SpaceMono-Regular.ttf"),
  });

  useEffect(() => {
    if (loaded) {
      SplashScreen.hideAsync();
    }
  }, [loaded]);

  if (!loaded) {
    return null;
  }

  return (
    <ThemeProvider value={colorScheme === "dark" ? DarkTheme : DefaultTheme}>
      <Stack />
      <StatusBar style='auto' />
    </ThemeProvider>
  );
}
Creating the WebView Screen
Create app/index.tsx, which will display the Next.js website inside a WebView:
import { WebView } from "react-native-webview";
import { useRouter } from "expo-router";
import { Alert, Button, View } from "react-native";
import { SafeAreaView } from "react-native-safe-area-context";
import { useCameraPermissions } from "expo-camera";
import { ThemedText } from "@/components/ThemedText";

export default function WebViewScreen() {
  const router = useRouter();
  const [permission, requestPermission] = useCameraPermissions();

  if (!permission) {
    // Camera permissions are still loading.
    return <View />;
  }

  if (!permission.granted) {
    // Camera permissions are not granted yet.
    return (
      <SafeAreaView>
        <ThemedText>We need your permission to show the camera</ThemedText>
        <Button onPress={requestPermission} title='grant permission' />
      </SafeAreaView>
    );
  }

  return (
    <SafeAreaView style={{ flex: 1 }}>
      <WebView
        startInLoadingState
        javaScriptCanOpenWindowsAutomatically
        allowsInlineMediaPlayback
        onMessage={(event) => {
          const data = JSON.parse(event.nativeEvent.data);

          switch (data.event) {
            case "Liveness_SDK_Initialized":
              console.warn("liveness initialized");
              break;

            case "Error_Creating_Session":
              console.warn("couldn't create session");
              break;

            case "User_Cancel":
              console.warn("user close verification");
              Alert.alert("User has asked to close verification!");
              break;

            case "Analysis_Complete":
              const response = JSON.stringify(data.data);
              router.push({ pathname: "/result", params: { data: response } });
              break;

            case "Error_Fetching_Result":
              console.warn("couldn't fetch result");
              break;

            case "OnError":
              const errorResponse = data.data;
              console.error("Error:", errorResponse);
              Alert.alert("Error", errorResponse?.error?.message);

              break;

            default:
              break;
          }
        }}
        style={{ flex: 1 }}
        source={{ uri: "https://a033-105-119-1-143.ngrok-free.app" }}
      />
    </SafeAreaView>
  );
}
How It Works
Loads the Next.js website using
WebView.Listens to messages from the website using
onMessage.If
Analysis_Completeis received, navigates to the result page
What’s this https://a033-105-119-1-143.ngrok-free.app uri?
The WebView in our Expo app needs to load the Next.js app, but if you're developing locally, localhost:3000 won't be accessible from a mobile device. To solve this, you have two options:
Deploy the Next.js app to a hosting service (e.g., Vercel, AWS, DigitalOcean) and use the deployed URL in the WebView.
Use a tunnelling service like ngrok to expose your local server with a public URL.
You can temporarily use ngrok to route traffic to your local Next.js app for development. Learn more in the ngrok documentation
Creating the Result Screen
Create app/index.tsx which will display the liveness check result:
import { ThemedText } from "@/components/ThemedText";
import { useLocalSearchParams } from "expo-router";
import { View } from "react-native";
import { SafeAreaView } from "react-native-safe-area-context";

export default function Result() {
  const { data } = useLocalSearchParams();
   const parsedData = JSON.parse(decodeURIComponent(data as string));

  return (
    <SafeAreaView
      style={{ flex: 1, alignItems: "center", justifyContent: "center" }}
    >
      <ThemedText>Liveness Check Result</ThemedText>
      <View>
        <ThemedText>Confidence: {parsedData.Confidence}</ThemedText>
      </View>
    </SafeAreaView>
  );
}
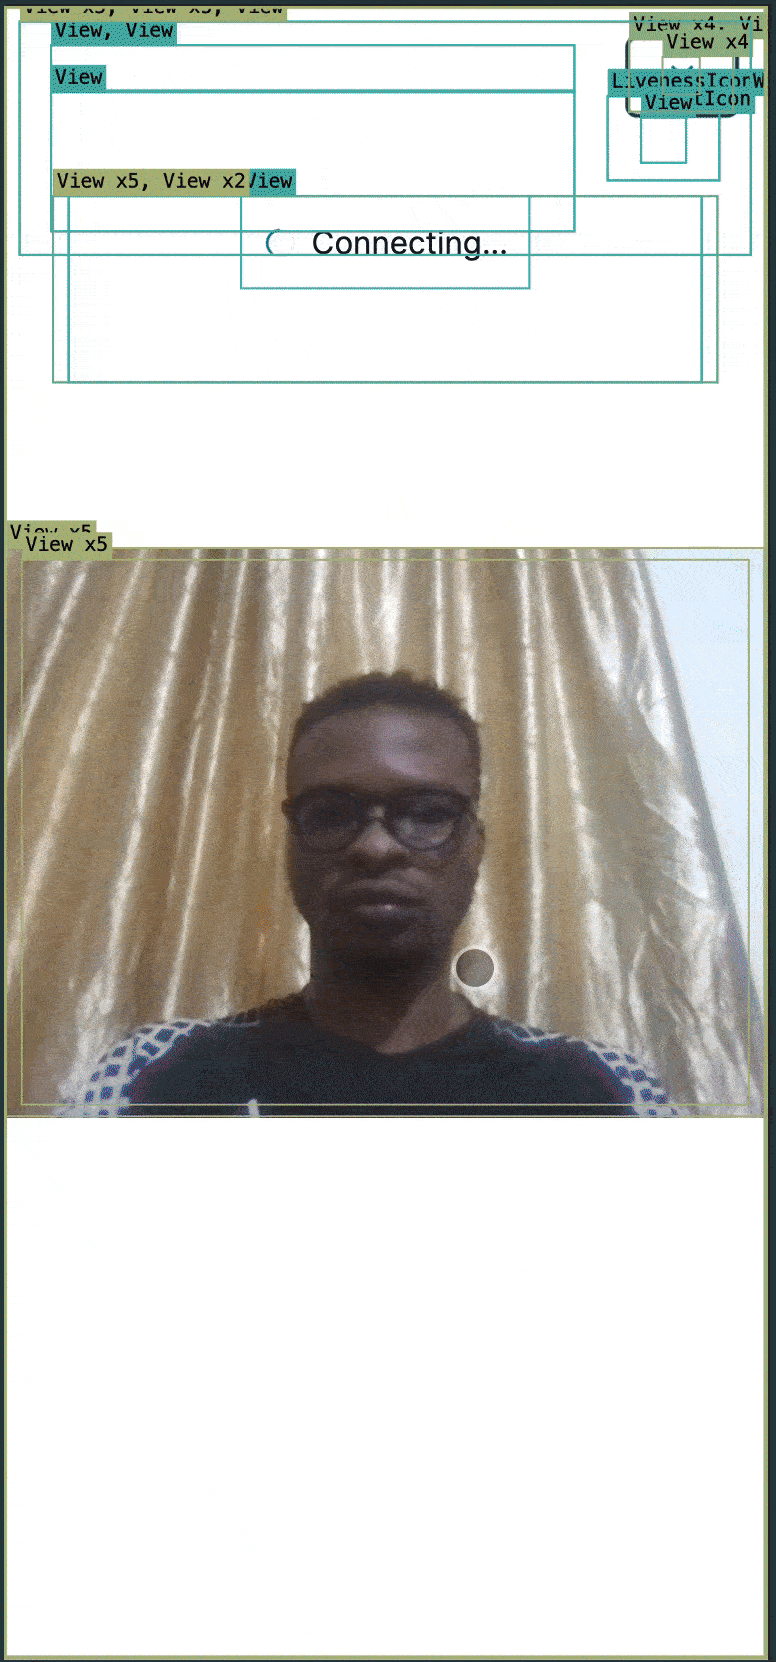
Previewing the result

Conclusion
In this guide, we successfully integrated Next.js, Expo, and AWS Rekognition to perform face liveness verification inside a WebView. We established a messaging channel using window.postMessage(), handled navigation based on user interactions, and ensured proper camera permissions in the Expo app.
With AWS Rekognition, we were able to analyze liveness verification results in real-time, making the solution scalable and reliable.
By following these steps, you now have a working face recognition system that can be further enhanced by:
Adding authentication to restrict access.
Optimizing UI/UX for a smoother verification process.
GitHub Repository
You can find the full source code for this project on GitHub:
Feel free to clone, explore, and contribute! If you have any questions or improvements, open an issue or submit a pull request. 🚀
Subscribe to my newsletter
Read articles from Ayomide Bamigboye directly inside your inbox. Subscribe to the newsletter, and don't miss out.
Written by
Ayomide Bamigboye
Ayomide Bamigboye
I'm a versatile developer seeking new opportunities in exciting companies. My expertise spans both frontend, mobile and backend development, enabling me to create holistic solutions. With a strong foundation in writing accessible HTML, applying modern CSS practices, and producing clean JavaScript code, I ensure top-notch user interfaces and smooth user experiences. On the front end, I specialize in React and TypeScript, including React Native for mobile development, crafting robust and maintainable applications. My skills extend to the backend as well, where I enjoy building APIs, working with databases, and managing server-side operations using Node alongside its frameworks. This full-stack capability allows me to create end-to-end solutions that meet diverse business needs. While I'm currently based in Nigeria, I'm open to remote work opportunities and have a track record of successful collaboration in remote teams. Beyond coding, I find solace outdoors and enjoy playing the piano and creating music. Feel free to explore my work to see how I can contribute to your projects. I'm enthusiastic about connecting and discussing how my TypeScript-driven skills can add value to your team.