06. Security in linux
 Arindam Baidya
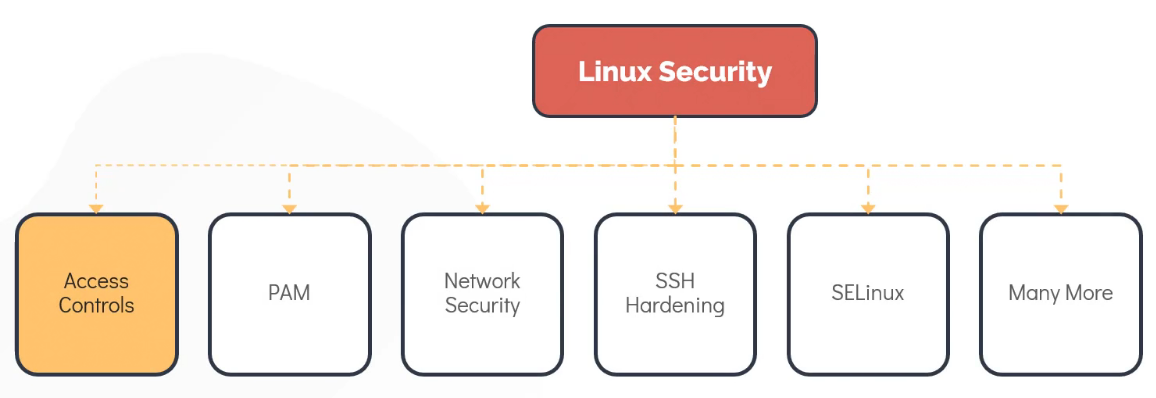
Access Controls: This method make use of user and password-based authentication to determine who can access the systems.
PAM (Pluggable Authentication Model): Another way to managing authentication in Linux. It is normally used to authenticate users to programs and services in Linux.
Network security: It is used to restrict or allow services listening on the Linux server. While we are commonly rely on the external firewalls to do this, it can also be setup within the Linux system by making use of tools such as IPTables and Firewalld.
SSH (Secure Shell): Used for remote access to a server over an unsecured network. SSH hardening can help make sure only the authorize users gain access to the server.
SELinux: Makes use of security policies for isolating application running on the same system from each other to protect the Linux server.
Although there are several other ways to secure the Linux operating system.
Linux Accounts
Every user in linux has an associated account. The user account maintain information about username and password used to log into the system. An user account also contains an identifier called UID which is unique for each user in the system.
cat /etc/passwd Contains information about user account.
Groups
A linux group is a collection of users. It is used to organize users based on common attributes such as role or a function
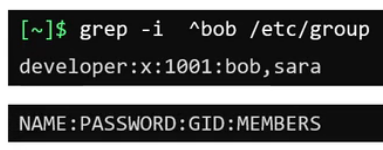
cat /etc/group Contains information about groups. Each group has a unique identifier called GID.
- Suppose we have two developers who have similar roles and working on the same system. We can group them in a Linux group called developers. By doing this we can grant them the same access to specific files and directories in the file system.
User account (based on the information it stores)
Each user has a username and an unique ID assign to them known as user ID of UID
The user also has a GID, the ID of the group they are part of. A user can be part of multiple groups. If no group is specified when a user is created, it assigned the user to a group with the same ID and name as the user ID which is the primary GID of the user.
The user account also stores information about the home directory of the user in the default shell.
id <user> Lists the UID, username, GID, and the groups the user is part of.
grep -i <user> /etc/passwd home directory path and the default shell assigned to the user.
Account Types
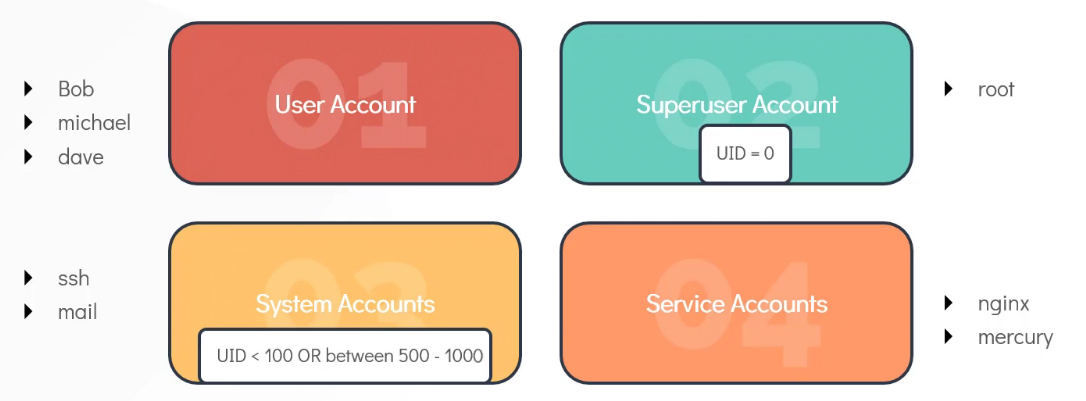
User account: individual people who need access to the linux system.
Superuser account: root → UID = 0. Superuser has unrestricted access and control over the system, including other users.
System account: Commonly created during OS installation. These are for use by software and services that will not run as the super user. UID is under 100 or, between 500 - 1000. Do not have dedicated home directory, but if they do, the home directory is not created under /home. (eg., sshd and mail user).
Service account: Created when services are installed in linux. (eg., nginx, mercury).
Commands
id to see information about user.
who to see which user logged into the system.
last display the record of all logged-in users. Also shows the date and time when system was rebooted.
Switching users
su - to switch any other user in the system including root.
su -c “whoami” to switch user. All this two is not recommended to use because need of password.
sudo apt-get install nginx the better way to do this, use of sudo.
default configuration of sudo is defined under /etc/sudoers. This file defines the policies applied by the sudo command and can be updated using the visudo commands. Only users listed under /etc/sudoers file, can make use of sudo command.
grep -i ^root /etc/passwd Now, no one can log into the system using the root user and password directly.
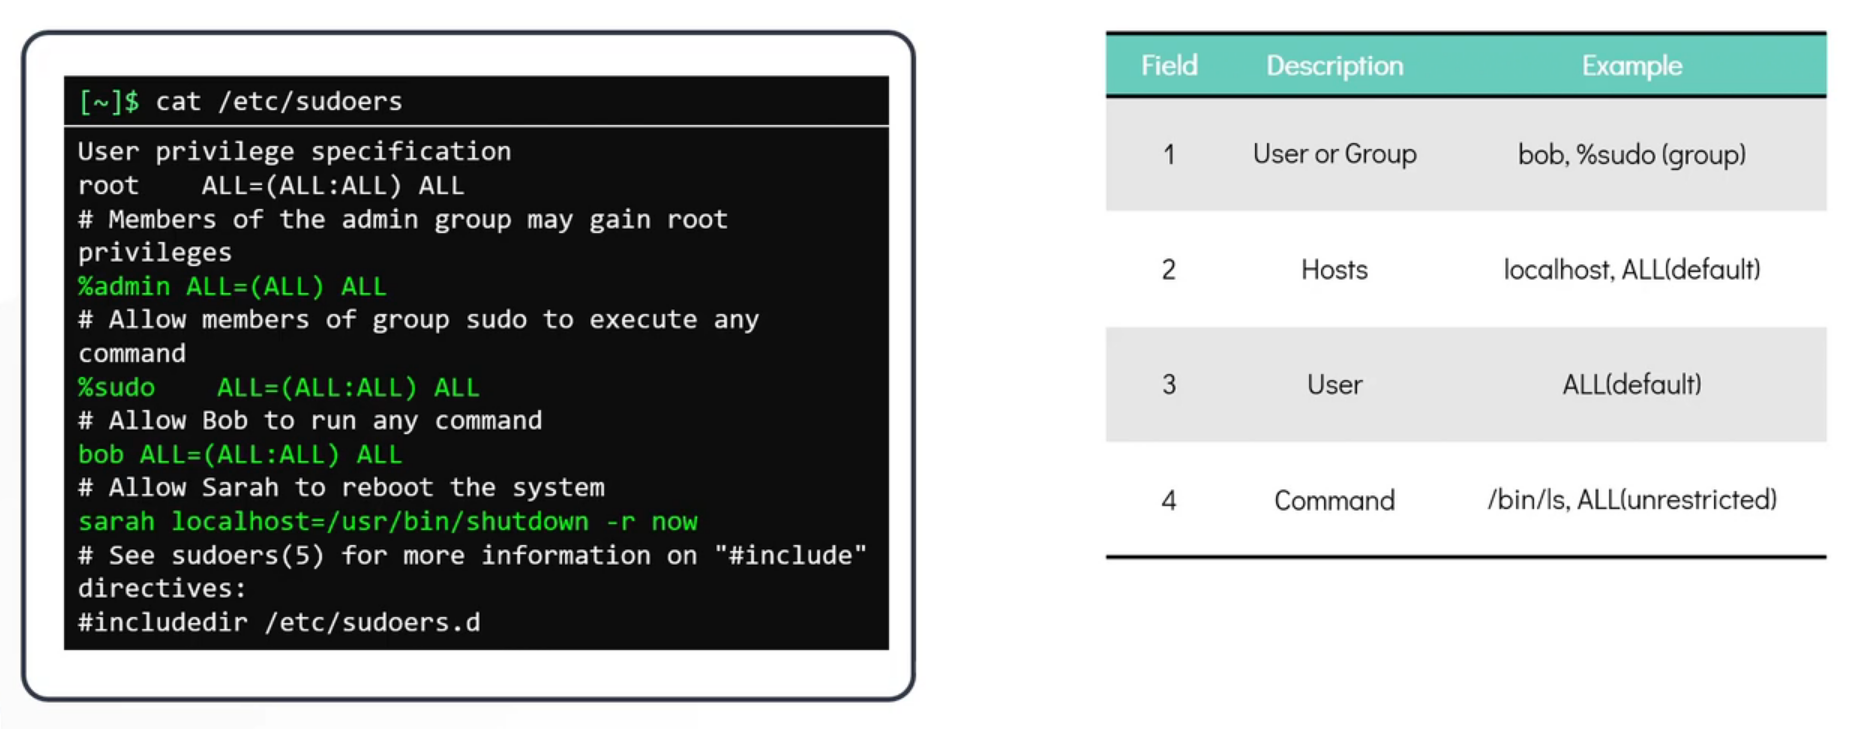
All lines that begin with the ‘
#’ of ‘$’ symbol are comments.The first field is either the user or the group to which privileges have been granted. Groups begins with '
%' symbol.The second field which by default left to the value
ALLspecifies the host in which the use can make use of privilege escalation. In a normal setup, there is just one host (localhost). The value ALL implies the localhost as well.The third field enclosed with brackets (), implies the user and groups. User in the first field can run the command as. Default value is ALL. Implies any users, not only the root, can be used to run the commands.
The fourth field is the command that can be run. If set to ALL, then user can run any command without restrictions. Or can be set as specific command (eg,
shutdown -r now)
Access control files
/etc/passwd contains basic information about user and the system. grep -i ^bob /etc/passwd but dont save any password.

/etc/shadow contains password. But content are in hashed format. grep -i ^bob /etc/shadow

/etc/group contains information about all user groups. grep -i ^bob /etc/group
Managing users
useradd bob to cereate a new local user grep -i ^bob /etc/passwd; grep -i ^bob /etc/shadow
passwd bob to set the password for bob user. both command need to run as root.
whoami to check username.
passwd to change password after login.
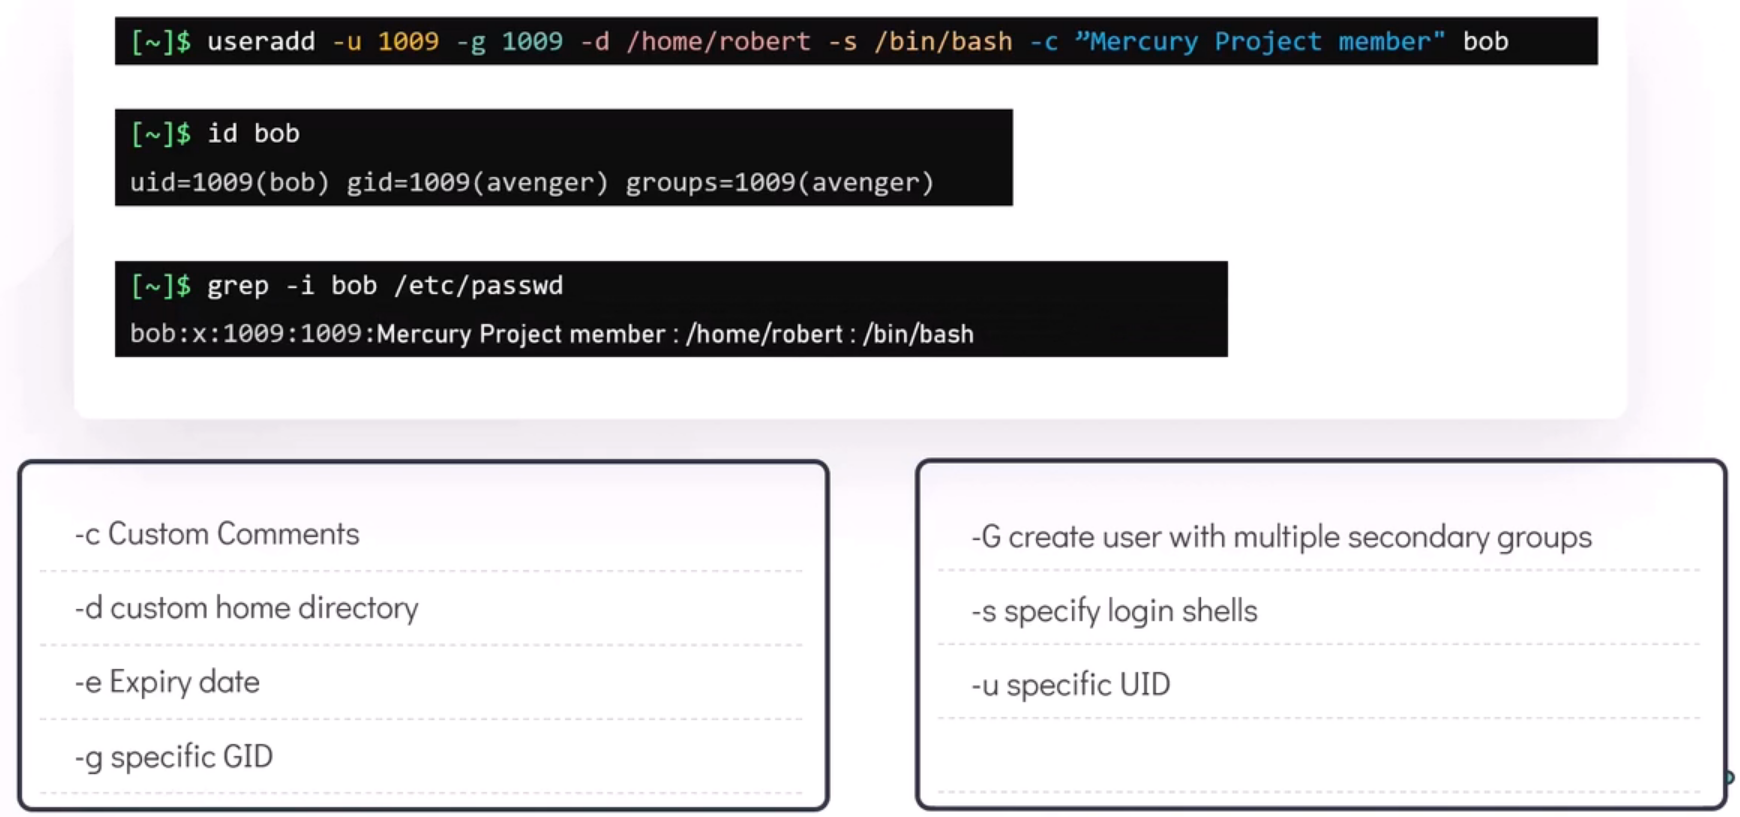
Customizing a user during creation.
userdel bob to delete a user.
groupadd -g 1011 developer create a group.
groupdel developer remove a group.
Linux file permissions

Using ls -l command, we can see the permissions on a file for different users (owner, group, and others).
Same thing can be happen for a file also.


Bob (the owner) can’t read or write the directory, but can execute

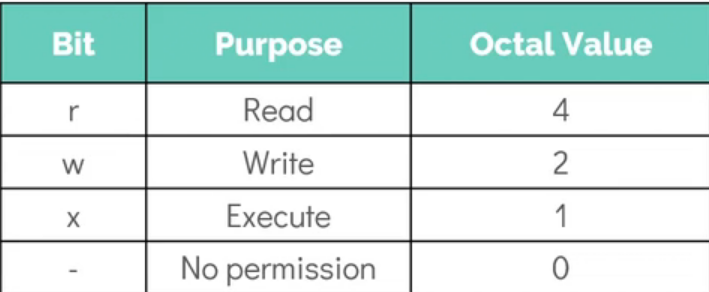
In octal notation,

Modifying file permissions

Granting permission using ‘+’ symbol and ‘-’ for revoking existing permissions.

Modifying permissions using octal values.

Changing ownership and group of a file along or separately.
SSH and SCP
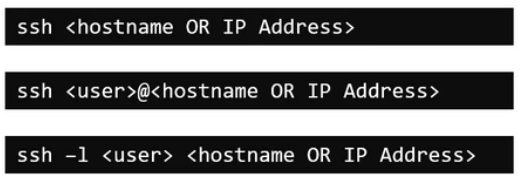
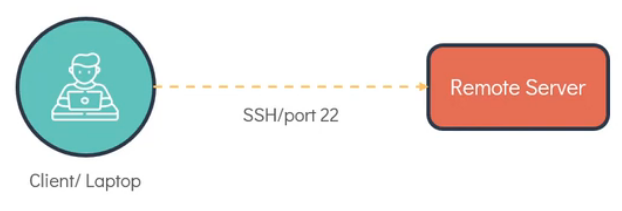
SSH is used for logging into and executing commands on a remote computer. We can do ssh using multiple why (syntax). Do do ssh, the remote server should have an ssh service running in port 22 accessible from the client for the connection to work.
Another requirement is a valid username and password created on the remote system that we can use.
Or using a ssh key, that we can use to login to the remote machine without password.

When we do ssh like this using hostname. It will try to login as current user because here we did not mention user name. If the connection get successful it will ask for the password for the same user on the remote system.
Password less authentication
For this, we need to generate key pairs on the client. key pair = Private key + Public key.
private key » only be used by client and not be shared with anyone else.
public key » can be shared with others including remote server.
Here, bob is the client, and devapp01 is the remote webserver of the dev.
- Now first create the key pairs on the client using
ssh-keygen -t rsa.
- Location, Public key:
/home/bob/.ssh/id_rsa.pub; Private key:/home/bob/.ssh/id_rsa
Now need to copy the public key to the remote server. And for this we need to make a password base authentication at least once. We can do this using
ssh-copy-id bob@devapp01Now, we can login to remote server without entering the password
ssh devapp01

The public key is now installed in the home directory of bob under the hidden file .ssh named as authorized_keys on remote server.
SCP
SCP allows to copy data over SSH.


We can copy our file to the location where we have the permission.

We can copy directory also, to do so we need to use -r flag and if we want to preserve the permission and ownership of the file then need to use -p flag.
IPTABLES
To connect to the remote server, required valid authentication mechanism such as username and password based authentication and SSH key based authentication. And secondly, the network connection must be open for port 22 from the client to the server.
It is importent that we implement network security to allow or restrict access to the various services. This allows us to control network connectivity, such as allowing SSH access from a specific IP of a network range. We can apply such security network-wide using external firewall of appliances such as Cisco ASA, Juniper next-gen firewall, Barracuda next-gen firewall, Fortinet, etc. Using these appliances we can define rules that will control any traffic flowing through the network or an alternate option is to apply these rules at an individual server level using tools such as IPtables and FirewallD in linux based system and firewalls in windows server.
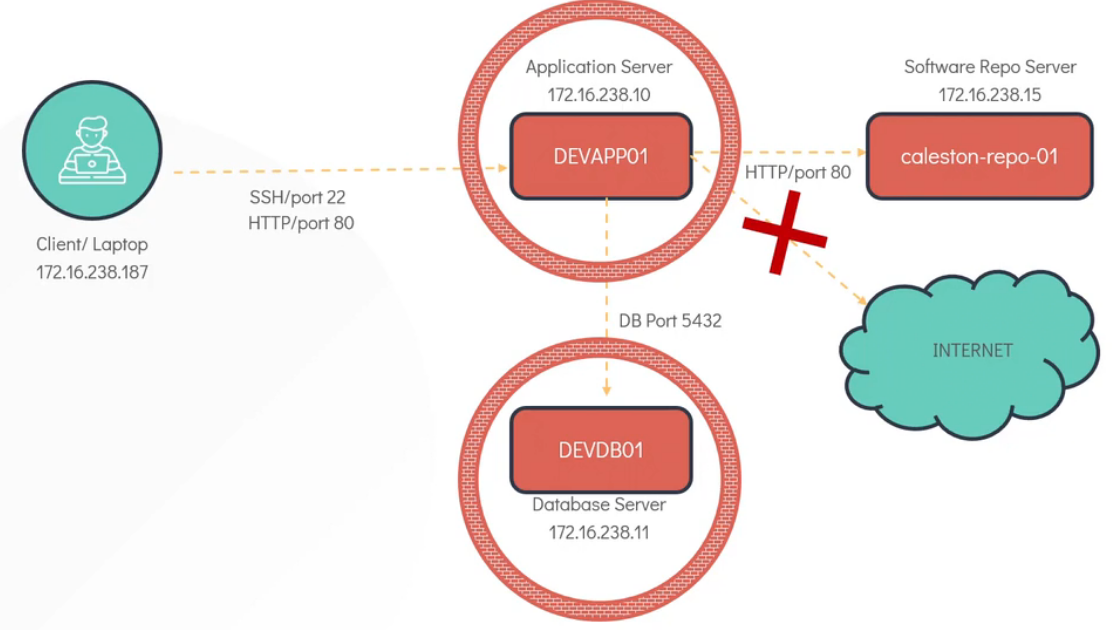
At the initial point all client and servers are accessible from each other. Now we want to access app server of dev from client and also want to access port 80 where the web-application running on app server from client. We also want to access database server from appserver on port 5432 and want to set a rule that only appserver can access the database on port 5432. We also want to access software repository server from devapp server on port 80. finally we want to restrict all external source to access application server for security purpose.
First we need to ssh from client to devserver and to filter data traffic on the server we need to use IPtables (in red-hat and centos system by default it is installed, but for ubuntu we need to install it).
sudo apt install iptables to install iptabels. After installation we can list the default rules configured in the system by sudo iptables -L
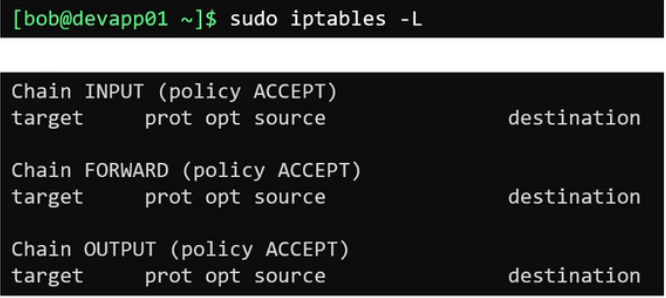
We can see the types of rules/chain configured by default » input, output, and forward
Input chain: Network traffic coming into the system. for this case, we need to add a input rule on devapp server to allow the ssh connection from client laptop to devapp server.
Output chain: It is responsible for connection initiated by this server to other systems. For example, when we need to query or write some data on the database-server.
Forward chain: Typically used in network routers where a data is forwarded to other devices in the network. Although this rules is not commonly used in a linux server.
Since we did not set any rules, the default policy is set to accept, this means all traffic is allowed in and out of the system.
Why are these called a chain ?
Because each chain has multiple rule within it. It’s a chain of rules. Each rules performs a check and accepts or drops the packets based on the condition.

This chain of rule accepts any traffic which are coming from the client01, client03, and client04 and drops everything else.
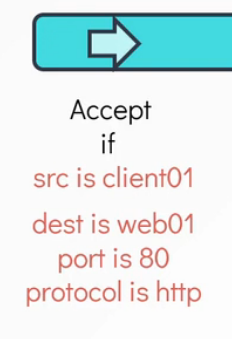
Apart from the source where the traffic originated, we can also configure the condition to consider the destination where the traffic is headed to, the port at which the traffic is coming through, as well as the protocol.
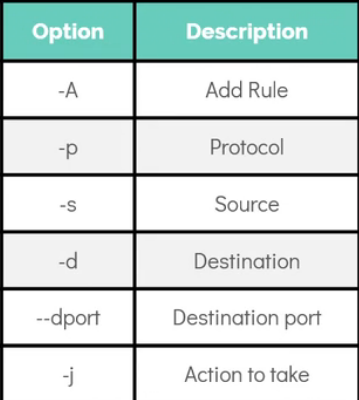
iptables -A INPUT -p tcp -s 172.16.238.187 --dport 22 -j ACCEPTadding an incoming/input rule on dev-server to allow SSH connection from client laptop. So we have successfully created SSH rule on dev-server, but all the other client also can access to dev-server till now what we don’t want to.iptables -A INPUT -p tcp --dport 22 -j DROPthis will drop any traffic except our client (172.16.238.187). we can check it usingiptables -L.iptables -A OUTPUT -p tcp -d 172.16.238.11 --dport 5432 -j ACCEPTto allow outgoing connection to db-server on port 5432.iptables -A OUTPUT -p tcp -d 172.16.238.15 --dport 80 -j ACCEPTto allow outgoing connection to port 80 for software repository server.iptables -A OUTPUT -p tcp --dport 443 -j DROPandiptables -A OUTPUT -p tcp --dport 80 -j DROPto drop all outgoing connections on http and https port (80/443).iptables -A INPUT -p tcp -s 172.16.238.187 --dport 80 -j ACCEPTto allow incoming traffic on port 80 from client laptop.Suppose Now we want to access caleston-hq.com app-server (172.16.238.100) over the https network, it will not work because we have already dropped all the https outgoing connectivity. To do so we need to add a https accept rule before the https drop rule.
iptables -I OUTPUT -p tcp -d 172.16.238.100 --dport 443 -j ACCEPTThis will add the accept rule at the first position of the chain and the https connection should work now.If we want to delete a rule
iptables -D OUTPUT 5need to specify the position of the rule the the last of the command.Now one last thing to do is, to confirm port 5432 is only accept the traffic when the source will be devapp-server, we need to add a rule on db-server.
iptables -A INPUT -p tcp -s 172.16.238.10 --dport 5432 -j ACCEPT;iptables -A INPUT --dport 5432 -j DROP
CRONjob - (Preset job)
crontab -e setting cronjob for the present user by opening a editor to create the job

Run uptime command which will redirect the output to /tmp/system-report.txt everyday at 9pm.
In the figure,
- m»month; h»hour; dom»day-of-month; mon»month-number; dow»weekday

After 10min of every hour.

In every minute.

Every second minute, or on each 2minute.
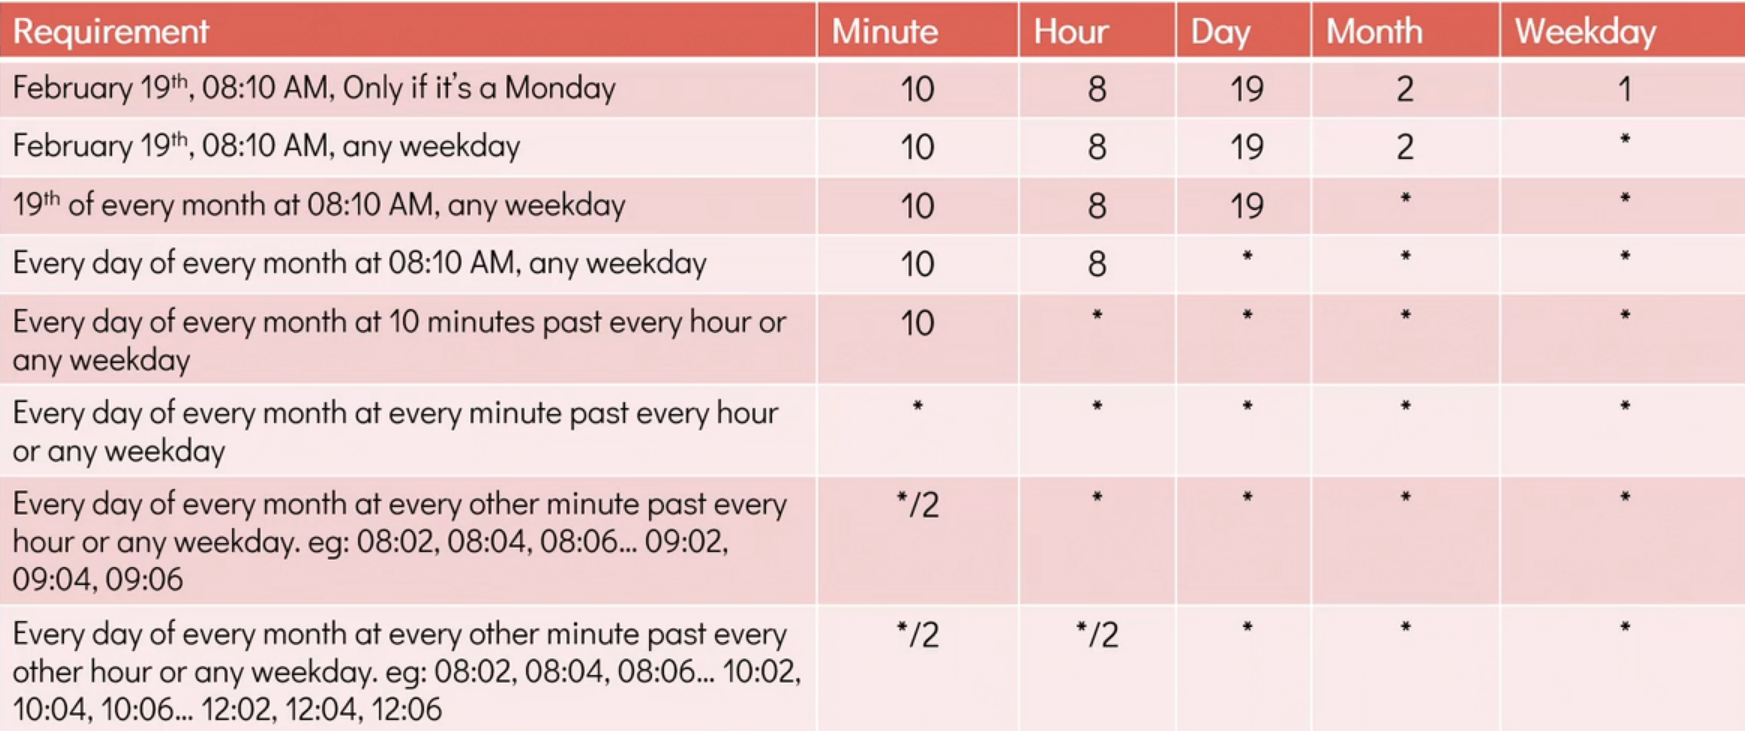
crontab -l to list all the scheduled job in Cron.
To check, cron job had run or not, can cat that file where we append the output or can check log by,
tail /var/log/syslog
References
Subscribe to my newsletter
Read articles from Arindam Baidya directly inside your inbox. Subscribe to the newsletter, and don't miss out.
Written by
Arindam Baidya
Arindam Baidya
🚀 Aspiring DevOps & Cloud Engineer | Passionate about Automation, CI/CD, Containers, and Cloud Infrastructure ☁️ I work with Docker, Kubernetes, Jenkins, Terraform, AWS (IAM & S3), Linux, Shell Scripting, and Git to build efficient, scalable, and secure systems. Currently contributing to DevOps-driven projects at Assurex e-Consultant while continuously expanding my skills through hands-on cloud and automation projects. Sharing my learning journey, projects, and tutorials on DevOps, AWS, and cloud technologies to help others grow in their tech careers. 💡 Let’s learn, build, and innovate together!