Step-by-Step Guide to Setting Up a Production-Ready Two Tier VPC .
 VIKRANT SARADE
Table of contents
- About the Project :
- Overview:
- Prerequisites:
- Project initiation :
- Deleting resources
- Step 1: Identify the Resources in Your VPC
- Step 2: Delete EC2 Instances
- Step 3: Delete the Elastic Load Balancer (ELB)
- Step 4: Delete the Target Group
- Step 5: Delete the NAT Gateway
- Step 6: Detach and Delete the Internet Gateway
- Step 7: Delete the Route Tables
- Step 8: Delete Security Groups
- Step 9: Delete the Subnets
- Step 10: Delete the VPC
- Step 11: Verify and Release Elastic IPs
- Step 12: Double-Check for Other Services
- Final Step: Confirm No Charges
A real-time project to deploy an application within a VPC using AWS services.
About the Project :
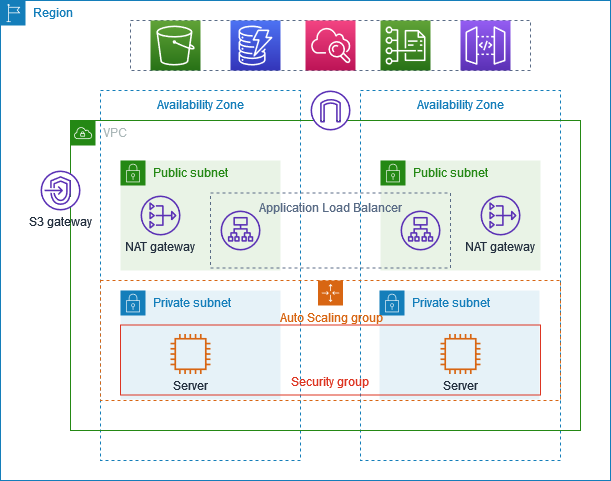
This project shows how to create a VPC for servers in a production environment. To enhance resiliency, you deploy the servers in two Availability Zones using an Auto Scaling group and an Application Load Balancer. For added security, you place the servers in private subnets. The servers receive requests through the load balancer and can connect to the internet using a NAT gateway. To further improve resiliency, you deploy the NAT gateway in both Availability Zones.
Overview:
The VPC has public subnets and private subnets in two Availability Zones. Each public subnet contains a NAT gateway and a load balancer node. The servers run in the private subnets, are launched and terminated by using an Auto Scaling group, and receive traffic from the load balancer. The servers can connect to the internet by using the NAT gateway.
Prerequisites:
NAT
Load balancer
Autoscaling groups
Target groups
Baston Host or Jump Server
I have explained the prerequisite topics below. If you are already familiar with them, you can skip directly to the project initiation step..👇
What’s a NAT gateway?
A NAT gateway is a Network Address Translation (NAT) service. It allows instances in a private subnet to connect to services outside your VPC, while preventing external services from initiating a connection with those instances.

As per the image above, only the Private IP (10.0.0.1) will be visible to the Internet. And, rest all other IP addresses, such as 10.0.0.4, 10.0.0.3, etc., will be hidden.
If an application in our instance, which is in the private subnet, needs to access the internet, obtain resources from the internet, or connect to a third-party application, the NAT (Network ) gateway converts the private IP address to the public IP address of the public subnet for that moment. This way, the IP address of the private subnet remains hidden, enhancing security.
NAT gateway in depth 👈(NAT in detail )
However, keep in mind that NAT gateways do incur hourly usage charges and data processing charges once you exceed the Free Tier limits. You can refer to the NAT gateway pricing for more details on the costs involved.
🔶Load Balancers in AWS
Load balancers in AWS are essential components that help distribute incoming application or network traffic across multiple targets, such as Amazon EC2 instances, containers, and IP addresses. By spreading the traffic, load balancers ensure that no single resource is overwhelmed, which enhances the availability and reliability of your applications.
AWS offers several types of load balancers, each designed to handle different types of traffic and use cases:
Application Load Balancer (ALB): This type is ideal for HTTP and HTTPS traffic and operates at the application layer (Layer 7) of the 🔗 OSI model. It provides advanced routing capabilities, allowing you to route traffic based on the content of the request. This is particularly useful for microservices and container-based architectures.
Network Load Balancer (NLB): Operating at the transport layer (Layer 4), the Network Load Balancer is designed to handle millions of requests per second while maintaining ultra-low latencies. It is best suited for load balancing TCP, UDP, and TLS traffic, making it ideal for handling volatile traffic patterns.
Classic Load Balancer (CLB): Although considered legacy, the Classic Load Balancer supports both Layer 4 and Layer 7 traffic. It is suitable for applications that were built within the EC2-Classic network and provides basic load balancing across multiple EC2 instances.
🔶Target groups
Target groups in AWS allow you to direct traffic to specific instances, containers, or IP addresses based on your needs. They are used with load balancers to ensure that requests are sent to the right resources, improving the efficiency and performance of your applications. By configuring target groups, you can manage and scale your applications more effectively, ensuring that traffic is balanced and resources are optimally utilized.
🔶Autoscaling groups
AWS automatically adjust the number of EC2 instances based on your needs. This helps ensure that your application has the right amount of resources at any time. If demand increases, more instances are added, and if demand decreases, instances are removed. This process helps maintain performance and can save costs by not running unnecessary instances.
🔶Bastion Host or Jump Server in AWS
A Bastion Host, also known as a Jump Server, is a critical component in AWS architecture, designed to enhance the security of your network. It acts as a gateway for accessing your private network from an external network, such as the internet. By using a Bastion Host, you can securely manage and administer your EC2 instances without exposing them directly to the internet, thereby reducing the attack surface.
In AWS, a Bastion Host is typically an EC2 instance that is configured to allow SSH or RDP access. It is placed in a public subnet within your Virtual Private Cloud (VPC), while your other instances remain in private subnets. This setup ensures that only the Bastion Host is accessible from the internet, and all other instances are shielded from direct exposure.
To use a Bastion Host effectively, you would first connect to it using SSH or RDP. Once connected, you can then access your private instances through the Bastion Host. This method provides an additional layer of security, as you can implement strict security group rules that only allow access to the Bastion Host from specific IP addresses, such as your office network or VPN.
Furthermore, you can enhance security by enabling logging and monitoring on your Bastion Host. By doing so, you can track all access attempts and activities, helping you to detect any unauthorized access or suspicious behavior. Additionally, you can automate the scaling of your Bastion Host using AWS Auto Scaling, ensuring that it can handle multiple simultaneous connections during peak times.
Overall, a Bastion Host is an essential security measure in AWS, providing a secure and controlled way to access your private resources while minimizing the risk of unauthorized access.
Project initiation :
*Before starting make sure to release all the unused elastic IP addresses
Elastic Ip address : static Ip address , usually Ip addresses don’t remain static for an instance that’s why we need elastic IPS .
Creating VPC
In the AWS Management Console, search for VPC and open the VPC Dashboard.
Click Create VPC & Choose VPC and more.
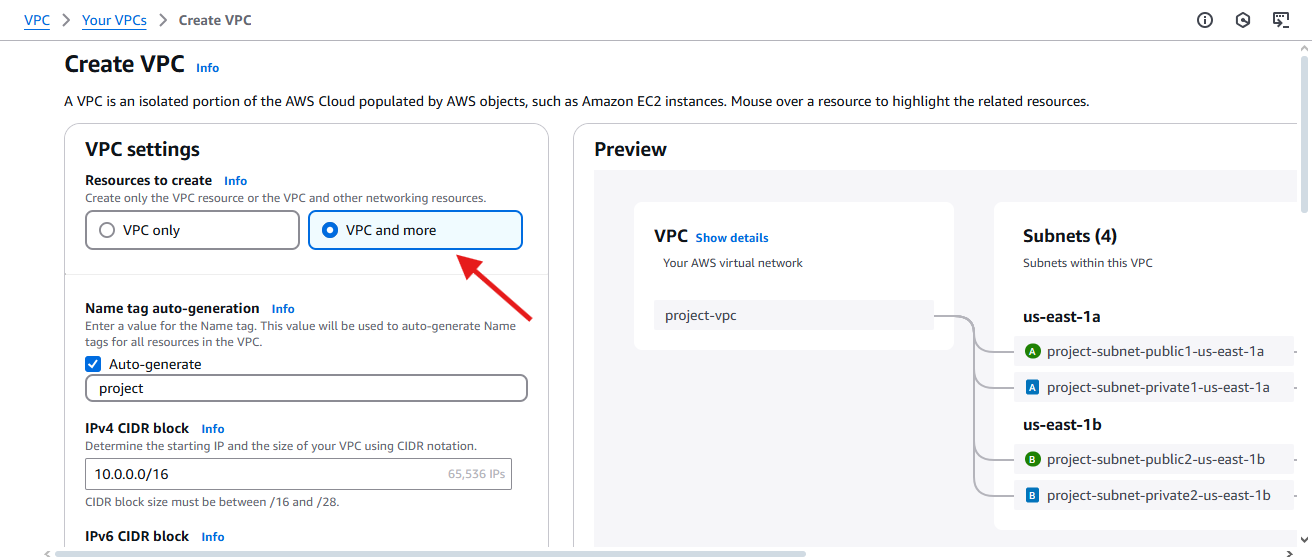
Set up VPC details:
Name:
demo-vpc. (you can give any name here)IPv4 CIDR Block:
10.0.0.0/16(which is equivalent to 65,536 IPs )Keep Tenancy as Default (Free Tier eligible).
We can see the flow of our VPC in right hand side
Select number of Availability Zones , public subnets , private subnets and NAT gateways as shown below .
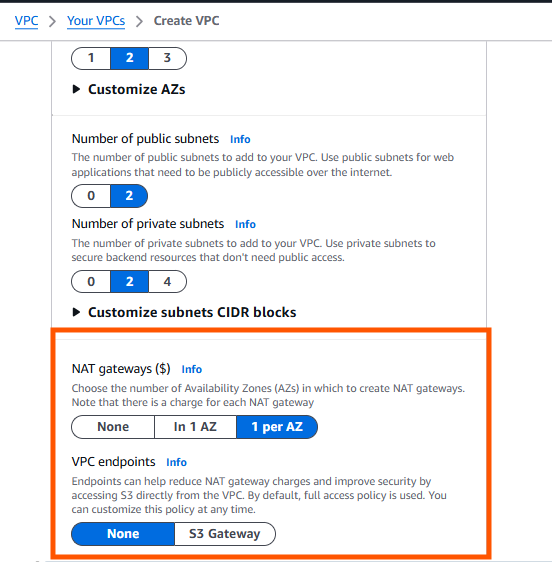
Preview on right hand should look like this .

- Click Create VPC
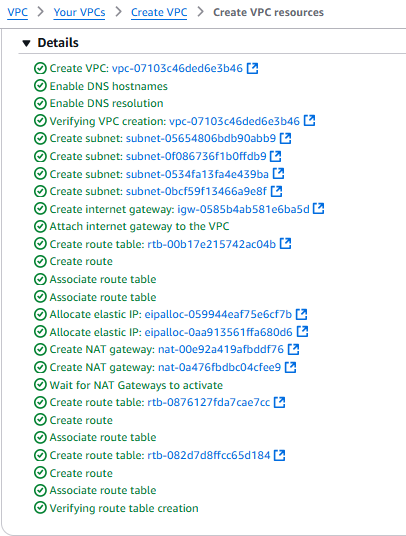
- It’ll take some time to create , review all the info and click view VPC.
Ec2 instance with ELB
Now go to:
EC2 > Auto Scaling groups > Create Auto Scaling group
Click on Create a launch template option
💡why we use launch template ? — we basically use it for for future reference
We use launch templates when creating Auto Scaling groups to define the configuration of the EC2 instances that the group will launch, offering flexibility, versioning, and access to newer features compared to older launch configurations.
Here's a more detailed explanation:
Instance Configuration:
Launch templates specify the configuration information for the instances, including the Amazon Machine Image (AMI), instance type, security groups, and key pair.
Flexibility and Versioning:
Launch templates provide more flexibility than launch configurations, allowing you to create multiple versions of a template and easily update them without disrupting the Auto Scaling group.
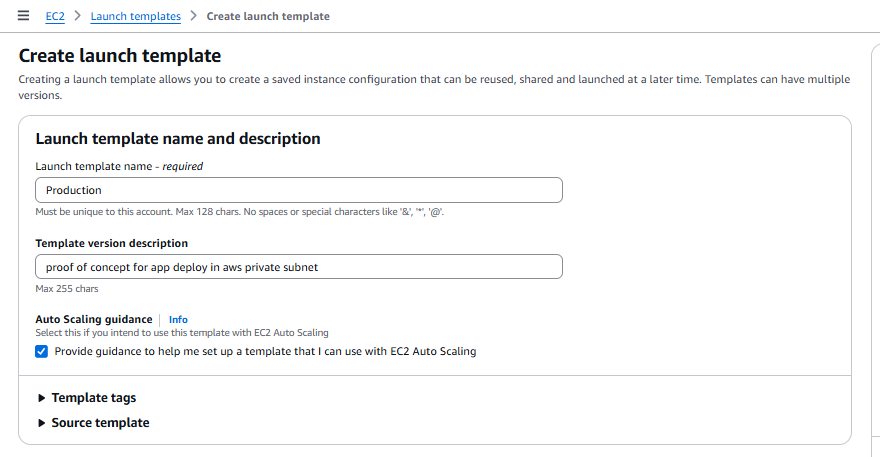
Click on Create a launch template option
Select all the free resources
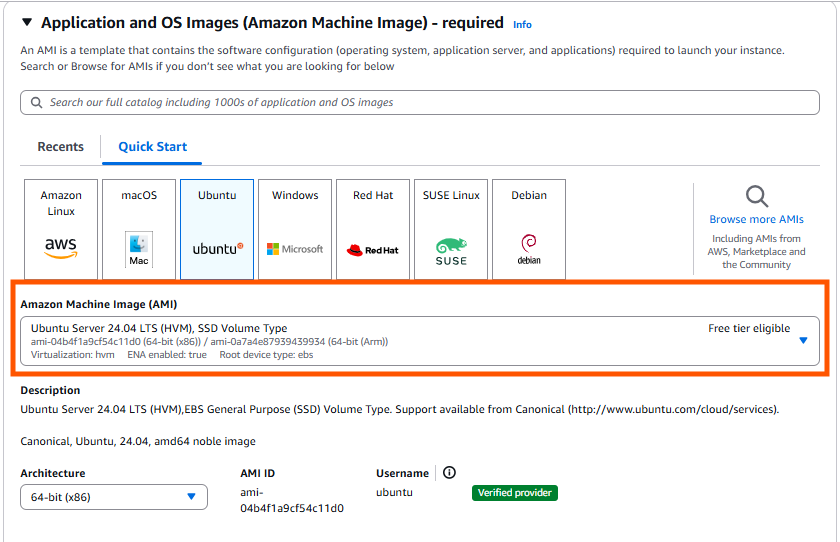
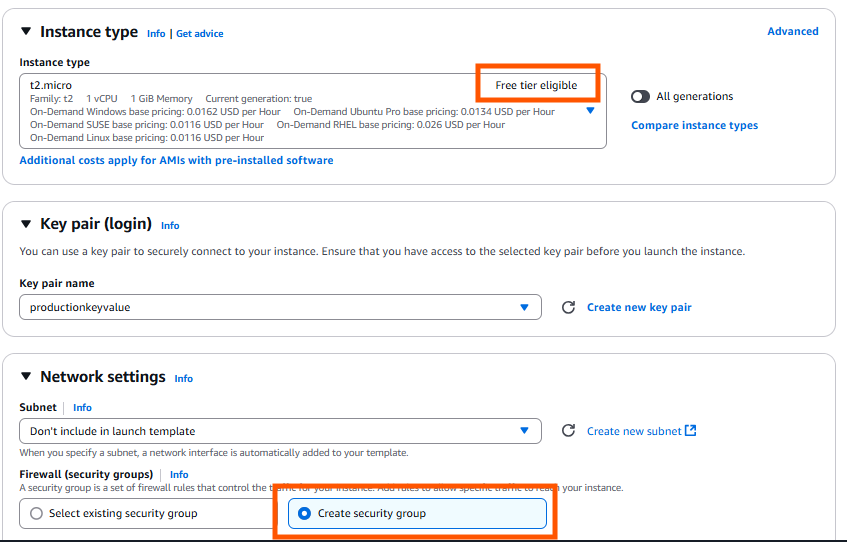
- Add a key pair or select an existing one
- Create a separate security group
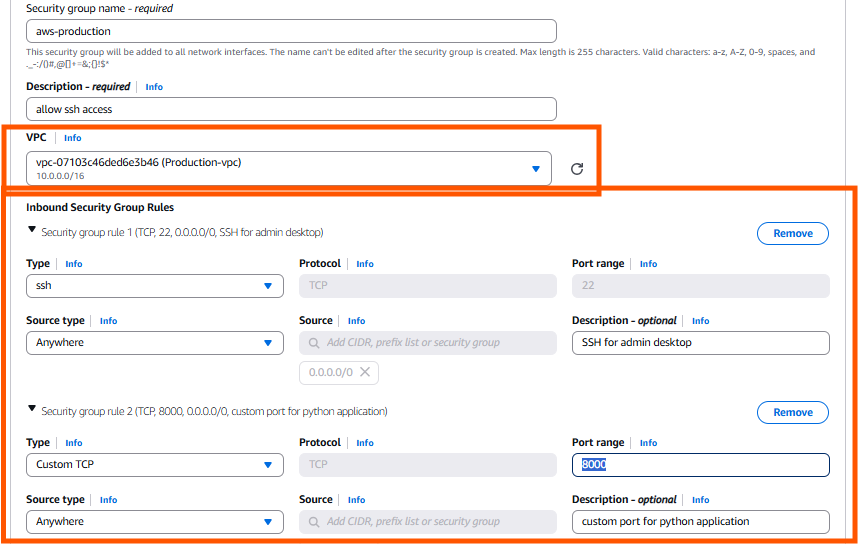
- Select the VPC we created and allow traffic for PORT —22,8000
Click Create and head back to > Auto scaling groups creation page
Select the launch template we create and > NEXT.
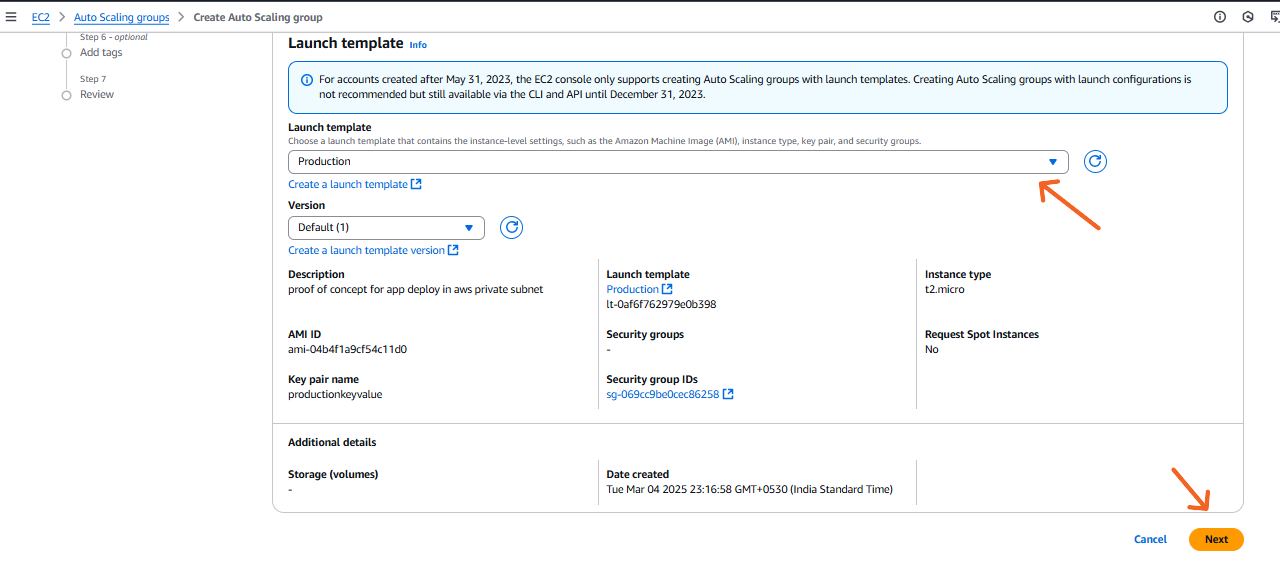
- On the next page under network section Select VPC and the subnet location in which you want to setup the Auto scaling. —Private subnets
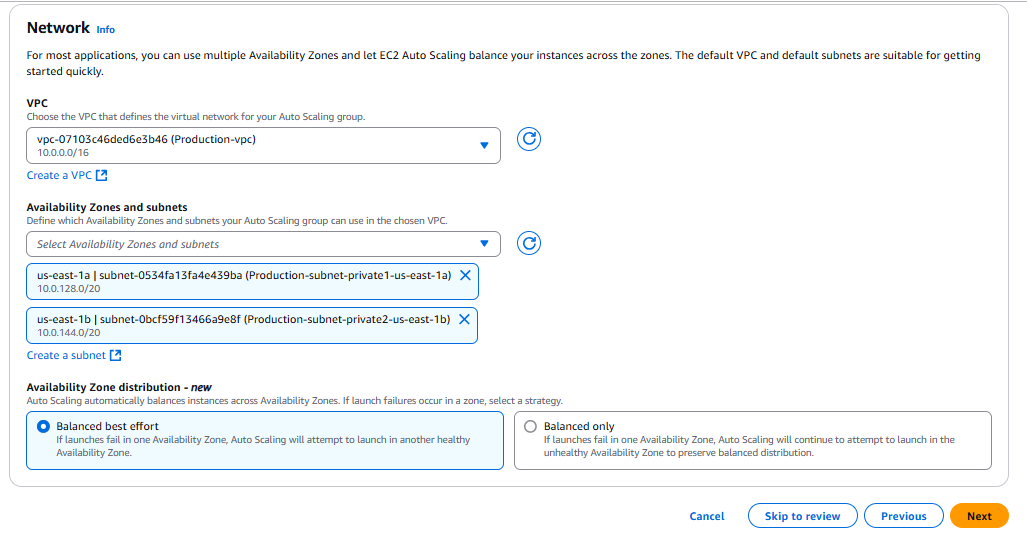
🟡 Option 1: Balanced best effort
✅ What it does:
If AWS detects that a particular AZ is having problems (for example, capacity issues or AZ-level issues), Auto Scaling will try to launch instances in another healthy AZ to maintain capacity — even if that makes the distribution uneven temporarily.🟢 When to choose this option:
You prioritize having enough running instances (high availability) over perfect balance across AZs.
If your application can handle slightly uneven distribution across AZs for a short time.
Good for most general-purpose applications where uptime and scaling are critical.
🟡 Option 2: Balanced only
✅ What it does:
If AWS detects a launch failure in an AZ, Auto Scaling will keep trying to launch in that same AZ until it succeeds — even if other AZs have capacity. It prioritizes keeping all AZs balanced, even if it means some capacity is temporarily missing.🟠 When to choose this option:
You prioritize perfectly balanced distribution across all AZs (for compliance, regulatory, or strict architecture reasons).
Your app can tolerate temporary capacity shortages if one AZ is having issues.
Typically used for very latency-sensitive apps or apps with specific failover designs.
- In the Integrate with other services - (**optional tab)
Select no load balancer for the private subnet , (* we’ll create it later for the public subnet)
keep as it is and next
In Size and Scaling section select the MAX & MIN capacity of the auto scaling grp
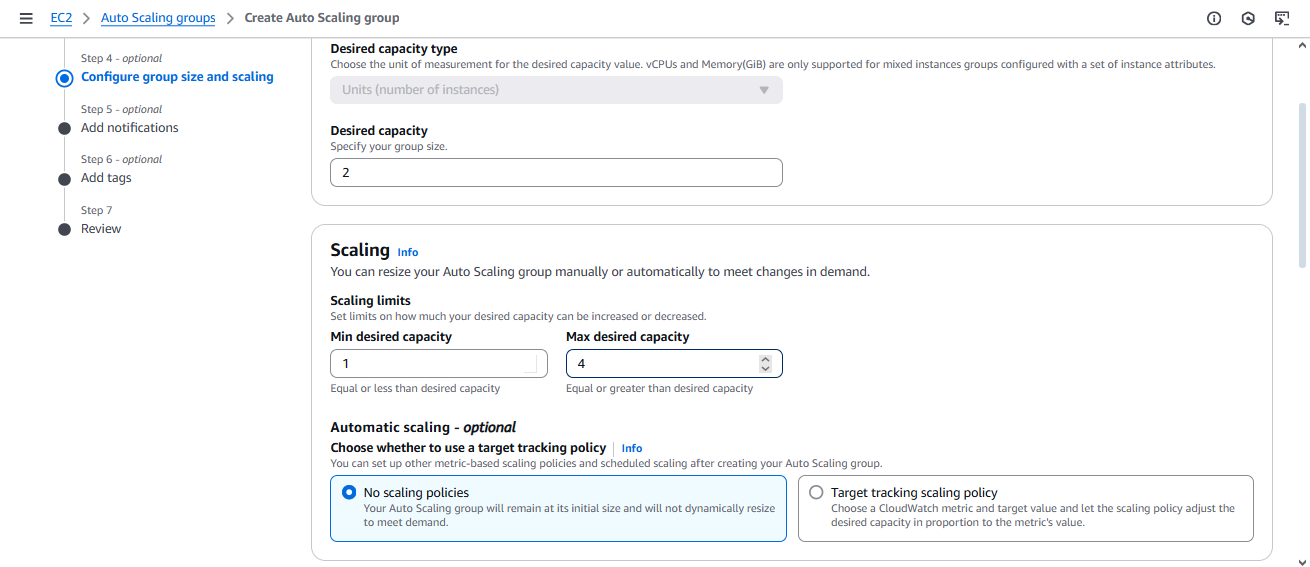
- Keep the settings as default and next
(If you want, you can add SNS services and more, but I'll skip that for now.)
- And click - create auto scaling group
-Now before going to create application load balancer in public subnet , we’ll first need to install our app inside the server
Baston Host Creation
- Go to your instances (private). You'll notice they don't have public IP addresses. So, how do you access them? This is where a Bastion Host or Jump Server comes into play.
It acts as a bridge between the private and public subnets. We'll create a Bastion Host in the public subnet to access the private subnet.
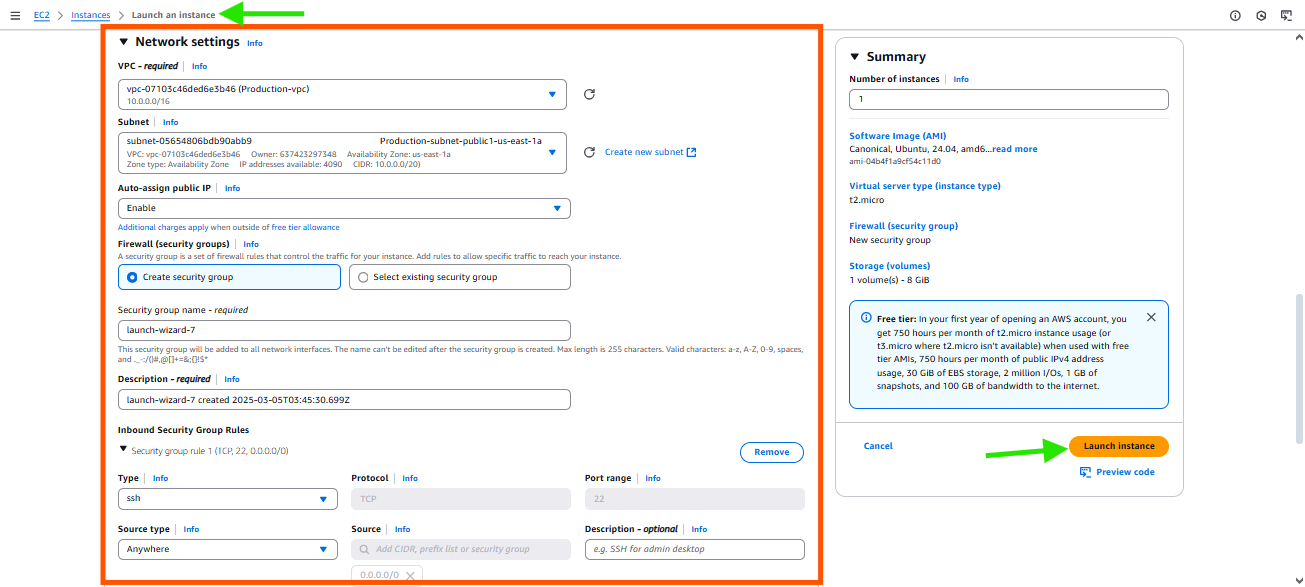
For bastion host go to > instance tab , create new instance
and do following configurations .Name the instance as bastion-host & choose default free tier settings
In the network tab click edit and choose the VPS .
Auto assign public IP enabled
Allow SSH traffic and Create
From your personal PC, we'll SSH to the bastion host, and from there, we'll SSH to our private server or private subnet.
To do this, we need to have the .pem key of our private VPC on the bastion host. Only then will we be able to access the private server from the bastion server. Open PowerShell and copy the .pem file from your local PC to the Ubuntu VM/bastion server.
First head to the location of the
.pemkey then execute SCP command to copy the.pemfile from your local machine to the bastion instance .Copy the public Ip of the baston instance and paste it in front of ubuntu in the following command .
:home/ubuntuis the source location .
PS C:\Users\vikrant\Downloads> scp -i productionkeyvalue.pem /Users/vikrant/Downloads/productionkeyvalue.pem ubuntu@100.27.207.245:/home/ubuntu
The authenticity of host '100.27.207.245 (100.27.207.245)' can't be established.
ED25519 key fingerprint is SHA256:RMJcIgJkJwBY7eIYZsEV8ZcNQYHN9Oxx6P2rm8wtIqQ.
This key is not known by any other names.
Are you sure you want to continue connecting (yes/no/[fingerprint])?
Warning: Permanently added '100.27.207.245' (ED25519) to the list of known hosts.
productionkeyvalue.pem
- After execution type YES to confirm
output : copied successfully
- Now login to the bastion host
PS C:\Users\vikrant\Downloads>ssh -i productionkeyvalue.pem ubuntu@100.27.207.245
Once login use $ls command to check if the file is present in the ubuntu or not
ubuntu@ip-10-0-6-55:~$ ls
productionkeyvalue.pem
ubuntu@ip-10-0-6-55:~$
we need this .pem file to login to any of the private instance.
- Now use the ssh command to log in to the private instance :
ssh -i productionkeyvalue.pem ubuntu@10.0.129.182here paste the private IP address of the instance
ubuntu@ip-10-0-6-55:~$ ssh -i productionkeyvalue.pem ubuntu@10.0.129.182
The authenticity of host '10.0.129.182 (10.0.129.182)' can't be established.
ED25519 key fingerprint is SHA256:2Fbyr1MOJvINjeFXpke/I2h/edexsUBe5aNS9URvzaY.
This key is not known by any other names.
Are you sure you want to continue connecting (yes/no/[fingerprint])? yes
Warning: Permanently added '10.0.129.182' (ED25519) to the list of known hosts.
@@@@@@@@@@@@@@@@@@@@@@@@@@@@@@@@@@@@@@@@@@@@@@@@@@@@@@@@@@@
@         WARNING: UNPROTECTED PRIVATE KEY FILE!          @
@@@@@@@@@@@@@@@@@@@@@@@@@@@@@@@@@@@@@@@@@@@@@@@@@@@@@@@@@@@
Permissions 0664 for 'productionkeyvalue.pem' are too open.
It is required that your private key files are NOT accessible by others.
This private key will be ignored.
Load key "productionkeyvalue.pem": bad permissions
This warning shows that the file contains sensitive information, and we don't have the right access. Let's change the permissions with the following command chmod 600 and try running the instance again.
ubuntu@ip-10-0-6-55:~$ chmod 600 productionkeyvalue.pem
ubuntu@ip-10-0-6-55:~$ ssh -i productionkeyvalue.pem ubuntu@10.0.129.182
Now we have logged in to the instance , update the packages
ubuntu@ip-10-0-129-182:~$ sudo apt update
- Create a index.html file using following command and hit enter
vim index.html
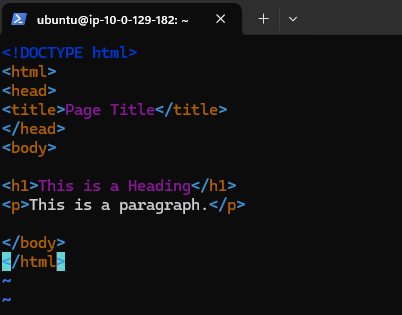
This will open a vim editor window where you can paste the HTML code
you can paste any HTML code or write it on your own .
<!DOCTYPE html>
<html>
<head>
<title>Page Title</title>
</head>
<body>

<h1>This is a Heading</h1>
<p>This is a paragraph.</p>

</body>
</html>
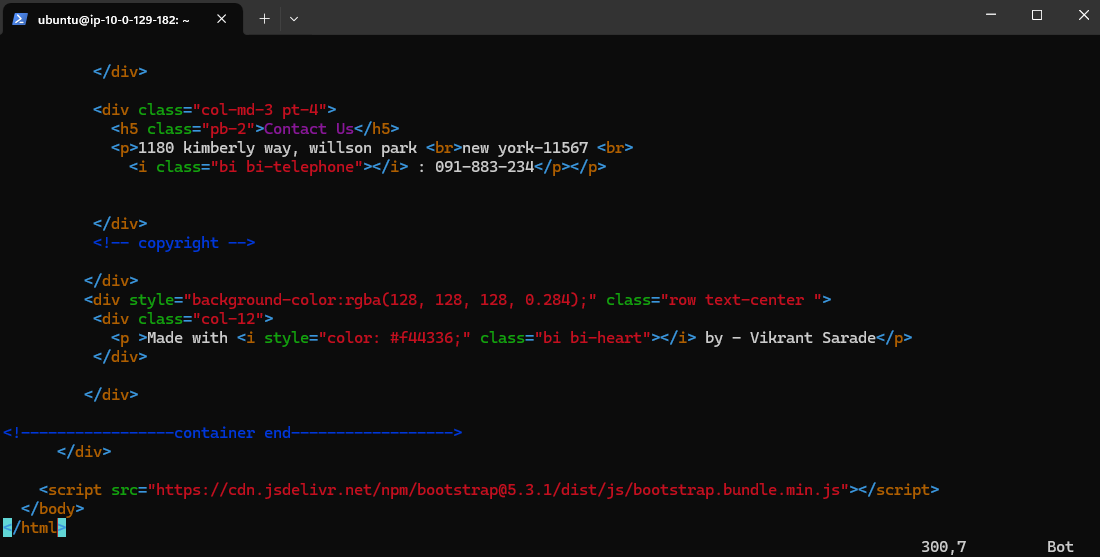
once everything is done execute this command to save and exit
:wq!use
$ python3 -m http.server 8000to run the application on 8000 port
ubuntu@ip-10-0-129-182:~$ python3 -m http.server 8000
Serving HTTP on 0.0.0.0 port 8000 (http://0.0.0.0:8000/) ...
→We have two instances, so the load balancer should direct 50% of the traffic to each instance.
Now we have installed the application on only one instance because we want to demonstrate that when instance 1 (private subnet 1) receives a request from outside, it responds correctly. However, when the load balancer tries to redirect the traffic to the second instance (private subnet 2), it shows an error.
Now we create load balancers and attach the private instances as the target groups
Attaching Load Balancers
Go to EC2 > Load balancers > choose Application load balancer
Then on the creation page keep the settings as it just make the following changes.
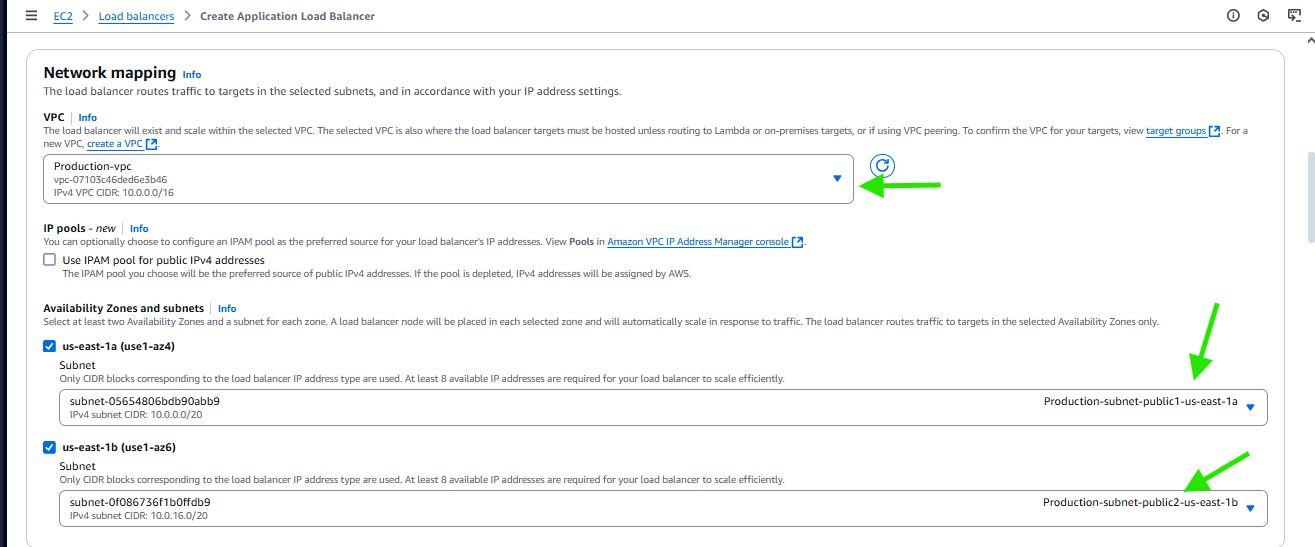

- Our security group has access to port 22 and 8080

let’s create Target group to define , which instances should be accessible . click on create target grp link
In target group tab choose target type - Instance and provide group name eg :
VPC-production-target-groupand hit next
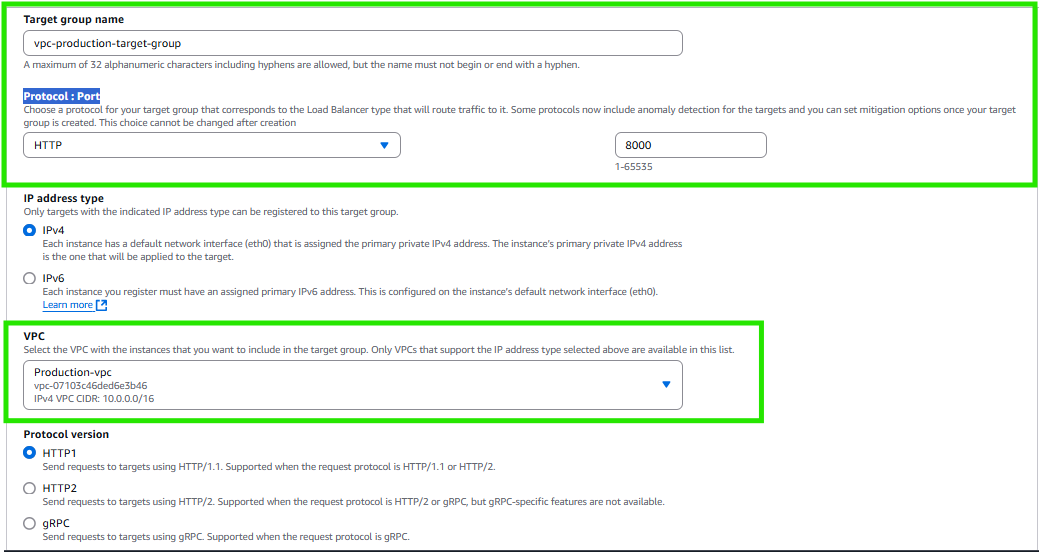
- Click next.
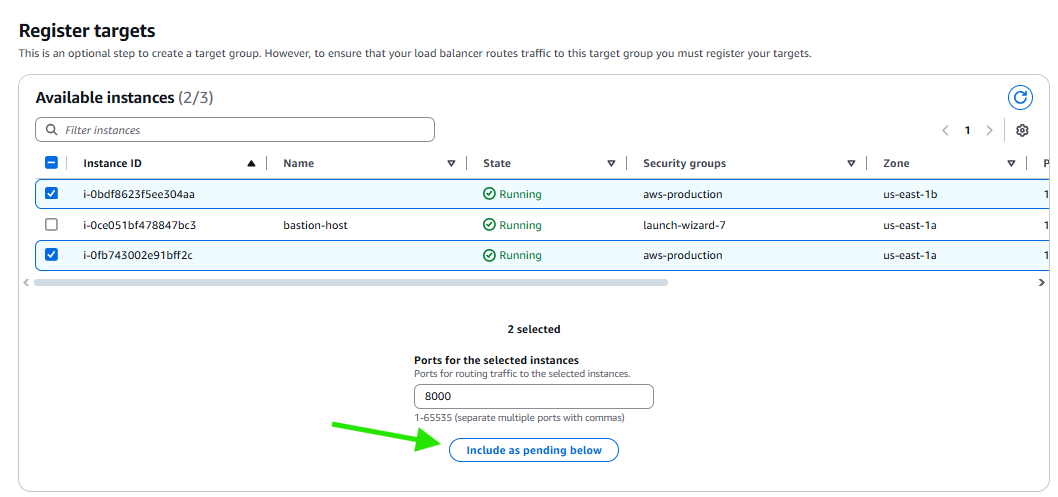
Select and include them as pending and create target grp .
Now we’ll go back EC2 > Load balancers > choose Application load balancer and add this to load balancer

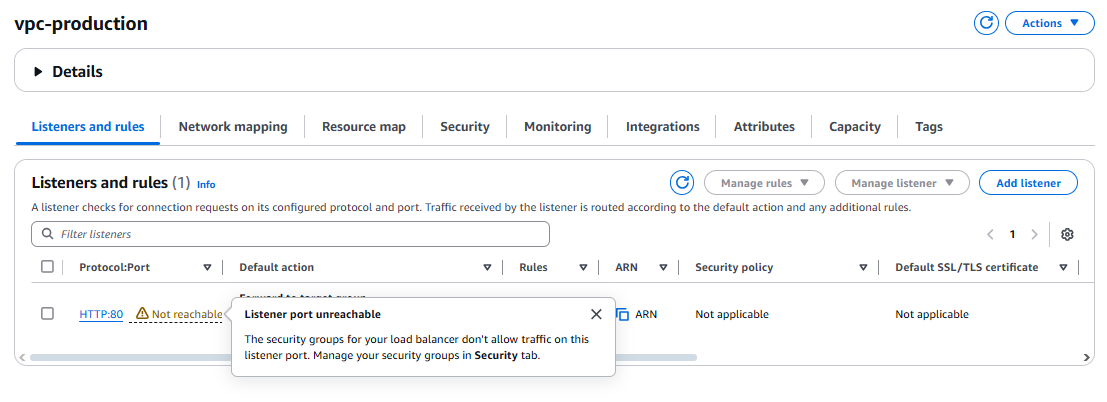
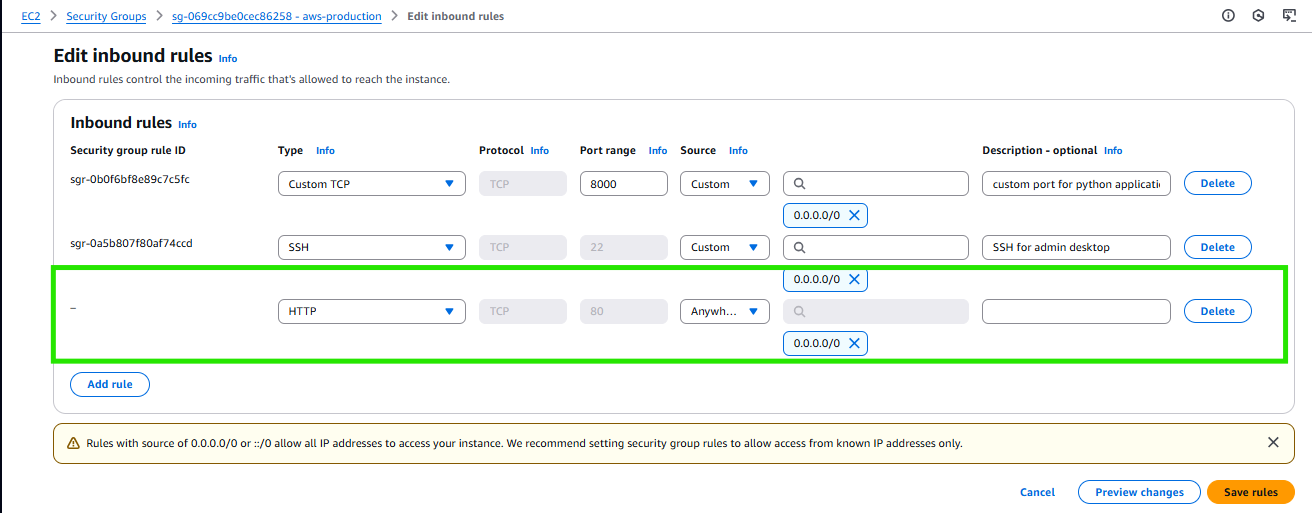
After creation we’ll find an error because we haven’t allowed port 8000 the access , we can adjust it in the security group
- Go to security groups add inbound traffic for HTTP.
- Go back and copy the DNS URL and paste it in the browser

- App is UP and running

- Now the question is why is traffic always heading to one instance (always success)
It’s because of healthy instance selection mechanism of the server
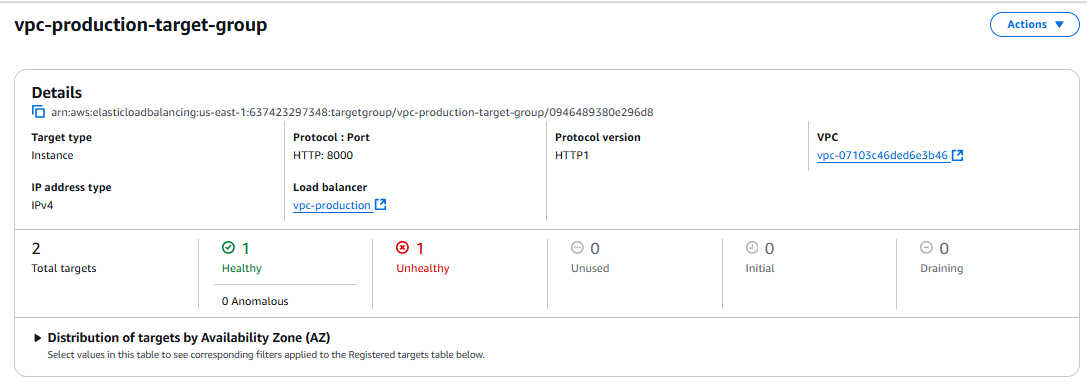
Now lets make both of them healthy
Fixing unhealthy instance
Open a new power shell
and log in to the Baston server (we have already done this above , perform the same steps again)Now once inside baston server log in to the second private instance by using it’s private Ip
ubuntu@ip-10-0-6-55:~$ ssh -i productionkeyvalue.pem ubuntu@10.0.156.98
- Once inside the private server , create a new html file
using vim editor just like we did previously .
paste the following code in it
<!DOCTYPE html>
<html>
<head>
<title>Page Title</title>
</head>
<body>

<h1>This is a Heading from the second instance</h1>
<p>This is a paragraph from second priavte subnet , load balancer reached here.</p>

</body>
</html>
:wq! command to save and exit
- Run the python server
ubuntu@ip-10-0-129-182:~$ python3 -m http.server 8000
Serving HTTP on 0.0.0.0 port 8000 (http://0.0.0.0:8000/) ...
- Go to EC2 >Load balancers >vpc-production , copy the DNS address and paste it in incognito tab
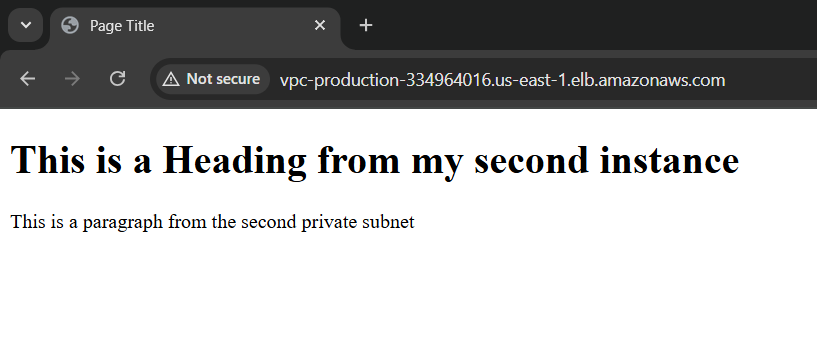
Make sure to run the server for both the instances :
Following is the live comparison between both the servers
(right side first server , left side second server)
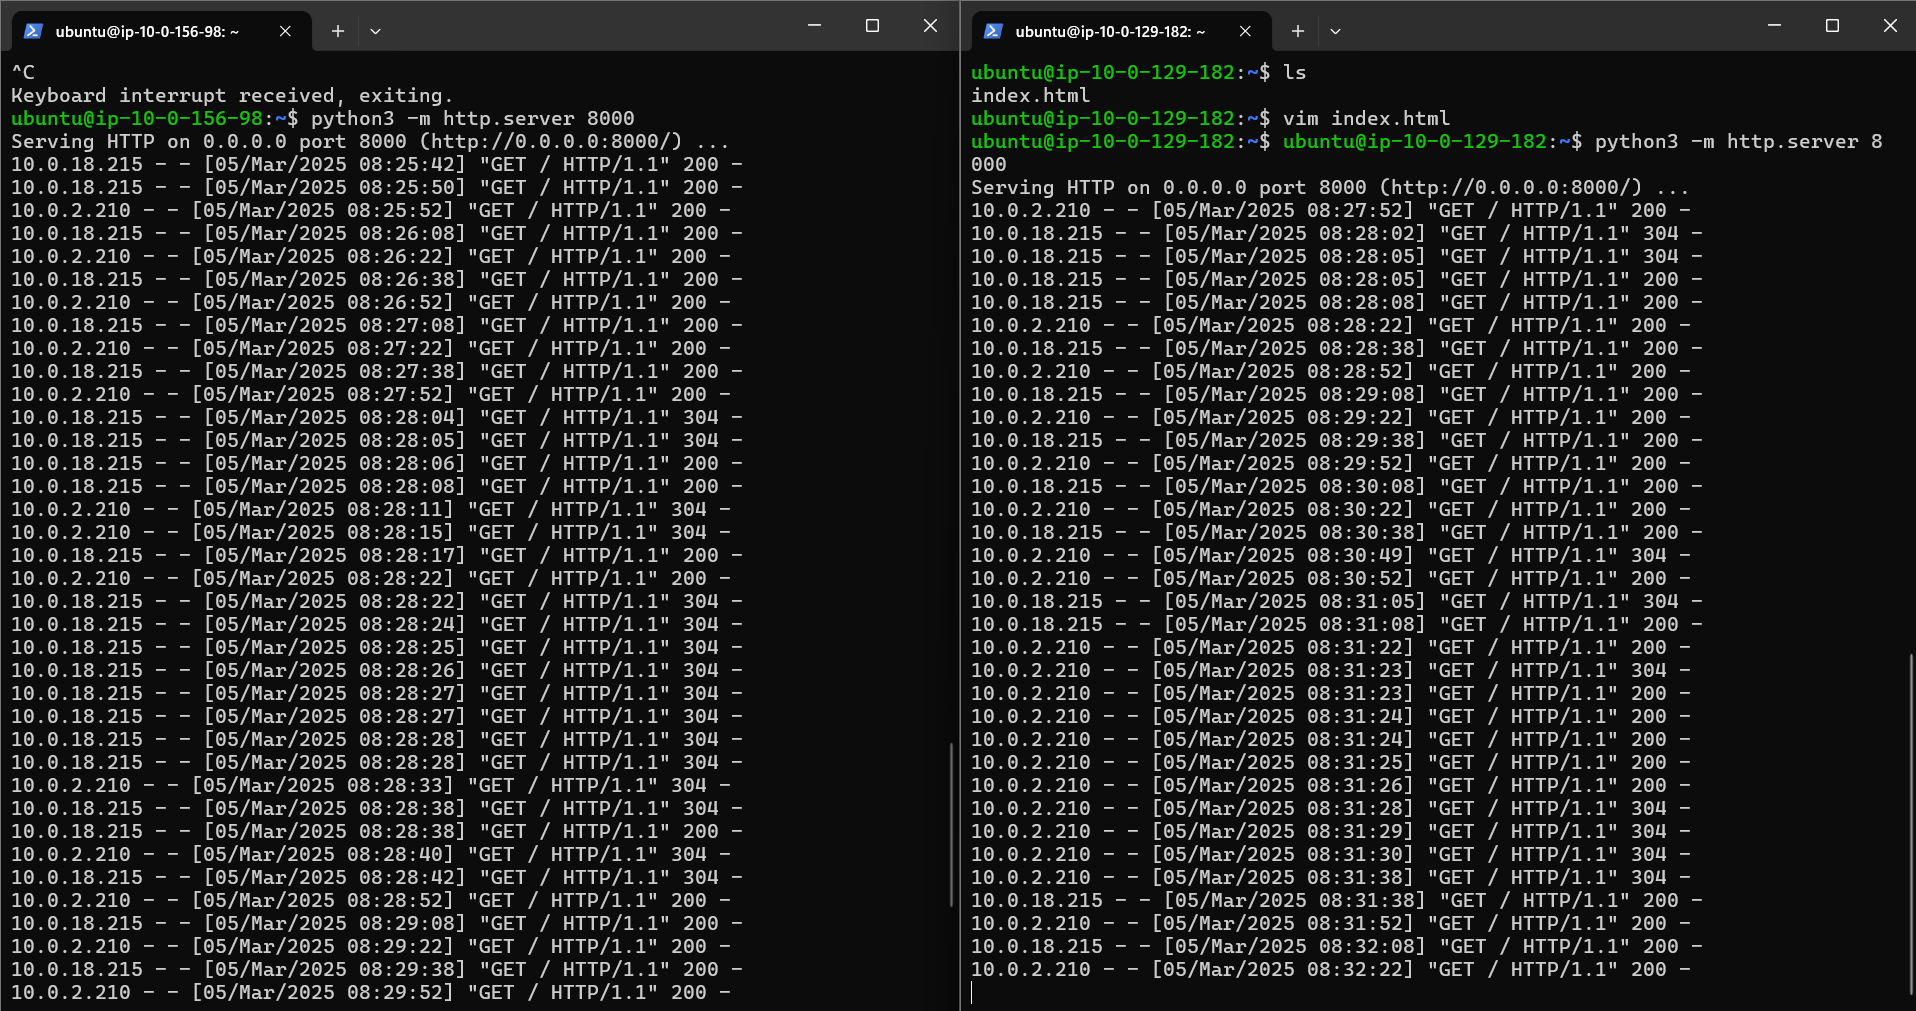
💡We can now clearly see that we have both target groups healthy.
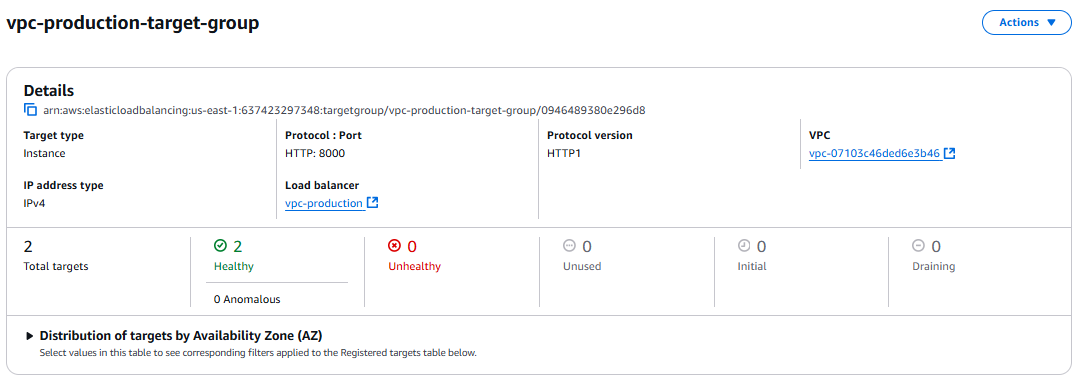
Congratulations! 🎉We have successfully created a two-tier architecture for an app.
Deleting resources
Now lets delete all the associated resources to avoid AWS charges. Follow these step-by-step instructions carefully.
Step 1: Identify the Resources in Your VPC
Your VPC consists of several components, including:
EC2 instances
Elastic Load Balancer (ELB)
NAT Gateway
Internet Gateway
Subnets (4 subnets in your case)
Route Tables
Security Groups
Elastic IPs
Other AWS resources (like S3, EBS, RDS, etc.)
🚨 Important: You must delete resources in the correct order because AWS won't allow you to delete a VPC that still has dependencies.
Step 2: Delete EC2 Instances
Open the AWS EC2 Dashboard.
Select all EC2 instances running inside your VPC.
Click Actions > Instance State > Terminate.
Wait for the status to change to Terminated.
Step 3: Delete the Elastic Load Balancer (ELB)
Open the EC2 Dashboard > Click on Load Balancers.
Select the Elastic Load Balancer associated with your VPC.
Click Actions > Delete Load Balancer.
Confirm the deletion.
Step 4: Delete the Target Group
Go to EC2 Dashboard > Click on Target Groups.
Select the target group linked to your Load Balancer.
Click Actions > Delete Target Group.
Step 5: Delete the NAT Gateway
Open the VPC Dashboard.
Click on NAT Gateways.
Select the NAT Gateway associated with your VPC.
Click Actions > Delete NAT Gateway.
Release the Elastic IP:
Open EC2 Dashboard > Click on Elastic IPs.
Select the Elastic IP linked to the NAT Gateway.
Click Actions > Release Elastic IP.
Step 6: Detach and Delete the Internet Gateway
Open the VPC Dashboard.
Click on Internet Gateways.
Select the Internet Gateway attached to your VPC.
Click Actions > Detach from VPC.
Click Actions > Delete Internet Gateway.
Step 7: Delete the Route Tables
Open the VPC Dashboard.
Click on Route Tables.
Identify non-main route tables linked to your VPC.
Click Actions > Delete Route Table.
Step 8: Delete Security Groups
Open the VPC Dashboard.
Click on Security Groups.
Identify the custom security groups linked to your VPC.
Click Actions > Delete Security Group.
- 🚨 You cannot delete the default security group (skip it).
Step 9: Delete the Subnets
Open the VPC Dashboard.
Click on Subnets.
Select the 4 subnets inside your VPC.
Click Actions > Delete Subnet.
- Note: Ensure there are no active resources inside these subnets.
Step 10: Delete the VPC
Open the VPC Dashboard.
Click on Your VPCs.
Select the VPC you created.
Click Actions > Delete VPC.
Confirm the deletion.
Step 11: Verify and Release Elastic IPs
Open the EC2 Dashboard.
Click on Elastic IPs.
If you see unused Elastic IPs, select them.
Click Actions > Release Elastic IP.
Step 12: Double-Check for Other Services
S3 Buckets: If you stored any data, delete it.
EBS Volumes: Delete unused Elastic Block Store (EBS) volumes.
CloudWatch Logs: Delete logs if created.
Auto Scaling Groups: If configured, delete them.
RDS Databases: If you used AWS RDS, terminate the database.
Final Step: Confirm No Charges
Go to AWS Billing Dashboard.
Check if any services are still running.
If everything is deleted, you won't incur further charges.
Step 1: Identify Associated Subnets
Open the AWS VPC Dashboard.
Click on Route Tables in the left panel.
Find the route table with ID rtb-00b17e215742ac04b.
Click on it and go to the "Subnet Associations" tab.
Note the subnets associated with this route table.
Step 2: Remove Subnet Associations
Open VPC Dashboard > Click Subnets.
Find the subnets associated with the route table.
Select each subnet and click Actions > Edit Route Table Association.
Change the route table to the default route table or disassociate it.
Save changes.
Step 3: Delete the Subnets
After disassociating the subnets, go back to the VPC Dashboard.
Click Subnets.
Select each subnet and click Actions > Delete Subnet.
Confirm the deletion.
Step 4: Delete the Route Table
Now that the subnets are deleted, go to VPC Dashboard > Route Tables.
Select rtb-00b17e215742ac04b.
Click Actions > Delete Route Table.
Confirm the deletion.
Step 5: Delete the VPC (if needed)
Go to VPC Dashboard > Your VPCs.
Select vpc-07103c46de.
Click Actions > Delete VPC.
Confirm the deletion.
Subscribe to my newsletter
Read articles from VIKRANT SARADE directly inside your inbox. Subscribe to the newsletter, and don't miss out.
Written by

VIKRANT SARADE
VIKRANT SARADE
I am a passionate and motivated Full Stack Developer with experience in Python, Django, Flask , AI/ML, React, and PHP frameworks like CodeIgniter. With a strong foundation in web development, databases, and cloud computing, I am eager to transition into an AWS DevOps role. I have hands-on experience with CI/CD pipelines, infrastructure automation, and deployment strategies. As a quick learner and problem solver, I am committed to building scalable and efficient cloud-based solutions. I am always open to new challenges and opportunities to expand my skills in cloud and DevOps technologies.