Project 1: AWS VPC & VPC Peering Project. 💻💡
 Sachin
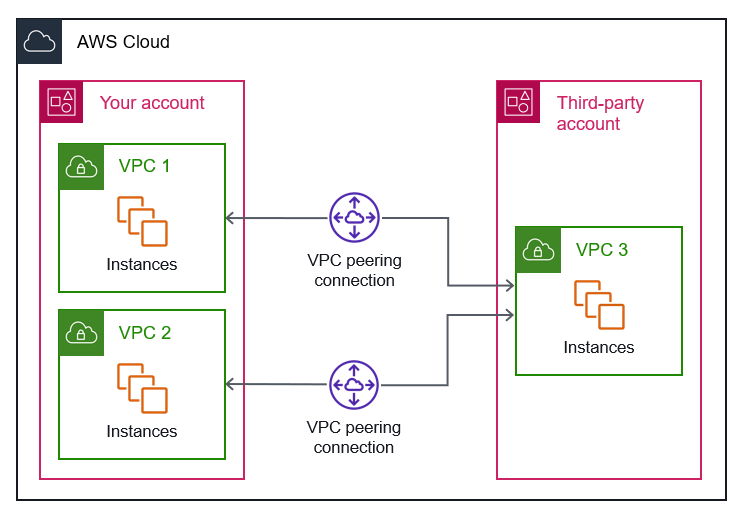
Introduction
Amazon virtual Private Cloud (VPC) allow you to create an isolated network environment within AWS. VPC Peering enables communication between two VPC’s using private IP addresses. This project will guide you through setting up a secure VPC network and configuring VPC peering for seamless connectivity.
Project Overview
Objectives:
✅ Create two custom VPCs with different CIDR blocks
✅ Launch EC2 instances in separate VPCs
✅ Establish VPC Peering between the two VPCs
✅ Configure route tables to enable cross-VPC communication
✅ Test connectivity using SSH and ping
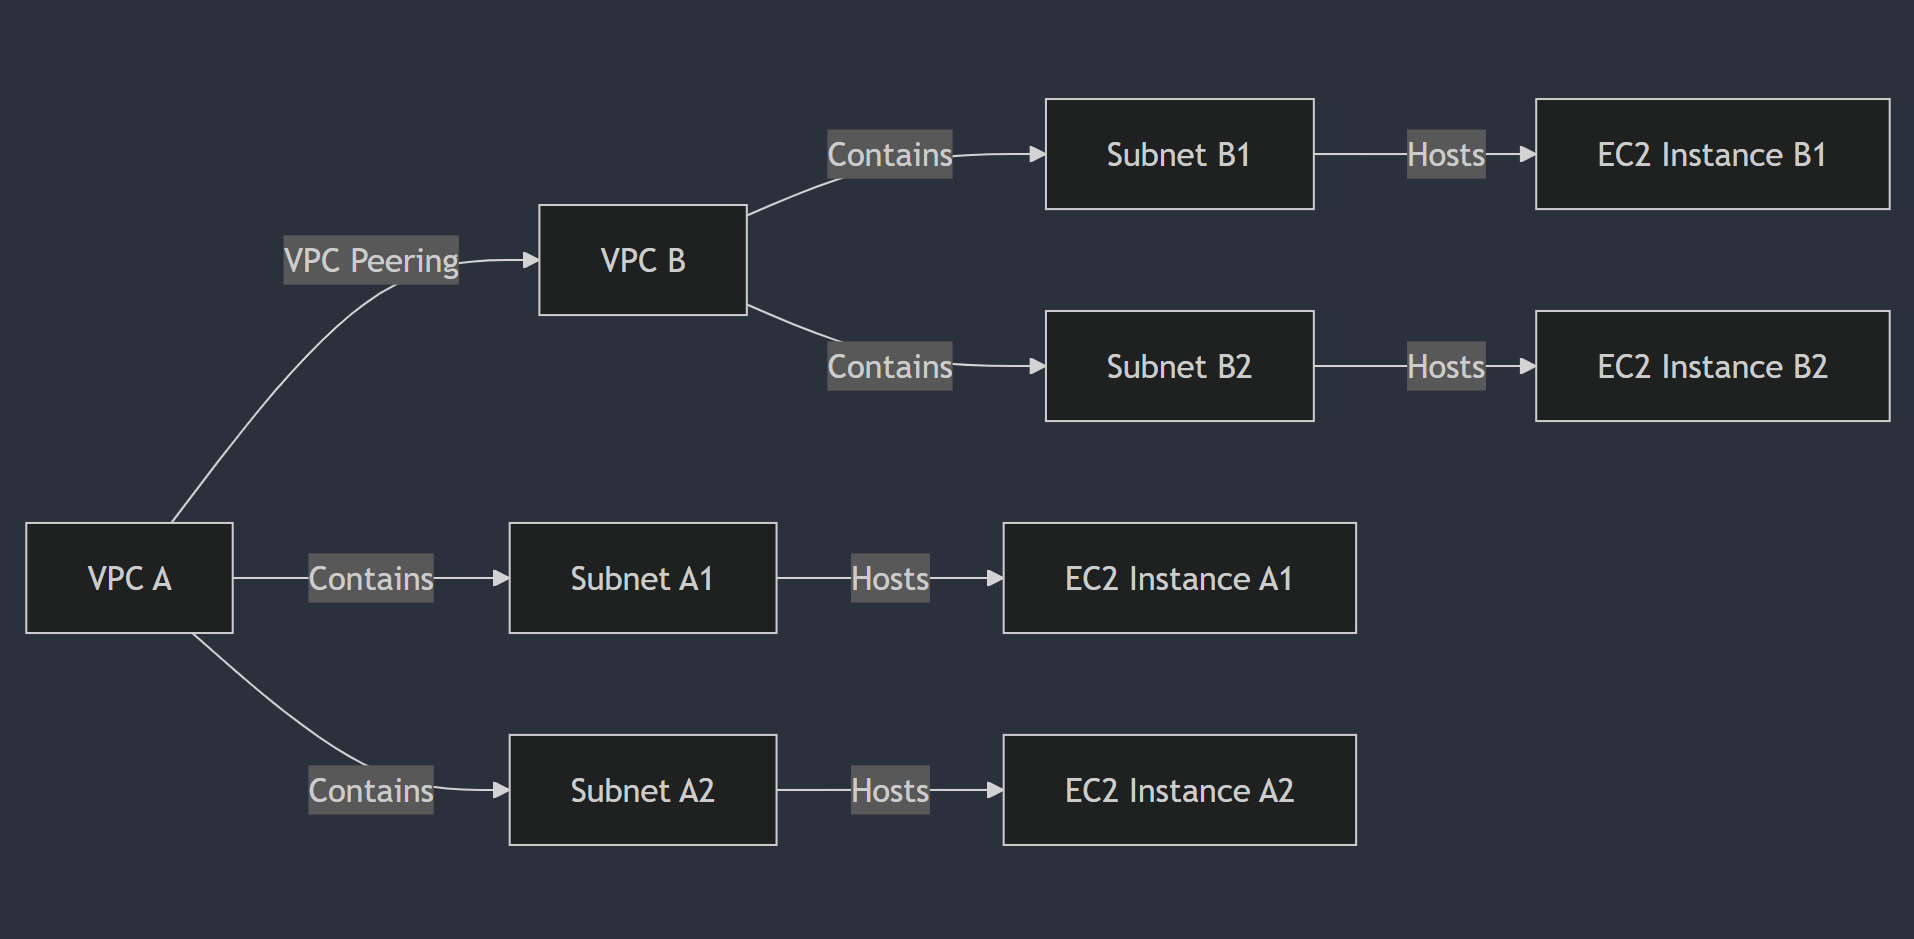
Architecture Diagram
PART 1
Step-by-Step Implementation
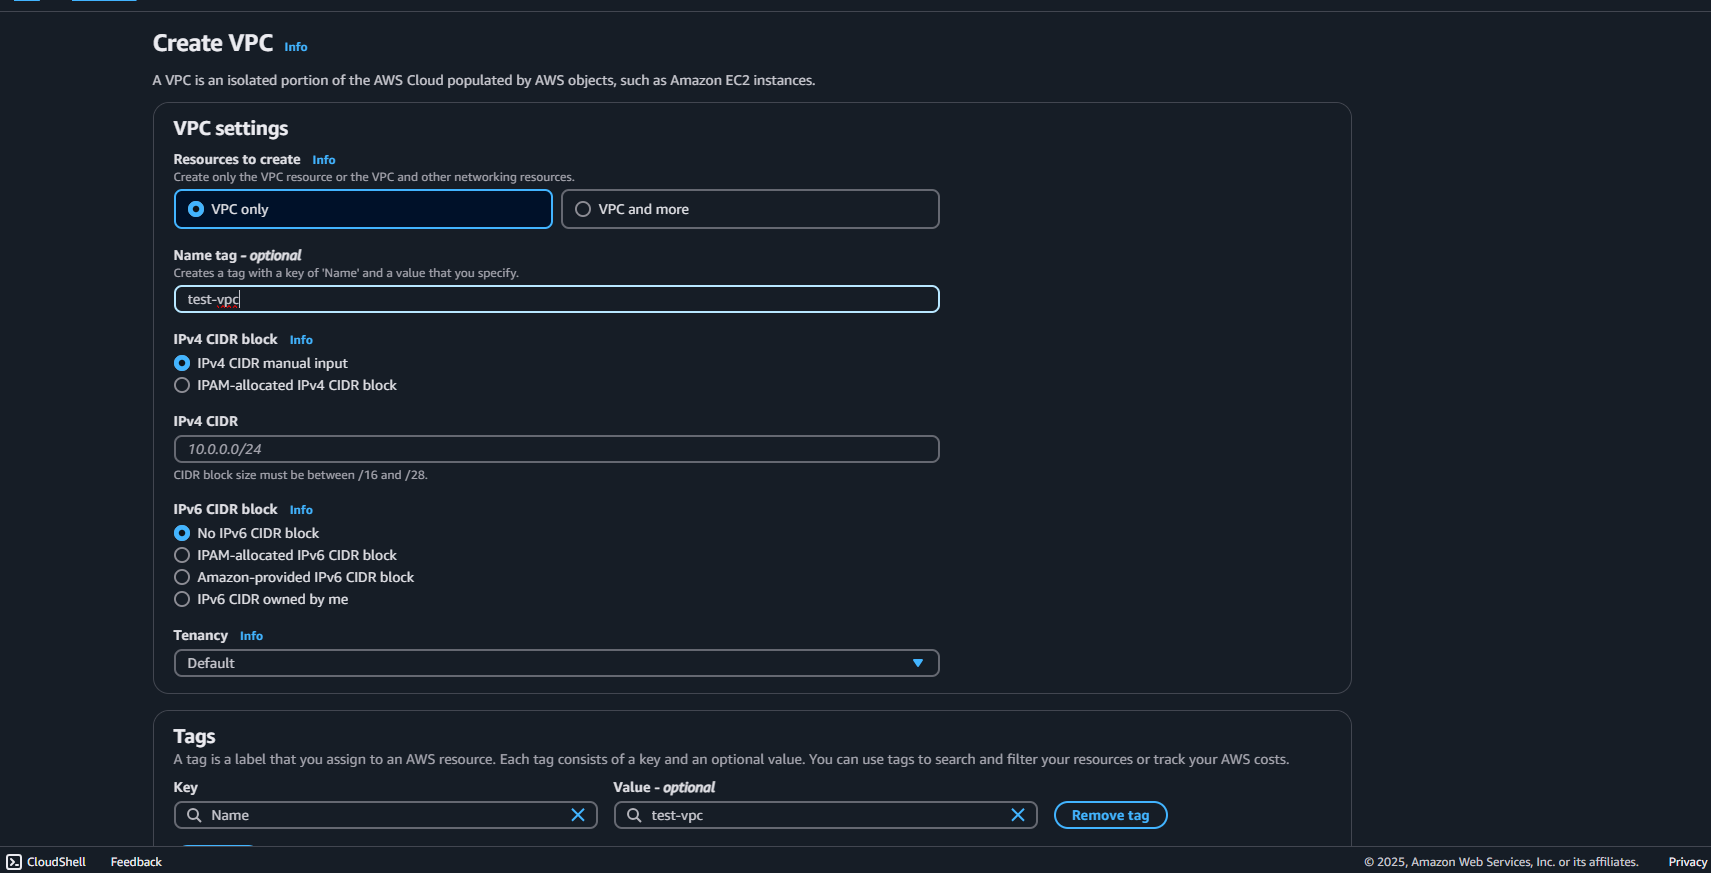
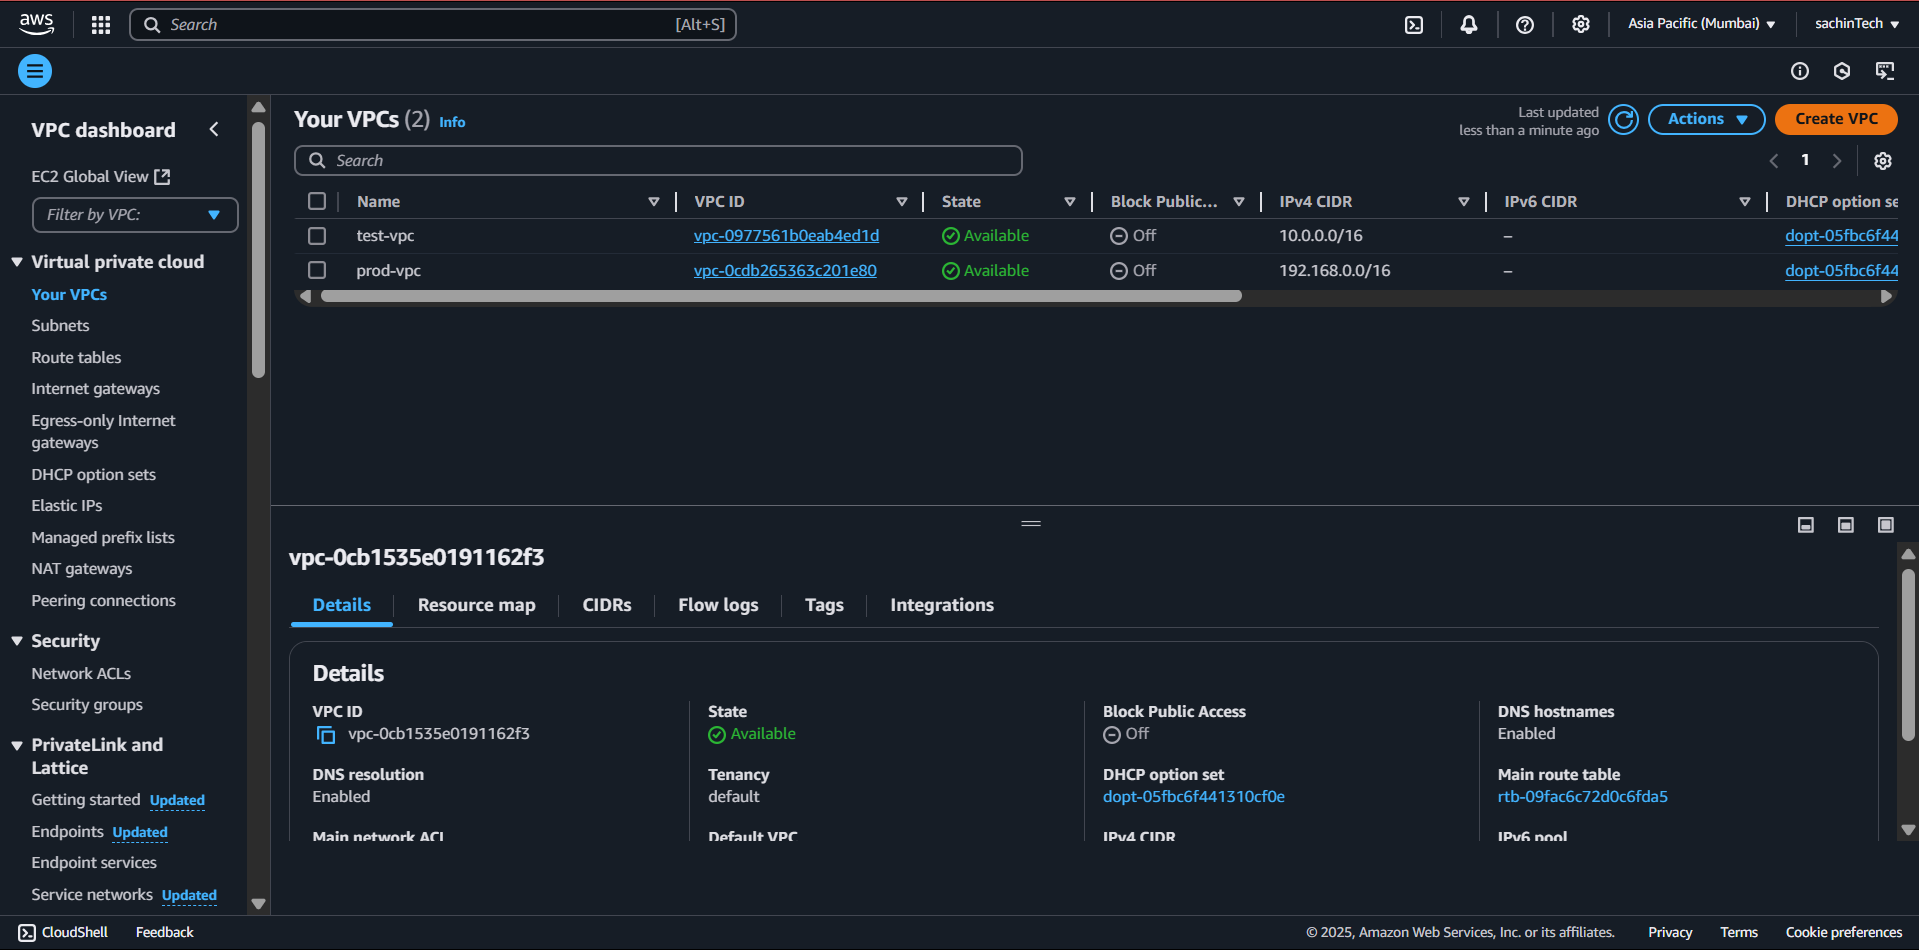
Step 1: Create Two VPCs
VPC 1(App VPC) -CIDR: 10.0.0.0/16
VPC 2 ( DB VPC ) - CIDR 192.168.0.0/16
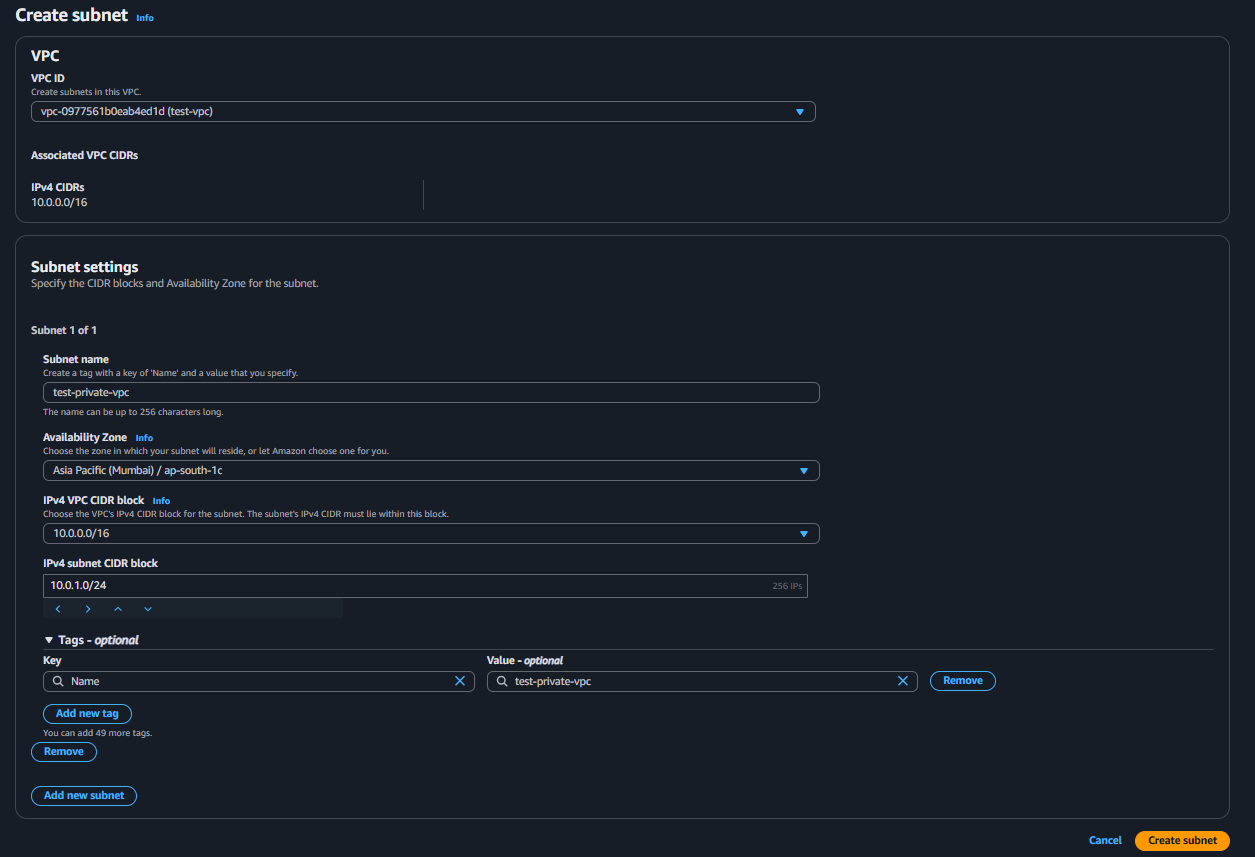
Step 2: Create Subnet
select Your created VPC
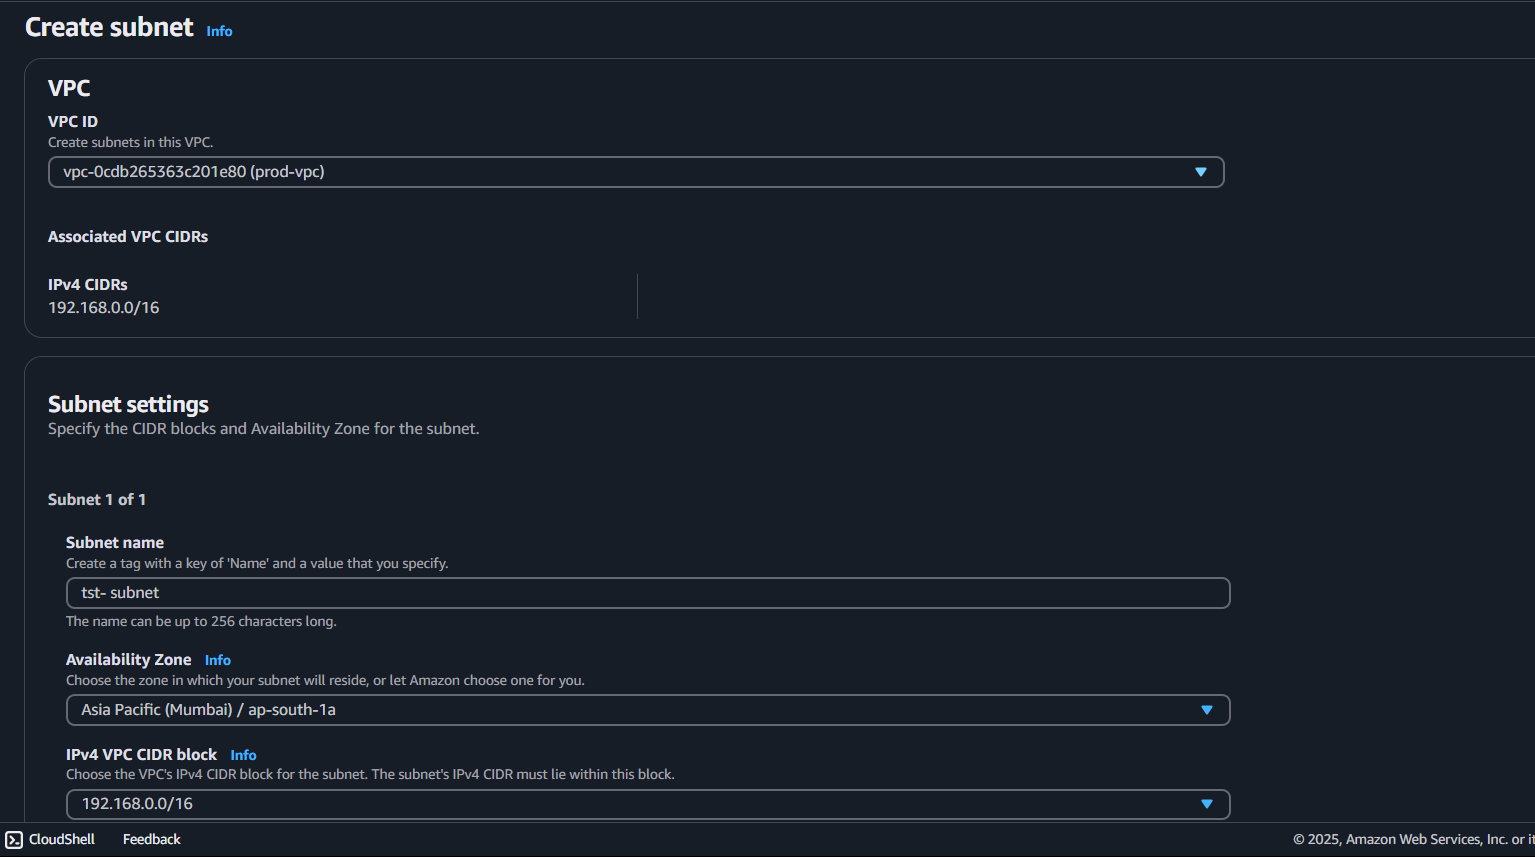
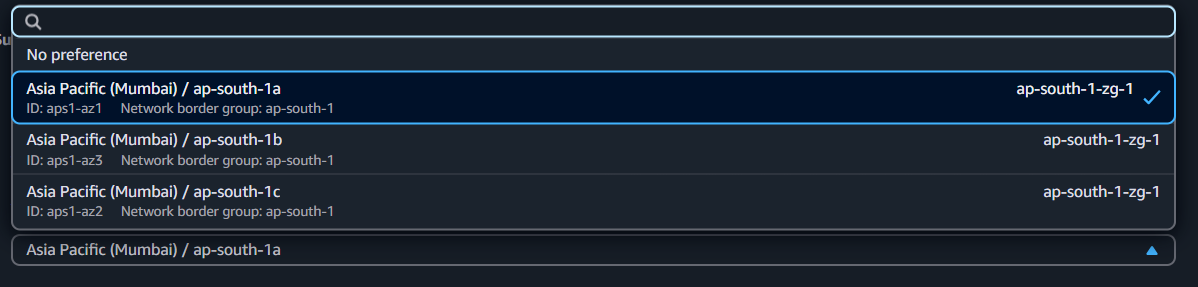
select Availability Zone
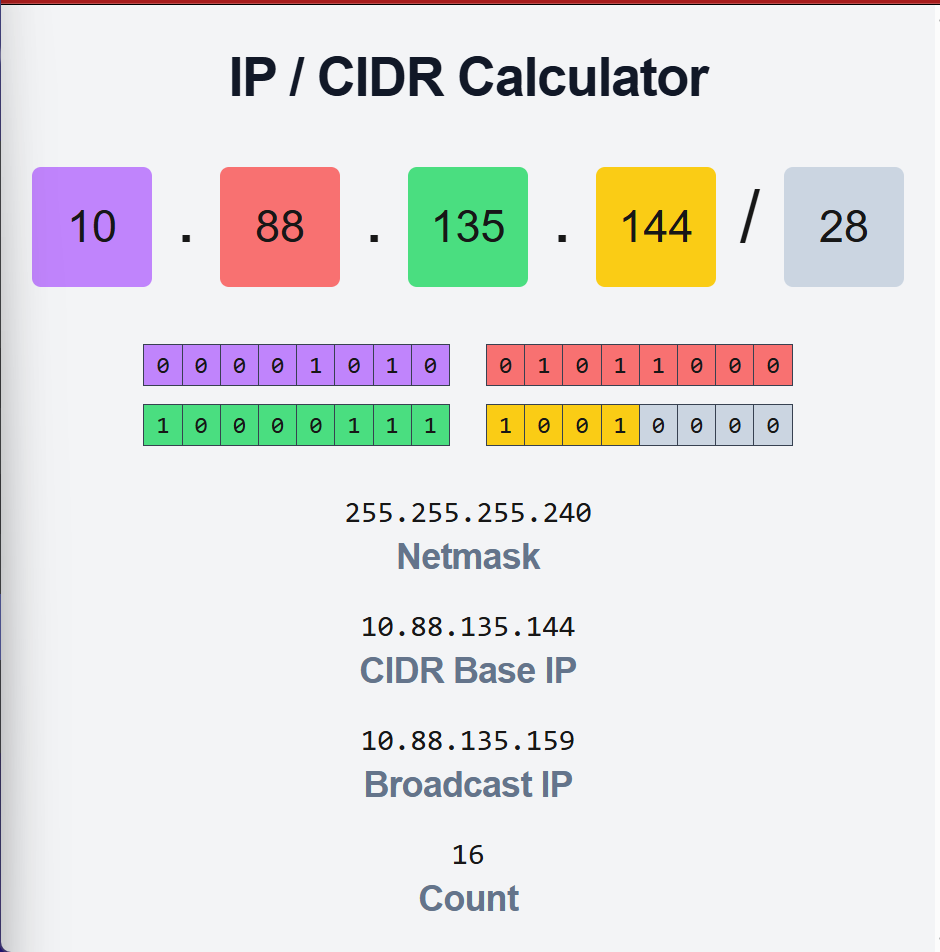
Choose the Vpc Ipv4 CIDR Block for the Subnet
Visit - https://cidr.xyz/ website to calculate CIDR Block
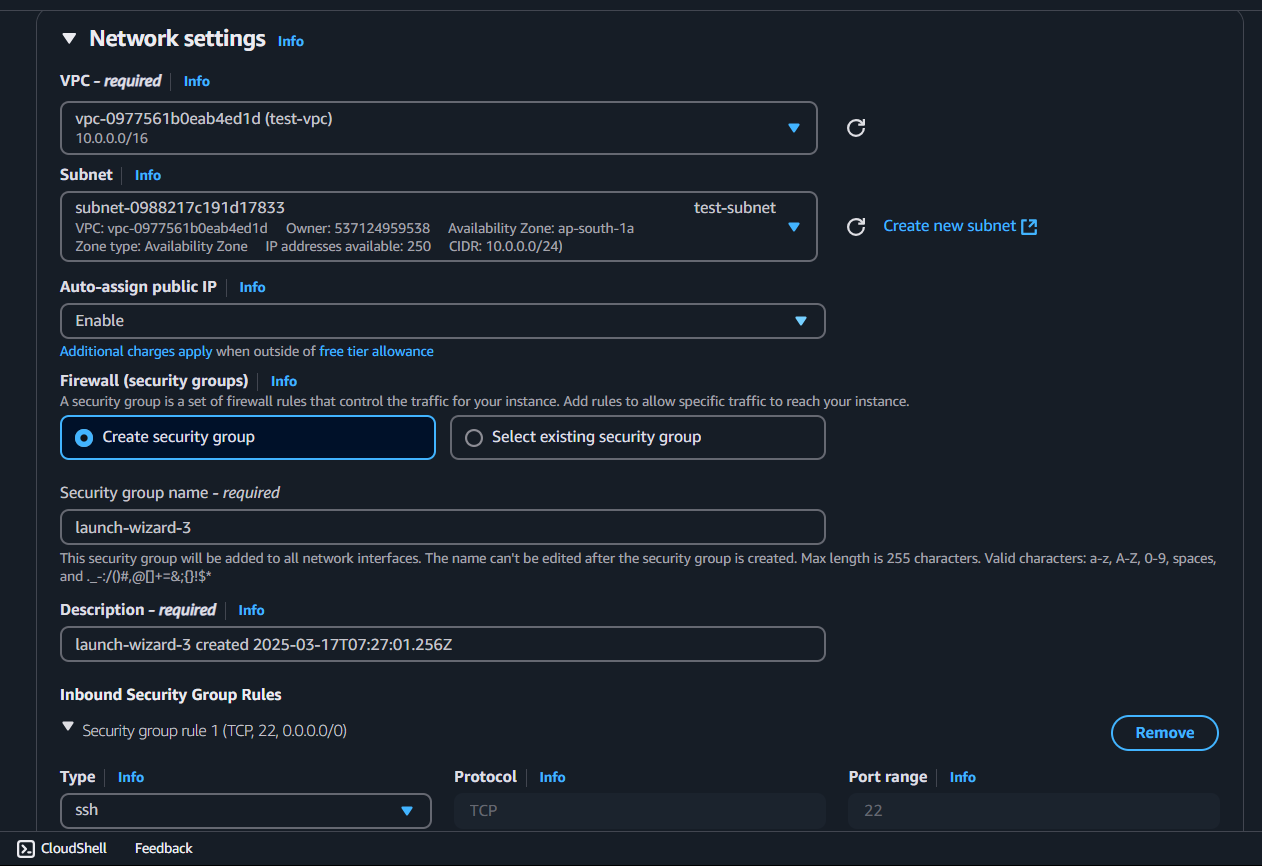
Step 3: Launch EC2 Instances
Launch an Ec2 Instance
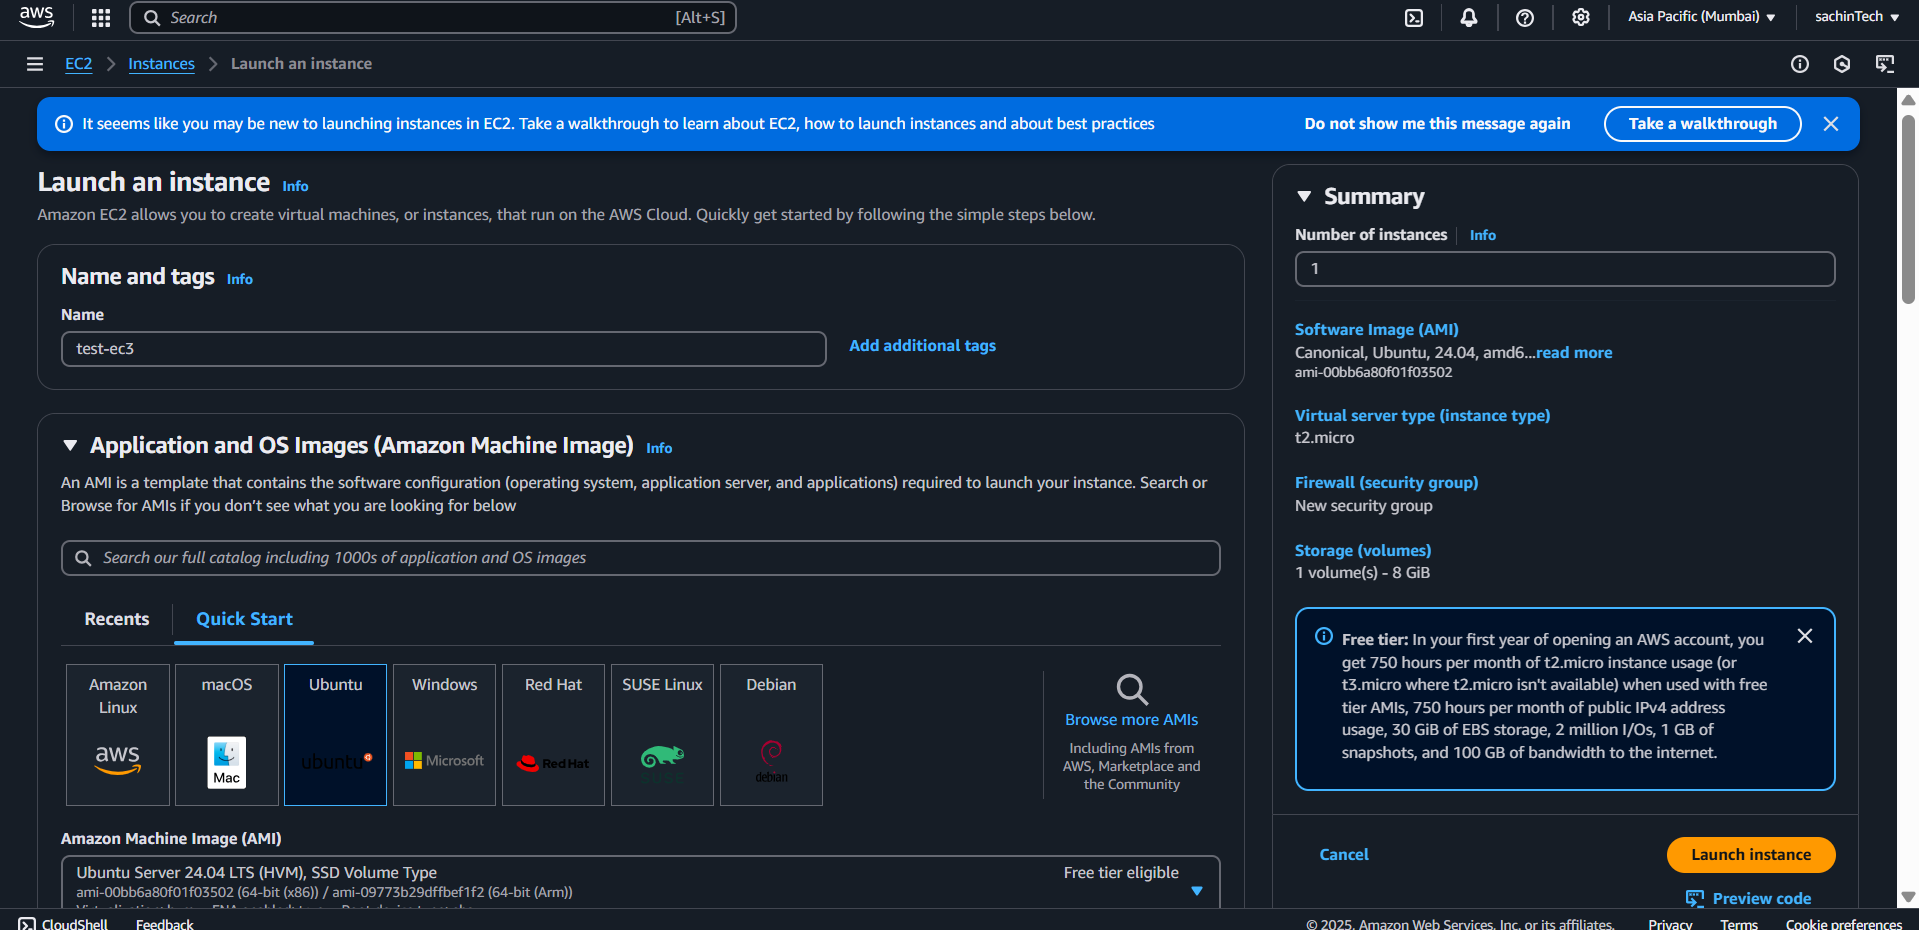
Edit the Network Settings → select Your VPC → add any security Groups (Optional)
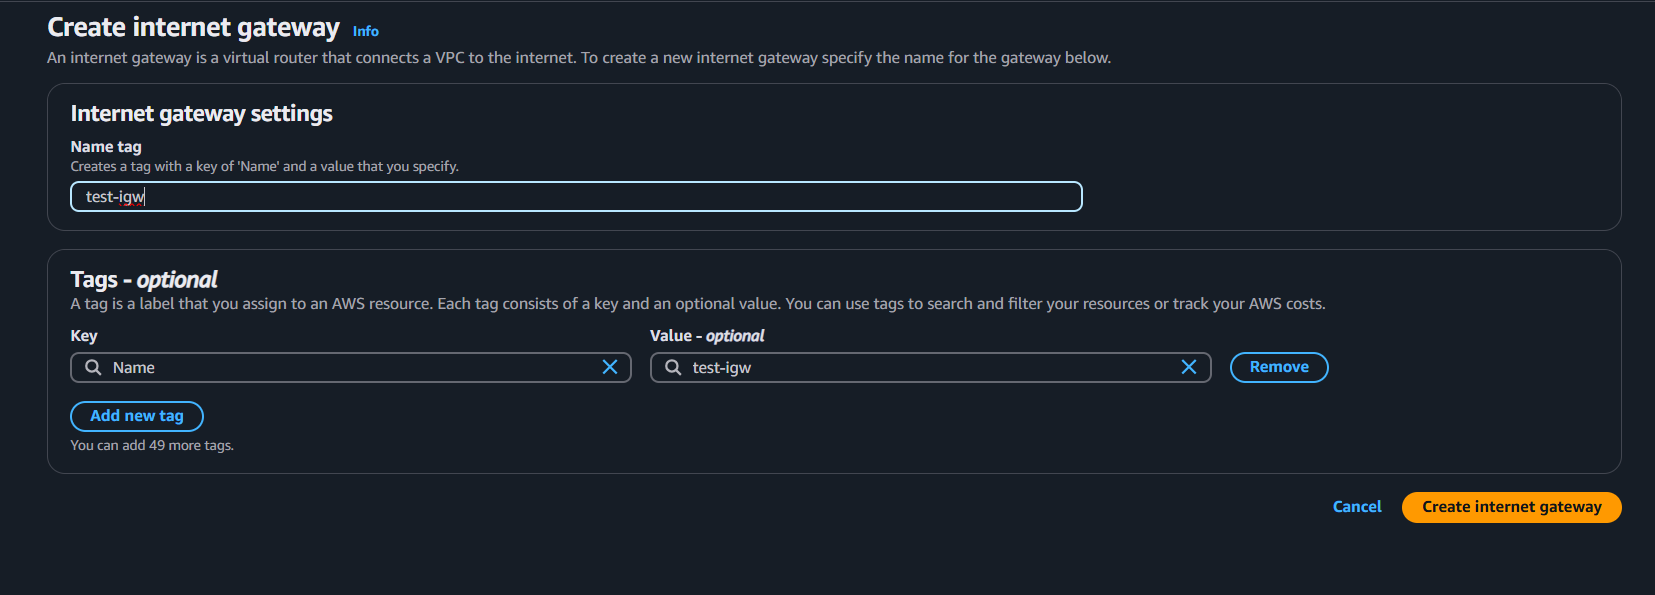
Step 3: Now attach a Internet Gateway
Go to VPC section → Internet Gateway → give name create Internet Gateway
Now you have to attach that gateway .
You will get the option like this → click on Attach to VPC → Select Your VPC

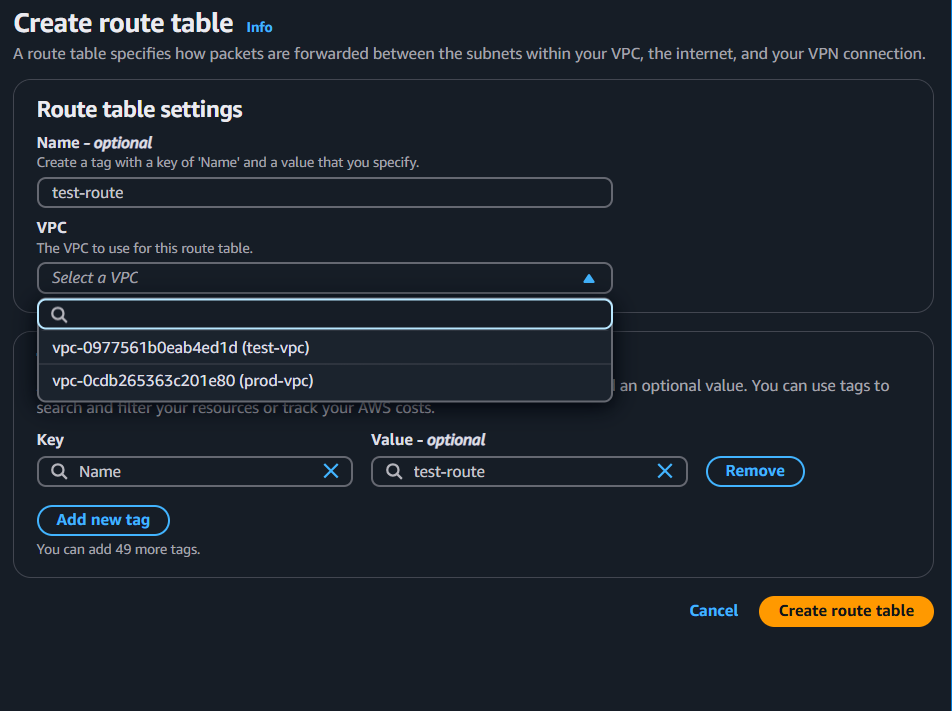
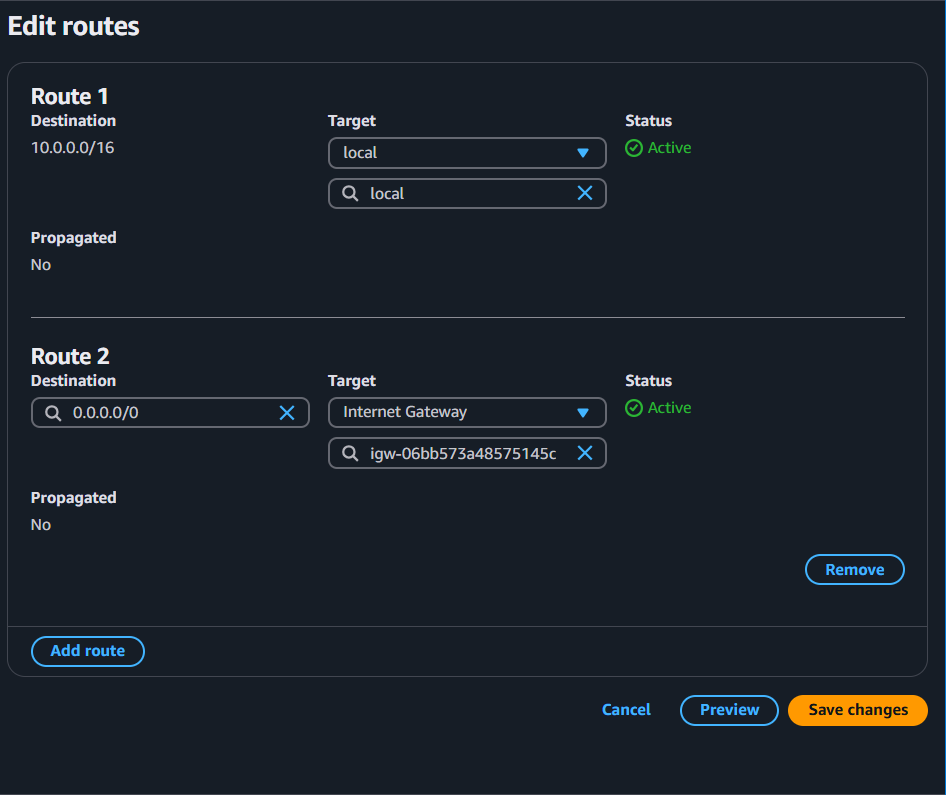
Step 4: Now do routing and associate with the Internet Gateway
Go to VPC dashboard → Click on Route table → Create route table → give the name and select the VPC to use for this route table.
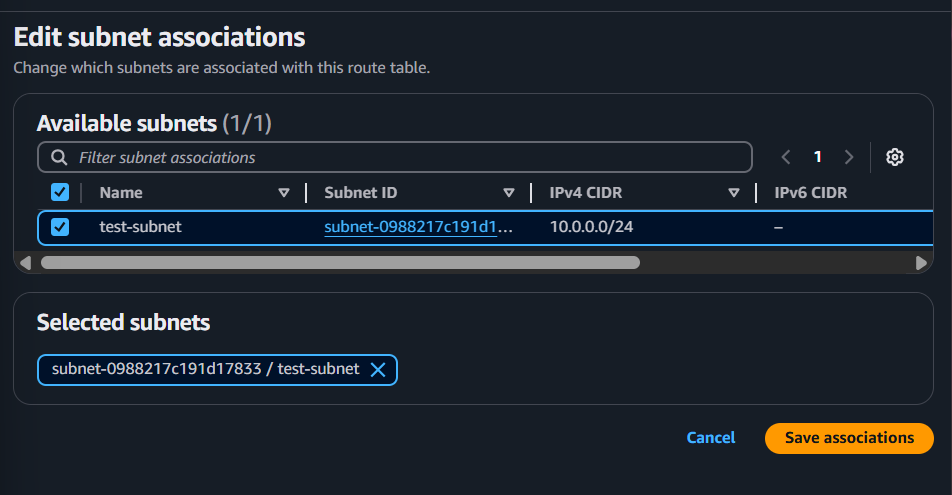
select the Created Route → Scroll down → click on Subnet associations , select the available subnets.
now edit the route table → same select the created route → click on Routes → edit routes → give the route that attach with the internet gateway.
Step 5: Done Now launch the EC2 instance.
Successfully Launched.
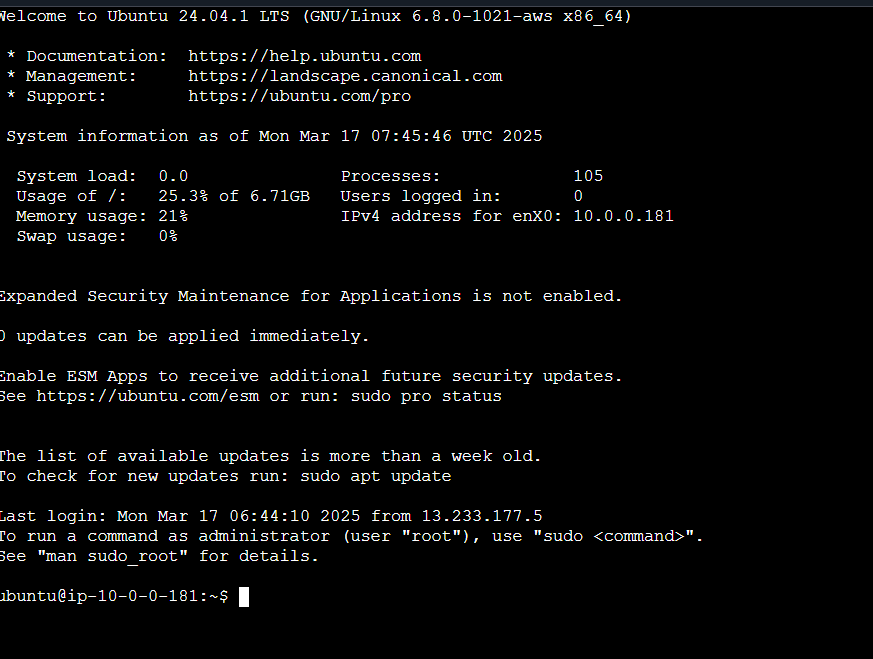
✅ Done! You have successfully launched an EC2 instance.
PART - 2 ( VPC PEERING )
You have created two VPCs and two instances. Now, we are going to ping one instance from the other. Let's do it!
first let’s understand what PING is
Ping is a network utility used to test connectivity between two devices. It sends small data packets (ICMP Echo Requests) to a target device and waits for a response (ICMP Echo Reply). This helps check if the device is reachable and measures network latency.
In simple terms, ping helps you verify if two systems can communicate over a network. 🚀
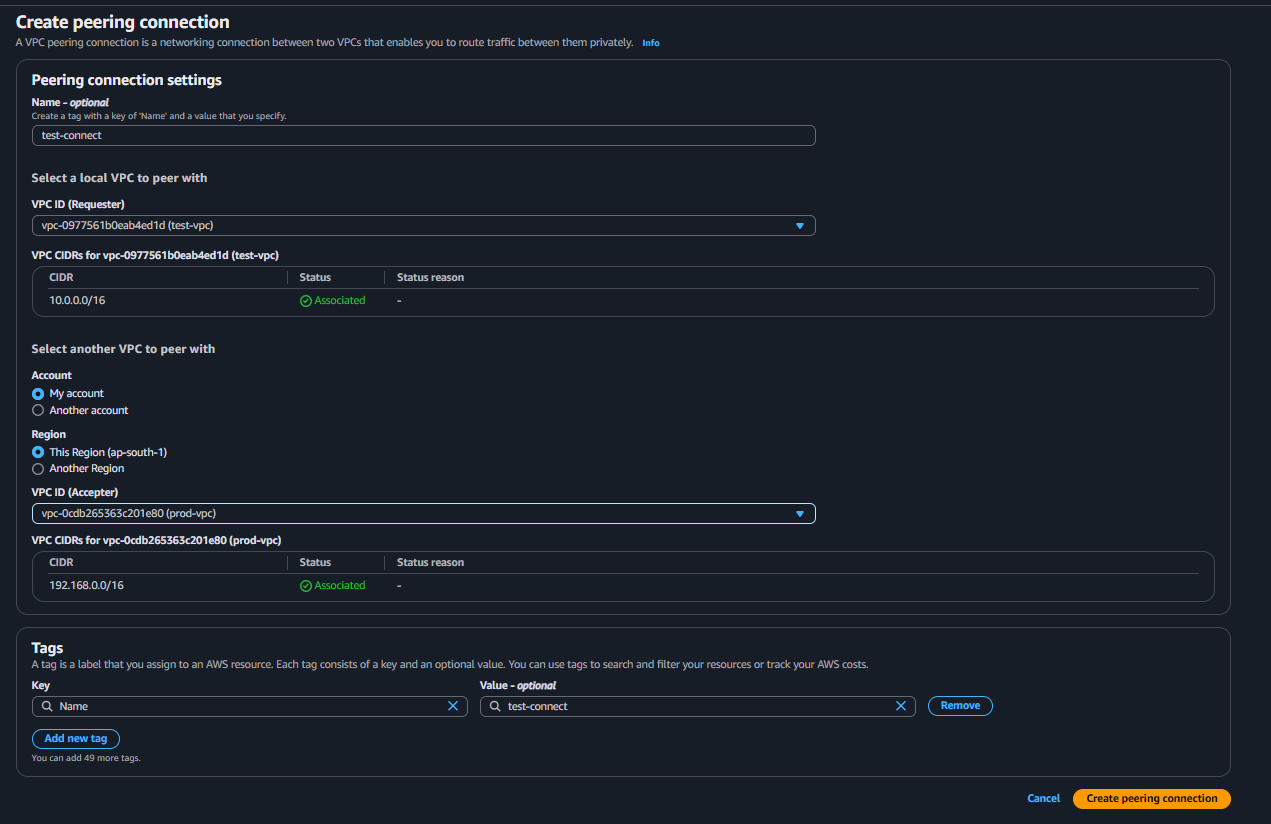
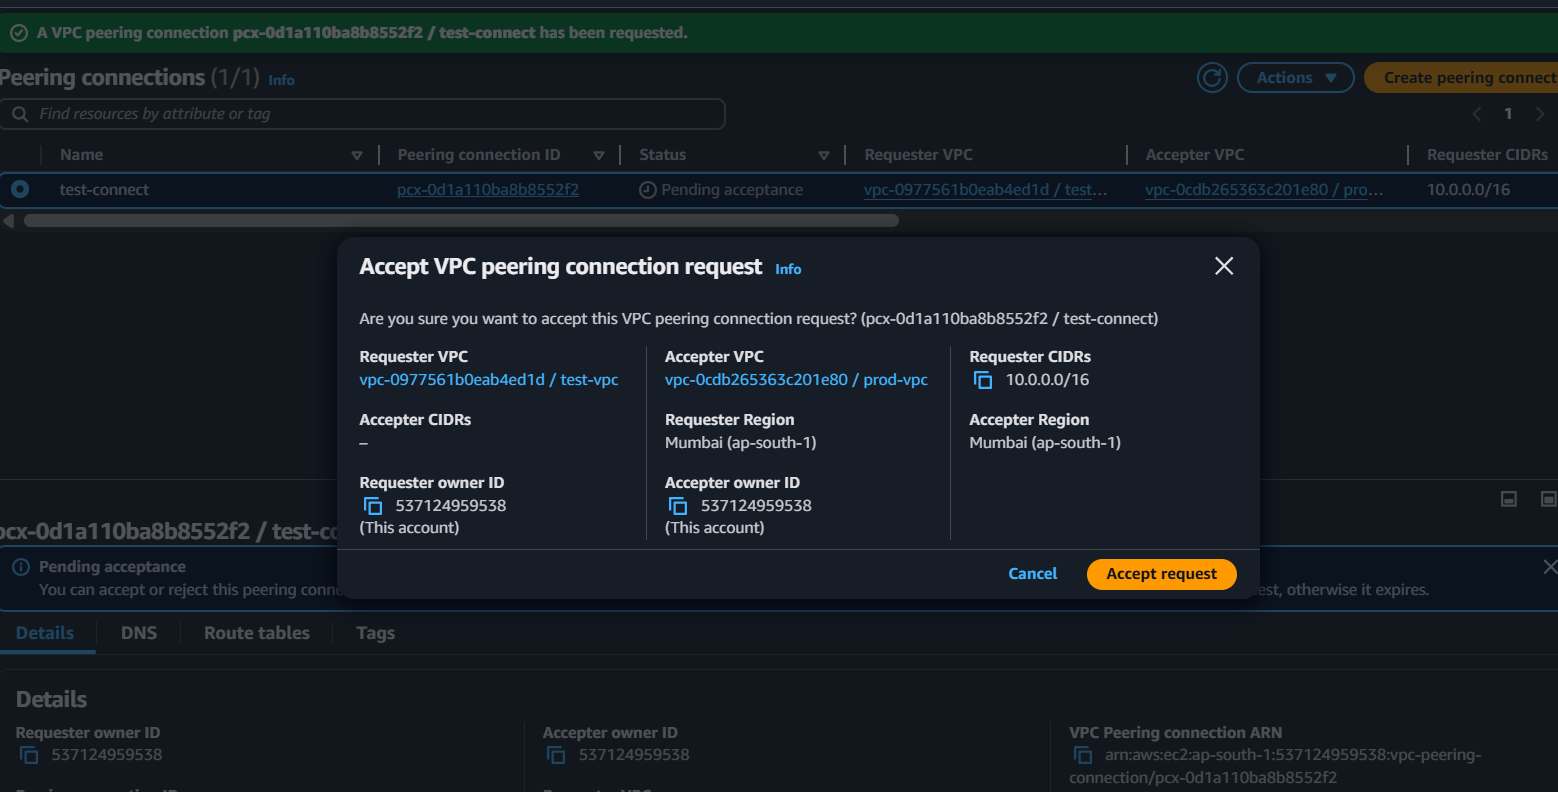
STEP 1: Create a Peering Connection
Click on create peering Connection
Created But have you accept the request? No ,
then Accept the request
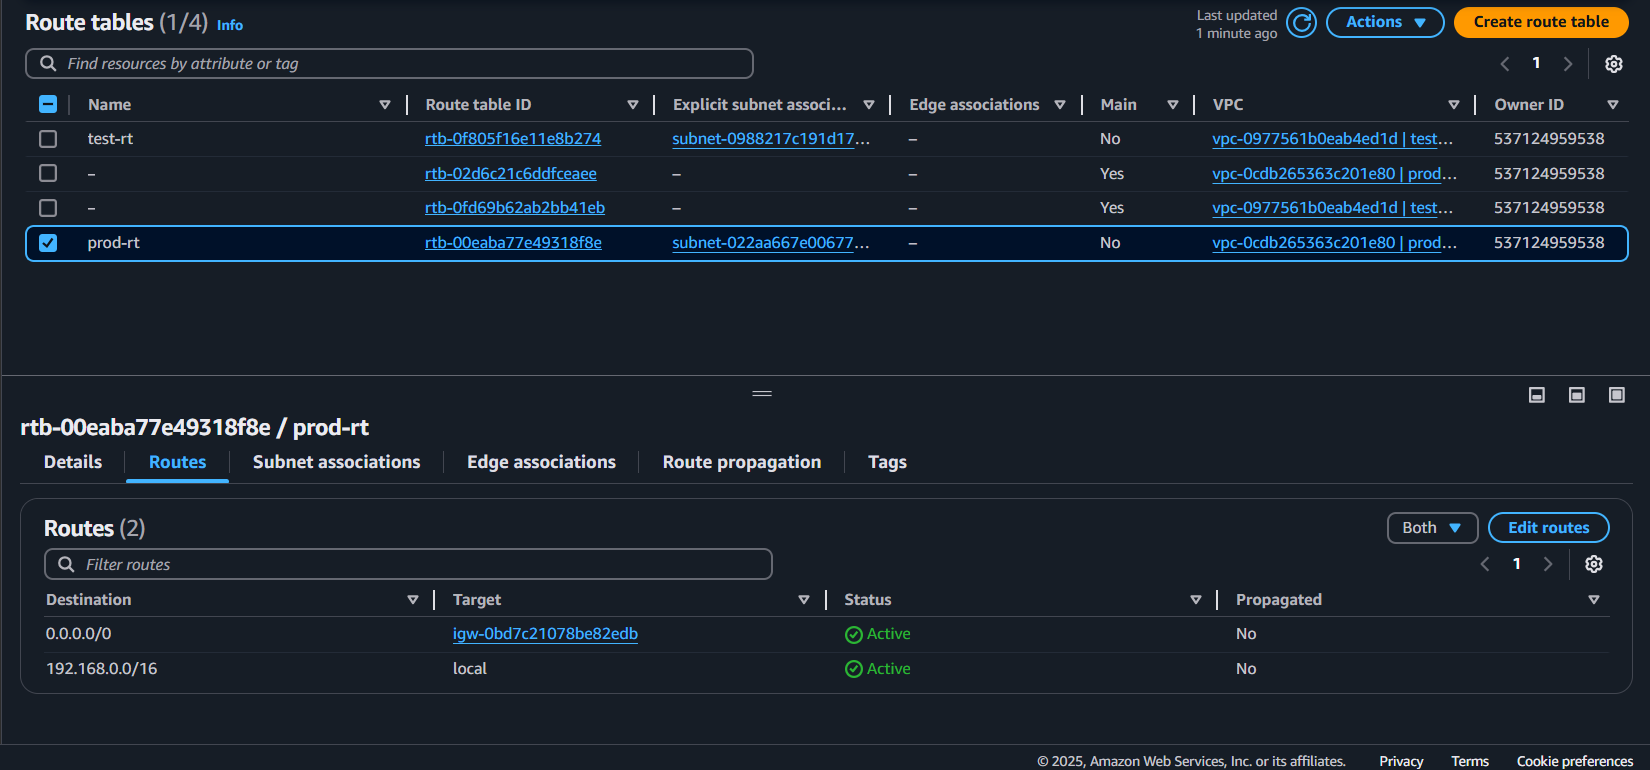
STEP 2: Add it into the Route table
select VPC dashboard → Route table → select the route (in my case - test-rt) → edit the route
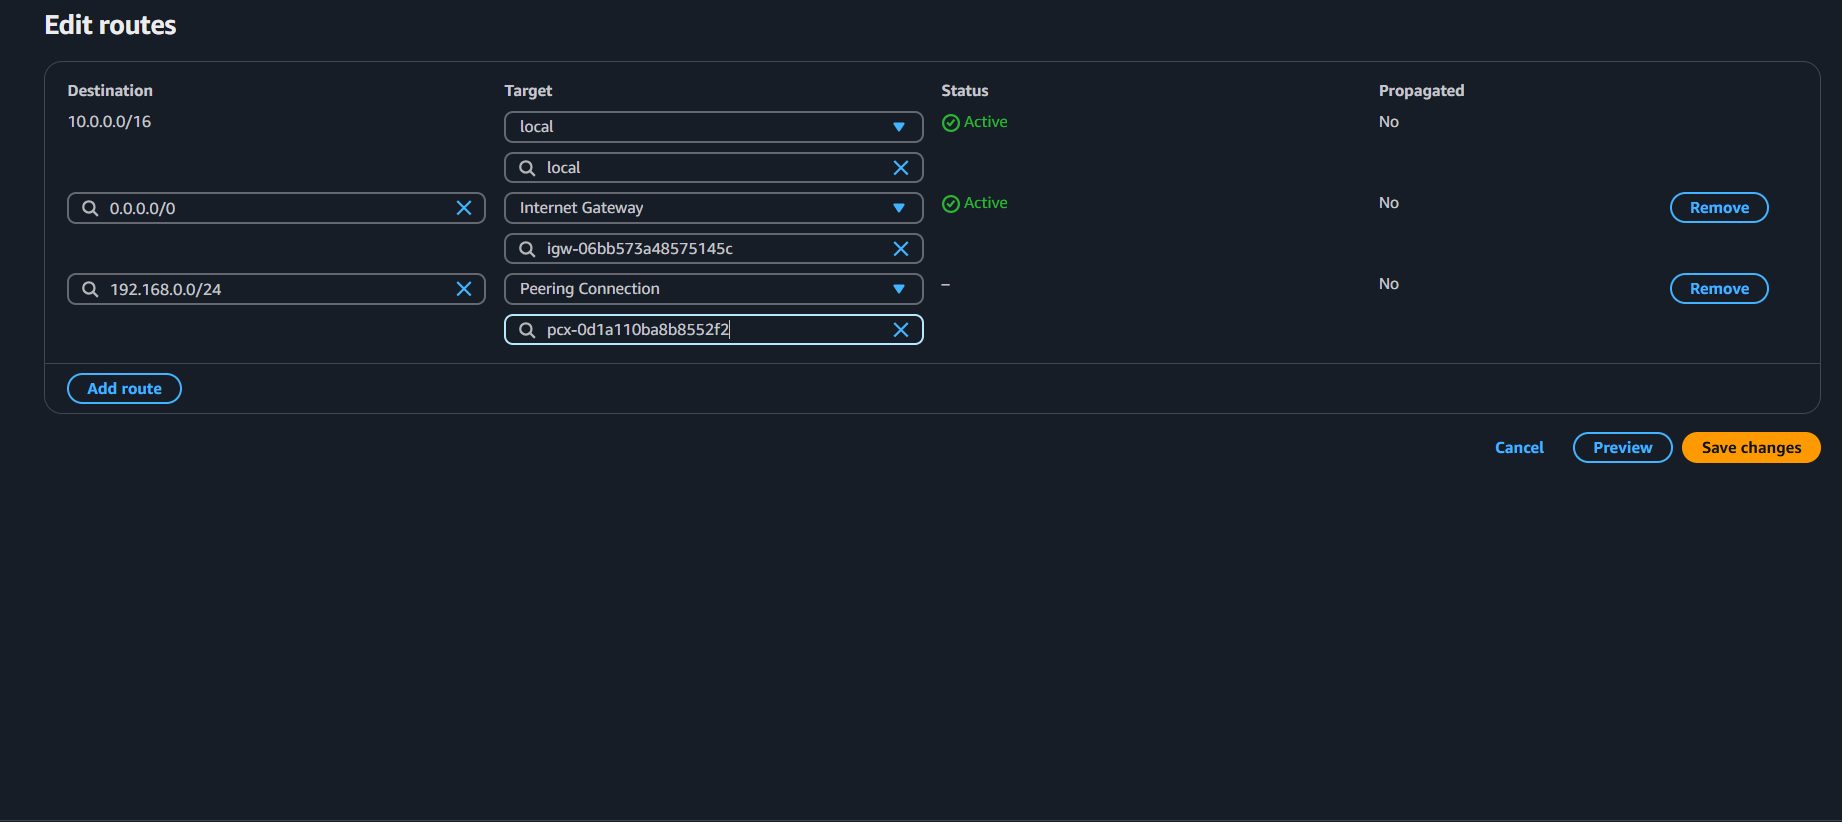
Perform the above steps for another VPC
done.
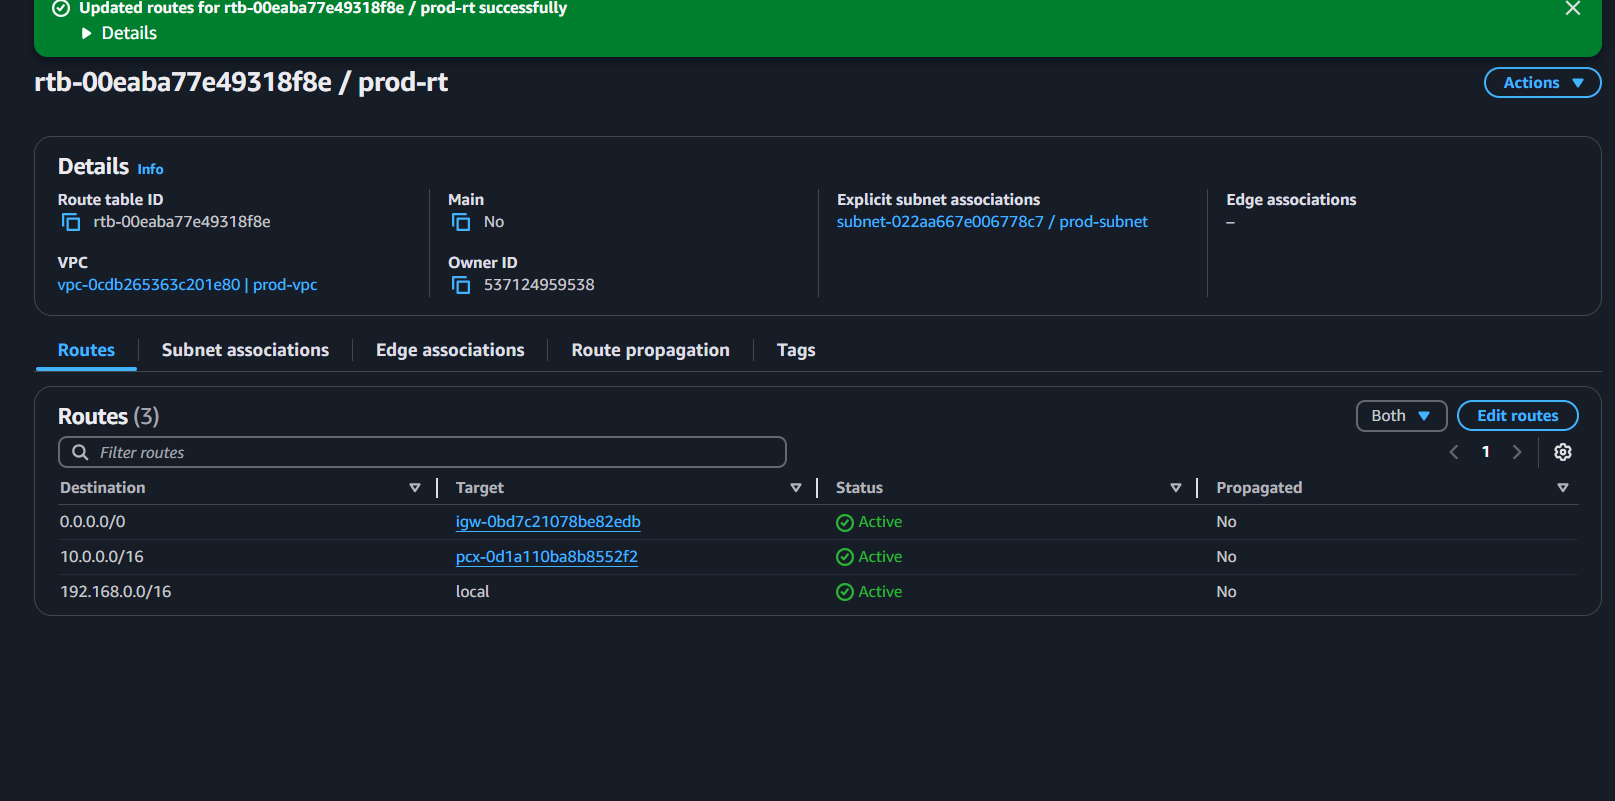
✅ If you get a response, VPC Peering is working! 🚀
STEP 3: Edit the security groups rules
Search instance → select the first created instance → scroll down and click o security → go to security groups → edit inbound rules →
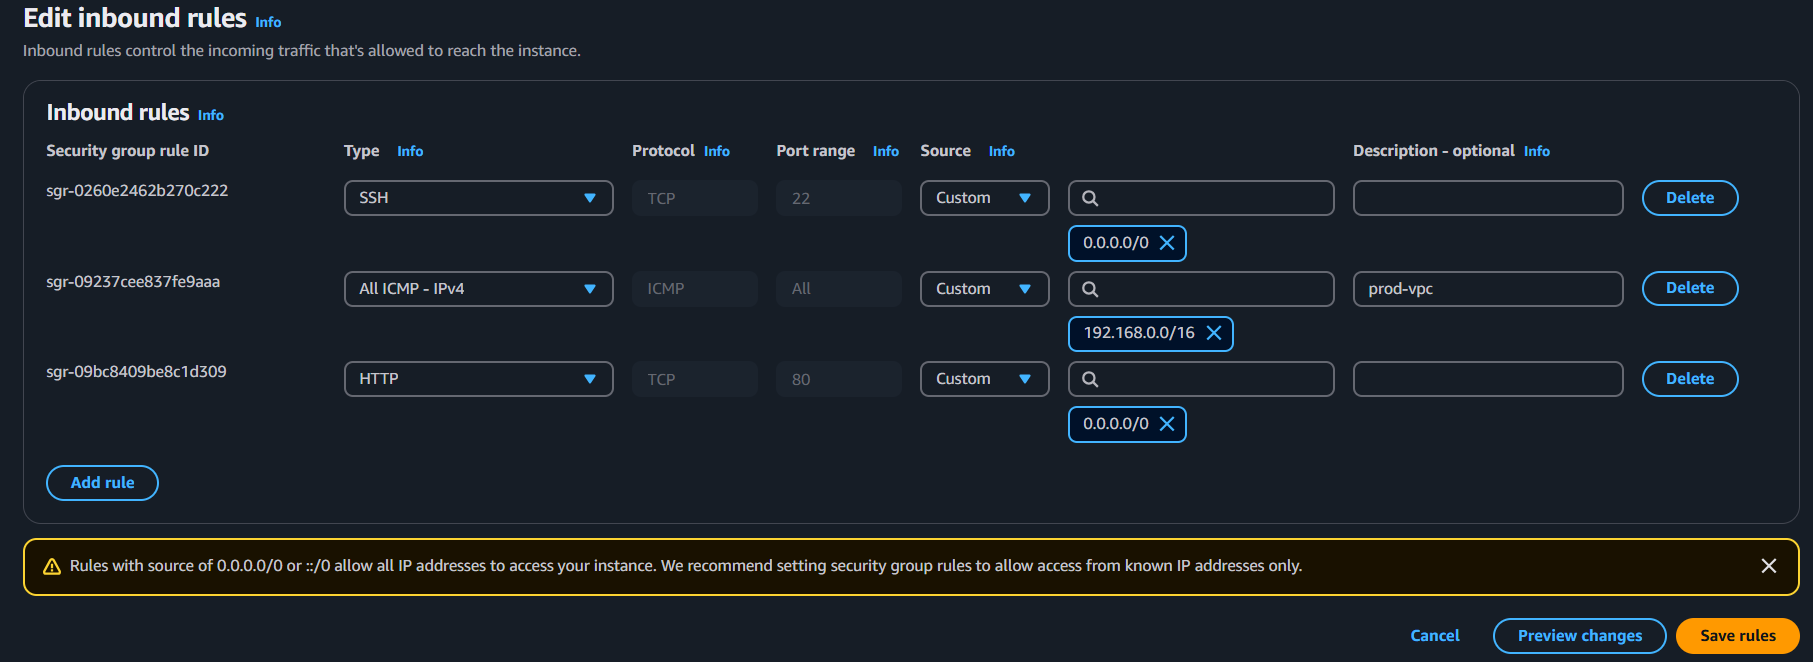
select the All ICMP IPv4 Option. save rules
Perform the above steps for second instance also and give the IP of other instance .
STEP 4: RUN the instance
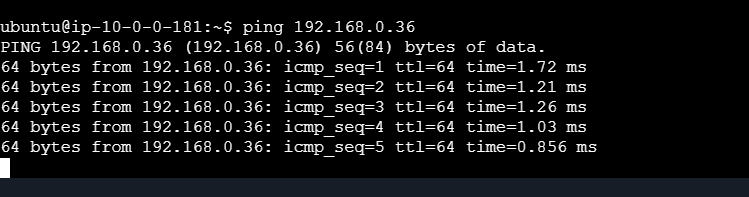
i am able to get response. 🥵
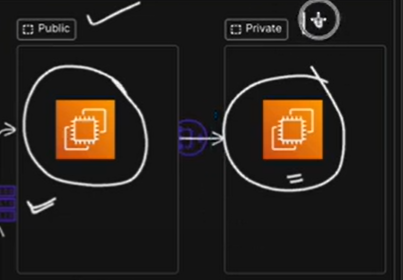
PART 3 (EXTRA)
What we Gonna do is move from a public subnet to a private subnet.
Performing the Steps? Let's First Understand What NAT Is!
NAT (Network Address Translation) is a networking technique used to allow instances in a private subnet to access the internet without exposing their private IPs.
Why Do We Need NAT?
Private instances don’t have direct internet access.
NAT Gateway (or NAT Instance) allows them to connect to the internet while keeping them private.
It’s useful for downloading updates, software, or external API calls without assigning public IPs.
Create an subnet
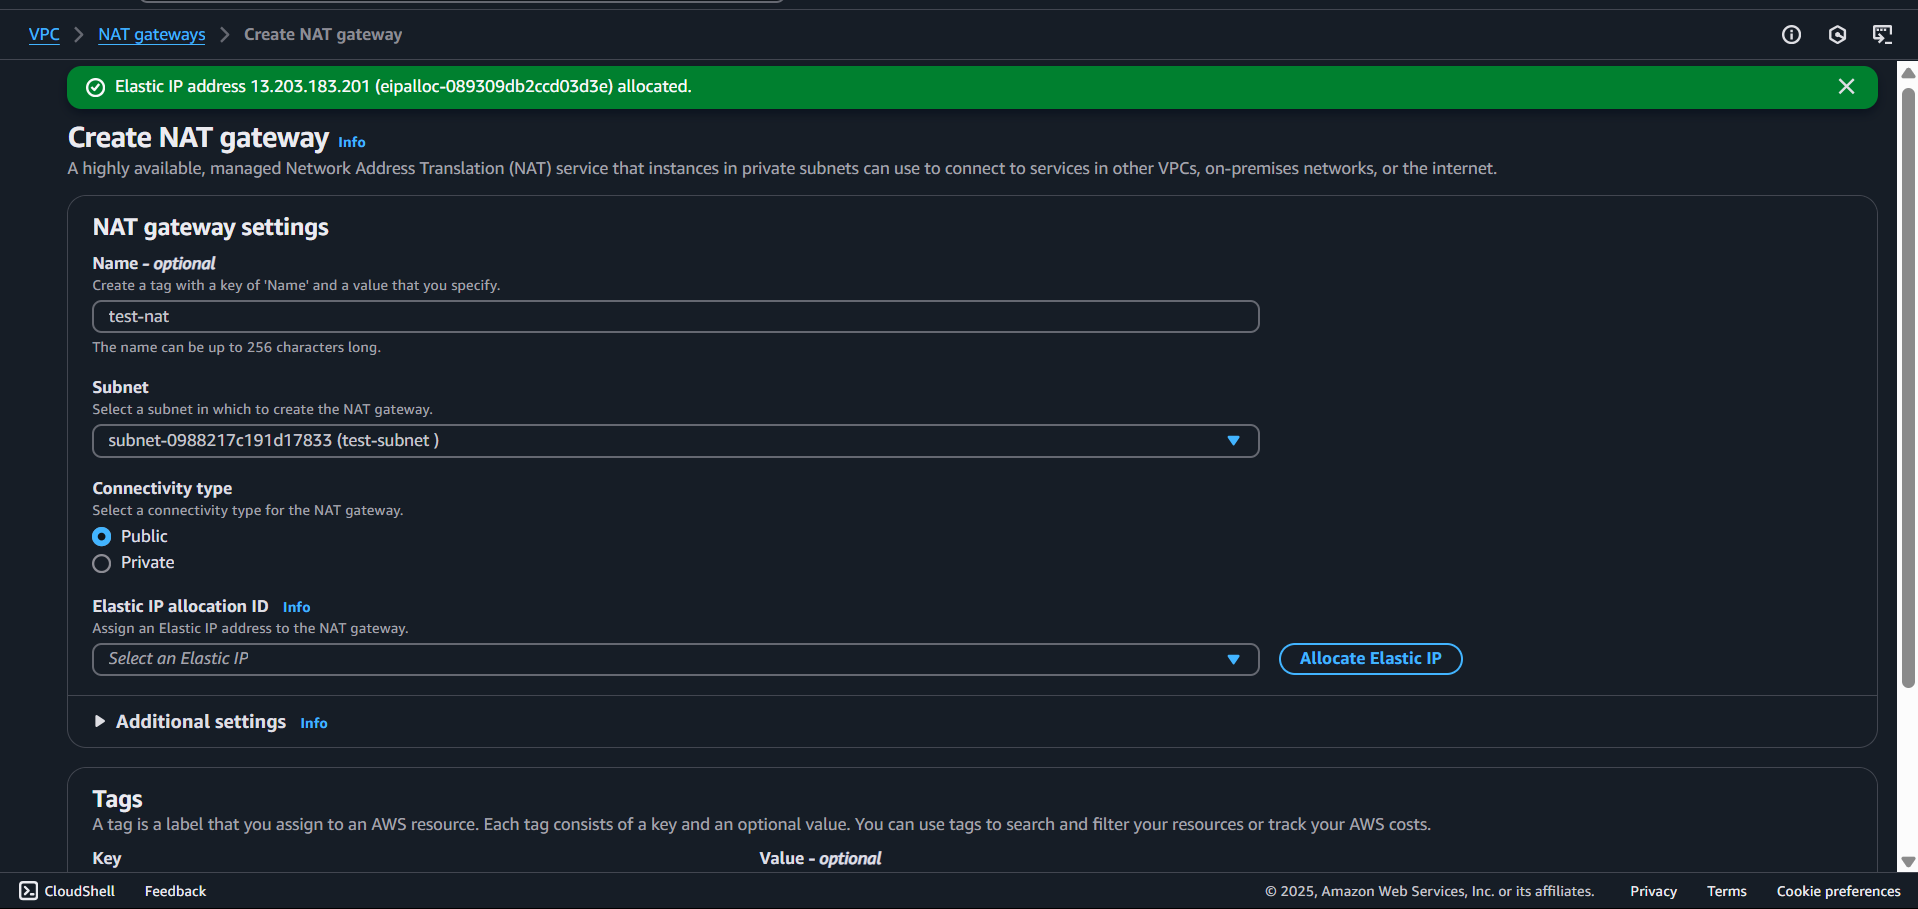
Create a NAT Gateway.
Now that you created a NAT gateway you have to route it through the route gateway.


Now that you've created a subnet, a NAT Gateway, and updated the route table, you can check connectivity between the instances as follows:
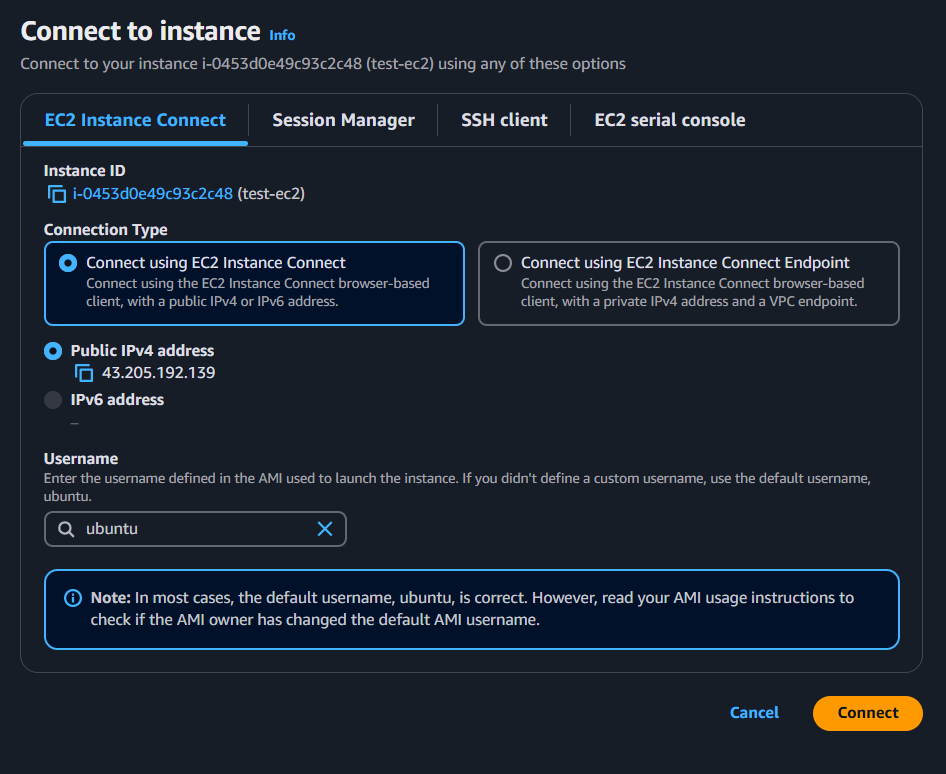
Step 1: Connect to Your Public EC2 Instance
First, SSH into your public instance (which has an Elastic IP):
bashCopyEditssh -i your-key.pem ec2-user@<public-ip>Replace
your-key.pemwith your private key file.Replace
<public-ip>with your public instance's IP address.
Step 2: SSH from Public to Private Instance
Once inside the public EC2 instance, use SSH to connect to the private instance using its private IP:
ssh -i your-key.pem ec2-user@<private-ip>
- Replace
<private-ip>with your private instance’s private IP address.
If successful, it means your NAT Gateway is correctly set up for outbound internet access.
Step 3: Check Internet Access from the Private Instance
If your private instance should have internet access via NAT Gateway, check connectivity by pinging a public website:
bashCopyEditping google.com
If the ping works, your NAT Gateway is working.
Step 4: Debugging Connectivity Issues
If SSH or ping fails:
Check Security Groups:
Public instance must allow inbound SSH (port 22) from your local machine.
Private instance must allow inbound SSH (port 22) from the public instance.
Outbound rules should allow all traffic.
Check Route Tables:
Public subnet should have a route to the internet via an Internet Gateway (IGW).
Private subnet should have a route to the NAT Gateway.
Check NAT Gateway Status:
- Ensure it is active and associated with the correct route table.
Troubleshooting Tips
1. If SSH Fails:
Check Security Groups:
Public instance should allow Inbound SSH (Port 22) from your IP.
Private instance should allow Inbound SSH (Port 22) from the public instance.
Outbound rules should allow all traffic.
2. If Ping Fails:
Ensure Peering Connection is Active.
Check Route Tables to ensure proper routing.
Verify Security Groups allow ICMP traffic.
Conclusion
In this guide, we covered: ✅ Creating two VPCs and launching EC2 instances.
✅ Setting up VPC Peering and configuring routes.
✅ Implementing a NAT Gateway for private subnets.
✅ Testing connectivity via SSH and ping.
This setup is essential for secure AWS networking and inter-VPC communication. 🚀
Social Links
Instagram 💻: instagram.com/sachinnn_72
Portfolio 🐦🔥: sachin-sharma-portfolio.vercel.app
Hashnode: s72tech.hashnode.dev
Subscribe to my newsletter
Read articles from Sachin directly inside your inbox. Subscribe to the newsletter, and don't miss out.
Written by
Sachin
Sachin
Hello Devs, I'm Sachin Sharma, a graduate student currently pursuing my master's degree. During my studies, I've decided to dive into DevOps and aim to land my first job in the field by January 2025. I'll be sharing my learning journey and experiences along the way. If you guys have any questions, feel free to ask!