Code: Feedforward Neural Network
 Retzam Tarle
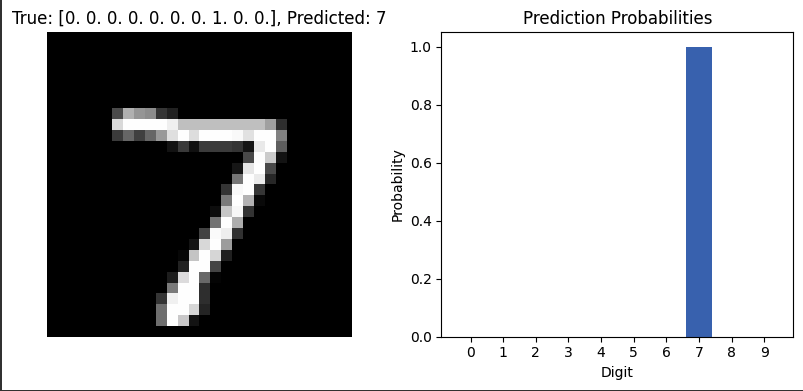
Hello 🤖,
As I said, we’ll write the actual code for all we learn. So we’ll take some weeks to code so we understand and apply what we’ve been learning in theory. We’ll start with the Feedfeedword Neural Network (FNN), which we learned about in chapter 21.
Problem
We’ll solve a classic neural network problem: Train a model to predict handwritten text. In our case, we’ll train an FNN model to predict handwrittetten digits from 0-9.
Dataset
We’ll also use the classic MNIST dataset for this. MNIST (Modified National Institute of Standards and Technology) is a popular dataset of handwritten digits (0-9) used in machine learning and deep learning research. It consists of:
60,000 training images and 10,000 test images.
Each image is 28×28 pixels grayscale (simply means black and white images, with values from black(0) - white(255))
The images are different handwritten images of 0-9, as shown in the image below:

Alright, since we have our training and test datasets, we can now start training our FNN model 🦾.
Solution
We’ll be using Google Colab; you can create a new notebook here. You can use any other ML text editors like Jupyter.
You can find the complete code pdf with outputs of each step here.
Data preprocessing
a. Load dataset: Here, we import the MNIST dataset from the Tensorflow library. Then, we print the shape of the dataset. We can see that the training images are 60,000 and the test images 10,000, with each image being 28×28 pixels.

b. Flatten images: As we know, each image is a 2D array 28×28. Each image would look like this:
[ 0, 255, 0, 255 ]
[ 233, 3, 0, 155]
[ 0, 255, 0, 255 ]
[ 233, 3, 0, 45]
We want to flatten each image to be a 1D image, so each row contains an image. So, each image would look like this:
[ 0, 255, 0, 255, 233, 3, 0, 155, 0, 255, 0, 255, 233, 3, 0, 45]

c. Normalize images: Next, we want all the image values to be between 0 and 1. Remember, our MNIST images are made of numbers 0 - 255. So 0=0 and 255=1.
d. One-hot encoding: Here, we want to encode the labels 0-9 with one-hot encoding. We learned about one-hot encoding in Chapter 3.
For MNIST (digits 0-9), each label is converted into a 10-element vector:
Digit 3 →
[0, 0, 0, 1, 0, 0, 0, 0, 0, 0]Digit 7 →
[0, 0, 0, 0, 0, 0, 0, 1, 0, 0]
We do this for both the train and test labels
Build Feedforward Neural Network
a. Build FNN: We don’t need to build an FNN neural network from scratch; there are already made libraries built by experts. In our solution, we’ll use the one from Tensorflow.
We learned about the features and philosophy of neural networks in chapter 21, you can brush that up to understand how we create the model.

Now, as we know, the neural network is made up of 3 layers: input, hidden, and output layers. The image above shows each layer creation with the number of layers and activation functions used. We also specify input_shape in the input layer to a 1D array of length 784.
Dropout here is a technique used to deactivate some neurons randomly so the model does not rely too much on any neuron and prevents overfitting. We use a dropout of 0.2, which is 20 percent of neurons.
So now we have an FNN model with an Input Layer, 2 Hidden Layers, and an Output Layer.
b. Compile FNN: We then compile the model, and it’s ready to use.

Here, we use the Adam optimizer, an algorithm used to improve model accuracy. Then, we set a loss function as well. The categorical_crossentropy function is great for classification tasks.
Train the FNN model: Here we train the model with our training datasets as shown in the image below.

The training will take a few minutes, then we can check our model accuracy. From the training logs you can see that with each epoch circle the model accuracy increases, the loss decreases and the validation accuracy increases as well which means our model is doing great. We then evaluate our model to check it’s accuracy, and we got 0.98 which 98% accuracy, smooth!

Deploy model: In our case here, we’ll try to use our newly created model to make some predictions using our test data sets.

The prediction value as shown above returns an array of integers for each number. eg [0, 0.2, 0.1, 0.7]. The sum of the predictions equal 1. If you remember we used one-hot encoding right so each position in the array belongs to a specific number. Let’s see it in action when we run some predictions.

The above image shows a prediction for 5 test images and our model got all of them correct! We can also see the confidence score which means how sure the model is above the prediction from lowest (0) - to highest (1).
Our model works well 🥂
This went well right? If you’ve been with us for the over 20 models we’ve deployed before this one this would be quite straightforward. If you are just joining us, you can take your time to go over it some more, practice, practice, and practice.
Thank you, the next Neural Network we’ll implement will be the Convolutional Neural Network, CNN. Ciao 👋
Subscribe to my newsletter
Read articles from Retzam Tarle directly inside your inbox. Subscribe to the newsletter, and don't miss out.
Written by
Retzam Tarle
Retzam Tarle
I am a software engineer.