Deploying a 3-Tier Application on AWS Using Terraform
 Ganesh Aravind Shetty G
Real-World Scenario: Deploying a Scalable Web Application
Imagine a scenario where a startup is launching a new e-commerce platform. They expect rapid growth and need a robust infrastructure to support their application. Here’s how a 3-tier architecture deployed on AWS using Terraform can meet their needs:
Networking: We start by creating a Virtual Private Cloud (VPC) to isolate our resources. Within this VPC, we set up public and private subnets. Public subnets host the web servers, while private subnets contain the application servers and the database.
Load Balancing: To ensure high availability and distribute incoming traffic, we deploy an Application Load Balancer (ALB). The ALB routes requests to multiple EC2 instances running the web application, allowing us to handle more users simultaneously.
Auto-Scaling: To manage varying traffic loads, we configure an Auto Scaling group for our EC2 instances. This group automatically adjusts the number of instances based on traffic patterns, ensuring optimal performance without overspending on resources.
Managed Database: For the database layer, we use AWS RDS. This managed service takes care of routine database tasks, allowing our team to focus on application development rather than database maintenance.
Static Assets: We leverage AWS S3 to store static assets like images, CSS, and JavaScript files. This offloads traffic from our web servers and improves load times for users.
DNS Management: Finally, we use AWS Route 53 for DNS management, ensuring that users can easily access our application through a friendly domain name.
In modern application development, scalability, security, and maintainability are crucial. A 3-tier architecture separates the application into:
Presentation Layer (Web Tier) — Handles user interactions.
Application Layer (App Tier) — Processes business logic.
Database Layer (DB Tier) — Manages data storage and retrieval.
This approach improves performance, security, and fault tolerance, making it ideal for cloud-native applications.
Prerequisites
An AWS account
Terraform installed on your local machine
An SSH key pair (
.pemfile) for connecting to EC2 instancesBasic understanding of AWS networking (VPC, Subnets, Security Groups, etc.)
GitHub Repository
You can find the project repository at: https://github.com/GANESHARAVIND-124/3-Tier-Application-on-AWS-Using-Terraform.git
1. Architecture Overview
Architecture Diagram
This Terraform project provisions a 3-Tier Architecture on AWS, which includes:
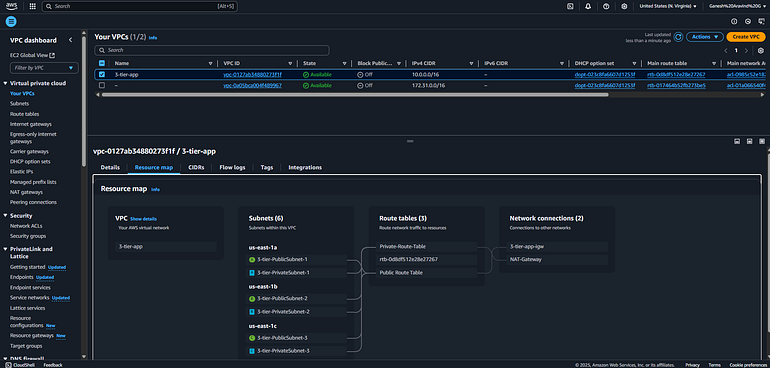
Networking Layer: VPC, Subnets (Public & Private), Internet Gateway, NAT Gateway, Route Tables.
Application Layer: Auto Scaling Group (ASG) for EC2 instances, Load Balancer (ALB), Security Groups.
Database Layer: Amazon RDS instance with a private subnet.
2. Infrastructure Overview
We will create:
The setup is modularized into separate Terraform modules:
Networking Module: Creates VPC, Subnets, Route Tables, NAT Gateway, Internet Gateway, and Security Groups.
Compute Module: Provisions EC2 instances inside an Auto Scaling Group (ASG) and attaches an ALB.
Database Module: Creates an Amazon RDS instance within a private subnet.
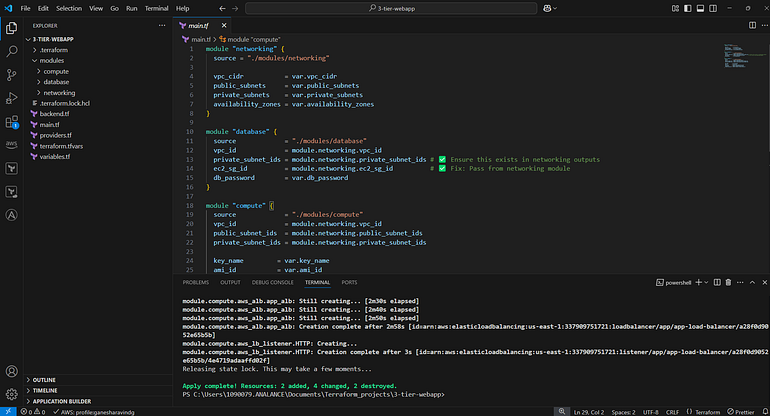
Networking Module (modules/networking)
Networking (virtual private cloud)
Resources Created:
VPC
Public and Private Subnets
Internet Gateway & NAT Gateway
Route Tables
Security Groups (for ALB & EC2)
Compute Module (modules/compute)

Compute(ALB,EC2,LaunchTemplates)
Resources Created:
Auto Scaling Group (ASG) with EC2 Instances
Launch Template with Ubuntu AMI (
ami-04b4f1a9cf54c11d0)Application Load Balancer (ALB)
Security Groups
Database Module (modules/database)
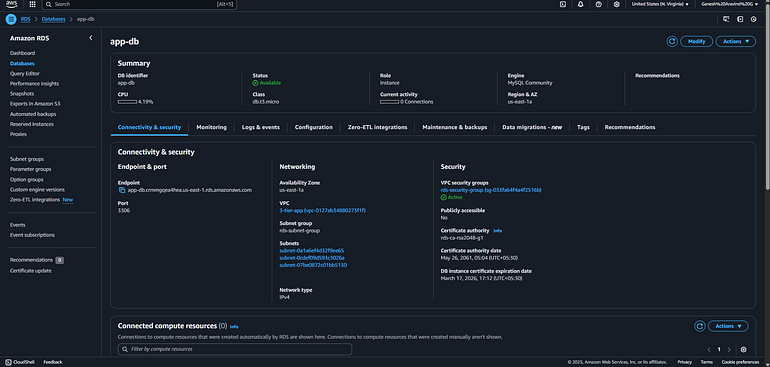
RDS(MySql)
Resources Created:
Amazon RDS instance
Security Group allowing EC2 instances to access RDS
3. Terraform Code Structure
Directory Structure
3-tier-webapp/
│
├── .terraform/                     # Terraform's internal files and state
│   ├── .terraform.lock.hcl         # Lock file for provider versions
│   ├── terraform.tfstate           # Current state of your infrastructure
│   └── modules/                    # Cached modules
│
├── backend.tf                      # Backend configuration for state management
├── main.tf                         # Main configuration file for resources
├── providers.tf                    # Provider configuration (e.g., AWS)
├── terraform.tfvars                # Variable values for the Terraform configuration
├── variables.tf                    # Variable definitions
│
├── modules/                        # Custom modules for organizing resources
│   ├── compute/                    # Module for compute resources (EC2, ALB, etc.)
│   │   ├── alb.tf                  # ALB configuration
│   │   ├── autoscaling.tf          # Auto Scaling configuration
│   │   ├── ec2.tf                  # EC2 instance configuration
│   │   ├── outputs.tf              # Outputs for the compute module
│   │   └── variables.tf            # Variables for the compute module
│   │
│   ├── database/                   # Module for database resources (RDS, etc.)
│   │   ├── rds.tf                  # RDS configuration
│   │   ├── outputs.tf              # Outputs for the database module
│   │   └── variables.tf            # Variables for the database module
│   │
│   └── networking/                 # Module for networking resources (VPC, subnets, etc.)
│       ├── vpc.tf                  # VPC configuration
│       ├── subnets.tf              # Subnet configuration
│       ├── nat.tf                  # NAT Gateway configuration
│       ├── security_groups.tf       # Security Groups configuration
│       ├── outputs.tf              # Outputs for the networking module
│       └── variables.tf            # Variables for the networking module
│
└── README.md                       # Documentation for the project
Initializing Terraform
terraform init
Planning the Deployment
terraform plan
Deploying the Infrastructure
terraform apply -auto-approve
Configure Terraform Remote State with S3 and DynamoDB:
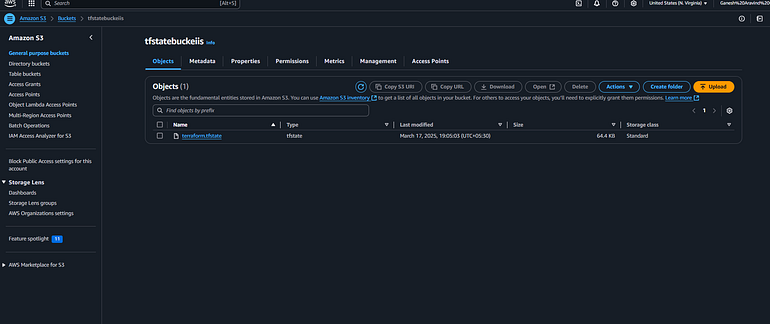
Simple Storage Service(S3)
Set up remote state management using Amazon S3 to store the Terraform state file and DynamoDB for state locking. This ensures that multiple team members can collaborate without conflicts and provides a reliable backup for the state file.
Why This Matters: Using remote state management is crucial for teams working on shared infrastructure. It prevents state file corruption due to concurrent modifications and enhances collaboration by allowing team members to work on the same infrastructure without conflicts.
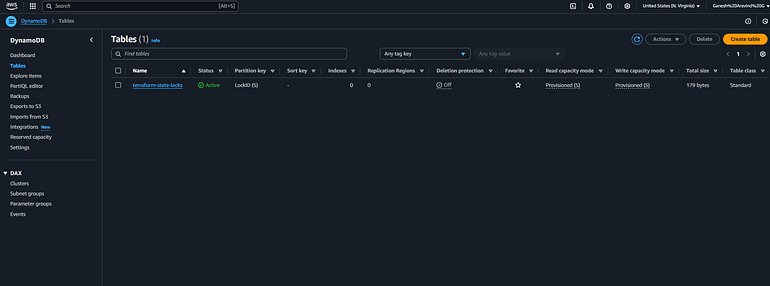
DynamoDB for State-locking files
4. Troubleshooting Common Issues
1️⃣ EC2 Instance Does Not Have a Public IP
Cause: The subnet is not configured to auto-assign a public IP.
Solution:
Go to AWS Console → VPC → Subnets
Click on the public subnet
Enable Auto-assign public IPv4 address
Alternatively, allocate and associate an Elastic IP to the instance.
2️⃣ Invalid AMI ID Error
Cause: AMI ID is incorrect.
Solution:
- Use the correct Ubuntu AMI ID for your region, e.g.,
ami-04b4f1a9cf54c11d0(us-east-1)
3️⃣ Security Group Error: Invalid ID
Cause: The referenced security group does not exist.
Solution:
Ensure dependencies between resources are correctly set.
Use Terraform
depends_onwhere necessary.
4️⃣ Auto Scaling Group Error: Key Pair Does Not Exist
Cause: The key pair used in the launch template does not exist.
Solution:
Create an EC2 key pair in the AWS Console.
Update Terraform code to use the correct key pair name.
5️⃣ ALB Works Inside Instances but Not Externally
Cause: Security group rules or missing public DNS resolution.
Solution:
Ensure the ALB security group allows inbound HTTP/HTTPS traffic.
Check that the ALB is associated with the correct public subnets.
Confirm that your DNS settings (Route53 or ALB DNS) are resolving correctly.
Validate application security group settings for correct inbound/outbound rules.
5. Destroying the Infrastructure
To clean up all resources:
terraform destroy -auto-approve
6. Conclusion
we explored the deployment of a scalable web application on AWS using a 3-tier architecture. By separating the application into distinct layers — Web, Application, and Database — we can achieve better performance, flexibility, and manageability. This architecture allows us to scale each component independently, ensuring that our application can handle varying traffic loads efficiently.
Using Terraform as our Infrastructure as Code (IaC) tool, we automated the provisioning of AWS resources, enabling us to maintain consistency and reduce manual errors. The benefits of version control, automation, and the ability to replicate environments make Terraform an invaluable asset for modern cloud deployments.
By leveraging AWS services such as EC2, ALB, RDS, S3, and Route 53, we built a robust infrastructure that not only meets the demands of a growing application but also simplifies management and enhances security.
As you embark on your journey to deploy scalable applications, consider adopting a 3-tier architecture and utilizing Terraform for your infrastructure needs. This approach not only streamlines the deployment process but also positions your application for success in a dynamic and ever-evolving digital landscape.
For those interested in the complete implementation, feel free to check out the GitHub Repository for the code and detailed setup instructions. Happy coding
If you found this helpful, consider sharing your learnings and improvements with the community!
Happy coding! 🚀
#AWS #Terraform #CloudComputing #DevOps #InfrastructureAsCode #WebDevelopment #Scalability #3TierArchitecture #LoadBalancing #AutoScaling#ManagedDatabase #S3#Route53 #TechBlog #CloudNative #AWSCommunity #DevCommunity
Subscribe to my newsletter
Read articles from Ganesh Aravind Shetty G directly inside your inbox. Subscribe to the newsletter, and don't miss out.
Written by
Ganesh Aravind Shetty G
Ganesh Aravind Shetty G
DevSecOps Engineer Persistent and detail-oriented DevOps engineer with Experience in Cloud computing, Information security, facilitating Agile application updates, building, scaling, and automating infrastructures. Good hands-on knowledge of Source Code Management (Version Control System) tools like Git and common SCM practices such as Branching strategies. Proficient in the following; Developing and maintaining Continuous Integration/ Delivery pipelines. Experience with automation/ integration tools like Jenkins. Hands-on knowledge of software containerization platforms like Docker and container orchestration tools like Kubernetes and Docker Swarm. Tools: Gitlab, Jenkins, IBM Urban Code Deploy, Synk, MySQL, Docker, Jenkins, Github, Sonarqube. Operating System: Window, Ubuntu