Creating a CyberArk Central Policy Manager plugin for an API using the new REST API framework
 Tim Schindler
CyberArk has released their new framework for creating Central Policy Manager (CPM) plugins that interact with REST APIs. Unlike WSChains, this framework is documented and supported by CyberArk, making it worthwhile to become familiar with it. CyberArk is already using it, as it is the framework on which the new CyberArk Digital Vault platform is built, among others.
Additionally, it offers an alternative to the Credential Management .NET SDK for storing credentials generated by target systems (or “access keys”), which is becoming increasingly common.
To complete our CyberArk Shopizer Administrator extensions series, we will use it to build a CPM plugin that manages Shopizer users through the Shopizer API.
Developing the REST API plugin
The documentation for the REST API framework is quite comprehensive so there is no need to repeat it. After giving it a read-through and ensuring we’ve met the prerequisites for the framework, we can jump in.
Creating a new platform
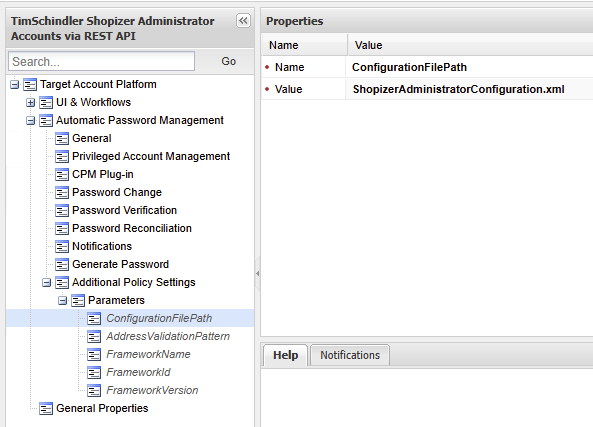
After we import the REST API framework CPM plugin all that needs to be done is cloning it for use with our Shopizer platform and under Additional Policy Settings updating two parameters:
Defining
8080as the value forPort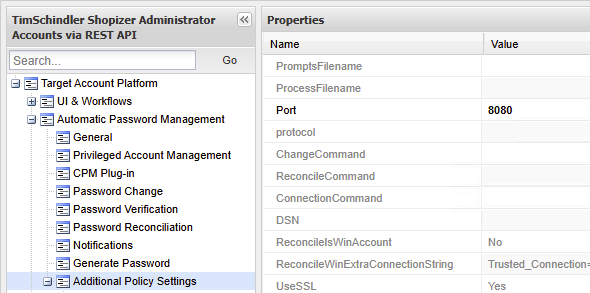
- Changing the value for
ConfigurationFilePathunder to the filename that will contain the Shopizer configuration:ShopizerAdministratorConfiguration.xml
Creating the parameters file for testing
When developing the CPM plugin, we will test it by invoking it manually. Our .ini will be similar to what we used for WSChains with slight modifications:
[targetaccount]
username=shopizeradministrator@timschindler.dev
newpassword=Password2
password=Password2
safename=Safename
foldername=Foldername
objectname=Objectname
PolicyID=PolicyID
; The machine where the Shopizer instance is running.
Address=192.168.178.61
; The port the Shopizer REST API is running on.
Port=8080

[extrapass3]
username=reconcile@timschindler.dev
password=Password1

[extrainfo]
; Path to the configuration file.
ConfigurationFilePath=ShopizerAdministratorConfiguration.xml
AddressValidationPattern=.*
Debug=Yes
ManagementType=password
After adding ConfigurationFilePath and AddressValidationPattern we can invoke it from the root of the Central Policy Manager’s installation folder with .\bin\CANetPluginInvoker.exe shopizerrestplugin.ini <verifypass/changepass/reconcilepass> CyberArk.Extensions.Generic.Plugin.RestAPI.dll True
Writing the configuration file
Luckily, we've already done most of the hard work when developing the WSChains plug-in. We know the necessary API calls for each operation, their URLs, and the request and possible response bodies. We just need to format the data to match what the REST API framework expects. We can refer to the Shopizer API documentation as needed.
To begin, we copy the sample configuration file provided with the framework, SampleRestAPIPlatformConfiguration.xml, and rename it to ShopizerAdministratorConfiguration.xml.
Verify
We’ll leverage the Parameters section for the sake of cleaner code, removing almost everything but opting to leave AddressWithValidation as it is.
We add the parameter AddressWithValidationAndPort that combines the address (host) and port properties along with the scheme, which is hard-coded to be http as the Shopizer instance we are developing against does not have a HTTPS listener.
<Parameters>
    <Parameter name="AddressWithValidation" validationPattern="{{AddressValidationPattern}}">{{Address}}</Parameter>
    <Parameter name="AddressWithValidationAndPort">http://{{AddressWithValidation}}:{{Port}}</Parameter>
</Parameters>
We only need a single APICall in the APICalls section:
<APICall>
    <Request name="LogonAsTargetAccount" method="POST">
        <URL>{{AddressWithValidationAndPort}}/api/v1/private/login</URL>
        <Headers>
            <Header key="Content-Type">application/json</Header>
        </Headers>
        <Body>
                    {
                    "username": "{{Username}}",
                    "password": "{{Password|JsonEscape}}"
                    }
        </Body>
    </Request>
    <Responses>
        <Response name="SuccessfulLogonResponse" type="valid" format="json" statusCode="200">
            <Parse>
                <ParseBody>
                    <Parameter name="id" path="id" />
                    <Parameter name="token" path="token" secure="true"/>
                </ParseBody>
            </Parse>
        </Response>
        <Response name="IncorrectPassword" type="error" statusCode="401">
            <Parse>
                <ParseBody>
                    <Parameter name="ErrorMessage" path="message"/>
                </ParseBody>
            </Parse>
            <ErrorMessage name="IncorrectPasswordMsg" returnCode="2001" description="{{ErrorMessage}}"/>
        </Response>
    </Responses>
</APICall>
The Request element does not have any magic to it. It is exactly what we would see if we were making the call using a tool such as cURL or PowerShell’s Invoke-RestMethod. The only part that is specific to the REST API framework is how we can JSON escape placeholders using placeholder modifiers.
We have two Response child elements in the Responses element: one representing a successful logon response and a failed logon due to an incorrect password. In the successful logon response, we parse out the returned id and token as we can reuse the Response in other APICall elements. In the case of a failed login, we parse out the message so it can be displayed in the PVWA.
The last piece is defining the Request name in the verifypass chain in the Chains element. With that, our ShopizerAdministratorConfiguration.xml reads as below:
<RestPlugin>

    <Parameters>
        <Parameter name="AddressWithValidation" validationPattern="{{AddressValidationPattern}}">{{Address}}</Parameter>
        <Parameter name="AddressWithValidationAndPort">http://{{AddressWithValidation}}:{{Port}}</Parameter>
    </Parameters>

    <ErrorMessages/>

    <APICalls>
        <APICall>
            <Request name="LogonAsTargetAccount" method="POST">
                <URL>{{AddressWithValidationAndPort}}/api/v1/private/login</URL>
                <Headers>
                    <Header key="Content-Type">application/json</Header>
                </Headers>
                <Body>
                    {
                    "username": "{{Username}}",
                    "password": "{{Password|JsonEscape}}"
                    }
                </Body>
            </Request>
            <Responses>
                <Response name="SuccessfulLogonResponse" type="valid" format="json" statusCode="200">
                    <Parse>
                        <ParseBody>
                            <Parameter name="id" path="id" />
                            <Parameter name="token" path="token" secure="true"/>
                        </ParseBody>
                    </Parse>
                </Response>
                <Response name="IncorrectPassword" type="error" statusCode="401">
                    <Parse>
                        <ParseBody>
                            <Parameter name="ErrorMessage" path="message"/>
                        </ParseBody>
                    </Parse>
                    <ErrorMessage name="IncorrectPasswordMsg" returnCode="2001" description="{{ErrorMessage}}"/>
                </Response>
            </Responses>
        </APICall>
    </APICalls>

    <Chains>
        <Chain name="verifypass">
            <Request name="LogonAsTargetAccount" />
        </Chain>
    </Chains>

</RestPlugin>
Even though we are not using ErrorMessages, we need to at least define <ErrorMessages/> as the REST API framework expects the element to be there.
Testing the plugin, we see positive progress:
PS > .\bin\CANetPluginInvoker.exe shopizerrestplugin.ini verifypass CyberArk.Extensions.Generic.Plugin.RestAPI.dll True
The plugin ended successfully (RC = 0)
PS >
Change
We need one more APICall that is used to change the password.
The additional APICall in the APICalls element for our change operation is:
<APICall>
    <Request name="ChangeAsTargetAccount" method="PATCH">
        <URL>{{AddressWithValidationAndPort}}/api/v1/private/user/{{id}}/password</URL>
        <Headers>
            <Header key="Content-Type">application/json</Header>
            <Header key="Authorization">Bearer {{token}}</Header>
        </Headers>
        <Body>
                    {
                    "password": "{{password|JsonEscape}}",
                    "changePassword":"{{newpassword|JsonEscape}}"
                    }
        </Body>
    </Request>
    <Responses>
        <Response name="ValidChangeResponse" type="valid" statusCode="200"/>
        <Response name="InternalErrorResponse" type="error" statusCode="500">
            <Parse>
                <ParseBody>
                    <Parameter name="ErrorMessage" path="error"/>
                </ParseBody>
            </Parse>
            <ErrorMessage name="InternalErrorResponseMsg" returnCode="2002" description="{{ErrorMessage}}"/>
        </Response>
    </Responses>
</APICall>
The Request element is simple. We include the Bearer token from the LogonAsTargetAccount Request as an Authorization header.
A successful password change gives a status code 200 with no extra details to process. We have a response for when the API returns a 500 — this is the only code the Shopizer API seems to give when the new password doesn't meet complexity requirements.
Adding the below Chain element to Chains and a successful test has us moving on to the reconcile operation.
<Chain name="changepass">
    <Request name="LogonAsTargetAccount" />
    <Request name="ChangeAsTargetAccount" />
</Chain>
PS > .\bin\CANetPluginInvoker.exe shopizerrestplugin.ini changepass CyberArk.Extensions.Generic.Plugin.RestAPI.dll True
The plugin ended successfully (RC = 0)
PS >
Reconcile
Compared to the verify and change operation, reconcile is more complicated. Our reconcile operation needs to:
Log in as the reconciliation account.
Get the details of the target account.
Set the new password for the target account, using the details from step 2.
We can create a new APICall element just for logging in as the reconciliation account, but since the request and responses would be the same as our current APICall for logging in as the target account during the verify operation, this would lead to a lot of repetition.
By using dynamic account types for placeholders, we can modify the existing APICall to work for logging in as either the target account or the reconciliation account.
The APICall element is updated to:
<APICall>
    <Request name="Logon" method="POST">
        <URL>{{AddressWithValidationAndPort}}/api/v1/private/login</URL>
        <Headers>
            <Header key="Content-Type">application/json</Header>
        </Headers>
        <Body>
                    {
                    "username": "{{reconcileaccountORtargetaccount\username}}",
                    "password": "{{reconcileaccountORtargetaccount\password|JsonEscape}}"
                    }
                </Body>
    </Request>
    <Responses>
        <Response name="SuccessfulLogonResponse" type="valid" format="json" statusCode="200">
            <Parse>
                <ParseBody>
                    <Parameter name="id" path="id" />
                    <Parameter name="token" path="token" secure="true"/>
                </ParseBody>
            </Parse>
        </Response>
        <Response name="IncorrectPassword" type="error" statusCode="401">
            <Parse>
                <ParseBody>
                    <Parameter name="ErrorMessage" path="message"/>
                </ParseBody>
            </Parse>
            <ErrorMessage name="IncorrectPasswordMsg" returnCode="2001" description="{{ErrorMessage}}"/>
        </Response>
    </Responses>
</APICall>
Besides updating the Body element of the Request, we change the name attribute to Logon to show that it's not used for only logging in as the target account anymore. Be sure to update the verifypass and changepass chains with the new name of the Request element!
How do dynamic account type placeholders work? The documentation states:
The plugin searches for the ParameterName in the accounts declared from left to right and takes the first occurrence it finds. If the parameter is not found in any account, the replacement fails. For example, {{logonaccountORextrapass2ORtargetaccount\username}} tries to retrieve the username in the logon account. If the plugin cannot find it, it tries to retrieve the username from the extrapass2 account. If not found there as well, the plugin tries to retrieve the username from the target account. If the username parameter is not found in any of the declared accounts, the plugin fails.
The CPM only gives the reconciliation account's details during a reconcile operation. Since we list reconcileaccount first in the dynamic type placeholder, the plugin uses the reconcile account details for the Logon Request during the reconcile operation and uses the target account details for verify and change operations.
We still need the APICall elements for retrieving the target account’s details and the actual password change.
To retrieve the target account’s details needed as part of the password change process:
<APICall>
    <Request name="GetUsersInformation" method="GET">
        <URL>{{AddressWithValidationAndPort}}/api/v1/private/users</URL>
        <Headers>
            <Header key="Content-Type">application/json</Header>
            <Header key="Authorization">Bearer {{token}}</Header>
        </Headers>
        <Body></Body>
    </Request>
    <Responses>
        <Response name="ValidGetUsersInformationResponse" type="valid" format="json" statusCode="200">
            <Parse>
                <ParseBody>
                    <Parameter name="targetaccount\id" path="..data[?(@.userName=='{{username}}')].id"/>
                    <Parameter name="targetaccount\active" path="..data[?(@.userName=='{{username}}')].active"/>
                    <Parameter name="targetaccount\defaultLanguage" path="..data[?(@.userName=='{{username}}')].defaultLanguage"/>
                    <Parameter name="targetaccount\emailAddress" path="..data[?(@.userName=='{{username}}')].emailAddress"/>
                    <Parameter name="targetaccount\firstName" path="..data[?(@.userName=='{{username}}')].firstName"/>
                    <Parameter name="targetaccount\groups" path="..data[?(@.userName=='{{username}}')].groups"/>
                    <Parameter name="targetaccount\lastName" path="..data[?(@.userName=='{{username}}')].lastName"/>
                    <Parameter name="targetaccount\merchant" path="..data[?(@.userName=='{{username}}')].merchant"/>
                    <Parameter name="targetaccount\username" path="..data[?(@.userName=='{{username}}')].userName"/>
                </ParseBody>
            </Parse>
        </Response>
        <Response name="InternalErrorResponse"/>
    </Responses>
</APICall>
The only thing we are doing for the first time is parsing the response using JSONPath.
We used XPath before with the Shopizer PSM connection component, and JSONPath works in a similar way. We use it to extract user details from the response. Since the APICall element calls a URL that returns all Shopizer users, we use JSONPath to find the information we need for the target account, using the username placeholder in the expression.
In the final APICall element, we include the new password along with the details extracted from the previous APICall:
<APICall>
    <Request name="ChangeAsReconcileAccount" method="PUT">
        <URL>{{AddressWithValidationAndPort}}/api/v1/private/user/{{targetaccount\id}}</URL>
        <Headers>
            <Header key="Content-Type">application/json</Header>
            <Header key="Authorization">Bearer {{token}}</Header>
        </Headers>
        <Body>
                    {
                    "active": {{targetaccount\active}},
                    "defaultLanguage": "{{targetaccount\defaultLanguage}}",
                    "firstName": "{{targetaccount\firstName}}",
                    "groups:": {{targetaccount\groups}},
                    "lastName": "{{targetaccount\lastName}}",
                    "password": "{{newpassword}}",
                    "repeatPassword": "{{newpassword}}",
                    "store": "{{targetaccount\merchant}}",
                    "emailAddress": "{{targetaccount\emailAddress}}",
                    "userName": "{{targetaccount\username}}"
                    }
                </Body>
    </Request>
    <Responses>
        <Response name="ValidReconcileChangePasswordResponse" type="valid" statusCode="200"/>
        <Response name="InternalErrorResponse"/>
    </Responses>
</APICall>
Finally, our Chains element looks like:
<Chains>
    <Chain name="verifypass">
        <Request name="Logon" />
    </Chain>
    <Chain name="changepass">
        <Request name="Logon" />
        <Request name="ChangeAsTargetAccount" />
    </Chain>
    <Chain name="reconcilepass">
        <Request name="Logon" />
        <Request name="GetUsersInformation" />
        <Request name="ChangeAsReconcileAccount" />
    </Chain>
</Chains>
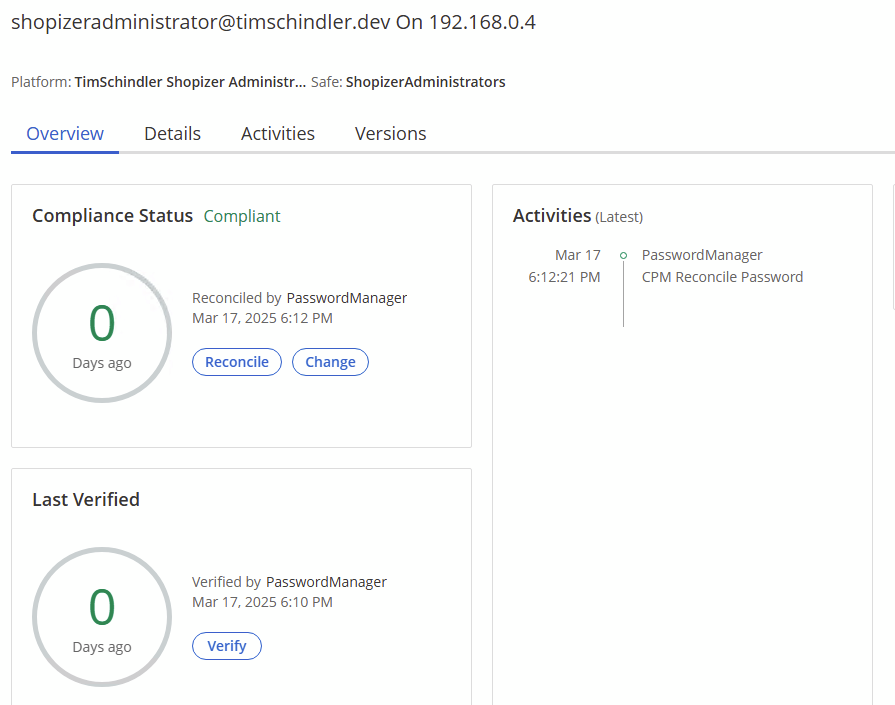
In the end, what matters is that the plugin works when invoked by the CPM so we would be remiss not to ensure it works as we expect. Invoking the reconcile in the PVWA versus invoking it manually we see success:
Conclusion
Creating a CyberArk Central Policy Manager plugin using the new REST API framework offers a robust and supported method for managing credentials through REST APIs. This approach not only aligns with CyberArk's latest platform developments but also provides a documented alternative to older methods like WSChains.
By following the documentation and leveraging the flexibility of the REST API framework, we can efficiently build plugins tailored to specific applications, such as managing Shopizer administrator users.
See the below GitHub repository for all the platform files.
https://github.com/aaearon/cyberark-shopizer-admin-extensions
Subscribe to my newsletter
Read articles from Tim Schindler directly inside your inbox. Subscribe to the newsletter, and don't miss out.
Written by
Tim Schindler
Tim Schindler
Originally from the USA, working in Amsterdam, Netherlands in the digital identity space.