Linux Training : Section 7 (Part-7)
 Aditya Dev Shrivastava
Kickstart (Automate Linux Installation)
Kickstart is a method to automate the Linux installation without the need for nay intervention form the user.
With the help of kickstart you can automate questions that are asked during the installation.
Example:
Language and time zone
How the drives should be partitioned
Which packages should be installed etc.
Purpose» For one Linux installation its fine to setup the machine manually, but for setup of 30-40 machines, it will be difficult. So, to remove the dependency, this concept got introduced. (Automation software are in used such as Ansible)
Steps:
Choose a Kickstart server and create/edit a Kickstart file
Make the Kickstart file available on a network location
Make the installation source available
Make boot media available for client which will be used to begin the installation
Start the Kickstart installation
LAB-
Identify the server
Take a snapshot of the server
Install kickstart configurator (for version 7 only)
yum install system-config-kickstartStart the kickstart file configurator and define parameters OR use the
/root/anaconda-ks.cfgsystem-config-kickstart(To start the configurator)We will use anaconda installation kickstart file and change the hostname only
Make sure httpd package is installed
yum install httpdrpm -qa | grep httpdsystemctl start httpdsystemctl enable httpdCopy kickstart file to httpd directory and change the permissions
cp /root/anaconda-ks.cfg /var/www/htmlchmod a+r /var/www/html/anaconda-ks.cfgsystemctl stop/disable firewalldcheck file through browser on another PC
http://192.168.1.10/anaconda-ks.cfgCreate a new VM and attach the CentOS iso image
Change the network adapter to Bridged adapter
Hit Esc
boot: linux ks=http://192.168.1.10/anaconda-ks.cfgWait and enjoy the installation
Kickstart for clients with static IP
boot: linux ks=http://server.exmaple.com/ks.cfg ksdevice=eth0 IP:192.168.1.10 netmask=255.255.255.0 gateway=182.168.1.1
Where:
ksdevice » is the network adapter of the client
IP » IP you are assigning to the client
netmask » Subnet mask for the client
gateway » Gateway IP address for the client
Ansible
Ansible is a suite of software tools that enables infrastructure as code. It is open-source and the suite includes software provisioning, configuration management, and application deployment functionality.
It is a automation tool, which helps in Software Deployment, Config Management, Server Provisioning.
It is a Agent-less (no need extra software), it read the YAML code for writing the playbook.
An Ansible playbook is a file that contains instructions for automating tasks on remote hosts. Playbooks are written in YAML, a human-readable markup language.
Example-
Let’s say you have to install a software in 100 machines, instead of doing it manually, you go with Ansible.
You will create a playbook in YAML which will contain the details like Install Software, Set Configuration…etc.
When playbook will execute it will automatically connects with all those 100 machine servers and it will save your and company time.
YAML File Example-

LAB-
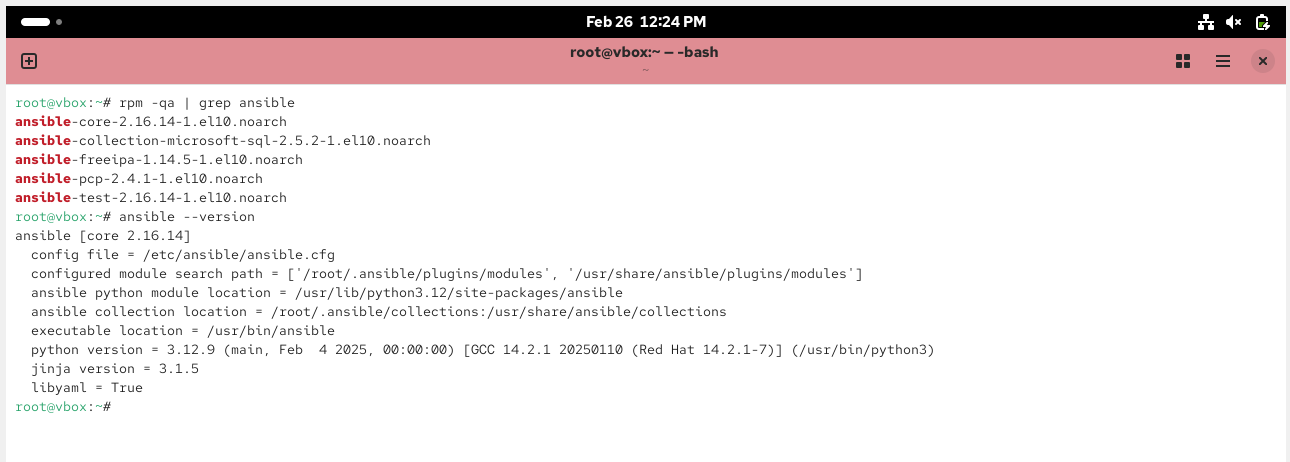
Install and Verify Ansible
Configure Ansible hosts file
vi /etc/ansible/hosts
Verify the Configuration settings

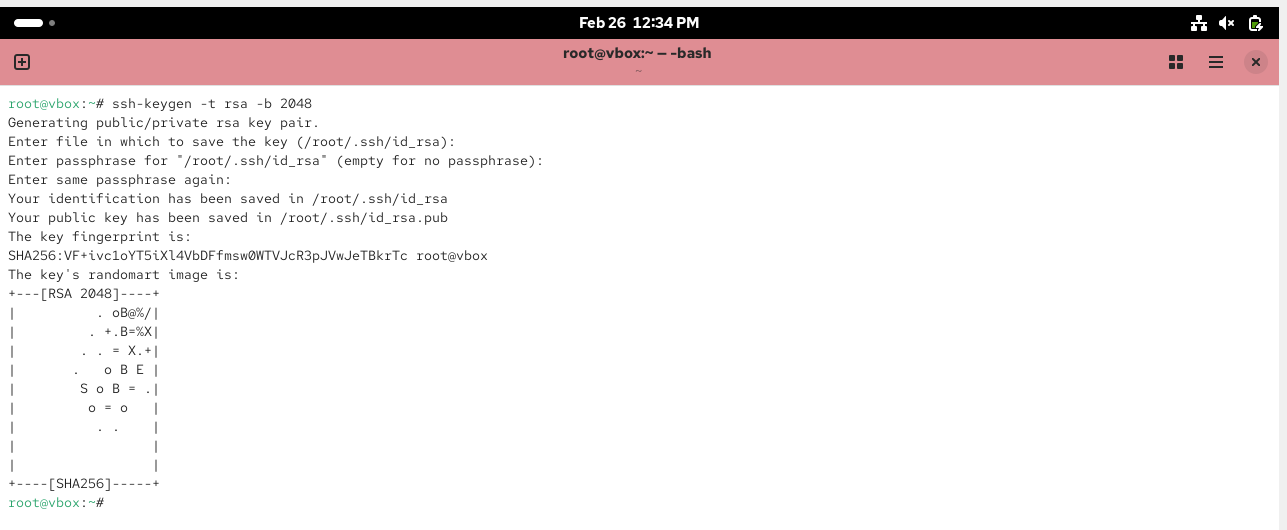
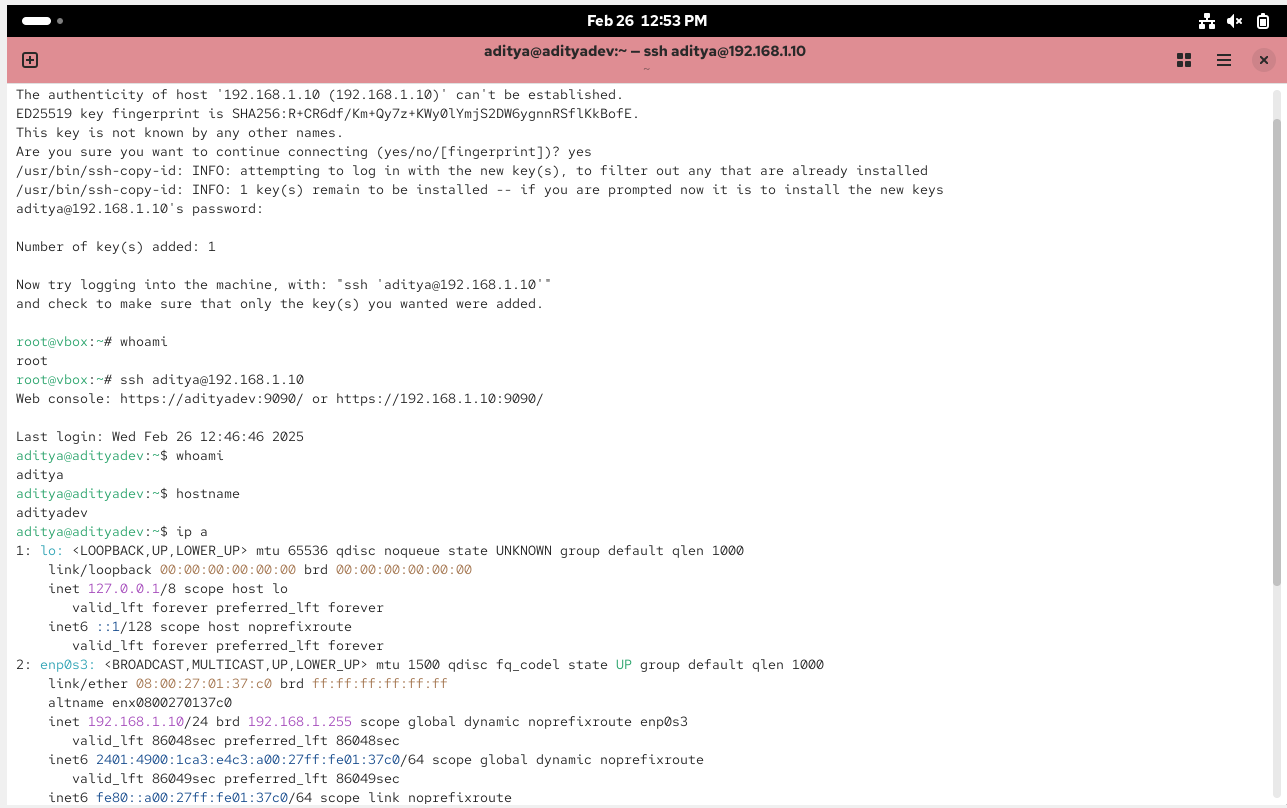
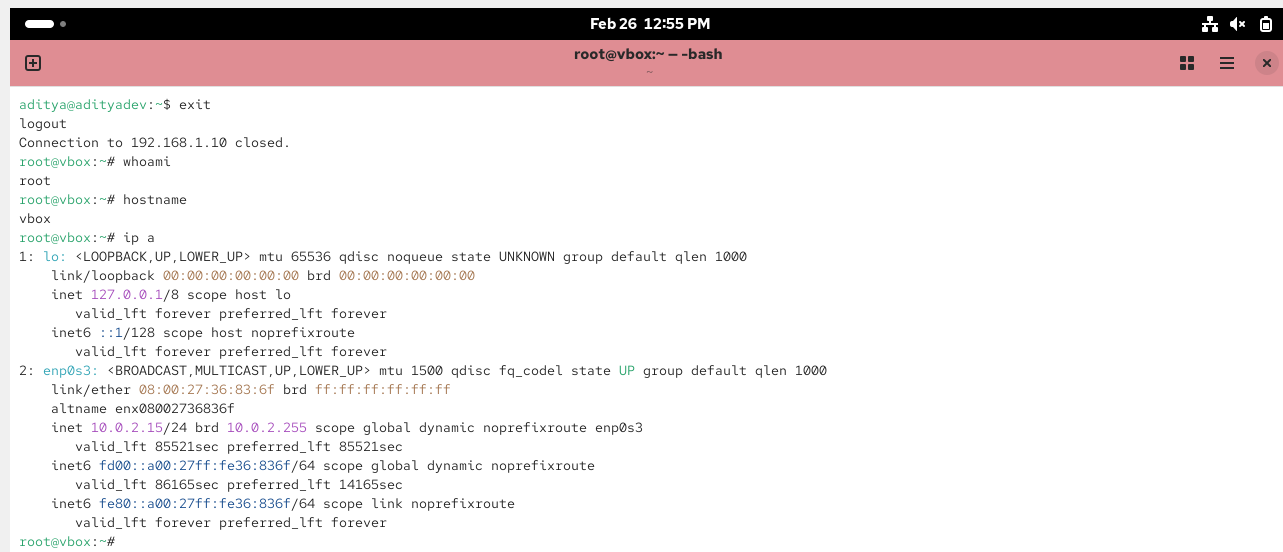
Generate SSH key pair
Create the Ansible Playbook to Install Apache Server


check for httpd package, not installed, so using YAML file will install the package-


kindly note, file should be in this format only


OpenVPN
A VPN, which stands for virtual private network, establishes a digital connection between your computer and a remote server owned by a VPN provider, creating a point-to-point tunnel that encrypts your personal data, masks your IP address, and lets you sidestep website blocks and firewalls on the internet. This ensures that your online experiences are private, protected, and more secure.
OpenVPN is a free, open-source protocol that creates secure connections between devices over the internet. It's a popular choice for securing online activity and privacy.
What is the difference between a VPN and OpenVPN? A VPN is a tool that encrypts your data and masks your IP address to create a secure and private connection online. OpenVPN, on the other hand, is one of the protocols used to create that VPN connection.
LAB-
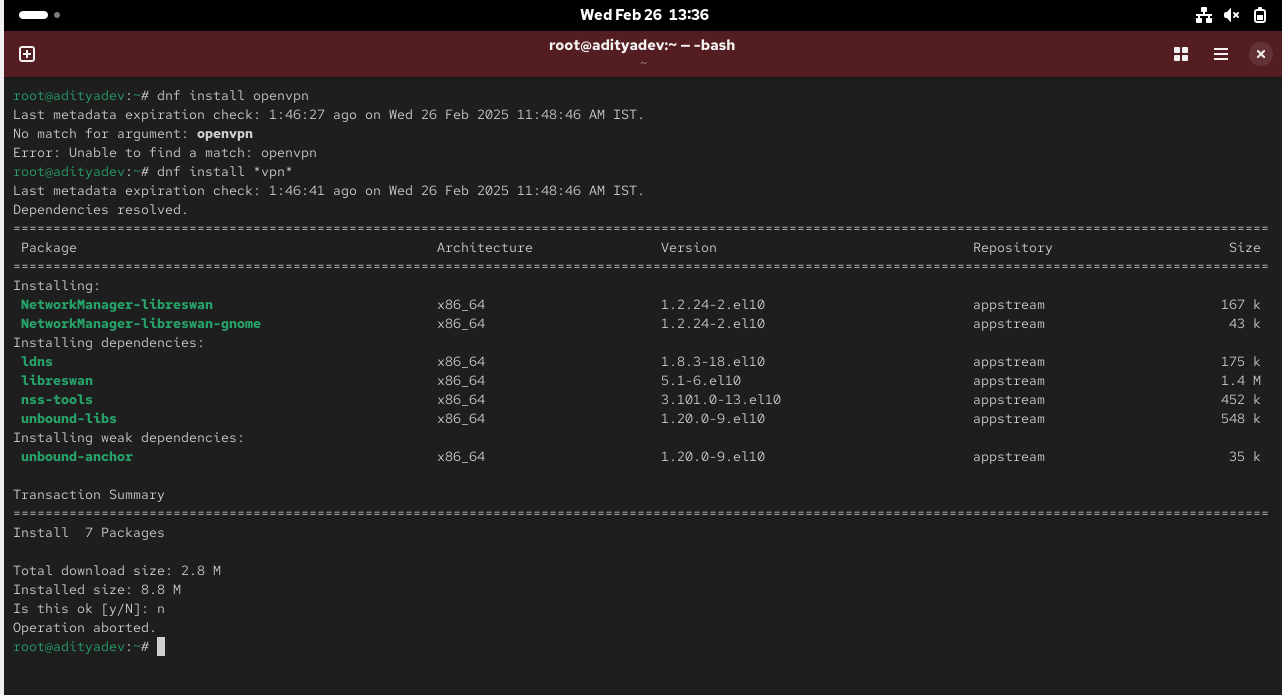
Since, not able to find the package in CentOS10 as openvpn, so, will not be able to proceed further with hands-on.
Step 1: Install OpenVPN and Easy-RSA
dnf install epel-release -y
rpm -qa | grep openvpn
dnf install openvpn easy-rsa –y
Step 2: Set up Easy-RSA for OpenVPN
cp -rv /usr/share/easy-rsa/3.1.6/* /etc/openvpn/
cd /etc/openvpn/
./easyrsa init-pki
./easyrsa build-ca nopass
./easyrsa gen-req server nopass
./easyrsa sign-req server server
./easyrsa gen-req client nopass
./easyrsa sign-req client client
./easyrsa gen-dh
openvpn --genkey secret ta.key
Step 3: Move Certificates and Keys
mv pki/ca.crt pki/dh.pem /etc/openvpn/
mv pki/issued/server.crt /etc/openvpn/
mv pki/private/server.key /etc/openvpn/
Step 4: Configure OpenVPN Server
cp -rv /usr/share/doc/openvpn/sample/sample-config-files/server.conf /etc/openvpn/server/
vi /etc/openvpn/server/server.conf # Customize server config if needed
vi /etc/sysctl.conf # Enable IP forwarding
net.ipv4.ip_forward = 1
sysctl -p
chmod 600 /etc/openvpn/server/server.conf /etc/openvpn/*.key /etc/openvpn/*.crt
Step 5: Configure Firewall and Start OpenVPN Service
firewall-cmd --add-service=openvpn --permanent
firewall-cmd --add-masquerade --permanent
firewall-cmd --reload
systemctl start openvpn-server@server.service
systemctl enable openvpn-server@server.service
systemctl status openvpn-server@server.service
Step 6: Set Up OpenVPN Client
dnf install openvpn –y
cd /etc/openvpn/
scp /etc/openvpn/ca.crt /etc/openvpn/ta.key /etc/openvpn/pki/issued/client.crt /etc/openvpn/pki/private/client.key root@192.168.100.178:/etc/openvpn/
cp /usr/share/doc/openvpn/sample/sample-config-files/client.conf /etc/openvpn/client/
vi /etc/openvpn/client/client.conf # Update server IP: 192.168.100.167
chmod 600 /etc/openvpn/*.key /etc/openvpn/*.crt /etc/openvpn/client/client.conf
openvpn --config /etc/openvpn/client/client.conf
DHCP
A DHCP Server is a network server that automatically provides and assigns IP addresses, default gateways and other network parameters to client devices. It relies on the standard protocol known as Dynamic Host Configuration Protocol or DHCP to respond to broadcast queries by clients.
DHCP » Dynamic Host Configuration Protocol
In order to communicate over the networks, a computer needs to have and IP address
DHCP server is responsible to automatically assign IP addresses to servers, laptops, desktops, and other devices on the network.
IMP Points-
Right now in our home how IPs are assigned to our devices?
- The router or gateway given to you by your ISP provider
How IPs are assigned in corporate world?
- Dedicated routers run DHCP service to assign IPs on the network
Steps-
Pick a server to be your DHCP and take a snapshot
Assign a static IP to the DHCP server » vi /etc/sysconfig/network/enp0s3 OR using nmtui GUI
Install package » yum install dhcp
Edit the configuration file with desired parameter
vi /etc/dhcp/dhcp.conf
cp /usr/share/doc/dhco-x.x.x/dhcp.conf.example /etc/dhcp/dhcpd.conf
Start dhcpd service » systemctl start/enable dhcp
Disable firewall
Switch DHCP service form your router/modem to your new DHCP server
Login to your ISP provider router
Disable dhcp and enable forwarding to the new dhcp server
Proxy server in Linux (Squid)
A proxy server is a server application that acts as an intermediary between a client requesting a resource and the server providing that resource. It improves privacy, security, and possibly performance in the process.

It Hides real location » Secure browsing » May boost speed » Access blocked content
Shields online activity » Adds privacy and control
Squid Proxy Server
Manages internet traffic
Speeds up browsing
Stores copied of websites and files
Provides faster access without re-downloading
Saves bandwidth
Blocks websites or control access
Default Port: 3128
squid.conf » /etc/squid
LAB-
Install package-

Start the service-
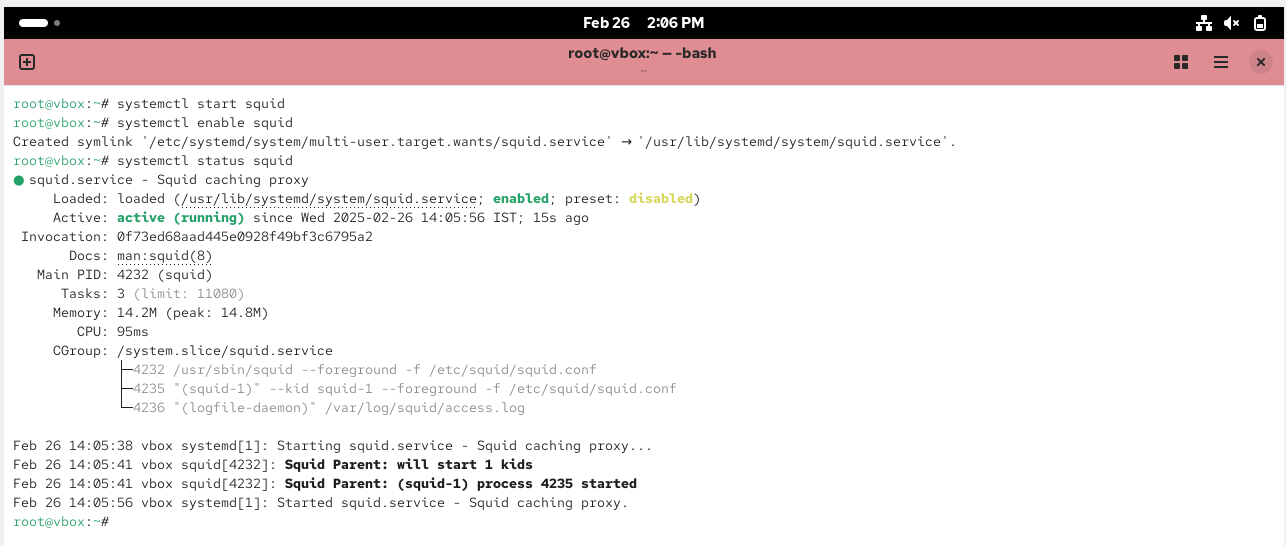
Edit conf file-

Create new file and add the site you want to block-

Re-edit the file and add the condition-

Add the firewall rule-

Restart squid

In the other machine, go to firefox and set the below setting-
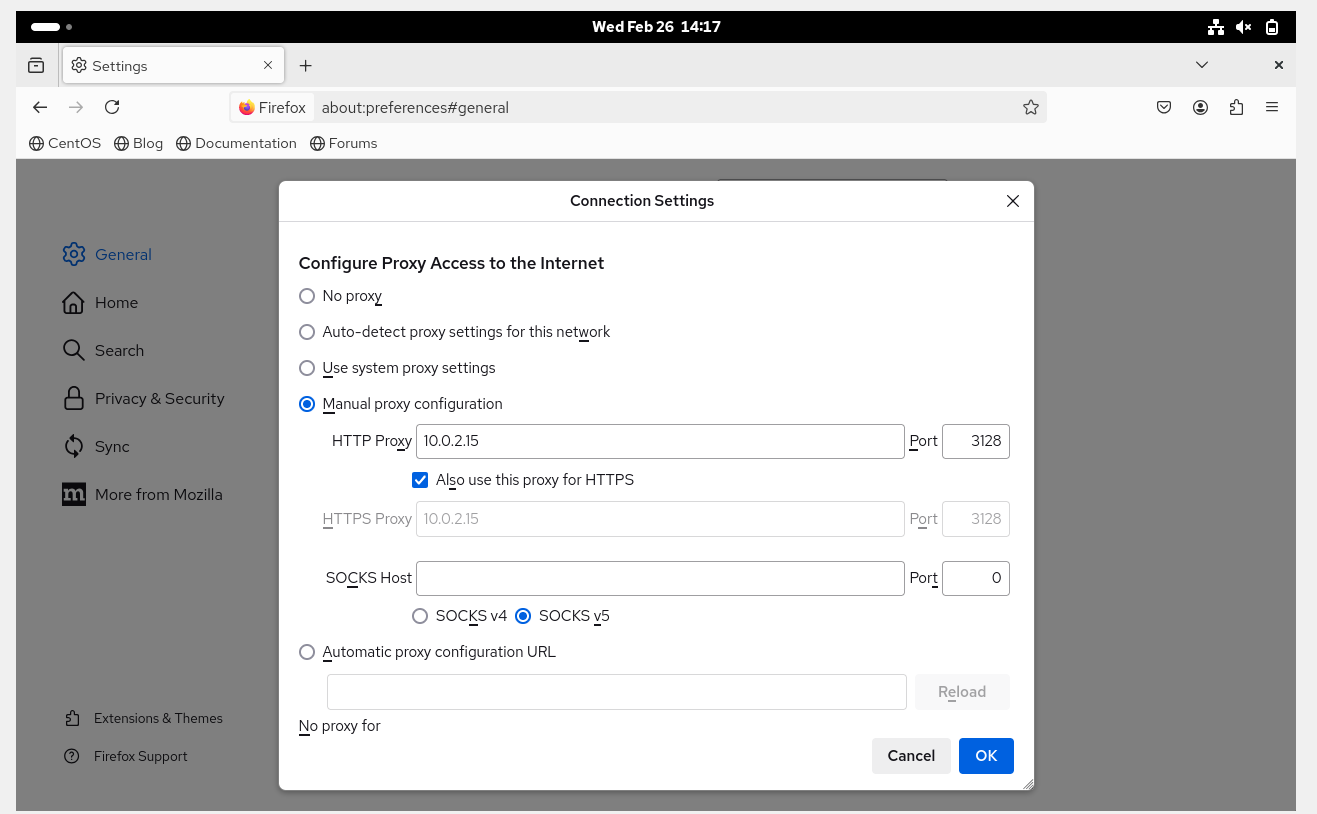
Now, if you will try to access facebook.com, you will get the PROXY error!!
Thanks for going all the parts of this blog, Happy Learning !! 😁
Subscribe to my newsletter
Read articles from Aditya Dev Shrivastava directly inside your inbox. Subscribe to the newsletter, and don't miss out.
Written by
