Caching in Next.js
 Tarun
Tarun
In web development, performance optimization is crucial for delivering a seamless user experience. Next.js 15 introduces several powerful caching mechanisms, which we will explore one by one.
1 . Request Memoization
Next.js extends the fetch API to automatically memoize requests that have the same URL and options. This means that if you make identical data requests multiple times while rendering a page, Next.js will only execute the actual network request once and reuse the result for subsequent calls.
Showcasing the above:
Let’s say I have an async function which fetches collection of videos from my local backend setup and I have the backend server running where I have console.log the headers to check where the request is coming from. (layout or page.tsx).
And I am calling the same async function in both page.tsx and layout.tsx
async function getVideos() {
  const response = await fetch('http://localhost:5000/vids',{
    headers : {
      'test' : "layout"
    }
  });
  return response.json();
}
And in backend I am logging the headers :
app.get('/vids',(req,res)=>{
  const head = req.headers
  console.log(head,"header")
})
Case 1 : When the URL or options are not same :
In root > page.tsx
Here the header which I am passing is ‘test’ : ‘page’ and url is same.
async function getData() {
  const response = await fetch('http://localhost:5000/vids',{
    headers : {
      'test' : "page"
    }
  });
  return response.json();
}

export default async function Home() {
  const data = await getData();
  return (
    <div>
     <p>Testing</p>
    </div>
  );
}
In root > Layout.tsx
Here the header which I am passing is ‘test’ : ‘layout’ and url is same.
import type { Metadata } from "next";
import "./globals.css";

export const metadata: Metadata = {
  title: "Create Next App",
  description: "Generated by create next app",
};

async function getVideos() {
  const response = await fetch('http://localhost:5000/vids',{
    headers : {
      'test' : "layout"
    }
  });
  return response.json();
}


export default async function RootLayout({
  children,
}: Readonly<{
  children: React.ReactNode;
}>) {
  const res = await getVideos()
  return (
    <html lang="en">
      <body
      >
        {children}
      </body>
    </html>
  );
}
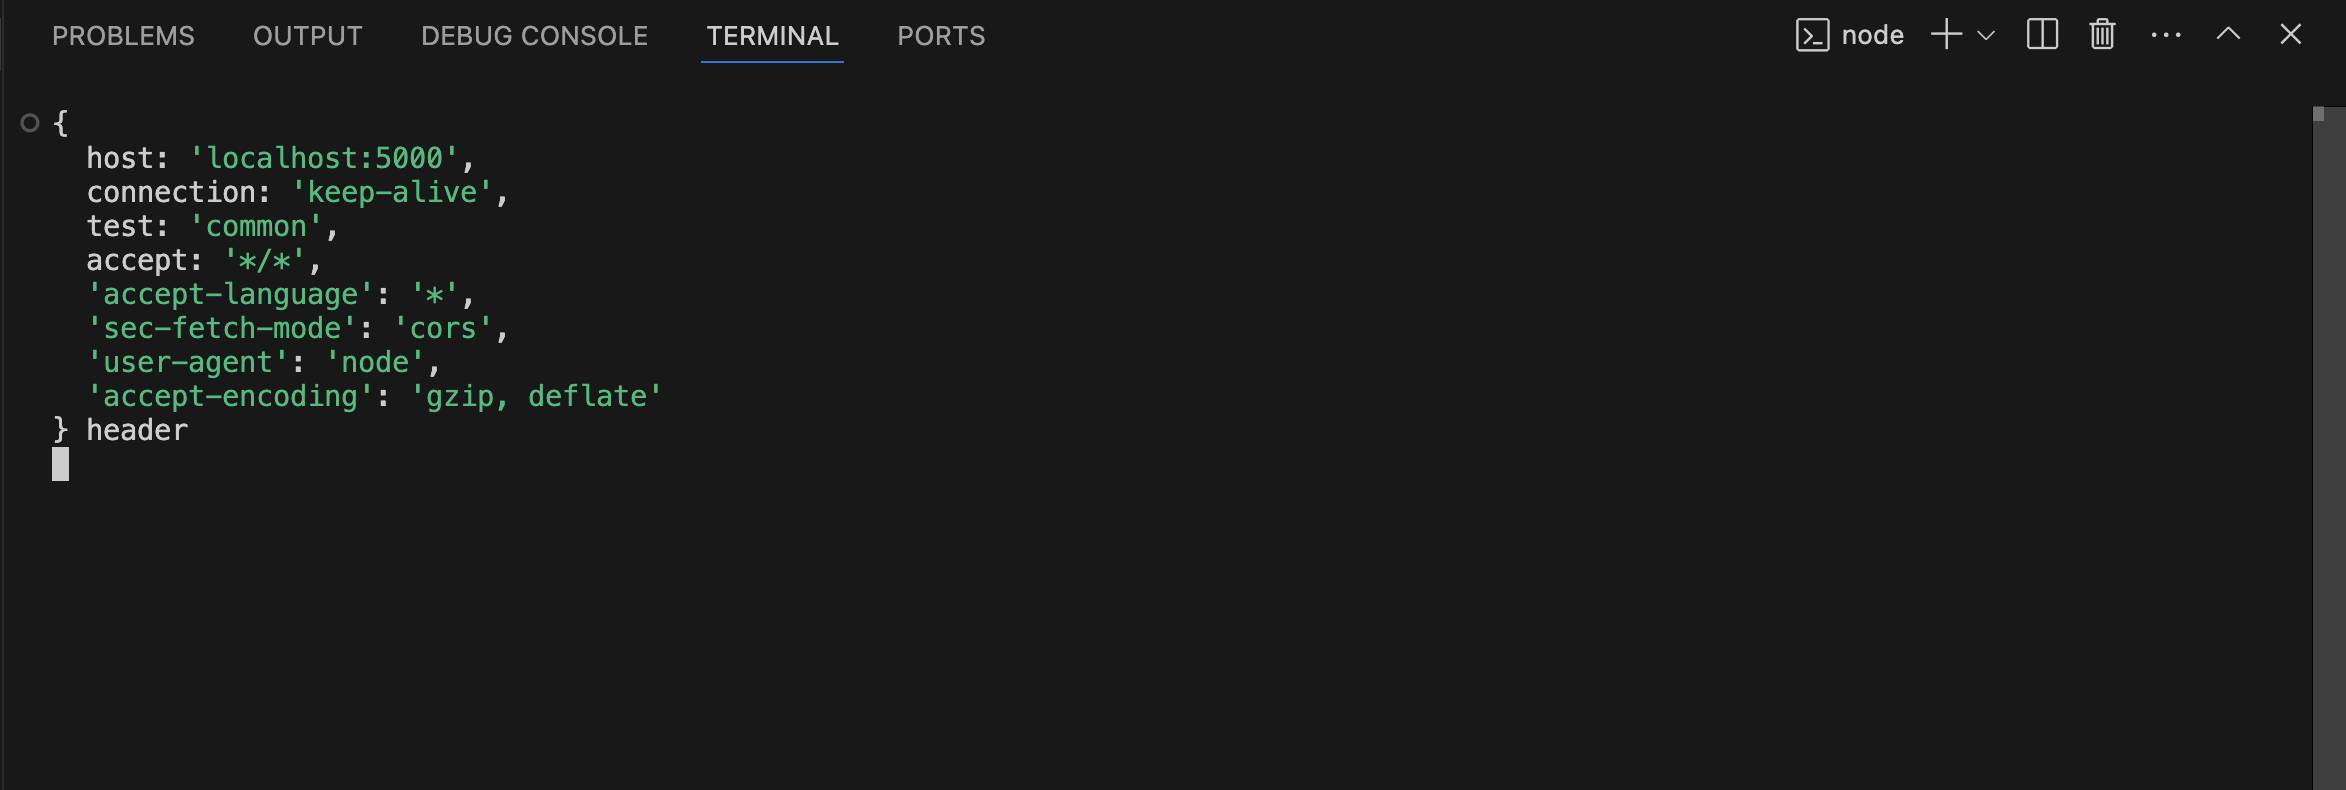
We know layout wraps the page so ideally we are fetching url with different option 2 times here. On visiting the page we can observe the backend terminal logging the headers :
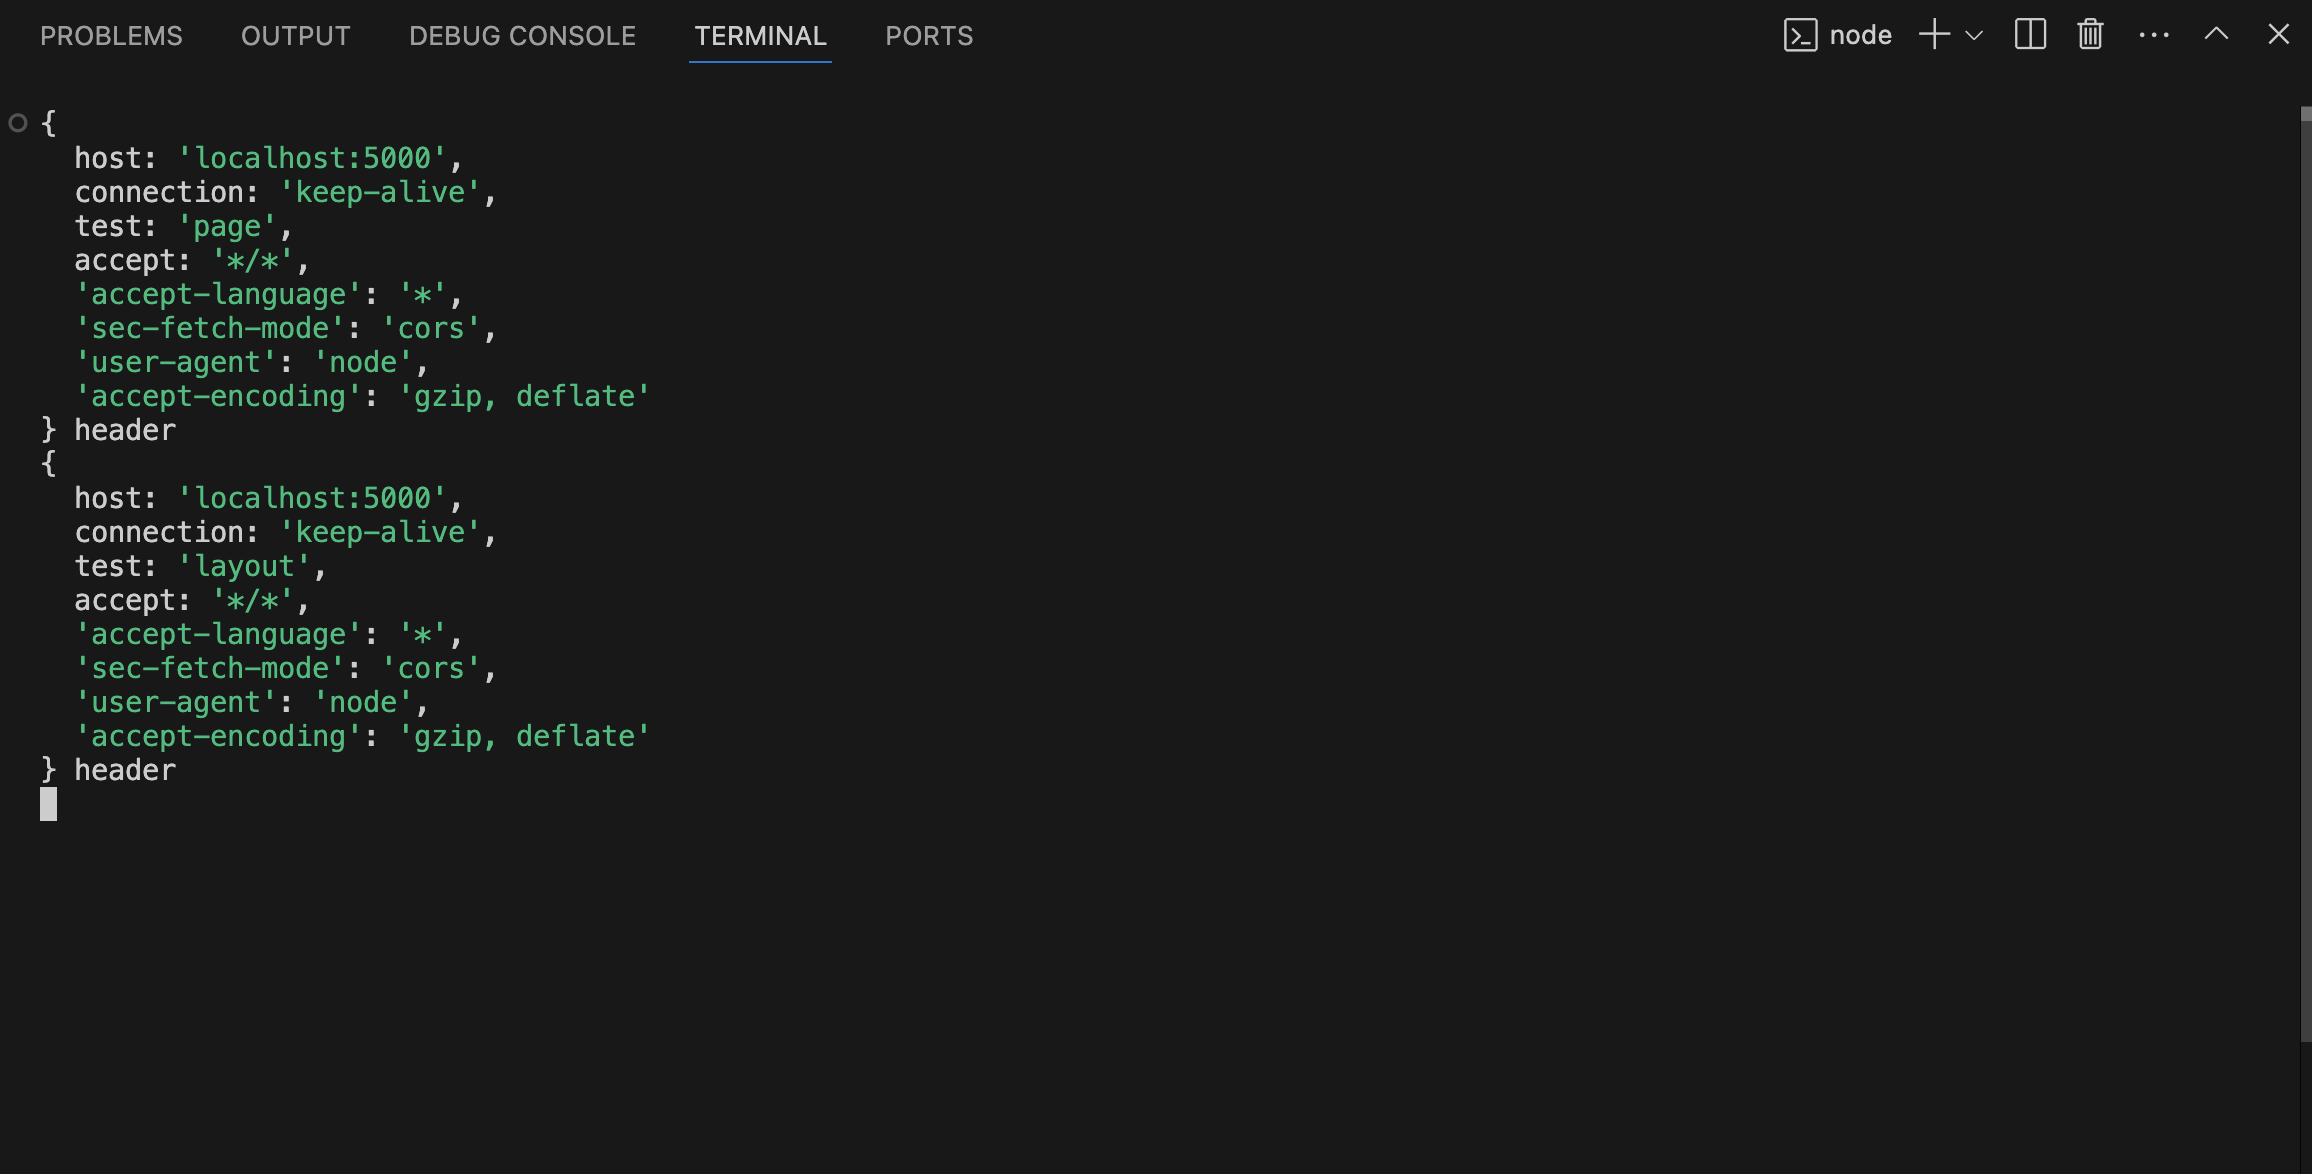
The above makes sense as layout wraps the page and since fetch has different option we will see the network request with different header one coming from page and the other from layout.
Case 2 : When the URL and options are same :
I will just make the header same for both of layout and page now and see if fetch is running multiple times now.
so ,headers : { 'test' : "common" }
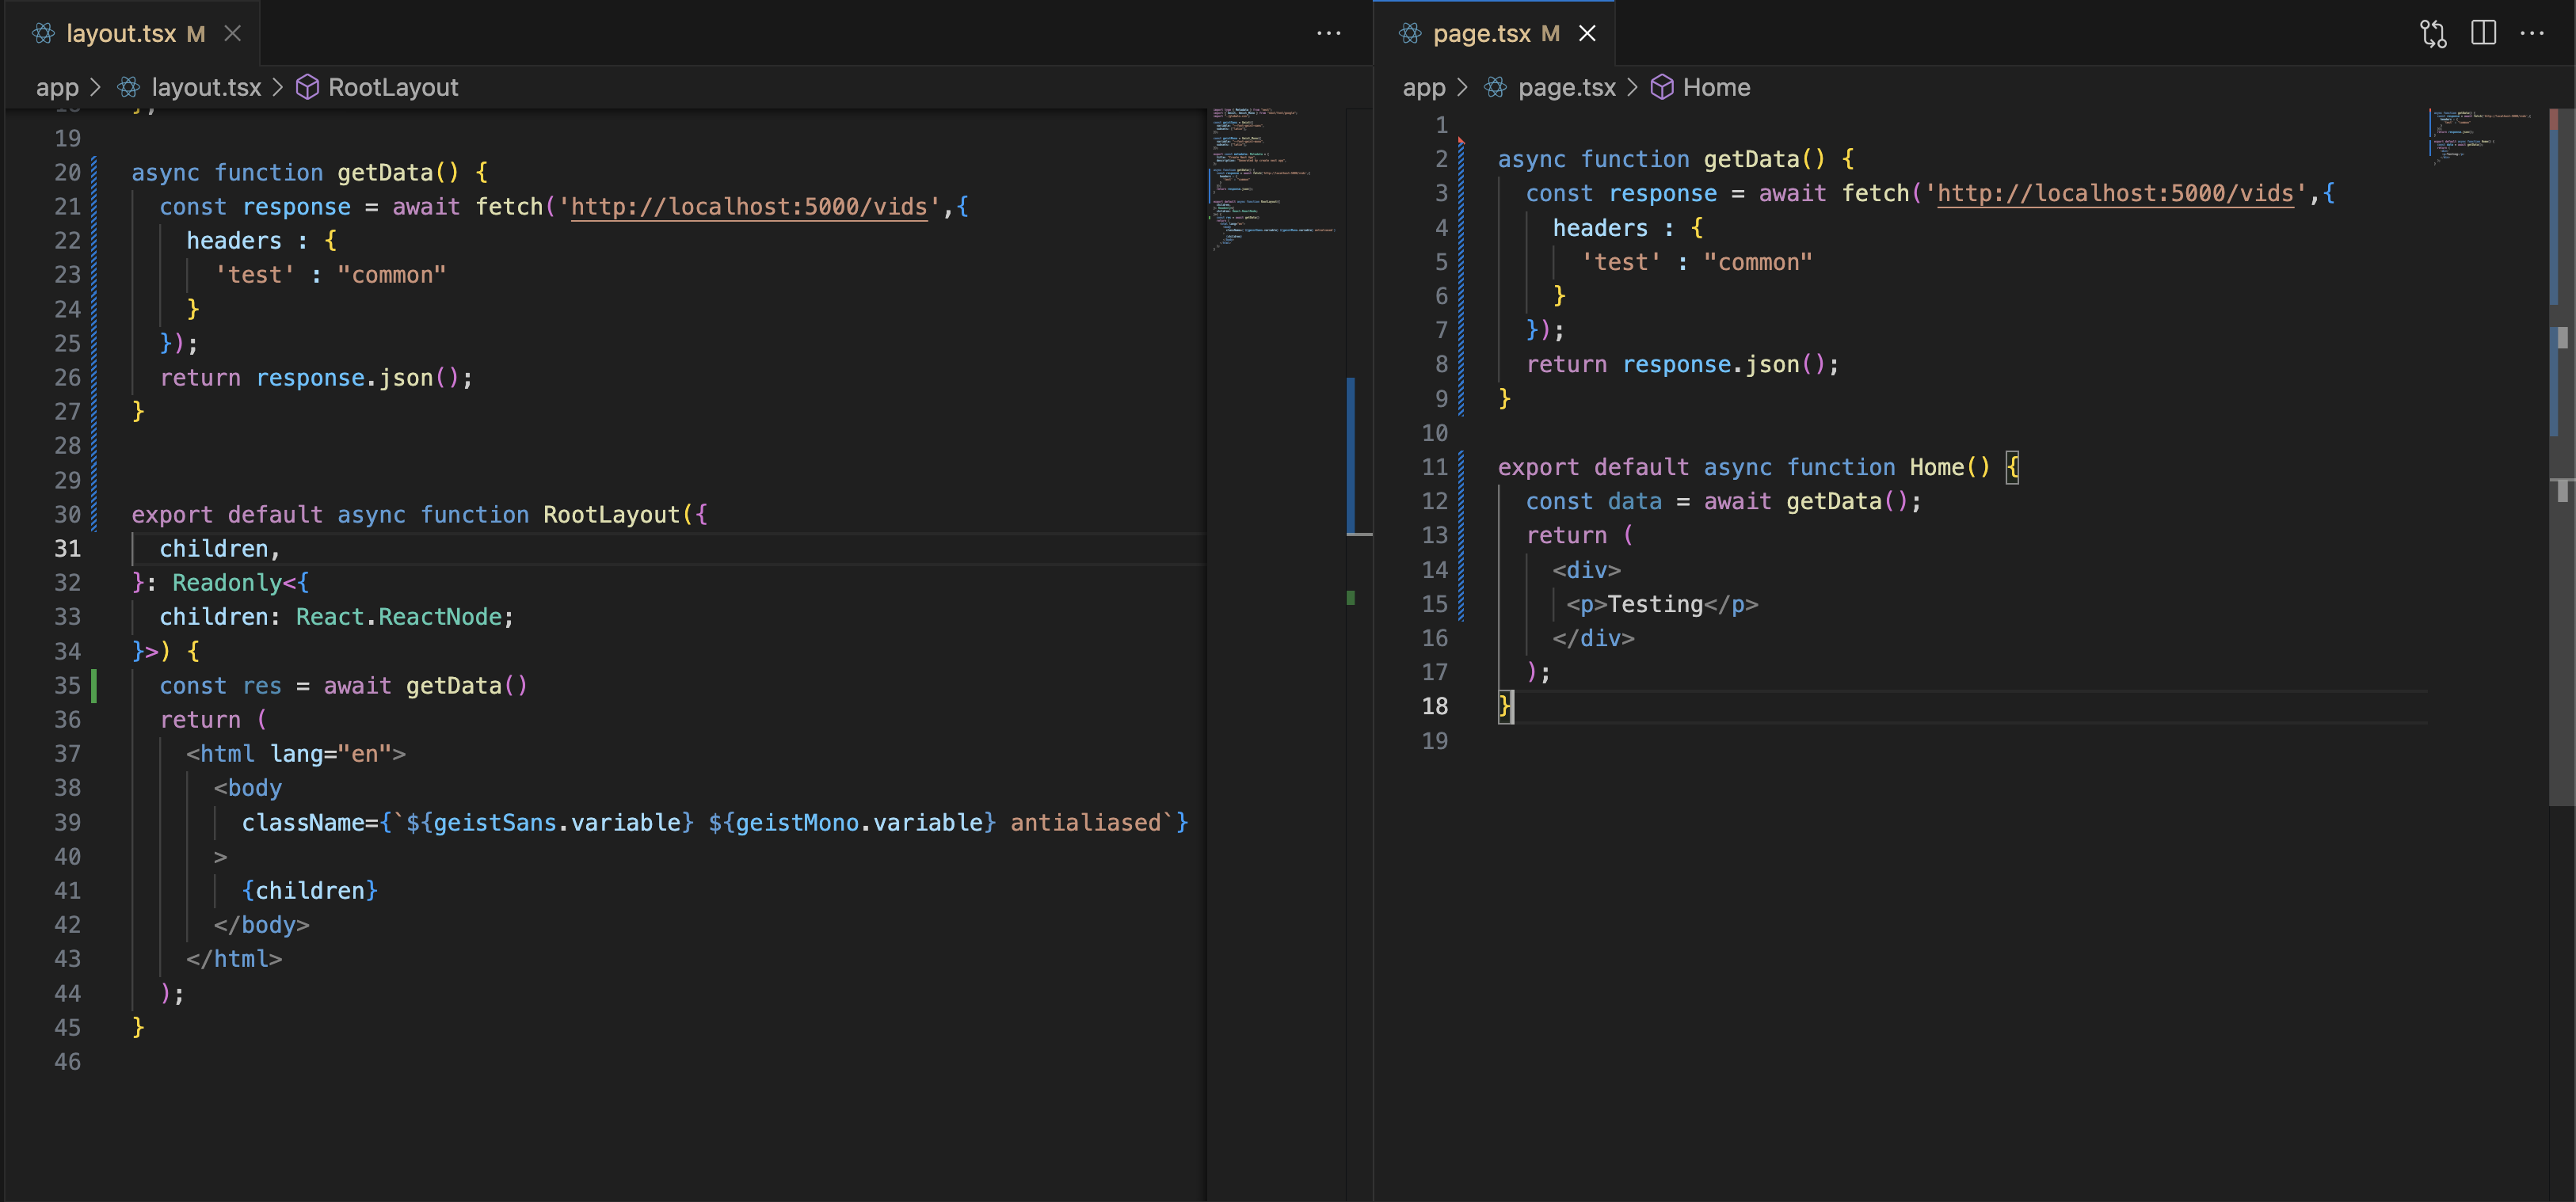
And now if we go to our page url and refresh , Empty cache and hard reload to be sure ,we get this in backend terminal :
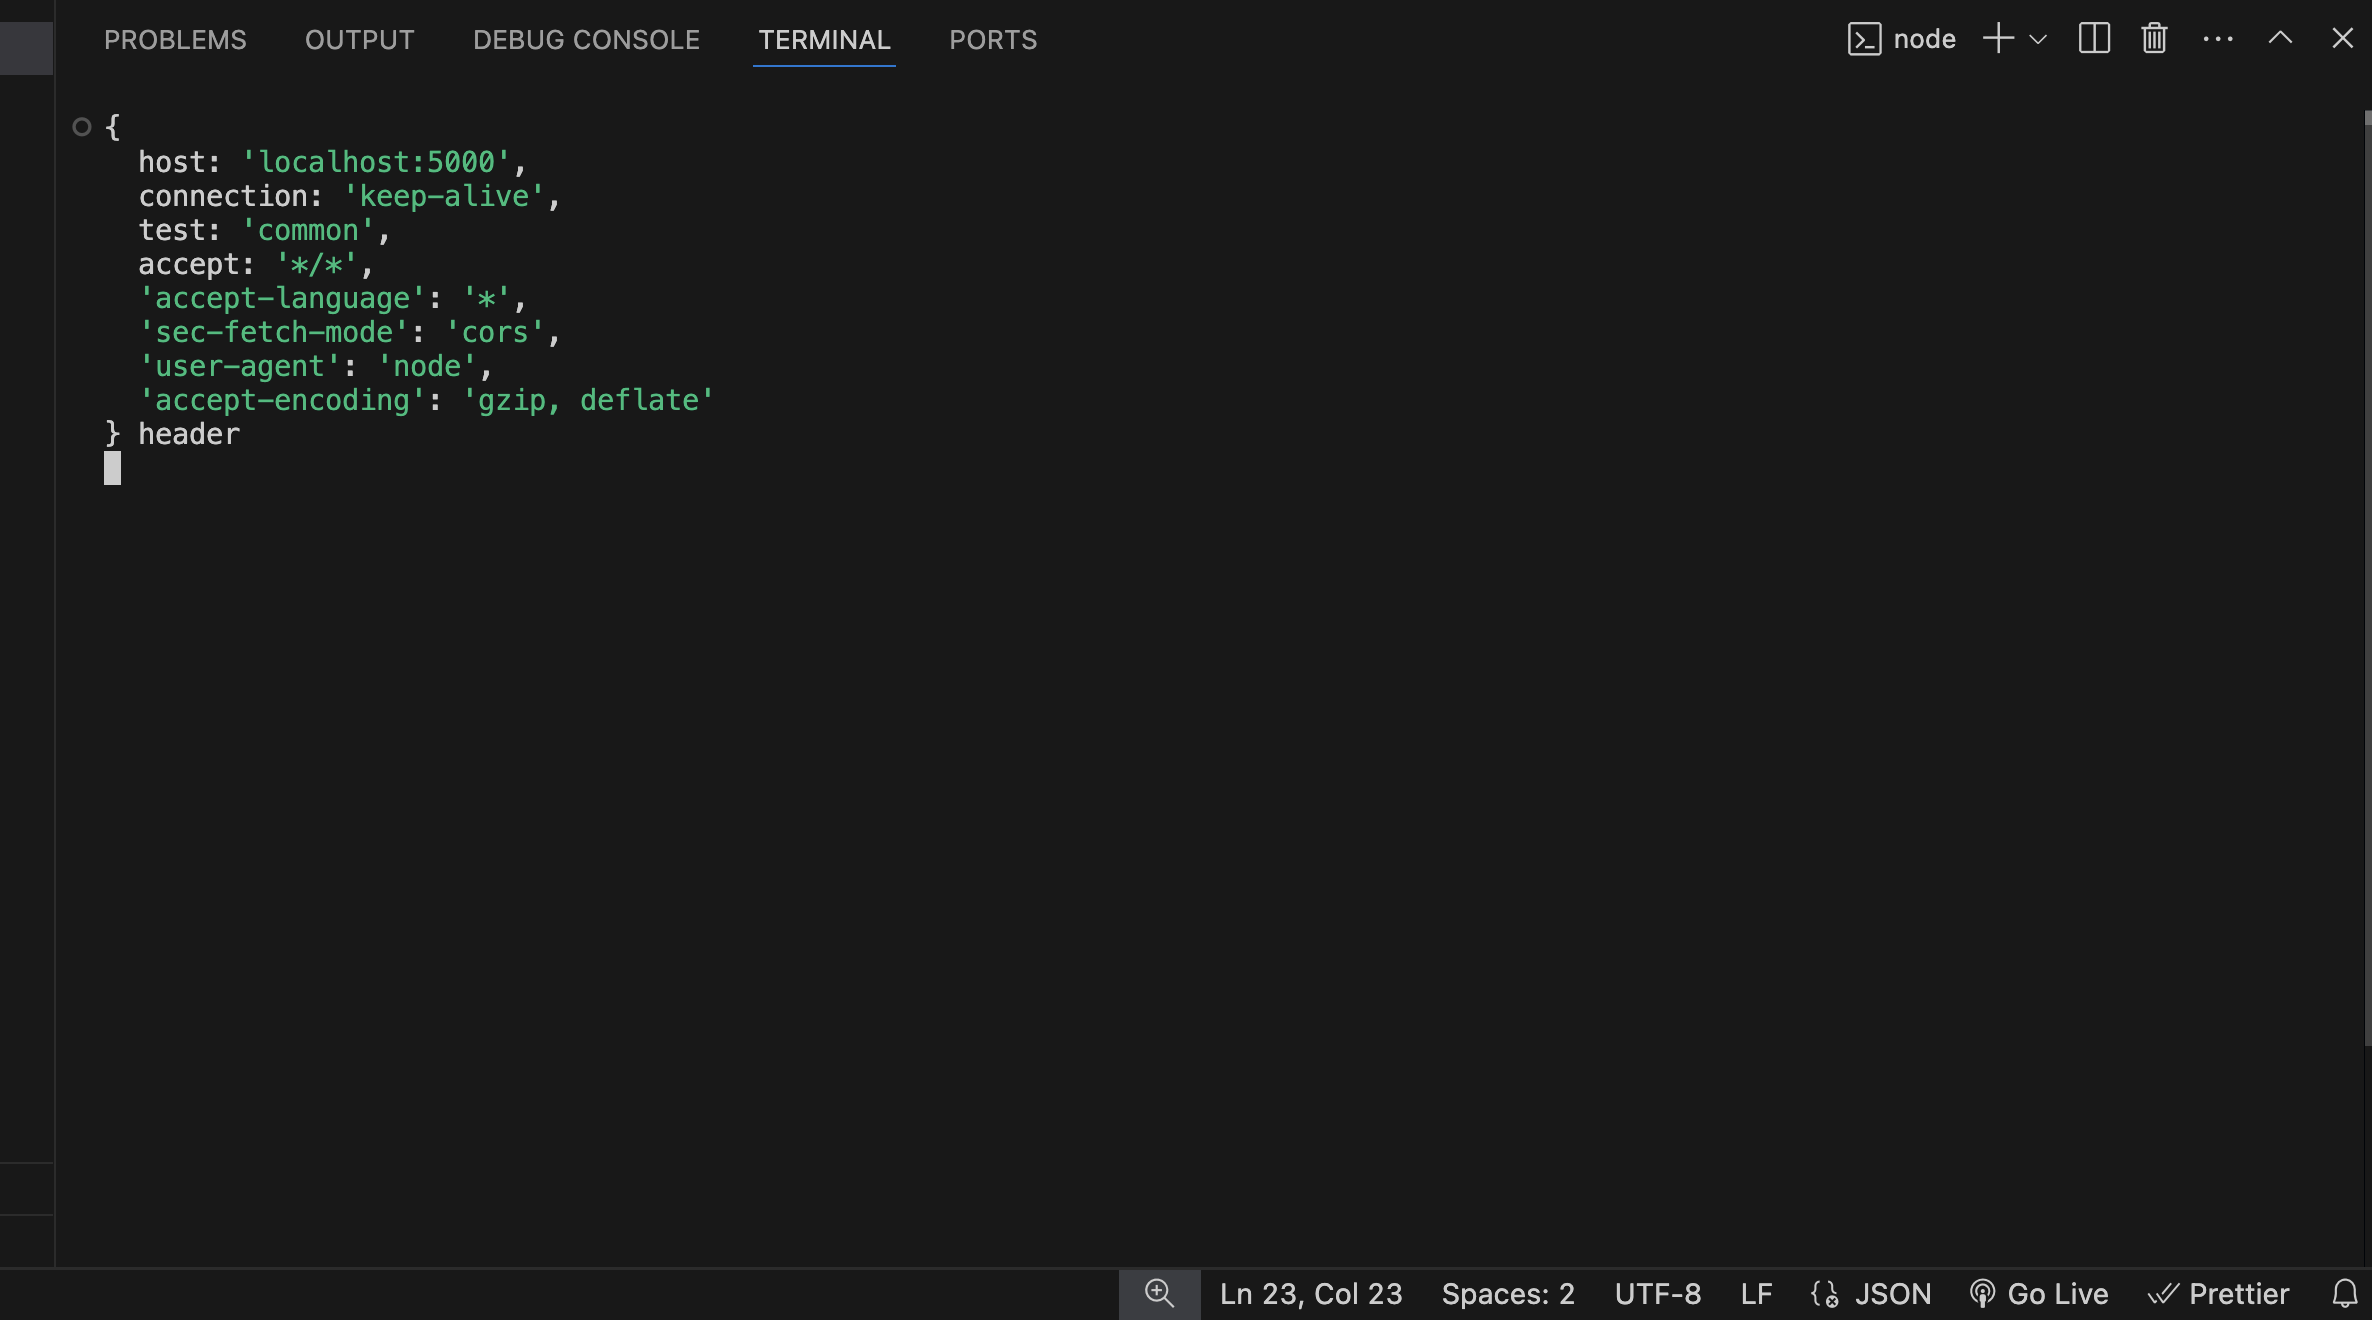
So, this is how Request Memoization is working under the hood.
And lets say even for some reason we are calling the same async fetch function multiple times in page.tsx like this:
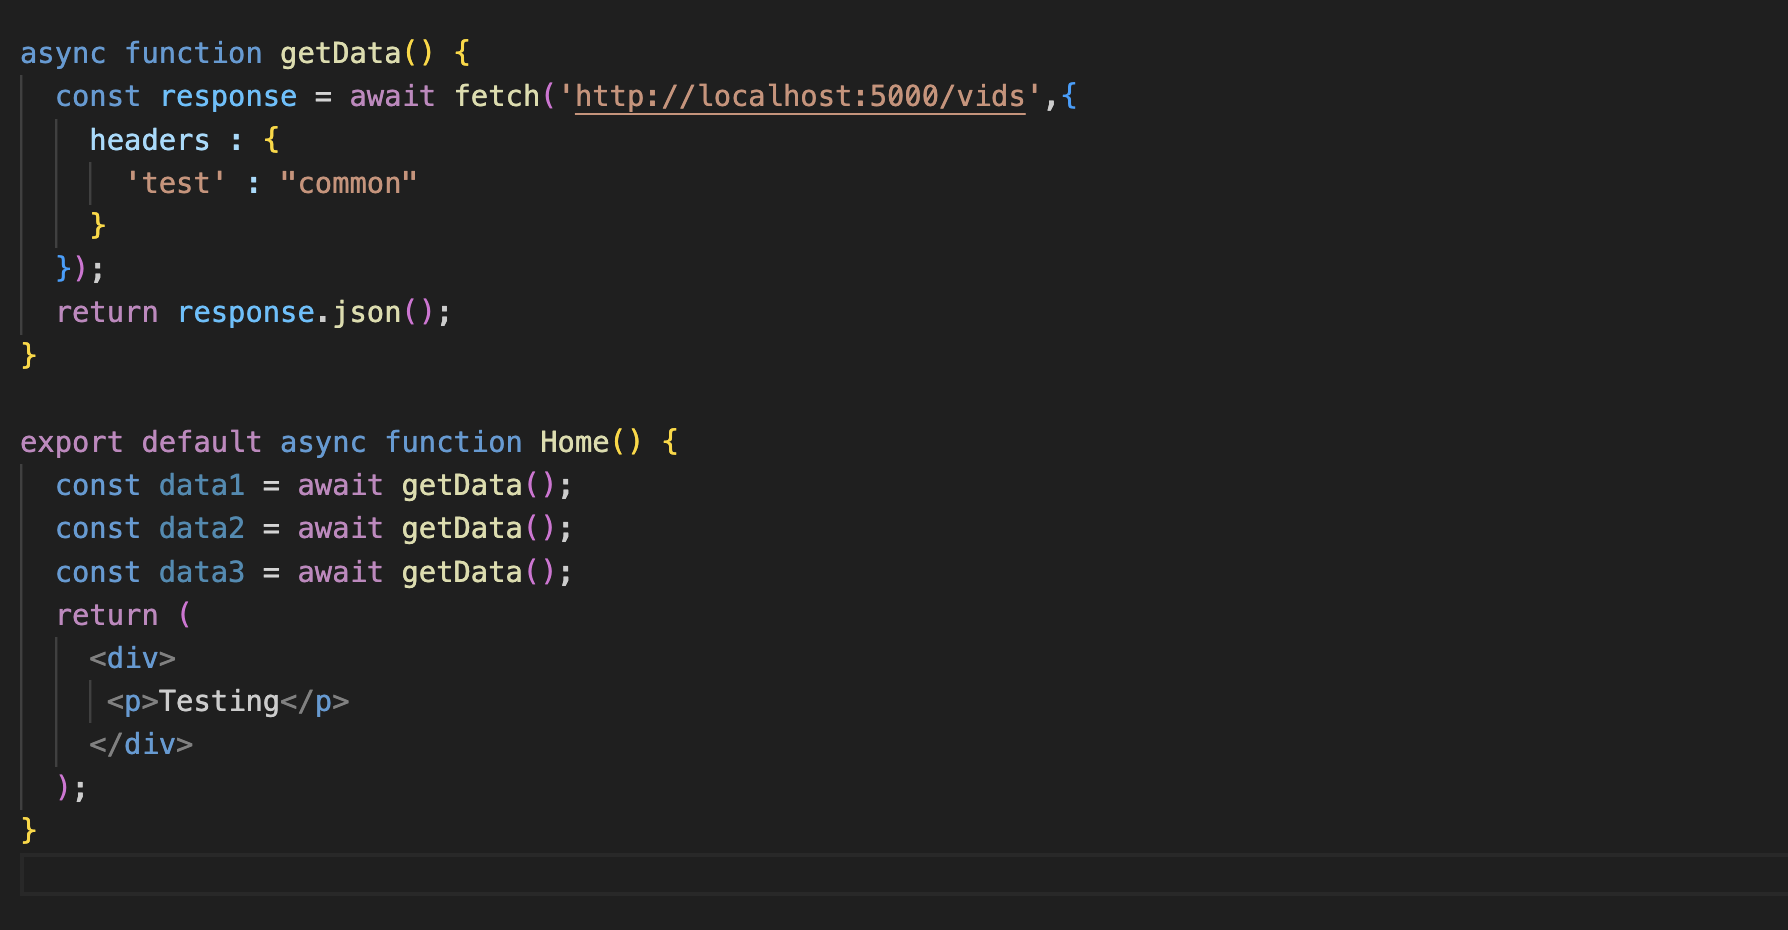
And visit the page and again check the Backend terminal we see only one fetch request was made.
With request memoization, you can:
Create more modular, self-contained components that fetch their own data
Avoid "prop-drilling" (passing data through multiple layers of components)
Simplify your component tree and make it more maintainable
Instead, you can fetch data in the components that need it without worrying about the performance implications of making multiple requests across the network for the same data.
Limitations and Scope
It's important to understand where request memoization applies:
Only works with the
GETmethod infetchrequestsOnly applies within the React component tree (including
generateMetadata,generateStaticParams, Layouts, Pages, and other Server Components)Does not apply to fetch requests in Route Handlers (as they exist outside the React component tree)
Does not persist between different server requests or render passes
2. Data Caching
Next.js 15 introduces a built-in Data Cache that optimizes performance by persisting fetched data across incoming server requests and deployments. By extending the native fetch API, Next.js allows developers to fine-tune caching behavior, improving efficiency while ensuring data freshness when needed.
How Data Caching Works
By default, Next.js does not cache fetch requests (cache: 'no-store'), meaning data is fetched from the source for every request. However, caching behavior can be controlled using the cache and next.revalidate options in fetch. Here's how it works:
Fetching without Cache (Default Behavior): If no
cacheoption is provided or explicitly set to{ cache: 'no-store' }, every request fetches fresh data from the data source and is memoized for the duration of the request.Fetching with Cache: If
{ cache: 'force-cache' }is used, Next.js first checks the Data Cache:If cached data exists, it is returned immediately and memoized.
If no cached data exists, the request is made to the data source, stored in the Data Cache, and memoized.
Memoization: Regardless of caching behavior, all fetch requests are memoized to avoid duplicate network requests within the same React render pass.
Data Cache vs. Request Memoization
While both caching mechanisms improve performance, they differ in scope:
Data Cache: Persistent across server requests and deployments unless revalidated.
Request Memoization: Lives only during a single server request and prevents redundant fetch calls in a render cycle.
Configuring Data Caching
Time-Based Revalidation
To refresh cached data periodically, use the next.revalidate option in fetch:
// Revalidate data every hour (3600 seconds)
fetch('https://api.example.com/data', {
  next: { revalidate: 3600 },
  cache: 'force-cache' // Optional since 'force-cache' is applied when revalidate is used
})
How it works:
The first request fetches and caches data.
Subsequent requests within the revalidation period return the cached data.
After the revalidation period, the next request returns stale data and triggers a background update.
Once fresh data is retrieved, it updates the Data Cache.
If the update fails, stale data remains unchanged.
On-Demand Revalidation
For real-time updates, Next.js supports revalidating cached data manually using:
revalidatePath(path): Clears the cache for a specific route.revalidateTag(tag): Clears cache for specific tagged data.
Example:
Revalidating a Specific Path
import { revalidatePath } from 'next/cache';

export async function POST(request) {
  // Optional: Validate a secret token or other authentication
  const { token } = await request.json();

  if (token !== process.env.REVALIDATION_TOKEN) {
    return Response.json({ error: 'Invalid token' }, { status: 401 });
  }

  revalidatePath('/blog');
  return Response.json({ revalidated: true, now: Date.now() });
}
Revalidating a Specific Data Tag
First, tag your data when fetching:
// In your component or data fetching function
const data = await fetch('https://api.example.com/blog-posts', {
  next: { tags: ['blog-posts'] },
  cache: 'force-cache'
});
Then you can revalidate the tagged data:
import { revalidateTag } from 'next/cache';

export async function POST(request) {
  const { token } = await request.json();

  // Optional: validate token or other authentication
  if (token !== process.env.REVALIDATION_TOKEN) {
    return Response.json({ error: 'Invalid token' }, { status: 401 });
  }

  revalidateTag('blog-posts');
  return Response.json({ revalidated: true, now: Date.now() });
}
How it works:
Initial fetch request caches the data with the assigned tag.
When revalidation is triggered, all cache entries with the specified tag are cleared.
The next request fetches fresh data from the source and updates the cache.
Unlike time-based revalidation, no stale data is served while updating.
Applying Revalidation in a Layout or Page
Caching and revalidation can be applied at different levels:
Layout-Level Caching: Applies caching and revalidation to multiple pages that share the same layout.
Page-Level Caching: Applies caching and revalidation to a specific page component.
Example: Caching in a Layout
export const revalidate = 600; // Revalidate data every 10 minutes

export default function Layout({ children }) {
  return <div>{children}</div>;
}
This ensures that all pages within this layout benefit from the same caching and revalidation strategy.
Example: Caching in a Server Component Page
// Option 1: Set revalidation for the entire page
export const revalidate = 300; // Revalidate data every 5 minutes

export default async function Page() {
  // This will use the page-level revalidation setting
  const data = await fetch('https://api.example.com/data').then((res) => res.json());

  return (
    <div>
      <h1>Data</h1>
      <pre>{JSON.stringify(data, null, 2)}</pre>
    </div>
  );
}
// Option 2: Set revalidation for specific fetch requests
export default async function Page() {
  // This will revalidate every 5 minutes (300 seconds)
  // This takes precedence over any page-level settings
  const data = await fetch('https://api.example.com/data', {
    next: { revalidate: 300 }
  }).then((res) => res.json());

  return (
    <div>
      <h1>Data</h1>
      <pre>{JSON.stringify(data, null, 2)}</pre>
    </div>
  );
}
Opting Out of Caching
If you want fresh data on every request, disable caching with:
const data = await fetch('https://api.example.com/blog', { cache: 'no-store' });
This ensures every request fetches the latest data directly from the API. Note that in Next.js 15, this is actually the default behavior if no caching options are specified.
Combining Caching Strategies
You can combine different caching strategies for different data needs:
export default async function Page() {
  // Critical data that needs to be fresh every time >> default { cache: 'no-store' }
  const userData = await fetch('https://api.example.com/user').then(res => res.json());

  // Less important data that can be cached and periodically refreshed
  const productData = await fetch('https://api.example.com/products', {
    next: { revalidate: 3600, tags: ['products'] }
  }).then(res => res.json());

  // Static data that rarely changes
  const siteConfig = await fetch('https://api.example.com/config', {
    cache: 'force-cache'
  }).then(res => res.json());

  return (
    <div>
      <UserProfile data={userData} />
      <ProductList data={productData} />
      <SiteFooter config={siteConfig} />
    </div>
  );
}
3. Full Route Cache
1. What is Full Route Cache?
Full Route Cache in Next.js refers to caching entire routes, including React Server Component (RSC) payloads and HTML, either at build time or after data revalidation. This cache helps the server serve precomputed responses, avoiding unnecessary re-rendering on each request and improving performance.
2. How Full Route Cache Works
(A) Next.js Caching on the Server (Full Route Cache)
When a page is rendered, both the React Server Component Payload (RSC Payload) and HTML output are cached on the server.
This cache is reused for subsequent requests until it becomes invalidated by a manual trigger or revalidation event.
(B) Next.js Caching on the Client (Router Cache)
The RSC Payload is also stored in the client-side Router Cache, which reduces redundant requests to the server on revisits.
The cached data will be used unless it expires or is missing, in which case a fresh request will be made to the server.
(C) Subsequent Navigations
If the page is cached, Next.js serves it instantly from either the server or client cache.
If not cached, the server regenerates the content, updates its cache, and returns the new payload.
3. Cache Duration & Invalidation
(A) Cache Duration
- The Full Route Cache persists across requests, being cleared only on redeployment or through manual revalidation.
(B) Invalidation Methods
Revalidating Data
Revalidating the Data Cache will automatically invalidate the Full Route Cache, prompting a new render.
Example code to trigger revalidation:
    import { revalidatePath } from "next/cache";
    revalidatePath("/dashboard");
Redeploying
- Full Route Cache is cleared on redeployment, while the Data Cache persists.
4. Opting Out of Full Route Cache
To disable Full Route Cache and force fresh rendering on every request:
Use a dynamic API instead of static rendering.
Set
dynamic = "force-dynamic"in the route configuration to prevent caching:export const dynamic = "force-dynamic"; // Disables cachingFor data fetching, you can use
{ cache: "no-store" }to enforce fresh fetches:fetch("https://api.example.com/data", { cache: "no-store" });
5. Example: Full Route Cache in Action
✅ Cached Route (Default Full Route Cache)
export async function getStaticProps() {
  const posts = await fetch("https://api.example.com/posts").then((res) => res.json());

  return {
    props: { posts },
    revalidate: 3600, // Cache persists for 1 hour
  };
}
- Result: Cached at build time and only updates after 1 hour.
❌ Opting Out (No Full Route Cache)
export const dynamic = "force-dynamic"; // Always render fresh
export async function GET() {
  return Response.json({ message: "Dynamic response" });
}
- Result: Forces a fresh render with every request.
Conclusion
Full Route Cache enhances performance by caching routes at build time or after revalidation. Developers can choose to opt out when real-time data is required, ensuring flexibility in caching strategies.
4. Client-Side - Router Cache
Next.js uses an in-memory client-side router cache that stores the React Server Component (RSC) payload for various route segments. This cache is designed to enhance performance by enabling smooth navigation and reducing full-page reloads. Let’s explore how this cache works in detail.
How Client-Side Router Cache Works
Layouts:
Layouts are cached and reused during navigation, ensuring partial rendering rather than reloading the entire layout each time.Loading States:
Loading states are cached and reused when navigating between routes, resulting in instant navigation without waiting for the page to reload.Pages:
By default, pages are not cached. However, during browser backward/forward navigation, previously visited pages are reused from the cache.
You can enable caching for specific page segments using theexperimental staleTimesconfiguration option.
Duration of Client-Side Router Cache
Session-based Persistence:
The cache persists across route navigation during the session but is cleared when the page is refreshed. This ensures that the cache is available while navigating within a session.Automatic Invalidation:
The cache of layouts and loading states has an automatic invalidation period based on the prefetching method used:Dynamic Pages: Not cached by default.
Static Pages: Cached for 5 minutes.
Full Prefetching (
<Link prefetch={true}>orrouter.prefetch): Cache lasts 5 minutes for both static and dynamic pages.
Invalidation of the Router Cache
You can invalidate the router cache using the following methods:
Server Action:
revalidatePath: Invalidate the cache for a specific path.revalidateTag: Invalidate the cache for tags associated with data.
revalidatePath("/dashboard"); // Invalidate Router Cache for a specific path
Cookies:
- Using
cookies.set()orcookies.delete()within a Server Action will invalidate the Router Cache. This ensures that routes with cookies (e.g., authentication) remain up-to-date.
- Using
Manual Refresh:
- The
router.refresh()method can be used to force a refresh of the route. This will clear the Router Cache and trigger a new request to the server, but it does not affect the Data or Full Route Cache.
- The
router.refresh(); // Force refresh and invalidate the Router Cache
Opting Out of Router Cache
By default, page segments are not cached in the Router Cache. To opt out of prefetching and disable the cache for specific routes, you can set the prefetch={false} on the <Link> component.
Example:
<Link href="/about" prefetch={false}>About Us</Link>
This will prevent Next.js from caching the route when the user clicks the link.
Interacting with Other Caching Mechanisms
The Client-Side Router Cache interacts with other caching mechanisms like Data Cache and Full Route Cache:
Data Cache and Router Cache: Revalidating or invalidating the Data Cache will immediately affect the Router Cache, as the route segments rely on the data.
Full Route Cache and Router Cache: Invalidating or opting out of the Full Route Cache does not automatically invalidate the Router Cache. However, when the route is refreshed, the Router Cache will reflect the latest data.
Conclusion
Caching in Next.js 15 is a powerful feature that enhances performance, reduces server load, and improves user experience. By understanding how the Data Cache, Full Route Cache, Client-side Router Cache, and Request Memoization interact, developers can optimize their applications effectively.
Subscribe to my newsletter
Read articles from Tarun directly inside your inbox. Subscribe to the newsletter, and don't miss out.
Written by

Tarun
Tarun
I have 3 year-experience as software developer skilled in ReactJS, TypeScript, NextJS, Redux.