Mastering GitLab CI/CD: Secure & Scalable Node.js Deployment on Kubernetes EKS
 Neamul Kabir Emon
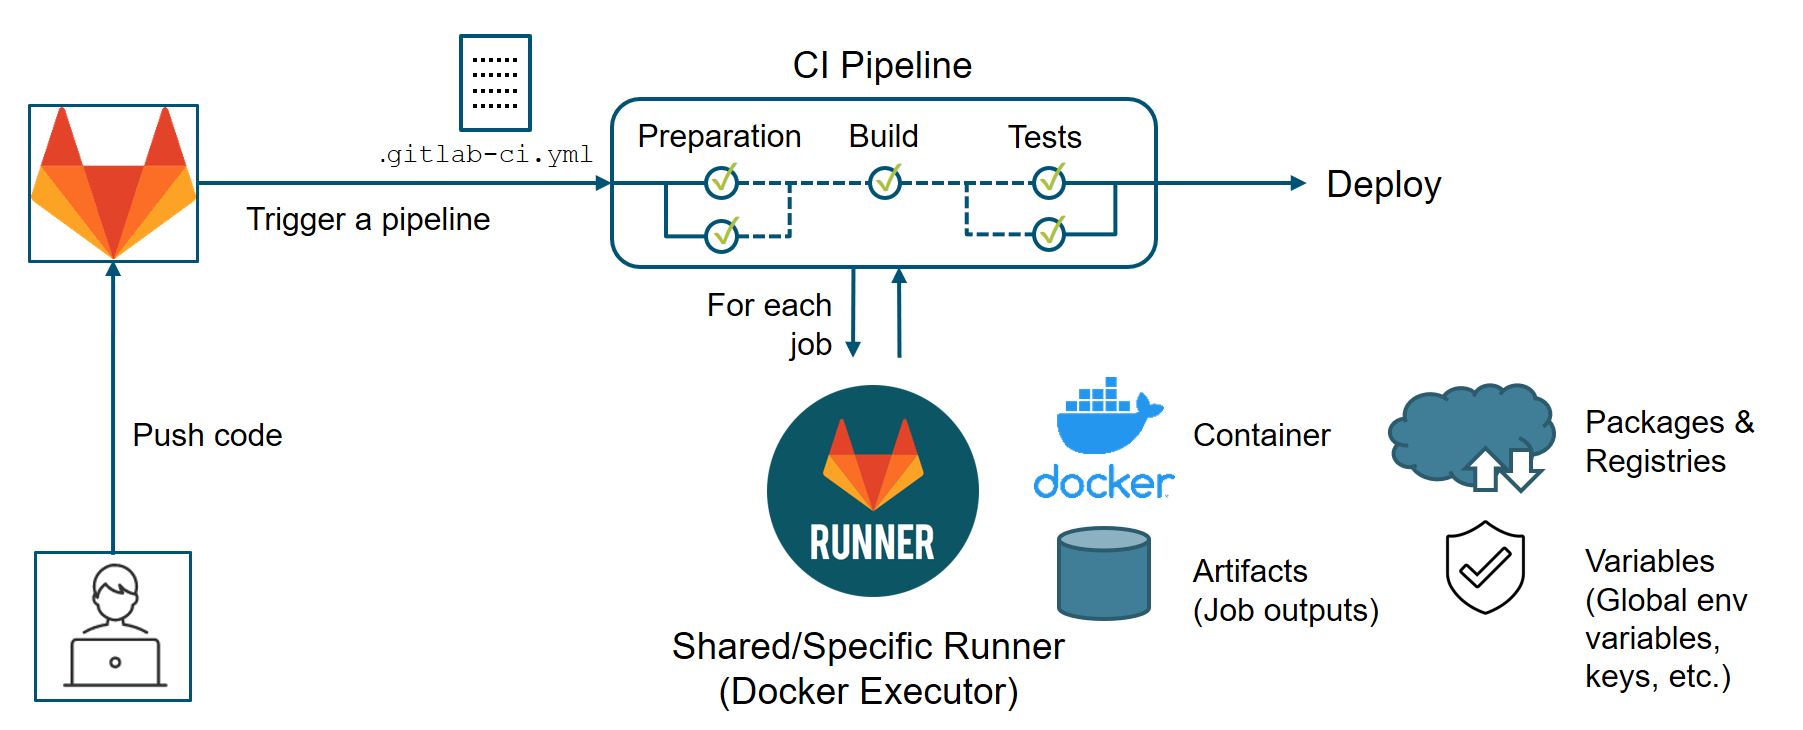
In this project, I automated the deployment of a Node.js application using GitLab CI/CD and AWS Elastic Kubernetes Service (EKS). The goal was to build a scalable, secure, and efficient CI/CD pipeline, ensuring seamless code integration, testing, security scanning, and deployment.
This article serves as a detailed guide outlining:
✅ Setting up GitLab CI/CD pipelines for continuous integration and deployment
✅ Containerizing the application using Docker
✅ Configuring Kubernetes manifests for deployment
✅ Securing the pipeline with vulnerability scans
✅ Deploying and managing the application on AWS EKS
This project showcases proficiency in DevOps automation, container orchestration, and cloud-native deployment strategies—key skills for modern software development.
Project Repository
The project is hosted on GitLab: GitLab Repository: Solar System
To get started, clone the repository to your local machine:
git clone https://gitlab.com/devops471812/solar-system.git
cd solar-system
Project Structure
After cloning the repository, the folder structure is as follows:
solar-system/
│── Dockerfile
│── app-controller.js
│── app.js
│── index.html
│── package.json
│── package-lock.json
│── terraform/
│── kubernetes/
│── scripts/
The key directories and files include:
Dockerfile: Contains the configuration for containerizing the application.
Terraform directory: Houses the Infrastructure as Code (IaC) for provisioning AWS EKS.
Kubernetes directory: Contains Kubernetes manifests for deploying the application.
Understanding the Application Code
The core of the application is the app.js file. This Node.js application connects to a MongoDB database, retrieves planetary data, and exposes API endpoints.
Running the Application Locally
Before containerizing the application, it is essential to test it locally.
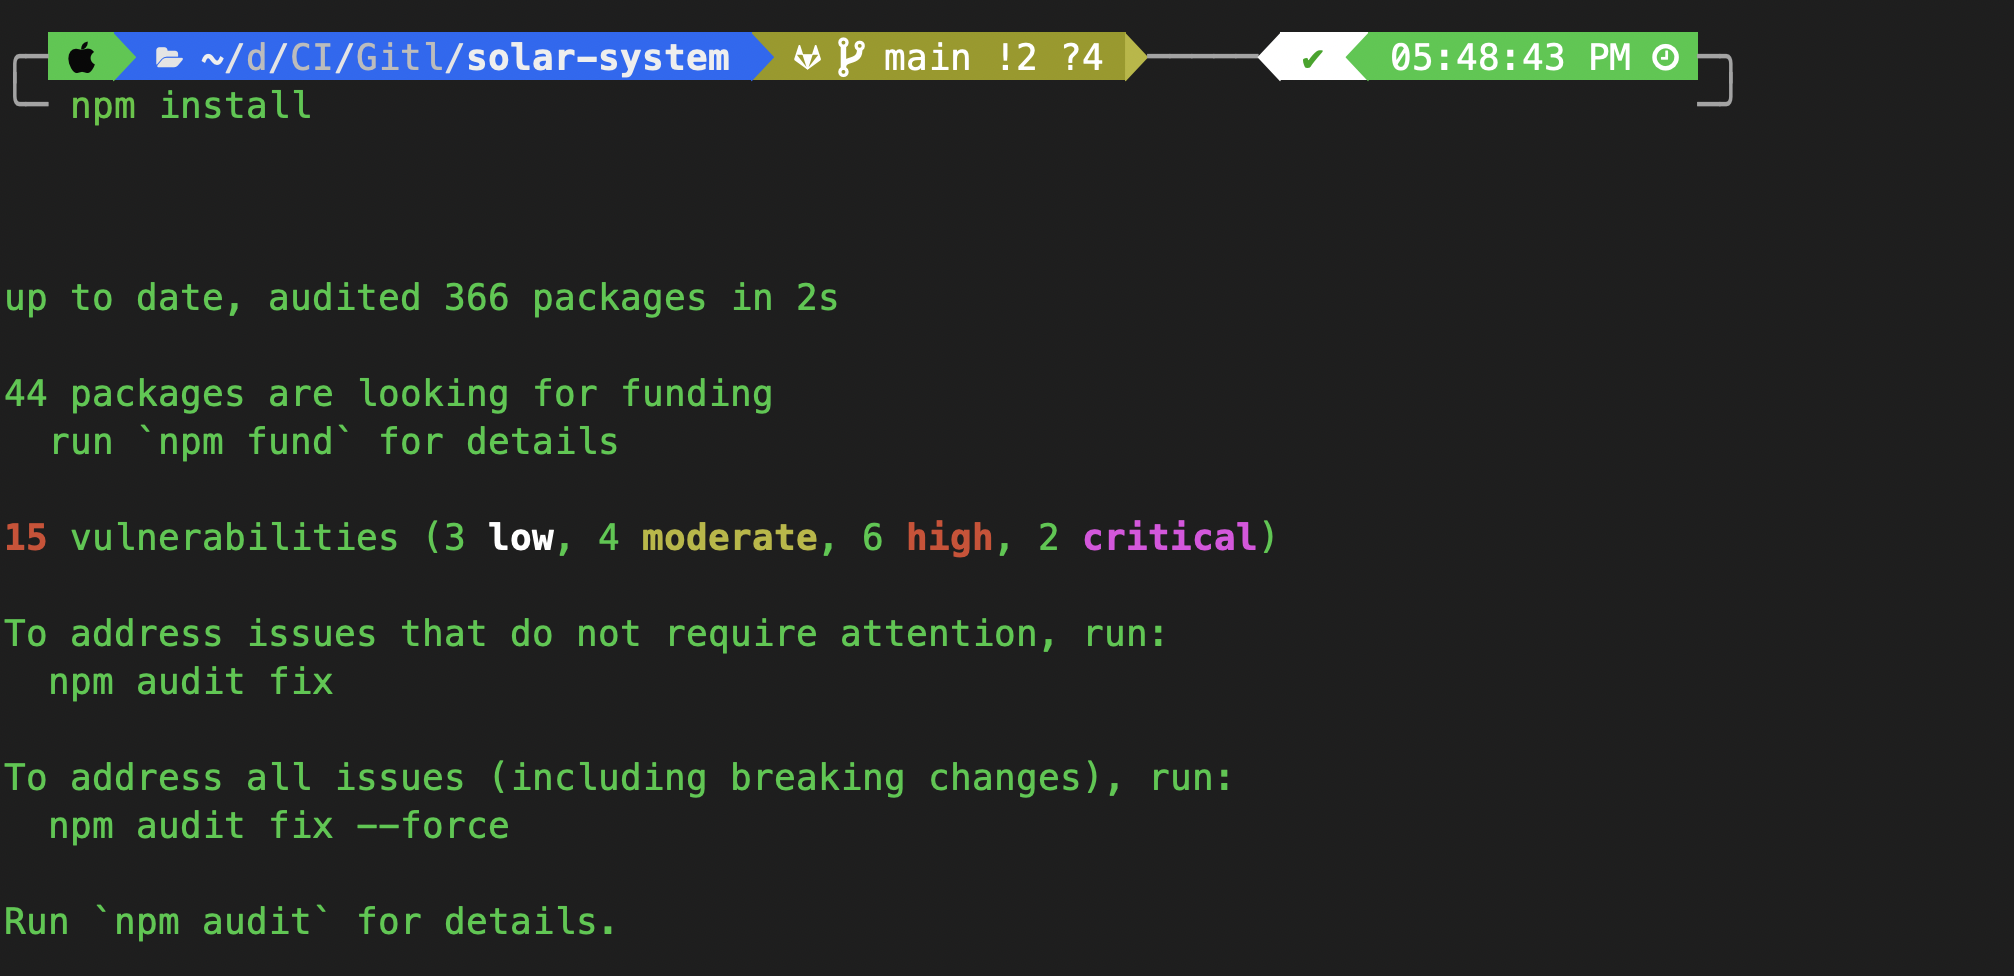
Step 1: Install Dependencies
Since this is a Node.js application, install dependencies using:
npm install
Step 2: Set Up Environment Variables
Export the MongoDB connection URI, username, and password:
export MONGO_URI="mongodb+srv://supercluster.d83jj.mongodb.net/superData"
export MONGO_USERNAME="superuser"
export MONGO_PASSWORD="SuperPassword"
Verify the environment variables:
echo $MONGO_URI
echo $MONGO_USERNAME
echo $MONGO_PASSWORD
Step 3: Start the Application
Run the application:
npm start
If everything is set up correctly, you should see output similar to this:
> solar-system@6.7.6 start
> node app.js
Server successfully running on port - 3000
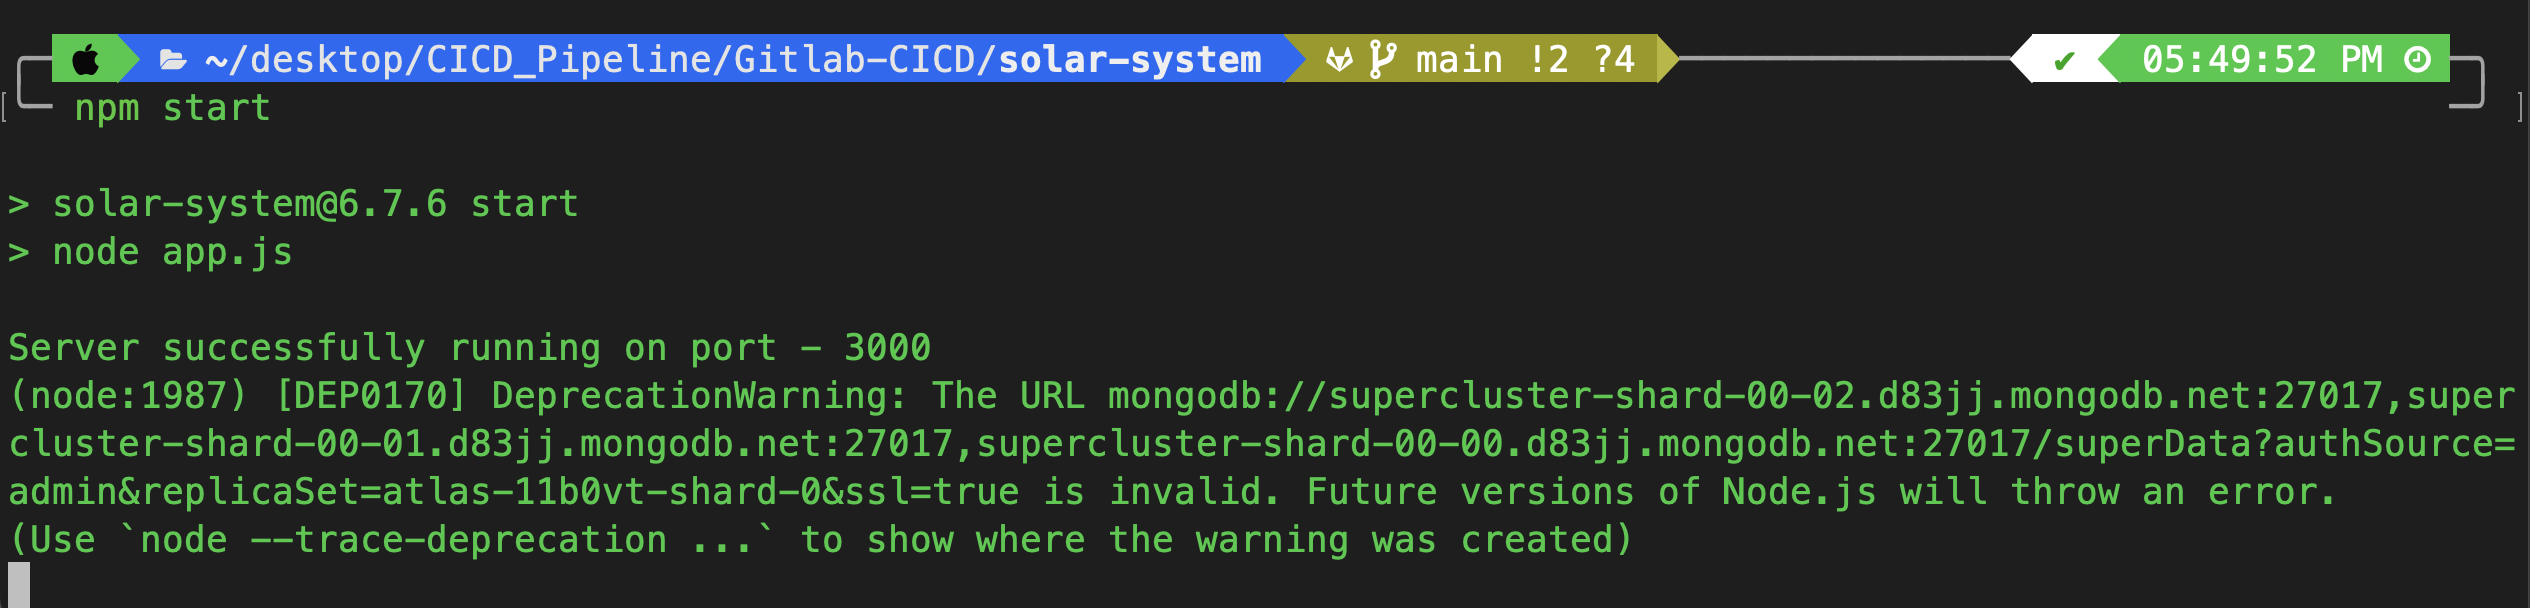
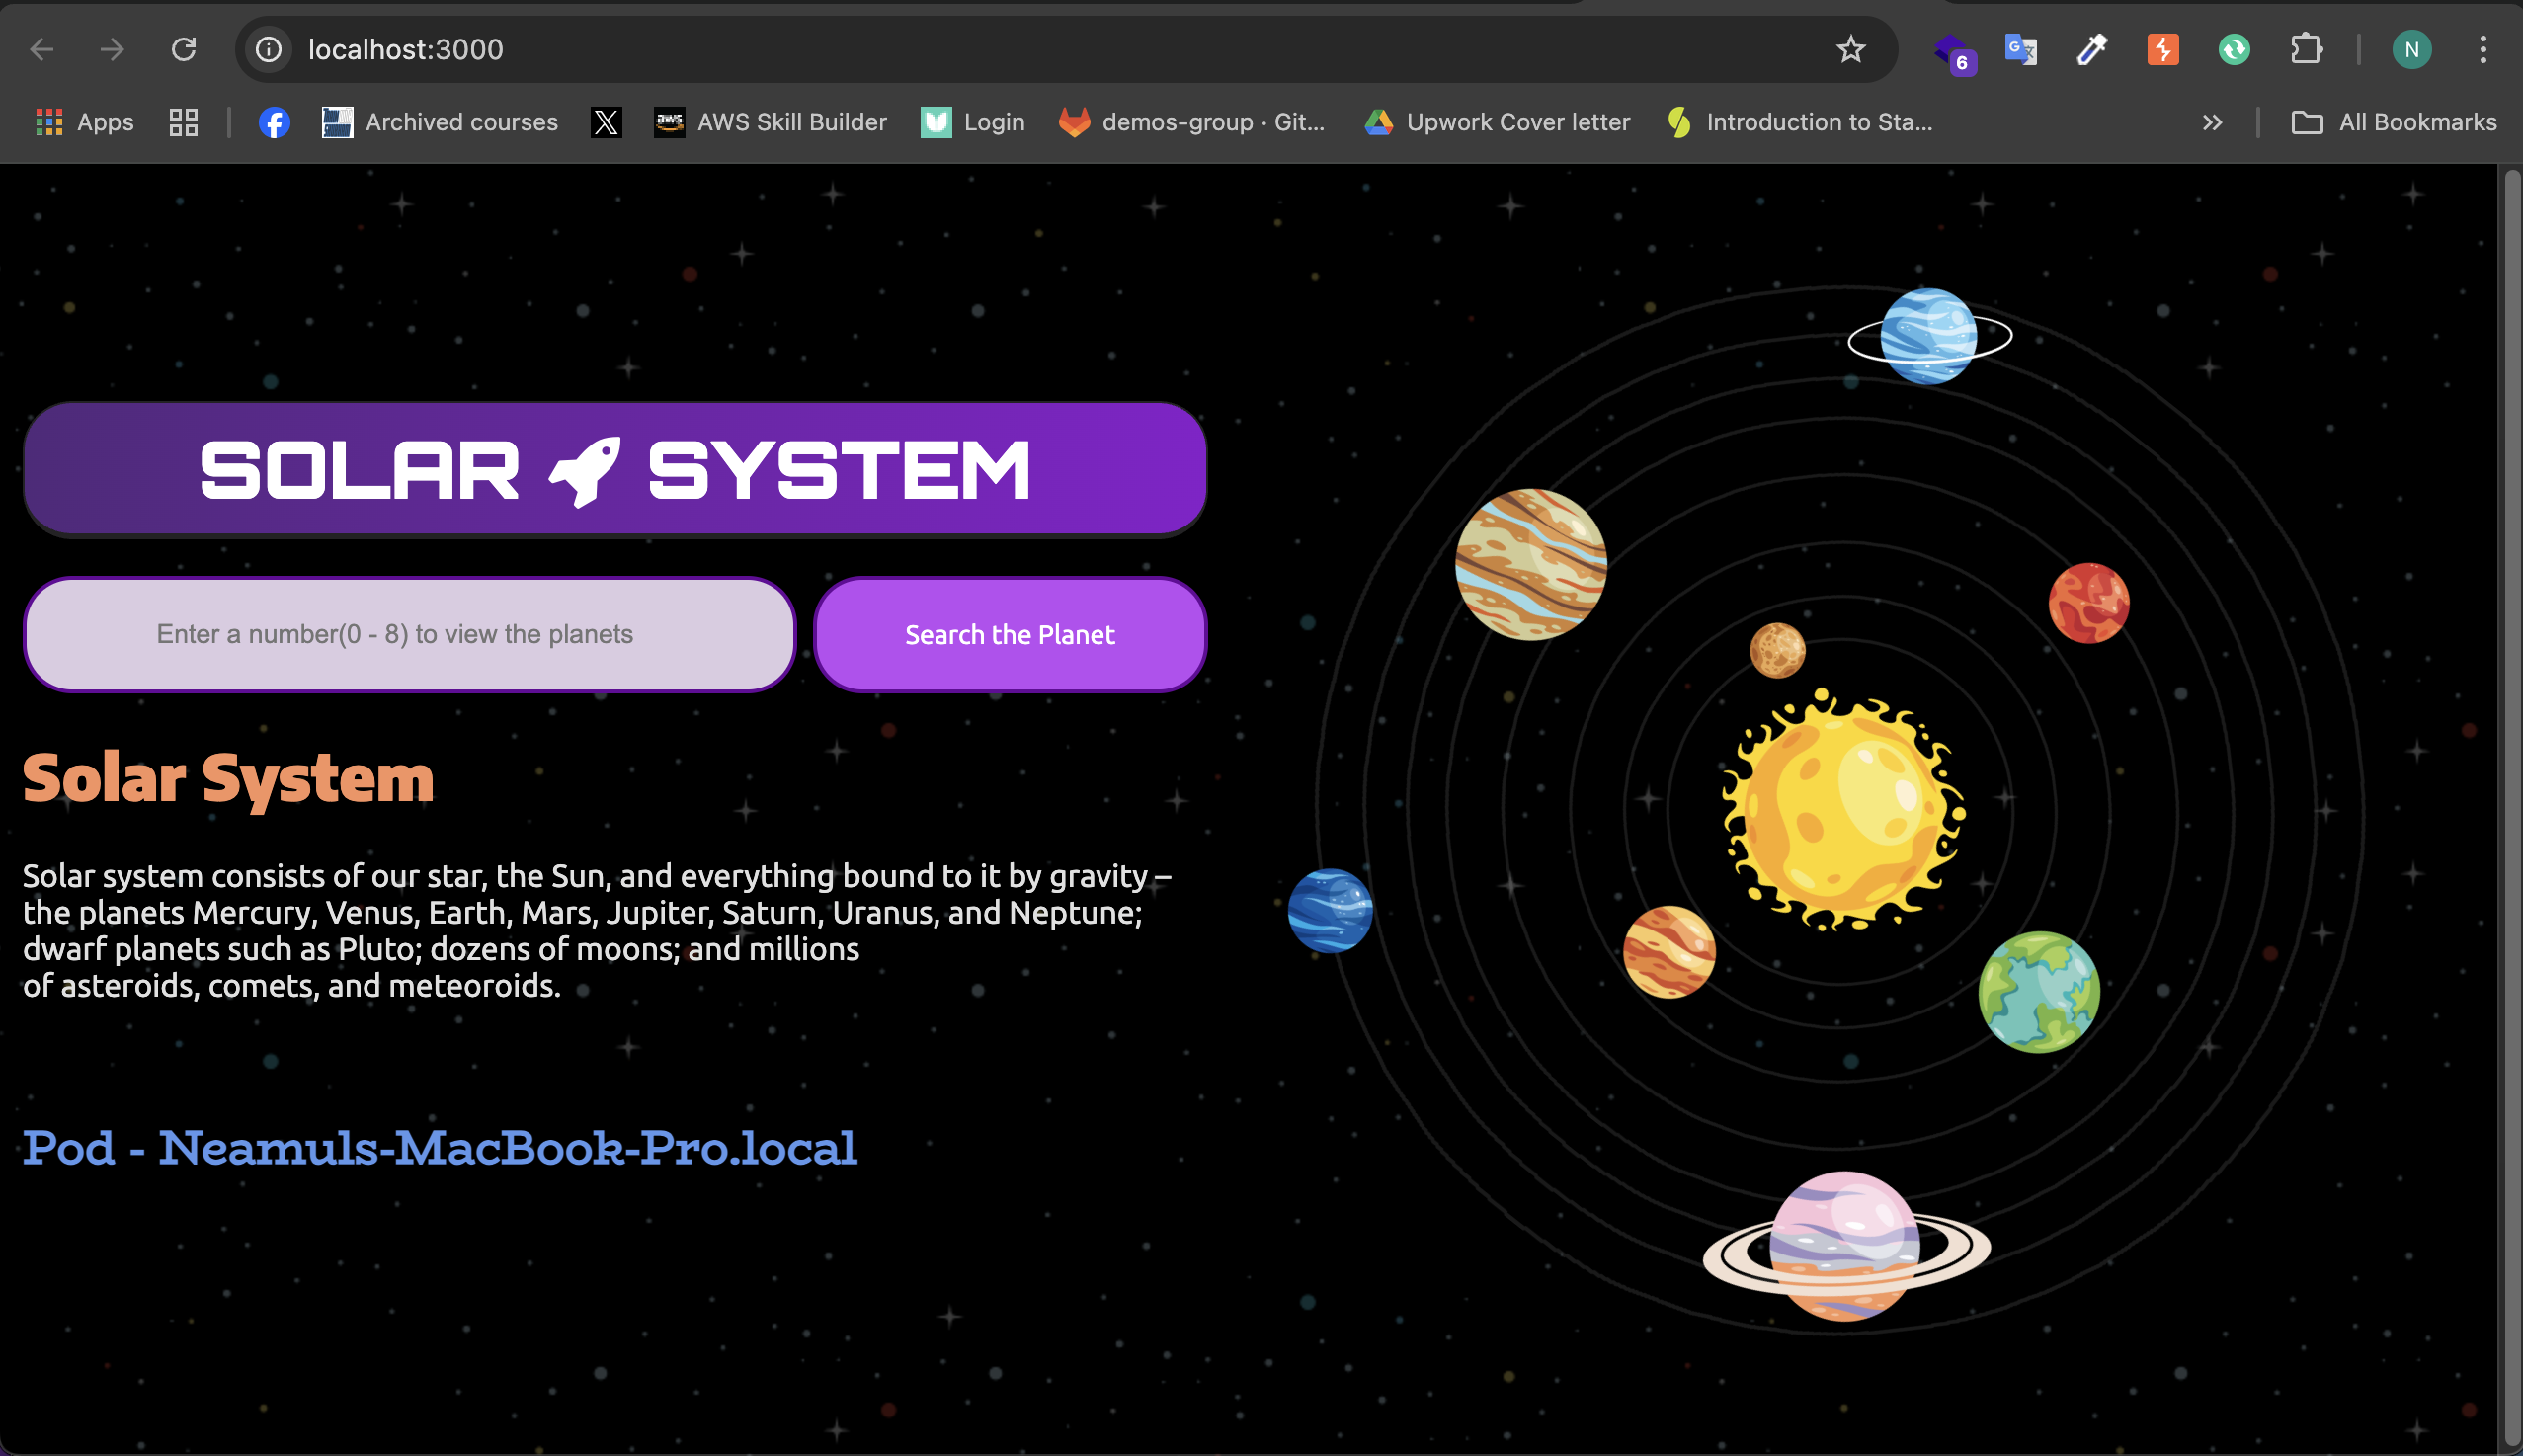
The application is now running at: http://localhost:3000
Containerizing the Application with Docker
Step 1: Writing the Dockerfile
Create a Dockerfile to define the containerized environment:
FROM node:18-alpine3.17

WORKDIR /usr/app

COPY package*.json /usr/app/

RUN npm install

COPY . .

ENV MONGO_URI=uriPlaceholder
ENV MONGO_USERNAME=usernamePlaceholder
ENV MONGO_PASSWORD=passwordPlaceholder

EXPOSE 3000

CMD [ "npm", "start" ]
Explanation:
Base Image: Uses
node:18-alpine3.17for a lightweight runtime.Work Directory: Sets
/usr/appas the working directory.Copy Dependencies: Copies
package.jsonandpackage-lock.jsonbefore runningnpm install.Copy Source Code: Adds all application files to the container.
Set Environment Variables: Defines placeholders for database credentials.
Expose Port 3000: The application runs on port 3000 inside the container.
Run the Application: Executes
npm startas the default command.
Step 2: Building and Running the Docker Container
Build the Docker Image
docker build -t solar-system:latest .
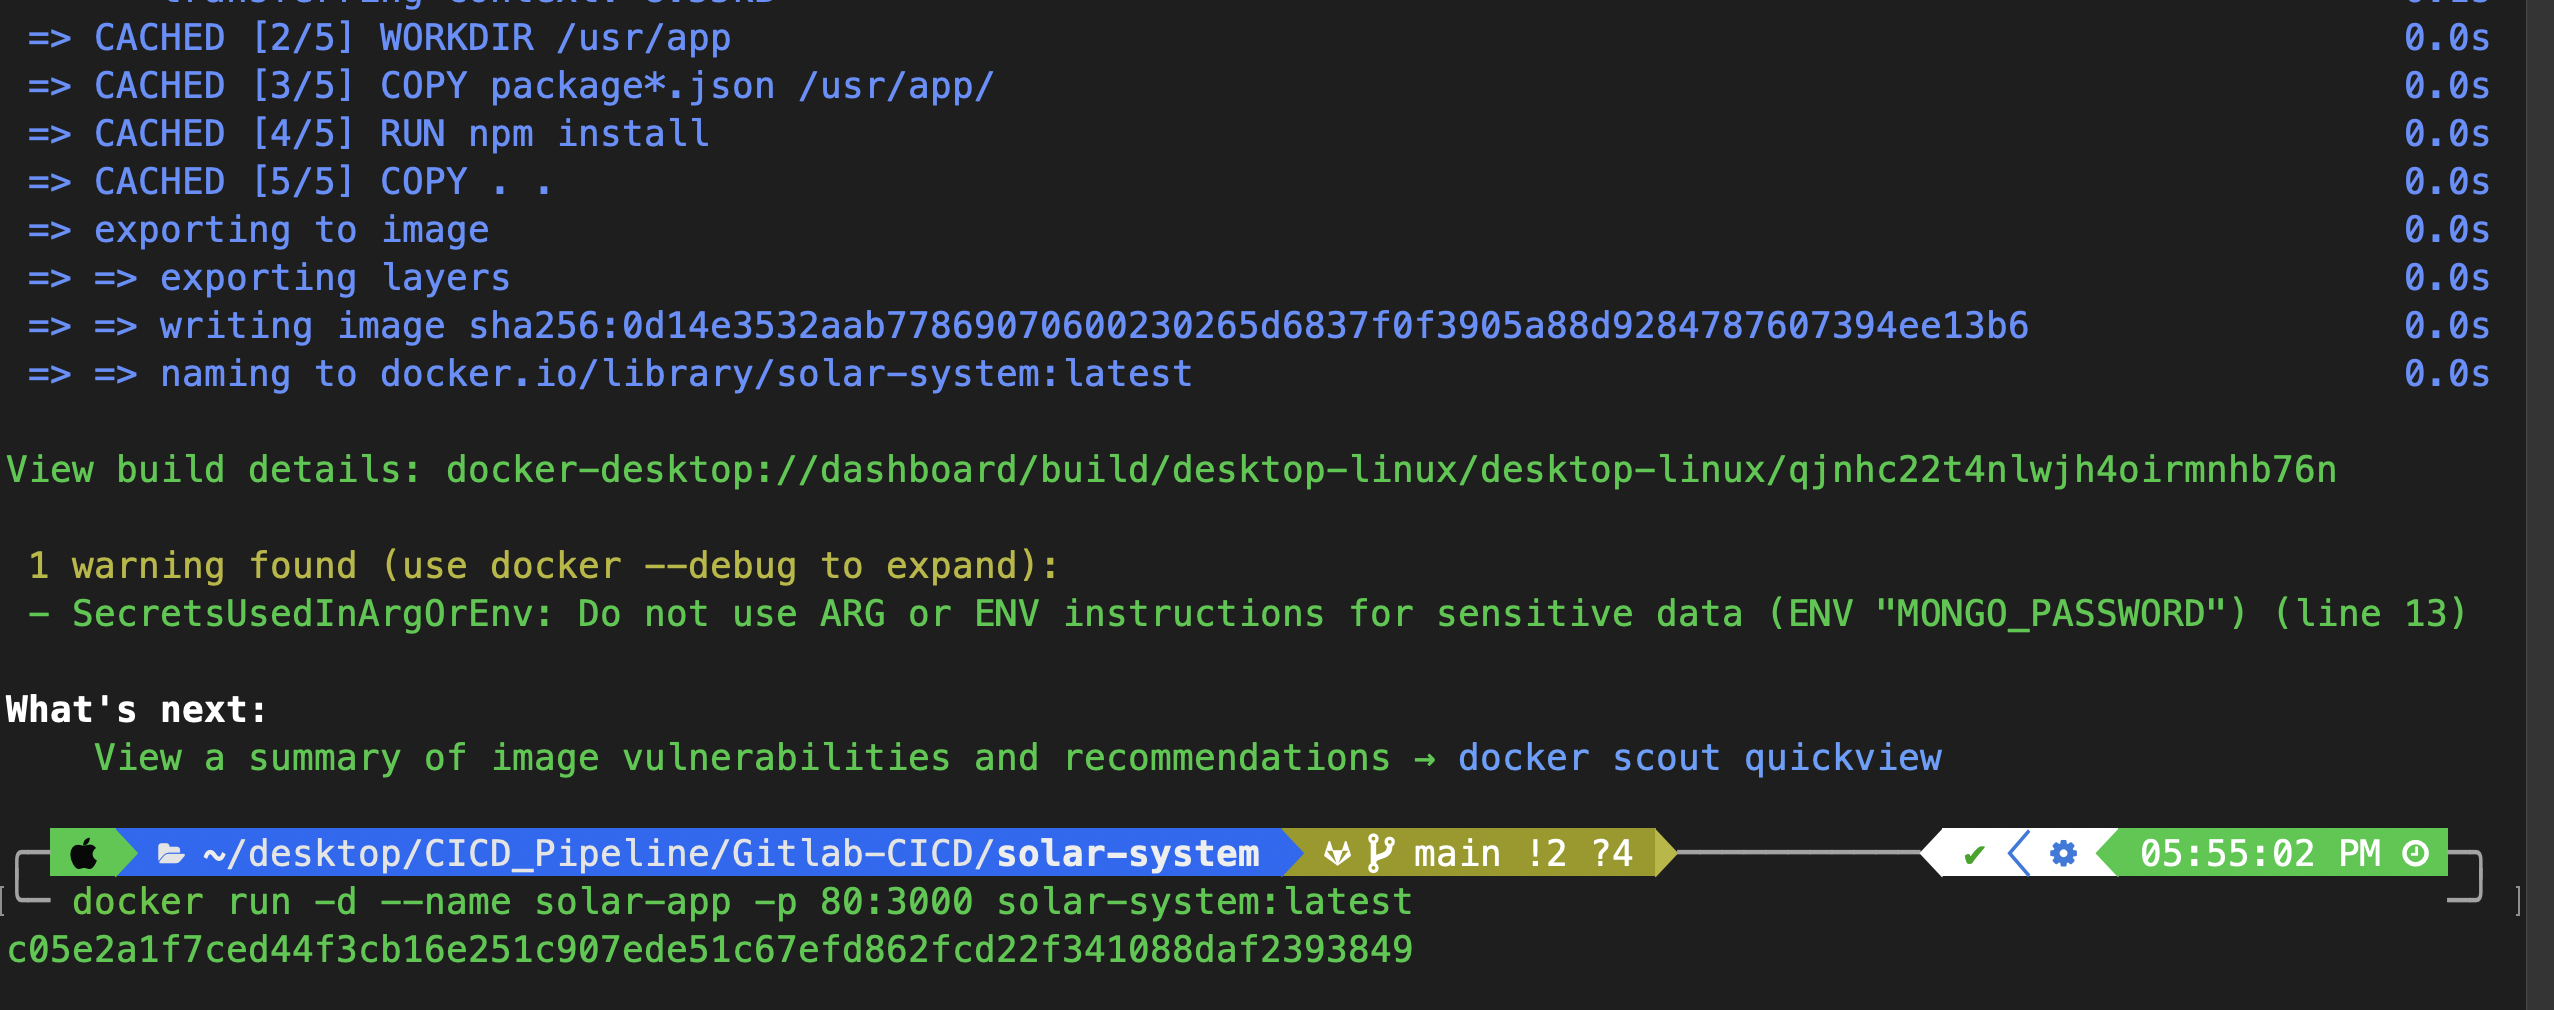
Run the Docker Container
docker run -d --name solar-app -p 80:3000 solar-system:latest
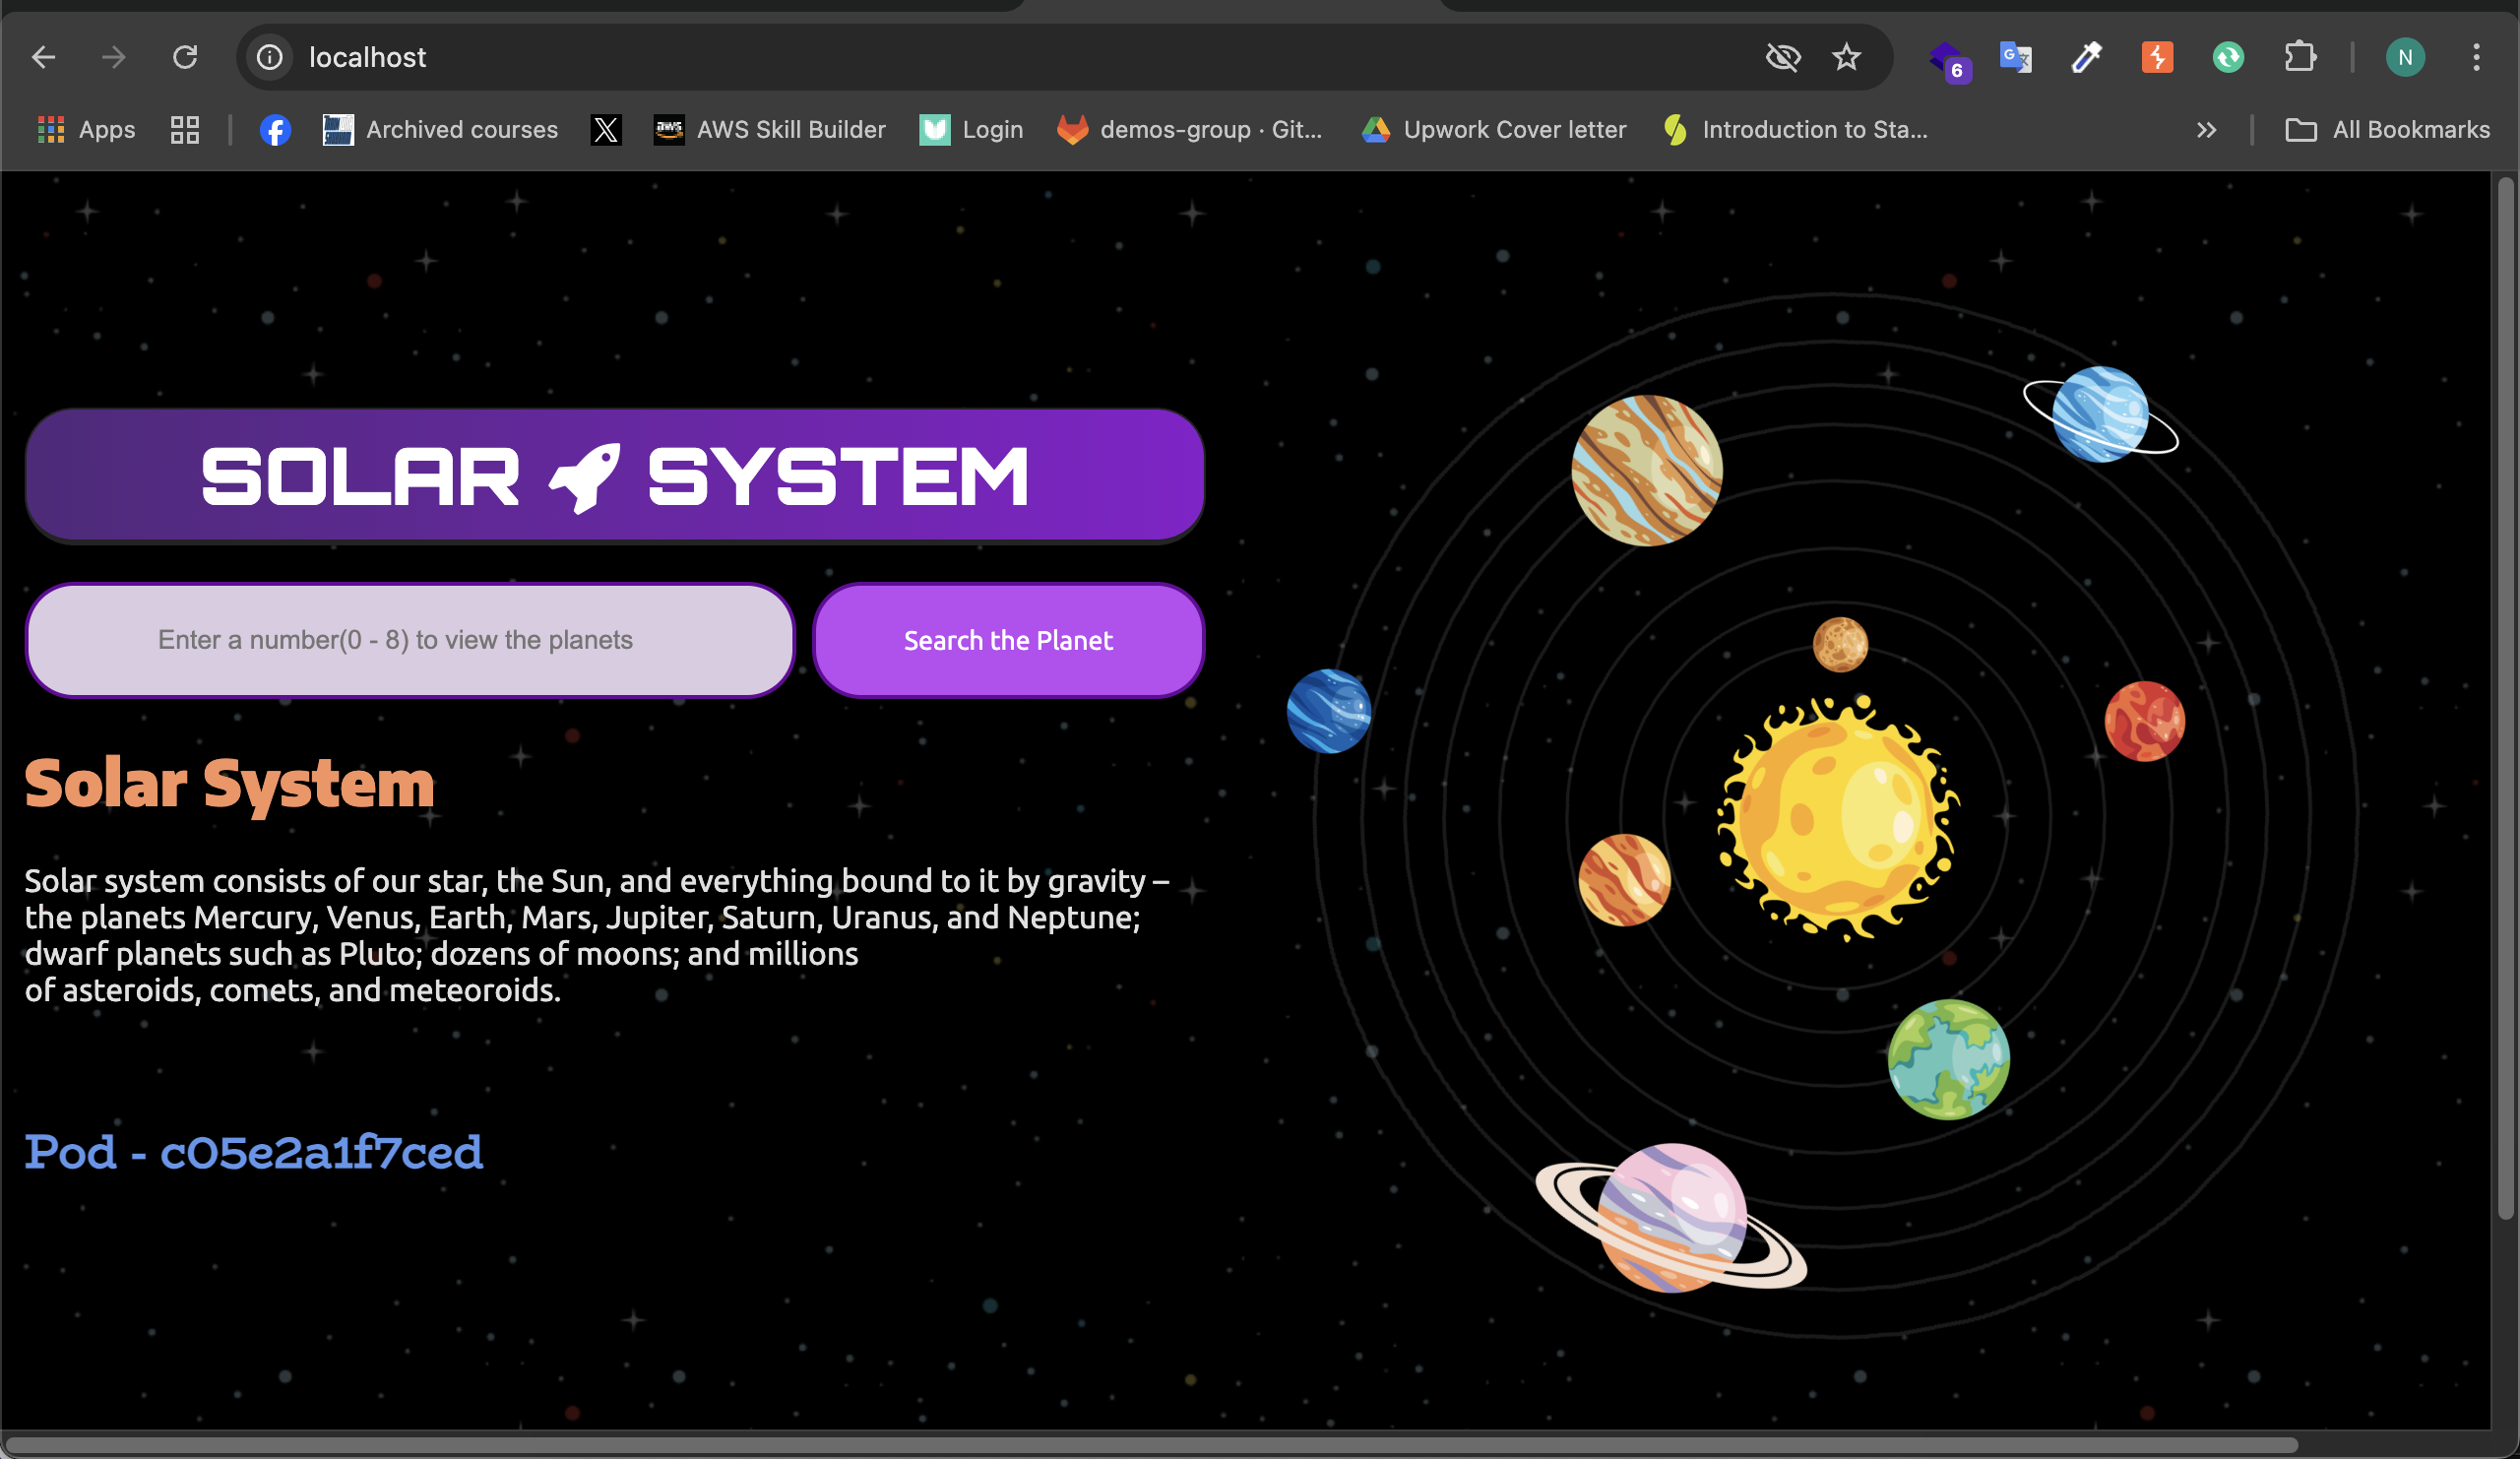
Your application should now be accessible at: http://localhost
Importing an Existing GitLab Repository into a New Repository
When working on GitLab, there may be situations where you need to import an existing repository into a new one. This guide will walk you through the steps to import an existing GitLab repository into a new GitLab repository, allowing you to build and extend the project seamlessly.
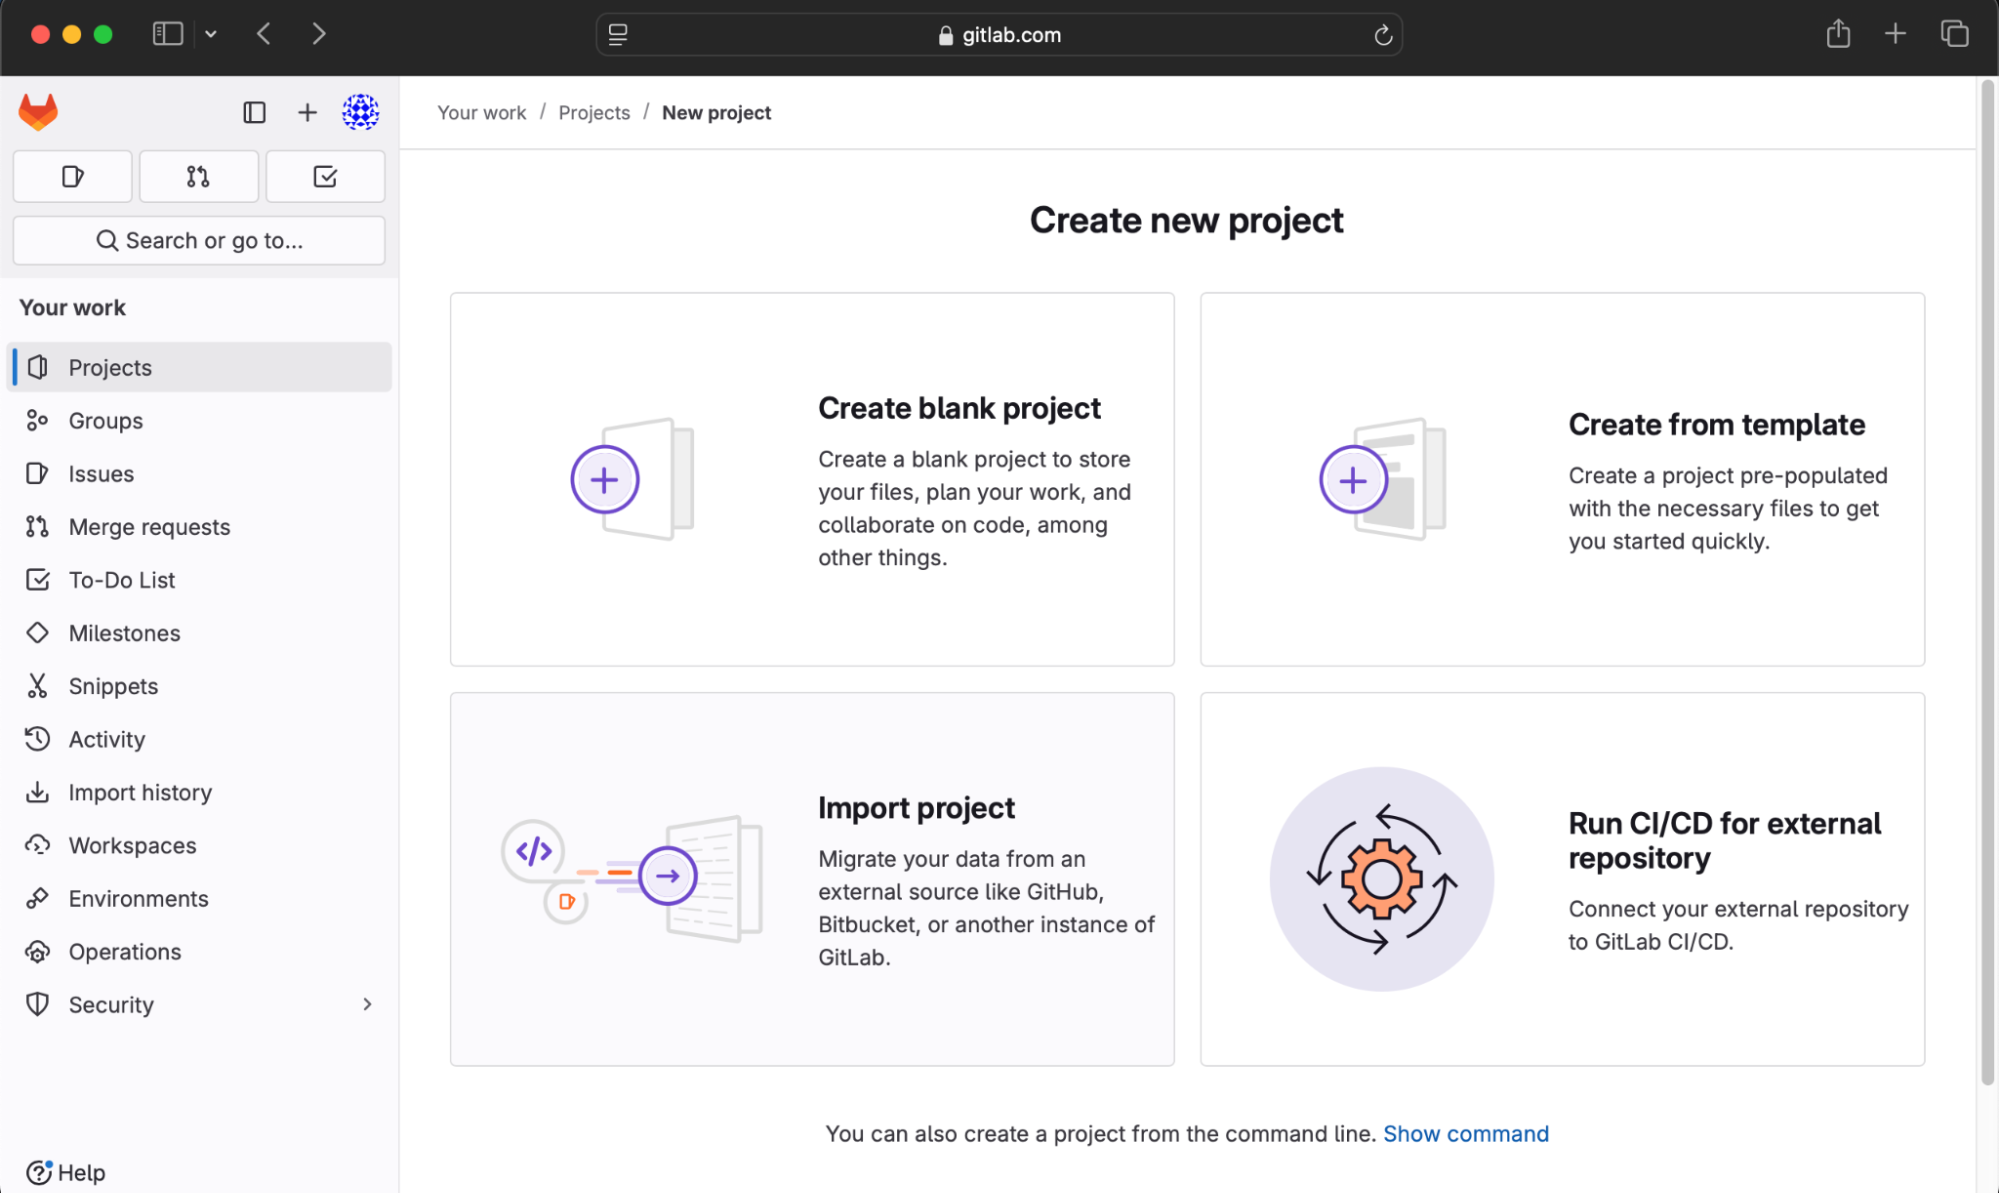
Step 1: Open GitLab and Create a New Project
Navigate to GitLab.
Click on New Project to create a new repository where the existing project will be imported.
Step 2: Import an Existing Project
On the Create New Project page, click on the Import Project tab.
GitLab will provide multiple options for importing projects. Since we have a repository URL, proceed with selecting Repo by URL.
Step 3: Provide Repository Details
In the repository URL field, enter the GitLab repository URL:
https://gitlab.com/devops5481724/solar-system.git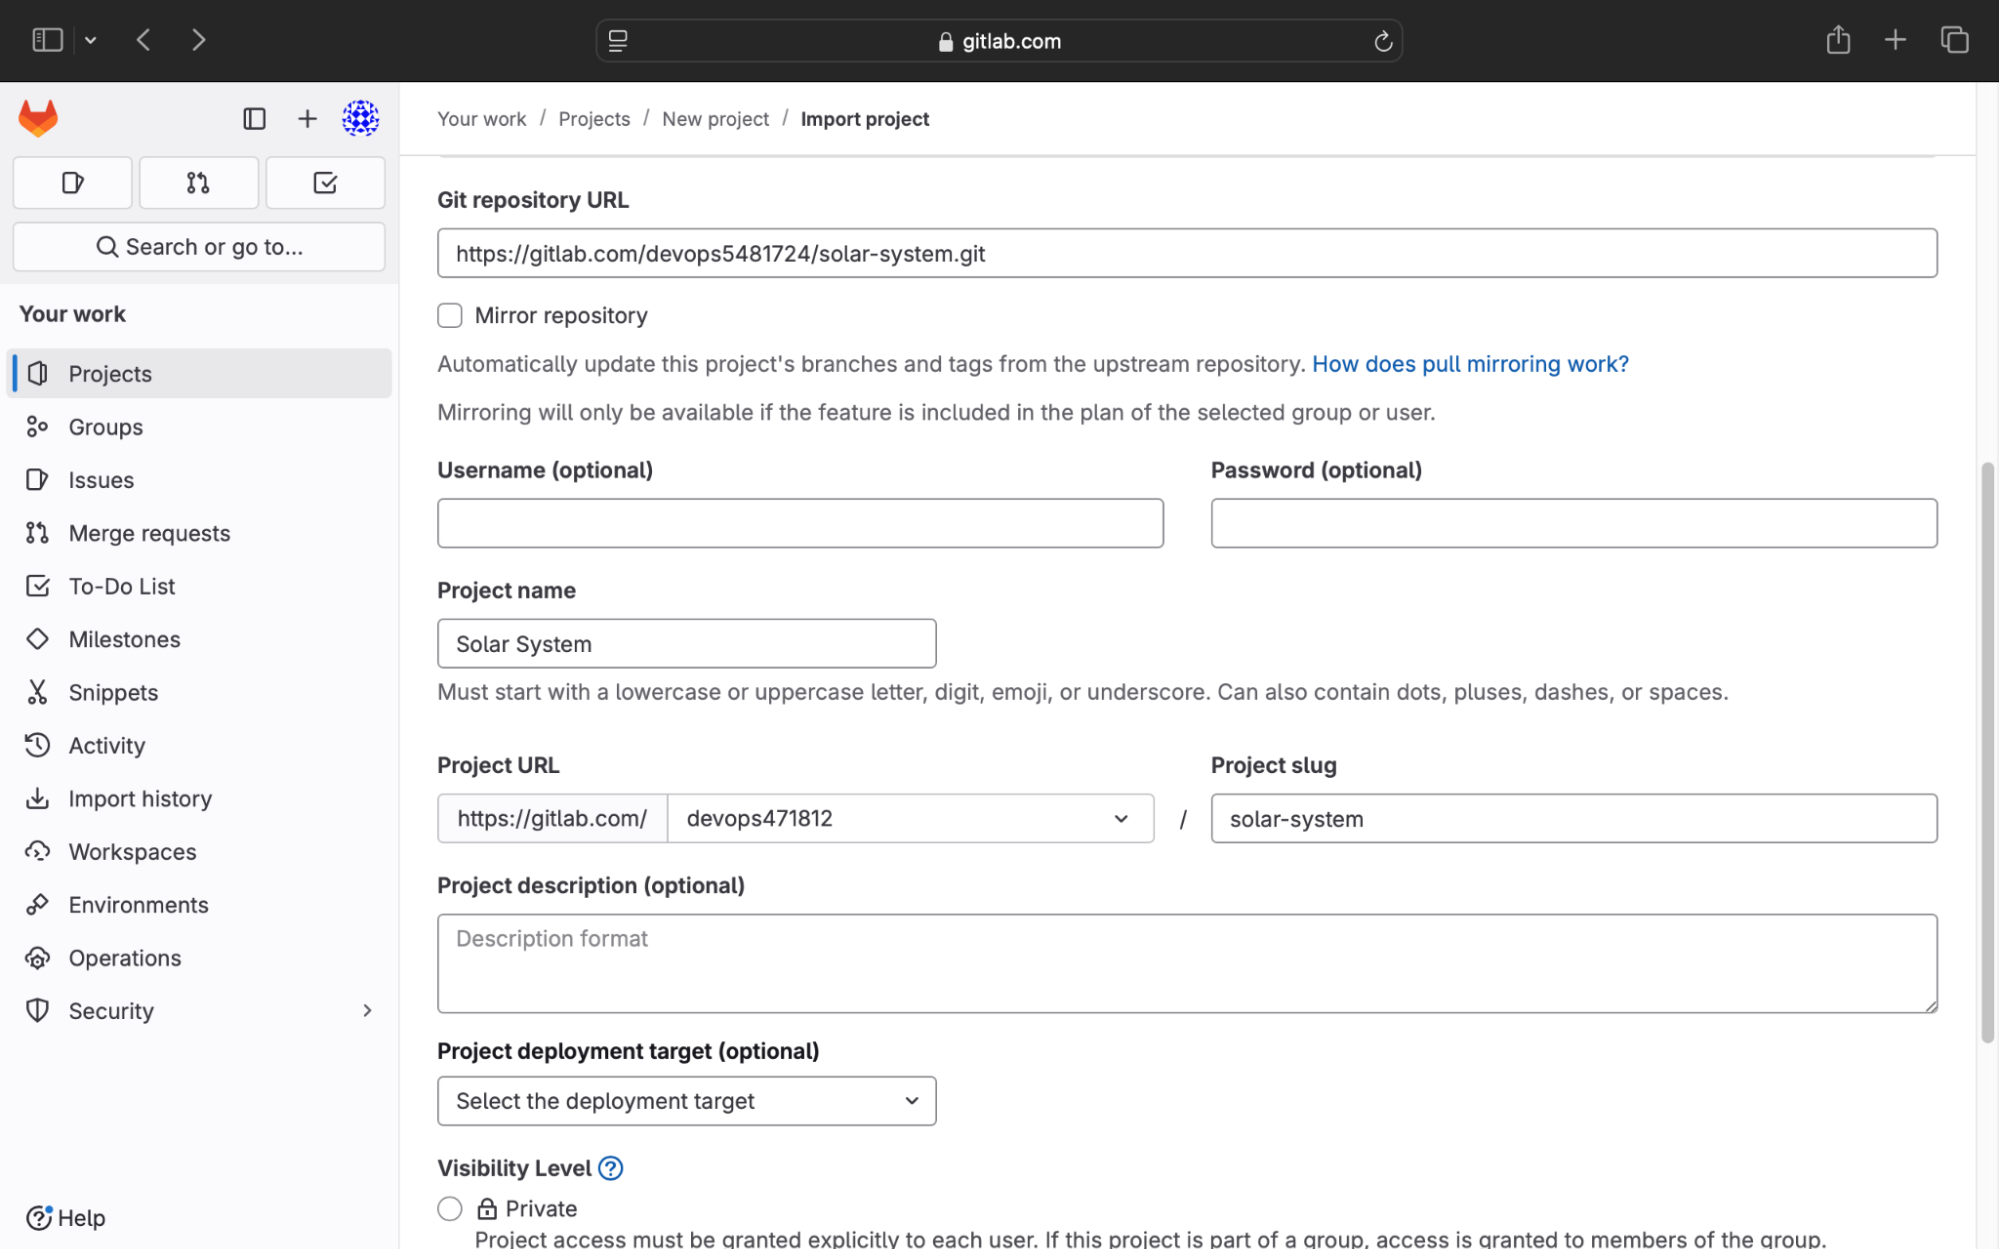
Select your desired GitLab Group or Namespace to manage the repository.
Set the project visibility to Public, so it can be accessed by others if needed.
Click Import Project to begin the import process.
Step 4: Wait for the Import Process
The system will take a few seconds to process the import.
Once completed, you will see a success message stating:
The project was successfully imported.At this point, the repository has been fully imported and is ready for use.
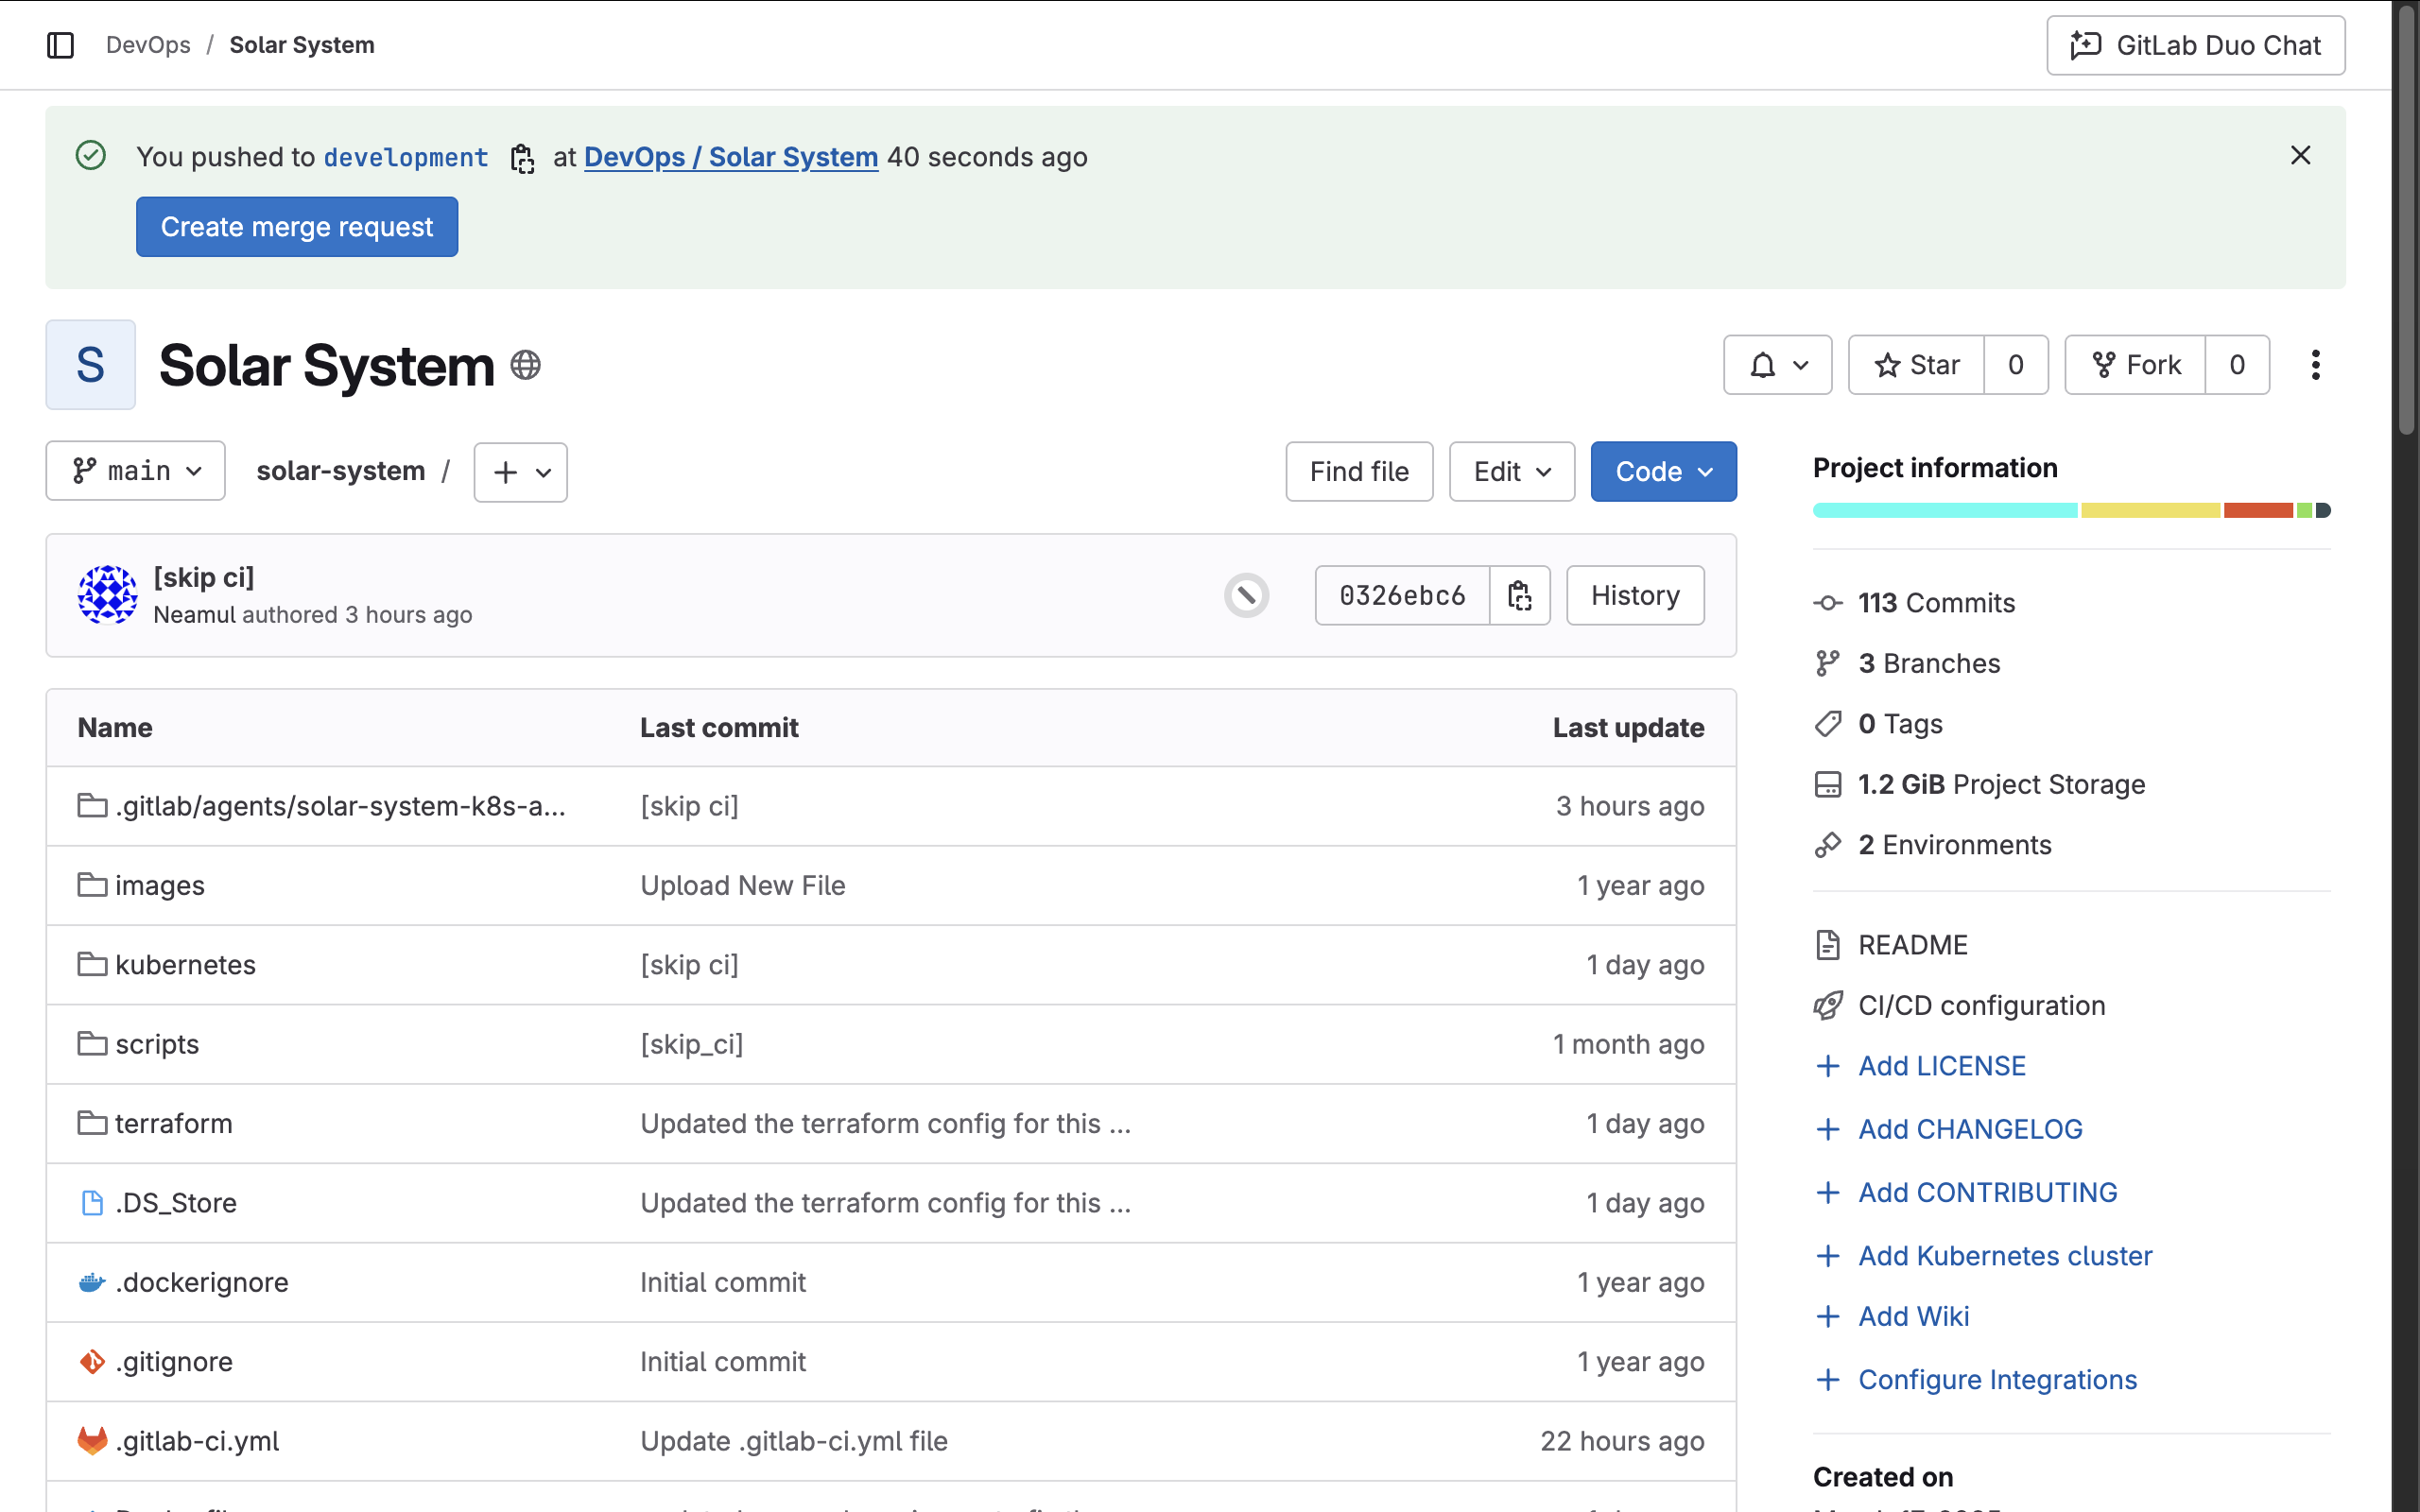
By following these steps, you have successfully imported an existing GitLab repository into a new project. You can now proceed with setting up CI/CD pipelines, deployments, and further development within the new repository.
Setting Up a GitLab CI/CD Pipeline for a Node.js App
In this section, we will configure a GitLab CI/CD pipeline to automate the testing, containerization, security scanning, and deployment of a Node.js application to AWS EKS. The CI/CD pipeline will be defined in the .gitlab-ci.yml file, located in the root directory of the repository.
Creating the .gitlab-ci.yml File
Step 1: Navigate to the Development Branch
Since the application is under active development, follow these steps:
Go to your GitLab Repository.
Switch to the
developmentbranch.Open the Pipeline Editor and create a
.gitlab-ci.ymlfile.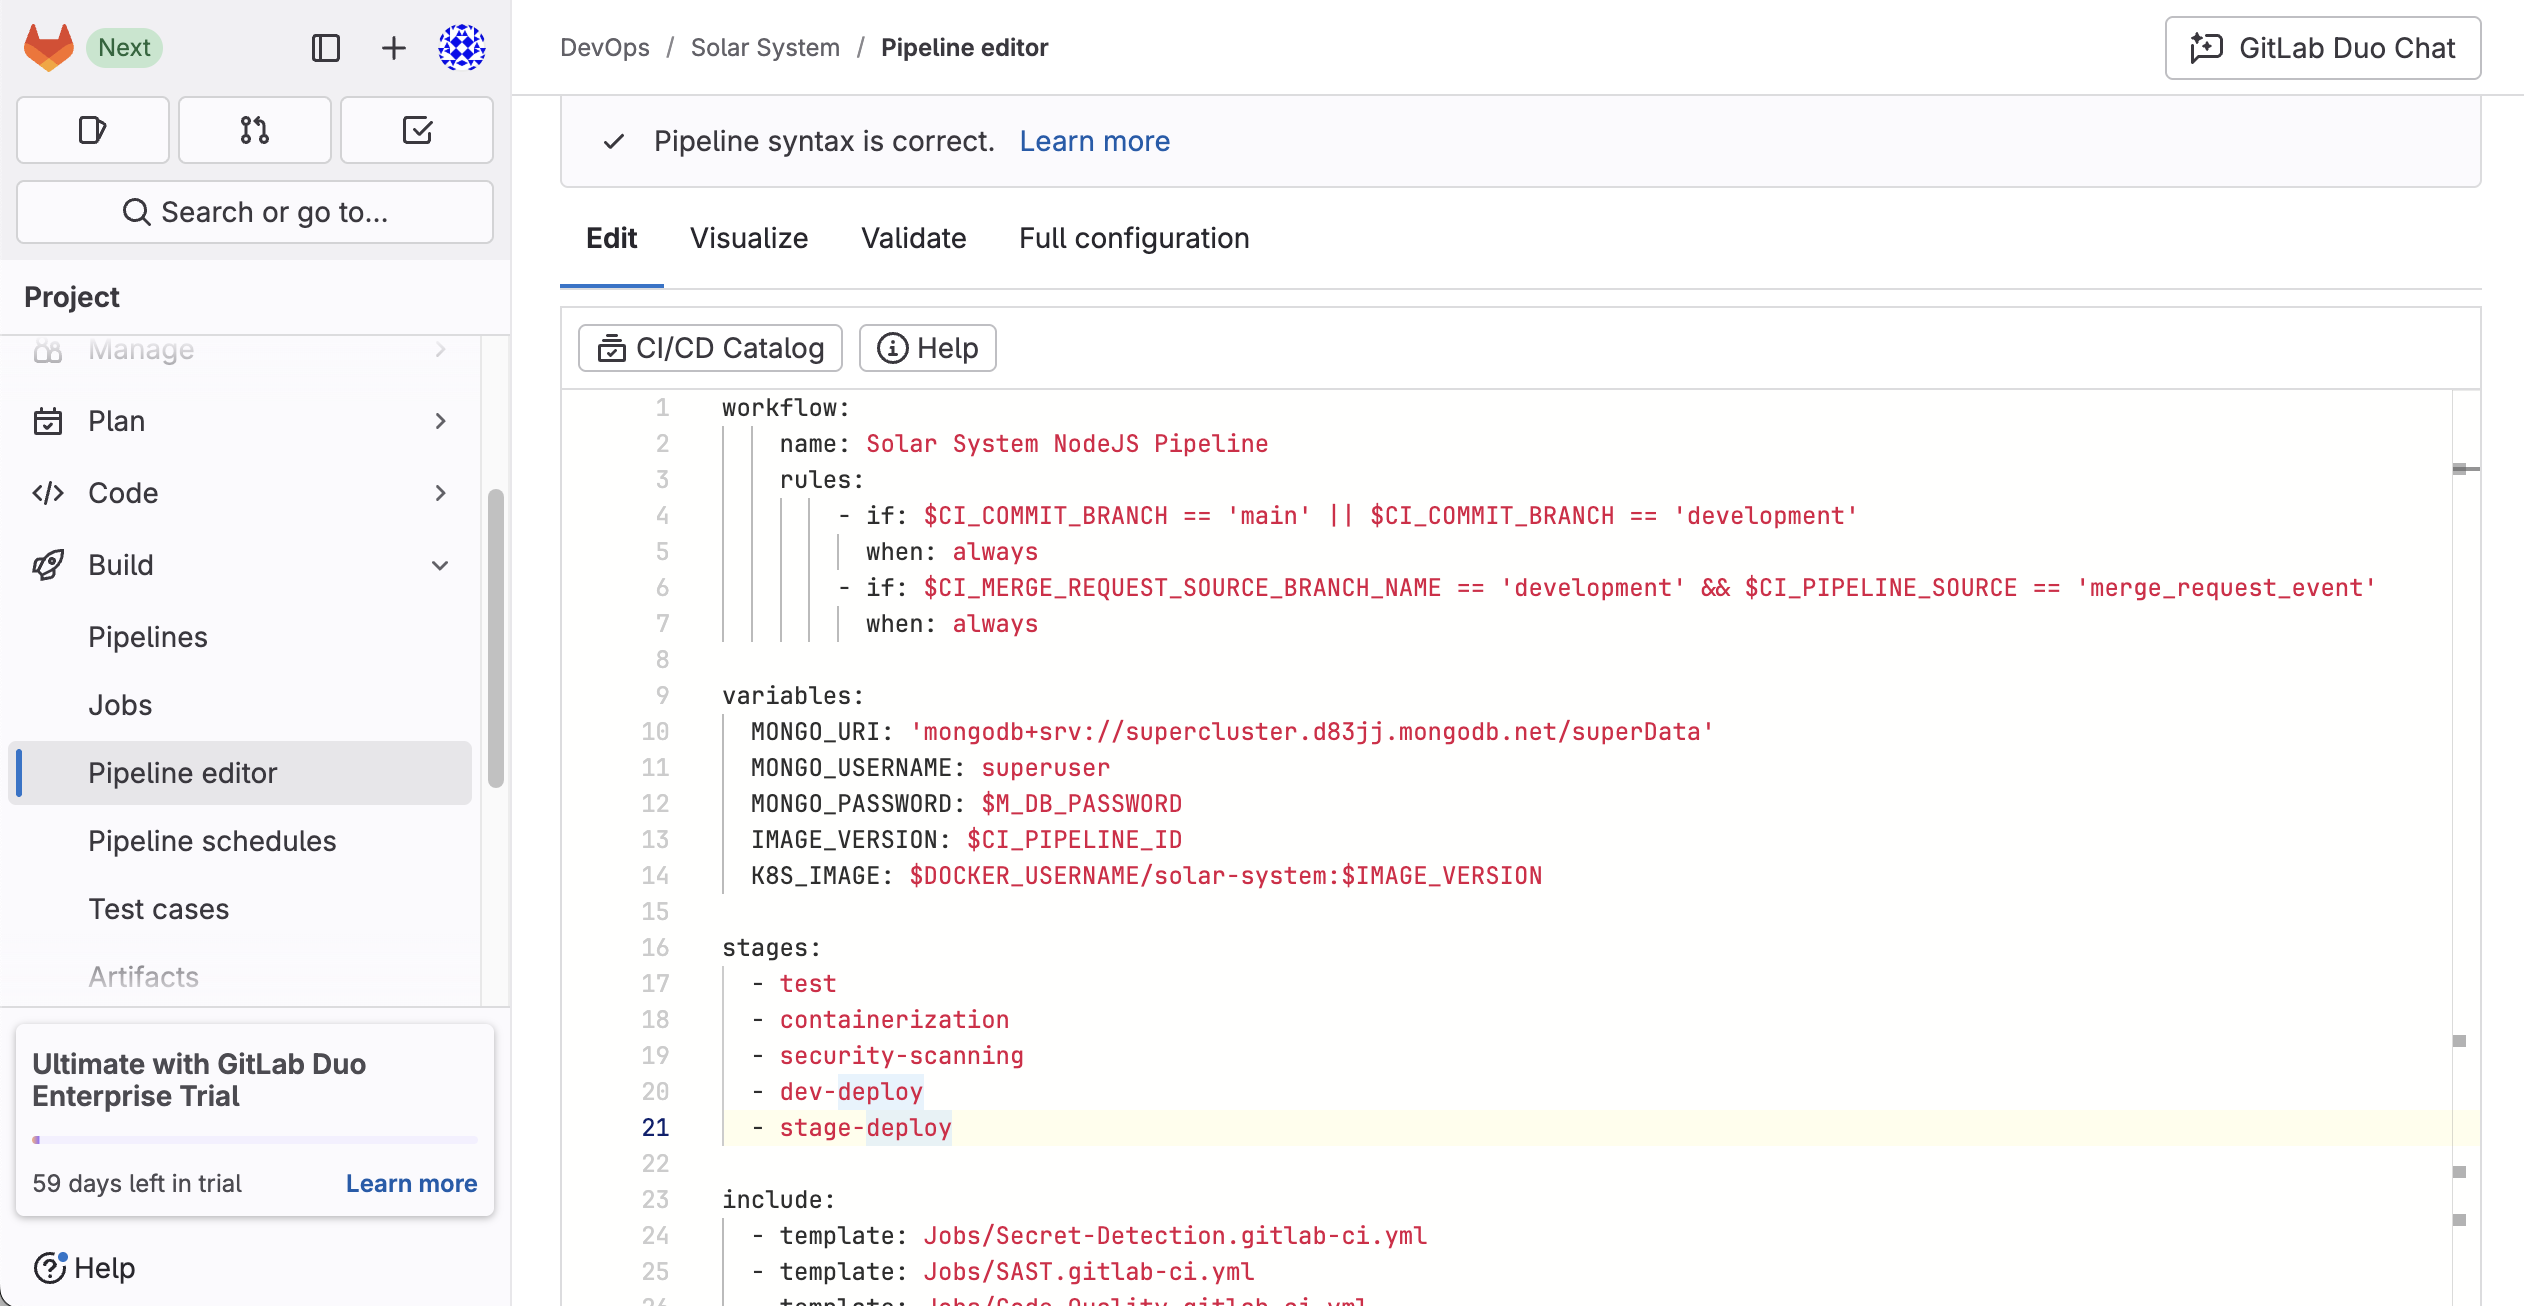
Pipeline Workflow Definition
The workflow defines when the pipeline should run:
workflow:
  name: Solar System NodeJS Pipeline
  rules:
    - if: $CI_COMMIT_BRANCH == 'main' || $CI_COMMIT_BRANCH == 'development'
      when: always
    - if: $CI_MERGE_REQUEST_SOURCE_BRANCH_NAME == 'development' && $CI_PIPELINE_SOURCE == 'merge_request_event'
      when: always
Explanation:
The pipeline runs when a commit is pushed to the
mainordevelopmentbranch.It also runs automatically for merge requests from
development.
Defining Variables
variables:
  MONGO_URI: 'mongodb+srv://supercluster.d83jj.mongodb.net/superData'
  MONGO_USERNAME: superuser
  MONGO_PASSWORD: $M_DB_PASSWORD
  IMAGE_VERSION: $CI_PIPELINE_ID
  K8S_IMAGE: $DOCKER_USERNAME/solar-system:$IMAGE_VERSION
These environment variables store database credentials and image versioning information.
Stages of the Pipeline
stages:
  - test
  - containerization
  - security-scanning
  - dev-deploy
  - stage-deploy
Explanation:
Test - Runs unit tests and code quality checks.
Containerization - Builds and tests Docker images.
Security Scanning - Detects vulnerabilities in dependencies and containers.
Dev Deploy - Deploys to the development environment.
Stage Deploy - Deploys to a staging environment after manual approval.
Implementing Pipeline Jobs
1. Code Quality and Security Tests
secret_detection:
  stage: test
  script:
    - echo "Running secret detection..."

code_quality:
  stage: test
  script:
    - echo "Running Code Quality Scan..."
Purpose:
secret_detectionchecks for exposed credentials in code.code_qualityensures adherence to coding standards.
2. Unit Testing and Code Coverage
.prepare_testing_environment:
  image: node:18-alpine
  services:
    - name: siddharth67/mongo-db:non-prod
      alias: mongo
  before_script:
    - npm install

unit_testing:
  stage: test
  extends: .prepare_testing_environment
  script:
    - npm test
Purpose:
Runs unit tests using Mocha.
Uses a lightweight Node.js image.
Deploys a temporary MongoDB container for testing.
3. Docker Build and Push
docker_build:
  stage: containerization
  image: docker:24.0.5
  services:
    - docker:24.0.5-dind
  script:
    - docker build -t $DOCKER_USERNAME/solar-system:$IMAGE_VERSION .
    - docker push $DOCKER_USERNAME/solar-system:$IMAGE_VERSION
Purpose:
- Builds and pushes the Docker image to Docker Hub.
4. Security Scanning
container_scanning:
  stage: security-scanning
  script:
    - echo "Running Container Security Scanning on Image $K8S_IMAGE"

dependency_scanning:
  stage: security-scanning
  script:
    - echo "Running Dependency Scanning for vulnerabilities..."
Purpose:
Container Scanning ensures Docker images are free from vulnerabilities.
Dependency Scanning detects insecure packages.
5. Deploy to the Development Environment
k8s_dev_deploy:
  stage: dev-deploy
  image: bitnami/kubectl:latest
  variables:
    NAMESPACE: development
    KUBE_CONTEXT: "devops5481724/solar-system:solar-system-k8s-agent"
  script:
    - kubectl config use-context "$KUBE_CONTEXT"
    - kubectl get namespace "$NAMESPACE" || kubectl create namespace "$NAMESPACE"
    - for file in kubernetes/development/*.yaml; do envsubst < "$file" | kubectl apply -f -; done
Purpose:
Uses
kubectlto apply Kubernetes manifests.Ensures the correct namespace and environment.
6. Integration Testing in Development
k8s_dev_integration_testing:
  stage: dev-deploy
  image: alpine:3.17
  needs:
    - k8s_dev_deploy
  script:
    - curl -s "http://$INGRESS_URL/live" | grep -i live
Purpose:
- Runs health checks to verify the deployment.
7. Manual Approval for Staging Deployment
k8s_staging_deploy:
  stage: stage-deploy
  image: bitnami/kubectl:latest
  when: manual
  script:
    - kubectl config use-context "$KUBE_CONTEXT"
    - for file in kubernetes/staging/*.yaml; do envsubst < "$file" | kubectl apply -f -; done
Purpose:
Deploys to staging only after manual approval.
Uses environment-specific configurations.
8. Integration Testing in Staging
k8s_stage_integration_testing:
  stage: stage-deploy
  image: alpine:3.17
  needs:
    - k8s_staging_deploy
  script:
    - curl -s "http://$INGRESS_URL/live" | grep -i live
Purpose:
- Ensures the staging environment is live before the production release.
In this section, we successfully:
Defined a multi-stage GitLab CI/CD pipeline.
Implemented automated testing, security scanning, and Docker image management.
Deployed the application to AWS EKS in development and staging environments.
This pipeline enhances the automation, security, and scalability of the deployment process, making it ideal for modern cloud-based applications.
Setting Up GitLab CI/CD Variables
To successfully run the CI/CD pipeline, we need to configure environment variables and secrets at the project level in GitLab.
Step 1: Navigate to GitLab CI/CD Settings
Go to the GitLab repository.
Click on Settings.
Select CI/CD from the left-hand menu.
Expand the Variables section.
Step 2: Add Required Variables
We need to define the following environment variables:
Docker Credentials
These are used to authenticate with Docker Hub to push and pull images:
DOCKER_USERNAME = [Your Docker Username]
DOCKER_PASSWORD = [Your Docker Hub Password]
Database Credentials
These are necessary for the application to connect to MongoDB:
M_DB_PASSWORD = SuperPassword
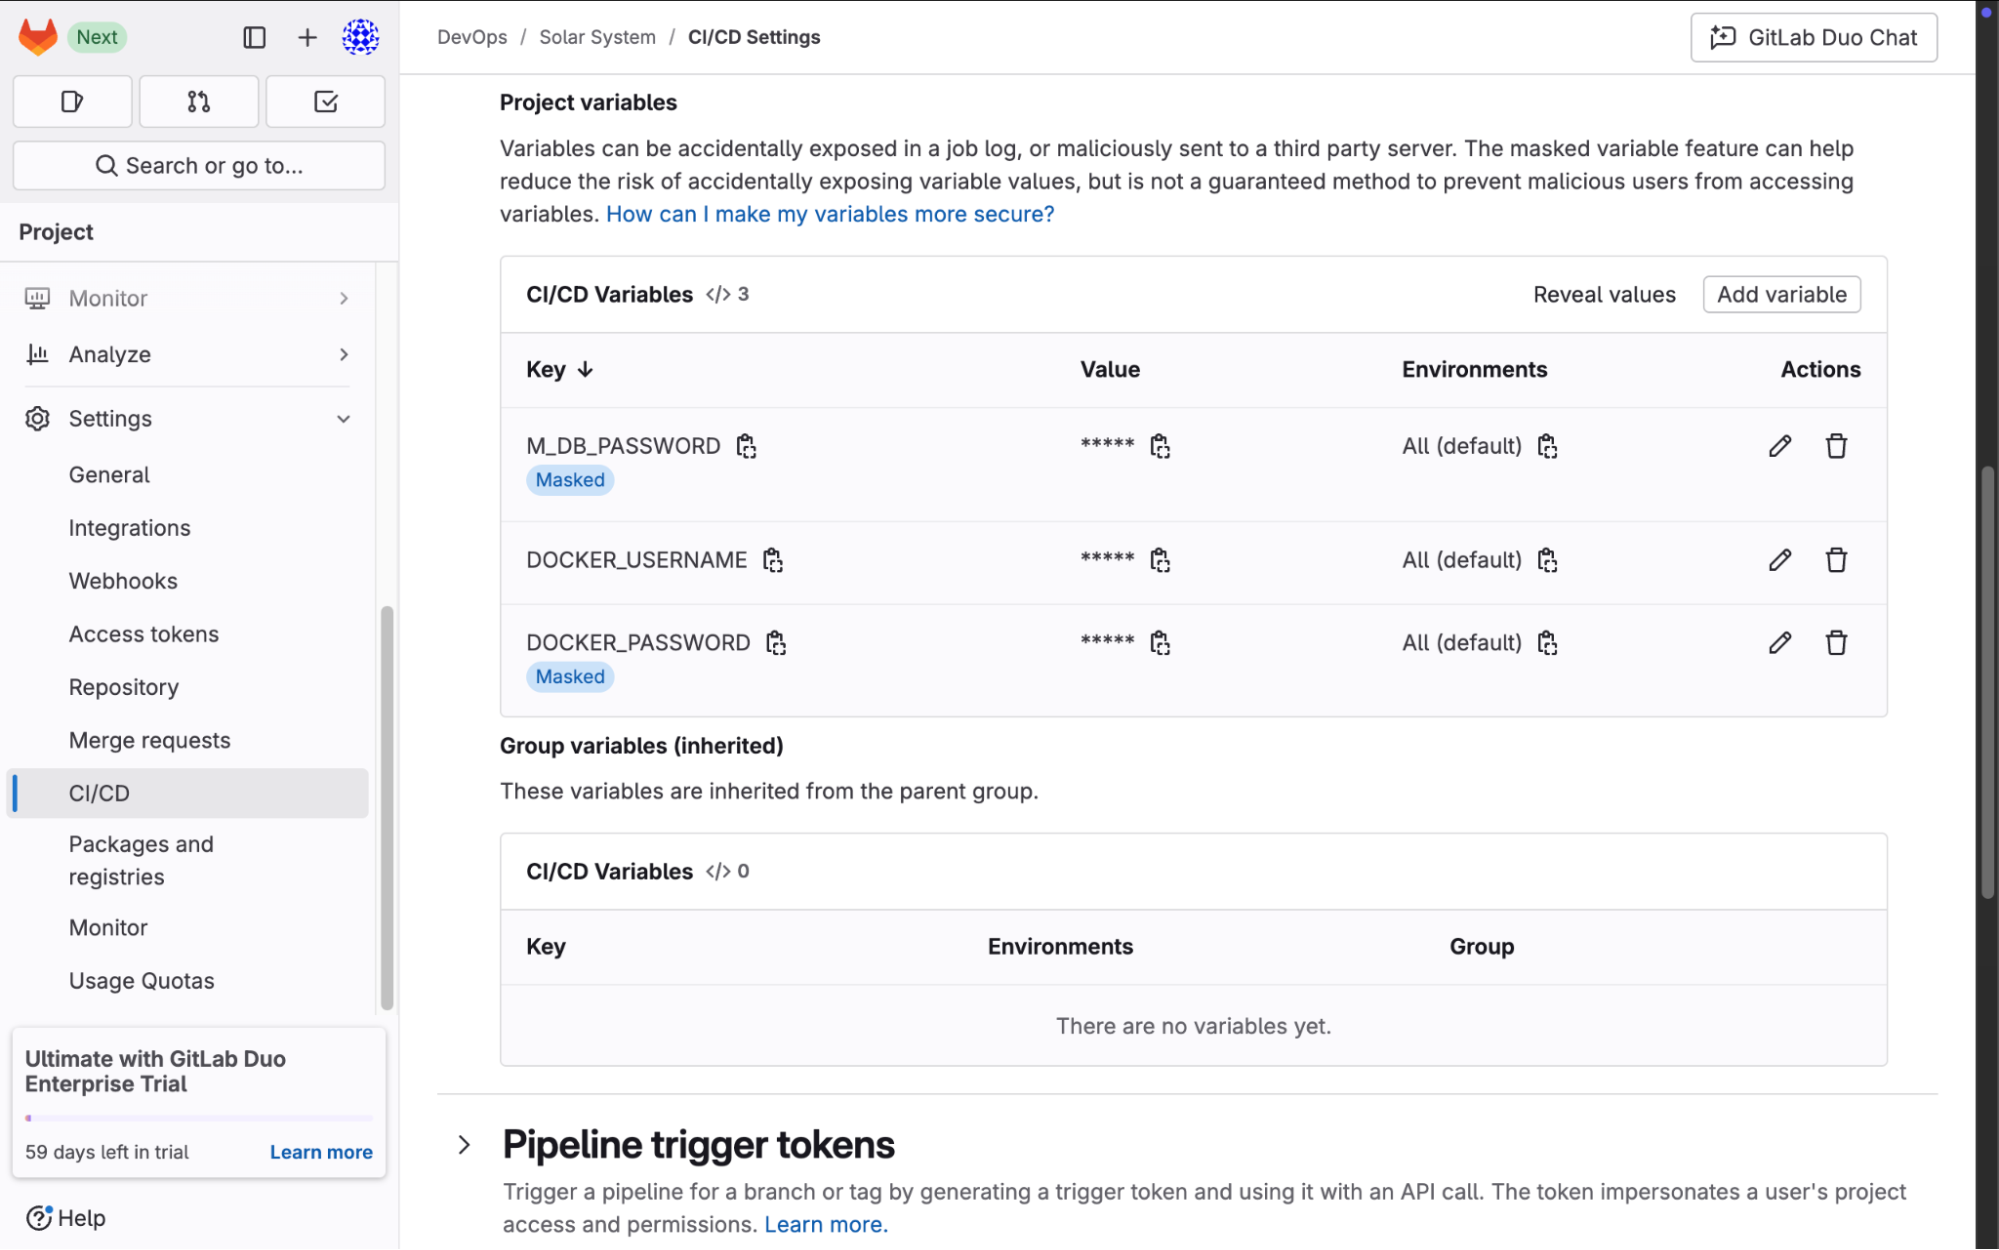
Step 3: Save Changes
Once all variables have been added, click Save Changes to ensure they are stored securely in GitLab.
Setting Up Kubernetes Manifests
Now, we need to create Kubernetes configuration files to deploy the application on AWS EKS.
Step 1: Create Kubernetes Directory in GitLab
Open your GitLab repository.
Navigate to the development branch.
Click on the + icon and select New Directory.
Name the directory kubernetes.
Inside the kubernetes directory, create another directory named development.
Writing Kubernetes Deployment Manifest
Create a file named deployment.yaml inside kubernetes/development/:
apiVersion: apps/v1
kind: Deployment
metadata:
  labels:
    app: solar-system
  name: solar-system
  namespace: ${NAMESPACE}
spec:
  replicas: ${REPLICAS}
  selector:
    matchLabels:
      app: solar-system
  template:
    metadata:
      labels:
        app: solar-system
    spec:
      containers:
      - image: ${K8S_IMAGE}
        imagePullPolicy: Always
        name: solar-system
        ports:
        - containerPort: 3000
          name: http
          protocol: TCP
        envFrom:
        - secretRef:
            name: mongo-db-creds
Explanation:
Deployment Resource: Manages how many instances (pods) of the application should run.
Replica Count: The value
${REPLICAS}is dynamically set based on the environment.Container Image: Pulled from Docker Hub using
${K8S_IMAGE}.Port 3000: Exposes the application inside the cluster.
Secret Reference: Fetches database credentials stored in Kubernetes secrets.
Writing Kubernetes Service Manifest
Create a file named service.yaml inside kubernetes/development/:
apiVersion: v1
kind: Service
metadata:
  labels:
    app: solar-system
  name: solar-system
  namespace: ${NAMESPACE}
spec:
  ports:
  - port: 3000
    protocol: TCP
    targetPort: 3000
  selector:
    app: solar-system
  type: NodePort
Explanation:
Service Resource: Exposes the application within the Kubernetes cluster.
Selector: Routes traffic to pods labeled
app: solar-system.NodePort: Allows external access via a mapped port on the node.
Writing Kubernetes Ingress Manifest
Create a file named ingress.yaml inside kubernetes/development/:
apiVersion: networking.k8s.io/v1
kind: Ingress
metadata:
  name: solar-system
  namespace: ${NAMESPACE}
  annotations:
    alb.ingress.kubernetes.io/target-type: ip
    alb.ingress.kubernetes.io/scheme: internet-facing
spec:
  ingressClassName: alb
  rules:
  - http:
      paths:
        - path: /
          pathType: Prefix
          backend:
            service:
              name: solar-system
              port:
                number: 3000
Explanation:
Ingress Resource: Defines routing rules for external traffic.
AWS ALB Annotations: Ensures the application is exposed publicly using an Application Load Balancer (ALB).
Path Routing: Maps all incoming traffic (
/) to the solar-system service on port 3000.
By following these steps, we have:
Configured GitLab CI/CD variables for Docker and database credentials.
Created Kubernetes manifests for deploying the application.
Defined Deployment, Service, and Ingress configurations for managing the application on AWS EKS.
Now that we have the necessary files for deploying the application to Kubernetes, the next step is to create an EKS (Elastic Kubernetes Service) cluster for deployment. You can choose any cluster setup based on your preference, but for this project, a Terraform configuration has been created to deploy the necessary components, including:
Application Load Balancer (ALB) controller
Required IAM permissions
Node group configuration
Essential plugins
Cluster networking setup
Terraform Configuration Overview
The Terraform configuration for this setup is located in the terraform/ directory of the project repository. It includes multiple Terraform files that define various aspects of the AWS infrastructure:
0-locals.tf                    16-ebs-csi-driver.tf           6-routes.tf
1-providers.tf                 17-openid-connect-provider.tf  7-eks.tf
10-metrics-server.tf           18-efs.tf                      8-nodes.tf
11-pod-Identity-addon.tf       19-secrets-store-csi-driver.tf 9-helm-provider.tf
12-cluster-autoscaler.tf       2-vpc.tf                       iam
13-aws-lbc.tf                  3-igw.tf                       values
14-nginx-ingress.tf            4-subnets.tf
15-cert-manager.tf             5-nat.tf
What This Terraform Configuration Does
Defines Infrastructure Components
Sets up the VPC, subnets, and necessary routing configurations.
Establishes public and private subnets for better security and networking.
Creates an EKS Cluster
Provisions an Amazon EKS cluster with appropriate IAM roles and permissions.
Configures node groups and ensures auto-scaling capabilities.
Deploys Essential Kubernetes Add-ons
Includes a Helm provider to manage Kubernetes package installations.
Installs important tools such as Metrics Server, Cluster Autoscaler, and AWS Load Balancer Controller.
Configures Security Policies
Defines IAM roles and permissions required for the cluster and workloads.
Sets up identity management and security measures for application access.
Provisioning the EKS Cluster
To apply this Terraform configuration, ensure that you have the following tools installed on your system:
Terraform CLI
AWS CLI (configured with the correct credentials)
kubectl (for interacting with the cluster)
Step 1: Initialize Terraform
Navigate to the terraform/ directory and run:
terraform init
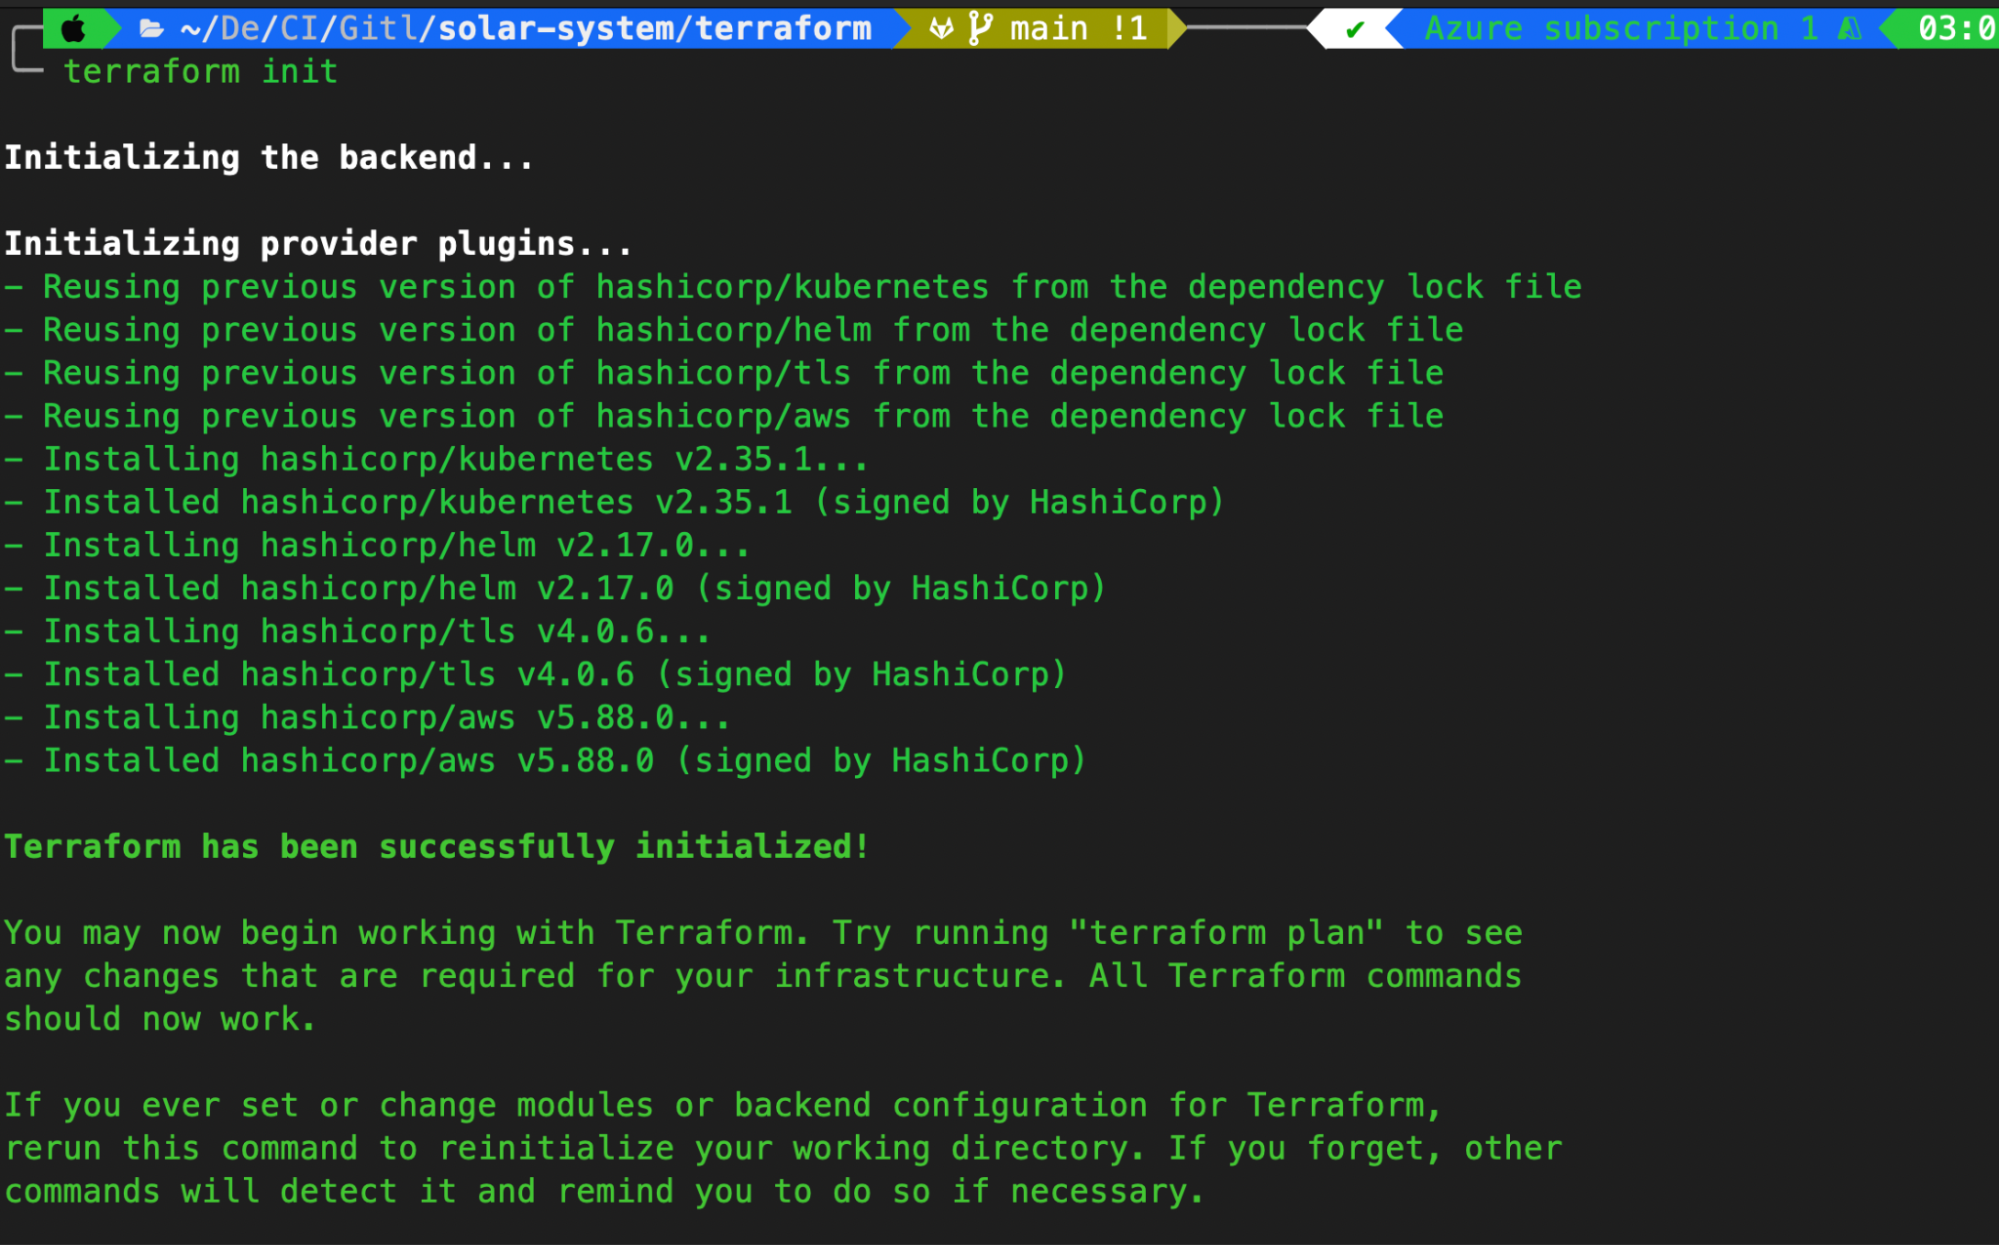
This will initialize the Terraform directory and install necessary plugins.
Step 2: Apply the Configuration
Run the following command to create the infrastructure:
terraform apply -auto-approve
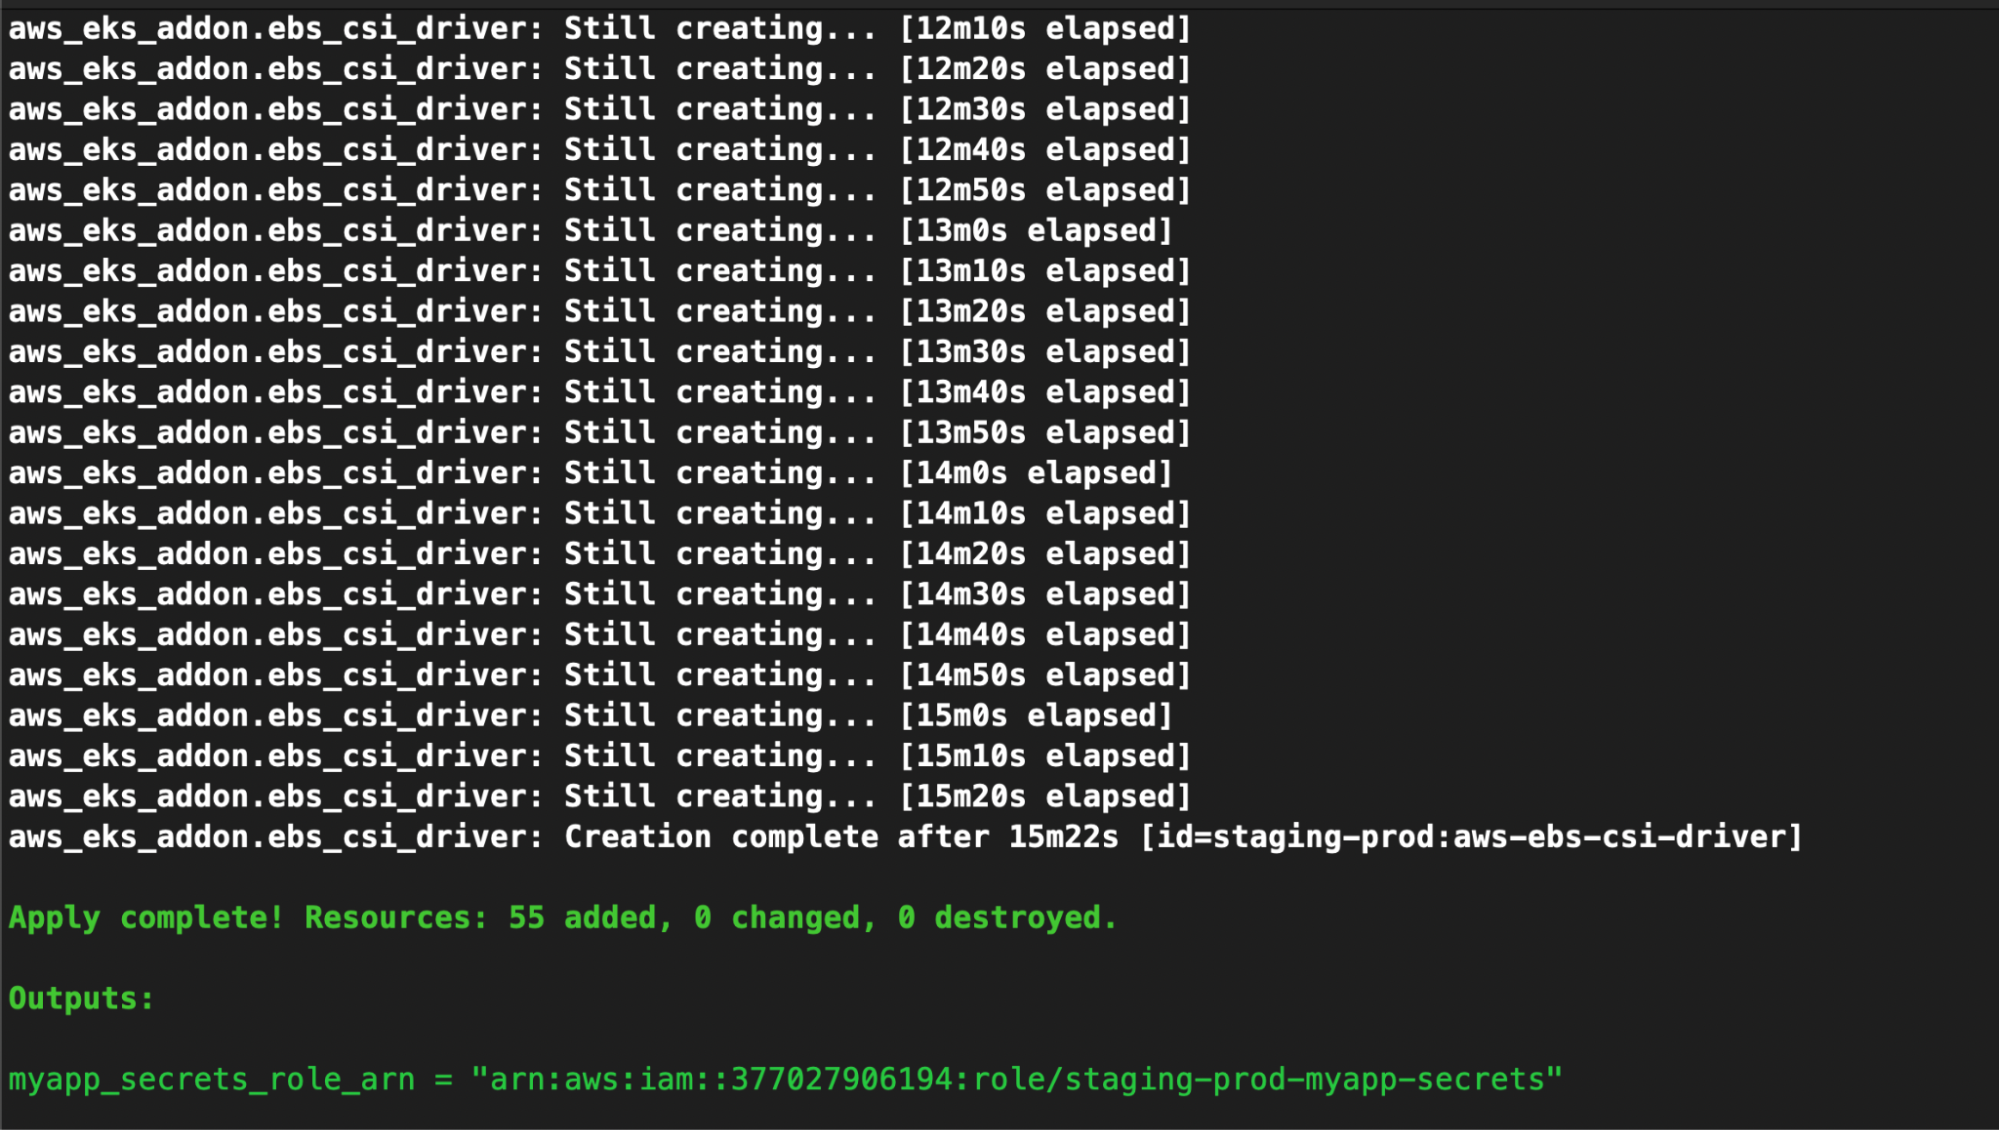
Provisioning an EKS cluster may take 10-30 minutes, depending on the configuration. In this case, it took approximately 18 minutes to complete.
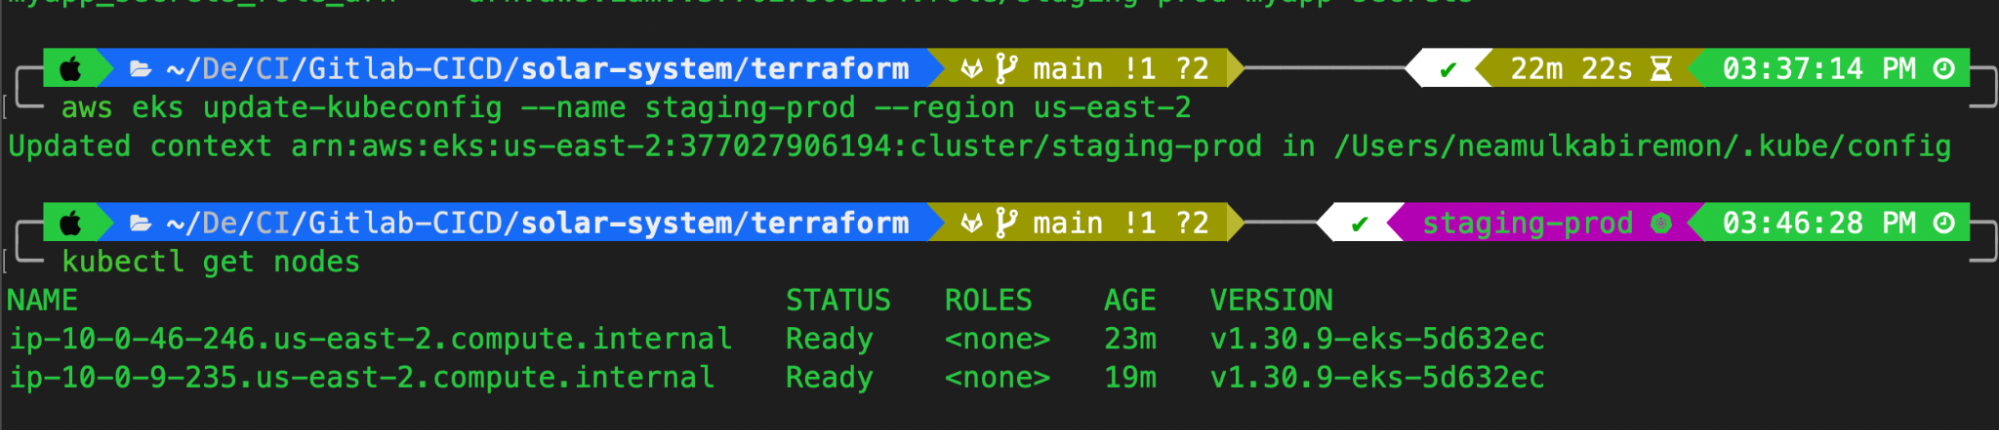
Step 3: Connect to the EKS Cluster
Once the cluster is provisioned, connect to it using the AWS CLI and kubectl by running:
aws eks update-kubeconfig --name staging-prod --region us-east-2
aws eks update-kubeconfig --name [your-cluster-name] --region [aws-region]
After executing these commands, your Kubernetes cluster will be configured, and you can interact with it using kubectl.
At this point, your EKS cluster is ready for application deployment, and the GitLab CI/CD pipeline can now be configured to deploy applications seamlessly
Configuring GitLab Agent on EKS
To deploy and manage applications on an EKS cluster using GitLab CI/CD, we need to configure the GitLab agent for Kubernetes. Below are the steps to achieve this setup:
Step 1: Navigate to GitLab's Kubernetes Cluster Settings
Open your GitLab project repository.
In the left sidebar, locate and click on Operate.
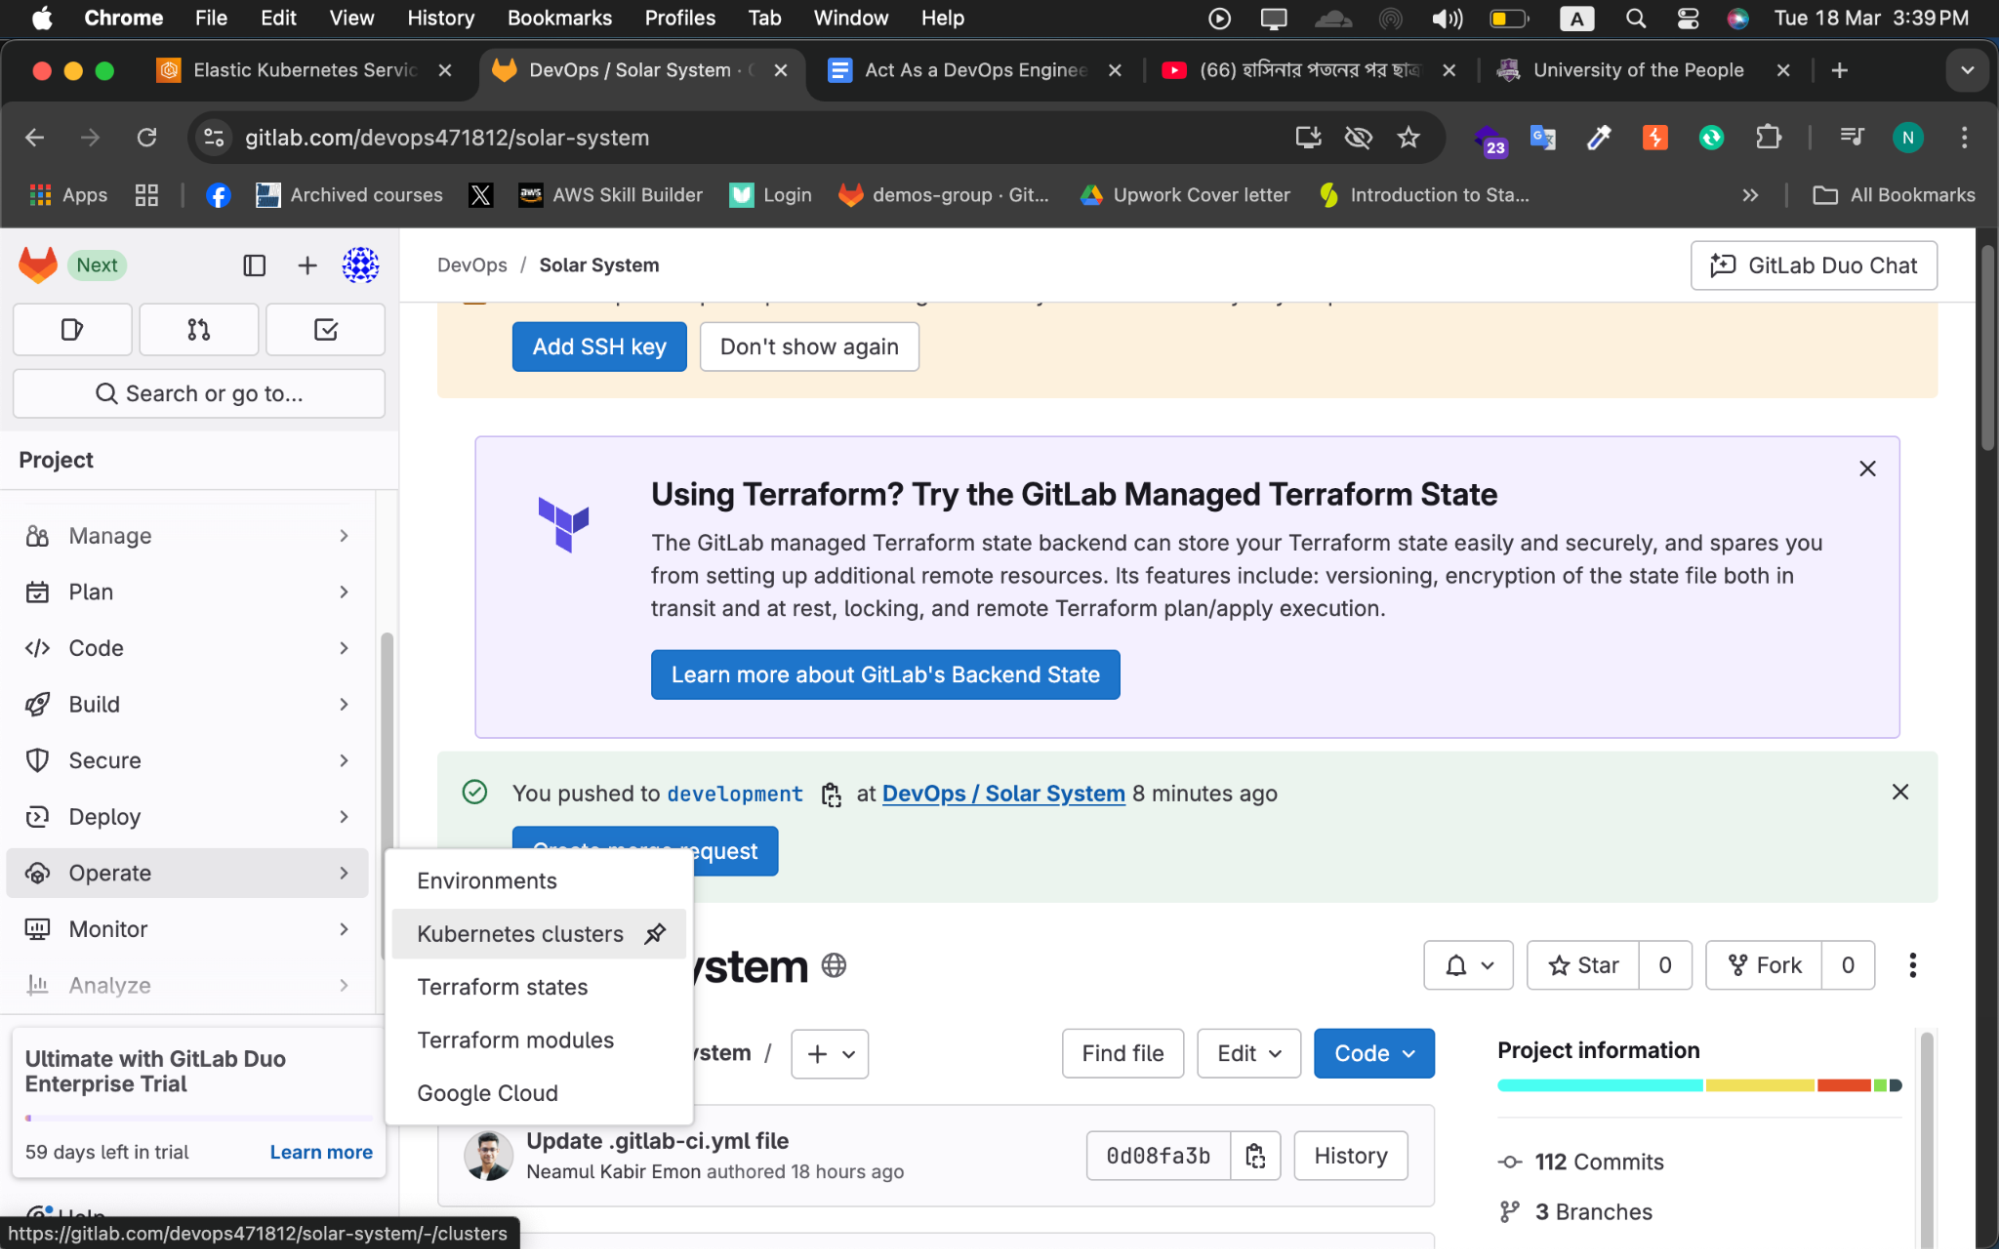
Under Operate, select Kubernetes Cluster.
Click on Connect a cluster.
Step 2: Register a New GitLab Agent
Provide a name for your GitLab agent. In this project, we will name it solar-system-k8s-agent.
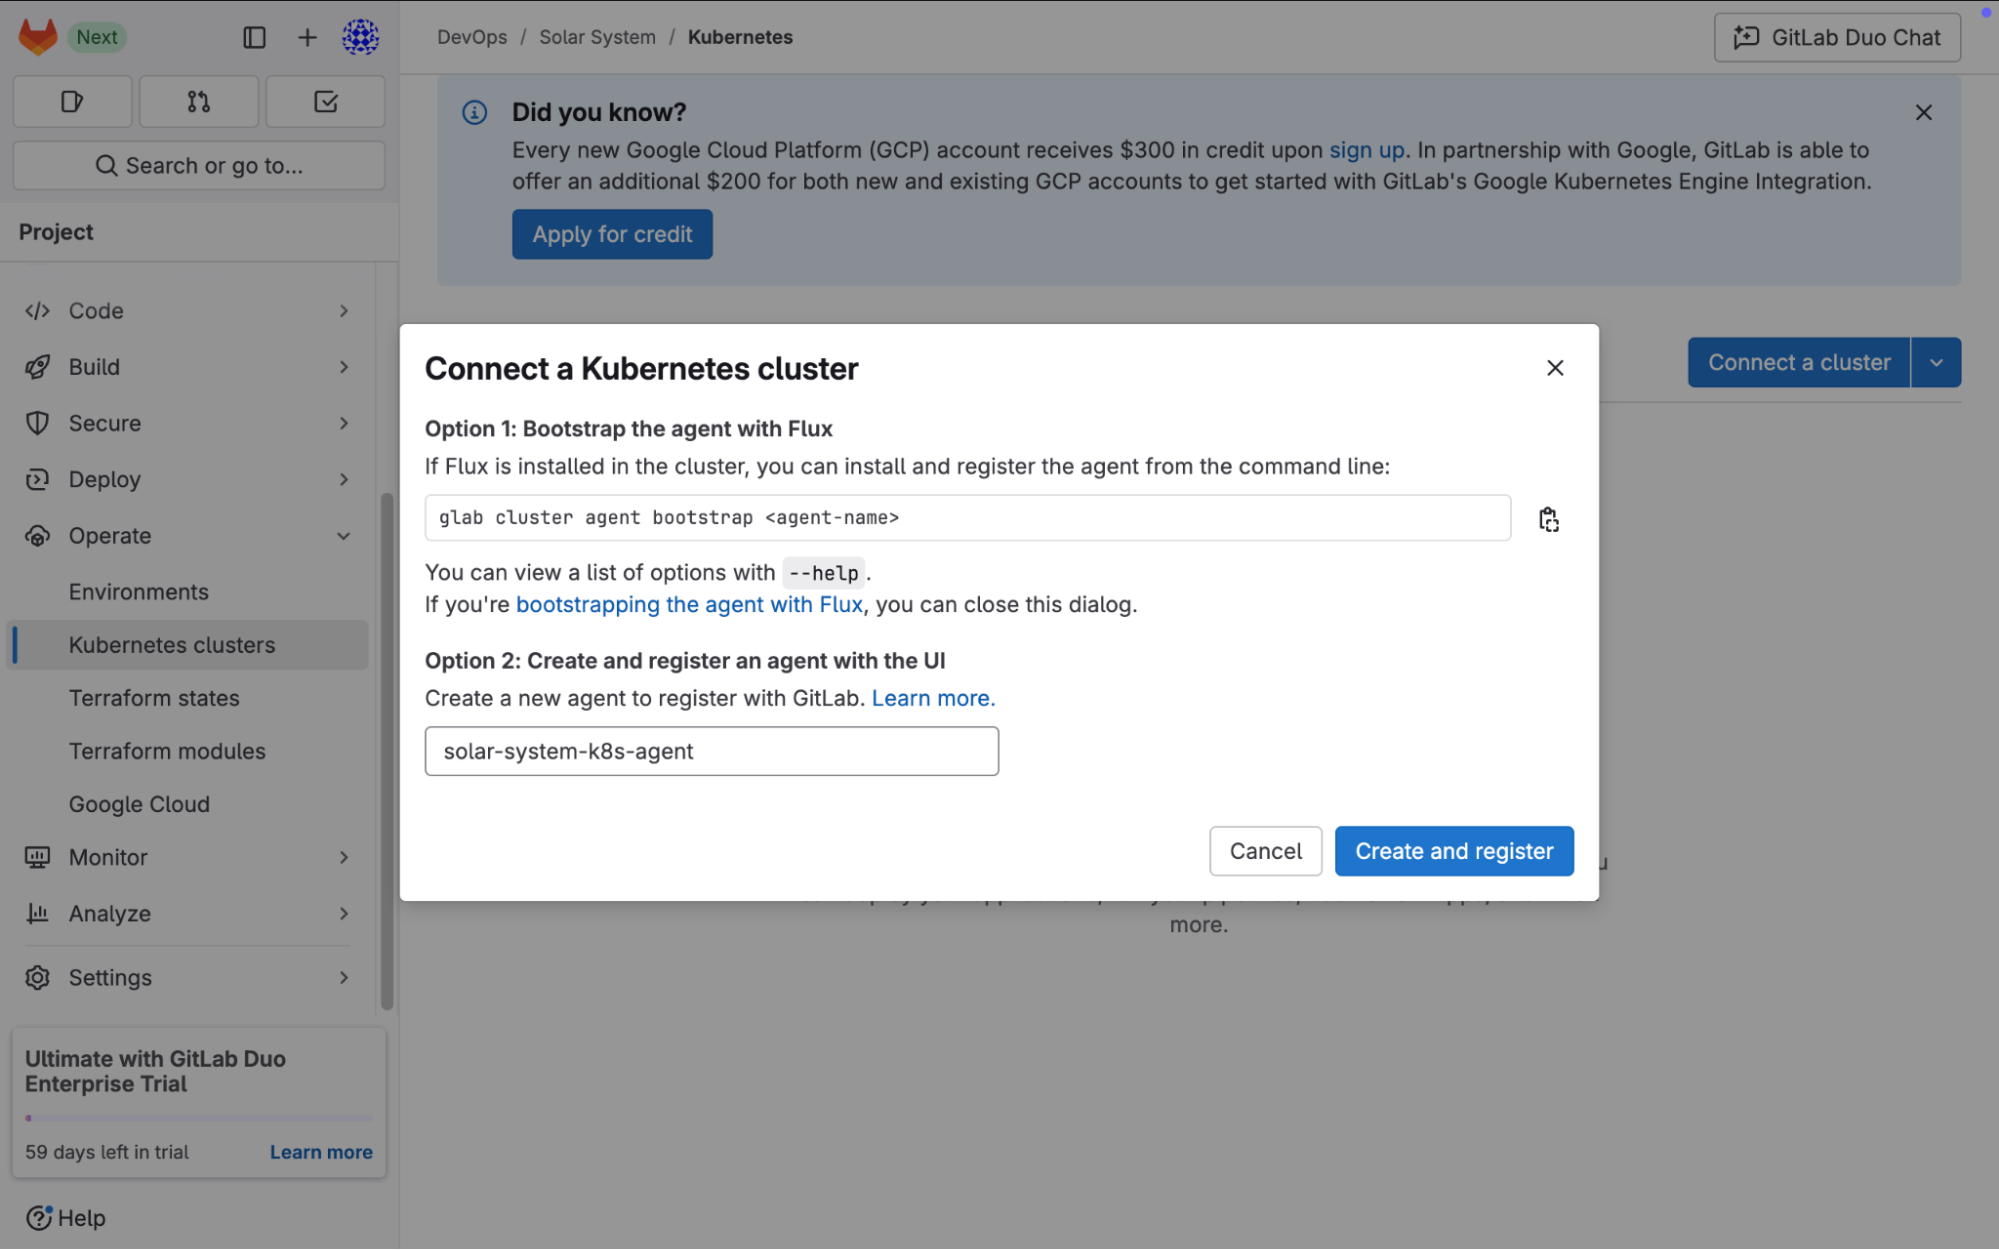
Click Create and Register.
After registration, GitLab will provide an access token and a Helm command to install the agent on the cluster.
Step 3: Install the GitLab Agent on the EKS Cluster
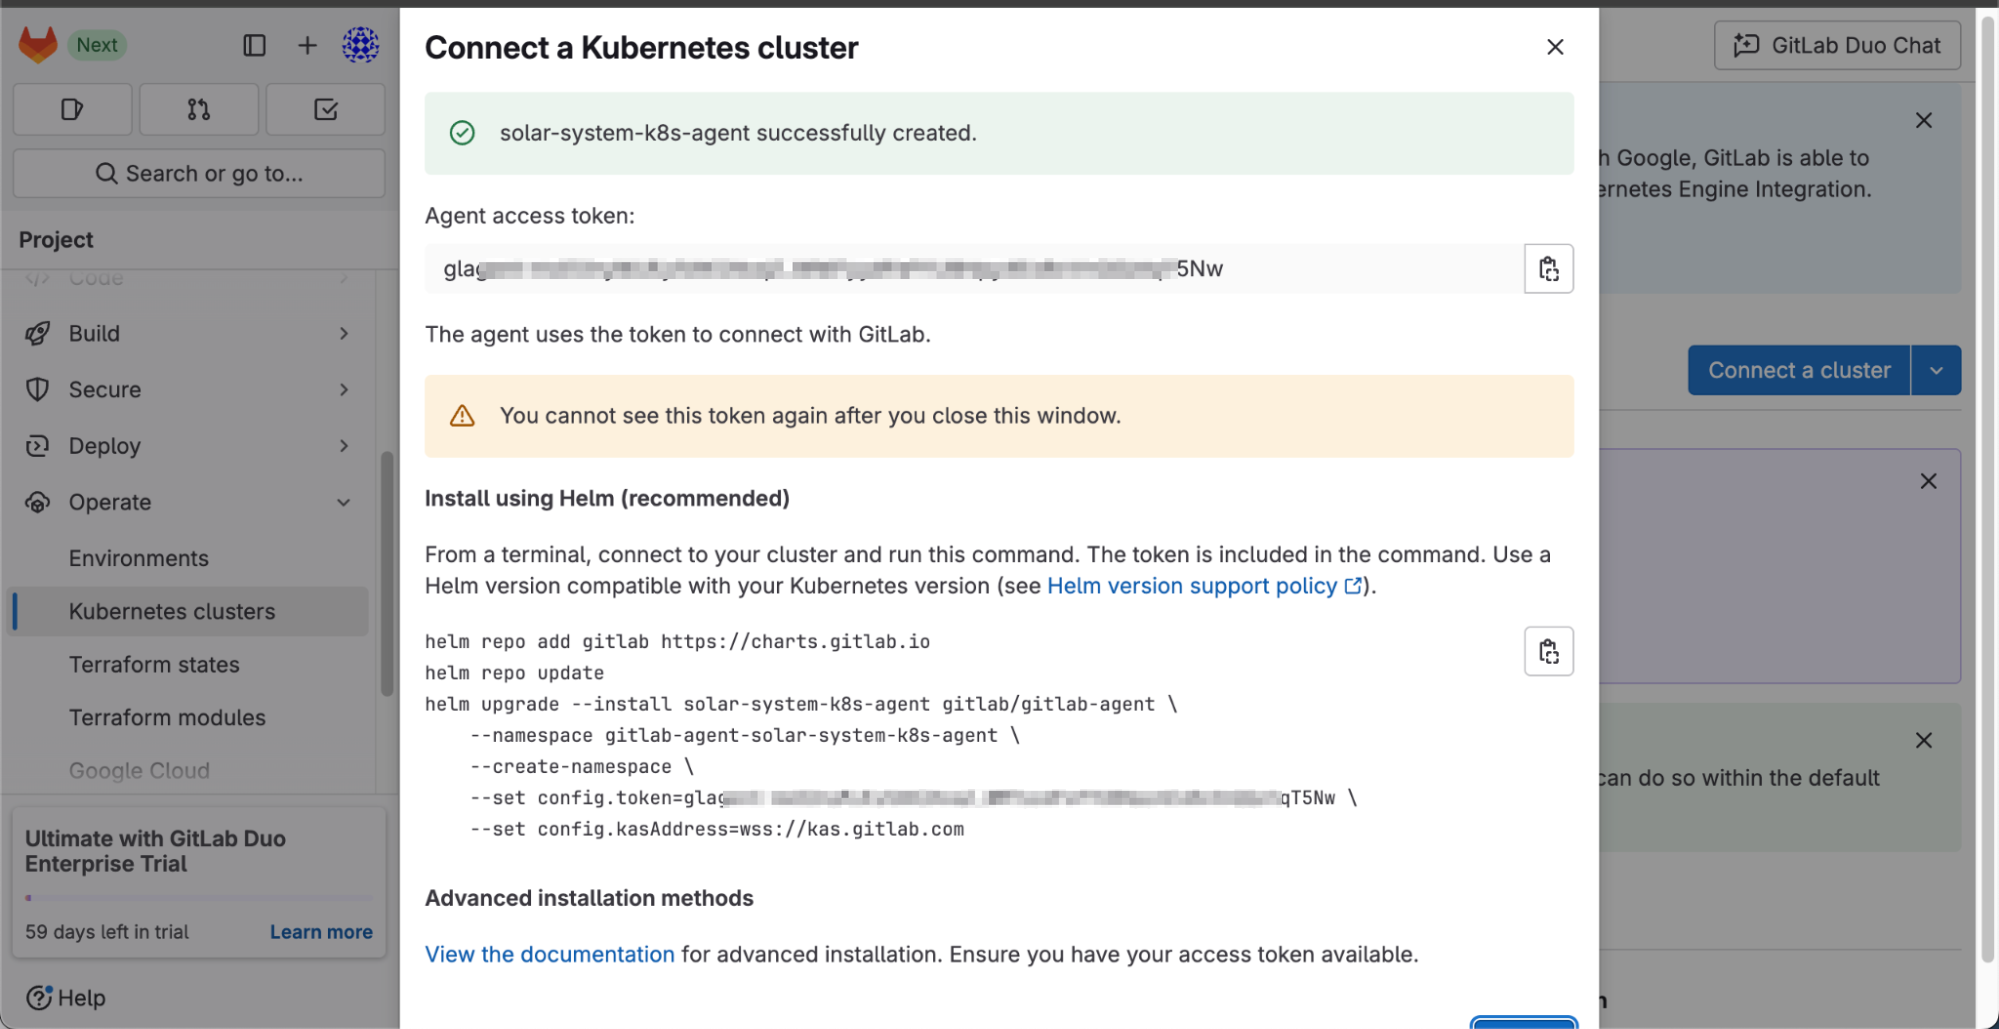
Copy the provided Helm command from GitLab.
Open your CLI where your cluster is already connected with
kubectl.Paste and execute the Helm command.
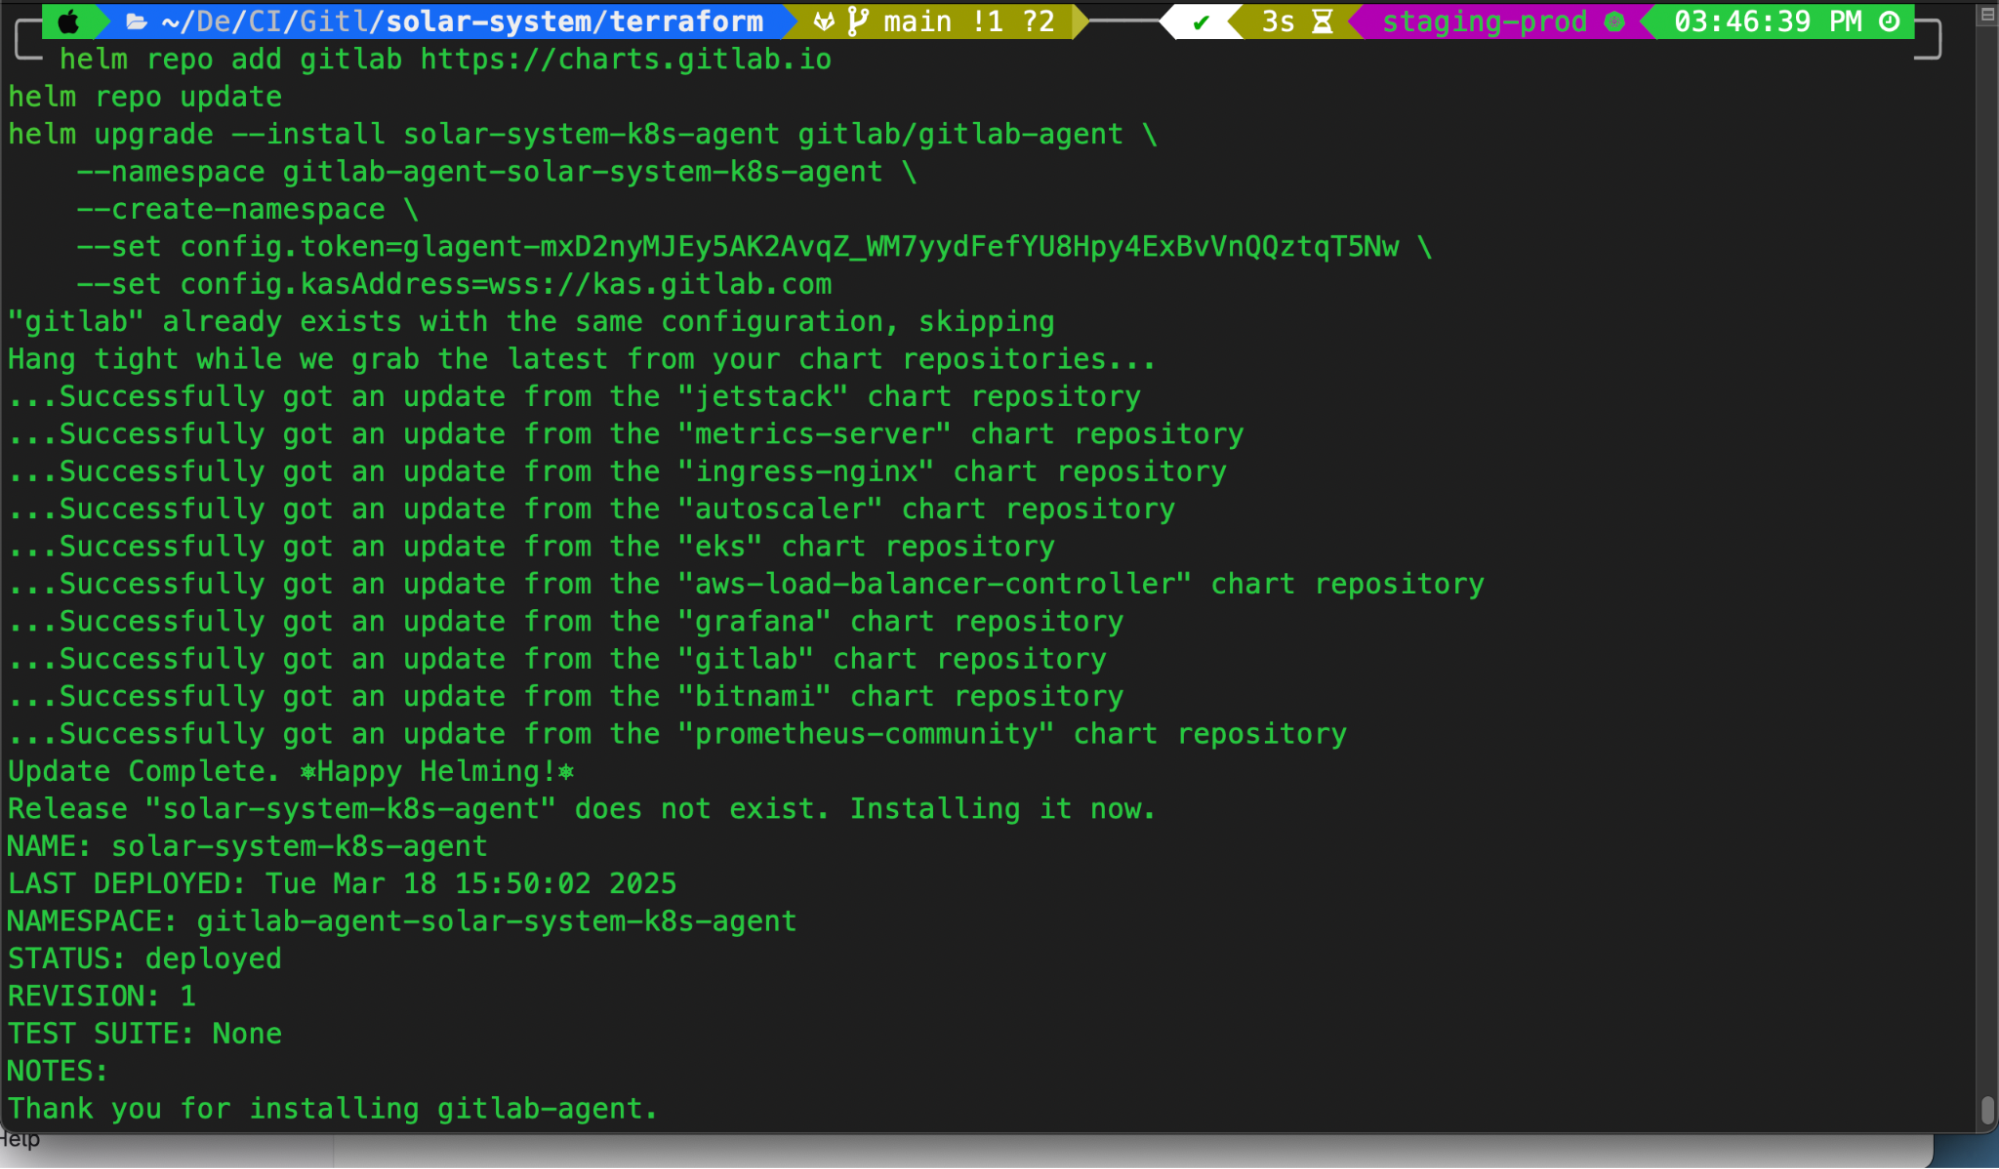
This step will install the GitLab agent in the Kubernetes cluster and allow it to interact with GitLab CI/CD pipelines.
Step 4: Configure the GitLab Agent for CI/CD Access
Once the agent is installed, it needs a configuration file to define project access permissions.
In your GitLab repository, create a new directory:
.gitlab/agents/solar-system-k8s-agent/Inside this directory, create a file named config.yaml
Add the following configuration:
ci_access:
  projects:
    - id: [your-gitlab-group-id/solar-system]
user_access:
  access_as:
    agent: {}
  projects:
    - id: [your-gitlab-group-id/solar-system]
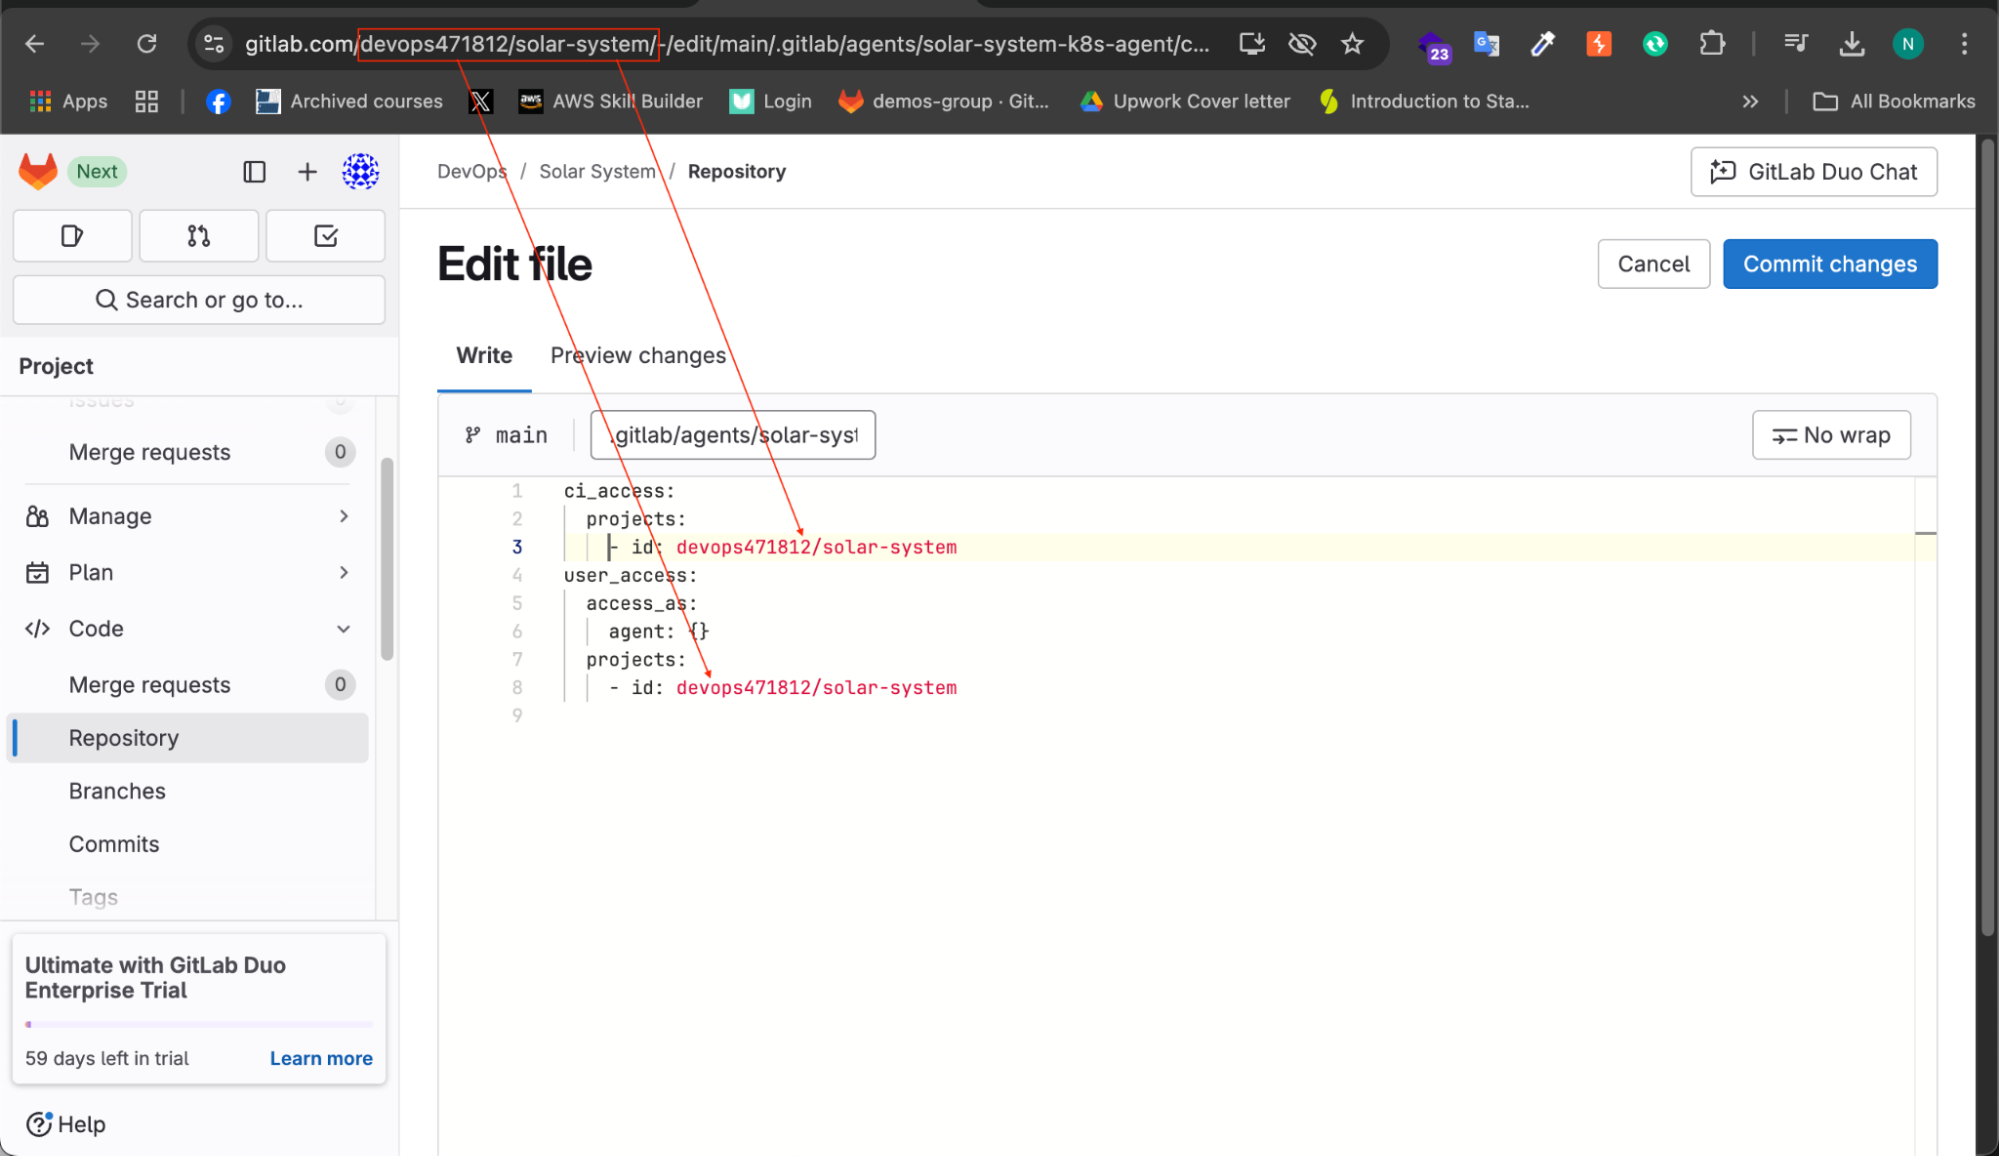
You will find the group ID and project name in your URL just copy and paste it into the config.yaml file so the GitLab agent can access the project appropriately.
Explanation of config.yaml
ci_access: This section allows the CI/CD pipelines in GitLab to interact with the Kubernetes cluster.projects: Defines the GitLab project ID that has access to the cluster.user_access: Grants user-level access to manage Kubernetes resources through the GitLab agent.
Step 5: Commit the Configuration File
Add the newly created configuration file to GitLab.
When committing, include
[skip ci]in the commit message to prevent an unnecessary pipeline run.
Step 6: Verify Cluster Connection
Go back to Operate > Kubernetes Cluster in GitLab.
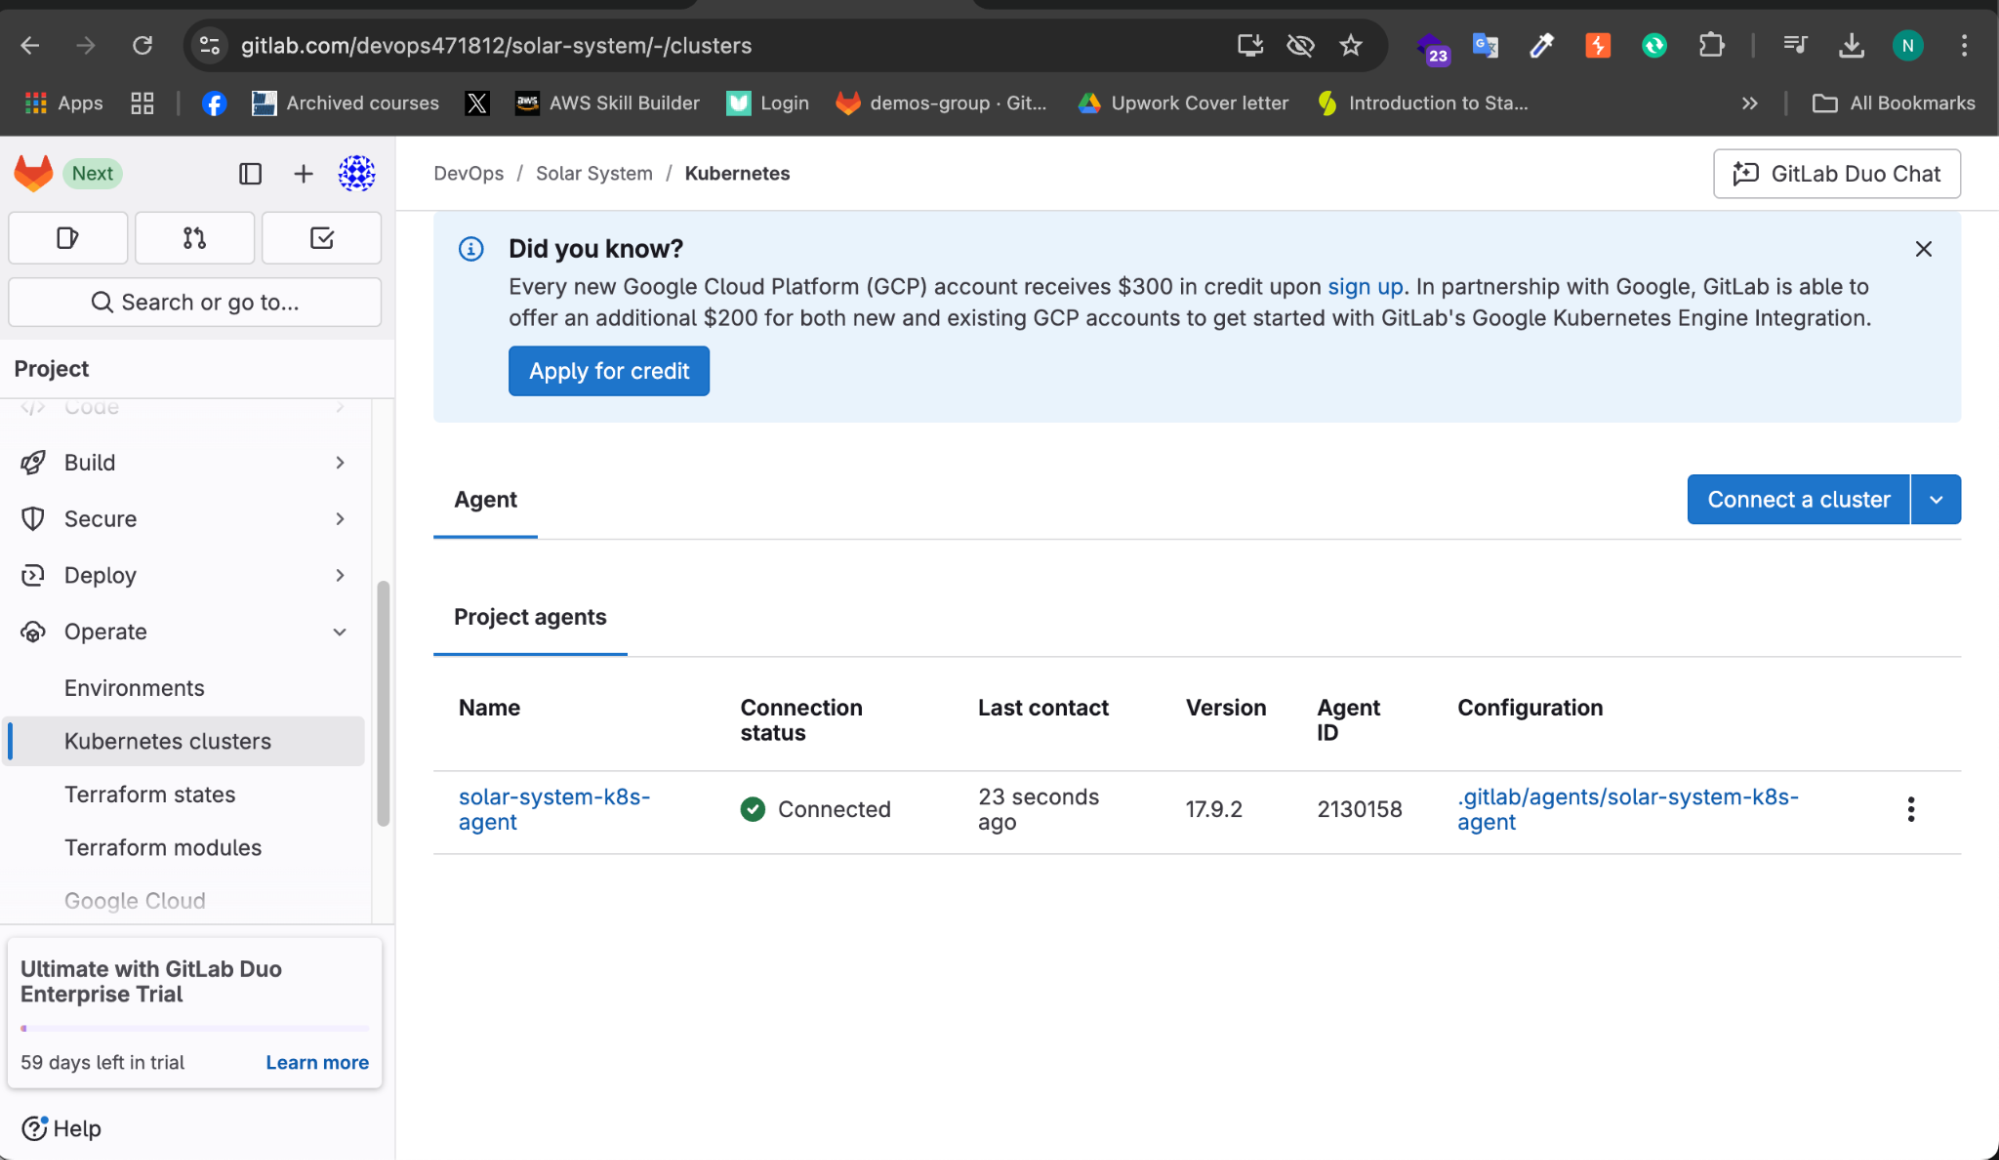
The EKS cluster connection status should now be displayed as Connected.
This confirms that the GitLab agent is correctly configured and ready to manage deployments.
Now that the GitLab agent is set up and connected to the EKS cluster, we can proceed with triggering the CI/CD pipeline to update the application. This integration allows seamless deployment and management of Kubernetes workloads from GitLab CI/CD.
Updating the Application and Running the Pipeline
Now, we will update the application and check the pipeline. Let’s navigate to the repository and switch to the development branch.
To trigger the pipeline, we will change the Docker image base from node:18-alpine3.17 to node:18 and commit the change.
Now, go to the pipeline section.
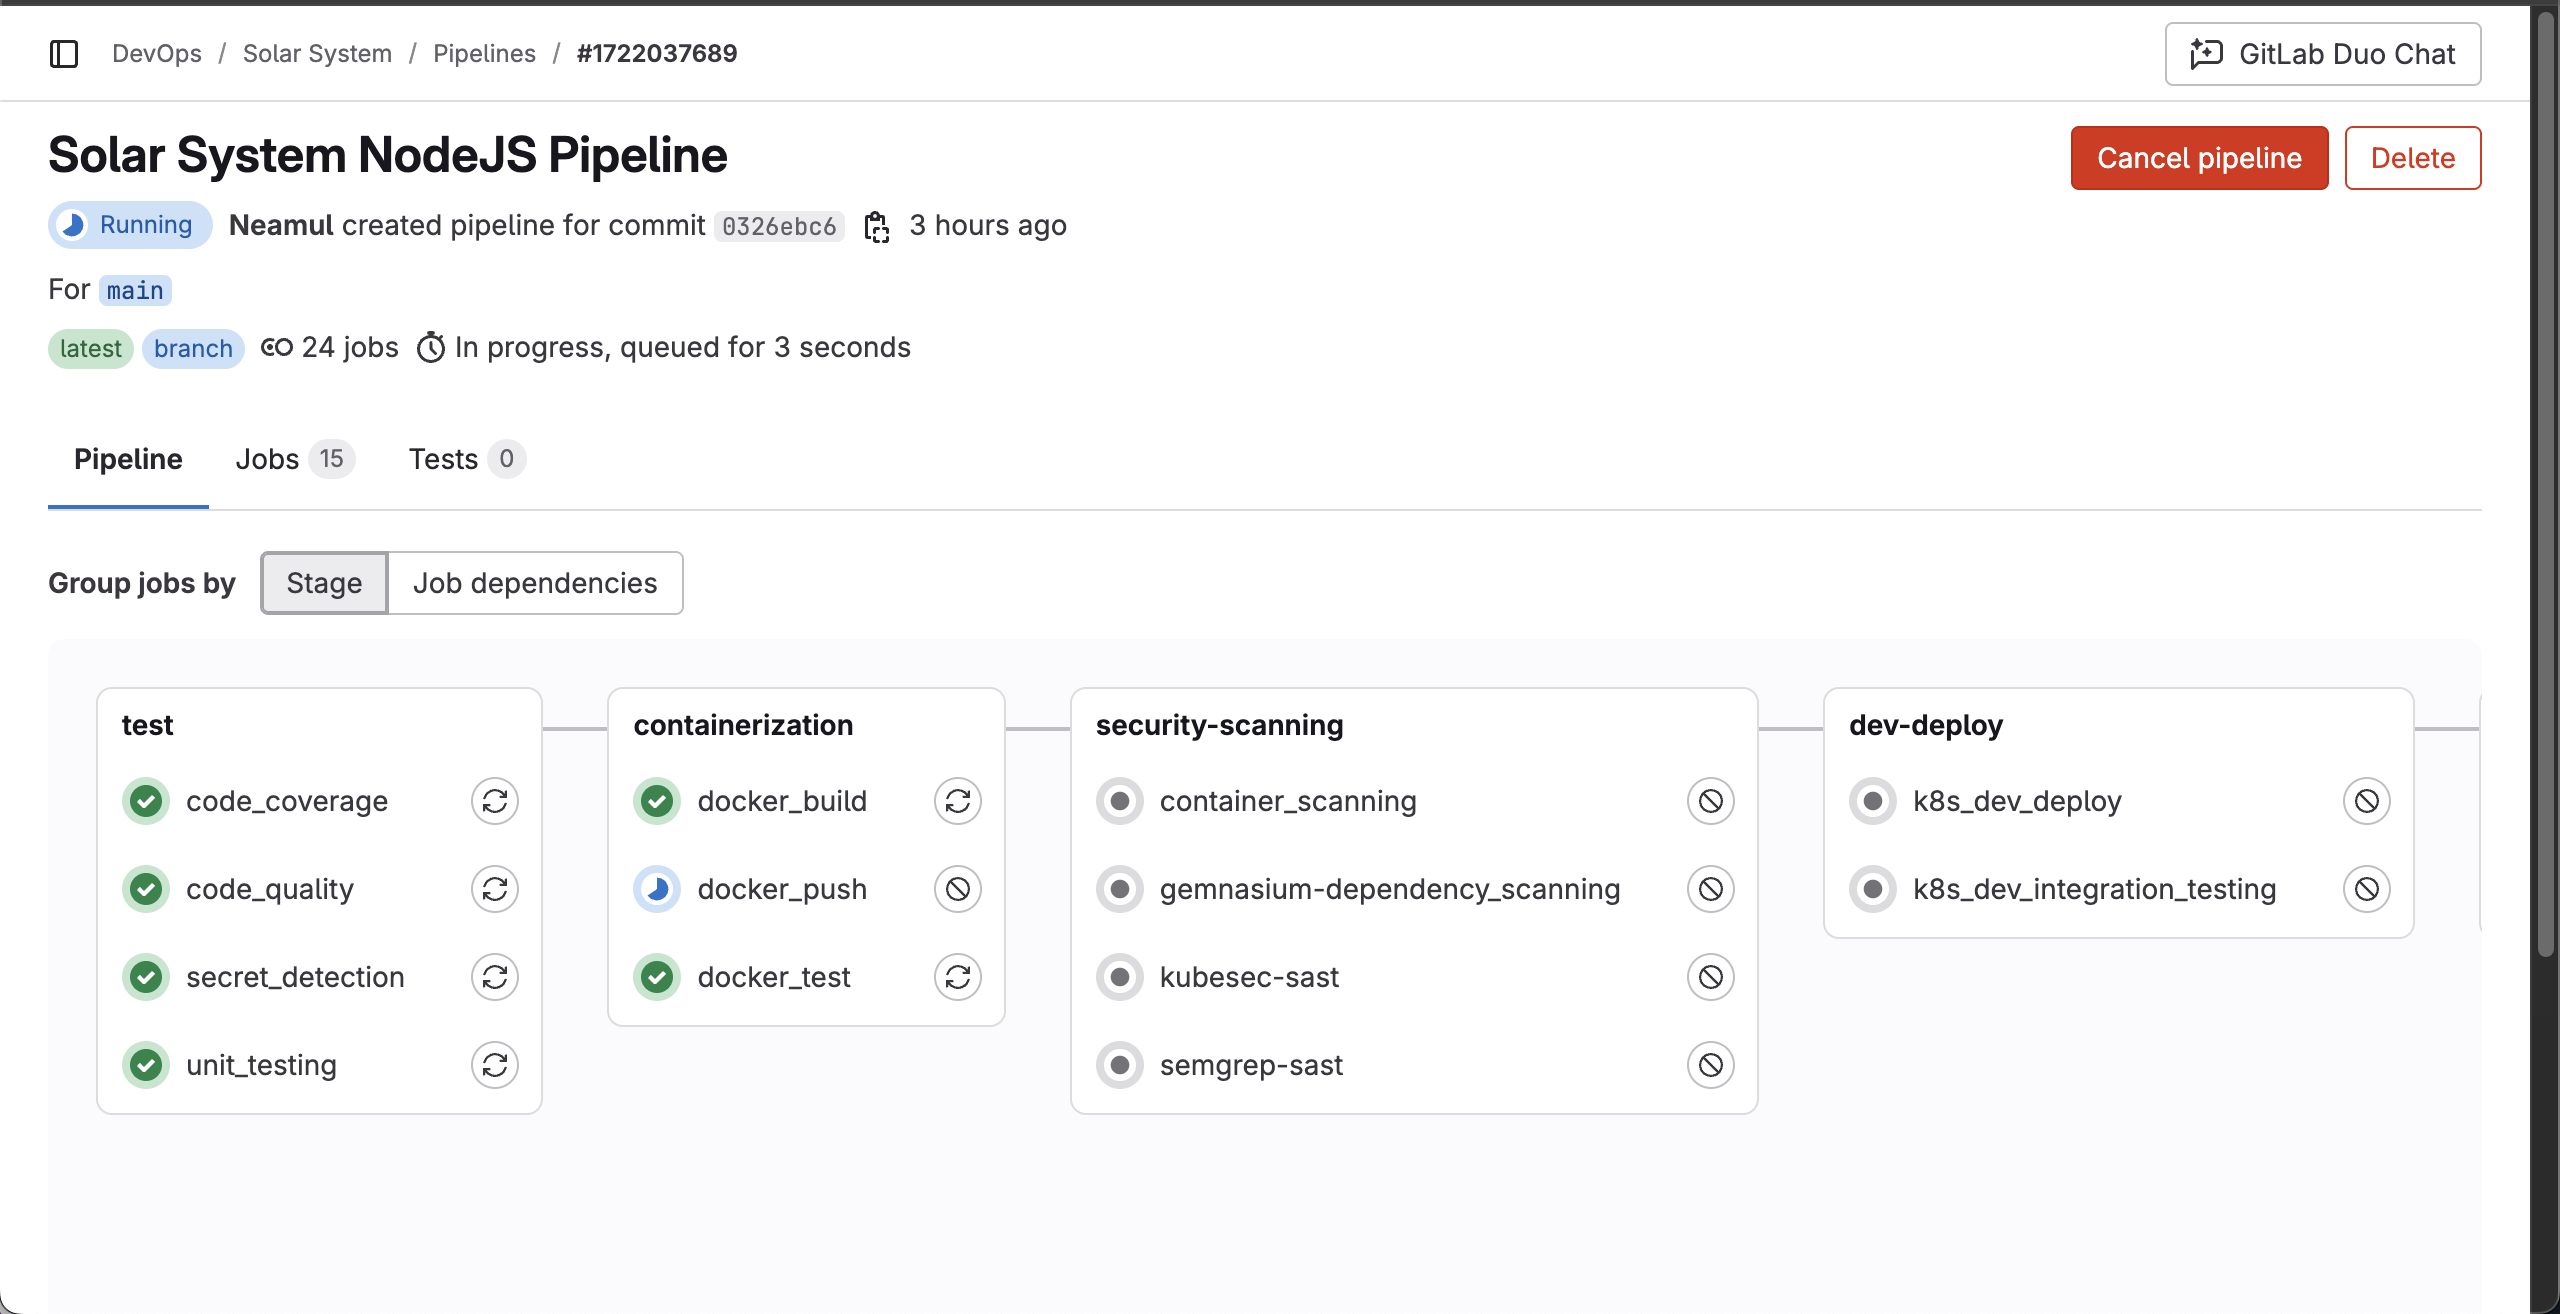
As you can see, the pipeline starts automatically based on the configured rules and begins testing the application:
After waiting 10 minutes, the pipeline failed.
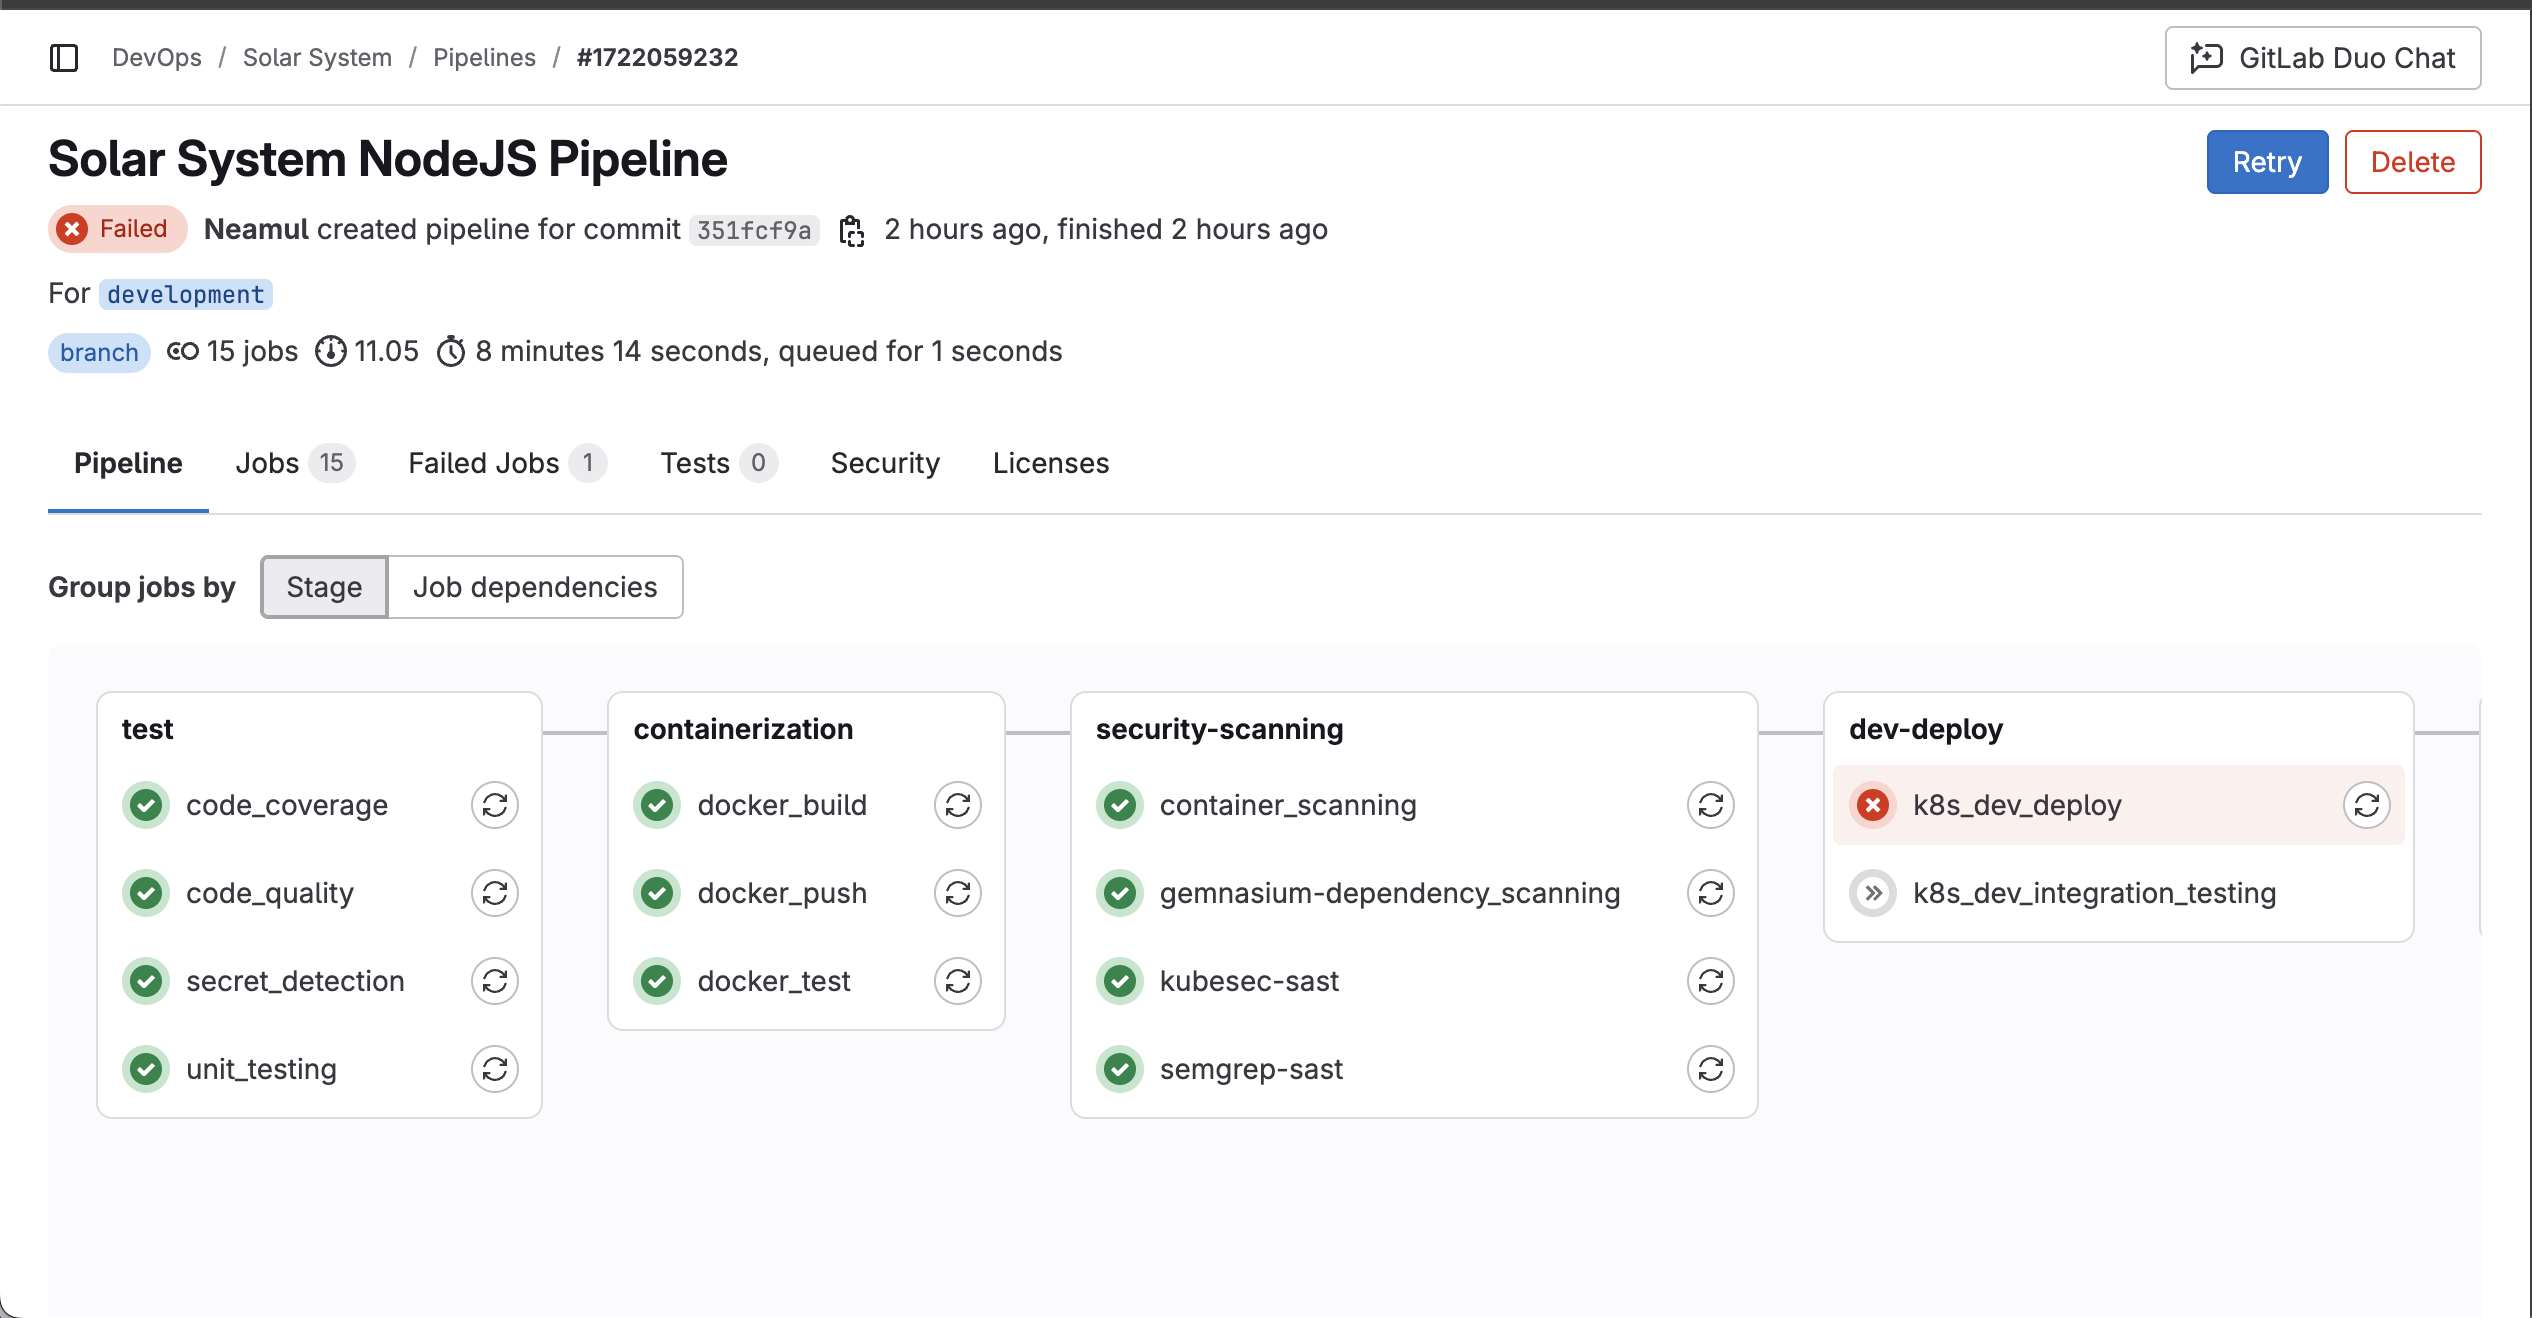
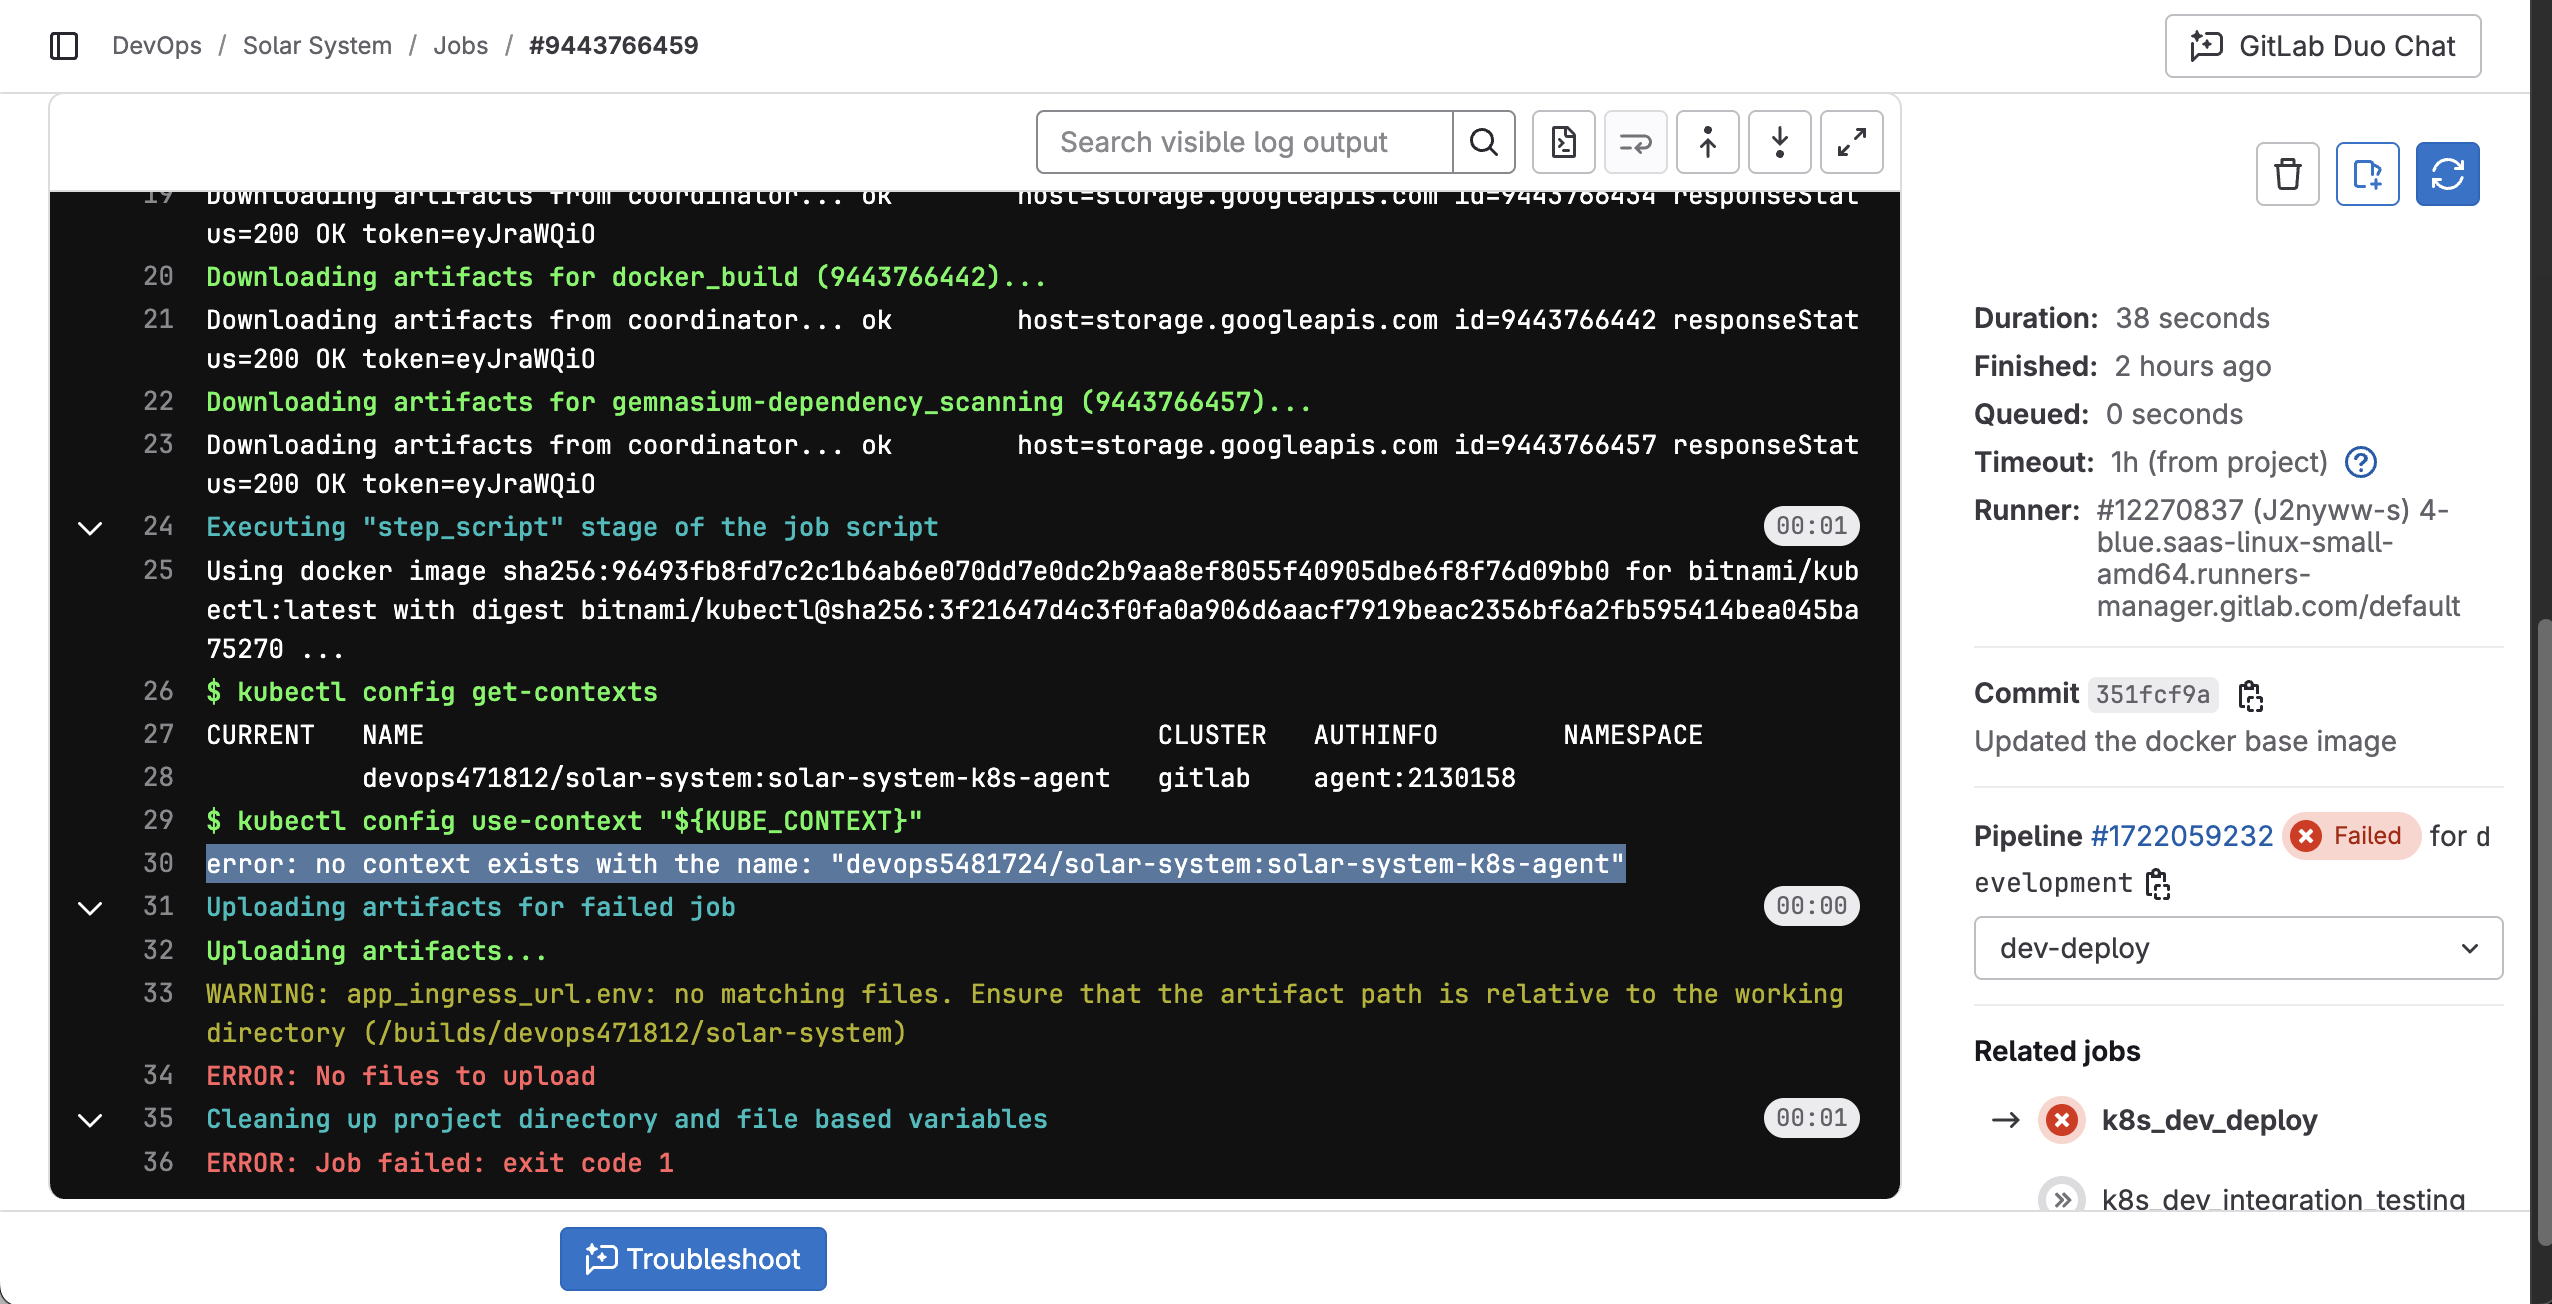
Then once I checked the logs of the runner I identified a missing ${KUBE_CONTEXT} variable in the pipeline configuration.
To fix this, add the following updated variable:
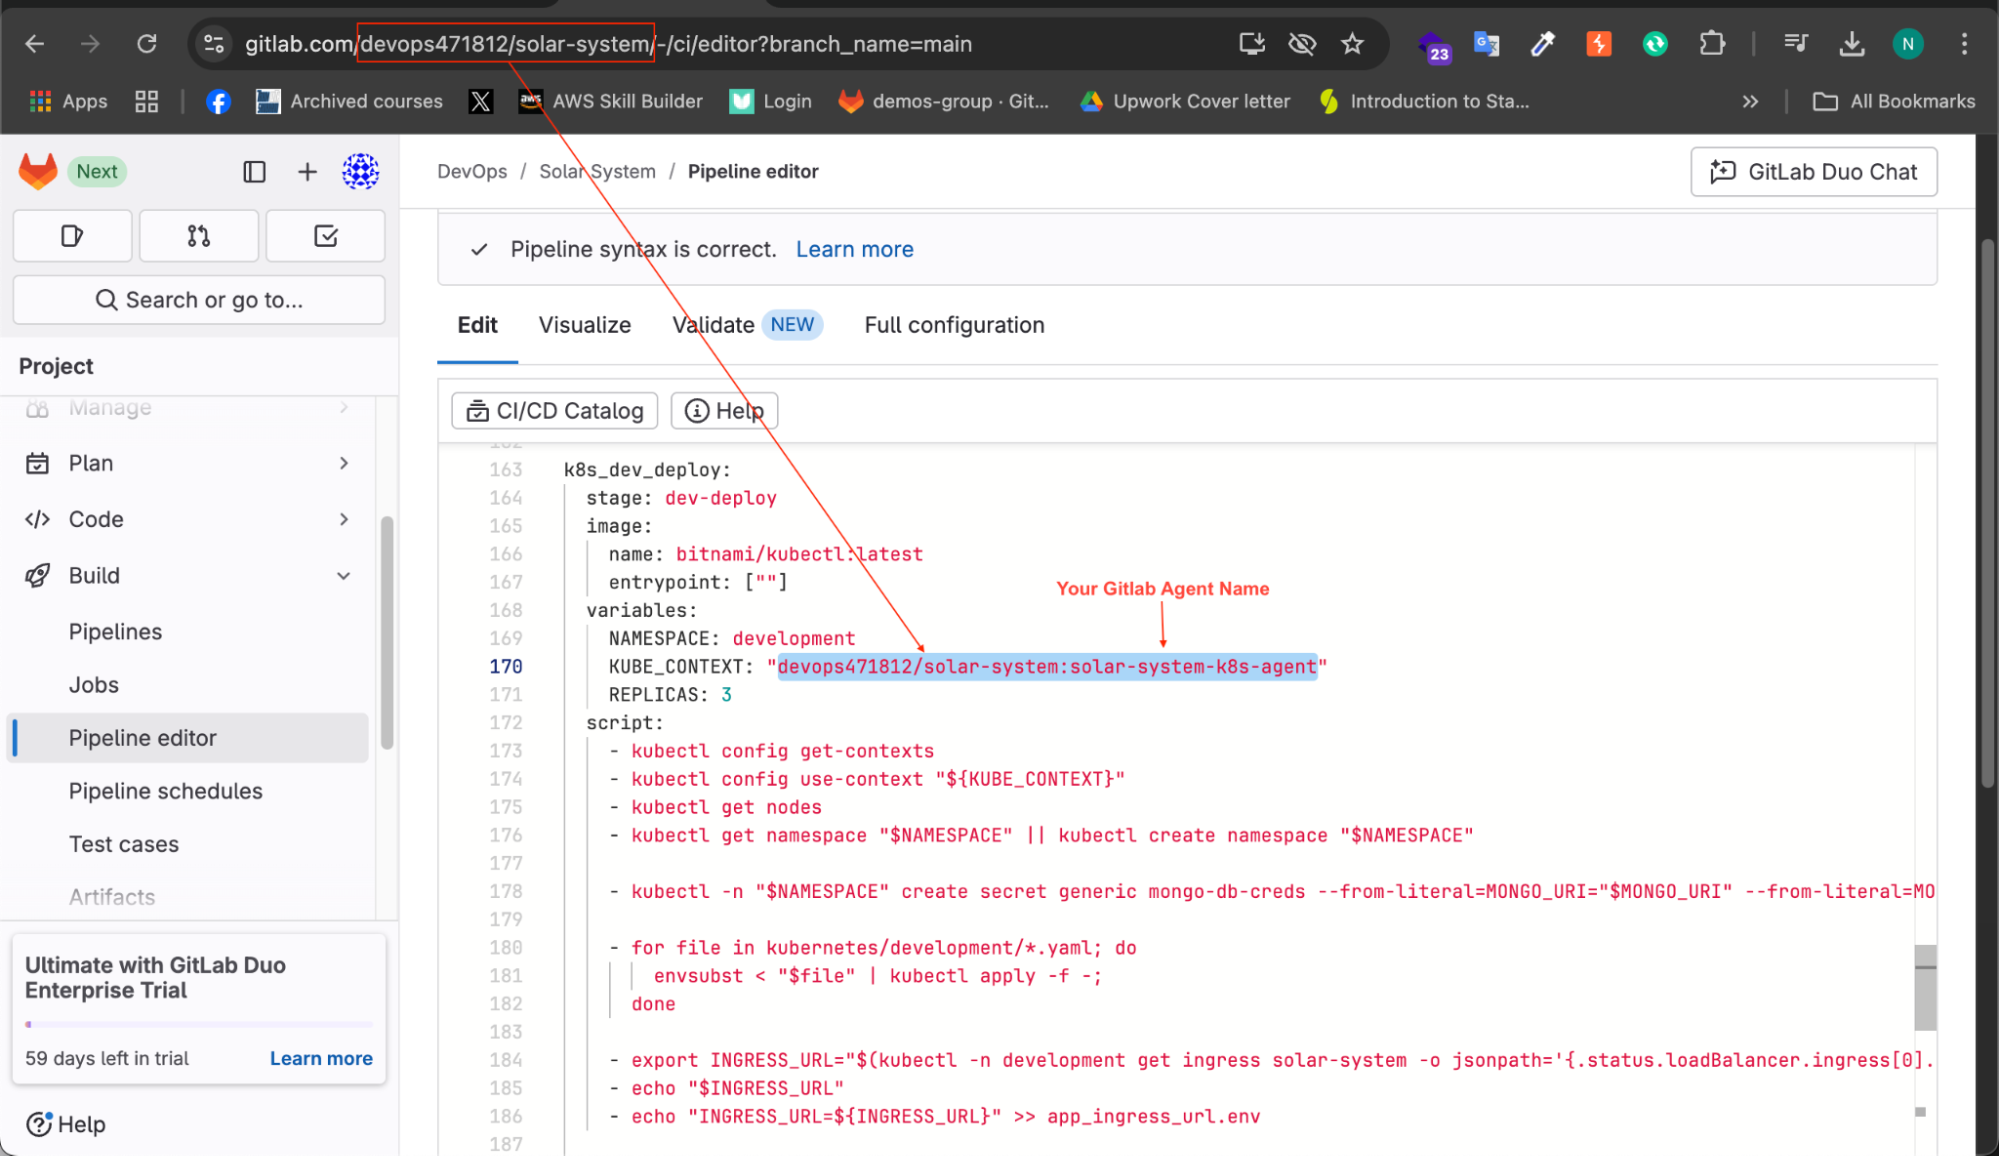
variables:
   KUBE_CONTEXT: "devops471812/solar-system:solar-system-k8s-agent"
This ensures that the GitLab runner can connect with the Kubernetes cluster for deployment.
Now, push the change to the development branch. The pipeline will restart, build, and deploy the application to the development environment.
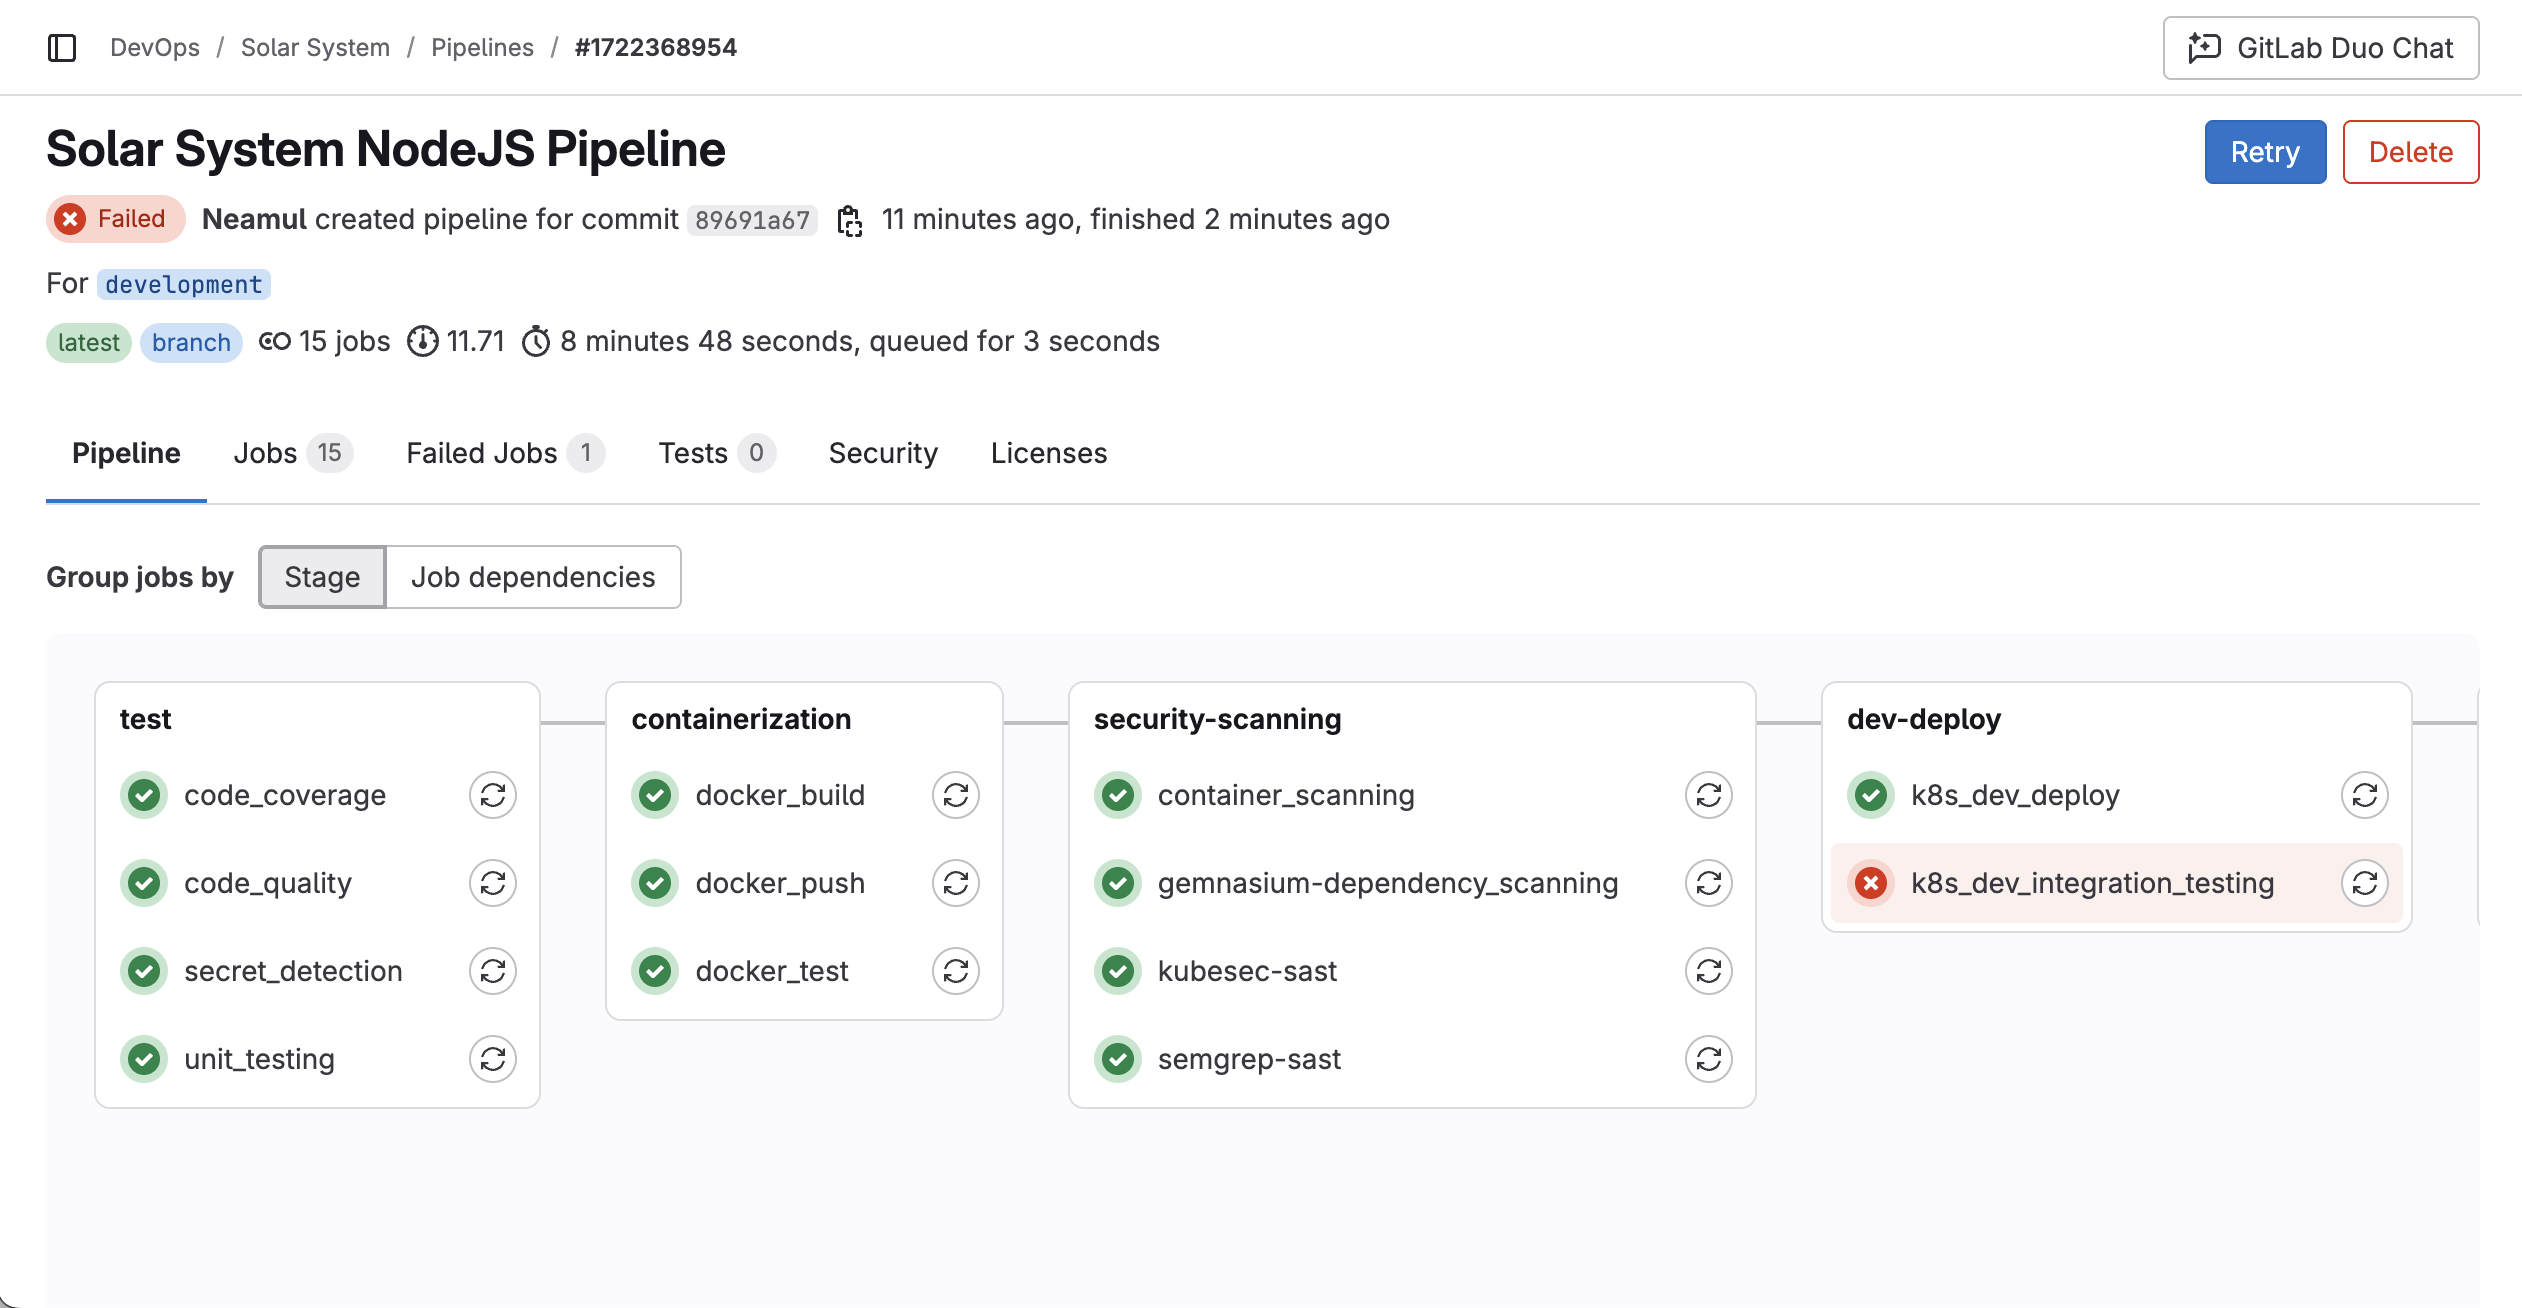
After 15 minutes, the application is successfully deployed to the development environment, but the integration testing failed due to DNS propagation delay. This is expected and will resolve in 2-3 minutes.
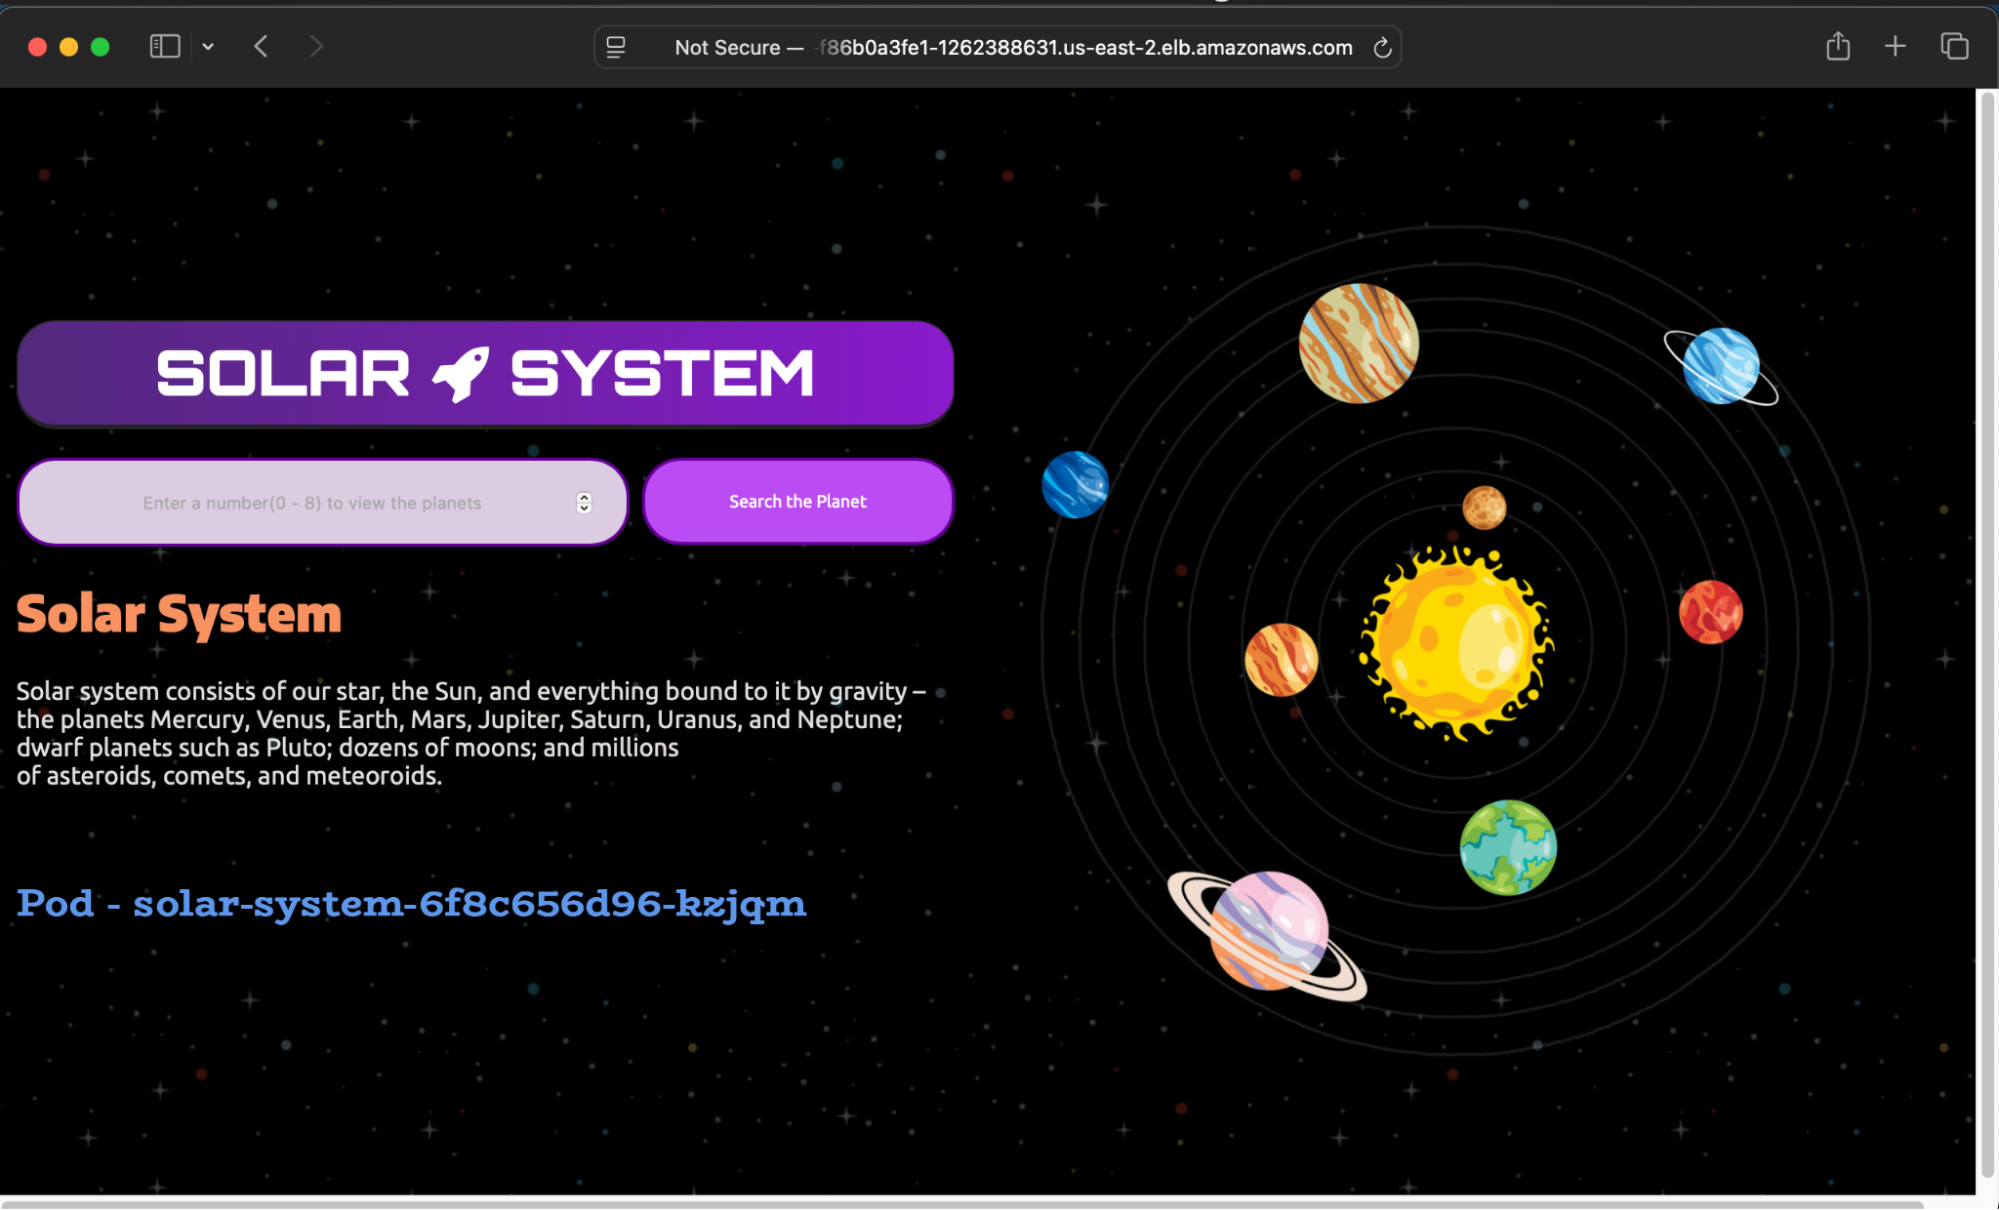
To manually check the deployment status:
Run the following command to obtain the DNS:
kubectl get ingress -n development
Copy the DNS and test it using
curl:curl http://<copied-dns>Paste the DNS into a browser to verify the application is running.
Once the DNS is propagated, re-run the integration test and the pipeline should pass.

Once the deployment reaches the staging environment, it requires manual approval for further deployment. The pipeline will now wait for manual approval to deploy in the staging environment.
The most critical aspect of this pipeline is security. We have placed a strong emphasis on identifying and mitigating vulnerabilities, and that effort has paid off significantly. As evident on the dashboard, we have uncovered multiple security flaws within the system.
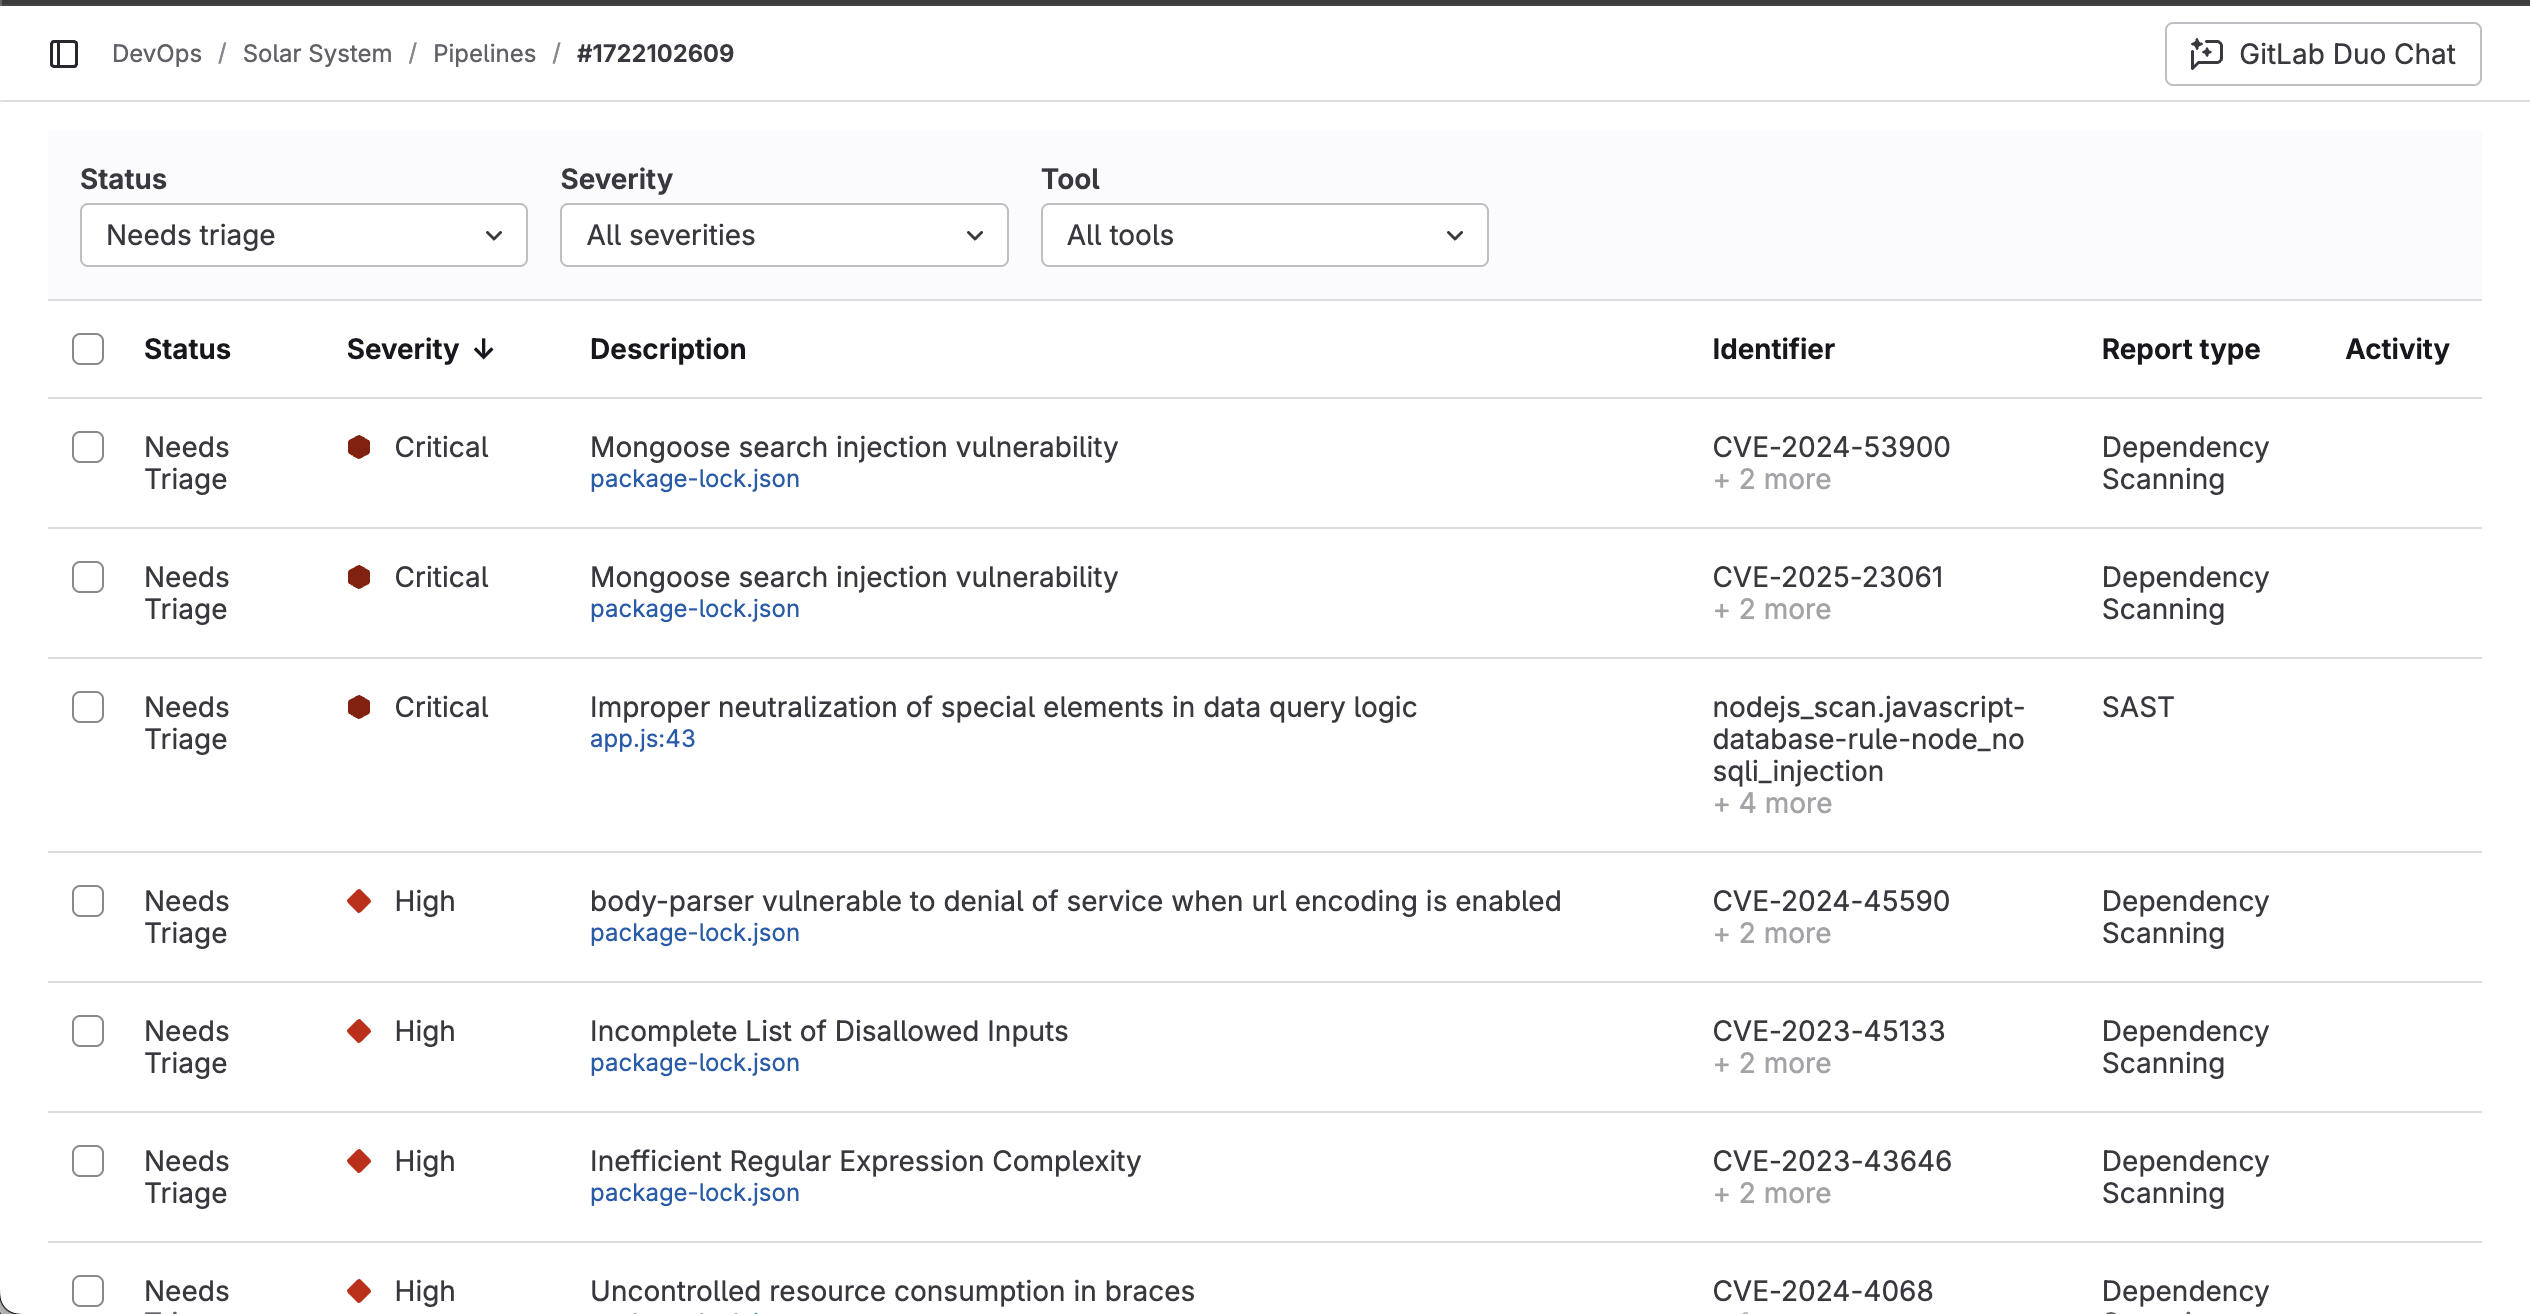
Had this application gone live without rigorous security testing, it could have been exploited by malicious actors, leading to unauthorized access and potential data breaches. By proactively addressing these vulnerabilities, we have ensured a more secure and resilient application, safeguarding sensitive data from cyber threats.
Configuring SSL/TLS – HTTPS for Secure Access
To ensure a secure connection, we need to update the ingress configuration to support SSL/TLS encryption.
Create
ingress-https.yaml:apiVersion: networking.k8s.io/v1 kind: Ingress metadata: name: solar-system namespace: development annotations: alb.ingress.kubernetes.io/certificate-arn: arn:aws:acm:us-east-2:377027906194:certificate/2e919de7-caf1-427d-afea-9b5b2b458a92 alb.ingress.kubernetes.io/listen-ports: '[{"HTTP": 80}, {"HTTPS":443}]' alb.ingress.kubernetes.io/ssl-redirect: "443" alb.ingress.kubernetes.io/target-type: ip alb.ingress.kubernetes.io/scheme: internet-facing spec: ingressClassName: alb rules: - host: solar-system-dev.neamulkabiremon.com http: paths: - path: / pathType: Prefix backend: service: name: solar-system port: number: 3000Generate an SSL certificate in AWS Certificate Manager and copy the Certificate ARN.
Replace the ARN in
alb.ingress.kubernetes.io/certificate-arn: [your certificate ARN].Update the host with your custom domain name.
Add a CNAME record in Route 53 pointing to the application DNS.
Apply the new ingress configuration:
kubectl apply -f ingress-https.yaml -n developmentWait for DNS propagation (2-10 minutes or more).
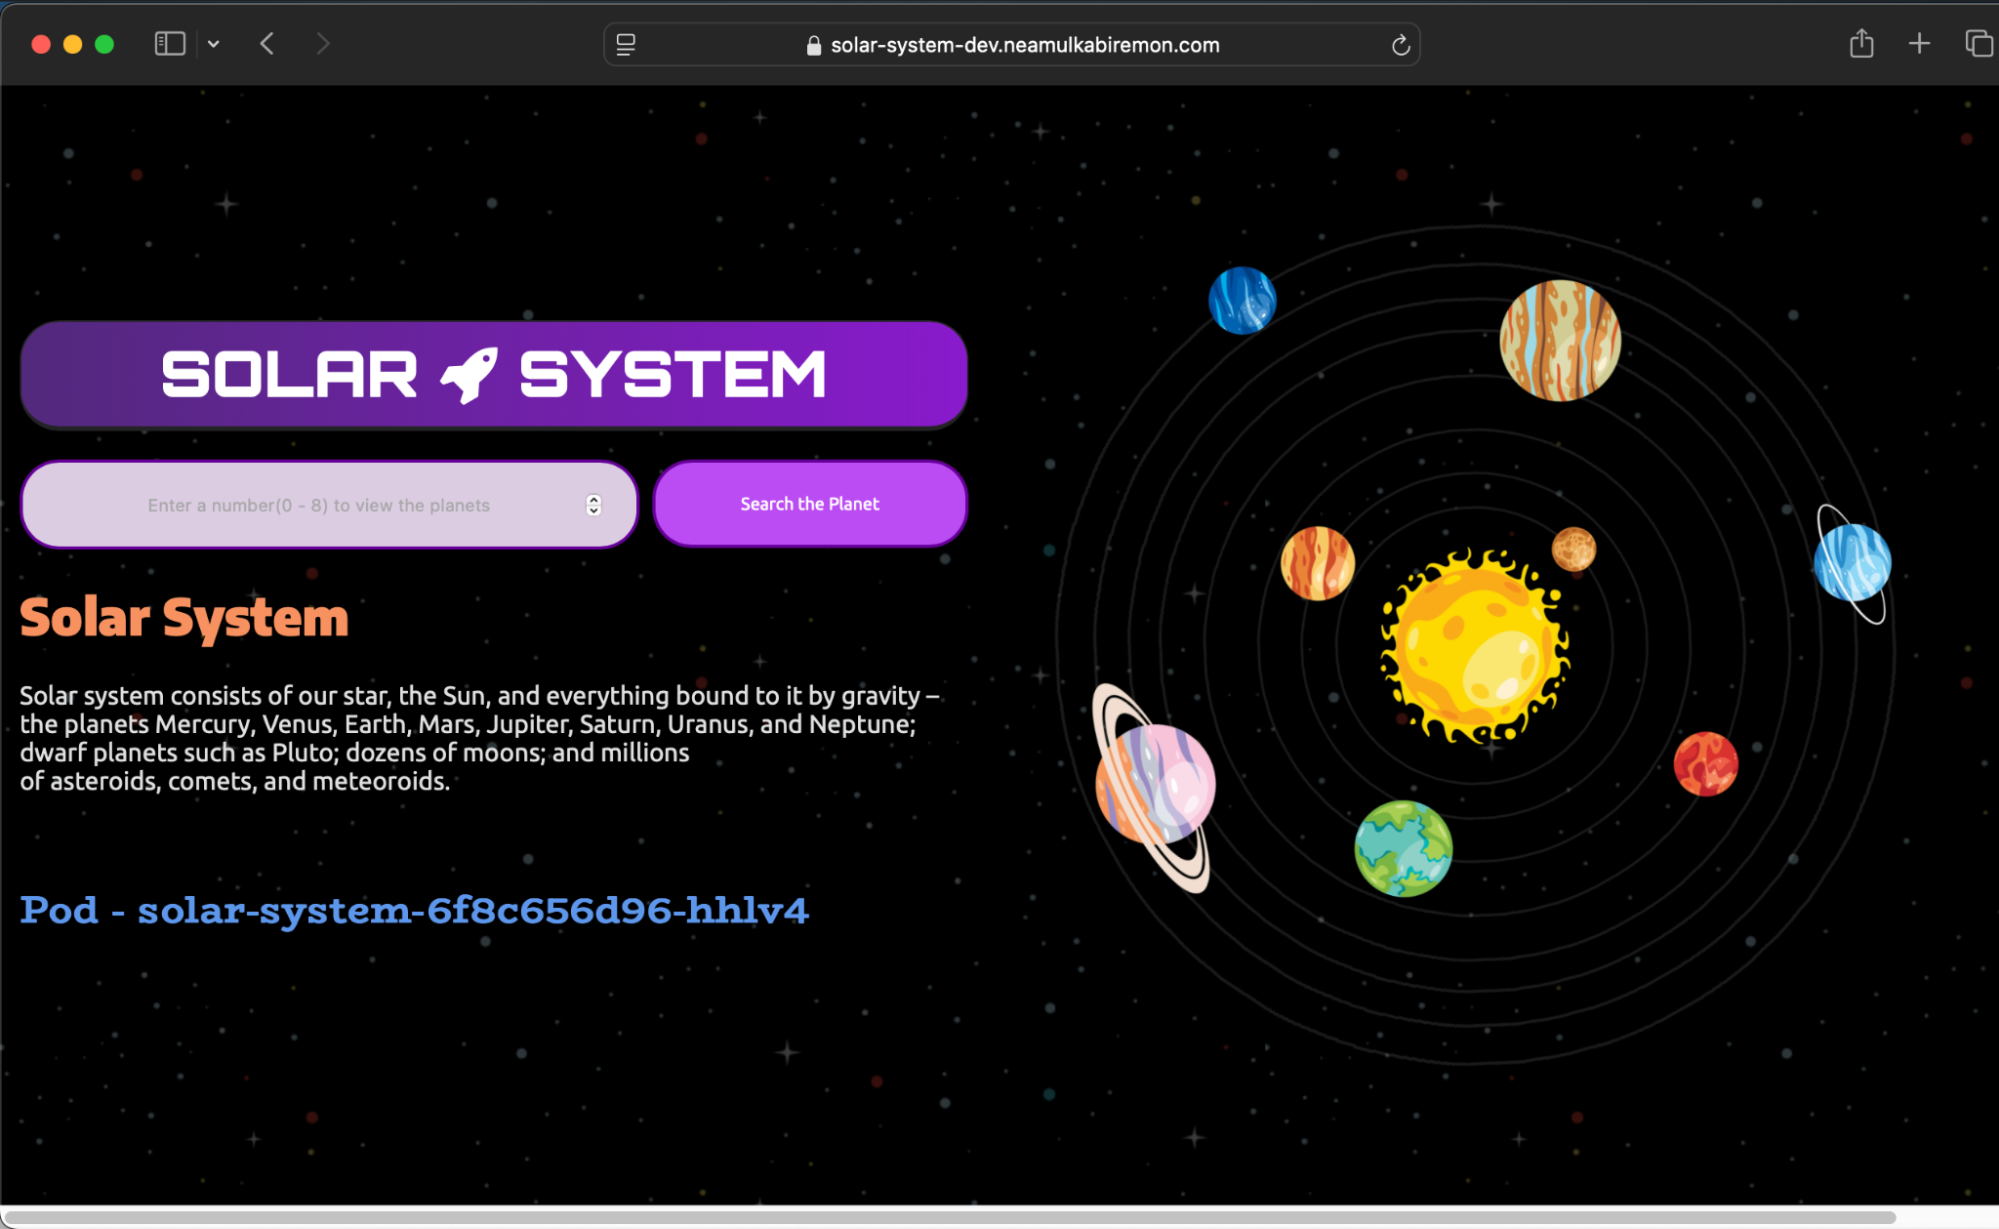
Once complete, access the application securely via HTTPS:
https://solar-system-dev.neamulkabiremon.com
Conclusion
The Solar System application is now fully operational, equipped with a robust CI/CD pipeline, Kubernetes deployment, and HTTPS security. Through GitLab CI/CD automation, we have ensured seamless integration, automated builds, rigorous security scanning, and efficient deployment across development and staging environments.
The implementation of best practices in DevOps and security has played a crucial role in strengthening the application's resilience, preventing potential vulnerabilities, and ensuring a smooth deployment process. The pipeline's structured approach—from code testing and containerization to security assessments and deployment—has enabled a reliable and scalable workflow.
With the final integration of SSL/TLS for secure access, the project is now production-ready, providing a secure, automated, and streamlined deployment process for future updates. This end-to-end automation lays a solid foundation for maintaining and scaling the application with minimal manual intervention.
Subscribe to my newsletter
Read articles from Neamul Kabir Emon directly inside your inbox. Subscribe to the newsletter, and don't miss out.
Written by
Neamul Kabir Emon
Neamul Kabir Emon
Hi! I'm a highly motivated Security and DevOps professional with 7+ years of combined experience. My expertise bridges penetration testing and DevOps engineering, allowing me to deliver a comprehensive security approach.