Lets Build Our Own Protocol Like HTTP
 Yagya Goel
Back in the day, I was working on a project related to Redis. I created QuickDB, which is an in-memory store similar to Redis. I built both the client and the server. If you want to check it out, you can find it here.
While working on this project, I also helped the client and server interact using the RESP protocol, which is a protocol built for Redis over TCP.
By this i got the idea of how actually RESP work and similarly how HTTP works(which is also based on TCP)
So, let's first look into what a protocol is, then discuss how HTTP works using a Go server, and finally dive into creating our own protocol. It will be super fun, so let's get started!
So, what is a Protocol?
You can think of a protocol as a language that helps us communicate between two or more parties.
In language, we have a set of rules for forming sentences that you need to follow so others can understand. Both the sender and the receiver need to agree on these rules.
Similarly, a protocol is just a set of rules that helps us communicate over a connection or a network between a sender and a receiver.
We have various protocols like TCP/IP, Hypertext Transfer Protocol, and UDP. These protocols are widely used to enable communication over the internet. For example, Ram's device can understand what Tanu sent using WhatsApp only because of these protocols. Without them, the messages sent between devices would be gibberish and incomprehensible.
What is HTTP and Diving into How it works
Hypertext Transfer Protocol, or HTTP, is a request-response protocol that helps web servers and web clients communicate with each other. It works on top of the TCP protocol.
If you use the internet, you've probably heard of HTTP—it's everywhere and very easy to use! That's why most web servers use HTTP.
Let's look at how it works with a simple example. HTTP supports several methods such as PUT, POST, DELETE, and GET. To send a message using the HTTP protocol, we first need to define the method. The method tells us what action we want to perform on the server. For a GET request, we retrieve data from the server, and it doesn't include a body.
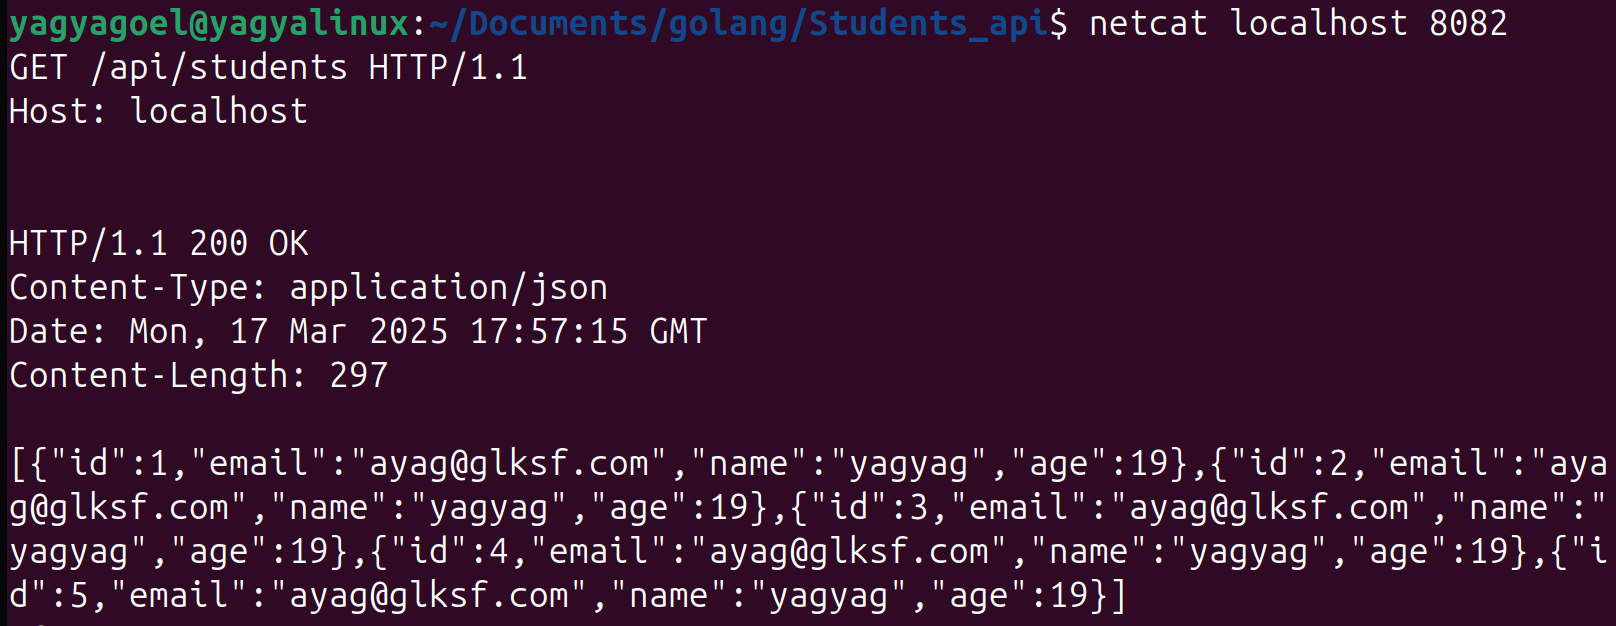
Let's use our Go server running on port 8082 to get all the students. It's a student management server, and you can check out its code here.
Here's an example request to fetch all the students using the HTTP protocol:
GET /api/students HTTP/1.1
Now let's run this on a TCP connection to the server.
Let's use netcat for that.
Start a TCP connection using the command:

Here, as you can see, we got an error for the host header. So, we need to add the headers on a new line like this, and then we will get a response.
GET /api/students HTTP/1.1
Host: localhost:8082

As you can see, we got a response in the HTTP protocol in a particular format, which includes the headers and the body.
That's usually how we send data in a set format, following specific rules that help both the server and client understand what's being sent.
So, now that we have an idea of how HTTP works behind the scenes, let's build our own protocol.
Building Our Own Protocol
So, let's first set the context for what the server will be doing. The server is a chat application running on TCP. We want to create a set of rules (i.e., a protocol) to let the server know what the user wants. The user can be anyone connected to the server.
I have built a basic server that uses our own in-house chat protocol. You can send two type of message broadcast \n your message to send a message to everyone, or send \n userid \n message for a personal message over the TCP connection.
func main() {
    //open a tcp server
    listner, err := net.Listen("tcp", "localhost:8080")
    if err != nil {
        log.Fatal("error while starting the tcp server", err)
    }
    defer listner.Close()

    fmt.Println("Server is listening on port 8080")
    for {
        conn, err := listner.Accept()
        if err != nil {
            fmt.Println("error while acceptiing the connection ", err)
            continue

        }
        go handleClient(conn)

        connectionInt := rand.Intn(500000-100000) + 100000

        connection[conn] = connectionInt
        broadcastMessage(conn, "client connected ")// we just iterate over the connection
    }//and write to each connection
}
Here, as you can see, we start a server and listen for any active client connections. When a connection is made, I handle the client asynchronously using a goroutine and add it to the list of connections with a random ID to help us identify the connection. Then, we broadcast that the client has connected.
Note: The random generator does not check if a previous ID exists with the same number; in this case, it will be overwritten.
func handleClient(conn net.Conn) {
    defer func() {
        mutex.Lock()
        delete(connection, conn)
        conn.Close()
        mutex.Unlock()
        fmt.Println("client disconnected ", conn)
    }()

    fmt.Println("connection established to client", conn)
    reader := bufio.NewReader(conn)
    for {
        command, err := decryptCommand(reader)
        if err != nil {
            fmt.Println("error while reading message from", conn, "error:", err)
            return
        }

        var user int
        if command == "send" {
            user, err = getTheConnectionNumber(reader)
            if err != nil {
                fmt.Println("error while reading message from", conn, "error:", err)
                return
            }
        }

        message, err := reader.ReadString('\n')
        if err != nil {
            fmt.Println("error while reading message from", conn, "error:", err)
            return
        }

        fmt.Println("message received:", message)

        if command == "broadcast" {
            broadcastMessage(conn, message)
        } else if command == "send" {
            if err := sendMessage(message, user); err != nil {
                fmt.Println("Failed to send message:", err)

            }
        } else {
            fmt.Println("Unknown command:", command)
        }
    }
}
This is the handleClient function where we listen for messages from all clients connected to the server. If a client encounters an error or disconnects, we remove it from the connection map and close the connection.
We listen for two commands in the first line: "send" or "broadcast," and proceed accordingly. For "send," we read the ID, look it up in the connection map, and send the message if the connection is found. For "broadcast," we send the message to all users.
You can check out the entire code here.
Example in Action
Let's see how it works in action.

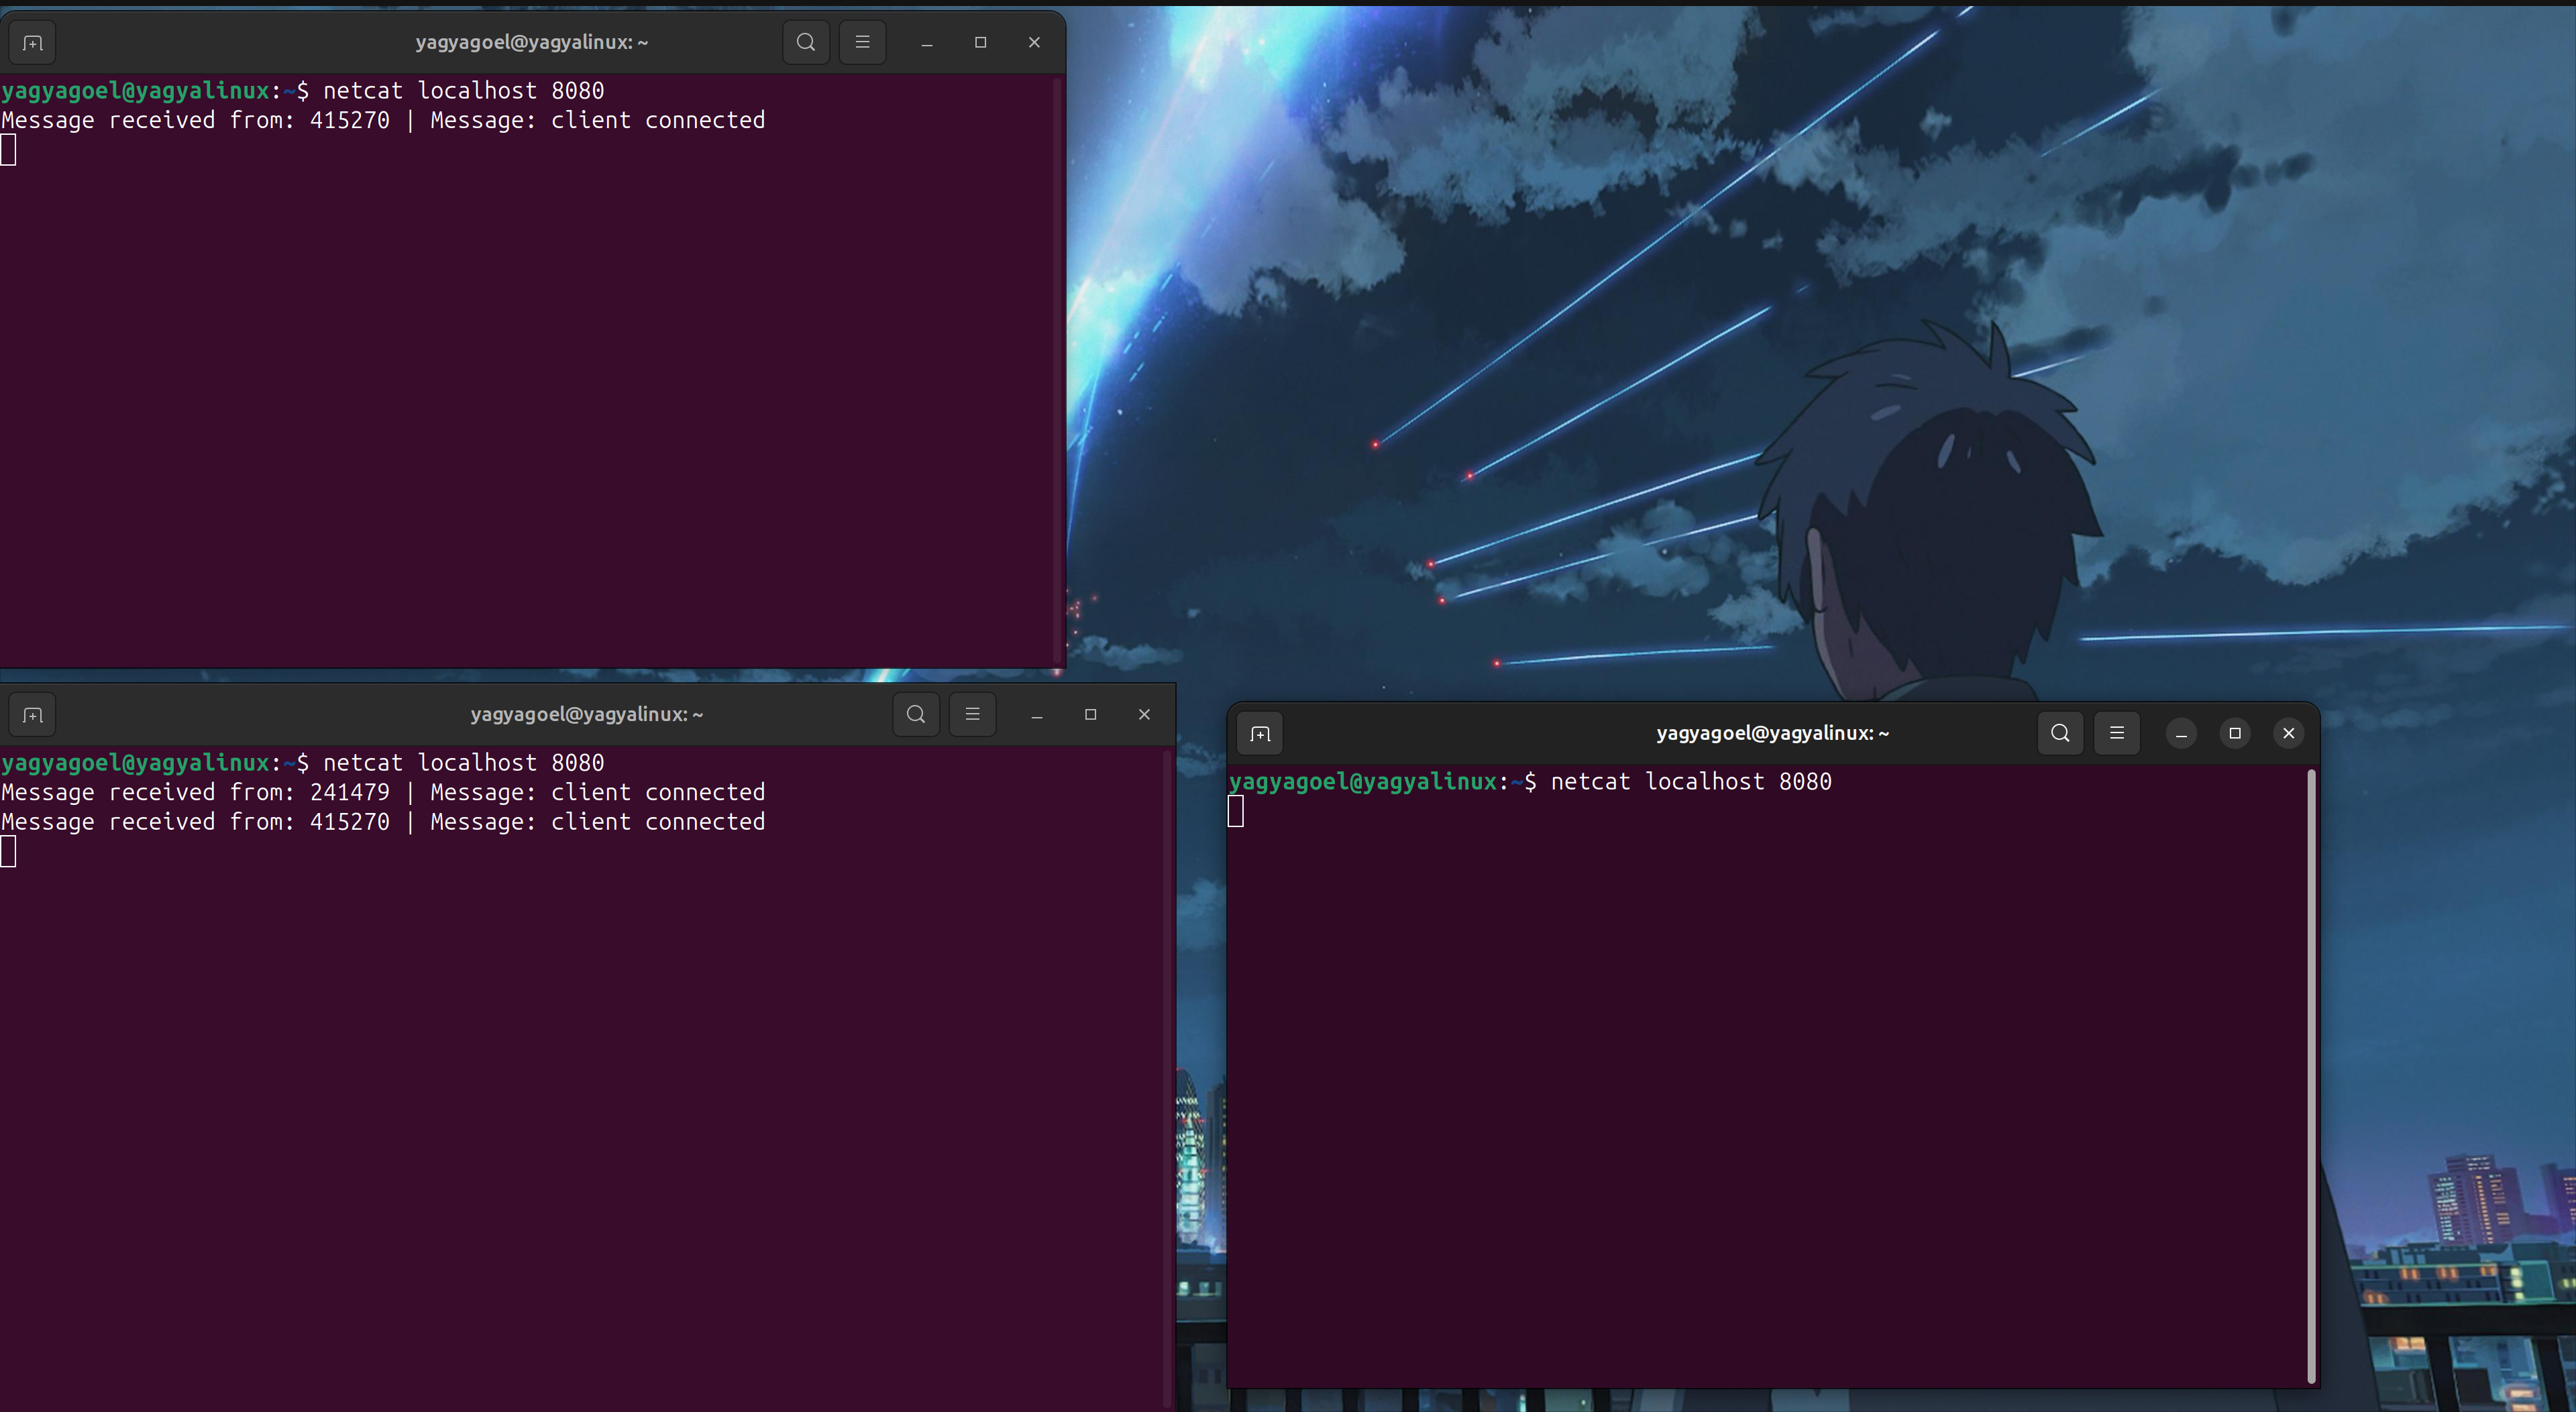
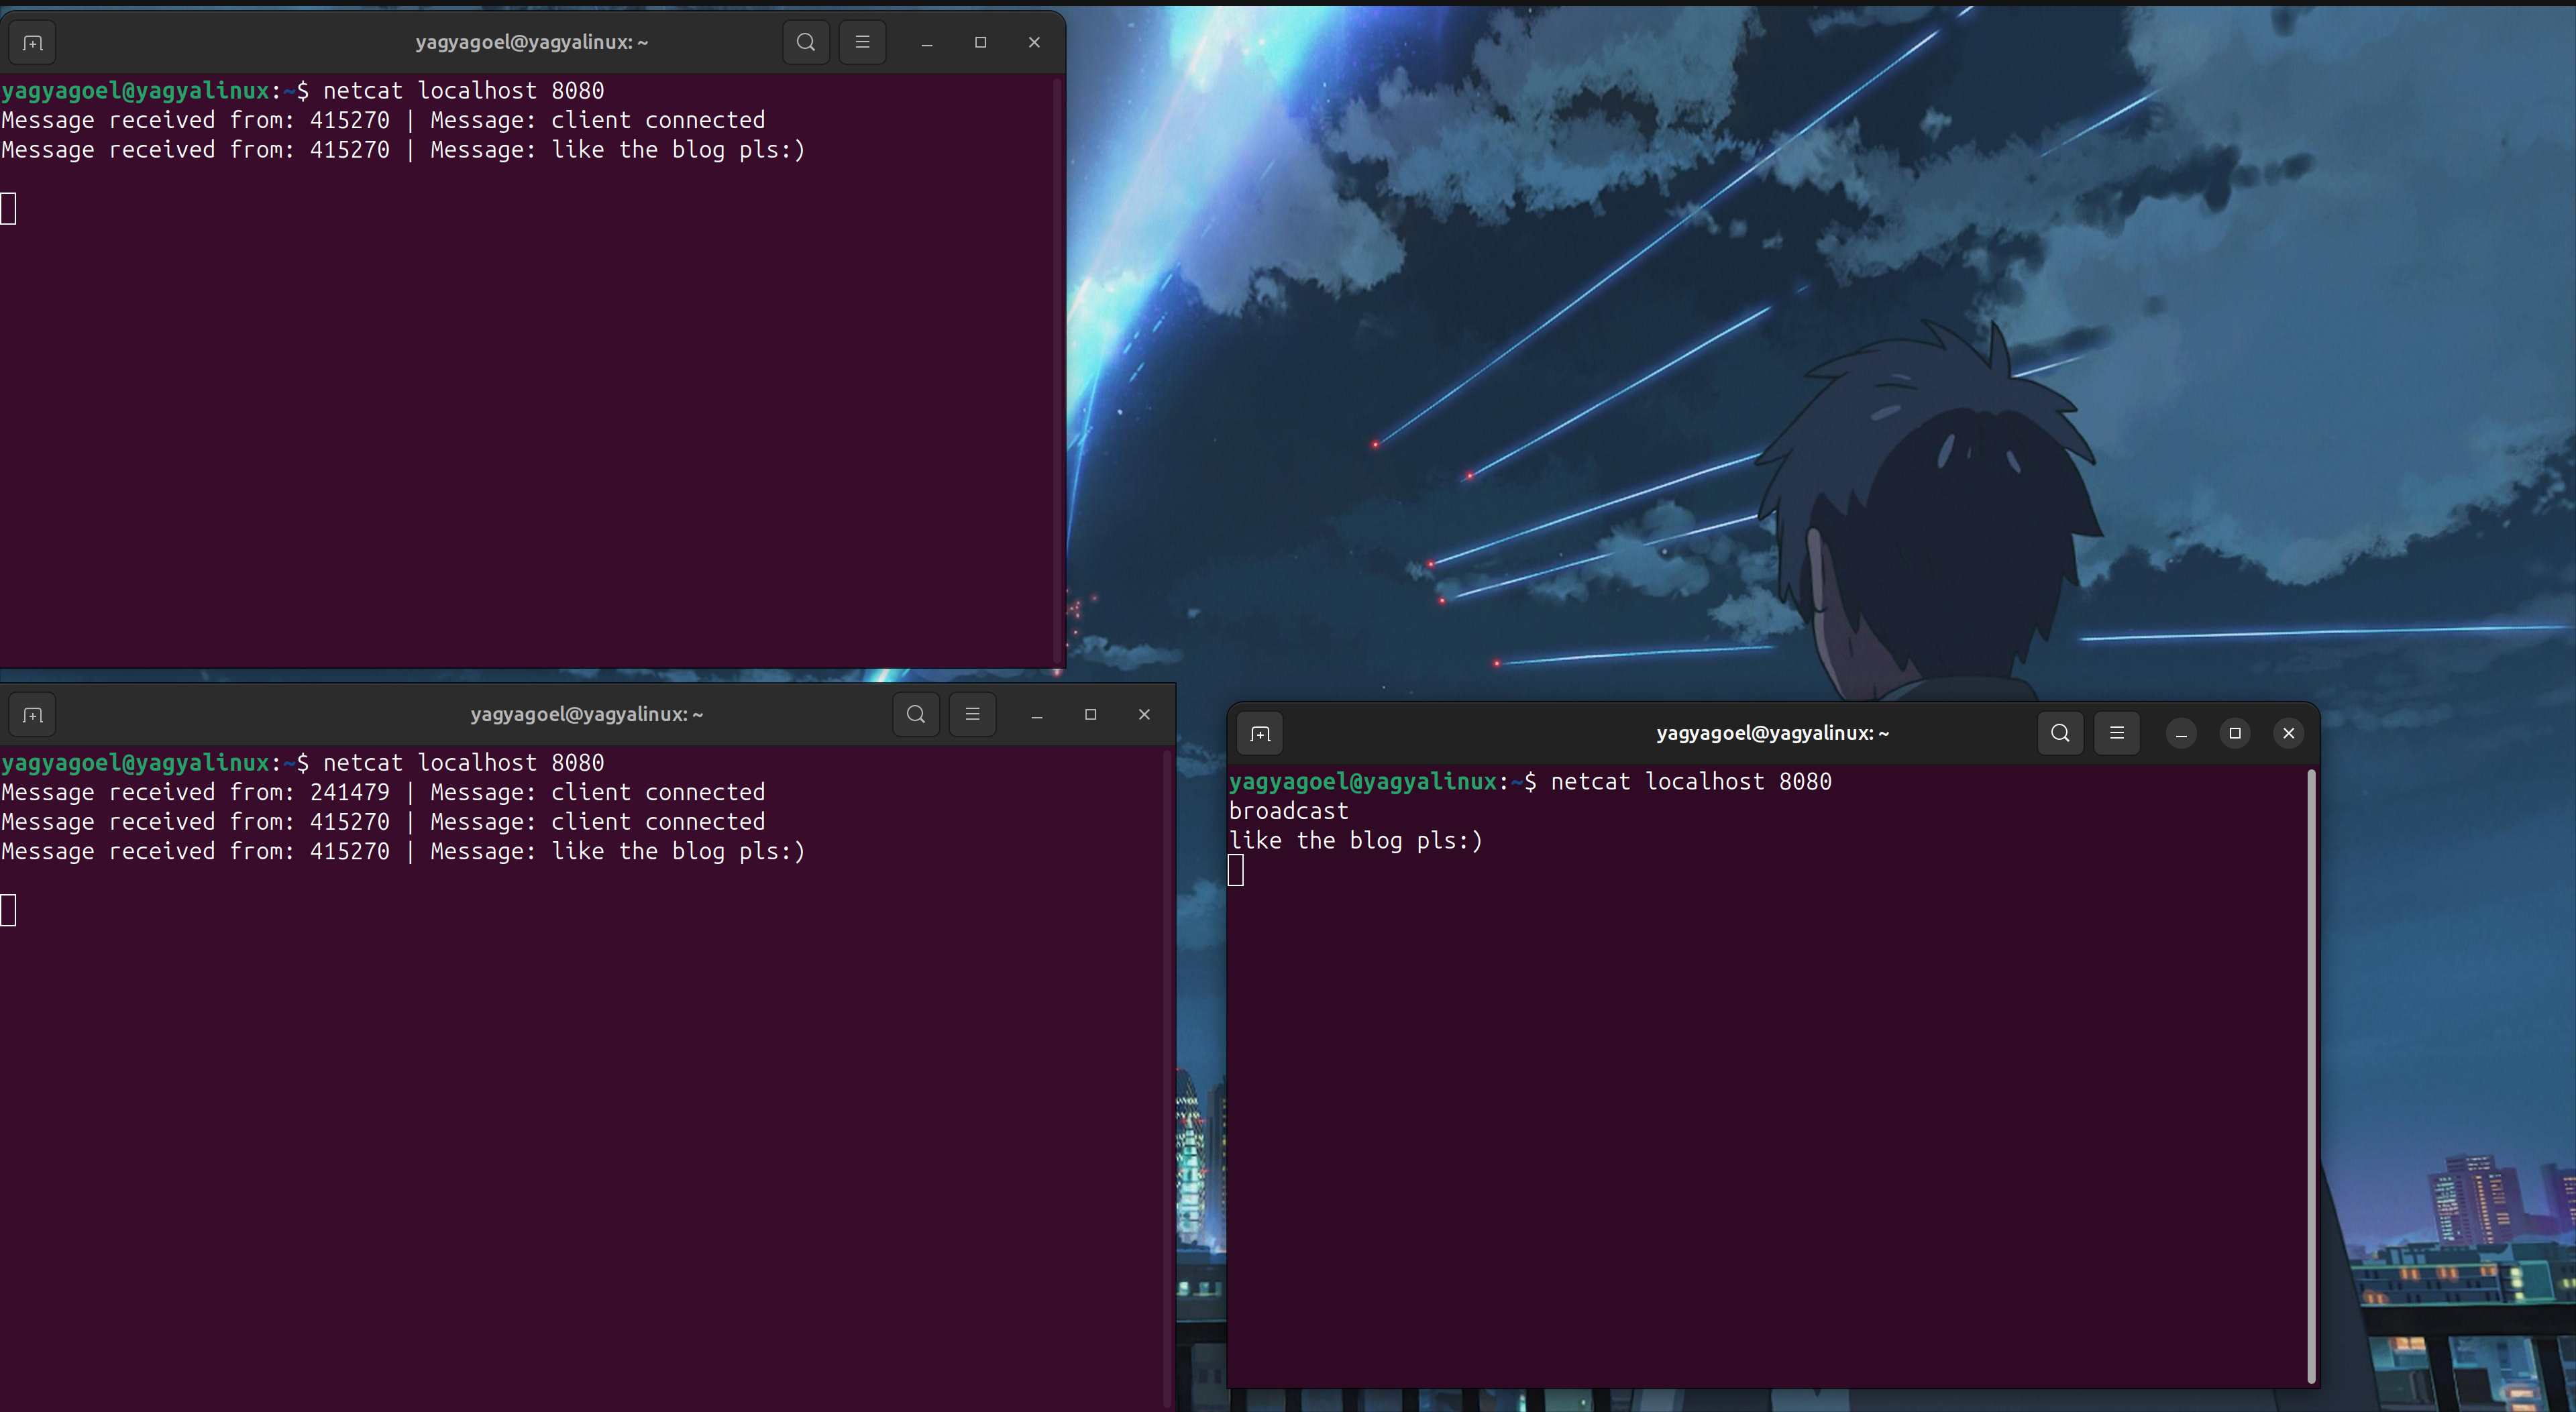
Here, as you can see, we have three connections. The first connection has the client IDs of the next two connected clients. So, let's first try broadcasting a message.

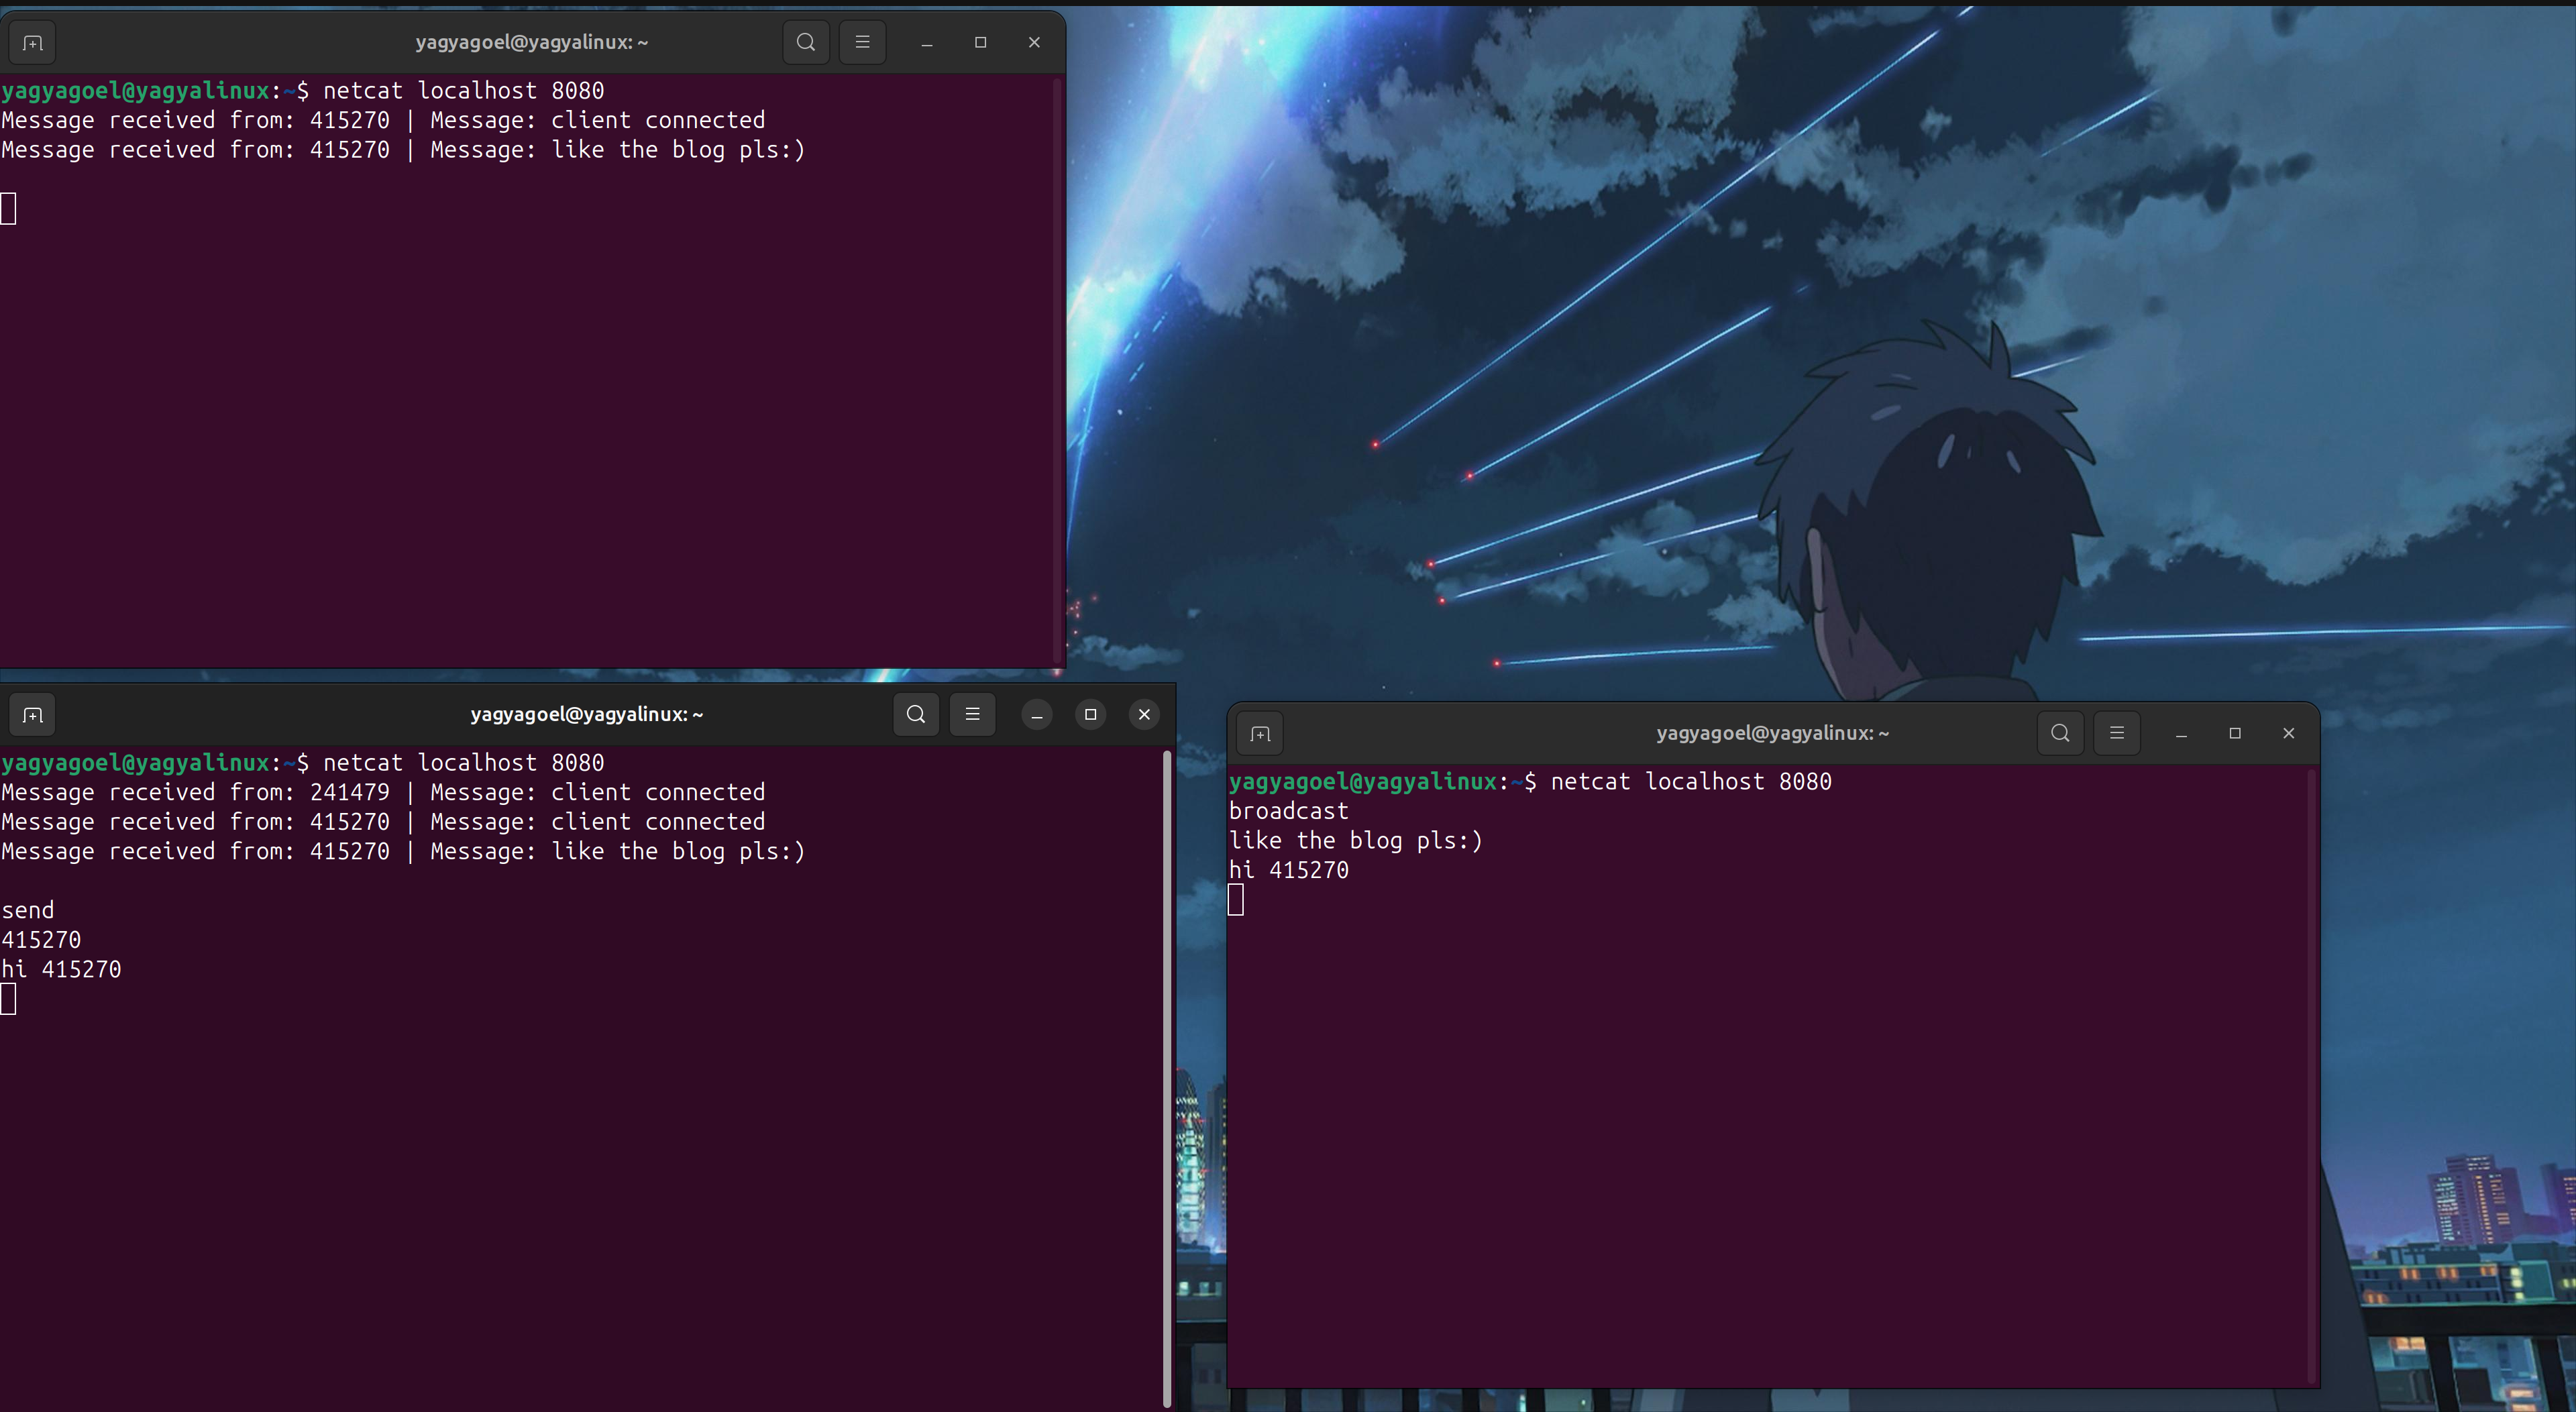
As you can see, I broadcasted the message, and it was received by both connected clients. Now, let's send a personal message to a connected client.

Here, as you can see, the message was received only by the intended client, and we are working within a specific protocol.
Yay, we built our own protocol!
Thank you for reading my blog.
Please like and comment on my blog if you find it helpful, and feel free to ask any questions in the comments.
Subscribe to my newsletter
Read articles from Yagya Goel directly inside your inbox. Subscribe to the newsletter, and don't miss out.
Written by

Yagya Goel
Yagya Goel
Hi, I'm Yagya Goel, a passionate full-stack developer with a strong interest in DevOps, backend development, and occasionally diving into the frontend world. I enjoy exploring new technologies and sharing my knowledge through weekly blogs. My journey involves working on various projects, experimenting with innovative tools, and continually improving my skills. Join me as I navigate the tech landscape, bringing insights, tutorials, and experiences to help others on their own tech journeys. You can checkout my linkedin for more about me : https://linkedin.com/in/yagyagoel