Linux Training : Section 8 (Part-1)
 Aditya Dev Shrivastava
Table of contents
- System Run Levels
- Computer Boot Process
- Linux Boot Process
- Linux Boot Process (Newer Versions)
- The systemd-analyze command
- Message of the Day
- Customize Message of the Day
- Storage
- Disk Partition
- Add Disk and Creating Partition
- Logical Volume Management (LVM)
- Add Disk and Create LVM Partition
- Extend Disk Using LVM
- Adding Swap Space
System Run Levels
Main Run Level
0 » Shutdown (or halt) the system
1 » Single-user mode; usually aliased as s or S
6 » Reboot the system
Other Run Level
2 » Multiuser mode without networking
3 » Multiuser mode with networking
5 » Multiuser mode with networking and GUI
NOTE: Run-level 4 is undefined or not used/User-definable
- Command »
init 0/1/6/2/3/5&who -r» To check the run level details
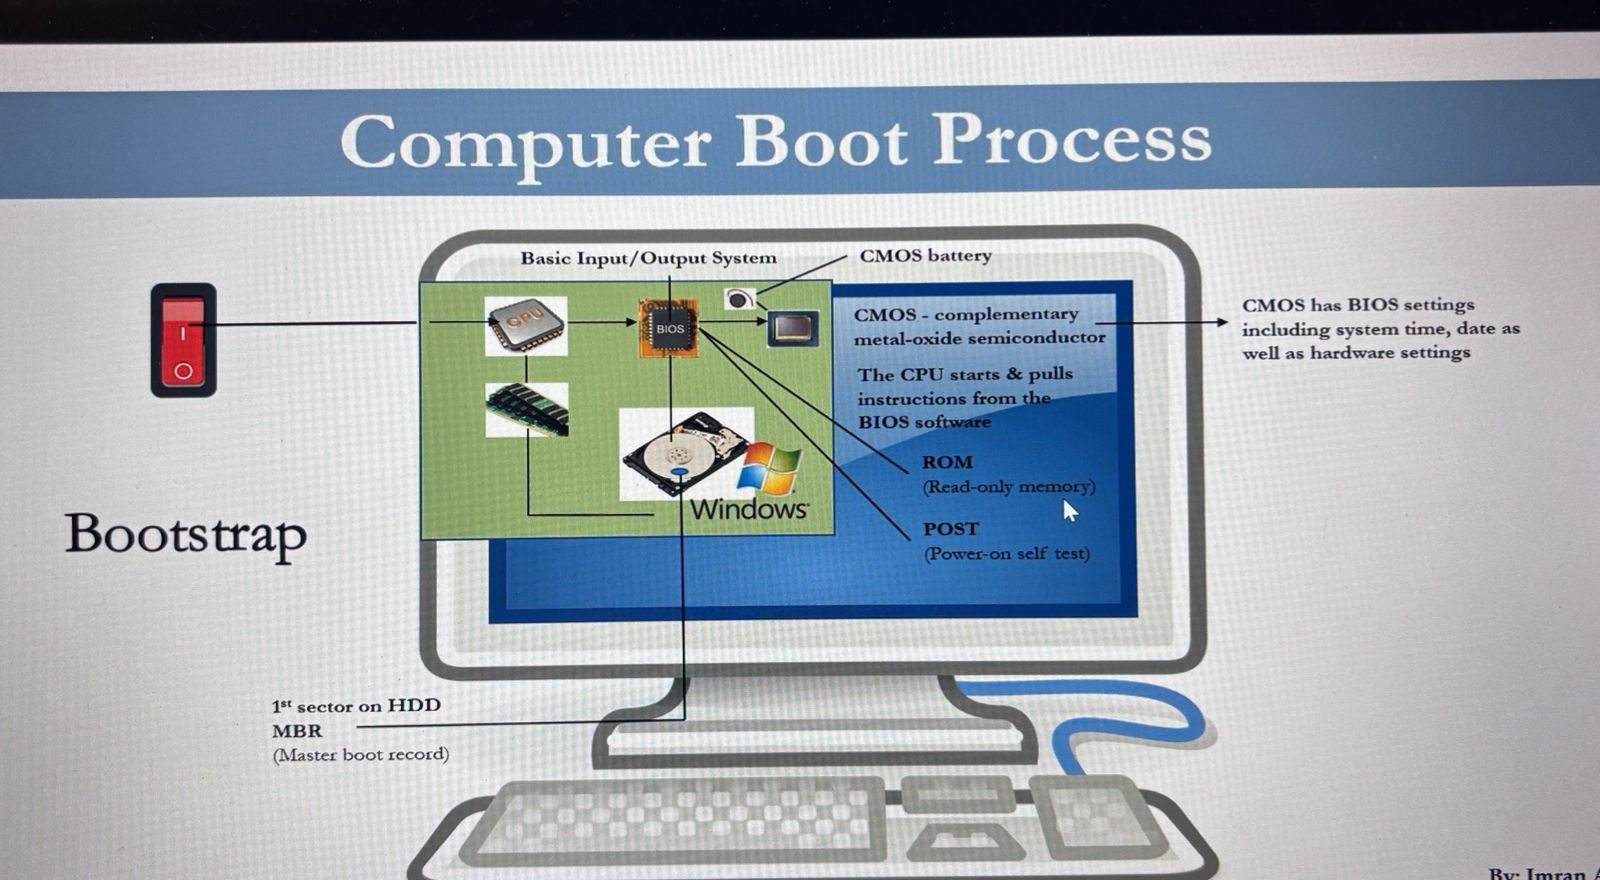
Computer Boot Process
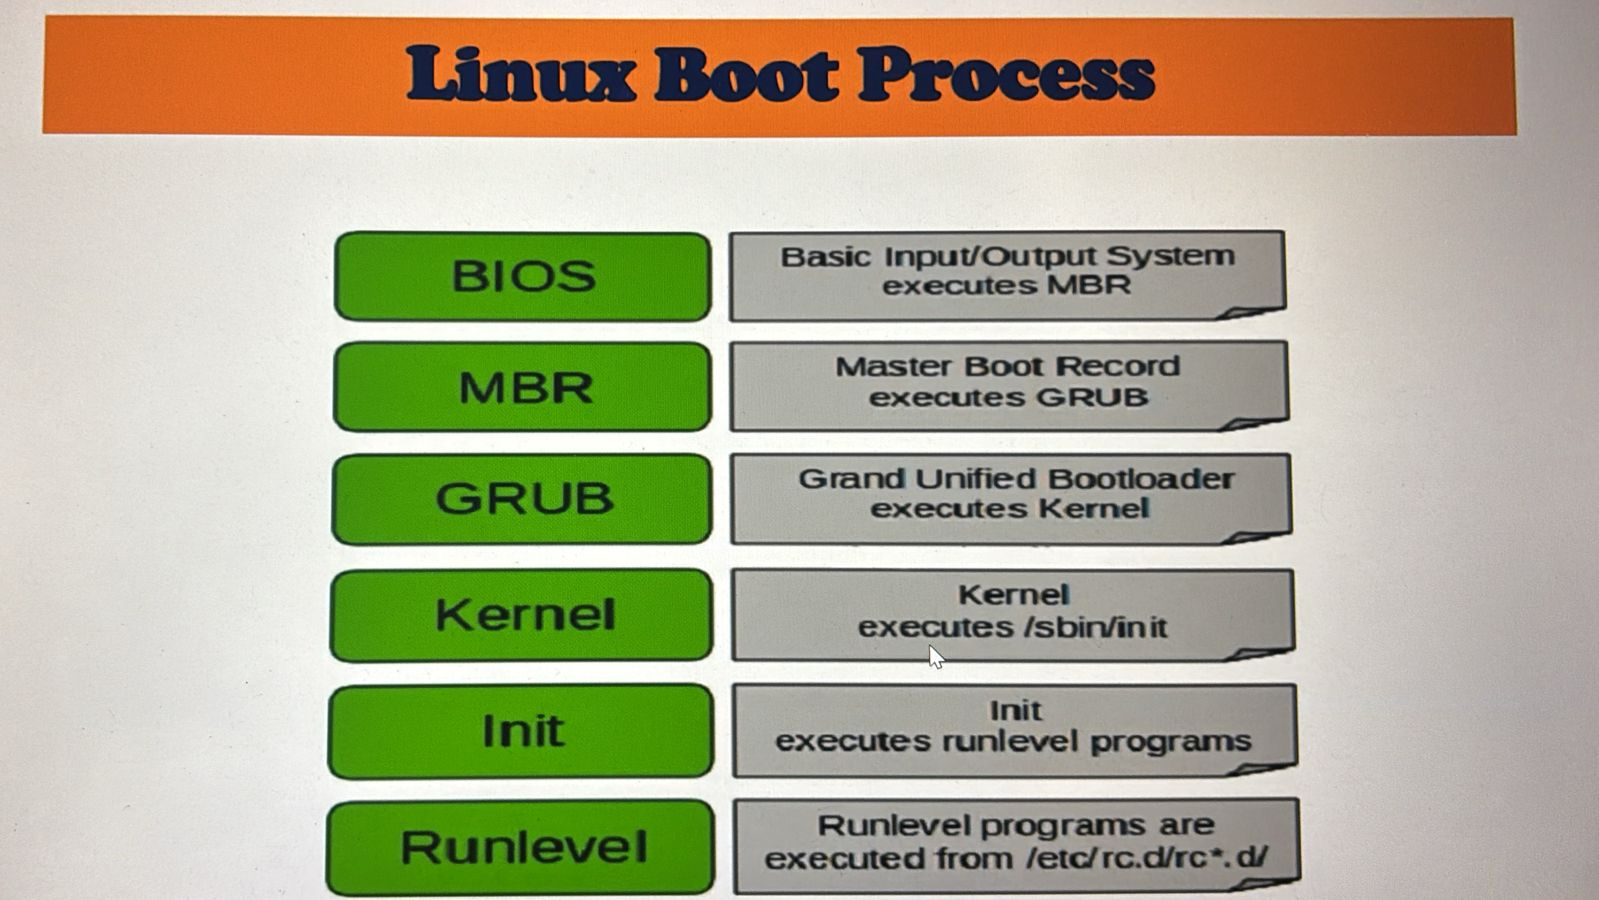
Linux Boot Process
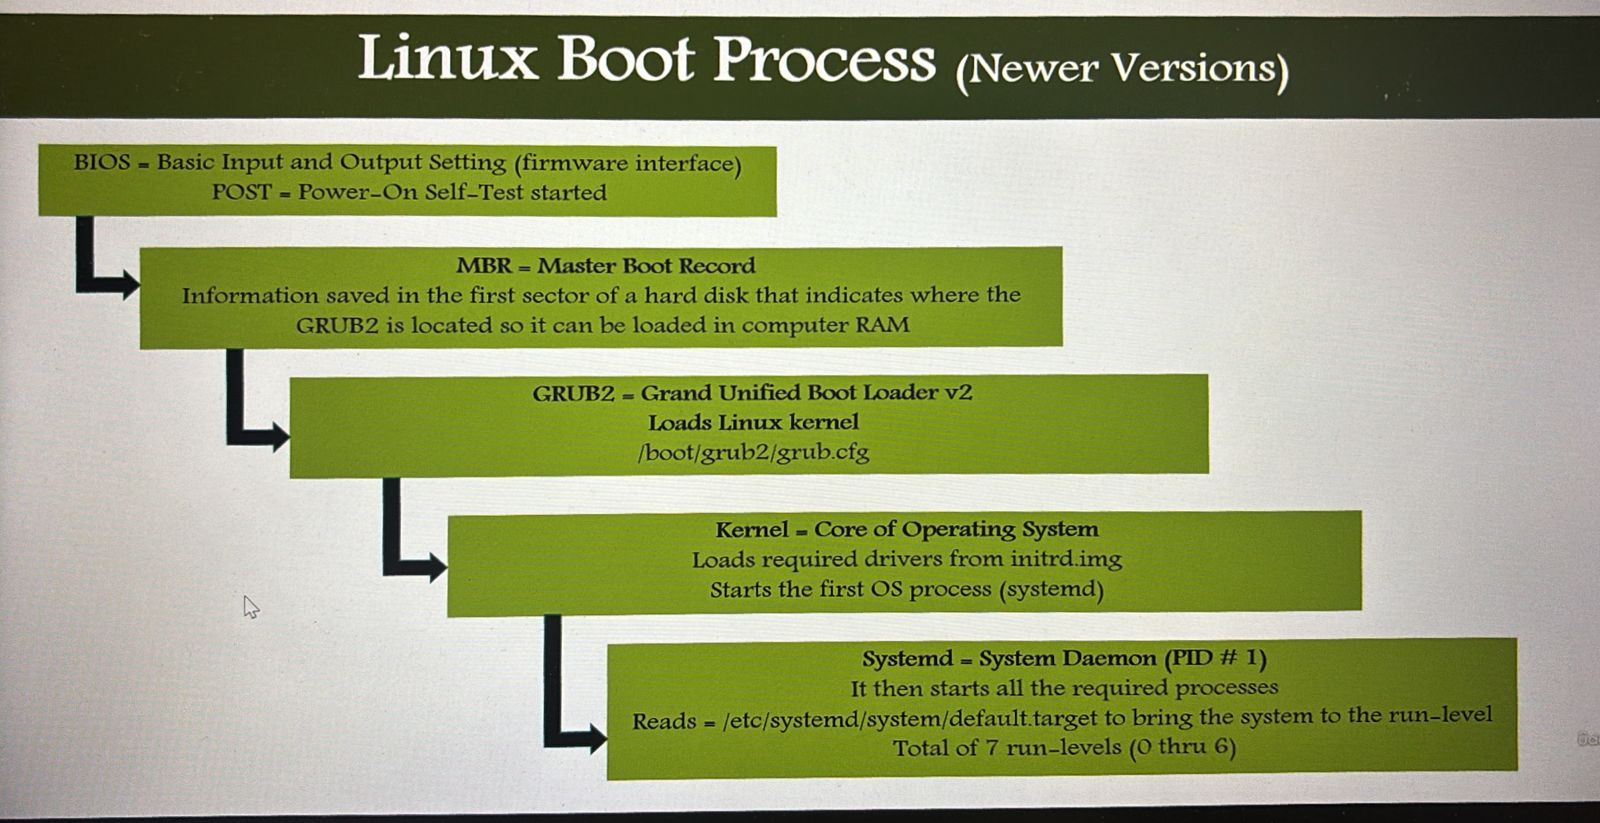
Linux Boot Process (Newer Versions)
The systemd-analyze command
Systemd is a system and service manager for Linux that manages services and system settings. It's the default initialization system for many Linux distributions.
Boot by kernel, service, initrd
It helps to identify slowest services
Start time in blame list
Optimizing boot performance
Some commands are-
systemd-analyze timesystemd-analyze blamesystemd-analyze blame --user
Message of the Day
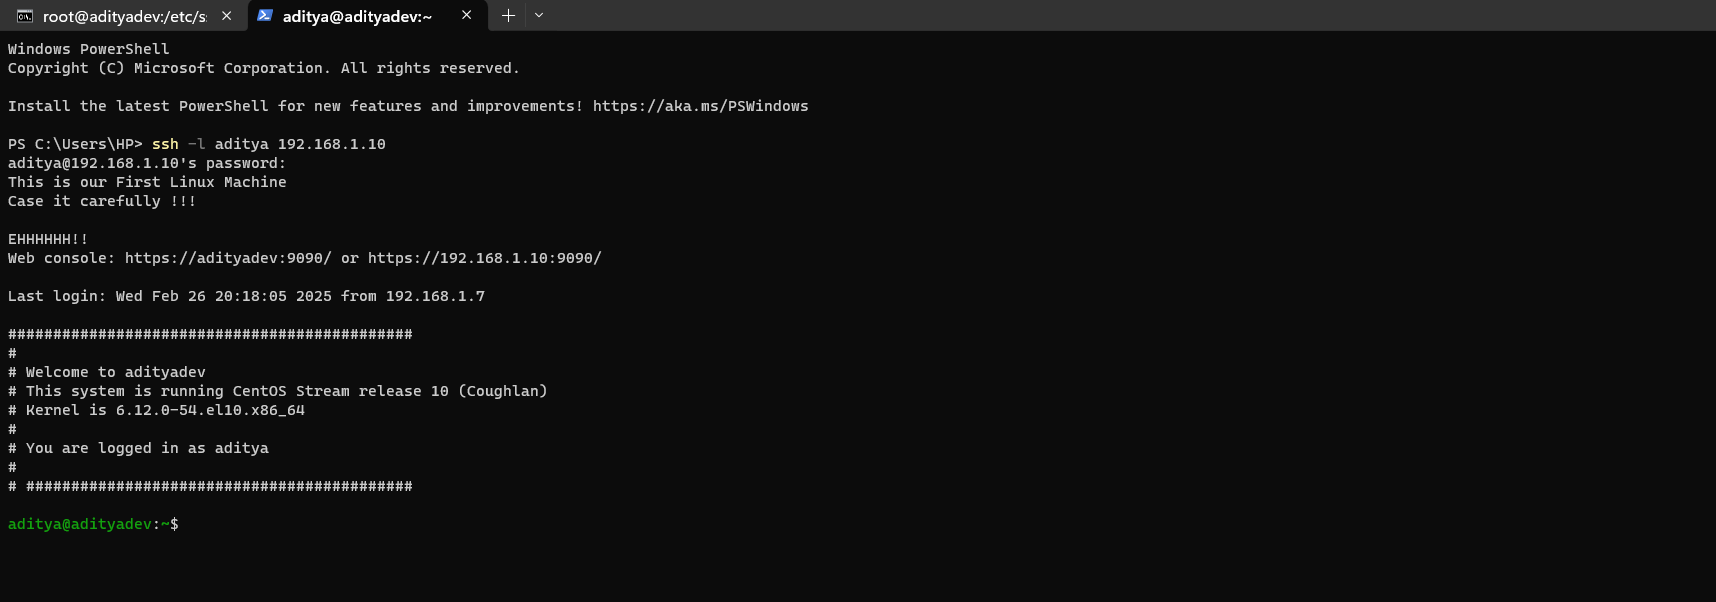
It will appear whenever you are connected.
Message of the day file location »
/etc/motd

Customize Message of the Day
Message of the day is the first message users will see when they login to the Linux machine
Steps:
Create a new file in
/etc/profile.d/motd.shAdd desired commands in
motd.shfile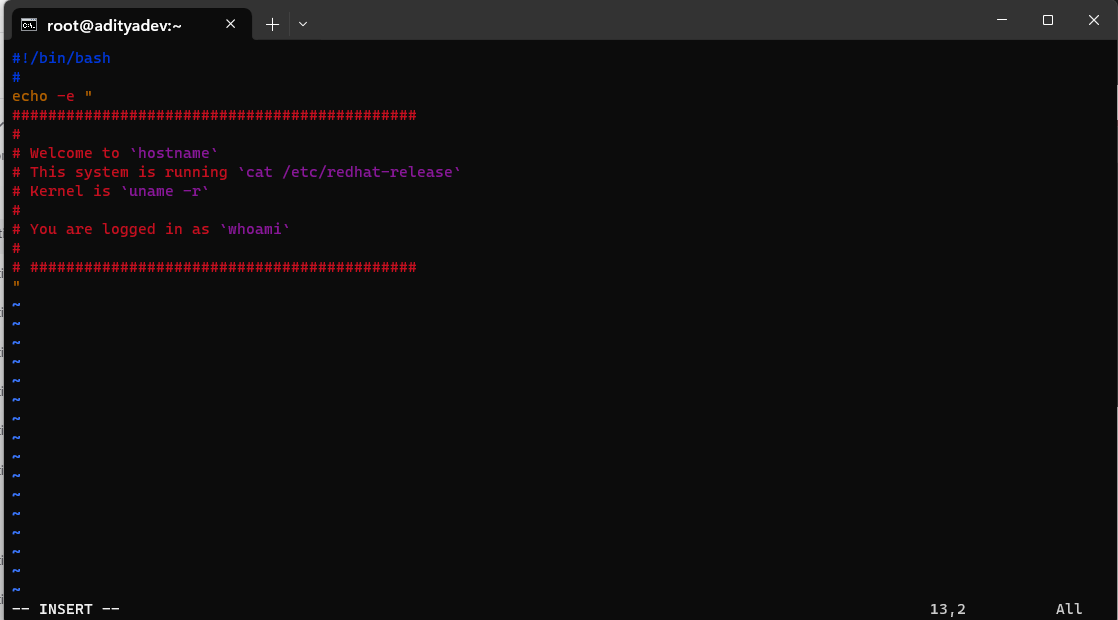
Modify the /etc/ssh/sshd_config file to edit » #PrintMotd yes to no


Restart sshd service

Storage
Local Storage
- RAM, HDD, SDD, etc.
DAS (Direct Attached Storage)
- CD/DVD, USB Flash Drive, external disk directly attached with USB or other cables
SAN (Storage Area Network)
- Storage attached through iSCSI or fiber cable
NAS (Network Attached Storage)
Storage attached over network (TCP/IP)
E.g., Samba, NFS etc.
Disk Partition
Commands for disk partition
df» df shows the available space on the file system which is set up on that device.
fdisk -l» fdisk shows the total number of disk blocks
Add Disk and Creating Partition
Purpose? » Out of space, Additional apps etc
Commands » df and fdisk
Follow Below Steps-
# fdisk /dev/emcpowerp OR fdisk /dev/sdb m » n » p » 1 » enter » enter » w
Then format the new partition
# mkfs –t ext2 /dev/sdb1
OR
# mkfs.ext3 /dev/emcpowerL# OR mkfs.ext3 /dev/sdb1
Logical Volume Management (LVM)
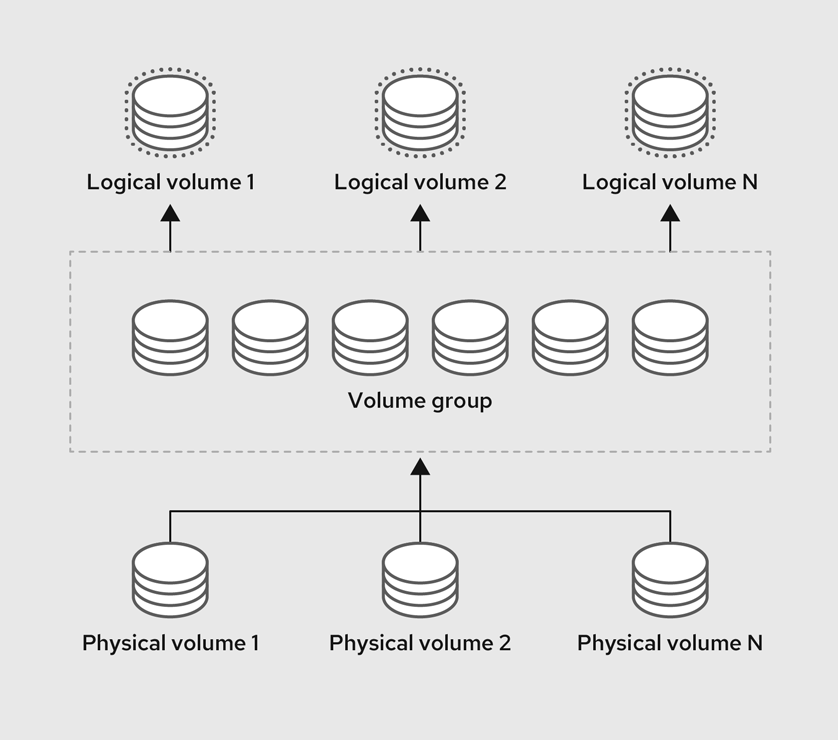
- LVM allows disks to be combined together
Add Disk and Create LVM Partition

Steps-
fdisk /dev/sdc
n
p
Enter for first sector
Enter for last sector
p = print the partition table
t = change a partition's system id
L = type L to list all codes
8e = Partition type from Linux to Linux LVM
w
Create Physical Volume (PV) = pvcreate /dev/sdc1
Verify physical volume = pvdisplay
Create Volume Group (VG) = vgcreate oracle_vg /dev/sdc1
Verify Volume group = vgdisplay oracle_vg
Create Logical Volumes (LV) = lvcreate –n oracle_lv –size 2G oracle_vg
Verify logical volumes = lvdisplay
Format Logical Volumes = mkfs.xfs /dev/oracle_vg/oracle_lv
Create a new directory = mkdir /oracle
Mount the new file system = mount /dev/oracle_vg/oracle_lv /oracle
Verify = df –h
Extend Disk Using LVM
Go to your virtualization product (VMWare or Oracle Virtual Box)
Increase the disk space to desired number and then click ok
Now go to your Linux VM
Reboot the VM to have the system re-scan the newly added disk Or
cd /sys/class/scsi_disk/2:0:0:0
echo '1' > device/rescan
fdisk –l (To make sure the disk is increased)
Create a new partition
fdisk /dev/sdc
n (for new partition)
p (for primary partition)
2 (partition number, 2 or the new partition)
Enter
Enter
t (Label the new partition)
3 (Pick default value)
8e (This will make the filesystem as LVM)
w (Write)
# reboot or init 6
Note: The above procedure will create /dev/sdc2 partition
Extend the LVM group
pvdisplay (To see which group associated with which disk)
pvs (Info about physical volumes
vgdisplay oracle_vg (oracle_vg is the group name or you can simply run vgdisplay) On vgdisplay you will notice Free PE / Size at the bottom
pvcreate /dev/sdc2 (Initialize partition for use by LVM)
vgextend oracle_vg /dev/sdc2 (# = whichever partition was created above)
Run vgdisplay oracle_vg check (Free PE / Size). The second column is the right column as free. If it is in G convert that into M. e.g. 1G = 1024M
lvextend –L+1024M /dev/mapper/oracle_vg-oracle_lv
resize2fs /dev/mapper/oracle_vg-oracle_lv
OR
xfs_growfs /dev/mapper/oracle_vg-oracle_lv
Adding Swap Space
What is swap? – CentOS.org
Swap space in Linux is used when the amount of physical memory (RAM) is full. If the system needs more memory resources and the RAM is full, inactive pages in memory are moved to the swap space. While swap space can help machines with a small amount of RAM, it should not be considered a replacement for more RAM. Swap space is located on hard drives, which have a slower access time than physical memory
Recommended swap size = Twice the size of RAM
Lets say,
M = Amount of RAM in GB, and S = Amount of swap in GB, then
If M < 2
then S = M *2
Else S = M + 2
Commands
dd
mkswap
swapon or swapoff
Steps to Create Swap Space from Existing Disk
If you don’t have any additional disks, you can create a file somewhere on your filesystem, and use that file for swap space. The following dd command example creates a swap file with the name “newswap” under / directory with a size of 1024MB (1.0GB)
- # dd if=/dev/zero of=/newswap bs=1M count=1024
Where
if = read from FILE instead of stdin
of = write to FILE instead of stdout
bs = read and write BYTES at a
time count = total size of the file
Change the permission of the swap file so that only root can access it.
# chmod go-r /newswap
OR
# chmod 0600 /newswap
Make this file as a swap file using mkswap command.
# mkswap /newswap
Enable the newly created newswap.
# swapon /newswap
To make this swap file available as a swap area even after the reboot, add the following line to the /etc/fstab file.
# cat /etc/fstab
/newswap swap swap defaults 0 0
Verify whether the newly created swap area is available for your use.
# swapon –s
# free –h
If you don’t want to reboot to verify whether the system takes all the swap space mentioned in the /etc/fstab, you can do the following, which will disable and enable all the swap partition mentioned in the /etc/fstab
# swapoff -a
# swapon -a
Thanks for going through this blog, Happy Learning !! 😁
Subscribe to my newsletter
Read articles from Aditya Dev Shrivastava directly inside your inbox. Subscribe to the newsletter, and don't miss out.
Written by
