Advanced Python for DevOps
 GOUROB DAS
Table of contents
- Learning points:
- ✅ Solutions:
- ✅ Challenge 1: Create a Python script that connects to a remote server via SSH using paramiko.
- 📌 Example Input & Output:
- 🛠 Explanation of the Commands:
- ✅Challenge 2: Build a simple Flask API with an endpoint that returns system health (CPU/memory usage).
- 🚀 Bonus: Extended Health API with Disk and Network Stats
- 🛠 Explanation of the Commands
- ✅Challenge 3: Create a Django app, and set up models, views, and templates for a basic CRUD operation.
- ✅ Step 1: Install Django
- ✅ Step 2: Create a Django Project
- ✅ Step 3: Create a Django App
- ✅ Step 4: Create a Model
- ✅ Step 5: Apply Migrations
- ✅ Step 6: Create a Form
- ✅ Step 7: Create Views
- ✅ Step 8: Create Templates
- ✅ Step 9: Configure URLs
- ✅ Step 10: Run the Django Server
- 🛠 Explanation of the Commands
- ✅Challenge 4: Use Python subprocess to execute system commands and capture output.
- ✅ Step 1: Create the Python Script
- ✅ Step 2: Run the Script
- ✅ Step 3: Test with Example Commands
- 🛠 Explanation of the Commands
- ✅Challenge 5: Build a Flask API that fetches live weather data from an external API and returns it in JSON format.
- ✅ Step 1: Sign Up for an API Key
- ✅ Step 2: Install Required Packages
- ✅ Step 3: Create the Flask API
- ✅ Step 4: Run the Flask API
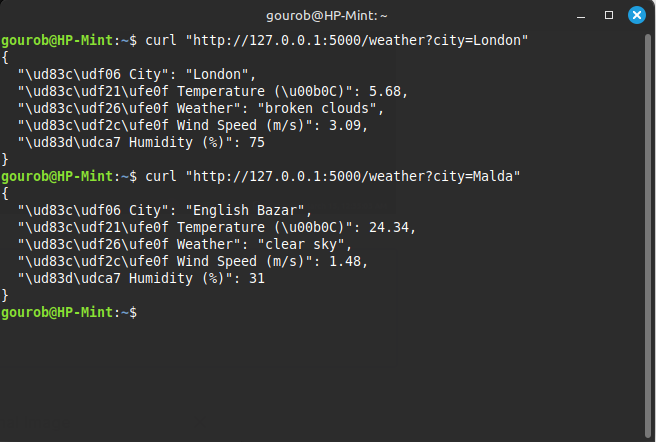
- ✅ Step 5: Test the API
- 🛠 Explanation of the Commands
- ✅Challenge 6: Deploy a Django application on AWS EC2 with Nginx & Gunicorn.
- ✅ Step 1: Launch an AWS EC2 Instance
- ✅ Step 2: Install Required Packages
- ✅ Step 3: Clone Your Django Project
- ✅ Step 4: Set Up a Virtual Environment & Install Dependencies
- ✅ Step 5: Configure Django Settings
- ✅ Step 6: Set Up Gunicorn
- ✅ Step 7: Set Up Nginx as a Reverse Proxy
- ✅ Step 8: Run Django as a Background Process
- ✅ Step 9: Configure Firewall & Security Groups
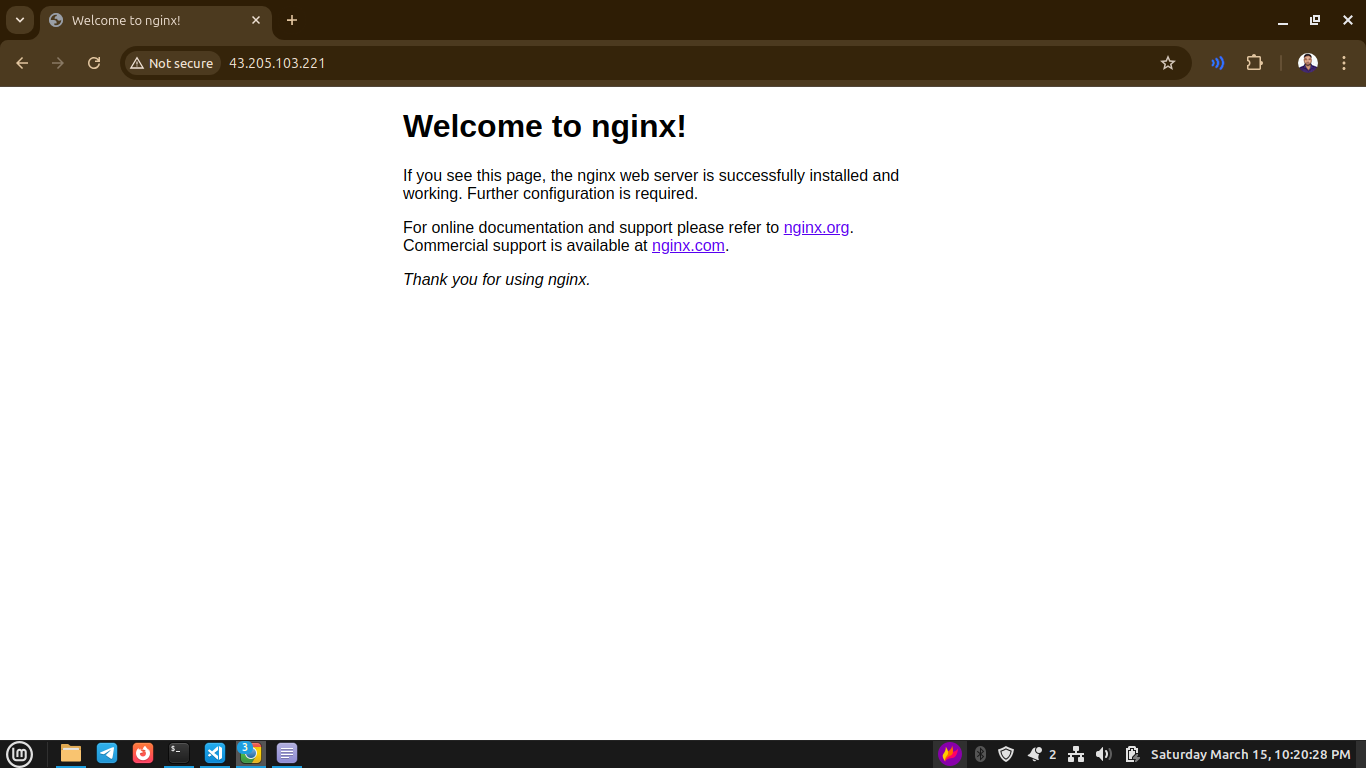
- ✅ Step 10: Access the Application
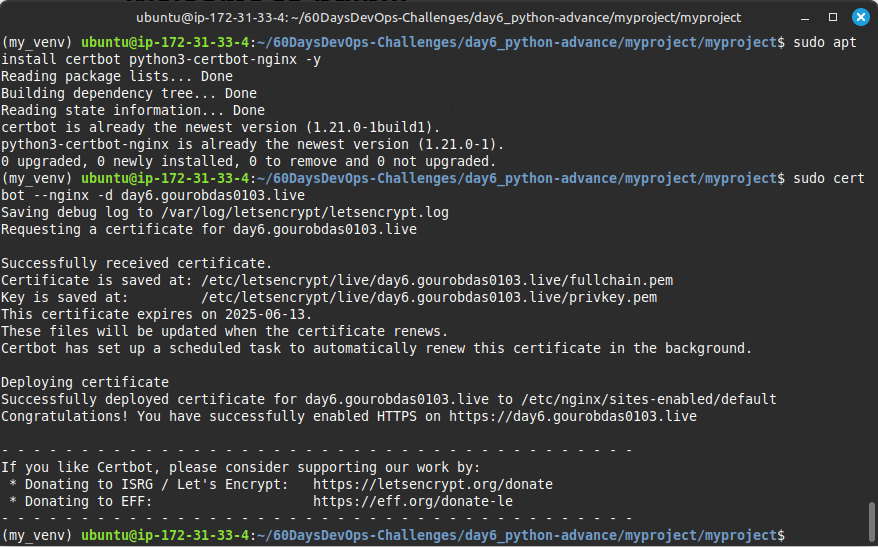
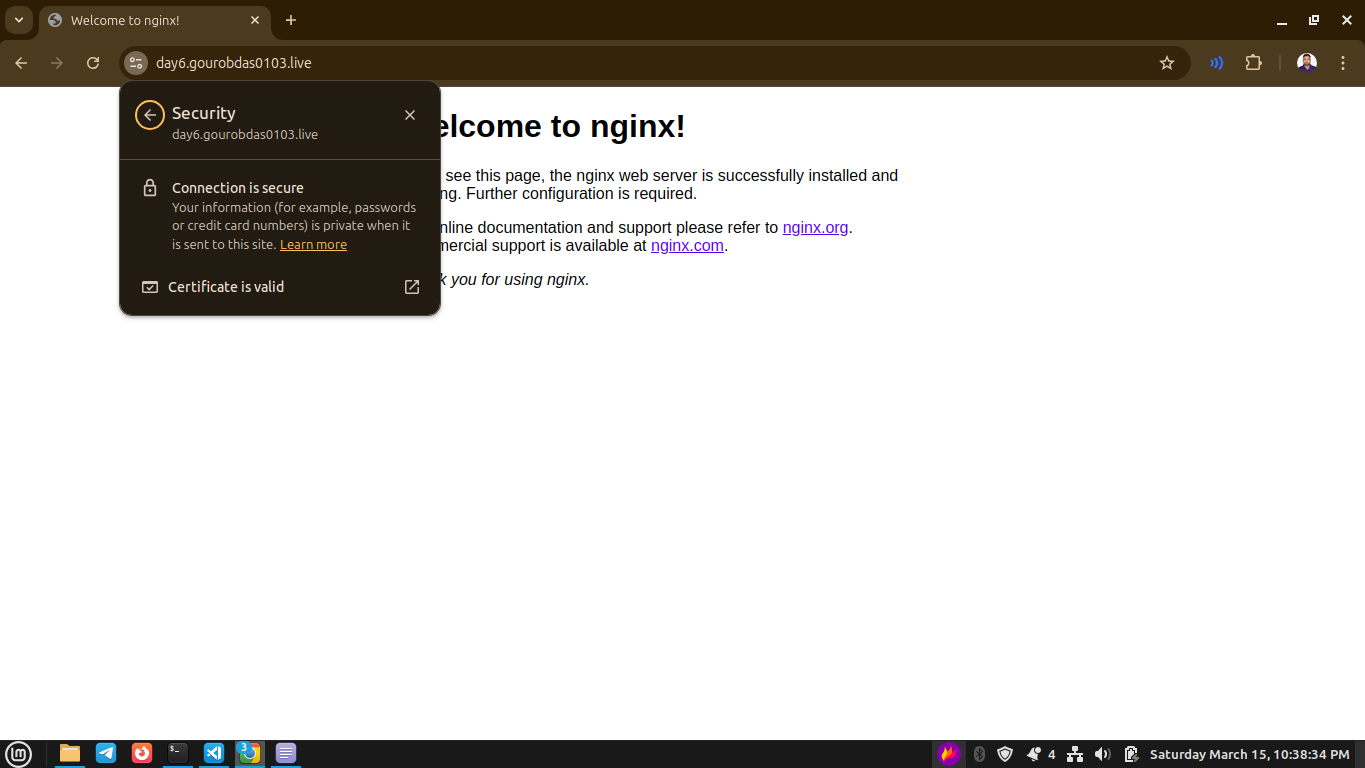
- ✅ Bonus: Enable HTTPS with Let's Encrypt
- 🛠 Explanation of the Commands
- ✅Challenge 7: Write a Python program to parse log files and extract failed SSH login attempts.
- 🛠 Explanation of the Commands:
- ✅ Challenge 8: Use fabric or paramiko to automate SSH login and run commands on multiple servers.
- ✅ Challenge 9: Implement a Python script that monitors Docker containers and sends alerts if a container crashes
- ✅ Challenge 10: Write a Python program that checks a GitHub repository for new commits and triggers a build job.
- ✅ Challenge 11: Package your Python script as a CLI tool using argparse and click.
- ✅ Challenge 12: Use any python binary package builder like PyInstaller, Nuitka, Cython, PyOxidizer etc, so that code will be heard to reverse engineer and become easily distributable
- 📌 Option 1: Using PyInstaller (Easy & Popular)
- 📌 Option 2: Using Nuitka (Compiles to C for Better Obfuscation)
- 📌 Option 3: Using Cython (Converts Python to Compiled C)
- 📌 Option 4: Using PyOxidizer (Best for Performance & Security)
- 🛠 Explanation of the Commands
- Thanks for reading my tec blog in 60 Days DevOps challenge keep eye on my bogs and subscribe my news latter for future updates.

Learning points:
🔹 Object-Oriented Programming (OOP) – Classes, Inheritance, and Polymorphism.
🔹 Concurrency & Parallelism – Using threading and multiprocessing.
🔹 Creating & Interacting with APIs – Buiding REST API FastAPI.
🔹 Database Integration – Working with MySQL/PostgreSQL using SQLAlchemy.
🔹 Logging & Debugging – Setting up structured logging (logging module).
🔹 Infrastructure Automation – Using Python for provisioning servers, managing SSH connections (paramiko).
🔹 Building Python Apps – Flask/Django for web apps
🔹 Packaging & Distribution – Creating Python packages with setuptools.
Initial Tasks:
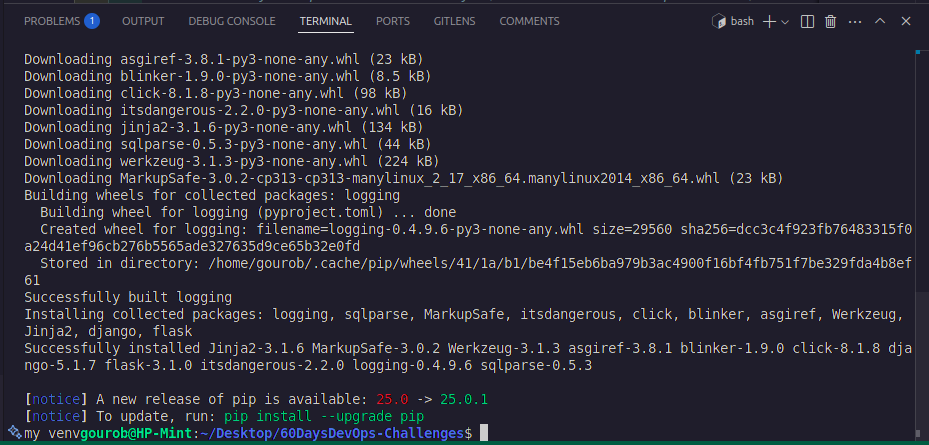
✅ Task 1: Set up a virtual environment (venv) and install the required packages (pip install flask django requests logging).
✅ Output:
🔥 Challenges
🔹 Challenge 1: Create a Python script that connects to a remote server via SSH using paramiko.
🔹 Challenge 2: Build a simple Flask API with an endpoint that returns system health (CPU/memory usage).
🔹 Challenge 3: Create a Django app, set up models, views, and templates for a basic CRUD operation.
🔹 Challenge 4: Use Python subprocess to execute system commands and capture output.
🔹 Challenge 5: Build a Flask API that fetches live weather data from an external API and returns it in JSON format.
🔹 Challenge 6: Deploy a Django application on AWS EC2 with Nginx & Gunicorn.
🔹 Challenge 7: Write a Python program to parse log files and extract failed SSH login attempts.
🔹 Challenge 8: Use fabric or paramiko to automate SSH login and run commands on multiple servers.
🔹 Challenge 9: Implement a Python script that monitors Docker containers and sends alerts if a container crashes.
🔹 Challenge 10: Write a Python program that checks a GitHub repository for new commits and triggers a build job.
🔹 Challenge 11: Package your Python script as a CLI tool using argparse and click.
🔹 Challenge 12: Use any python binary package builder like PyInstaller, Nuitka, Cython, PyOxidizer etc, so that code will be heard to reverse engineer and become easily distributable
✅ Solutions:
✅ Challenge 1: Create a Python script that connects to a remote server via SSH using paramiko.
✅Answer:
✅ Step 1: Install Paramiko (If Not Installed)
pip install paramiko
✅ Step 2: Create the Python Script
📂 Path: Desktop/60DaysDevOps-Challenges/day6_python-advance/ssh_connect.py
import paramiko

def ssh_connect(hostname, username=None, password=None, key_path=None, command=None):
    """Connects to a remote server via SSH and executes a command."""

    try:
        # Create an SSH client
        client = paramiko.SSHClient()

        # Automatically accept unknown host keys (Not recommended for production)
        client.set_missing_host_key_policy(paramiko.AutoAddPolicy())

        print(f"🔌 Connecting to {hostname}...")

        if key_path:
            # Connect using SSH key
            client.connect(hostname, username=username, key_filename=key_path, timeout=10)
        else:
            # Connect using username and password
            client.connect(hostname, username=username, password=password, timeout=10)

        print(f"✅ Connected to {hostname}")

        # Execute the command
        stdin, stdout, stderr = client.exec_command(command)

        # Print command output
        print("📜 Command Output:")
        print(stdout.read().decode())

        # Print errors if any
        error = stderr.read().decode()
        if error:
            print(f"❌ Error:\n{error}")

        # Close the connection
        client.close()
        print("🔌 Disconnected.")

    except paramiko.AuthenticationException:
        print("❌ Authentication failed. Check your credentials.")
    except paramiko.SSHException as e:
        print(f"❌ SSH error: {e}")
    except Exception as e:
        print(f"❌ An error occurred: {e}")

# User input for authentication method
auth_method = input("Choose authentication method (1: Username & Password, 2: SSH Key): ")

hostname = input("Enter remote server IP or hostname: ")

if auth_method == "1":
    username = input("Enter SSH username: ")
    password = input("Enter SSH password: ")
    key_path = None
elif auth_method == "2":
    username = input("Enter SSH username: ")
    key_path = input("Enter path to SSH private key: ")
    password = None
else:
    print("❌ Invalid selection. Exiting.")
    exit()

command = input("Enter command to execute: ")

ssh_connect(hostname, username, password, key_path, command)
✅ Step 3: Run the Script
python Desktop/60DaysDevOps-Challenges/day6_python-advance/ssh_connect.py
📌 Example Input & Output:
Example 1: Using Username & Password Authentication
Input:
pgsqlCopyEditChoose authentication method (1: Username & Password, 2: SSH Key): 1
Enter remote server IP or hostname: 192.168.1.100
Enter SSH username: user
Enter SSH password: mysecurepassword
Enter command to execute: ls -l
Output:
sqlCopyEdit🔌 Connecting to 192.168.1.100...
✅ Connected to 192.168.1.100
📜 Command Output:
total 8
drwxr-xr-x 2 user user 4096 Mar  7 10:30 Documents
drwxr-xr-x 2 user user 4096 Mar  7 10:31 Downloads

🔌 Disconnected.
Example 2: Using SSH Key Authentication
Input:
pgsqlCopyEditChoose authentication method (1: Username & Password, 2: SSH Key): 2
Enter remote server IP or hostname: 192.168.1.100
Enter SSH username: user
Enter path to SSH private key: /home/user/.ssh/id_rsa
Enter command to execute: whoami
Output:
cssCopyEdit🔌 Connecting to 192.168.1.100...
✅ Connected to 192.168.1.100
📜 Command Output:
sandip

🔌 Disconnected.
🛠 Explanation of the Commands:
Import Paramiko - A Python library for SSH communication.
Create an SSH Client - Establishes an SSH connection to the server.
Authentication Methods:
Username & Password (
username+password)SSH Key Authentication (
username+key_path)
Executing a Remote Command - Uses
exec_command(command).Capturing Output & Errors - Reads the command output and prints errors.
Handling Exceptions - Catches errors like incorrect credentials, SSH failures, etc.
✅Challenge 2: Build a simple Flask API with an endpoint that returns system health (CPU/memory usage).
✅Answer:
✅ Step 1: Install Required Packages
pip install flask psutil
✅ Step 2: Create the Flask API
📂 Path: Desktop/60DaysDevOps-Challenges/day6_python-advance/app.py
from flask import Flask, jsonify
import psutil

app = Flask(__name__)

@app.route('/health', methods=['GET'])
def system_health():
    """Returns system health metrics (CPU & Memory usage)"""
    health_data = {
        "cpu_usage": psutil.cpu_percent(interval=1),
        "memory_usage": psutil.virtual_memory().percent
    }
    return jsonify(health_data)

if __name__ == '__main__':
    app.run(host='0.0.0.0', port=5000, debug=True)
✅ Step 3: Run the Flask API
python Desktop/60DaysDevOps-Challenges/day6_python-advance/app.py
🔹 Output:
* Running on http://127.0.0.1:5000/ (Press CTRL+C to quit)
✅ Step 4: Test the API
📌 Using Curl:
curl http://127.0.0.1:5000/health
📌 Using a Browser:
🔗 Open: http://127.0.0.1:5000/health
✅ Example JSON Response:
{
    "cpu_usage": 12.5,
    "memory_usage": 43.2
}
🚀 Bonus: Extended Health API with Disk and Network Stats
📂 Path: Desktop/60DaysDevOps-Challenges/day6_python-advance/app_extended.py
from flask import Flask, jsonify
import psutil

app = Flask(__name__)

@app.route('/health', methods=['GET'])
def system_health():
    """Returns system health metrics (CPU, Memory, Disk Usage, and Network Stats)"""
    disk_usage = psutil.disk_usage('/')
    net_io = psutil.net_io_counters()

    health_data = {
        "cpu_usage": psutil.cpu_percent(interval=1),
        "memory_usage": psutil.virtual_memory().percent,
        "disk_usage": {
            "total": disk_usage.total,
            "used": disk_usage.used,
            "free": disk_usage.free,
            "percent": disk_usage.percent
        },
        "network": {
            "bytes_sent": net_io.bytes_sent,
            "bytes_received": net_io.bytes_recv,
            "packets_sent": net_io.packets_sent,
            "packets_received": net_io.packets_recv
        }
    }
    return jsonify(health_data)

if __name__ == '__main__':
    app.run(host='0.0.0.0', port=5000, debug=True)
✅ Run Flask in the Background:
nohup python app_extended.py
🛠 Explanation of the Commands
flask- Used to create the API and define endpoints.psutil- Fetches system resource usage (CPU, Memory, Disk, Network).jsonify- Converts Python dictionary to JSON response.nohup- Runs the API in the background without stopping.
✅Challenge 3: Create a Django app, and set up models, views, and templates for a basic CRUD operation.
✅Answer:
✅ Step 1: Install Django
pip install django
✅ Step 2: Create a Django Project
django-admin startproject myproject
cd myproject
✅ Step 3: Create a Django App
python manage.py startapp myapp
Add myapp to INSTALLED_APPS in myproject/settings.py:
INSTALLED_APPS = [
    'django.contrib.admin',
    'django.contrib.auth',
    'django.contrib.contenttypes',
    'django.contrib.sessions',
    'django.contrib.messages',
    'django.contrib.staticfiles',
    'myapp',  # Add this line
]
✅ Step 4: Create a Model
📂 File: myapp/models.py
from django.db import models

class Task(models.Model):
    title = models.CharField(max_length=200)
    description = models.TextField()
    completed = models.BooleanField(default=False)

    def __str__(self):
        return self.title
✅ Step 5: Apply Migrations
python manage.py makemigrations
python manage.py migrate
✅ Step 6: Create a Form
📂 File: myapp/forms.py
from django import forms
from .models import Task

class TaskForm(forms.ModelForm):
    class Meta:
        model = Task
        fields = ['title', 'description', 'completed']
✅ Step 7: Create Views
📂 File: myapp/views.py
from django.shortcuts import render, redirect, get_object_or_404
from .models import Task
from .forms import TaskForm

# List all tasks
def task_list(request):
    tasks = Task.objects.all()
    return render(request, 'task_list.html', {'tasks': tasks})

# Create a new task
def task_create(request):
    if request.method == "POST":
        form = TaskForm(request.POST)
        if form.is_valid():
            form.save()
            return redirect('task_list')
    else:
        form = TaskForm()
    return render(request, 'task_form.html', {'form': form})

# Update an existing task
def task_update(request, pk):
    task = get_object_or_404(Task, pk=pk)
    if request.method == "POST":
        form = TaskForm(request.POST, instance=task)
        if form.is_valid():
            form.save()
            return redirect('task_list')
    else:
        form = TaskForm(instance=task)
    return render(request, 'task_form.html', {'form': form})

# Delete a task
def task_delete(request, pk):
    task = get_object_or_404(Task, pk=pk)
    if request.method == "POST":
        task.delete()
        return redirect('task_list')
    return render(request, 'task_confirm_delete.html', {'task': task})
✅ Step 8: Create Templates
📂 Directory: myapp/templates/
📄 Task List (task_list.html)
<!DOCTYPE html>
<html>
<head><title>Task List</title></head>
<body>
    <h1>Task List</h1>
    <a href="{% url 'task_create' %}">Add Task</a>
    <ul>
        {% for task in tasks %}
            <li>
                {{ task.title }} - {{ task.description }}
                <a href="{% url 'task_update' task.id %}">Edit</a> |
                <a href="{% url 'task_delete' task.id %}">Delete</a>
            </li>
        {% endfor %}
    </ul>
</body>
</html>
📄 Task Form (task_form.html)
<!DOCTYPE html>
<html>
<head><title>Task Form</title></head>
<body>
    <h1>{% if form.instance.pk %}Edit Task{% else %}New Task{% endif %}</h1>
    <form method="post">
        {% csrf_token %}
        {{ form.as_p }}
        <button type="submit">Save</button>
    </form>
    <a href="{% url 'task_list' %}">Back to list</a>
</body>
</html>
📄 Task Delete (task_confirm_delete.html)
<!DOCTYPE html>
<html>
<head><title>Delete Task</title></head>
<body>
    <h1>Are you sure you want to delete "{{ task.title }}"?</h1>
    <form method="post">
        {% csrf_token %}
        <button type="submit">Yes, Delete</button>
    </form>
    <a href="{% url 'task_list' %}">Cancel</a>
</body>
</html>
✅ Step 9: Configure URLs
📂 File: myapp/urls.py
from django.urls import path
from .views import task_list, task_create, task_update, task_delete

urlpatterns = [
    path('', task_list, name='task_list'),
    path('create/', task_create, name='task_create'),
    path('update/<int:pk>/', task_update, name='task_update'),
    path('delete/<int:pk>/', task_delete, name='task_delete'),
]
📂 Modify: myproject/urls.py
from django.contrib import admin
from django.urls import path, include

urlpatterns = [
    path('admin/', admin.site.urls),
    path('', include('myapp.urls')),
]
✅ Step 10: Run the Django Server
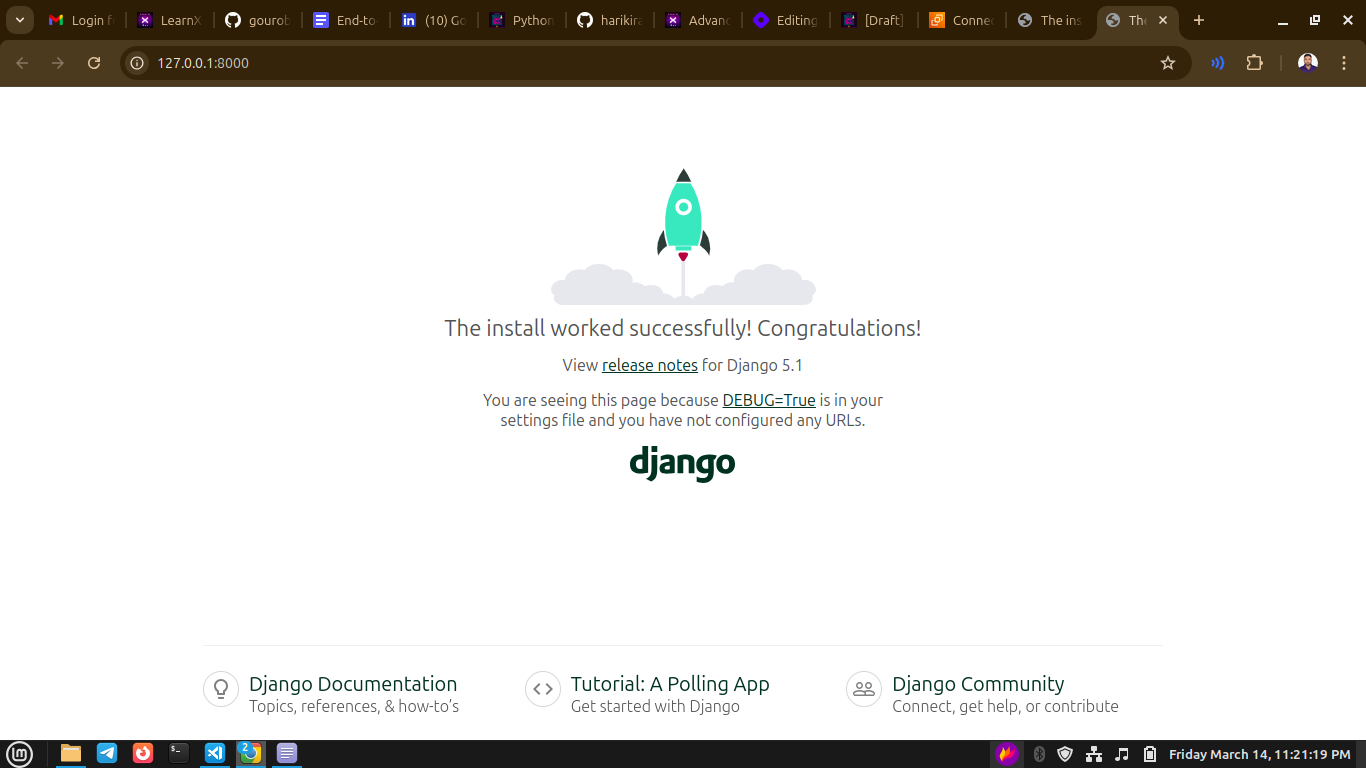
python manage.py runserver
🔗 Open in Browser: http://127.0.0.1:8000/
🛠 Explanation of the Commands
django-admin startproject myproject→ Creates a new Django project.python manage.py startapp myapp→ Creates an app within the project.python manage.py makemigrations→ Prepares database changes.python manage.py migrate→ Applies database migrations.python manage.py runserver→ Starts the development server.
✅Challenge 4: Use Python subprocess to execute system commands and capture output.
✅Answer:
✅ Step 1: Create the Python Script
📂 File: run_command.py
import subprocess

def run_command(command):
    """Executes a system command and captures its output."""
    try:
        result = subprocess.run(command, shell=True, check=True, text=True, capture_output=True)
        print("✅ Command executed successfully!\n")
        print("📜 Output:\n", result.stdout)
    except subprocess.CalledProcessError as e:
        print(f"❌ Command failed with error:\n{e.stderr}")

# Get user input for a command
command = input("📝 Enter a system command to run: ")
run_command(command)
✅ Step 2: Run the Script
python challenge4-run_command.py
✅ Step 3: Test with Example Commands
🟢 Example 1: Check System Uptime
📝 Enter a system command to run: uptime
📜 Output:

🟢 Example 2: List Files
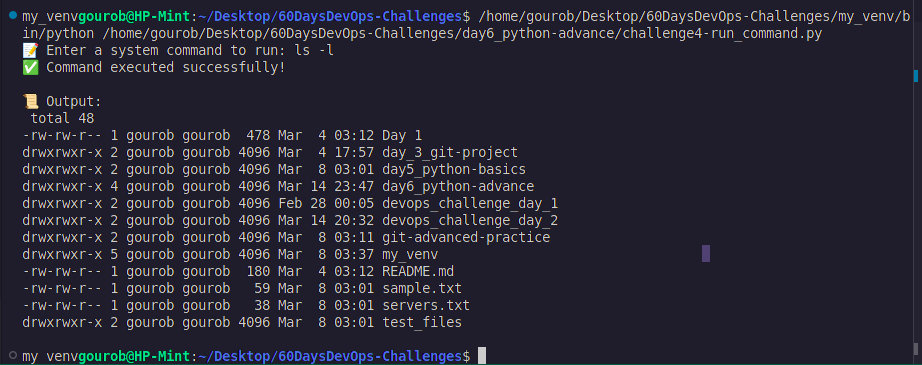
📝 Enter a system command to run: ls -l
📜 Output:
🔴 Example 3: Run an Invalid Command
📝 Enter a system command to run: invalidcommand
❌ Output:

🛠 Explanation of the Commands
subprocess.run(command, shell=True, check=True, text=True, capture_output=True)
→ Runs the command, captures output, and raises an error if the command fails.input("Enter a system command to run: ")
→ Takes user input for a system command.try-exceptblock
→ Handles errors when a command fails.
✅Challenge 5: Build a Flask API that fetches live weather data from an external API and returns it in JSON format.
✅Answer:
✅ Step 1: Sign Up for an API Key
🔗 Go to: OpenWeatherMap Signup
📌 Steps:
Sign up for a free account.
Navigate to the API Keys page.
Copy your free API key.
✅ Step 2: Install Required Packages
pip install flask requests
✅ Step 3: Create the Flask API
📂 File: weather_api.py
from flask import Flask, jsonify, request
import requests

app = Flask(__name__)

# 🌍 Replace with your OpenWeatherMap API key
API_KEY = "your_api_key_here"
BASE_URL = "http://api.openweathermap.org/data/2.5/weather"

@app.route('/weather', methods=['GET'])
def get_weather():
    """🌤️ Fetch live weather data for a given city."""
    city = request.args.get('city')

    if not city:
        return jsonify({"error": "❌ City parameter is required"}), 400

    params = {"q": city, "appid": API_KEY, "units": "metric"}

    try:
        response = requests.get(BASE_URL, params=params)
        data = response.json()

        if response.status_code != 200:
            return jsonify({"error": data.get("message", "Unknown error")}), response.status_code

        weather_data = {
            "🌆 City": data["name"],
            "🌡️ Temperature (°C)": data["main"]["temp"],
            "🌦️ Weather": data["weather"][0]["description"],
            "💧 Humidity (%)": data["main"]["humidity"],
            "🌬️ Wind Speed (m/s)": data["wind"]["speed"]
        }
        return jsonify(weather_data)

    except requests.exceptions.RequestException as e:
        return jsonify({"error": f"API request failed: {e}"}), 500

if __name__ == '__main__':
    app.run(host='0.0.0.0', port=5000, debug=True)
✅ Step 4: Run the Flask API
python challenge5-weather_api.py
✅ Step 5: Test the API
🔹 Using Curl:
curl "http://127.0.0.1:5000/weather?city=Malda"
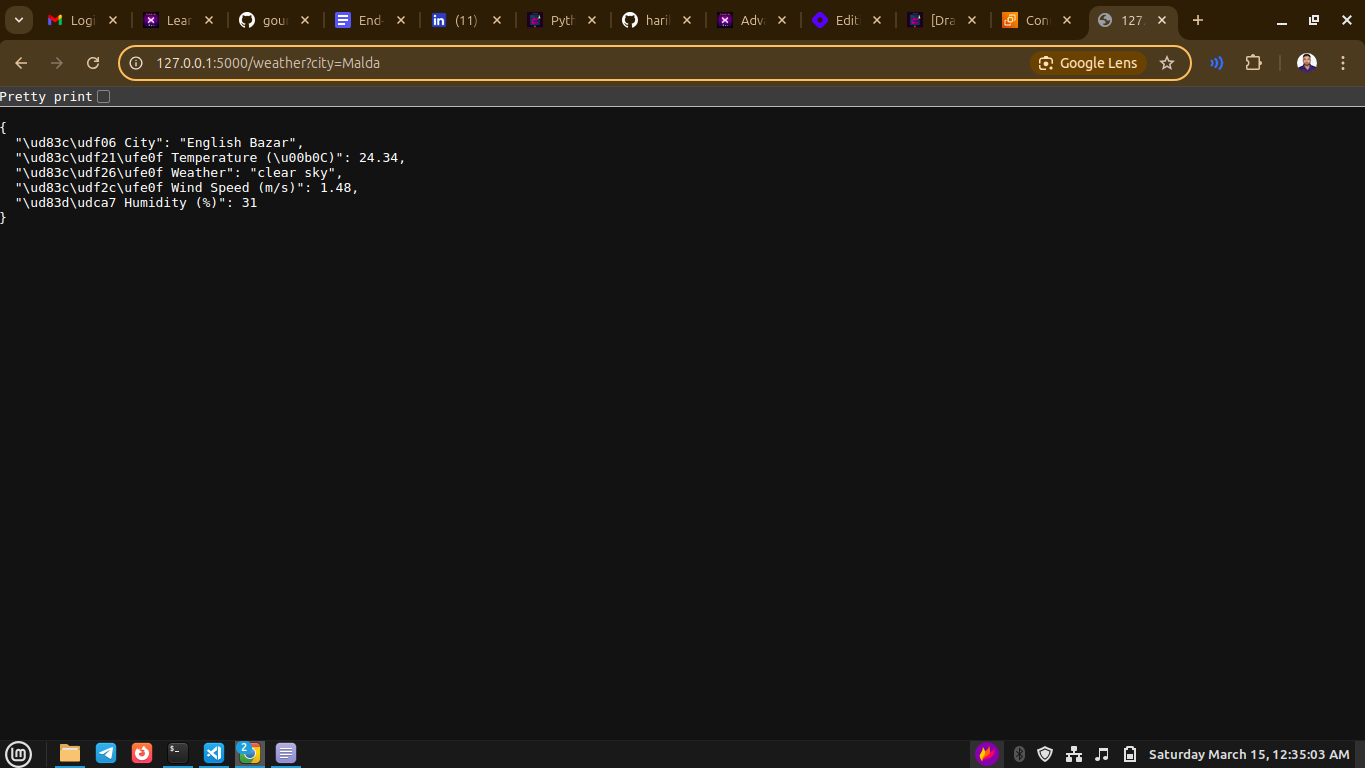
🔹 Using a Browser:
🌍 Open: http://127.0.0.1:5000/weather?city=Malda
🛠 Explanation of the Commands
pip install flask requests
→ Installs Flask for API development and Requests for making HTTP calls.request.args.get('city')
→ Retrieves thecityparameter from the API request.requests.get(BASE_URL, params=params)
→ Calls the OpenWeatherMap API with the city and API key.jsonify(weather_data)
→ Converts the weather response into JSON format.app.run(host='0.0.0.0', port=5000, debug=True)
→ Starts the Flask API server on port 5000.
✅Challenge 6: Deploy a Django application on AWS EC2 with Nginx & Gunicorn.
✅Answer:
✅ Step 1: Launch an AWS EC2 Instance
Log in to AWS and navigate to EC2 Dashboard.
Click Launch Instance and configure:
OS: Ubuntu 22.04 LTS
Instance type:
t2.micro(Free Tier)Security Group:
- Allow SSH (22), HTTP (80), HTTPS (443)
Launch the instance and connect via SSH:
ssh -i your-key.pem ubuntu@your-ec2-public-ip
✅ Step 2: Install Required Packages
Update the system:
sudo apt update && sudo apt upgrade -y
Install dependencies:
sudo apt install python3-pip python3-venv nginx git -y
✅ Step 3: Clone Your Django Project
cd /home/ubuntu
git clone https://github.com/your-username/60DaysDevOps-Challenges.git
cd 60DaysDevOps-Challenges/day6_python-advance/myproject
✅ Step 4: Set Up a Virtual Environment & Install Dependencies
python3 -m venv my_venv
source my_venv/bin/activate
pip install -r requirements.txt
if requirements.txt is not available, create it
nano requirements.txt
paste this code then ctrl+x, then y then enter key
📄 requirements.txt
Django>=4.2,<5.0
gunicorn>=21.0.0
psycopg2>=2.9.3  # If using PostgreSQL
mysqlclient>=2.1.0  # If using MySQL
whitenoise>=6.5.0  # For static file serving
djangorestframework>=3.14.0  # If using DRF
django-environ>=0.10.0  # For environment variables
command for install dependencies
pip install psycopg2

pip install psycopg2-binary

sudo apt update && sudo apt install -y libpq-dev python3-dev

sudo apt update && sudo apt install -y pkg-config libmysqlclient-dev

ip install -r requirements.txt
✅ Step 5: Configure Django Settings
Modify settings.py:
ALLOWED_HOSTS = ["your-ec2-public-ip", "your-domain.com"]
Open your Django settings file:
nano myproject/settings.py
example:

Add this at the bottom:
pythonCopy codeimport os

STATIC_ROOT = os.path.join(BASE_DIR, "staticfiles")
STATIC_URL = "/static/"
🔹
STATIC_ROOTis the directory wherecollectstaticwill put all static files.
🔹STATIC_URLdefines how static files will be accessed.
Create the static directory manually (optional but recommended):
mkdir ~/60DaysDevOps-Challenges/day6_python-advance/myproject/staticfiles
Collect static files:
python manage.py collectstatic
Run migrations:
python manage.py migrate
✅ Step 6: Set Up Gunicorn
Install Gunicorn:
pip install gunicorn
Start Gunicorn Server:
gunicorn --workers 3 --bind 0.0.0.0:8000 myproject.wsgi:application
✅ Step 7: Set Up Nginx as a Reverse Proxy
Create an Nginx configuration file:
sudo nano /etc/nginx/sites-available/django
Paste the following configuration:
server {
    listen 80;
    server_name your-ec2-public-ip;

    location / {
        proxy_pass http://127.0.0.1:8000;
        proxy_set_header Host $host;
        proxy_set_header X-Real-IP $remote_addr;
        proxy_set_header X-Forwarded-For $proxy_add_x_forwarded_for;
    }
}
Enable the configuration:
sudo ln -s /etc/nginx/sites-available/django /etc/nginx/sites-enabled
sudo nginx -t  # Test configuration
sudo systemctl restart nginx
✅ Step 8: Run Django as a Background Process
Create a Gunicorn systemd service:
sudo nano /etc/systemd/system/gunicorn.service
Paste the following:
[Unit]
Description=Gunicorn service for Django
After=network.target

[Service]
User=ubuntu
Group=ubuntu
WorkingDirectory=/home/ubuntu/django-app
ExecStart=/home/ubuntu/django-app/venv/bin/gunicorn --workers 3 --bind unix:/home/ubuntu/django-app/gunicorn.sock myproject.wsgi:application

[Install]
WantedBy=multi-user.target
Enable and start the service:
sudo systemctl daemon-reload
sudo systemctl start gunicorn
sudo systemctl enable gunicorn
✅ Step 9: Configure Firewall & Security Groups
Allow Nginx through the firewall:
sudo ufw allow 'Nginx Full'
sudo ufw enable
Ensure AWS Security Group allows inbound traffic on ports 80 & 443.
✅ Step 10: Access the Application
🌐 Open http://your-ec2-public-ip or yourdomain.com in a browser.
example:
✅ Bonus: Enable HTTPS with Let's Encrypt
sudo apt install certbot python3-certbot-nginx -y
sudo certbot --nginx -d your-domain.com
🔒 This enables SSL/TLS for secure connections.
example:
🛠 Explanation of the Commands
🔹 python3 -m venv venv && source venv/bin/activate → Creates & activates a virtual environment.
🔹 pip install -r requirements.txt → Installs required Python dependencies.
🔹 gunicorn --workers 3 --bind 0.0.0.0:8000 myproject.wsgi:application → Runs Django using Gunicorn on port 8000.
🔹 sudo ln -s /etc/nginx/sites-available/django /etc/nginx/sites-enabled → Enables the Nginx configuration.
🔹 sudo certbot --nginx -d your-domain.com → Sets up HTTPS using Let's Encrypt.
✅Challenge 7: Write a Python program to parse log files and extract failed SSH login attempts.
Step 1: Create the Python Script (parse_ssh_logs.py)
import re

LOG_FILE = "/var/log/auth.log"  # Modify if using a different log file

def parse_ssh_failures(log_file):
    """Parses the log file and extracts failed SSH login attempts."""

    try:
        with open(log_file, "r") as file:
            logs = file.readlines()

        failed_attempts = []

        # Regular expression to match failed SSH login attempts
        ssh_fail_pattern = re.compile(r"Failed password for (invalid user )?(\S+) from (\d+\.\d+\.\d+\.\d+) port \d+")

        for line in logs:
            match = ssh_fail_pattern.search(line)
            if match:
                user = match.group(2)
                ip_address = match.group(3)
                failed_attempts.append((user, ip_address))

        # Print extracted failed login attempts
        print("📜 Failed SSH Login Attempts:")
        for user, ip in failed_attempts:
            print(f"🔴 User: {user} | IP: {ip}")

    except FileNotFoundError:
        print(f"❌ Error: Log file '{log_file}' not found!")
    except Exception as e:
        print(f"❌ An error occurred: {e}")

# Run the log parsing function
parse_ssh_failures(LOG_FILE)
Step 2: Run the Script
sudo python parse_ssh_logs.py
sudo is required to read system logs (/var/log/auth.log).
Example Output
📜 Failed SSH Login Attempts:

🔴 User: admin | IP: 192.168.1.100

🔴 User: root | IP: 203.0.113.50

🔴 User: test | IP: 178.62.80.100
🛠 Explanation of the Commands:
🔹 re.compile(r"Failed password for (invalid user )?(?P<user>\S+) from (?P<ip>\S+) port")
- Uses regex to capture failed SSH login attempts, extracting the username and IP.
🔹 open(log_path, "r")
- Opens the log file in read mode.
🔹 match = pattern.search(line)
- Checks each line for failed login patterns.
🔹 failed_attempts.append((user, ip))
- Stores extracted usernames and IPs in a list.
🔹 Exception Handling (FileNotFoundError)
- Prevents errors if the log file doesn’t exist.
✅ Challenge 8: Use fabric or paramiko to automate SSH login and run commands on multiple servers.
Option 1: Using Fabric
Fabric simplifies SSH automation with an easy-to-use API.
Step 1: Install Fabric
pip install fabric
Step 2: Create the Python Script (challenge8_paramiko_ssh.py)
from fabric import Connection

# List of servers to connect to
servers = [
    {"host": "192.168.1.100", "user": "ubuntu", "password": "yourpassword", "ssh_key": "/path/to/your/private_key"},
    {"host": "192.168.1.101", "user": "ubuntu", "password": "yourpassword", "ssh_key": None},  # No SSH key, use password
]

def run_command_on_servers(command):
    """Runs a command on multiple servers using Fabric."""
    for server in servers:
        try:
            print(f"🔌 Connecting to {server['host']}...")

            connect_kwargs = {}
            if server.get("ssh_key"):
                connect_kwargs["key_filename"] = server["ssh_key"]
            elif server.get("password"):
                connect_kwargs["password"] = server["password"]

            conn = Connection(host=server["host"], user=server["user"], connect_kwargs=connect_kwargs)
            result = conn.run(command, hide=True)
            print(f"✅ {server['host']} Output:\n{result.stdout.strip()}\n")

        except Exception as e:
            print(f"❌ Failed to connect to {server['host']}: {e}")

# Run a command on all servers
run_command_on_servers("uptime")
Step 3: Run the Script
python challenge8_paramiko_ssh.py
Example Output:
🔌 Connecting to 192.168.1.100...
✅ 192.168.1.100 Output:
10:42:30 up 5 days,  2:30,  2 users,  load average: 0.15, 0.12, 0.10

🔌 Connecting to 192.168.1.101...
✅ 192.168.1.101 Output:
10:42:35 up 7 days,  1:15,  3 users,  load average: 0.20, 0.18, 0.12
Option 2: Using Paramiko
If you prefer low-level SSH automation, use Paramiko.
Step 1: Install Paramiko
pip install paramiko
Step 2: Create the Python Script (paramiko_ssh.py)
import paramiko

# List of servers
servers = [
    {"host": "192.168.1.100", "user": "ubuntu", "password": None, "key": "/path/to/private/key"},
    {"host": "192.168.1.101", "user": "ubuntu", "password": "yourpassword", "key": None},
]

def run_ssh_command(host, user, password, key, command):
    """Runs an SSH command using Paramiko with support for both key and password authentication."""
    try:
        client = paramiko.SSHClient()
        client.set_missing_host_key_policy(paramiko.AutoAddPolicy())

        if key:
            client.connect(hostname=host, username=user, key_filename=key, timeout=10)
        else:
            client.connect(hostname=host, username=user, password=password, timeout=10)

        stdin, stdout, stderr = client.exec_command(command)
        output = stdout.read().decode().strip()
        error = stderr.read().decode().strip()

        print(f"✅ {host} Output:\n{output}\n" if output else f"❌ {host} Error:\n{error}\n")
        client.close()
    except Exception as e:
        print(f"❌ Failed to connect to {host}: {e}")

# Run command on all servers
for server in servers:
    print(f"🔌 Connecting to {server['host']}...")
    run_ssh_command(server["host"], server["user"], server.get("password"), server.get("key"), "uptime")
Step 3: Run the Script
python paramiko_ssh.py
Example Output
🔌 Connecting to 192.168.1.100...

✅ 192.168.1.100 Output:

10:42:30 up 5 days,  2:30,  2 users,  load average: 0.15, 0.12, 0.10


🔌 Connecting to 192.168.1.101...

✅ 192.168.1.101 Output:

10:42:35 up 7 days,  1:15,  3 users,  load average: 0.20, 0.18, 0.12
✅ Challenge 9: Implement a Python script that monitors Docker containers and sends alerts if a container crashes
📌 Steps to Implement
1️⃣ Install Dependencies
Ensure you have Python’s Docker SDK installed:
pip install docker requests
Also, make sure the Docker daemon is running:
sudo systemctl start docker
2️⃣ Python Script (challenge9_monitor_docker.py)
This script monitors Docker containers and sends alerts via Email and Slack if a container stops unexpectedly.
import docker
import time
import smtplib
import requests
from email.mime.text import MIMEText

# Initialize Docker client
client = docker.from_env()

# Email alert configuration
SMTP_SERVER = "smtp.gmail.com"  # Replace with your SMTP server
SMTP_PORT = 587
EMAIL_FROM = "your-email@gmail.com"
EMAIL_TO = "alert-recipient@gmail.com"
EMAIL_PASSWORD = "your-email-password"

# Slack alert configuration
SLACK_WEBHOOK_URL = "https://hooks.slack.com/services/your/webhook/url"  # Replace with your Slack webhook

def send_email_alert(container_name):
    """Sends an email alert when a container crashes."""
    subject = f"🚨 ALERT: Docker Container {container_name} Stopped!"
    body = f"The container '{container_name}' has stopped unexpectedly."

    msg = MIMEText(body)
    msg["Subject"] = subject
    msg["From"] = EMAIL_FROM
    msg["To"] = EMAIL_TO

    try:
        server = smtplib.SMTP(SMTP_SERVER, SMTP_PORT)
        server.starttls()
        server.login(EMAIL_FROM, EMAIL_PASSWORD)
        server.sendmail(EMAIL_FROM, EMAIL_TO, msg.as_string())
        server.quit()
        print(f"📧 Email alert sent for {container_name}")
    except Exception as e:
        print(f"❌ Failed to send email: {e}")

def send_slack_alert(container_name):
    """Sends a Slack alert when a container crashes."""
    message = {
        "text": f"🚨 *ALERT:* Docker Container `{container_name}` has stopped unexpectedly!"
    }

    try:
        response = requests.post(SLACK_WEBHOOK_URL, json=message)
        if response.status_code == 200:
            print(f"💬 Slack alert sent for {container_name}")
        else:
            print(f"❌ Failed to send Slack alert: {response.text}")
    except Exception as e:
        print(f"❌ Slack request failed: {e}")

def monitor_containers():
    """Monitors Docker containers and alerts if any crash."""
    print("🔍 Monitoring Docker containers...")
    known_containers = {container.name: container.status for container in client.containers.list(all=True)}

    while True:
        for container in client.containers.list(all=True):
            if container.name in known_containers and container.status != "running":
                print(f"⚠️ {container.name} has stopped!")
                send_email_alert(container.name)
                send_slack_alert(container.name)
                known_containers[container.name] = container.status

        time.sleep(10)  # Check every 10 seconds

# Start monitoring
monitor_containers()
3️⃣ Run the Script
Execute the monitoring script:
python monitor_docker.py
4️⃣ Simulate a Container Crash
Start a test container:
docker run -d --name test_container alpine sleep 100
Manually stop the container to trigger an alert:
docker stop test_container
✅ Example Output
🔍 Monitoring Docker containers...

⚠️ test_container has stopped!

📧 Email alert sent for test_container
💬 Slack alert sent for test_container
🛠 Explanation of the Commands
| Command | Explanation |
pip install docker requests | Installs required Python libraries. |
sudo systemctl start docker | Starts the Docker daemon. |
docker run -d --name test_container alpine sleep 100 | Runs a test container that sleeps for 100 seconds. |
docker stop test_container | Manually stops the container to simulate a crash. |
🚀 Bonus: Run as a Background Process
To run the monitoring script continuously in the background:
nohup python monitor_docker.py &
✅ Challenge 10: Write a Python program that checks a GitHub repository for new commits and triggers a build job.
Answer:
📌 Steps to Implement
1️⃣ Install Dependencies
Ensure the required Python library is installed:
pip install requests
2️⃣ Python Script (challenge10_check_github_commits.py)
This script checks a GitHub repository for new commits and triggers a CI/CD build job when a new commit is detected.
import requests
import time
import json

# GitHub repository details
GITHUB_REPO = "owner/repository"  # Replace with your GitHub repo (e.g., "torvalds/linux")
GITHUB_BRANCH = "main"
GITHUB_API_URL = f"https://api.github.com/repos/{GITHUB_REPO}/commits/{GITHUB_BRANCH}"
LAST_COMMIT_FILE = "last_commit.json"

# CI/CD build trigger URL (e.g., Jenkins, GitHub Actions, etc.)
BUILD_TRIGGER_URL = "https://ci.example.com/build"  # Replace with your CI/CD webhook URL

def get_latest_commit():
    """Fetches the latest commit SHA from GitHub API."""
    try:
        response = requests.get(GITHUB_API_URL)
        response.raise_for_status()
        commit_data = response.json()
        return commit_data["sha"]
    except requests.exceptions.RequestException as e:
        print(f"❌ Error fetching latest commit: {e}")
        return None

def load_last_commit():
    """Loads the last stored commit SHA from a local file."""
    try:
        with open(LAST_COMMIT_FILE, "r") as file:
            return json.load(file).get("last_commit")
    except FileNotFoundError:
        return None

def save_last_commit(commit_sha):
    """Saves the latest commit SHA to a local file."""
    with open(LAST_COMMIT_FILE, "w") as file:
        json.dump({"last_commit": commit_sha}, file)

def trigger_build(commit_sha):
    """Triggers a CI/CD build job when a new commit is detected."""
    try:
        response = requests.post(BUILD_TRIGGER_URL, json={"commit": commit_sha})
        if response.status_code == 200:
            print(f"✅ Build triggered successfully for commit: {commit_sha}")
        else:
            print(f"⚠️ Failed to trigger build. Status Code: {response.status_code}")
    except requests.exceptions.RequestException as e:
        print(f"❌ Error triggering build: {e}")

def monitor_github():
    """Monitors the GitHub repository for new commits."""
    print(f"🔍 Monitoring GitHub repository: {GITHUB_REPO}")

    while True:
        latest_commit = get_latest_commit()
        if not latest_commit:
            time.sleep(60)
            continue

        last_commit = load_last_commit()

        if latest_commit != last_commit:
            print(f"🚀 New commit detected: {latest_commit}")
            trigger_build(latest_commit)
            save_last_commit(latest_commit)
        else:
            print("✅ No new commits detected.")

        time.sleep(60)  # Check every 60 seconds

# Start monitoring
monitor_github()
3️⃣ Run the Script
Execute the monitoring script:
python challenge10_check_github_commits.py
4️⃣ Example Output
🔍 Monitoring GitHub repository: owner/repository

✅ No new commits detected.

🚀 New commit detected: 1a2b3c4d5e

✅ Build triggered successfully for commit: 1a2b3c4d5e

✅ No new commits detected.
🛠 Explanation of the Commands
| Command | Explanation |
pip install requests | Installs the requests library for making API calls. |
python check_github_commits.py | Runs the script to monitor GitHub commits. |
requests.get(GITHUB_API_URL) | Fetches the latest commit from GitHub API. |
requests.post(BUILD_TRIGGER_URL, json={"commit": commit_sha}) | Triggers the CI/CD build for the new commit. |
🚀 Bonus: Run as a Background Process
To keep the monitoring script running in the background:
nohup python check_github_commits.py &
✅ Challenge 11: Package your Python script as a CLI tool using argparse and click.
Answer:
Option 1: Using argparse
Step 1: Create the Python Script (cli_tool.py)
import argparse

def greet(name, uppercase):
    """Prints a greeting message."""
    message = f"Hello, {name}!"
    if uppercase:
        message = message.upper()
    print(message)

def main():
    parser = argparse.ArgumentParser(description="Simple CLI tool to greet users.")

    parser.add_argument("name", type=str, help="Name of the person to greet")
    parser.add_argument("-u", "--uppercase", action="store_true", help="Convert the greeting to uppercase")

    args = parser.parse_args()
    greet(args.name, args.uppercase)

if __name__ == "__main__":
    main()
Step 2: Run the CLI Tool
python cli_tool.py Gourob
Output:
Hello, Sandip!
Run with the -u flag:
python cli_tool.py Gourob -u
Output:
HELLO, GOUROB!
Option 2: Using click
click provides a more elegant and user-friendly CLI experience.
Step 1: Install click
pip install click
Step 2: Create the Python Script (challenge11_cli_tool.py)
import click

@click.command()
@click.argument("name")
@click.option("--uppercase", is_flag=True, help="Convert the greeting to uppercase")
def greet(name, uppercase):
    """Simple CLI tool to greet users."""
    message = f"Hello, {name}!"
    if uppercase:
        message = message.upper()
    click.echo(message)

if __name__ == "__main__":
    greet()
Step 3: Run the CLI Tool
python challenge11_cli_tool.py Gourob
Output:
Hello, Gourob!
Run with the --uppercase flag:
python challenge11_cli_tool Gourob --uppercase
Output:
HELLO, GOUROB!
Bonus 💡 Make it a Global CLI Command
Step 1: Create a setup.py for Packaging
Create a setup.py file to install the CLI tool globally:
from setuptools import setup

setup(
    name="greet-cli",
    version="1.0",
    py_modules=["cli_tool_click"],  # Update for argparse version if needed
    install_requires=["click"],
    entry_points={
        "console_scripts": [
            "greet=cli_tool_click:greet",
        ],
    },
)
Step 2: Install the CLI Tool
pip install --editable .
Step 3: Run the CLI Tool Globally
greet Gourob --uppercase
Output:
HELLO, Gourob!
✅ Challenge 12: Use any python binary package builder like PyInstaller, Nuitka, Cython, PyOxidizer etc, so that code will be heard to reverse engineer and become easily distributable
📌 Option 1: Using PyInstaller (Easy & Popular)
PyInstaller converts Python scripts into standalone executables.
1️⃣ Install PyInstaller
pip install pyinstaller
2️⃣ Convert the Script into an Executable
pyinstaller --onefile --noconsole cli_tool.py
--onefile→ Bundles everything into a single executable.--noconsole→ Hides the console window (for GUI apps).
3️⃣ Run the Executable
Windows:
dist\cli_tool.exeLinux/macOS:
./dist/cli_tool
4️⃣ Make It Harder to Reverse-Engineer
Add encryption using a secret key:
pyinstaller --onefile --noconsole --key "your-secret-key" cli_tool.py
📌 Option 2: Using Nuitka (Compiles to C for Better Obfuscation)
Nuitka converts Python scripts into C, making them faster and harder to decompile.
1️⃣ Install Nuitka
pip install nuitka
2️⃣ Compile the Script
nuitka --standalone --onefile --follow-imports cli_tool.py
3️⃣ Run the Executable
Windows:
cli_tool.exeLinux/macOS:
./cli_tool.bin
📌 Option 3: Using Cython (Converts Python to Compiled C)
Cython compiles Python into C-based executables, making it efficient and obfuscated.
1️⃣ Install Cython
pip install cython
2️⃣ Convert Script to a C Extension
python --embed -o cli_tool.c cli_tool.py
3️⃣ Compile to an Executable
gcc -o cli_tool cli_tool.c $(python3-config --cflags --ldflags)
4️⃣ Run the Executable
./cli_tool
📌 Option 4: Using PyOxidizer (Best for Performance & Security)
PyOxidizer packages Python apps into a fast, single-file binary.
1️⃣ Install PyOxidizer
pip install pyoxidizer
2️⃣ Generate a Config File
pyoxidizer init-config
3️⃣ Modify pyoxidizer.bzl
Edit the file and add:
def make_oxidized_python_distribution(pyoxidizer):
    dist = pyoxidizer.default_python_distribution()
    policy = pyoxidizer.default_resource_policy()

    # Define the executable
    exe = pyoxidizer.add_python_executable(
        name="cli_tool",
        python_distribution=dist,
        policy=policy,
    )

    # Add your script
    exe.add_python_resources(exe.pip_install(["cli_tool.py"]))

    # Enable single binary mode
    exe.packaging_mode = "standalone_exe"

    # Set entry point
    exe.set_entry_point("cli_tool", "main")

    return exe
4️⃣ Build the Executable
pyoxidizer build
5️⃣ Run the Executable
./cli_tool
🛠 Explanation of the Commands
| Command | Explanation |
pip install pyinstaller | Installs PyInstaller. |
pyinstaller --onefile --noconsole cli_tool.py | Creates a standalone executable. |
pip install nuitka | Installs Nuitka for C-based compilation. |
nuitka --standalone --onefile cli_tool.py | Compiles Python to C for better security. |
pip install cython | Installs Cython to convert Python to C. |
cython --embed -o cli_tool.c cli_tool.py | Converts Python to a C file. |
gcc -o cli_tool cli_tool.c $(python3-config --cflags --ldflags) | Compiles the C file into an executable. |
pip install pyoxidizer | Installs PyOxidizer for a more optimized binary. |
pyoxidizer build | Builds the Python script into an optimized standalone executable. |
Thanks for reading my tec blog in 60 Days DevOps challenge keep eye on my bogs and subscribe my news latter for future updates.
Subscribe to my newsletter
Read articles from GOUROB DAS directly inside your inbox. Subscribe to the newsletter, and don't miss out.
Written by

GOUROB DAS
GOUROB DAS
About seeking a fresher job opportunity in DevOps and CloudOps | AWS | GitHub | LInux | GitHub Actions | Docker | Volunteering @ AWS User Group Kolkata | MCA Graduated 2024