Fixing RDP Resolution Issues in Ubuntu Desktop Hosted on Hyper-V
 Sanchit Pandit
Step 1: Install Hyper-V Linux Integration Services (LIS)
Run the following commands to install the required packages and reboot your VM:
sudo apt update
sudo apt install linux-azure
sudo reboot
Step 2: Enable Enhanced Session Mode in Hyper-V
Open Hyper-V Manager.
Select your Ubuntu Desktop VM.
Click Settings → Integration Services.
Ensure Guest Services is enabled.
On your Hyper-V host, run this command in powershell to enable Enhanced Session Mode:
Set-VM -VMName "YourUbuntuVMName" -EnhancedSessionTransportType HvSocket
- Restart the VM and try connecting again.
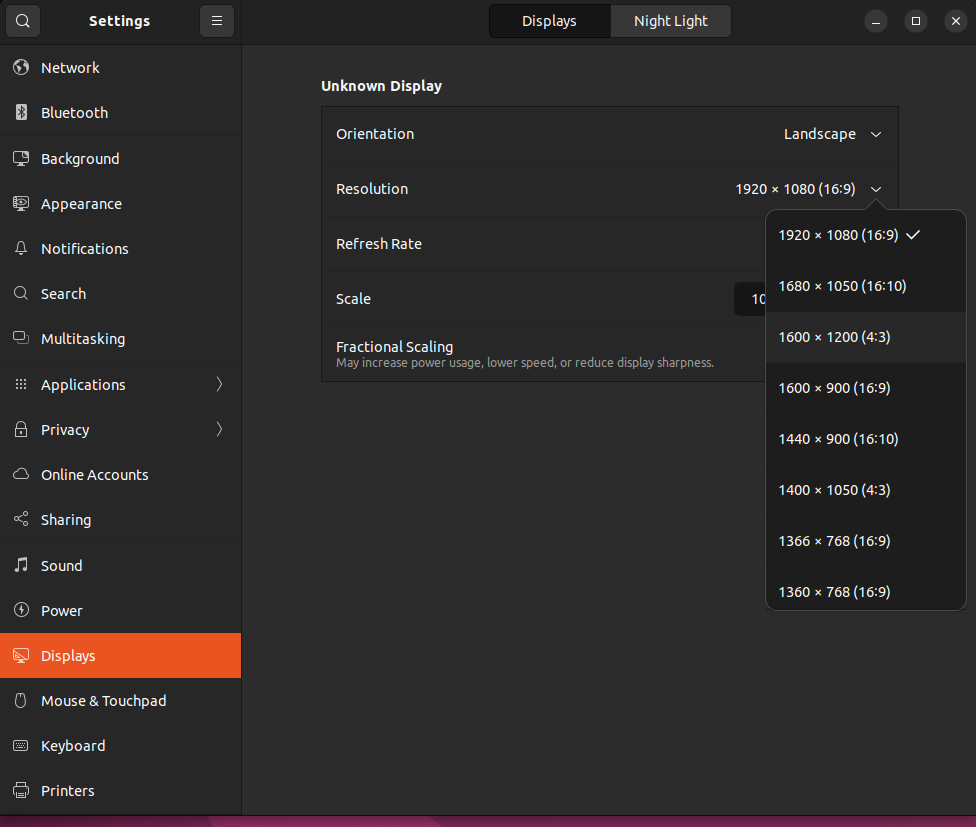
Step 3: Verify Resolution
After rebooting, check the available resolutions:
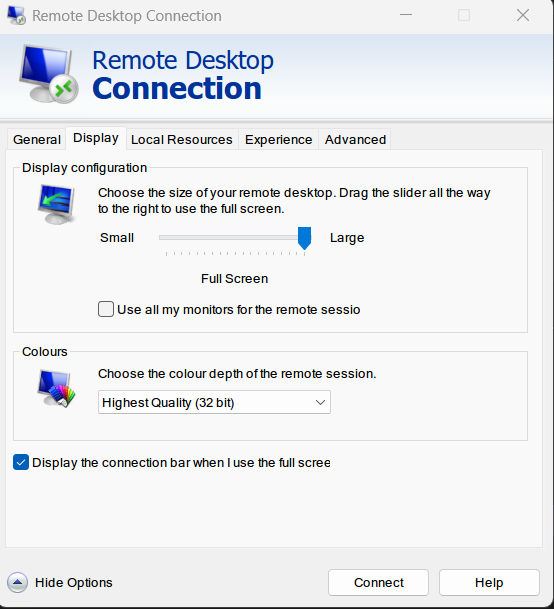
Step 4: RDP Client Configuration
In your RDP client, ensure these settings:
Select Full Screen in display settings.
For Microsoft Remote Desktop, ensure Resolution: Full Screen is enabled.
If above steps did not work, try steps given below:
Step 5: Force Resolution with Kernel Parameters (GRUB Settings)
Open the GRUB configuration file:
sudo nano /etc/default/grub
Find the line starting with
GRUB_CMDLINE_LINUX_DEFAULTand append this:GRUB_CMDLINE_LINUX_DEFAULT="quiet splash video=hyperv_fb:1920x1080"
Save the file by pressing CTRL + X, then Y, and Enter.
Update GRUB and reboot:
 sudo update-grub
 sudo reboot
- After reboot, go to Settings → Display on your Ubuntu Desktop and set the desired resolution for the instance.
Subscribe to my newsletter
Read articles from Sanchit Pandit directly inside your inbox. Subscribe to the newsletter, and don't miss out.
Written by
Sanchit Pandit
Sanchit Pandit
As a seasoned system administrator with a passion for technology and problem-solving, I bring 6 Years of hands-on experience in managing and maintaining IT infrastructure. My journey in the field began with a deep curiosity for computers and systems, which has evolved into a fulfilling career dedicated to ensuring the smooth operation of critical business systems.