Git & Github
 Nenis Rudani
🟡What is Git and Github?
Git(Globle information tracker) :- build by Linux Linus Torvalds
Git is a distributed version control system (VCS) created by Linus Torvalds, the developer of Linux, in 2005. It helps developers track changes in their code, and collaborate with others.
Github
GitHub is a cloud-based hosting platform for managing Git repositories. It allows developers to store, share, and collaborate on projects with teams worldwide. think GitHub is social media platform for developer
A Simple Analogy 🚗
github = car
git = engine which inside the car
🟡 How to install git?
Click here:- download git for window/linux/macos
🟡Understanding Git Workflow 📌
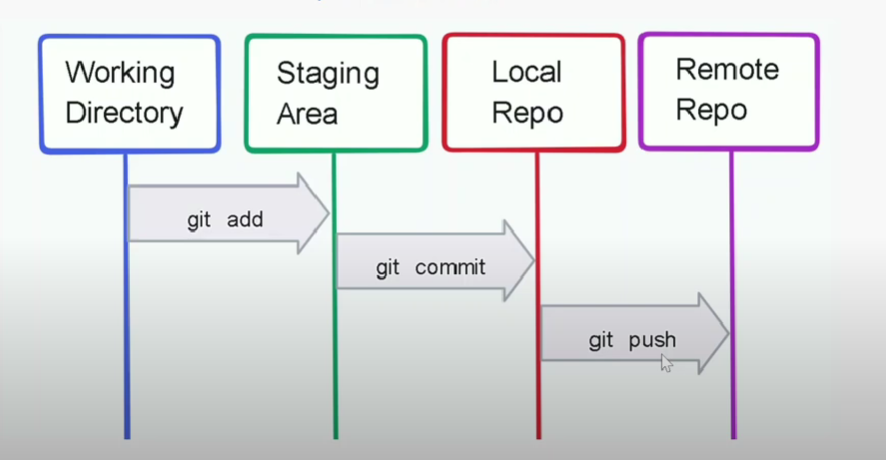
Let's understand how git works. The image below shows the four stages of Git:

Explanation in Simple Words
Working Directory (Blue) → This is where you create or modify files on your computer.
Staging Area (Green) → When you run
git add, the files are marked for commit (saved temporarily).Local Repository (Red) → When you run
git commit, the changes are saved in Git on your computer.Remote Repository (Purple) → When you run
git push, the changes are uploaded to GitHub so others can see them.
🟡Getting Started with Git
let's go through the basic steps to initialize a repository and push your code to GitHub.
🔹Step 1: Initialize Git
Run this command inside your project folder to start tracking your code with Git:
git init
This command initializes a new Git repository in your project folder.
🔹Step 2: Add Files to Staging Area
To add all files in your project to Git, use:
git add .
here . stand for “add all files“ in staging area.
🔹Step 3: Commit the Changes
Now, save your changes with a proper commit message:
git commit -m "Your Message"
🔹Use this command to check git status
git status
🔹Step 4: Set the Main Branch
Rename the default branch to main (recommended by GitHub):
git branch -M main
🔹Step 5: Connect to GitHub
Link your local repository to a remote repository on GitHub. Replace 'repo-url' with your actual repository URL:
git remote add origin 'repo-url'
🔹Then check the connection using this command
git remote -v
🔹Step 6: Push Code to GitHub
upload your code to GitHub with:
git push -u origin main
#after the frist push you can use this
git push
🔹Step 7: How to Clone a particular branch from the repo
git clone --branch <brnach name> <remote repo url>
🟡Let’s deep dive into Branching
Main Branch (main/master): The production-ready branch. All code here should be stable and tested.
Feature Branches: Branch off from the main branch to work on new features. Keep them short-lived and merge back to main once complete and reviewed.
Release Branches: Create these when you're preparing a new release. They allow for final bug fixes and polishing before merging into the main branch.
Hotfix Branches: For urgent fixes on the production code. These branches are crucial for quick and isolated bug fixes.
Development Branch (develop): An optional branch that serves as an integration branch for features. This is where ongoing development happens before merging into the main branch.
Epic Branches: For larger projects, an epic branch can group related feature branches. It helps in managing complex development work.
Defaut branch:-
main:- This is the default branch when you initialize a Git repository locally usinggit init.(unless changed in Git settings)Master:- If you create a new repository directly on GitHub, GitHub used to set
masteras the default branch.
🔹How to show a list of branches:-
git branch
🔹How to create a new branch:-
 git branch <branchname>
 #or
 git checkout -b <new-branch-name>
🔹How to rename a branch:-
git branch -M <newbranchname>
🔹How to switch branch:-
 git switch <branchname>
#or
git checkout <branchname>
🔹How to Create and Switch to a New Branch in One Command:-
git switch -c <branchname>
#or
git checkout -b <new_branch_name>
🔹How to delete a branch:-
git branch -d branchname
#or
git branch -D branchname
🔹How to upload your branch on remote repo:-
git push origin branchname
🔹How to merge your branch with mthe aster/main:-
#first switch branch to master/main
git switch master/main
#then
git merge branchname
🟡Git Restore Command: Undo Changes in Git
The git restore command is used to discard changes in the working directory. It helps revert modified or deleted files before staging them.
Basic Usage
Restore a specific file
git restore <file>This will discard any changes to the specified file and restore it to the last committed state.
Restore all files
git restore .This will discard changes in all modified files in the working directory.
Unstage a file (move from staging to working directory)
git restore --staged <file>This removes the file from the staging area without discarding the changes.
Restore a file from a specific commit
git restore --source <commit-hash> -- <file>
🟡Git revert: Undo a Commit Without Losing History
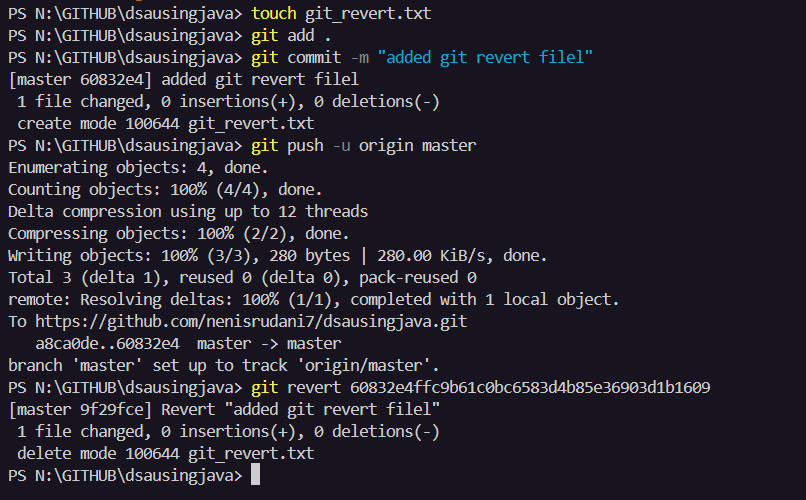
git revert is used to undo committed changes by creating a new commit that cancels them.
git revert <commit-hash>
🔹How to find commit-hash
go to github>particular_repo>commits>

OR
use this command
git log --online


🟡Git reset: It deletes your commit from history also
🔹 Unstage a File (Keep Changes in the Working Directory)
git reset <file>
This removes the file from the staging area but keeps the changes.
🔹 Unstage All Files (Keep Changes)
git reset
This unstages all staged files.
🔹 Undo the Last Commit (Keep Changes in the Staging Area)
git reset --soft HEAD~1
Moves the commit back but keeps the changes staged.
🔹 Undo the Last Commit (Keep Changes in the Working Directory)
git reset --mixed HEAD~1
Moves the commit back and unstages the changes but does not delete them.
🔹 Undo the Last Commit and Discard Changes (Permanent)
git reset --hard HEAD~1
Moves the commit back and erases all changes, including local edits. Be careful!
🟡Git amend: Modify the Last Commit
The git commit --amend command helps you fix the last commit instead of making a new one. Imagine you just submitted an assignment but forgot to attach an important file. Instead of submitting a new assignment, you replace the old one with the correct version. Similarly, git commit --amend lets you change the last commit message, add missing files, or update the author without creating extra commits. However, if you’ve already shared the commit, be careful because amending it changes history.
🔹 Update the Last Commit Message
If you change your commit message or want to improve your commit message, run:
git commit --amend -m "New commit message"

#or
git commit -amend
🔹after using this command:-

🟡 Git Fetch vs Git Pull: when should we use it?
When working with Git, you often need to update your local repository with the latest changes from a remote repository. Git provides two commands for this: git fetch and git pull. While they seem similar, they work differently.

🔹Git fetch:-
git fetch it will check are they any new changes in the remote repo that are not available in the local repo.
it’s like notification command(shows changes only not apply)
Imagine you are reading a book, and a new edition is released. You check the bookstore (fetch the new version) but don’t replace your current book. You just see what has changed before deciding to update your copy.
git fetch
After this, you want to apply all these changes. You need to use this command
git merge
🔹Git pull:-
git pull is like git fetch, but it automatically applies the changes to your current branch. It downloads the updates and merges them into your local branch immediately.
Now, imagine you go to the bookstore and buy the new edition without checking what’s different. You replace your old book with the latest version right away.
git pull
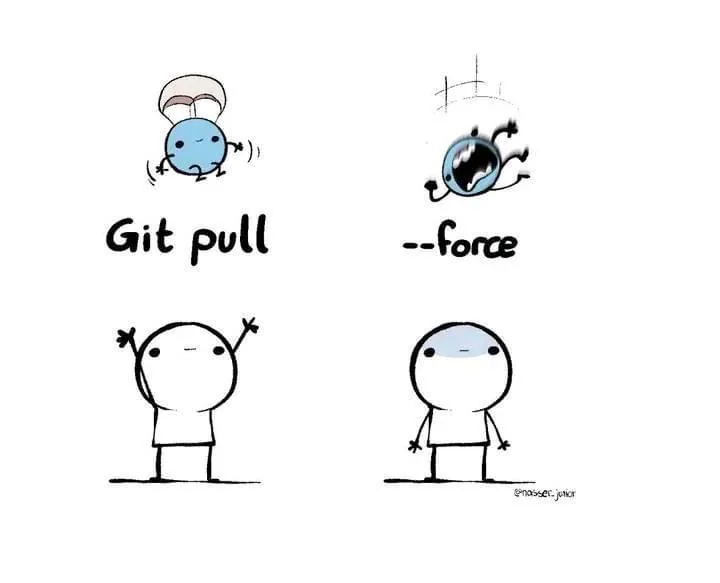
git fetch first to check for updates on the remote repository — it'll save you from potential merge conflicts🟡Git diff:- Used to compare changes
git diff show the line-by-line differences between your current changes and the previous version. It helps you see what has been added, removed, or modified in your files.
git diff
# Check Changes in Staged Files
git diff --staged
#check only file name
git diff --name-only
#show colors on changes
git diff --color-words
🟡Do this if you are confident:- Skip the git staging area
use this command to skip the staging area, do this if you are confident about your changes.
commit -a -m "skip staging area"
#if you want to add particular file
commit filename -m "skip staging area for this file"
-a stand for all files
🟡Git stash command - one type of storage box
Sometimes you need to save some changes without committing that time use this command

🔹code save (store) in a box
git stash
🔹 Showthe list or what’s inside the box, use this command
git stash list
🔹take one thing from the box (Apply Stashed Changes)
git stash apply
🔹Apply and Remove Stashed Changes
git statsh pop
🔹Clear all Stashes
git stash clear
🟡How to Fork a repo:- create the same copy of another’s repo to your account
Steps:- go to the repo which you wanna fork and simply click on the fork button.

🟡What after fork :- create new branch > push code to your repo > create pull request
steps:- create a new branch
git branch checkout -b newbranchname
push your code to your remote repo and then go to GitHub and create a pull request

🟡How to Create an Attractive GitHub Profile
A well-designed GitHub profile helps showcase your skills, projects, and contributions. Here’s how you can make your GitHub profile stand out:
1️⃣ Create a GitHub Profile README
Create a repository with the same name as your username (e.g.,
your-username/your-username).Add a
README.mdfile inside the repo.
Write about yourself, including:
A short introduction
Skills & technologies
Featured projects
Contact details
Use this to make attractive profile:-
📌 Websites to Create a GitHub Profile
Here’s a list of useful tools to design your GitHub profile:
🔹 GitHub Profile README Generato****r – Auto-generate a stylish profile.
🔹 Shields.io – Add cool badges for skills, languages, and tools.
🔹 GitHub Stats – Show your GitHub contributions & streaks.
🔹 GitHub Profile Trophy – Display trophies for achievements.
🔹 LottieFiles – Add animated icons & GIFs.
🟡Bonus for DevOps Guys:-
Mastering GitHub Branching Strategies for DevOps Engineers:-
Efficient GitHub branching strategies can be a game-changer for your CI/CD pipeline and overall workflow. Let's explore some key strategies that can streamline your development process:
Main Branch (main/master): The production-ready branch. All code here should be stable and tested.
Feature Branches: Branch off from the main branch to work on new features. Keep them short-lived and merge back to main once complete and reviewed.
Release Branches: Create these when you're preparing a new release. They allow for final bug fixes and polishing before merging into the main branch.
Hotfix Branches: For urgent fixes on the production code. These branches are crucial for quick and isolated bug fixes.
Development Branch (develop): An optional branch that serves as an integration branch for features. This is where ongoing development happens before merging into the main branch.
Epic Branches: For larger projects, an epic branch can group related feature branches. It helps in managing complex development work.
✨ Tips for Success:
Regular Merging: Keep your branches updated with the main branch to avoid conflicts.
Consistent Naming: Use a naming convention for clarity (e.g., feature/login-page, hotfix/payment-bug).
Pull Requests (PRs): Always use PRs for merging. They facilitate code reviews and discussions.
Automated Tests: Integrate CI tools to run tests on PRs to ensure code quality.
- Remember, a well-defined branching strategy can greatly enhance collaboration and code quality.
Congratulations! You just survived the Git jungle 🏆. If you've read this far, you're officially a Git Ninja 🥷.
💡 Have questions? Got feedback? Want to add some crazy Git tricks? Connect with me here 👇
📩 Drop a message:email
🌐 Find me on GitHub:Edit this text
And hey, don’t forget to fork this knowledge and share it with your fellow devs! 🚀
Happy Coding! 😃💻
Subscribe to my newsletter
Read articles from Nenis Rudani directly inside your inbox. Subscribe to the newsletter, and don't miss out.
Written by

Nenis Rudani
Nenis Rudani
🌟 Hello , I am Nenis Rudani, a passionate tech enthusiast carving my path as a DevOps maven and cloud sorcerer. My journey blends curiosity, innovation, and an insatiable appetite for building scalable systems and automating the mundane.