Firebase Data Connect explained: Flutter perspective.
 Odinachi David
NoSQL databases have been a great choice for many developers and companies due to their ease of use and quick setup. It has enabled the rapid development of products without requiring developers to have a deep understanding of SQL, which was not the case before the rise of NoSQL databases.
Over time, companies often consider migrating to a relational database in order to have structured data for scale, and with Data Connect, you can have everything your app needs both to start and scale in one platform.
About Data Connect
Data Connect is a relational database product from Firebase designed to offer top-notch performance, security, and an excellent developer experience. With Data Connect, all you need to do is define your schemas (table structures), queries, and mutations—Firebase takes care of the rest. It automatically creates tables, enforces security, and provides an SDK in your preferred language, allowing you to perform CRUD operations seamlessly without writing complex SQL commands.
Data Connect was announced at Google I/O 2024 and has been continuously evolving since then. In this guide, I’ll walk you through the basics of using Data Connect with Flutter.
Requirements:
Firebase Project with active billing
Project setup
Here are the steps you need to follow to set up Data Connect locally for a Note app.
run
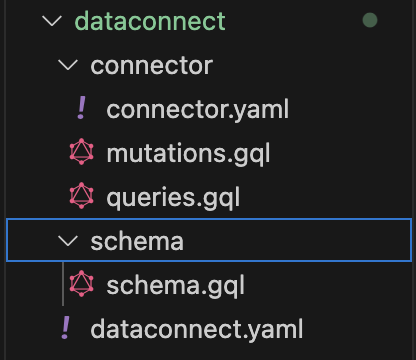
firebase initon your terminal scroll down to data connect and press your spacebar then hit enter. Alternatively, runnpx -y firebase-tools@latest init dataconnectand in whichever case you can follow the prompt. The default options are recommended.A dataconnect folder will be generated for you that looks like this

connector.yamlcontains the configuration for the generated SDK.mutations.gqlwill contain all your mutation operations e.g. create, delete and update.queries.gqlwill contain all your queries a.k.a get methodschema.gqlwill contain your table schemas or structure.dataconnect.yamlwill contain the configurations for connecting to the database
Schema
For this sample app, we’d be dealing with just 2 tables, one for notes and another for users.
schema.gql:
type Users @table(name: "users", singular: "user", key: "uid") {
  id: UUID! @col(name: "id") @default(expr: "uuidV4()")
  name: String! @col(name: "name")
  uid: String! @unique @col(name: "uid")
  email: String! @col(name: "email")
  createdAt: Timestamp! @col(name: "created_at") @default(expr: "request.time")
}

type Notes @table(name: "notes", singular: "note", key: "id") {
  id: UUID! @col(name: "id") @default(expr: "uuidV4()")
  title: String! @col(name: "title")
  content: String! @col(name: "content")
  user: Users! @ref
  createdAt: Timestamp! @col(name: "created_at") @default(expr: "request.time")
  updatedAt: Timestamp! @col(name: "updated_at") @default(expr: "request.time")
}
typekeyword and the@tableannotation is used to create a table.nameon the@tableannotation is used to declare the name of the table.singularon the@tableannotation is used to specify what will be used to query one row from our table.pluralon the@tableannotation is used to specify what will be used to filter from our table.The key of each field inside the map represents a value.
the first declaration of the value is the data type and adding
!to it makes it required when adding a new row. e.gString!nameon the@colannotation is used to declare what the column of the table should be.@defaultannotation is used to provide a default value, and a value with a default doesn’t have to be provided when creating a new row.“uuidV4()“is used to generate a unique id.“request.time”is used to get the timestamp of the request
Queries
Here are our queries.
queries.gql:
query GetUsers @auth(level: PUBLIC){
  users {
    id
    name
    email
    uid
  }
}

query GetUser($uid: String!) @auth(level: PUBLIC) {
  user(key: {uid: $uid}) {
    id
    name
    email
    uid
  }
}

query GetNotes @auth(level: PUBLIC){
  notes {
    id
    title
    content
    createdAt
    updatedAt
    user {
      id
      name
      email
      uid
    }
  }
}

query GeUserNotes($id: UUID!)@auth(level: PUBLIC) {
  notes(where: { user: { id: { eq: $id } } }) {
    id
    title
    content
    createdAt
    updatedAt
    user {
      id
      name
      email
      uid
    }
  }
}


query GetNote ($id: UUID!)@auth(level: PUBLIC) {
  note (id: $id) {
    id
    title
    content
    createdAt
    updatedAt
    user {
      id
      name
      email
      uid
    }
  }
}
Every query starts with
queryand then the name of the variable along with the datatype@authannotation is used to set who should have access to a particular operation and the options areNO_ACCESS: Only the admin can perform the operation.
PUBLIC: This query can be performed without authentication.
USER_ANON: All users can perform the operation including those who logged in anonymously.
USER: All authenticated users except those who logged in anonymously.USER_EMAIL_VERIFIED: only users with verified emails
you can get more information about database security hereWe did a filter for
GetUserNotesusing where condition, you can find more information hereAlso on the where condition we used a User object and this is because in our schemas, we used User reference for the user field, so for it to work we need to provide a valid user object with the foreign key which in our case is the id. Alternatively, we could just pass the user’s id as a string and that will still work but in that case, we will need another query to fetch the user’s information on each note.
Mutations
Here are our mutations.
mutations.gql:
mutation CreateUser($uid: String!, $email:String!, $name: String! )@auth(level: PUBLIC){
    user_insert(data: {uid: $uid, email: $email, name: $name})
}

mutation CreateNote($title: String!, $content: String!, $userId:String!)@auth(level: PUBLIC){
    note_insert(data: {title: $title, content: $content, user: {uid:  $userId}})
}

mutation DeleteNote($id: UUID!)@auth(level: PUBLIC){
    note_delete(id: $id)
}

mutation UpdateNote($id: UUID!, $title: String!, $content: String!)@auth(level: PUBLIC){
    note_update(id: $id,  data: {title: $title, content: $content})
}
- To mutate your data you have to accept the required or optional parameters then call the singular item name then an underscore with the operator eg.
user_insertandnote_inserte.t.c
Connector
This is the configuration of our outputted SDK.
connector.yaml:
connectorId: note
generate:
  dartSdk:
    outputDir: ../../lib/dataconnect-generated/dart/note_connector
    package: note_connector
- outputDir is where we want the generated SDK to be located, you can set it to your preferred location on the project.
You don’t need to change anything on your dataconnect.yaml
for more on schemas, queries and mutations Firebase documentation
Generating the SDK
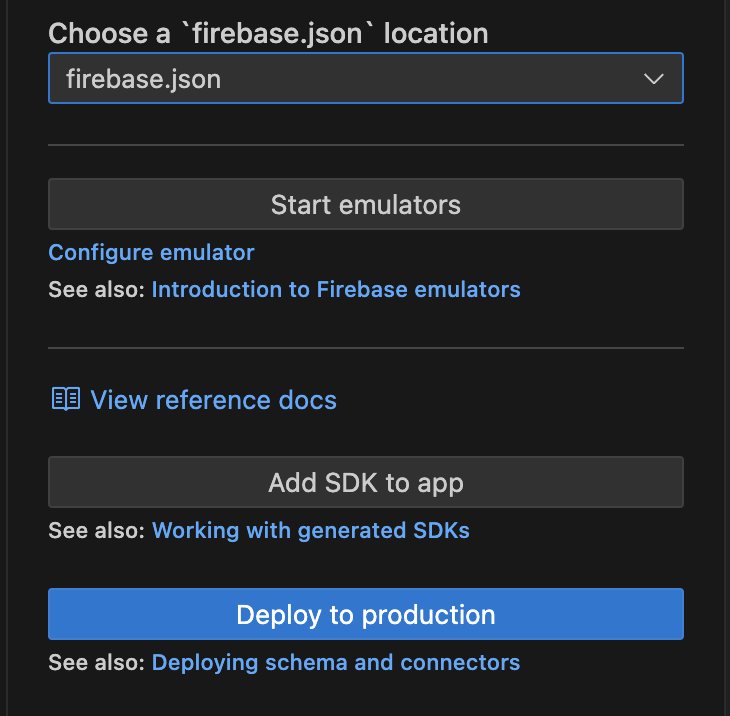
To generate our SDK we need to ensure that the correct firebase.json is selected and if it is we need to click on Add SDK to App, this will prompt us to select the location of the generated SDK and then we can choose where we want it to be, note that this location will be updated on the connector.yaml.
After the SDK is generated we can click on Start emulators to start testing out our connection on both the app and Firebase emulator.

Testing
Before we test we need to make sure that our Firebase emulator is running and then we can have a test folder inside our dataconnect folder which will have mutation_test.gql and queries_test.gql
mutation_test.gql:
mutation CreateUser {
    user_insert(data: {uid: "uniqe id", email: "mail@mail.com", name: "fumilayo opeyemi"})
}

mutation CreateNote{
    note_insert(data: {title: "second title", content: "second content", user: {uid:  "1F6ot3W3QAaeIrOmB564piyUJfQ2"} })
}

mutation DeleteNote {
    note_delete(id: "e94f39561d2d42bf957a9212686a80d6")
}

mutation UpdateNote{
    note_update(id:  "5980bd5d33c54792844d0ee365f6e06c", data: {title: "New title", content: "New content"})
}
queries_test.gql:
query GetUsers {
  users {
    id
    name
    email
    uid
  }
}


query GetUser {
  user(key: {uid:"fSK3JA9kOXPP8r7jKoZQRRQektB2"}) {
    id
    name
    email
    uid
  }
}


query GetNote  {
  note (id: "e09150f653aa4f7abfb81f0c9cd9ed87") {
    id
    title
    content
    createdAt
    updatedAt
    user {
      id
      name
      email
      uid
    }
  }
}

query GetNotes {
  notes {
    id
    title
    content
    createdAt
    updatedAt
    user {
      id
      name
      email
      uid
    }
  }
}

 query GeUserNotes{
  notes(where: { user: { id: { eq: "cbe1b7a742584a3892e9519f9a238ff7" } } }) {
    id
    title
    content
    createdAt
    updatedAt
    user {
      id
      name
      email
      uid
    }
  }
}
- Note that the IDs I used are actual values from my test.
For each query, you should see two options of either running it locally or in production, we’d choose locally for this test and see what we get.

For each operation, you can choose your authentication level to test your db security as well.

Flutter Integration
A readme is generated alongside the SDK detailing how the SDK can be used and you’ll find this inside your generated folder.
Firstly, connect the app to the emulator database by calling NoteConnector.instance.dataConnect.useDataConnectEmulator(host, port); and the values for these can be gotten from the emulator when it is running, like this.

Interacting with our database
Here’s what my service class for Data Connect looks like
class DataConnectService {
  final _noteConnector = NoteConnector.instance;

  Future<({Note? note, String? error})> createNote(
      {required String title,
      required String content,
      required String userId}) async {
    try {
      final call = await _noteConnector
          .createNote(title: title, content: content, userId: userId)
          .execute();
      return (
        note: Note(
          id: call.data.note_insert.id,
          title: title,
          content: content,
        ),
        error: null
      );
    } catch (e) {
      if (e is DataConnectError) {
        return (note: null, error: e.message);
      }
      return (note: null, error: e.toString());
    }
  }

  Future<void> deleleteNote(String noteId) async {
   await _noteConnector.deleteNote(
      id: noteId
    ).execute();
  }
 Future< void> updateNote(Note note) async{
    await _noteConnector.updateNote(id: note.id??"", title: note.title??"", content: note.content??"").execute();
  }
  Future<({List<Note>? notes, String? error})> fetchNotes(String id) async {
    try {
      final call = await _noteConnector.geUserNotes(id: id).execute();
      final notes = call.data.notes;
      return (
        notes: List<Note>.from(notes.map((e) => Note.fromMap(e.toJson()))),
        error: null
      );
    } catch (e) {
      if (e is DataConnectError) {
        return (notes: null, error: e.message);
      }
      return (notes: null, error: e.toString());
    }
  }


  Future<({GetUserUser? user, String? error})> fetchUser(
      ) async {
    try {
      final call = await _noteConnector
          .getUser(uid: FirebaseAuth.instance.currentUser?.uid??"")
          .execute();
      return (user: call.data.user, error: null);
    } catch (e) {
      if (e is DataConnectError) {
        return (user: null, error: e.message);
      }
      return (user: null, error: e.toString());
    }
  }
}
The complete code can be found here
Disclaimer:
- What I did in this tutorial is completely experimental and not suitable for a production environment. this is because you need to make sure your database is as secure as possible and also Data Connect is still in an experimental phase.
Data Connect is new, so you might have difficulty finding help online.
If you ever get stuck, I strongly recommend going through their documentation here.
I am open to your questions and Happy coding 🎉
Subscribe to my newsletter
Read articles from Odinachi David directly inside your inbox. Subscribe to the newsletter, and don't miss out.
Written by

Odinachi David
Odinachi David
I am vastly knowledgeable in designing mobile applications and testing and maintenance with proficiency in Flutter, Dart and every relevant technology with years of professional experience.