Web - Authentication
 Ram Bhardwaj
Table of contents

1. StateFul Authentication
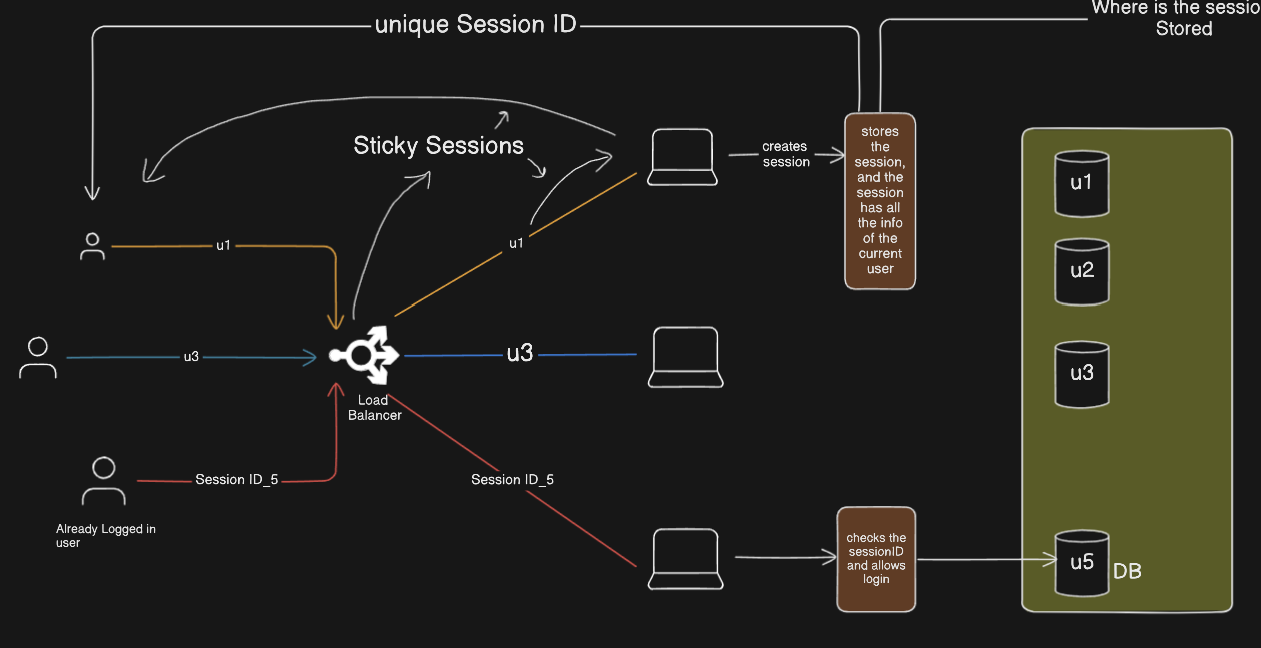
Stateful authentication is a traditional approach where the server maintains session data for each authenticated user. Stateful authentication maintains user session data on the server, ensuring seamless request handling by tracking session IDs
Auth Flow

Step 1. User Logs In
User request is directed to a specific server by Load balancer.
The server creates a session.
It generates a session ID (a random unique string).
This session ID is sent to the client (via cookies or headers).
Step 2. User Sends a Request again
When the user sends a request, the session ID is included in the request.
The server checks the session ID and looks it up in the session store to identify the associated user.
Step 3. Server Fetches Session Data
The server searches for the session ID in the session store (memory, database, Redis, etc.).
It retrieves the user data linked to that session ID (such as user ID, permissions, etc.).
If the session is valid, the request is allowed.
Role of Load Balancer
The user initiates a login request.
The Load Balancer utilizes Sticky Sessions, mapping the user’s session ID to a specific server to maintain continuity.
If the session is stored in server memory, horizontal scaling becomes inefficient since user sessions are tied to individual servers, limiting flexibility in distributing requests.
What are Sticky Sessions?
Sticky Sessions, also known as session affinity, is a technique used in load balancing where a user’s requests are consistently routed to the same backend server for the duration of their session. This ensures that the server maintains continuity by preserving the user's session data.
How Do Sticky Sessions Work?
When a user logs in, the load balancer forwards the request to a specific backend server (e.g., S1).
The server (S1) creates and stores the session data in its local memory and generates a session ID.
The load balancer remembers the mapping of the user’s session ID to the assigned server (S1).
For all subsequent requests from that user, the load balancer ensures the traffic is directed only to S1 instead of randomly distributing it among multiple servers.
Challenges of Sticky Sessions
Scalability Issues – If one server becomes overloaded, requests cannot be efficiently distributed.
Where is the Session Stored (External Session Storage)
RAM (Server Memory)
Fast
Persistant ? No (On restart the session is deleted)
Scalability-> Low (as the new
Suitable for → Small Applications
Database (SQL/NoSQL)
Slow
Persistant? Yes
Scalability-> Medium
Permanent session store
Redis/Memcached
Super Fast
Yes (Lekin mainly cache ke liye)
Scalability-> High
Suitable for →Large-scale apps (scalable & distributed)
Advantages of StateFul Authentication
Session Security – Since sessions are stored on the server, they are not exposed to the client, reducing the risk of session tampering.
Easy to Invalidate Sessions – The server has full control over active sessions, making it easy to log out users or expire sessions when needed.
Supports Fine-Grained Access Control – The server can update session data dynamically (e.g., updating user roles or permissions in real-time).
Disadvantages of StateFul Authentication
Scalability Issues – If the session data is stored on the server, horizontal scaling (adding more servers) becomes complex, requiring session synchronization across instances.
To overcome this we can use External Session Storage.
Load Balancing Challenges – Load balancers must implement Sticky Sessions (session affinity) to direct a user to the same server, which can lead to server overload and inefficiency.
Increased Server Memory Usage – As the number of active users grows, session storage consumes more memory, which can slow down performance.
When to Use Stateful Authentication?
Best for small to mid-sized applications where maintaining session data on the server is feasible.
Useful when session invalidation is critical, such as banking or admin dashboards.
When real-time session updates are needed, e.g., updating user permissions dynamically.
2. StateLess Authentication
In modern web applications, authentication is crucial for verifying user identity and ensuring secure access to resources. Stateless authentication is an approach where the server does not store user session data. Instead, authentication information is self-contained within each request, typically using JSON Web Tokens (JWTs) or similar mechanisms.
Unlike stateful authentication, where the server maintains session records, stateless authentication eliminates the need for session storage. This makes it highly scalable, as any server can handle a user request without relying on shared session data.
Auth Flow

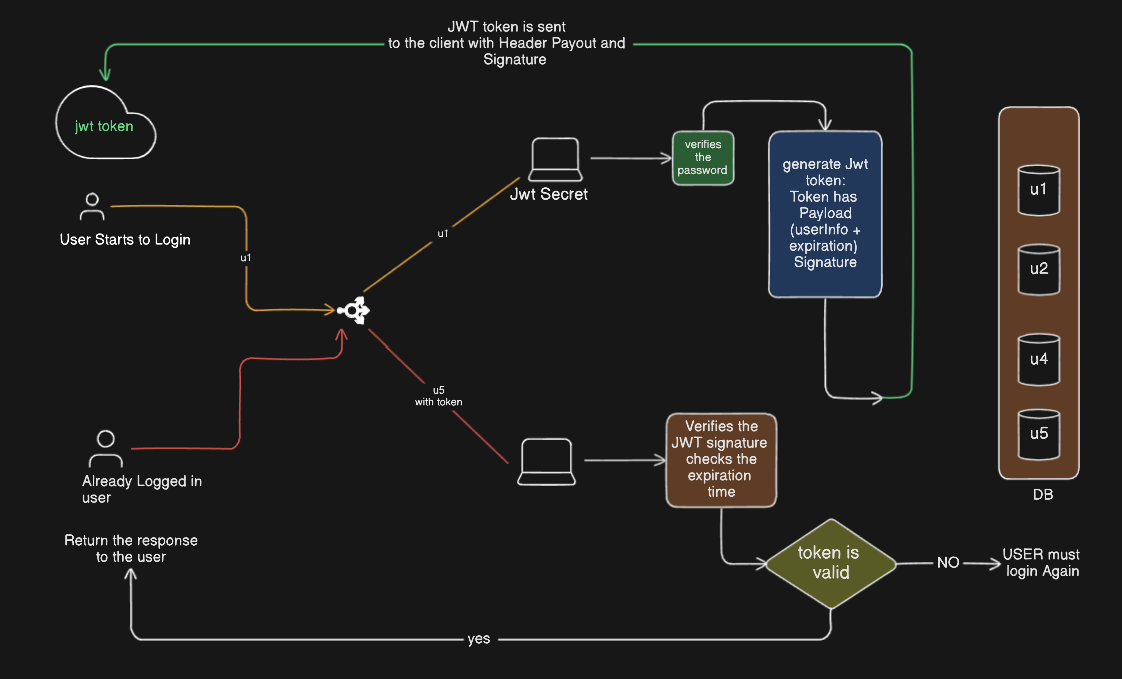
Step 1: User Login & JWT Token Generation
The user submits login credentials.
The server verifies the credentials (checks username & password).
If authentication is successful, the server:
Generates a JWT Token with:
Header (Algorithm & Token Type).
Payload (User ID, Role, Expiration Time, etc.).
Signature (to ensure token integrity).
The token is signed with a private secret key.
The JWT Token is sent to the client via:
HTTP Headers (
Authorization: Bearer <JWT>).Or Secure HttpOnly Cookies (recommended for security).
Step 2: User Makes a Request to a Protected Route
The user sends a request to a protected endpoint.
The request includes the JWT Token (from headers or cookies).
The server validates the token by:
Checking the signature (using the secret key).
Verifying the expiration time.
Checking user roles & permissions from the payload.
If the JWT is valid, the request is processed, and the response is sent back.
If the JWT is invalid or expired, the user must log in again to get a new token.
Step 3: Token Expiration & Reauthentication
Since there is no Refresh Token, when the JWT expires:
The server rejects the request (returns
401 Unauthorized).The user must log in again to receive a new token.
Optionally, the client-side application can detect expiration and redirect the user to the login page.
Step 4: User Logout (Optional)
Since JWTs are stateless, the server cannot forcefully log out users.
To implement logout:
The client removes the JWT from storage (cookies or local storage).
The server can implement a blocklist to store invalidated JWTs (optional).
✅ Advantages of JWT-Only Flow
Completely Stateless – No session storage required.
Fast & Scalable – Any server can validate JWT without needing a database lookup.
Simple Implementation – No need for refresh token management.
❌ Disadvantages of JWT-Only Flow
No Token Refresh – Users must log in again after the JWT expires.
Cannot Force Logout – Since JWTs are self-contained, the server cannot revoke them unless using a blocklist.
Long Expiration Risk – If JWTs have a long expiration time, they can be misused if stolen.
3. StateLess Auth with Access & Refresh Token
The Access Token & Refresh Token model was introduced to address the limitations of using only a single JWT token for authentication. The key reasons for this approach are:
Problem: Token Expiration & User Experience
If a single JWT token is used for authentication, it must have an expiration time for security reasons.
If the expiration time is short, users will be logged out frequently, requiring them to log in again.
If the expiration time is long, a stolen or compromised token could be misused for an extended period.
Solution→ ✅ Introduce a short-lived Access Token and a long-lived Refresh Token to maintain security without frequent logins.
Auth Flow

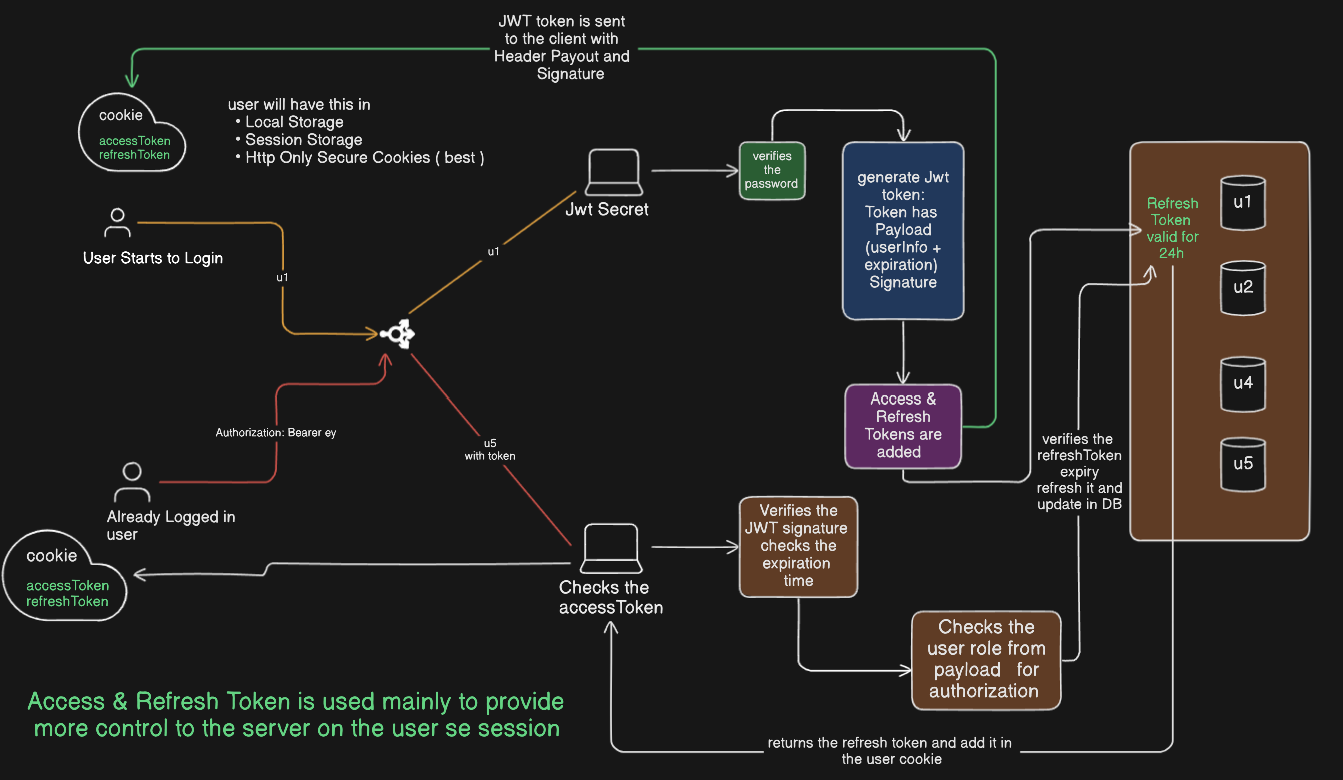
Step 1: User Login
User sends login credentials.
Server authenticates the user and generates:
Access Token (short-lived, e.g., 15 mins).
Refresh Token (long-lived, e.g., 7 days).
Server stores the Refresh Token in the database.
Tokens are sent via secure HttpOnly cookies.
Step 2: User Requests a Protected Route
User sends a request with the Access Token in cookies or Authorization header.
Server:
Validates Access Token (signature, expiration, user role).
If valid, processes the request.
Step 3: Access Token Expiration & Refresh
If the Access Token expires, the client sends a request with the Refresh Token.
Server:
Validates the Refresh Token (checks DB for existence and validity).
If valid, issues new Access & Refresh Tokens.
Updates the stored Refresh Token in the DB.
Sends the new tokens via cookies.
Step 4: Logout (Optional, for security)
When a user logs out, the server removes the Refresh Token from the DB.
Clears cookies on the client side.
Why This Method is better?
✅ Security – Limits the risk of stolen tokens.
✅ Better User Experience – Users don’t have to log in frequently.
✅ Scalability – Reduces authentication load in distributed systems.
✅ Token Revocation – Refresh Tokens can be managed in a database, allowing forced logout.
This method balances security and usability, making it the preferred authentication model for modern applications!
Thank you for reading!
Subscribe to my newsletter
Read articles from Ram Bhardwaj directly inside your inbox. Subscribe to the newsletter, and don't miss out.
Written by

Ram Bhardwaj
Ram Bhardwaj
Engineer @Ciena | Software Engineering | Full Stack Development | Typescript , Java, React Node | DSA LeetCode (600+) | System Design |