How to Install MongoDB Community Edition in Redhat Linux
 Baskar
This article will help you to install the latest version of MongoDB (8.0.6) in the Oracle Linux Server/Redhat Linux Server
Step 1: Create MongoDB Repository File
The first step is to create a MongoDB Repository File. The content of this file will vary depending upon which version of MongoDB you are going to install. To get the exact content of your version, you can refer to the MongoDB Installation Guide. Since, I am installing the latest MongoDB version such as 8.0.6, I got the following content from the MongoDB Installation Guide.
MongoDB Installation Guide Link:
https://www.mongodb.com/docs/manual/tutorial/install-mongodb-on-red-hat/
[mongodb-org-8.0]
name=MongoDB Repository
baseurl=https://repo.mongodb.org/yum/redhat/8/mongodb-org/8.0/x86_64/
gpgcheck=1
enabled=1
gpgkey=https://pgp.mongodb.com/server-8.0.asc
The repository file name for MongoDB 8.0.6 is: mongodb-org-8.0.repo
So, create a empty file called “mongodb-org-8.0.repo” in the location “/etc/yum.repos.d/”. Then, open this file and add the above lines of contents in this file.
$ sudo vi /etc/yum.repos.d/mongodb-org-8.0.repo
$ cat /etc/yum.repos.d/mongodb-org-8.0.repo
sudo vi /etc/yum.repos.d/mongodb-org-8.0.repo
cat /etc/yum.repos.d/mongodb-org-8.0.repo

Step 2: Install the MongoDB Software
Install the MongoDB software using the dnf or yum command.
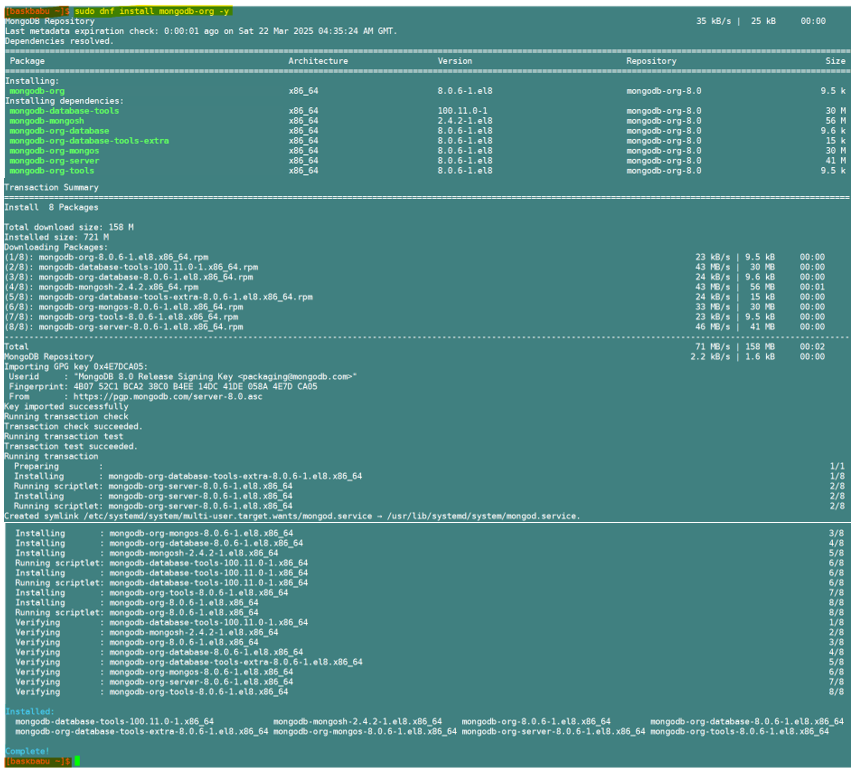
$ sudo dnf install mongodb-org -y
sudo dnf install mongodb-org -y
The above command will install the latest version of MongoDB. The current latest version is 8.0.6 as of writing this article date. The screenshot of the installation step is shown below.
Once the MongoDB is installed, it will also create an OS user called “mongod”. To validate whether this user is created or not, you can run the following command. This will show the username if it has created successfully.
$ sudo cat /etc/passwd|grep -i mongod
sudo cat /etc/passwd|grep -i mongod

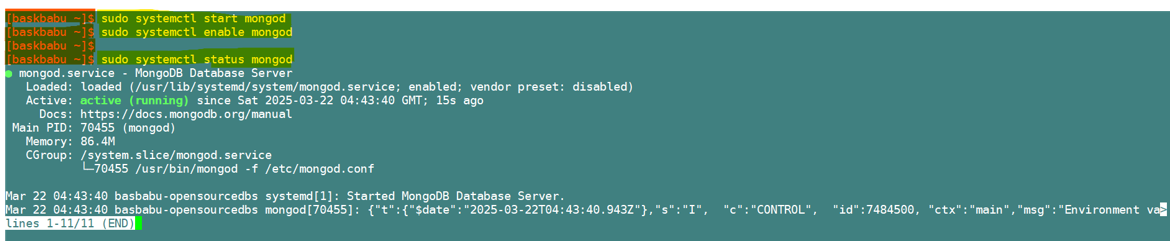
Step 3: Start the MongoDB Service/Process
$ sudo systemctl start mongod
$ sudo systemctl enable mongod
$ sudo systemctl status mongod
sudo systemctl start mongod
sudo systemctl enable mongod
sudo systemctl status mongod
Step 4: Verify the MongoDB Version
$ sudo mongod --version
sudo mongod --version

You can now start working with the MongoDB databases. For more details on how to work with MongoDB databases, please read my other article here.
Thanks for reading this article. Hope it helped you to progress your work!!
Subscribe to my newsletter
Read articles from Baskar directly inside your inbox. Subscribe to the newsletter, and don't miss out.
Written by