CI/CD DevOps Pipeline Project: Deployment of Java Application on Kubernetes
 ProDevOpsGuy Tech Community
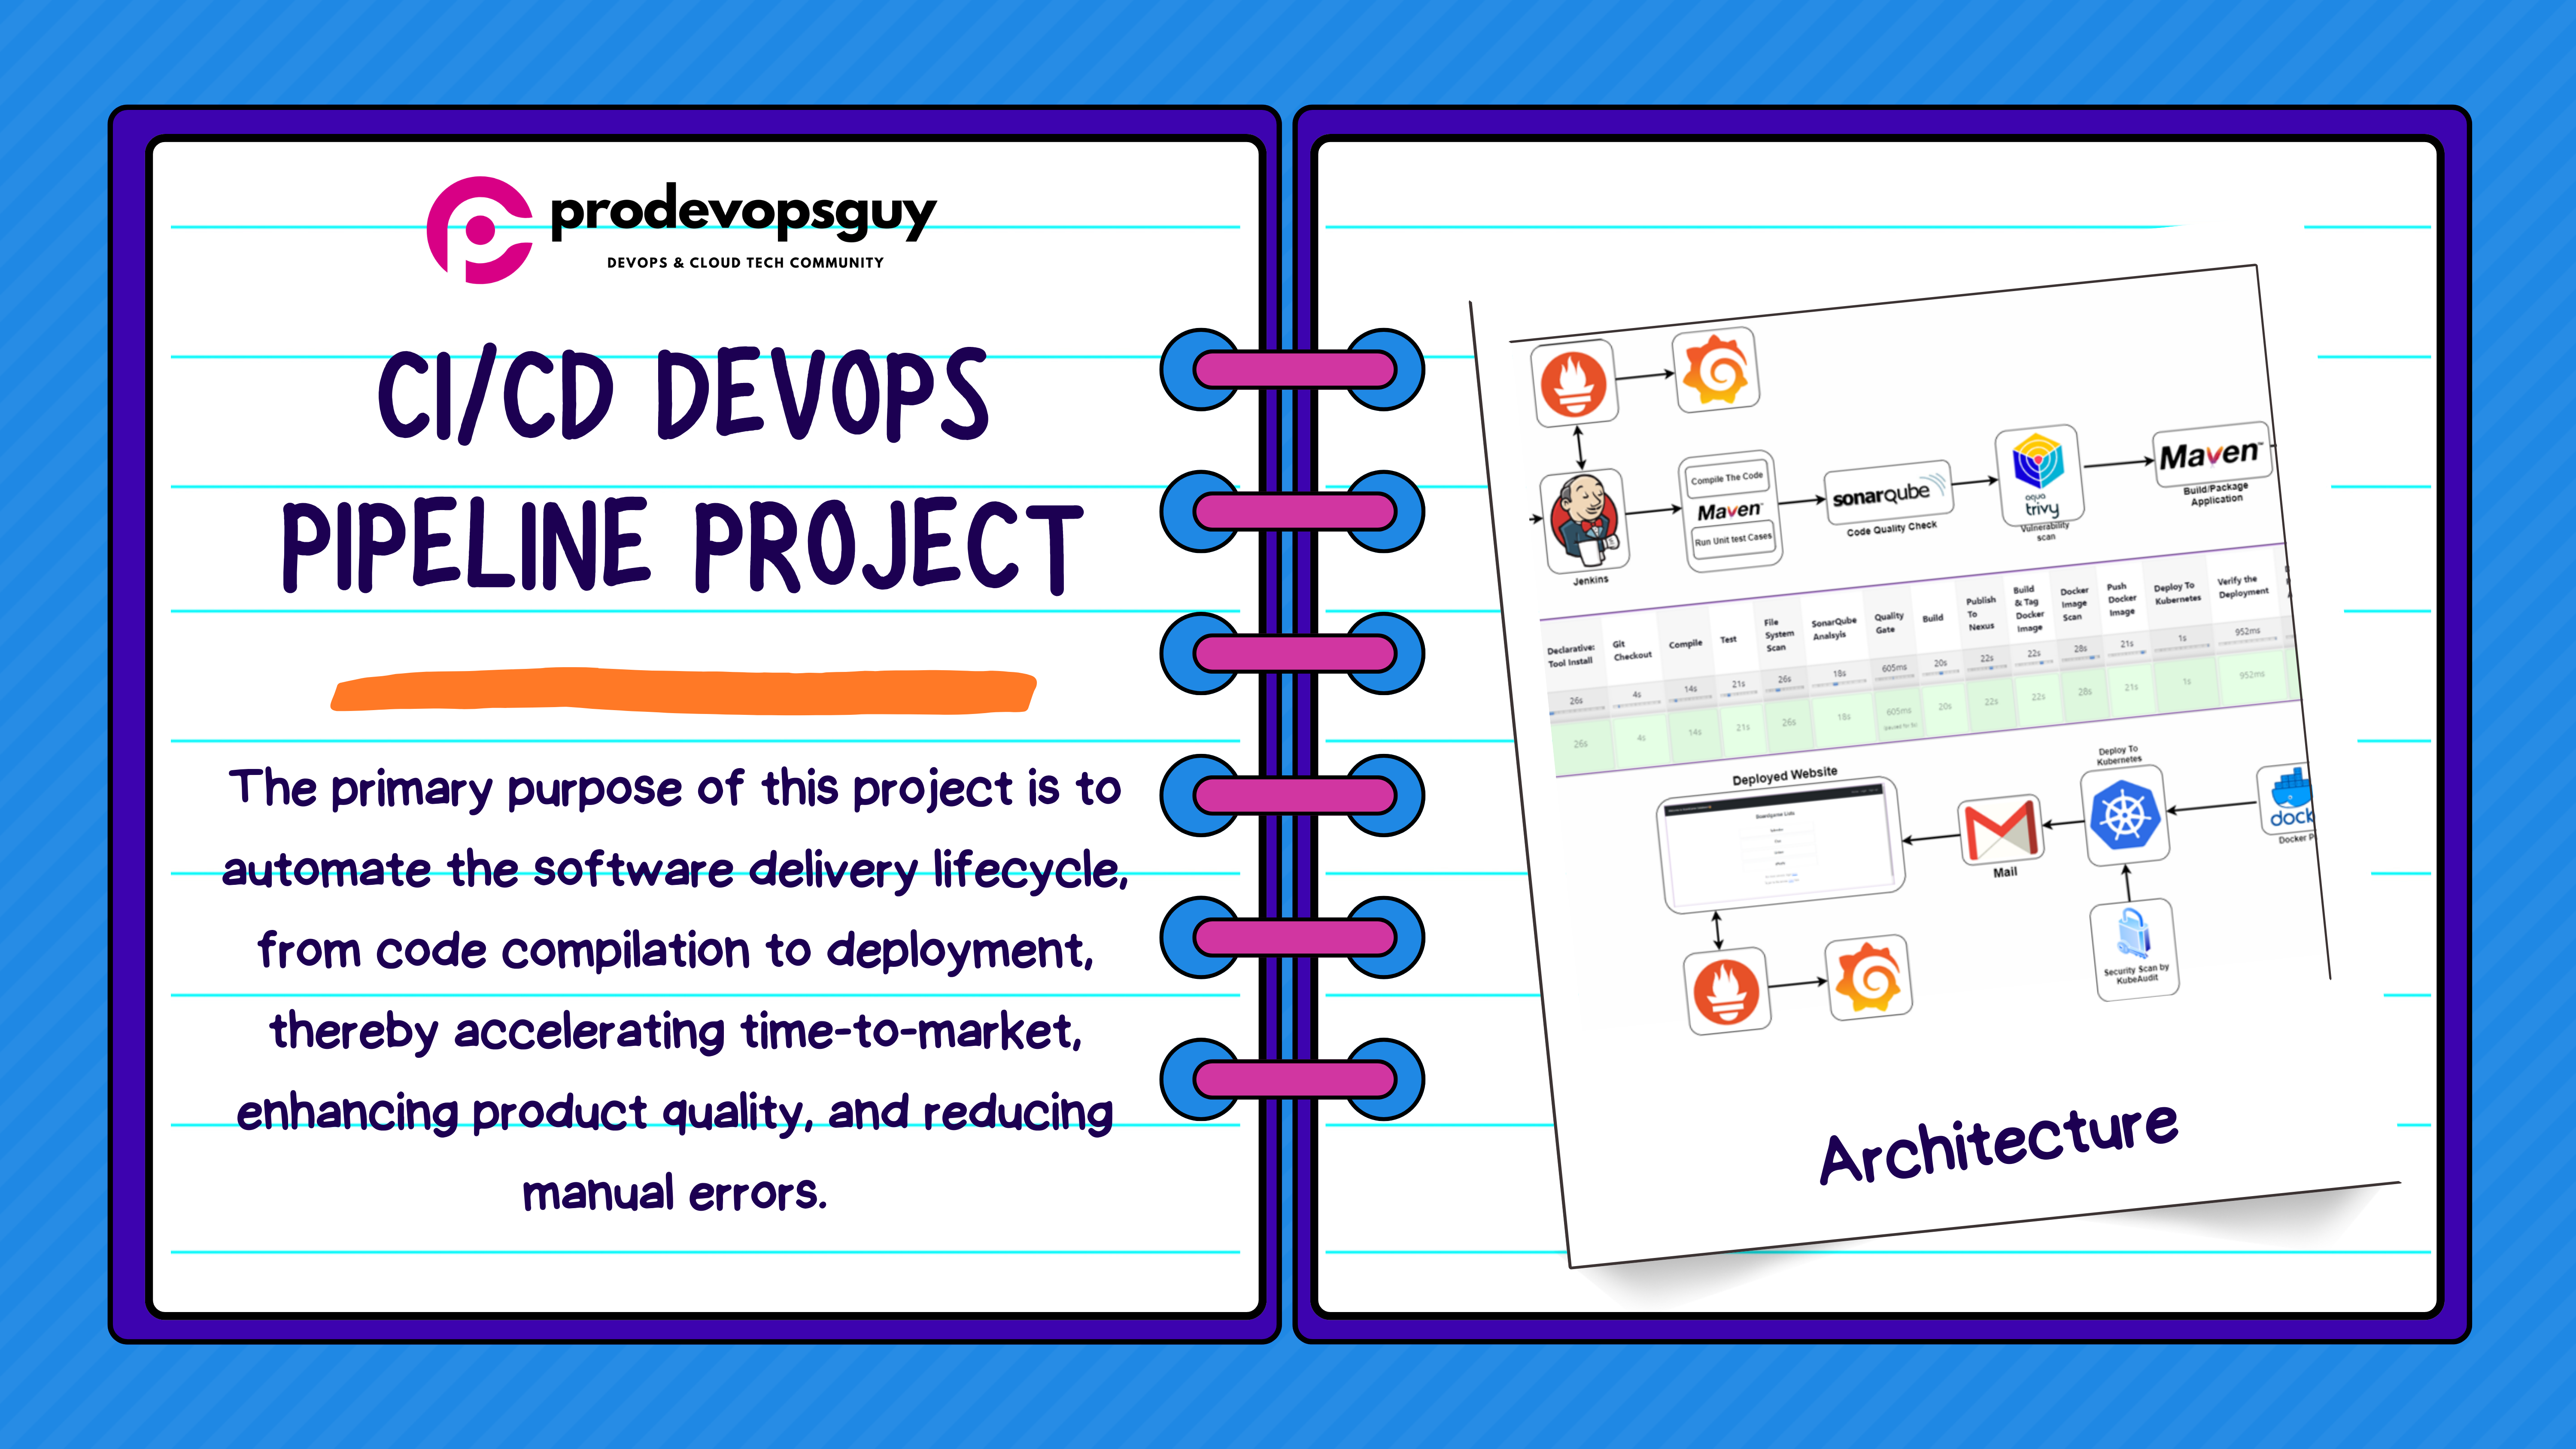
Introduction
In the rapidly evolving landscape of software development, adopting DevOps practices has become essential for organizations aiming for agility, efficiency, and quality in their software delivery processes. This project focuses on implementing a robust DevOps Continuous Integration/Continuous Deployment (CI/CD) pipeline, orchestrated by Jenkins, to streamline the development, testing, and deployment phases of a software product.
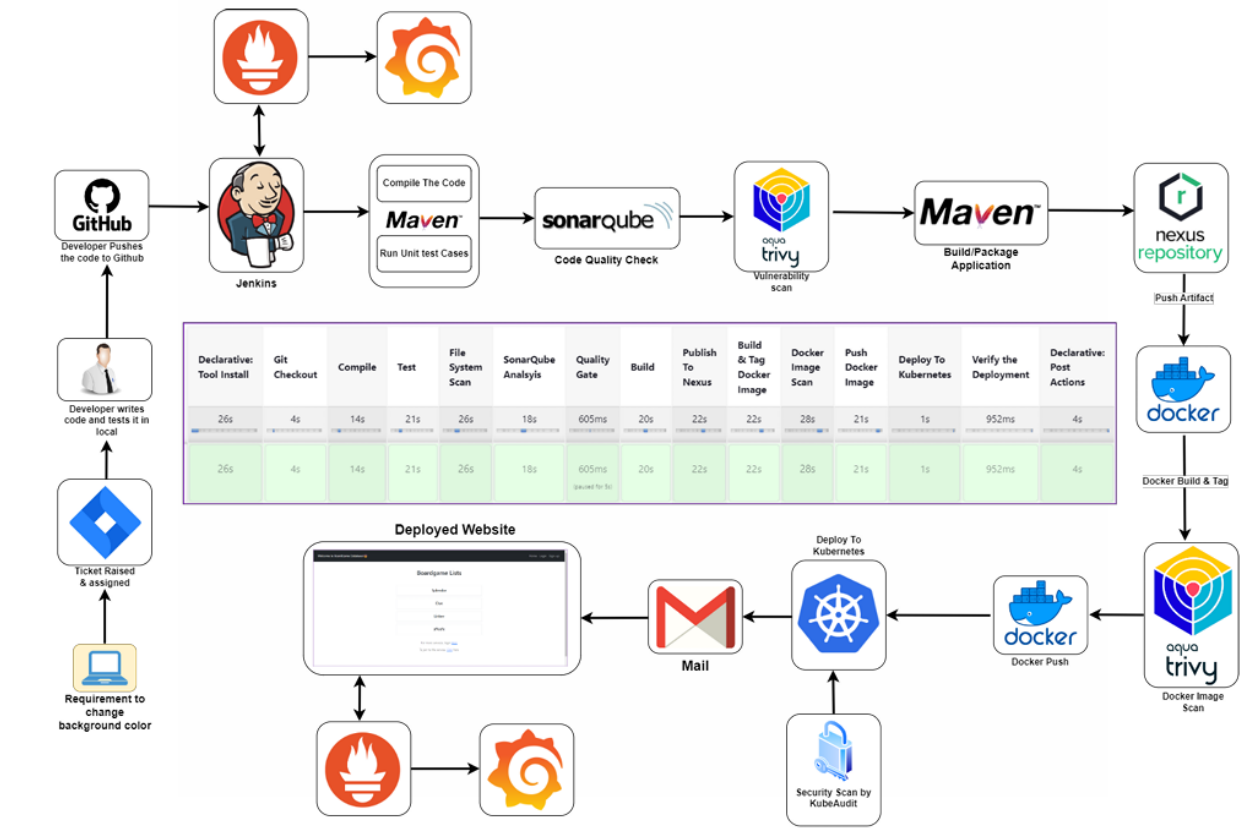
Architecture
Purpose and Objectives
The primary purpose of this project is to automate the software delivery lifecycle, from code compilation to deployment, thereby accelerating time-to-market, enhancing product quality, and reducing manual errors. The key objectives include:
Establishing a seamless CI/CD pipeline using Jenkins to automate various stages of the software delivery process.
Integrating essential DevOps tools such as Maven, SonarQube, Trivy, Nexus Repository, Docker, Kubernetes, Prometheus, and Grafana to ensure comprehensive automation and monitoring.
Improving code quality through static code analysis and vulnerability scanning.
Ensuring reliable and consistent deployments on a Kubernetes cluster with proper load balancing.
Facilitating timely notifications and alerts via email integration for efficient communication and incident management.
Implementing robust monitoring and alerting mechanisms to track system health and performance.
Tools Used
Jenkins: Automation orchestration for CI/CD pipeline.
Maven: Build automation and dependency management.
SonarQube: Static code analysis for quality assurance.
Trivy: Vulnerability scanning for Docker images.
Nexus Repository: Artifact management and version control.
Docker: Containerization for consistency and portability.
Kubernetes: Container orchestration for deployment.
Gmail Integration: Email notifications for pipeline status.
Prometheus and Grafana: Monitoring and visualization of system metrics.
AWS: Creating virtual machines.
Segment 1: Setting up Virtual Machines on AWS
To establish the infrastructure required for the DevOps tools setup, virtual machines were provisioned on the Amazon Web Services (AWS) platform. Each virtual machine served a specific purpose in the CI/CD pipeline. Here's an overview of the virtual machines created for different tools:
Kubernetes Master Node: This virtual machine served as the master node in the Kubernetes cluster. It was responsible for managing the cluster's state, scheduling applications, and coordinating communication between cluster nodes.
Kubernetes Worker Node 1 and Node 2: These virtual machines acted as worker nodes in the Kubernetes cluster, hosting and running containerized applications. They executed tasks assigned by the master node and provided resources for application deployment and scaling.
SonarQube Server: A dedicated virtual machine hosted the SonarQube server, which performed static code analysis to ensure code quality and identify potential issues such as bugs, code smells, and security vulnerabilities.
Nexus Repository Manager: Another virtual machine hosted the Nexus Repository Manager, serving as a centralized repository for storing and managing build artifacts, Docker images, and other dependencies used in the CI/CD pipeline.
Jenkins Server: A virtual machine was allocated for the Jenkins server, which served as the central hub for orchestrating the CI/CD pipeline. Jenkins coordinated the execution of pipeline stages, triggered builds, and integrated with other DevOps tools for seamless automation.
Monitoring Server (Prometheus and Grafana): A single virtual machine hosted both Prometheus and Grafana for monitoring and visualization of system metrics. Prometheus collected metrics from various components of the CI/CD pipeline, while Grafana provided interactive dashboards for real-time monitoring and analysis. 4 Each virtual machine was configured with the necessary resources, including CPU, memory, and storage, to support the respective tool's functionalities and accommodate the workload demands of the CI/CD pipeline. Additionally, security measures such as access controls, network configurations, and encryption were implemented to safeguard the virtualized infrastructure and data integrity.
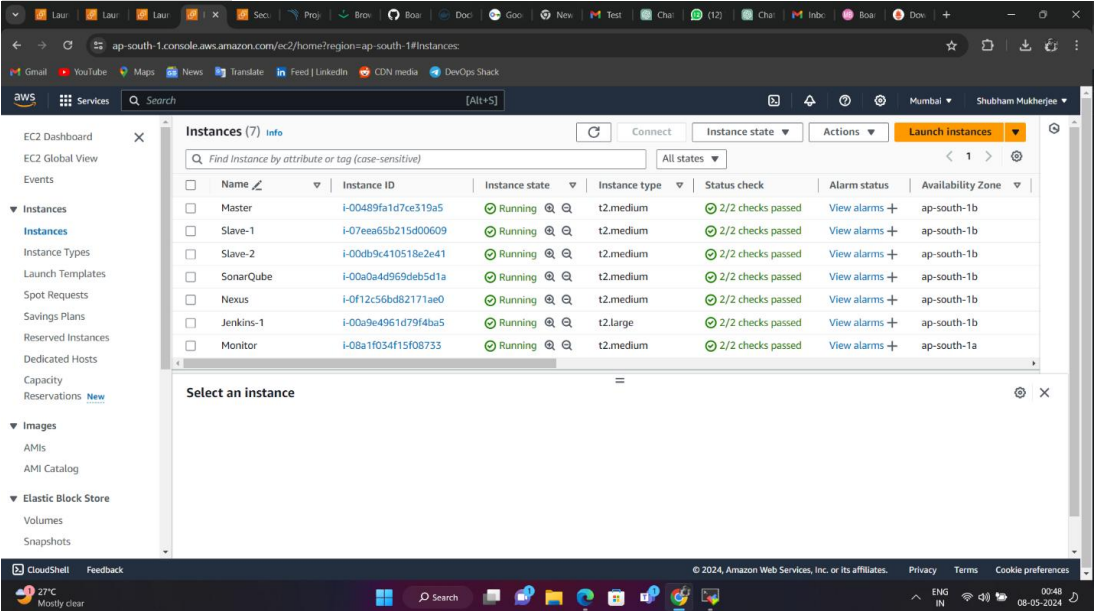
EC2 Instances :
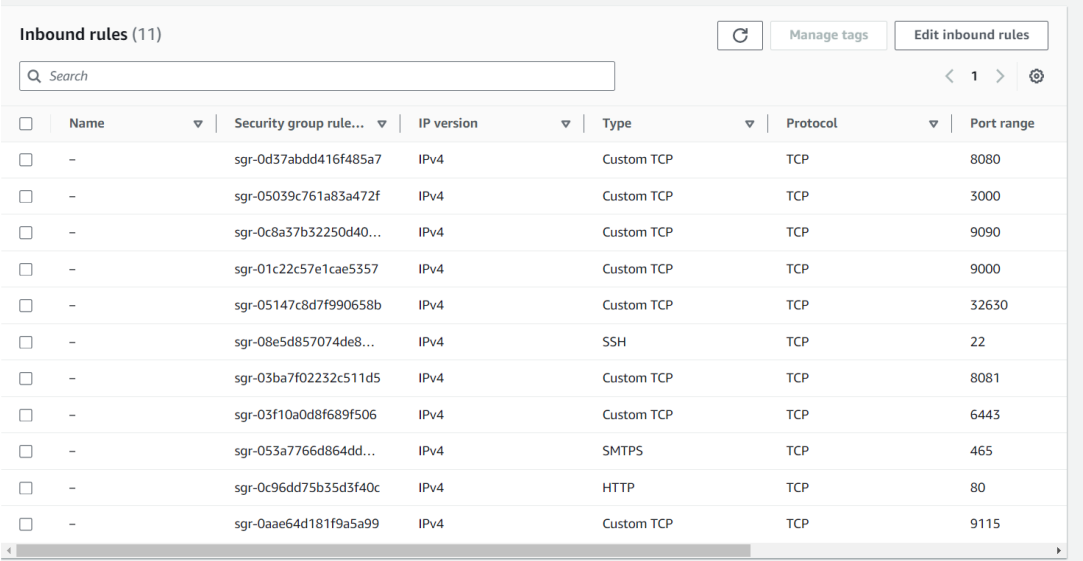
Security Group:
Set Up K8s Cluster Using Kubeadm
This guide outlines the steps to set up a Kubernetes cluster using kubeadm.
Prerequisites:
Ubuntu OS (Xenial or later)
Sudo privileges
Internet access
t2.medium instance type or higher
AWS Setup:
Ensure all instances are in the same Security Group.
Open port 6443 in the Security Group to allow worker nodes to join the cluster.
Execute on Both "Master" & "Worker Node":
Run the following commands on both the master and worker nodes to prepare them for kubeadm.
    # Disable swap
    sudo swapoff -a
Create the .conf file to load the modules at bootup:
    cat <<EOF | sudo tee /etc/modules-load.d/k8s.conf
    overlay
    br_netfilter
    EOF

    sudo modprobe overlay
    sudo modprobe br_netfilter
Set sysctl parameters required by the setup, ensuring they persist across reboots:
    cat <<EOF | sudo tee /etc/sysctl.d/k8s.conf
    net.bridge.bridge-nf-call-iptables = 1
    net.bridge.bridge-nf-call-ip6tables = 1
    net.ipv4.ip_forward = 1
    EOF

    # Apply sysctl parameters without reboot
    sudo sysctl --system
Install CRIO Runtime:
    sudo apt-get update -y
    sudo apt-get install -y software-properties-common curl apt-transport-https ca-certificates gpg

    sudo curl -fsSL https://pkgs.k8s.io/addons:/crio:/prerelease:/main/deb/Release.key | sudo gpg --dearmor -o /etc/apt/keyrings/cri-o-apt-keyring.gpg

    echo "deb [signed-by=/etc/apt/keyrings/cri-o-apt-keyring.gpg] https://pkgs.k8s.io/addons:/cri-o:/prerelease:/main/deb/ /" | sudo tee /etc/apt/sources.list.d/cri-o.list

    sudo apt-get update -y
    sudo apt-get install -y cri-o
    sudo systemctl daemon-reload
    sudo systemctl enable crio --now
    sudo systemctl start crio.service

    echo "CRI runtime installed successfully"
Add Kubernetes APT repository and install required packages:
    curl -fsSL https://pkgs.k8s.io/core:/stable:/v1.29/deb/Release.key | sudo gpg --dearmor -o /etc/apt/keyrings/kubernetes-apt-keyring.gpg

    echo 'deb [signed-by=/etc/apt/keyrings/kubernetes-apt-keyring.gpg] https://pkgs.k8s.io/core:/stable:/v1.29/deb/ /' | sudo tee /etc/apt/sources.list.d/kubernetes.list

    sudo apt-get update -y
    sudo apt-get install -y kubelet="1.29.0-*" kubectl="1.29.0-*" kubeadm="1.29.0-*"
    sudo apt-get update -y
    sudo apt-get install -y jq
    sudo systemctl enable --now kubelet
    sudo systemctl start kubelet
Execute ONLY on the "Master Node":
    sudo kubeadm config images pull
    sudo kubeadm init

    mkdir -p "$HOME"/.kube
    sudo cp -i /etc/kubernetes/admin.conf "$HOME"/.kube/config
    sudo chown "$(id -u)":"$(id -g)" "$HOME"/.kube/config
Set up the Network Plugin and Kubernetes Cluster:
# Apply Calico network plugin
kubectl apply -f https://raw.githubusercontent.com/projectcalico/calico/v3.26.0/manifests/calico.yaml
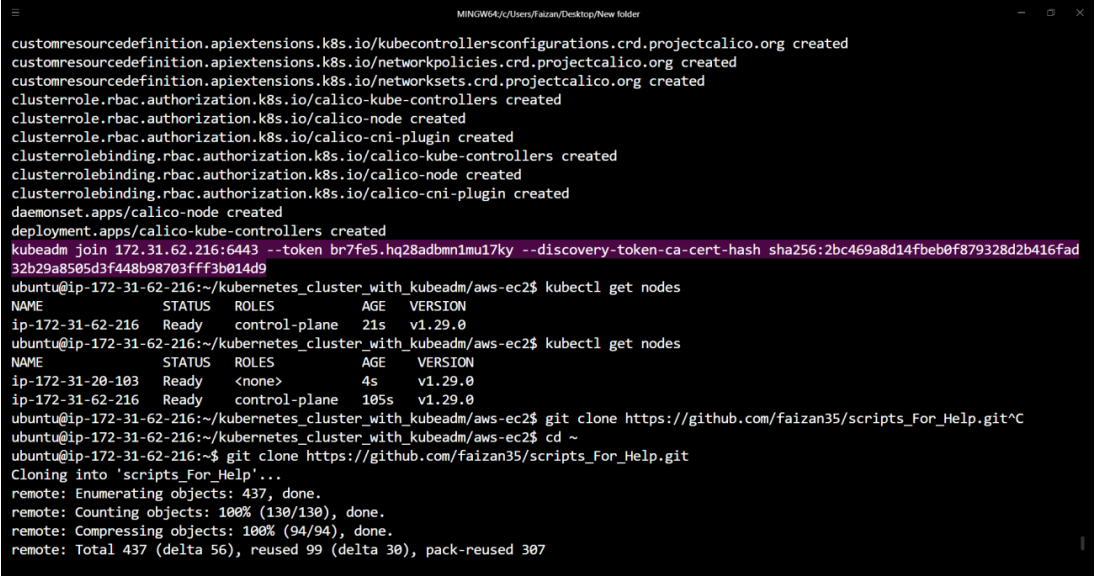
# Create kubeadm token and copy it
kubeadm token create --print-join-command
Execute on ALL Worker Nodes:
    # Perform pre-flight checks
    sudo kubeadm reset pre-flight checks

    # Paste the join command you got from the master node and append --v=5 at the end
    sudo <your-token> --v=5
Verify Cluster Connection on Master Node:
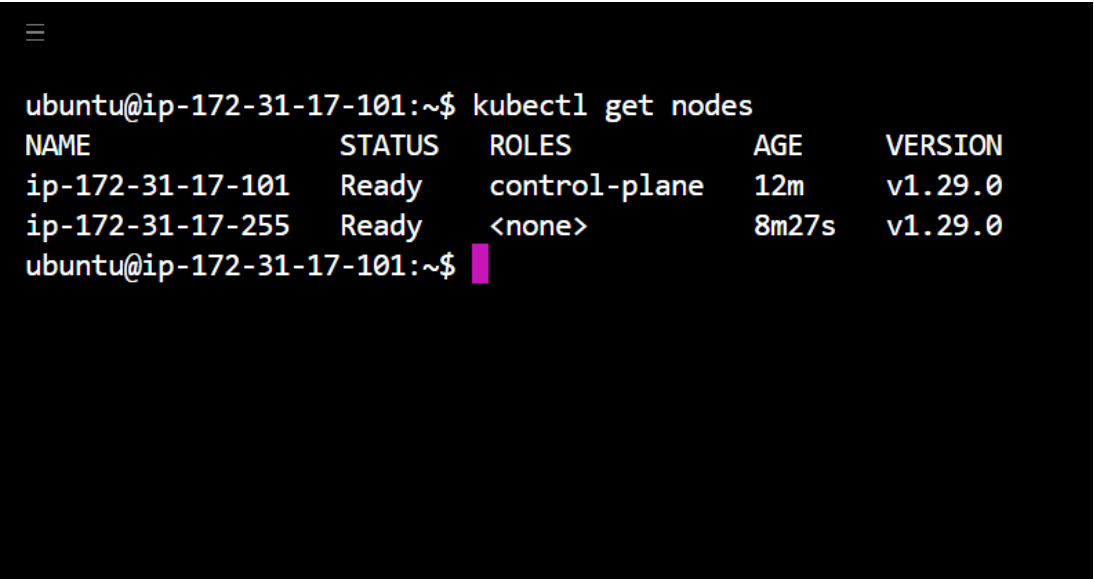
kubectl get nodes
Installing Jenkins on Ubuntu:
    #!/bin/bash

    # Install OpenJDK 17 JRE Headless
    sudo apt install openjdk-17-jre-headless -y

    # Download Jenkins GPG key
    sudo wget -O /usr/share/keyrings/jenkins-keyring.asc https://pkg.jenkins.io/debian-stable/jenkins.io-2023.key

    # Add Jenkins repository to package manager sources
    echo deb [signed-by=/usr/share/keyrings/jenkins-keyring.asc] https://pkg.jenkins.io/debian-stable binary/ | sudo tee /etc/apt/sources.list.d/jenkins.list > /dev/null

    # Update package manager repositories
    sudo apt-get update

    # Install Jenkins
    sudo apt-get install jenkins -y
Save this script in a file, for example, install_jenkins.sh, and make it executable using:
chmod +x install_jenkins.sh
Then, you can run the script using:
./install_jenkins.sh
Install kubectl:
    curl -o kubectl https://amazon-eks.s3.us-west-2.amazonaws.com/1.19.6/2021-01-05/bin/linux/amd64/kubectl
    chmod +x ./kubectl
    sudo mv ./kubectl /usr/local/bin
    kubectl version --short --client
Install Docker for future use:
    #!/bin/bash

    # Update package manager repositories
    sudo apt-get update

    # Install necessary dependencies
    sudo apt-get install -y ca-certificates curl

    # Create directory for Docker GPG key
    sudo install -m 0755 -d /etc/apt/keyrings

    # Download Docker's GPG key
    sudo curl -fsSL https://download.docker.com/linux/ubuntu/gpg -o /etc/apt/keyrings/docker.asc

    # Ensure proper permissions for the key
    sudo chmod a+r /etc/apt/keyrings/docker.asc

    # Add Docker repository to Apt sources
    echo "deb [arch=$(dpkg --print-architecture) signed-by=/etc/apt/keyrings/docker.asc] https://download.docker.com/linux/ubuntu $(. /etc/os-release && echo "$VERSION_CODENAME") stable" | sudo tee /etc/apt/sources.list.d/docker.list > /dev/null

    # Update package manager repositories
    sudo apt-get update

    # Install Docker
    sudo apt-get install -y docker-ce docker-ce-cli containerd.io docker-buildx-plugin docker-compose-plugin
Save this script in a file, for example, install_docker.sh, and make it executable using:
chmod +x install_docker.sh
Then, you can run the script using:
./install_docker.sh
Set Up Nexus:
    #!/bin/bash

    # Update package manager repositories
    sudo apt-get update

    # Install necessary dependencies
    sudo apt-get install -y ca-certificates curl

    # Create directory for Docker GPG key
    sudo install -m 0755 -d /etc/apt/keyrings

    # Download Docker's GPG key
    sudo curl -fsSL https://download.docker.com/linux/ubuntu/gpg -o /etc/apt/keyrings/docker.asc

    # Ensure proper permissions for the key
    sudo chmod a+r /etc/apt/keyrings/docker.asc

    # Add Docker repository to Apt sources
    echo "deb [arch=$(dpkg --print-architecture) signed-by=/etc/apt/keyrings/docker.asc] https://download.docker.com/linux/ubuntu $(. /etc/os-release && echo "$VERSION_CODENAME") stable" | sudo tee /etc/apt/sources.list.d/docker.list > /dev/null
Update package manager repositories and install Docker:
    sudo apt-get update
    sudo apt-get install -y docker-ce docker-ce-cli containerd.io docker-buildx-plugin docker-compose-plugin
Save this script in a file, for example, install_docker.sh, and make it executable using:
chmod +x install_docker.sh
Then, you can run the script using:
./install_docker.sh
Create Nexus using a Docker container:
To create a Docker container running Nexus 3 and exposing it on port 8081, use the following command:
docker run -d --name nexus -p 8081:8081 sonatype/nexus3:latest
This command does the following:
-d: Detaches the container and runs it in the background.--name nexus: Specifies the name of the container as "nexus".-p 8081:8081: Maps port 8081 on the host to port 8081 on the container, allowing access to Nexus through port 8081.sonatype/nexus3:latest: Specifies the Docker image to use for the container, in this case, the latest version of Nexus 3 from the Sonatype repository.
After running this command, Nexus will be accessible on your host machine at http://IP:8081.
Get Nexus initial password:
Your provided commands are correct for accessing the Nexus password stored in the container. Here's a breakdown of the steps:
Get Container ID: Find out the ID of the Nexus container by running:
docker psThis command lists all running containers along with their IDs, among other information.
Access Container's Bash Shell: Once you have the container ID, execute the
docker execcommand to access the container's bash shell:docker exec -it <container_ID> /bin/bashReplace
<container_ID>with the actual ID of the Nexus container.Navigate to Nexus Directory: Inside the container's bash shell, navigate to the directory where Nexus stores its configuration:
cd sonatype-work/nexus3View Admin Password: View the admin password by displaying the contents of the
admin.passwordfile:cat admin.passwordExit the Container Shell: Once you have retrieved the password, exit the container's bash shell:
exit
This process allows you to access the Nexus admin password stored within the container. Make sure to keep this password secure, as it grants administrative access to your Nexus instance.
Set Up SonarQube:
Execute these commands on the SonarQube VM:
#!/bin/bashpipeline { agent any
Update package manager repositories and install Docker:
    sudo apt-get update
    sudo apt-get install -y ca-certificates curl

    # Create directory for Docker GPG key
    sudo install -m 0755 -d /etc/apt/keyrings

    # Download Docker's GPG key
    sudo curl -fsSL https://download.docker.com/linux/ubuntu/gpg -o /etc/apt/keyrings/docker.asc

    # Ensure proper permissions for the key
    sudo chmod a+r /etc/apt/keyrings/docker.asc

    # Add Docker repository to Apt sources
    echo "deb [arch=$(dpkg --print-architecture) signed by=/etc/apt/keyrings/docker.asc] https://download.docker.com/linux/ubuntu $(. /etc/os-release && echo "$VERSION_CODENAME") stable" | sudo tee /etc/apt/sources.list.d/docker.list > /dev/null

    # Update package manager repositories
    sudo apt-get update
    sudo apt-get install -y docker-ce docker-ce-cli containerd.io docker-buildx-plugin docker-compose-plugin
Save this script in a file, for example, install_docker.sh, and make it executable using:
chmod +x install_docker.sh
Then, you can run the script using:
./install_docker.sh
Create SonarQube Docker container:
To run SonarQube in a Docker container, follow these steps:
Open your terminal or command prompt.
Run the following command:
docker run -d --name sonar -p 9000:9000 sonarqube:lts-communityThis command will download the
sonarqube:lts-communityDocker image from Docker Hub if it's not already available locally. It will create a container named "sonar" from this image, running it in detached mode (-dflag) and mapping port 9000 on the host machine to port 9000 in the container (-p 9000:9000flag).Access SonarQube by opening a web browser and navigating to
http://VmIP:9000. This will start the SonarQube server, and you should be able to access it using the provided URL. If you're running Docker on a remote server or a different port, replacelocalhostwith the appropriate hostname or IP address and adjust the port accordingly.
Segment 2: Private Git Setup
Steps to create a private Git repository, generate a personal access token, connect to the repository, and push code to it:
Create a Private Git Repository:
Go to your preferred Git hosting platform (e.g., GitHub, GitLab, Bitbucket).
Log in to your account or sign up if you don't have one.
Create a new repository and set it as private.
Generate a Personal Access Token:
Navigate to your account settings or profile settings.
Look for the "Developer settings" or "Personal access tokens" section.
Generate a new token, providing it with the necessary permissions (e.g., repo access).
Clone the Repository Locally:
Open Git Bash or your terminal.
Navigate to the directory where you want to clone the repository.
Use the
git clonecommand followed by the repository's URL. For example:git clone <repository_URL>
Replace <repository_URL> with the URL of your private repository.
Add Your Source Code Files:
Navigate into the cloned repository directory.
Paste your source code files or create new ones inside this directory.
Stage and Commit Changes:
Use the
git addcommand to stage the changes:git add .Use the
git commitcommand to commit the staged changes along with a meaningful message:git commit -m "Your commit message here"
Push Changes to the Repository:
Use the
git pushcommand to push your committed changes to the remote repository:git pushIf it's your first time pushing to this repository, you might need to specify the remote and branch:
git push -u origin master
Replace master with the branch name if you're pushing to a different branch.
Enter Personal Access Token as Authentication:
- When prompted for credentials during the push, enter your username (usually your email) and use your personal access token as the password.
By following these steps, you'll be able to create a private Git repository, connect to it using Git Bash, and push your code changes securely using a personal access token for authentication.
Segment 3: CI/CD
Install the following plugins in Jenkins:
Eclipse Temurin Installer:
This plugin enables Jenkins to automatically install and configure the Eclipse Temurin JDK (formerly known as AdoptOpenJDK).
To install, go to Jenkins dashboard -> Manage Jenkins -> Manage Plugins -> Available tab.
Search for "Eclipse Temurin Installer" and select it.
Click on the "Install without restart" button.
Pipeline Maven Integration:
This plugin provides Maven support for Jenkins Pipeline.
It allows you to use Maven commands directly within your Jenkins Pipeline scripts.
To install, follow the same steps as above, but search for "Pipeline Maven Integration" instead.
Config File Provider:
This plugin allows you to define configuration files (e.g., properties, XML, JSON) centrally in Jenkins.
These configurations can then be referenced and used by your Jenkins jobs.
Install it using the same procedure as mentioned earlier.
SonarQube Scanner:
SonarQube is a code quality and security analysis tool.
This plugin integrates Jenkins with SonarQube by providing a scanner that analyzes code during builds.
You can install it from the Jenkins plugin manager as described above.
Kubernetes CLI:
This plugin allows Jenkins to interact with Kubernetes clusters using the Kubernetes command-line tool (kubectl).
It's useful for tasks like deploying applications to Kubernetes from Jenkins jobs.
Install it through the plugin manager.
Kubernetes:
This plugin integrates Jenkins with Kubernetes by allowing Jenkins agents to run as pods within a Kubernetes cluster.
It provides dynamic scaling and resource optimization capabilities for Jenkins builds.
Install it from the Jenkins plugin manager.
Docker:
This plugin allows Jenkins to interact with Docker, enabling Docker builds and integration with Docker registries.
You can use it to build Docker images, run Docker containers, and push/pull images from Docker registries.
Install it from the plugin manager.
Docker Pipeline Step:
This plugin extends Jenkins Pipeline with steps to build, publish, and run Docker containers as part of your Pipeline scripts.
It provides a convenient way to manage Docker containers directly from Jenkins Pipelines.
Install it through the plugin manager like the others.
After installing these plugins, you may need to configure them according to your specific environment and requirements. This typically involves setting up credentials, configuring paths, and specifying options in Jenkins global configuration or individual job configurations. Each plugin usually comes with its own set of documentation to guide you through the configuration process.
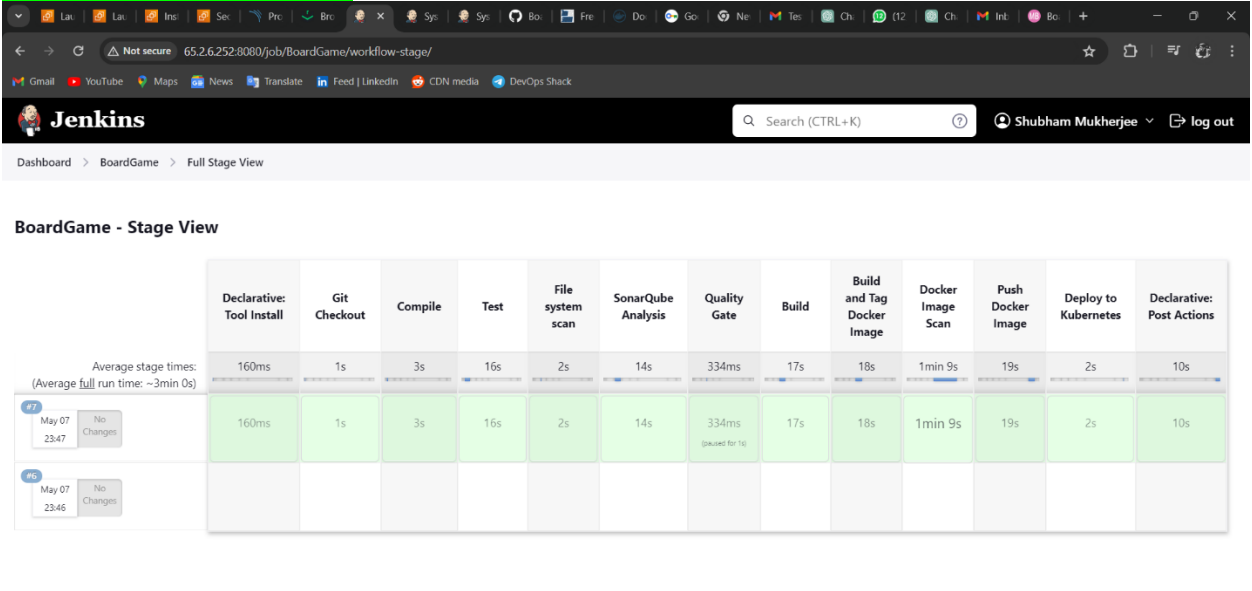
Jenkins Pipeline
Create a new Pipeline job.
pipeline {
    environment {
        SCANNER_HOME = tool 'sonar-scanner'
    }
    tools {
        jdk 'jdk17'
        maven 'maven3'
    }
    stages {
        stage('Git Checkout') {
            steps {
                git branch: 'main', credentialsId: 'git-cred', url: 'https://github.com/jaiswaladi246/Boardgame.git'
            }
        }
        stage('Compile') {
            steps {
                sh "mvn compile"
            }
        }
        stage('Test') {
            steps {
                sh "mvn test"
            }
        }
        stage('Trivy File system scan') {
            steps {
                sh "trivy fs --format table -o trivy-fs-report.html ."
            }
        }
        stage('SonarQube Analysis') {
            steps {
                withSonarQubeEnv('sonar') {
                    sh '''
                    $SCANNER_HOME/bin/sonar-scanner -Dsonar.projectName=BoardGame -Dsonar.projectKey=BoardGame -Dsonar.java.binaries=.
                    '''
                }
            }
        }
        stage('Quality Gate') {
            steps {
                script {
                    waitForQualityGate abortPipeline: false, credentialsId: 'sonar-token'
                }
            }
        }
        stage('Build') {
            steps {
                sh "mvn package"
            }
        }
        stage('Publish Artifacts to Nexus') {
            steps {
                withMaven(globalMavenSettingsConfig: 'global-settings', jdk: 'jdk17', maven: 'maven3', mavenSettingsConfig: '', traceability: true) {
                    sh "mvn deploy"
                }
            }
        }
        stage('Build and Tag Docker Image') {
            steps {
                script {
                    withDockerRegistry(credentialsId: 'docker-cred', toolName: 'docker') {
                        sh "docker build -t jaiswaladi246/Boardgame:latest ."
                    }
                }
            }
        }
        stage('Docker Image Scan') {
            steps {
                script {
                    withDockerRegistry(credentialsId: 'docker-cred', toolName: 'docker') {
                        sh "trivy image --format table -o trivy-image-report.html jaiswaladi246/Boardgame:latest"
                    }
                }
            }
        }
        stage('Push Docker Image') {
            steps {
                script {
                    withDockerRegistry(credentialsId: 'docker-cred', toolName: 'docker') {
                        sh "docker push jaiswaladi246/Boardgame:latest"
                    }
                }
            }
        }
        stage('Deploy to Kubernetes') {
            steps {
                withKubeConfig(caCertificate: '', clusterName: 'kubernetes', contextName: '', credentialsId: 'k8-cred', namespace: 'webapps', restrictKubeConfigAccess: false, serverUrl: 'https://172.31.8.22:6443') {
                    sh "kubectl apply -f deployment-service.yaml"
                    sh "kubectl get pods -n webapps"
                }
            }
        }
    }
    post {
        always {
            script {
                def jobName = env.JOB_NAME
                def buildNumber = env.BUILD_NUMBER
                def pipelineStatus = currentBuild.result ?: 'UNKNOWN'
                def bannerColor = pipelineStatus.toUpperCase() == 'SUCCESS' ? 'green' : 'red'
                def body = """
                ${jobName} - Build ${buildNumber}
                Pipeline Status: ${pipelineStatus.toUpperCase()}
                Check the console output.
                """
                emailext(
                    subject: "${jobName} - Build ${buildNumber} - ${pipelineStatus.toUpperCase()}",
                    body: body,
                    to: 'jaiswaladi246@gmail.com',
                    from: 'jenkins@example.com',
                    replyTo: 'jenkins@example.com',
                    mimeType: 'text/html',
                    attachmentsPattern: 'trivy-image-report.html'
                )
            }
        }
    }
}
Segment 4: Monitoring
Prometheus
Links to download Prometheus, Node Exporter, and Blackbox Exporter: https://prometheus.io/download/
Extract and Run Prometheus:
After downloading Prometheus, extract the
.tarfile.Navigate to the extracted directory and run
./prometheus &.By default, Prometheus runs on port 9090. Access it using
http://<instance_IP>:9090.
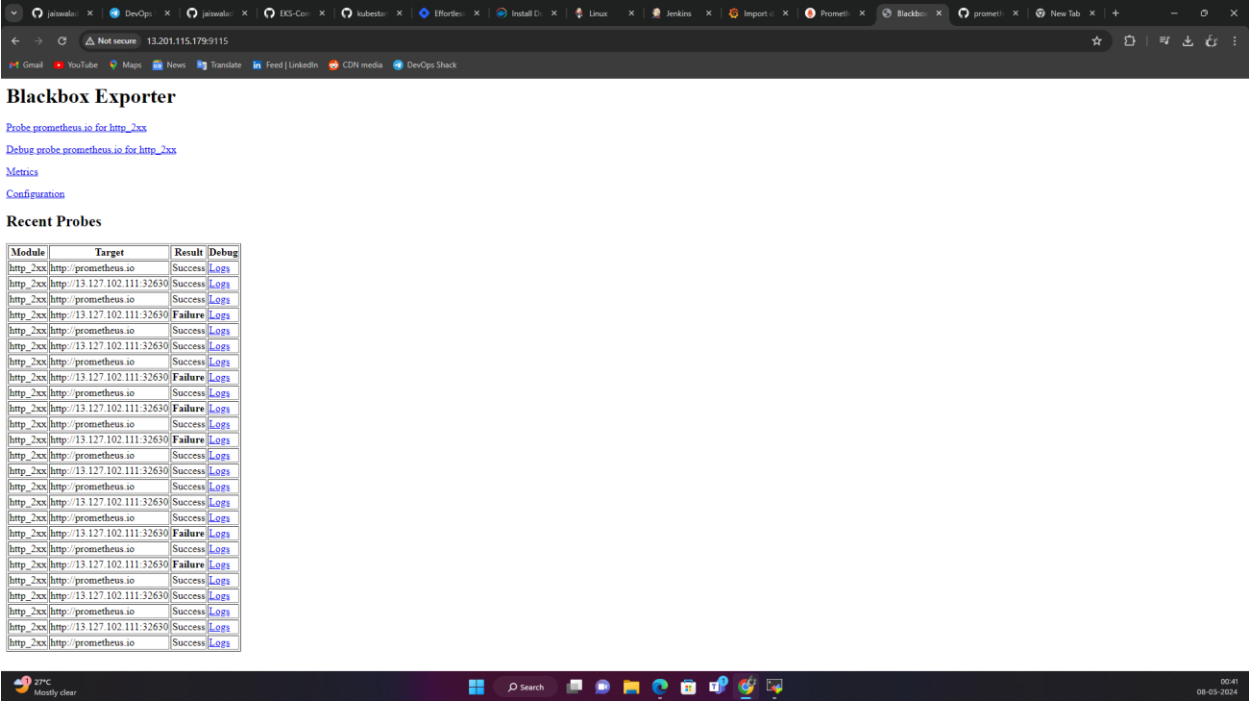
Similarly, download and run Blackbox Exporter:
- Run
./blackbox_exporter &.
- Run
Grafana
Links to download Grafana: https://grafana.com/grafana/download
Alternatively, run this code on the Monitoring VM to install Grafana:
  sudo apt-get install -y adduser libfontconfig1 musl
  wget https://dl.grafana.com/enterprise/release/grafana-enterprise_10.4.2_amd64.deb
  sudo dpkg -i grafana-enterprise_10.4.2_amd64.deb
Once installed, run:
sudo /bin/systemctl start grafana-serverBy default, Grafana runs on port 3000. Access it using
http://<instance_IP>:3000.
Configure Prometheus
Edit the
prometheus.yamlfile:scrape_configs: - job_name: 'blackbox' metrics_path: /probe params: module: [http_2xx] # Look for an HTTP 200 response. static_configs: - targets: - http://prometheus.io # Target to probe with HTTP. - https://prometheus.io # Target to probe with HTTPS. - http://example.com:8080 # Target to probe with HTTP on port 8080. relabel_configs: - source_labels: [__address__] target_label: __param_target - source_labels: [__param_target] target_label: instance - target_label: __address__ replacement: <instance_IP>:9115Replace
<instance_IP>with your instance IP address.Restart Prometheus:
pgrep prometheusUse the ID obtained to kill the process and restart it.
Add Prometheus as a Data Source in Grafana
Go to Grafana > Data Sources > Prometheus.
Add the IP address of Prometheus and import the dashboard from the web.
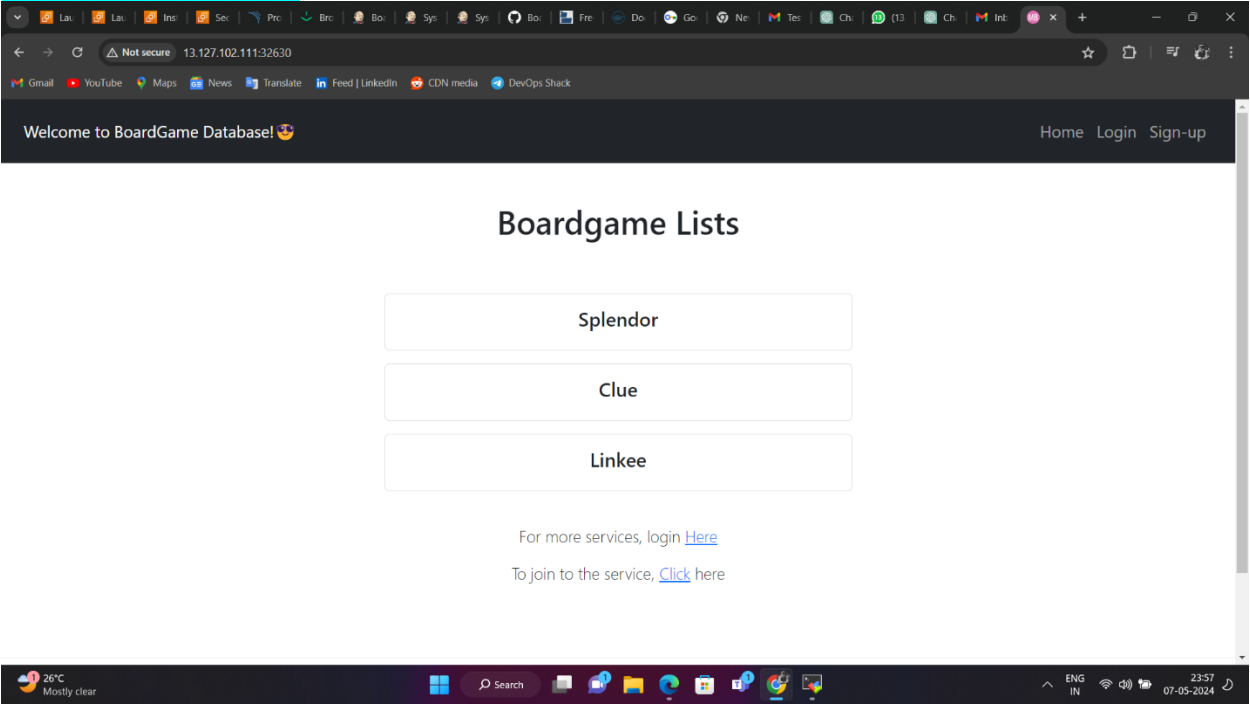
Results:
JENKINS PIPELINE:
PROMETHEUS:

BLACKBOX:
GRAFANA:

APPLICATION:
Conclusion
The successful implementation of the DevOps CI/CD pipeline project marks a significant milestone in enhancing the efficiency, reliability, and quality of software delivery processes. By automating key aspects of the software development lifecycle, including compilation, testing, deployment, and monitoring, the project has enabled rapid and consistent delivery of software releases, contributing to improved time-to-market and customer satisfaction.
Acknowledgment of Contributions
I want to express my gratitude to DevOps Shack for their excellent project and implementation guide.
Final Thoughts
Looking ahead, the project's impact extends beyond its immediate benefits, paving the way for continuous improvement and innovation in software development practices. By embracing DevOps principles and leveraging cutting-edge tools and technologies, we have laid a solid foundation for future projects to build upon. The scalability, flexibility, and resilience of the CI/CD pipeline ensure its adaptability to evolving requirements and technological advancements, positioning our organization for long-term success in a competitive market landscape.
References
Jenkins Documentation: https://www.jenkins.io/doc/
Maven Documentation: https://maven.apache.org/guides/index.html
SonarQube Documentation: https://docs.sonarqube.org/latest/
Trivy Documentation: https://github.com/aquasecurity/trivy
Nexus Repository Manager Documentation: https://help.sonatype.com/repomanager3
Docker Documentation: https://docs.docker.com/
Kubernetes Documentation: https://kubernetes.io/docs/
Prometheus Documentation: https://prometheus.io/docs/
Grafana Documentation: https://grafana.com/docs/
These resources provided valuable insights, guidance, and support throughout the project lifecycle, enabling us to achieve our goals effectively.
🛠️ Author & Community
This project is crafted by Harshhaa 💡.
I’d love to hear your feedback! Feel free to share your thoughts.
📧 Connect with me:
![]()
📢 Stay Connected

Subscribe to my newsletter
Read articles from ProDevOpsGuy Tech Community directly inside your inbox. Subscribe to the newsletter, and don't miss out.
Written by
ProDevOpsGuy Tech Community
ProDevOpsGuy Tech Community
𝑪𝒍𝒐𝒖𝒅 𝒂𝒏𝒅 𝑫𝒆𝒗𝑶𝒑𝒔 𝑻𝒆𝒄𝒉 𝑪𝒐𝒎𝒎𝒖𝒏𝒊𝒕𝒚 || 𝑷𝒓𝒐𝑫𝒆𝒗𝑶𝒑𝒔𝑮𝒖𝒚 🤖 https://t.me/prodevopsguy 👋 Hi there! We are ProDevOpsGuy, a passionate DevOps enthusiast Tech Community with a strong belief in the power of automation and collaboration to drive innovation. 🚀 I thrive in bridging the gap between development and operations, creating seamless and efficient software delivery pipelines. My journey in the world of DevOps has allowed me to blend my technical skills with a knack for problem-solving, enabling me to contribute effectively to agile and dynamic environments. 💡 With a keen interest in continuous integration, continuous delivery (CI/CD), containerization, and orchestration, I've had the privilege to explore cutting-edge technologies like Docker, Kubernetes, Jenkins, and Ansible. I find joy in designing scalable and resilient infrastructures that enable teams to deploy applications faster and with greater confidence. 🌐 Beyond the tech realm, I'm an advocate for DevOps culture, emphasizing collaboration, communication, and a relentless pursuit of improvement. I'm always eager to connect with fellow professionals, exchange insights, and explore opportunities to collaborate on exciting projects. 📚 When I'm not tinkering with the latest DevOps tools, you can find me indulging in books on technology trends, hiking to rejuvenate, and occasionally experimenting with new coding challenges. 🌟 Let's connect! Whether you're looking to discuss DevOps methodologies, explore partnership opportunities, or simply share experiences, feel free to reach out. I'm excited to be part of the DevOps journey, driving excellence together.