Replacing Google Forms with CloudFlare Pages & Apps Script
 GreenFlux
Google Forms is the most obvious choice when you need a simple public form to collect information into a spreadsheet. You can share a link to the form, or embed the form directly in your website. The Google branding will be displayed though, which is not ideal when embedding on a business website. There are other form solutions, but they also tend to include branding on the free plan.
So what do you do if you want a free solution, with no intrusive branding? Or you want to add your own custom branding? It’s actually pretty easy to set up for free using Google Apps Scripts and CloudFlare Pages. You could also use GitHub Pages, or any other free hosting for simple web apps, but I went with CloudFlare Pages because you can connect a domain for free. And it’s the registrar that I use for all my domains, so this makes it easy to deploy sites for free and connect my domain all from the same platform.
This guide will cover:
Saving data to Google Sheets from Apps Script
Publishing a Google Apps Script as a web app
Building a simple web form with HTML
Deploying the form with CloudFlare Pages
Let’s get started!
Saving data to Google Sheets from Apps Script
We’ll be creating a new web form to replace Google Forms, but we still need a way to save that data to Google Sheets. Google Apps Scripts works great for simple automations like this in your Google Workspace.
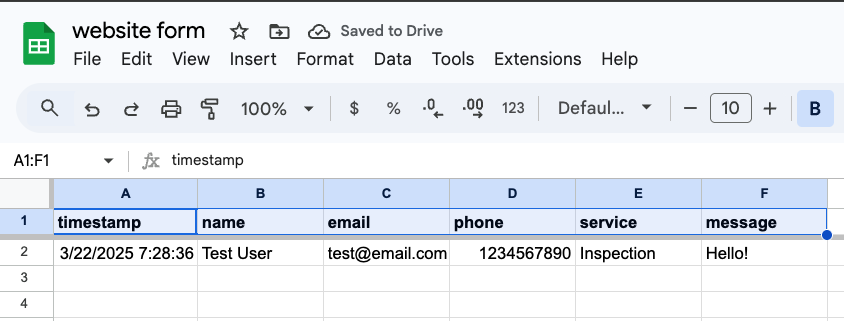
Start out by creating a new spreadsheet, and add columns for your form. Or you can build on top of an existing spreadsheet that’s already connected to a form.
timestamp | name | phone | service | message |
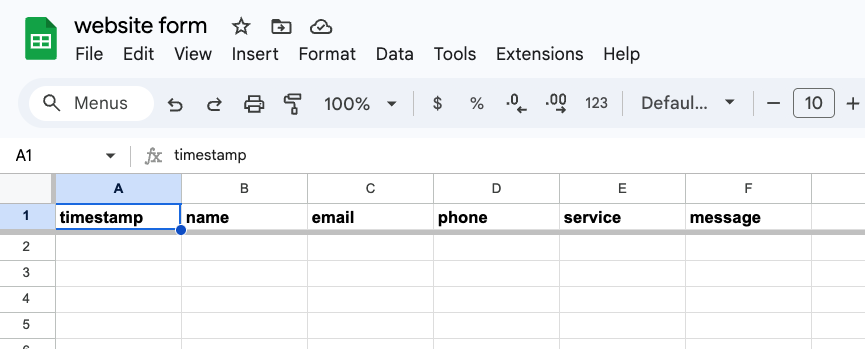
Then go to Extensions > Apps Script and paste in the following code:
function doPost(e) {
  const sheet = SpreadsheetApp.getActiveSpreadsheet().getSheetByName("Sheet1");

  const fields = ["name", "email", "phone", "service", "message"];

  const row = [
    new Date(),
    ...fields.map(field => e.parameter[field] || "")
  ];

  sheet.appendRow(row);

  return ContentService
          .createTextOutput()
          .setMimeType(ContentService.MimeType.JSON);
}
This extracts data from the doPost() event’s parameters, and saves it as a new row to the sheet. To keep the script simple, I’m assuming the order of fields array matches the destination sheet. But you could match up the names dynamically with a little more JavaScript.
Click Save, then run the doPost function. On the first run, you’ll be prompted to approve the permissions for the script to edit your Google Sheet. Approve the permissions, and the script should run. However, there’s no form data being sent in, so the script will fail. Ignore the error for now. It should work fine when triggered by a form submission.
Publishing a Google Apps Script as a web app
Next, click Deploy > New Deployment. Then set the type to Web app and enter a description. Set the Who has access field to Anyone. Then click Deploy.
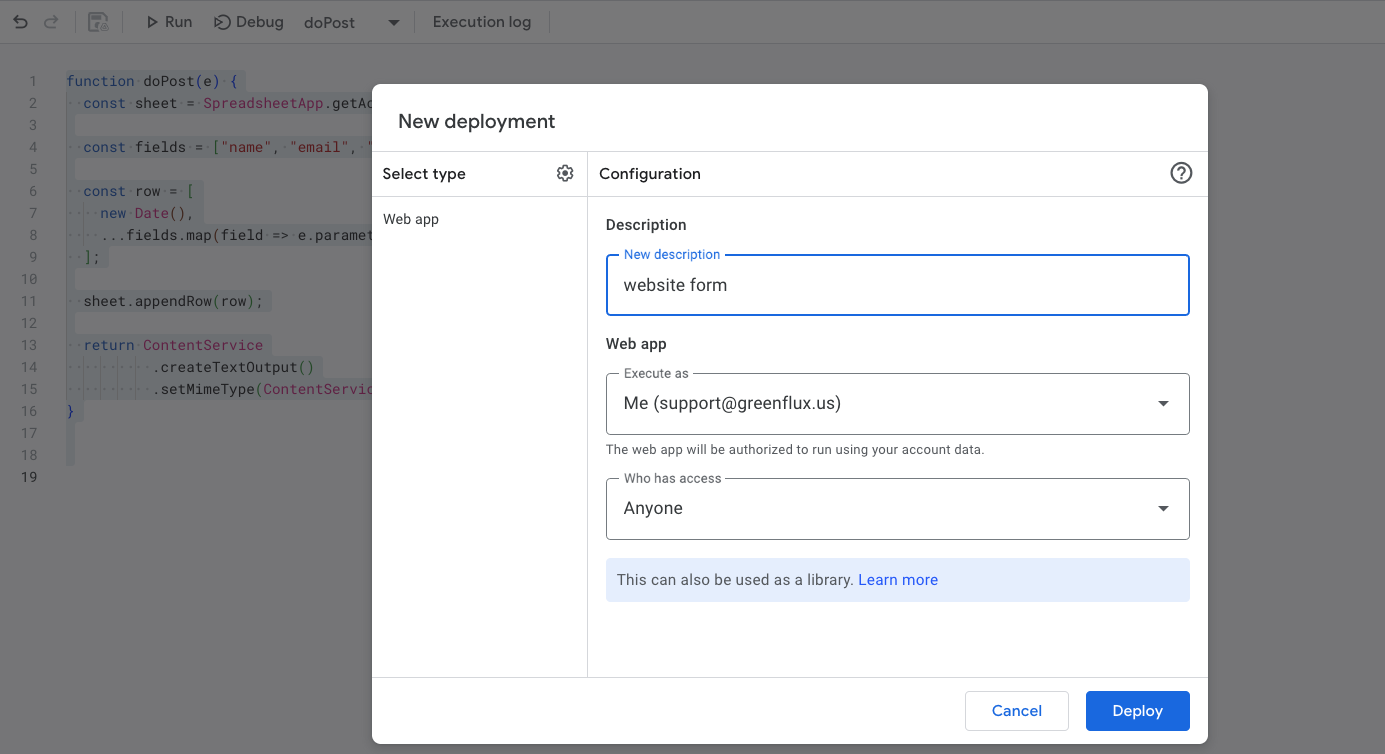
The next screen should provide the web app URL. Leave this open so we can copy it in the next section.
Building a simple web form with HTML
Next, create a ‘website’ folder on your local machine, and add an index.html file, using your favorite text editor.
Set the contents to:
<!DOCTYPE html>
<html lang="en">
<head>
  <meta charset="UTF-8">
  <title>Contact Us</title>
  <style>
    body { font-family: Arial, sans-serif; padding: 20px; }
    form { max-width: 600px; margin: auto; }
    input, select, textarea { width: 100%; padding: 8px; margin-bottom: 10px; box-sizing: border-box; }
    button { padding: 10px 20px; }
    .message { margin-top: 20px; font-weight: bold; }
  </style>
</head>
<body>
  <form id="contactForm">
    <h2>Contact Us</h2>
    <input type="text" name="name" placeholder="Name" required>
    <input type="email" name="email" placeholder="Email" required>
    <input type="tel" name="phone" placeholder="Phone" required>
    <select name="service" required>
      <option value="" disabled selected>Select Service</option>
      <option value="Inspection">Inspection</option>
      <option value="Repair">Repair</option>
      <option value="New Construction">New Construction</option>
      <option value="Other">Other</option>
    </select>
    <textarea name="message" placeholder="Message" required></textarea>
    <button type="submit">Send</button>
    <div id="responseMessage" class="message"></div>
  </form>
</body>
</html>
This creates a simple contact form with a dropdown to select a service.
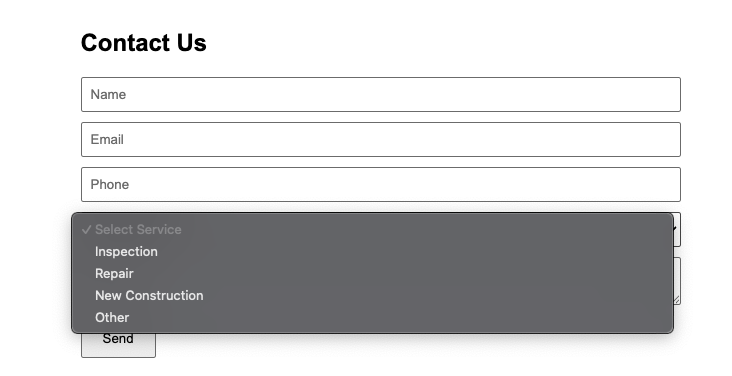
Update the fields as needed for your use case. Just make sure to update the script in the HTML to send the right field names that match your spreadsheet column names.
Then add this script right before the closing body tag:
  <script>
    document.getElementById("contactForm").addEventListener("submit", function(e) {
      e.preventDefault();
      const form = e.target;

      // Build URL-encoded form data
      const data = new URLSearchParams();
      data.append("name", form.name.value);
      data.append("email", form.email.value);
      data.append("phone", form.phone.value);
      data.append("service", form.service.value);
      data.append("message", form.message.value);

      // Send POST request with URL-encoded data
      fetch(SCRIPT_URL, {
        method: "POST",
        body: data
      })
      .then(response => {
        if (response.ok) {
          document.getElementById("responseMessage").textContent = "Thank you! Your message has been sent.";
          form.reset();
        } else {
          throw new Error("Network response was not ok.");
        }
      })
      .catch(error => {
        document.getElementById("responseMessage").textContent = "Error: Your message could not be sent.";
      });
    });
  </script>
Replace SCRIPT_URL with the web app URL from the last step. Then save the HTML file.
This script extracts the form data and constructs a set of URL encoded key/value pairs, then sends an HTTP POST request to the Google Apps Script web app with the form data.
You can open the file locally in the browser and test it out if you want. It should save a new row to the sheet. But the form isn’t available on the web yet, so let’s get it published, then test it out from the web.
Deploying the form with CloudFlare Pages
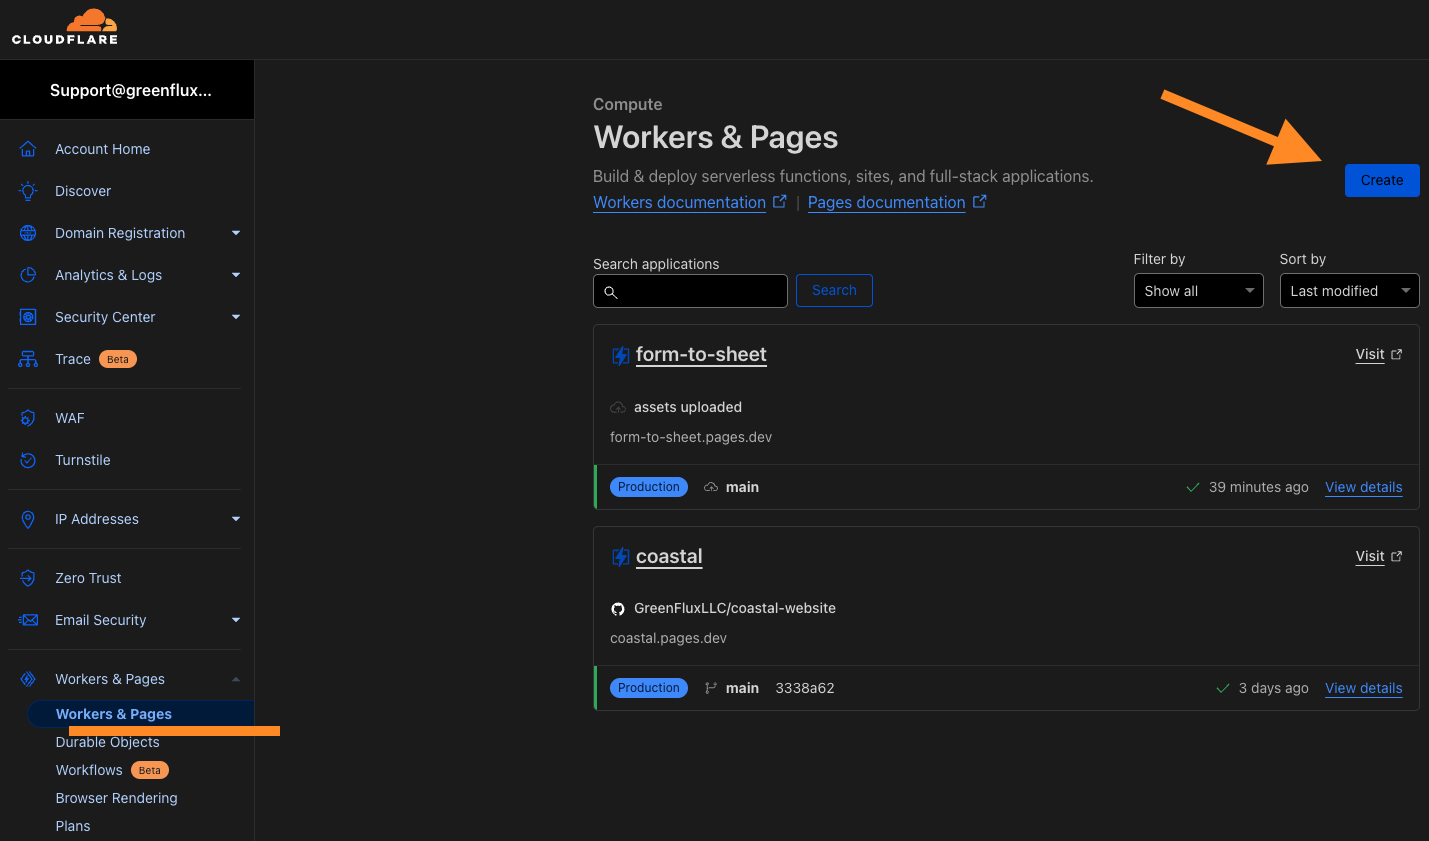
Now go to your CloudFlare dashboard, and open the Workers & Pages section. Click Create, then select Pages.
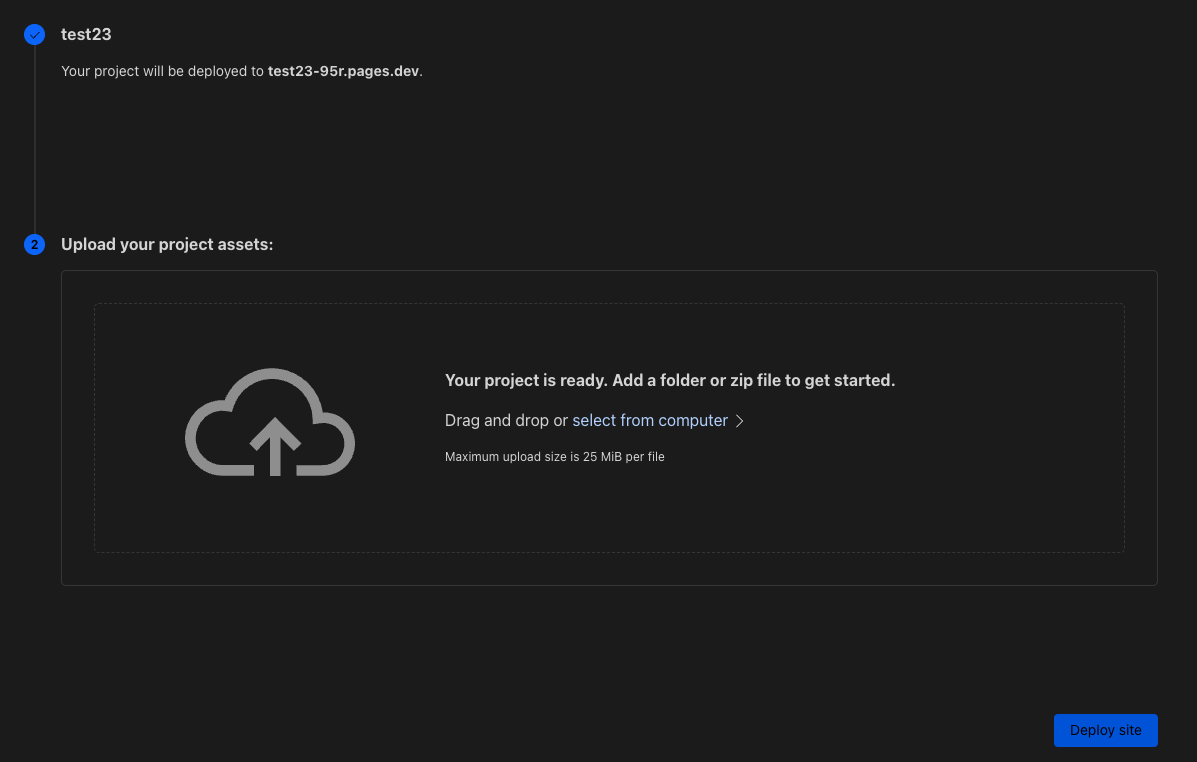
On the next screen, click Upload Assets. Give the project a name, and select your website folder to upload. Then click Deploy site!
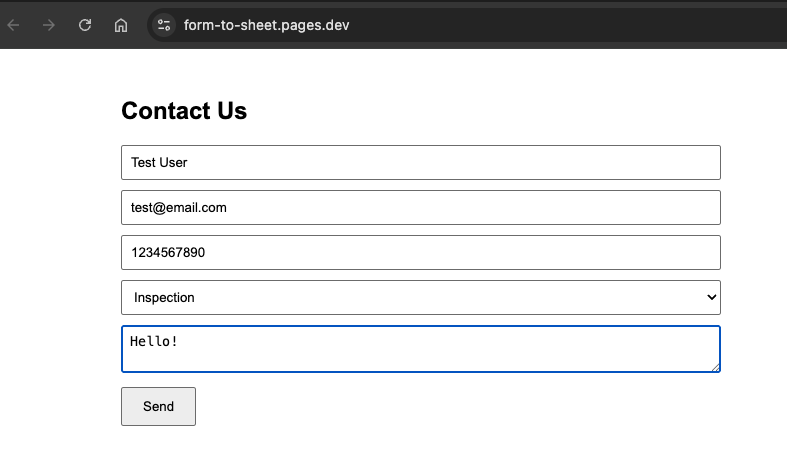
Now test it out! The next screen should show your new project URL for CloudFlare Pages. Submit a test form and check the spreadsheet for a response.
Deploy With GitHub
You can also create a GitHub repo for the website folder, then connect CloudFlare Pages to the repo to auto-deploy your site when the repo is updated. If you decide to use a UI framework that requires a build-step, you can configure CloudFlare Pages to run a specific build and deploy command for you. This way you can develop the site locally, push changes to GitHub, and CloudFlare will rebuild the site and update the live deployed version automatically.
Conclusion
CloudFlare Pages is a great options for hosting custom web applications for free, and it can easily be combined with Google Apps Script to replace Google Forms. This allow you to create public forms that save data to Google Sheets, without the Google branding being shown in your form. You can also include your own branding on the form and connect a domain for free, or embed the form in your own website.
Subscribe to my newsletter
Read articles from GreenFlux directly inside your inbox. Subscribe to the newsletter, and don't miss out.
Written by

GreenFlux
GreenFlux
NO LONGER ON HASHNODE: Follow at: https://news.greenflux.us/ Nuclear Plant Operator (US Navy), Turned Freelancer, Turned Developer Advocate. Head of Developer Relations @ Appsmith, Inc Founder/ Freelancer @ GreenFlux, LLC GREENFLUX, LLC WE'VE GOT YOUR APP COVERED. Veteran Owned & Operated Since 2016 - Tallahassee, FL