Model Context Protocol (MCP): A Beginner’s Guide to the Future of AI Communication
 अभिषेक
If you’ve been keeping up with the latest in AI, you’ve probably heard about the Model Context Protocol (MCP). It’s been making waves since its announcement in November 2024 by Anthropic, and for good reason. But what exactly is MCP, and why is it such a big deal? In this guide, we’ll break it down for you, explore its goals, and even walk through how to set up an MCP server using Python.
What is Model Context Protocol (MCP)?
At its core, MCP is a standardized protocol designed to streamline communication between AI models and external systems. Think of it as a universal language that allows different AI agents, tools, and services to interact seamlessly.
Why Do We Need MCP?
If you’re a developer, you’ve likely worked with tools like OpenAI’s Function Calling or built custom integrations for AI agents. While these solutions work, they’re often platform-specific and lack a common standard. This fragmentation is reminiscent of the early days of networking, where companies like IBM and DEC had their own proprietary protocols (SNA, DECnet, etc.) before TCP/IP emerged as the universal standard.
MCP aims to do for AI communication what TCP/IP did for the internet: create a single, unified protocol that everyone can adopt. This means less time spent on custom integrations and more time building innovative AI applications.

Key Goals of MCP
Standardization: Provide a common framework for AI-to-Data-Source or AI-to-tool communication.
Interoperability: Enable different AI models and systems to work together seamlessly.
Scalability: Support complex workflows involving multiple agents and tools.
Ease of Use: Simplify the process of integrating AI capabilities into applications.
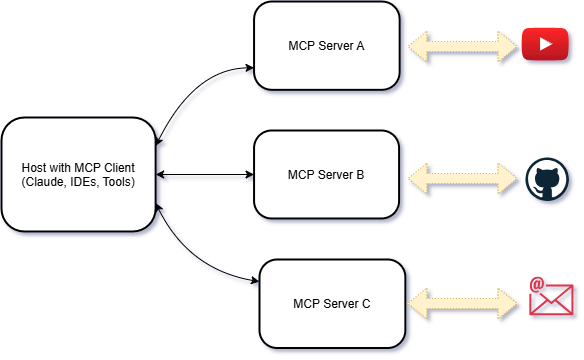
MCP follows a client-server architecture:
MCP Hosts: Applications like Claude Desktop or IDEs that want to access data through MCP.
MCP Clients: Protocol clients that maintain 1:1 connections with servers.
MCP Servers: Lightweight programs that expose specific capabilities (like email validation) through the standardized Model Context Protocol.
Local Data Sources: Your computer’s files, databases, and services that MCP servers can securely access.
Remote Services: External systems (e.g., APIs) that MCP servers can connect to.

MCP servers can provide three main types of capabilities:
Resources: File-like data that can be read by clients (e.g., API responses).
Tools: Functions that can be called by the LLM (with user approval).
Prompts: Pre-written templates that help users accomplish specific tasks.
Let’s Learn by Building an MCP Server for Email Validation

What We’re Building ✨
We’ll create an MCP server that allows your LLM to verify if an email address is valid. This server will:
Use the AbstractAPI Email Validation API to check email validity.
Expose a tool that the LLM can call to validate emails.
Integrate seamlessly with Claude Desktop.
Step 1: Setting Up the Project
System Requirements
Python 3.10 or higher.
Python MCP SDK 1.2.0 or higher.
Install UV
UV is a faster alternative to pip for managing Python dependencies. Install it using PowerShell:
powershell -ExecutionPolicy ByPass -c "irm https://astral.sh/uv/install.ps1 | iex"
Create the Project
Create a new directory for your project:
 uv init verify_mail
 cd verify_mail
Create a virtual environment and activate it:
 uv venv
 .venv\Scripts\activate
Install dependencies:
uv add mcp[cli] dotenv requestsCreate the server file:
new-item server.py
Step 2: Writing the MCP Server
Creating an MCP server is incredibly simple. All you need to do is:
Step 2.1 : Initialize the MCP Server
Start by importing the FastMCP class and initializing your server with a name.
from mcp.server.fastmcp import FastMCP

# Initialize FastMCP server
mcp = FastMCP("verify_email")
Step 2.2 : Create a Tool Function
Next, define a function that contains the logic for your tool. This function will be invoked by the LLM to perform the desired task (e.g., validating an email address).
To expose the function as an MCP tool, decorate it with @mcp.tool().
Key Features of the Tool Function
Type Hints: Use Python type hints to specify the input and output types.
Docstrings: Write a clear docstring to describe the tool’s purpose, inputs, and outputs. The FastMCP class uses this information to automatically generate tool definitions.
Here’s an example of a tool function for email validation:
@mcp.tool()
async def verify_email(email: str) -> dict[str, Any]:
    """
    Validates an email address using the AbstractAPI Email Validation API.

    Args:
        email (str): The email address to validate.

    Returns:
        dict[str, Any]: A dictionary containing detailed validation results, including:
            - "email": The email address being validated.
            - "is_valid_format": Whether the email is in a valid format.
            - "is_mx_found": Whether MX records are found for the email domain.
            - "is_smtp_valid": Whether the SMTP server for the email domain is valid.
            - "deliverability": The deliverability status of the email (e.g., "DELIVERABLE").
            - "quality_score": A score representing the quality of the email address.
    """
    # Tool logic goes here
    pass

if __name__ == "__main__":
    # Initialize and run the server
    mcp.run(transport='stdio')
Step 3: Testing the Server with Claude Desktop
Now that you’ve created your MCP server, you can:
Run the Server: Start the server using UV:
uv run .\server.pyIntegrate with an LLM: Register the server with an MCP-compatible application like Claude Desktop.
Update Claude Desktop Configuration
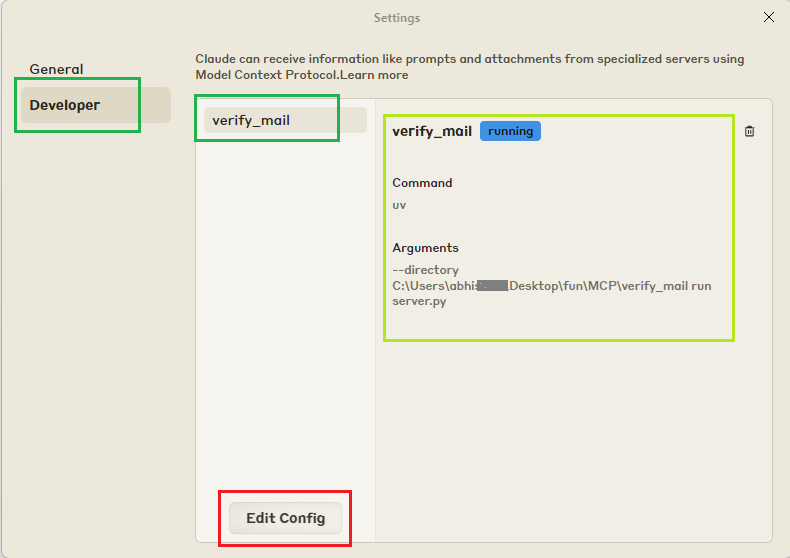
To register your new tool with Claude Desktop, update the
claude_desktop_config.jsonfile:Open the file in your preferred editor:
code $env:AppData\Claude\claude_desktop_config.jsonAdd your tool’s configuration:
 {
     "mcpServers": {
         "verify_mail": {
             "command": "uv",
             "args": [
                 "--directory",
                 "C:\\ABSOLUTE\\PATH\\TO\\verify_mail",
                 "run",
                 "server.py"
             ]
         }
     }
 }
Hint 💡
Make sure UV is installed globally. If it’s not, you’ll need to pass the complete path to the UV executable.Additionally, ensure the claude_desktop_config.json file exists. If it doesn’t, create it in the appropriate directory. Restart Claude Desktop
Test the Tool: Prompt the LLM to validate an email address and see the results.
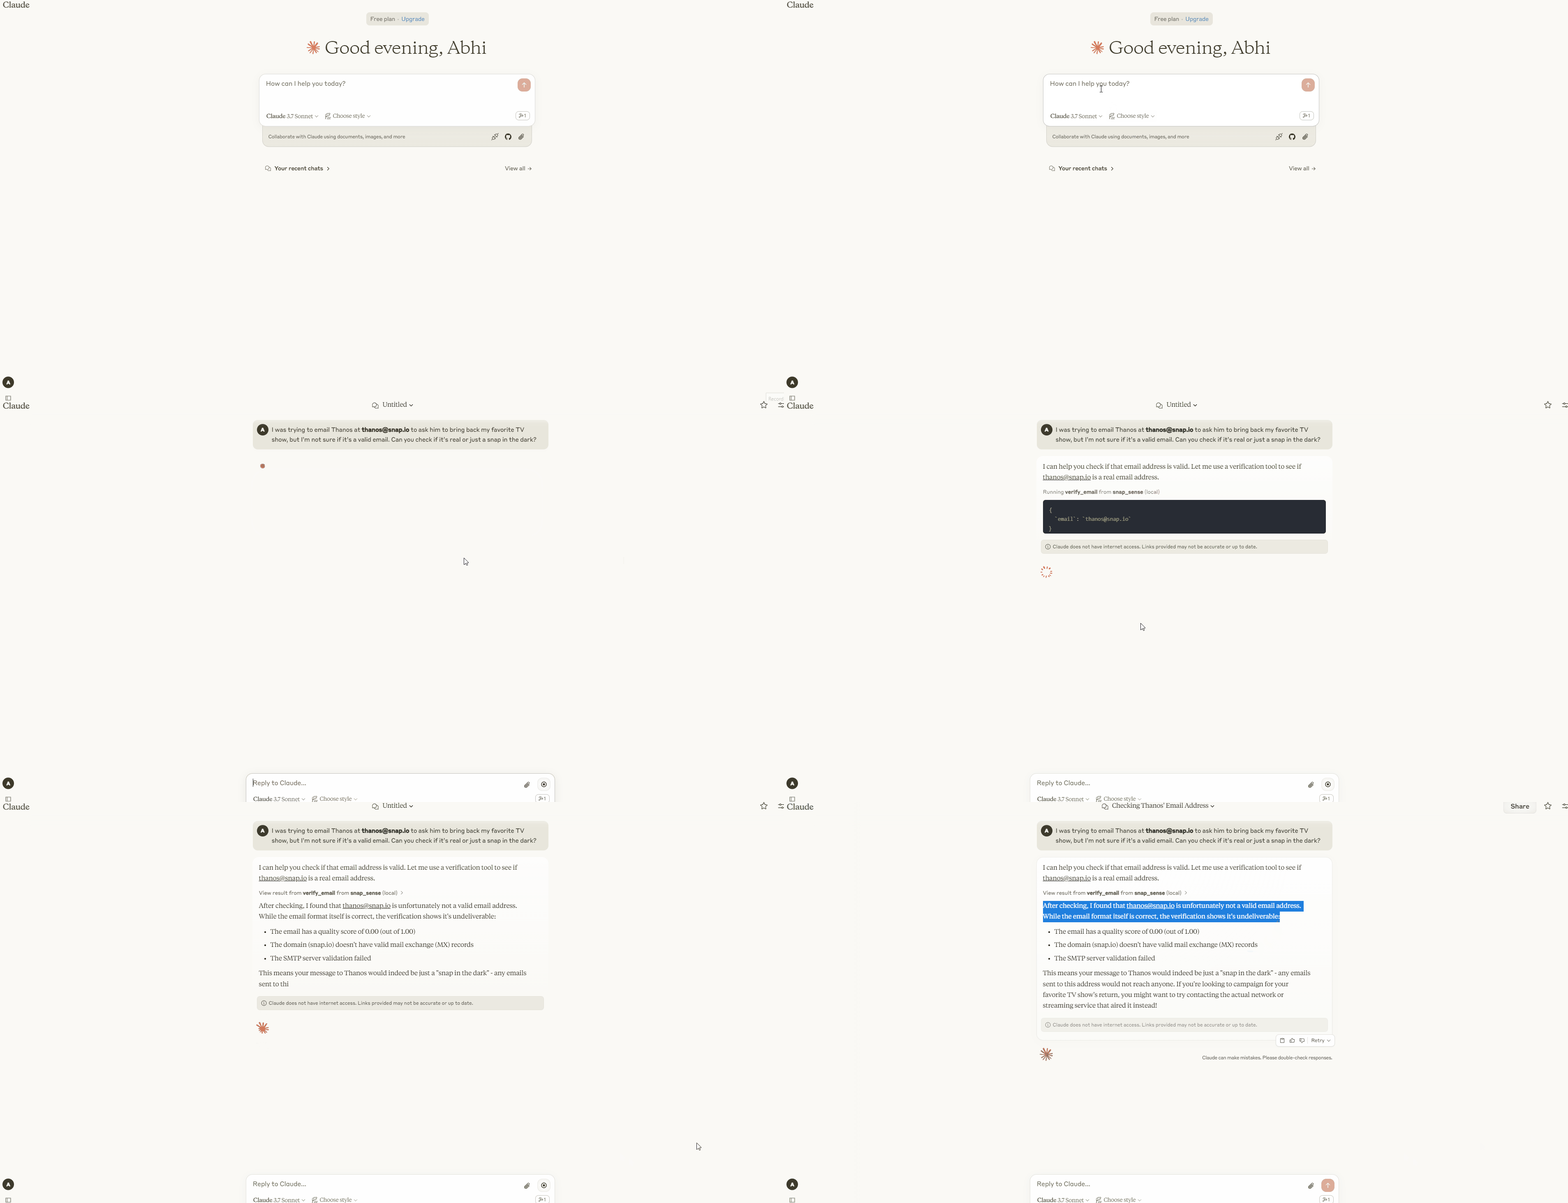
Once the tool is registered, you can prompt Claude to validate an email address:
- Example Prompt:
"I was trying to email Thanos at thanos@snap.io to ask him to bring back my favorite TV show, but I’m not sure if it’s a valid email. Can you check if it’s real or just a snap in the dark?"
- Example Prompt:
Claude will call the verify_email tool and return the validation results.

Congratulations 🎉
You’ve successfully built an MCP server that integrates seamlessly with Claude Desktop to validate email addresses.
Now you’re officially up to date with the AI hype 😸
Go ahead and flex those developer muscles 😁 your LLM is now smarter, cooler, and ready to tackle the world, one email at a time. 💪✨

You can find the complete code for this project on GitHub.
Subscribe to my newsletter
Read articles from अभिषेक directly inside your inbox. Subscribe to the newsletter, and don't miss out.
Written by

अभिषेक
अभिषेक
💻 Software engineer by profession, builder by passion. Crafting tools that solve real-world problems.