Unleashing the Power of Cursor's YOLO Mode: A Frontend Engineer's Guide
 Neelesh Roy
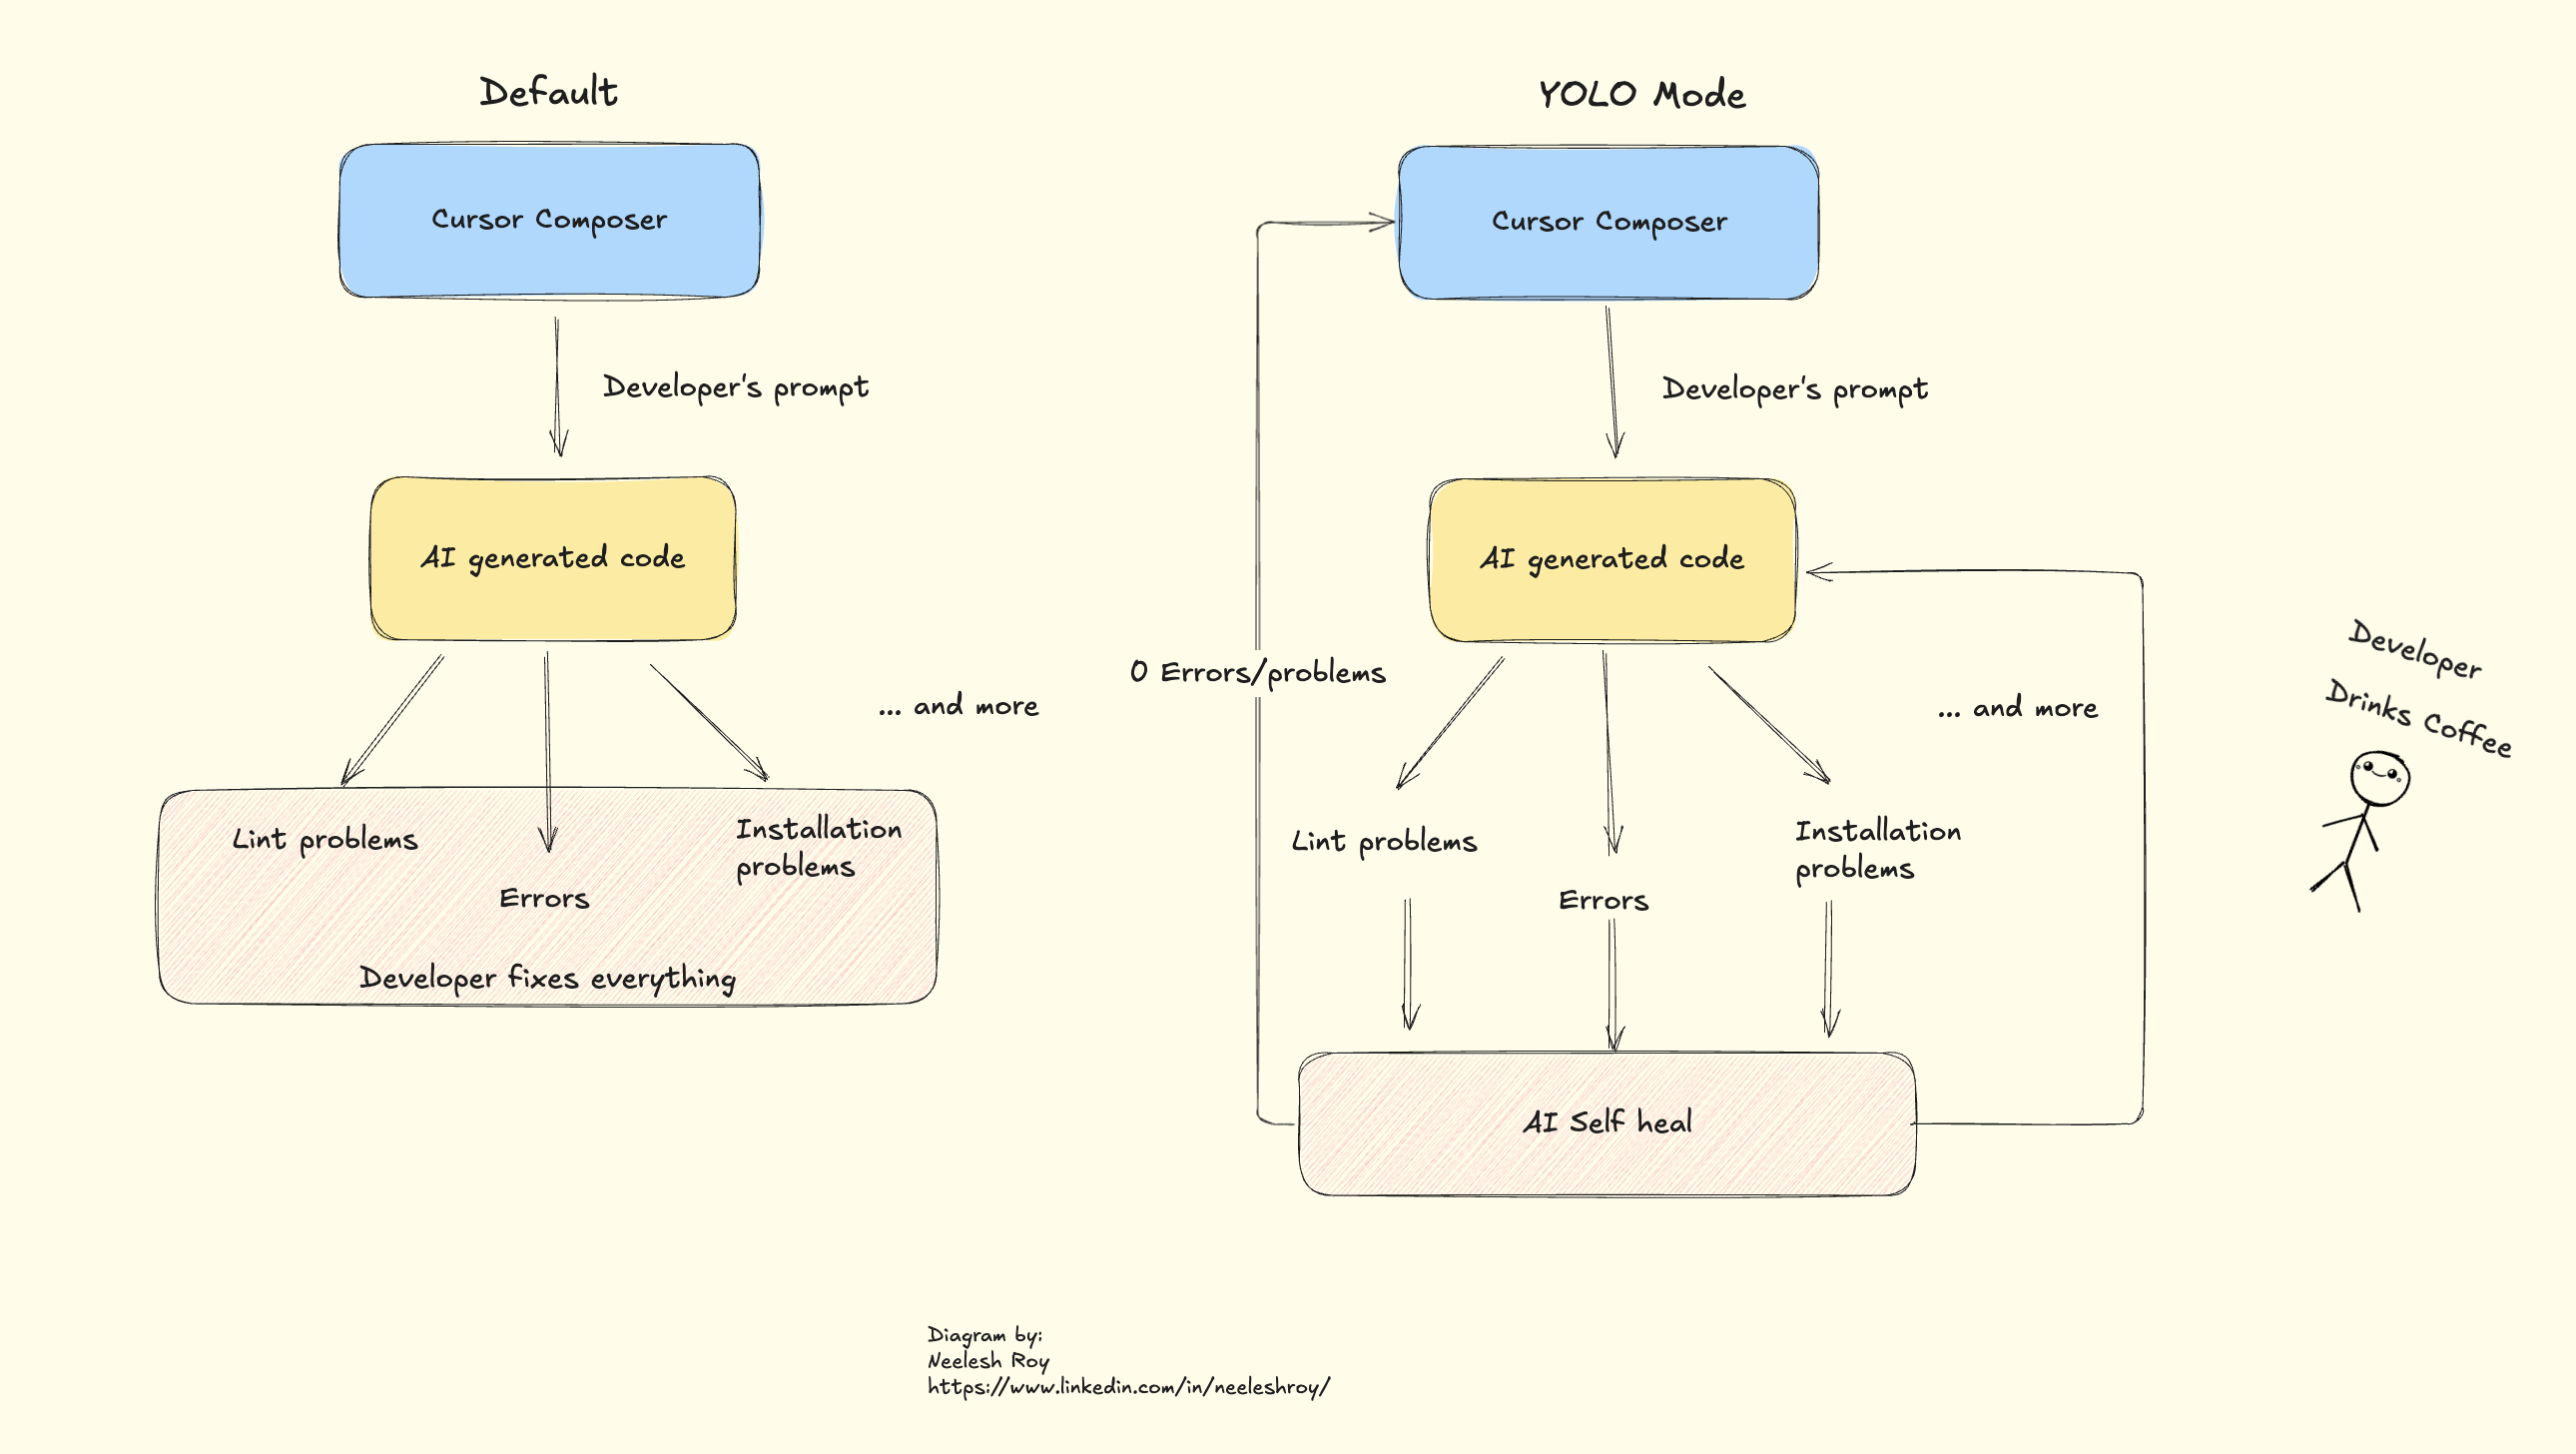
Cursor, an AI-powered code editor, introduces a groundbreaking feature known as YOLO Mode—"You Only Look Once"—designed to revolutionize the coding experience by allowing AI to autonomously generate, execute, and debug code. This article delves into setting up YOLO Mode and explores its vast potential for frontend engineers.
Setting Up YOLO Mode in Cursor: A Step-by-Step Guide
1. Install Cursor
- Download and Install: Visit Cursor's official website to download and install the editor compatible with your operating system.
2. Open Your Project in Cursor
Launch Cursor: Open the Cursor application.
Open Project Folder: Navigate to
File > Open Folderand select your frontend project directory.
3. Enable YOLO Mode
Access Settings: Click on the gear icon (⚙️) in the top-right corner to open the settings menu.
Navigate to Features: In the settings sidebar, select the 'Features' tab.
Activate YOLO Mode: Scroll to find 'Enable YOLO Mode' and toggle it on.
4. Configure YOLO Mode (Optional but Recommended)
Set Up
.cursorrules: Create a.cursorrulesfile in your project root to define AI behavior, such as command permissions and file access limitations. This ensures the AI operates within desired boundaries.Whitelist Commands: Specify which terminal commands the AI is permitted to execute autonomously, enhancing safety and control.
5. Start Coding with YOLO Mode
- AI Autonomy: With YOLO Mode enabled, the AI can now write code, execute it, and iteratively debug without manual intervention, streamlining your development process.
Benefits of YOLO Mode for Frontend Engineers
1. Accelerated Development
Rapid Prototyping: Quickly generate UI components and layouts, allowing for swift iteration and feedback.
Boilerplate Generation: Automate the creation of repetitive code structures, reducing manual coding time.
2. Enhanced Debugging
Automated Testing: The AI can write and execute tests, identify failures, and adjust code accordingly until all tests pass.
Continuous Integration: Seamlessly integrate with CI pipelines to ensure code quality and functionality.
3. Intelligent Refactoring
Code Optimization: The AI refactors code for efficiency and readability, adhering to best practices.
Consistency Enforcement: Maintains uniform coding standards across the project, enhancing maintainability.
4. Seamless Integration with Modern Frameworks
Framework Support: Efficiently works with popular frontend frameworks like React, Vue, and Angular, understanding their specific structures and conventions.
Styling Automation: Generates CSS or Tailwind classes, ensuring responsive and visually appealing designs.
Practical Examples of YOLO Mode in Action
For each of the scenarios, the AI will run, test and self-rewrite the code until it is correct.
Example 1: Creating a Responsive Navbar with Tailwind CSS
Prompt:
// Generate a responsive navigation bar using Tailwind CSS
AI-Generated Code:
function Navbar() {
  return (
    <nav className="bg-gray-800 p-4">
      <div className="container mx-auto flex justify-between items-center">
        <a href="#" className="text-white text-lg font-semibold">Brand</a>
        <ul className="flex space-x-4">
          <li><a href="#" className="text-gray-300 hover:text-white">Home</a></li>
          <li><a href="#" className="text-gray-300 hover:text-white">About</a></li>
          <li><a href="#" className="text-gray-300 hover:text-white">Services</a></li>
          <li><a href="#" className="text-gray-300 hover:text-white">Contact</a></li>
        </ul>
      </div>
    </nav>
  );
}
Outcome:
A fully responsive navigation bar is created instantly, ready for integration into your project.
Example 2: Implementing a Fetch Function with Error Handling
Prompt:
// Create a function to fetch user data from an API with proper error handling
AI-Generated Code:
function fetchUserData() {
  try {
    const response = await fetch('https://api.example.com/user');
    if (!response.ok) {
      throw new Error('Network response was not ok');
    }
    const data = await response.json();
    return data;
  } catch (error) {
    console.error('There was a problem with the fetch operation:', error);
  }
}
Outcome:
An asynchronous function is generated to fetch user data, complete with error handling, enhancing application reliability.
Example 3: Auto-Fixing TypeScript Errors
Scenario:
You have TypeScript errors after recent code changes.
AI Action:
The AI detects the errors, identifies missing type annotations, and automatically applies the necessary fixes.
Outcome:
Your TypeScript code is corrected without manual intervention, ensuring type safety and reducing potential runtime errors.
Words to Exclude During YOLO Mode Setup
To maintain control and prevent unintended actions by the AI, it's advisable to exclude certain commands and operations:
Destructive Commands: Avoid allowing commands like
rm -rfor any operation that can delete critical files or directories.System-Altering Commands: Exclude commands that can modify system settings or install/uninstall software without explicit permission.
Network Operations: Restrict commands that perform network
More details:
Subscribe to my newsletter
Read articles from Neelesh Roy directly inside your inbox. Subscribe to the newsletter, and don't miss out.
Written by

Neelesh Roy
Neelesh Roy
Neelesh is a Senior Frontend Engineer in the insurance technology industry. He specializes in building responsive, reliable, and user-friendly web applications. With years of experience in modern JavaScript frameworks, he cares deeply about clean code, performance, and good user experience. Neelesh enjoys solving complex business problems with simple, practical solutions. He often works closely with designers and backend teams to bring ideas to life. Outside of work, he likes to stay updated with the latest in web development and technology trends.