Building apps for LG TVs ft. webOS
 Pradyumna Jonnalagadda
The aim of this blog is help out any aspiring individuals trying to build apps for LG TVs through their webOS. Consider this as a comprehensive documentation of my experience and experimentation for building apps specifically for webOS. I have experimented different ways of building and deploying apps and web apps on LG TVs, where I will go through each approach and explain everything with as much detail as possible. While reading this blog the GitHub repo below can be referred for better understanding
Link to GitHub Repo
An Overview of webOS:
webOS is a Linux-based operating system designed primarily for smart TVs and connected devices. It works by using a lightweight Linux kernel to manage hardware resources, while a middleware layer handles communication between system services. This setup lets developers build apps using standard web technologies—HTML, CSS, and JavaScript—often with frameworks like Enact and React, instead of relying on traditional native development.
What sets webOS apart from other operating systems is its web-centric approach and efficiency. Unlike conventional OSes that require native programming languages and heavier system resources, webOS leverages the familiarity and flexibility of web technologies, making app development more accessible and streamlined. Its unique card-based interface also offers a simple, intuitive user experience optimized for navigating content on smart TVs. And hence its name webOS
Flow of the Blog
Here, I've outlined the blog's content in the order it's presented. This sequence is especially helpful for beginners or those struggling, as it provides a clear path to follow.
Installing the necessary tools
Web App types
Understanding your requirements
Technologies used to build web apps
Testing web apps on LG TVs
Debugging and Logging in web apps
Installing Basic Tools
Before we get going into building the apps, first ensure that these tools are installed on your device as we will most likely require them in developing an app for webOS.
webOS CLI
Please ensure the Node Package Manager
npminstalled first.Execute the following command in a terminal, using the
-goption to install the CLI globally.$ npm install -g @webos-tools/cliAfter installing, check if the if the version matches with the latest version of CLI npm package.
$ ares -VCheck if the system requirements are met before starting the installation. While the CLI might function even if the requirements are not fully met, its stability cannot be assured.
OS
Requirements
Windows
Windows 10 or higher (64bit only)
Linux
Ubuntu 20.04 or higher (64bit only)
macOS
macOS High Sierra (10.13) or higher (64bit only)
Simulator
To download the simulator, you can find the file for it on my GitHub repo or you can download it from Here
The simulator will help us run and test our application before we deploy it on the webOS.
webOS Developer Account
Make sure to create a developer account at webOS TV Home | webOS TV Developer and then sign in.
Developer Mode App of LGTV
To test your application on your LG TV, ensure to download the “Developer Mode App” from the LG content store on your TV. Once downloaded, login with your newly created LG webOS developer account.
Okay now let’s dive into building apps for webOS! Web apps for webOS TV come in two flavors: basic (packaged) web apps and hosted web apps. Each type has its own set of advantages and disadvantages. So, let’s go through both of them and then decide about your app's features and what it needs, and pick the type that fits best!
Web App Types
Basic web app
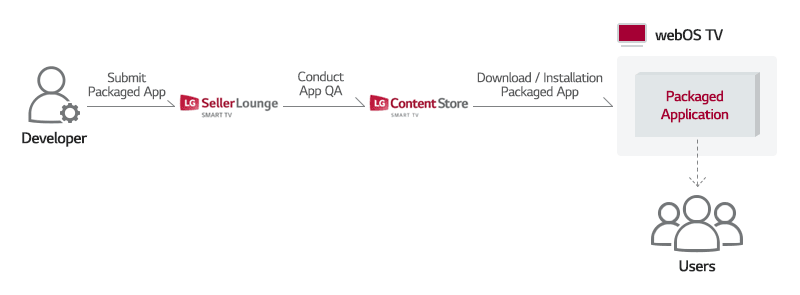
The basic web app is the simplest form of an application for webOS TV, often referred to as a packaged web app because it is delivered as a complete package. When you create this type of app, you compile all necessary resources, such as code, images, and other assets, into a single package. This package is then submitted for distribution.
When a user downloads and installs the app, all the included resources are installed on their device. This means that if you need to update the app—whether it's a change in the code or an update to the resources—you must create and submit a new package with the updated content. This approach ensures that users always have the latest version of the app, but it also requires resubmission of the entire package for any updates.
Hosted Web App
In a hosted web app, the app's content is stored on a remote web server. Users download and install a local dummy app on their device. When the app is launched, it redirects to the web app on the server, downloading resources from there to the device. Hence, heavily relies on good internet connection

Since a hosted web app's content is stored on a remote server, you can update features and code anytime without sending updates to users' devices. This is ideal if your app will change frequently.
However, its performance relies on a good connection to the server, and there are costs for running and maintaining the server. Choose the type of app that best suits your needs based on these factors.
Understanding your requirements
Once you have a clear understanding of whether you want to build a packaged or hosted web app, the next step is to choose the appropriate tech stack for your application. However, before finalizing the tech stack, it's crucial to consider one important aspect: the compatibility of your LG TV with the chosen tech stack.
webOS TV uses different web engines depending on the webOS version.

Though your high-end React App seems to be working fine on the webOS simulator, that might not be the same case when you try to run it on your LG TV.
Why?
Because the simulator uses the latest Chromium-based engine, supporting modern JavaScript features and React hooks.
Technologies for building web apps
Though there are many technologies and tech stacks out there to build web apps, in this blog I have divided and covered 3 main categories namely:
HTML/CSS/JS
Enact
React
I will guide you on how to build packaged applications using HTML/CSS/JS and Enact, while for Hosted web app I will cover HTML/CSS/JS and React.
Packaged Application ft. HTML/CSS/JS
Obviously, the straightforward and traditional way of building any web app is just writing HTML, CSS and some JS. But, who on earth would sit and write HTML along with lines and lines of CSS you may ask.
As I mentioned previously, your requirements are an important consideration. Hence, lets dive in deeper to understand these requirements and compatibilities with these three technologies with different webOS versions.

Though, I haven’t really covered packaged application with HTML in my GitHub repository, I have outlined the steps below for developing and testing packaged web app using HTML, CSS, JS
Step 1:
Ensure you have downloaded the webOS TV CLI as mentioned in the “Installing Basic Tools” section. Once installed verify the installation by running:
$ ares --version
Step 2:
Structure your project with something that is similar to:
/MyWebApp
│
├── /assets         # Images, icons, and other assets
├── /css            # CSS files
├── /js             # JavaScript files
├── index.html      # Main HTML file
├── appinfo.json    # App metadata file
└── icon.png        # App icon (recommended 512x512)
Step 3:
Create the appinfo.json file, this file defines the app’s metadata. Here’s an example below:
{
  "id": "com.sample.hosted",
  "version": "2.0.0",
  "vendor": "LG Developer",
  "type": "web",
  "main": "index.html",
  "title": "Hosted App",
  "icon": "icon.png",
  "largeIcon": "largeIcon.png",
  "uiRevision": 2
}

Step 4:
Use the webOS CLI or powershell to package the app into a .ipk file. Run the command:
ares-package MyWebApp
You will then get a file that looks like:
com.example.mywebapp_1.0.0_all.ipk
Step 5: Testing on the Simulator
Open up the webOS simulator and click on Files in the top left corner and click Files> Launch App. This will then open up the File Explorer and then select the directory where the .ipk and the appinfo.json files are both located. Ensure that you have created an appinfo.json file, else it won’t recognize and run the app. To inspect the app and view console logs, click on “Inspect” on the bottom right of the Simulator.
To test it on the LGTV please refer to the section Testing your web app on an LG TV
Packaged application ft. Enact
Enact is an open-source JavaScript framework built on React, designed specifically for creating web applications on webOS.
It simplifies the development of TV apps by providing a set of pre-built components optimized for large screens, remote navigation, and performance.
It handles TV remote controls, focus management, and screen resolutions out of the box. Handles D-Pad Navigation (up, down, left, right) out of the box. Hence faster to build with fewer lines of code and minimal setup.
Since Enact is built on top of React, we can easily integrate and use the same UI libraries available for React. However, make sure that your webOS version supports the UI libraries. Below is a table for the Enact support:

If you refer to my GitHub repository, you can see a sample Enact project named “Enact App”. It uses basic Enact components with two panels, to get an understanding behind building an app using Enact. Primarily, the main UI libraries available for Enact are @enact/core @enact/ui, @enact/i18n, @enact/spotlight, @enact/sandstone, @enact/sanstone. The documentation for all these can be found at:
https://enactjs.com/docs/modules/
All these modules have pre-built UI elements optimized for large screens. They are responsive and support internationalization. In my implementation of the Enact App, I have used basic sandstone components.
Now let’s go over through the steps in building an Enact App:
Step 1:
Ensure the webOS CLI is installed and then continue to install the enact CLI globally by running the following command
npm install -g @enact/cli
And then verify the installation by:
enact --version
Step 2:
Then go on to create a basic enact project by running the command:
enact create MyEnactApp
Step 3:
Inside your project folder you will see:
MyEnactApp/
├── /node_modules         # Installed dependencies
├── /src                  # Source code (UI Components)
│   ├── /App              # Main application logic
│   ├── /components       # Reusable components
│   ├── /theme            # Custom themes (optional)
├── /resources            # App icons and metadata
├── /dist                 # Built production files
├── .eslint.js            # Linting config
├── package.json          # Project metadata and dependencies
Step 4:
Run the app locally on your computer by running
npm run serve
And the app will be available at localhost:8080 accessible via your browser
Step 5:
Modify and add new custom components in the components folder and you can create new views i.e. panels in the views folder. Refer to my GitHub repo, where I have made a basic enact app that has two panels.
Step 6:
Build the project before packaging it by running the command:
npm run pack
Upon doing so, this will create a dist folder. To package the application ensure that the appinfo.json file is created inside the dist folder. Here’s a sample appinfo.json:
{
    "id": "webos",
    "version": "1.0.0",
    "vendor": "LGE-SVL",
    "type": "web",
    "main": "index.html",
    "title": "Enact App Template",
    "icon": "icon.png",
    "uiRevision": 2
}
It is mandatory that you provide an icon or logo and mentioning the path to it in the appinfo.json
Step 7:
To package the application for webOS, run the following command:
ares-package ./dist
This then creates an .ipk packaged file in your root directory
Step 8:
Finally, to run and test on your simulator, open the simulator app and select Files>Launch App. Select the folder where the .ipk file is located and it will automatically start running the application.
To test it on the LGTV please refer to the section Testing your web app on an LG TV
Hosted Web App ft. React
Building a hosted web app might be much and direct than building a packaged web app. The main advantage in building a hosted web app compared to a packaged application is that your application runs in a remote server, hence any changes made to your app will be immediately reflected on your web app on the LG TVs. However, again we come back to the compatibility issue, not all webOS distributions i.e. versions support complete React apps. Here’s the table below:

In my personal experience, I had to build an application for LG TVs running on webOS 5.5.0-19. As you can see above it runs on the Chromium 68 web engine which only supports until React 16. It doesn’t support later versions, hence hooks like useEffect were un-useable. This is when I finally decided to build a Hosted Web App using HTML, CSS and JS, which I have covered in the next section.
You can find a sample React App in my GitHub repository, where I have also implemented WebSockets connection with a server along with sending requests. The server code can be found under the AdminServer folder.
Below are the steps outlined in packaging your React app once you have developed it.
Step 1:
Start off by creating your React app as you would do normally. Upon doing so follow the steps below to package, test, and deploy in on LGTVs.
Step 2:
In root your directory open up a power shell a run the following command:
ares-generate -t hosted_webapp [your-project-name]
Will be prompted to enter details like app id(reverse domain), title, version, and url. Upon doing so it will create a new folder for your Hosted Web app project. Ensure your appinfo.json contains the right information.
Step 3:
Next, ensure that your React app is running on a remote server like AWS or Azure. If it is not and you just want to test the hosted web app then don’t worry. Simply, go to your vite.config.js (create one if it does not exist) file under your React app and ensure your application is listening on all network interfaces
import { defineConfig } from 'vite'
import react from '@vitejs/plugin-react'
import tailwindcss from '@tailwindcss/vite'
export default defineConfig({
  plugins: [
    react(),
    tailwindcss(),
  ],
  server: {
    host: '0.0.0.0', //Makes your application available oon all network interfaces
    port: 5173, //Choose your desired port
  },
})
This allows you and anyone connected to your network to access your application through your machine’s IP address.
Step 4:
Edit your index.html file under your hosted web app project to point to the correct URL where your application is deployed or your machine’s IP address. For example:
 <!DOCTYPE html>
<html>
  <head> </head>
  <body>
    <script>
      // window.location.href = "https://webostv.developer.lge.com/";
      window.location.href = "http://192.168.1.12:5173";
      //My machine's IP address along with port no where application is available
    </script>
    <script src="https://cdnjs.cloudflare.com/ajax/libs/webcomponentsjs/2.6.0/webcomponents-bundle.js"></script>
  </body>
</html>
Step 5:
To package the application for webOS, run the following command in your hosted web app directory:
ares-package . -o .
This then creates an .ipk packaged file in your hosted web app directory
Step 8:
Finally, to run and test on your simulator, open the simulator app and select Files>Launch App. Select the folder where the .ipk file is located and it will automatically start running the application.
To test it on the LGTV please refer to the section Testing your web app on an LG TV
Hosted Web App ft. HTML/CSS/JS
Since you have understood how to create Hosted Web apps with React, creating it while using HTML, CSS, JS is pretty much the same steps again. However, this time we deploy our application using this tech stack. In my GitHub repo, you can find this implementation under the "HTMl-CSS-JS” folder, where I have replicated whatever I’ve done in the React app using CSS and JavaScript. Both the project implment API calls and websocket connections to the backend, code for which can be found in the AdminServer folder.
To use UI components like ChartJS, for my React project I have installed it using the Node Package Manager whereas for the HTML & JS project I have used CDN. Hence, we can still use advanced UI libraries in HTML and JS via Content Delivery Network (CDN).
Why did I go for this as my final implementation?
Well as I have mentioned previously, the LG TV I was having was running on a webOS 5.5.0-19 and couldn’t use advanced React features and hence built the application using HTML, CSS, JS making it work across wide range of webOS SmartTVs. I had dockerised my application and further launched it on AWS.
On the contrary, the difficult and challenging part was manually writing JavaScript code (Along with some help from ChatGPT as well of course😂) for handling TV remote controls and navigation. Here’s one example for handling up and down keys:
/**
 * Handle keyboard navigation for TV remote control
 * @param {KeyboardEvent} e - Keyboard event
 */
function handleKeyNavigation(e) {
    // Handle TV remote navigation - e.g., directional keys
    switch (e.keyCode) {
        case 37: // Left arrow
            navigateFocus('left');
            break;
        case 38: // Up arrow
            navigateFocus('up');
            break;
        case 39: // Right arrow
            navigateFocus('right');
            break;
        case 40: // Down arrow
            navigateFocus('down');
            break;
        case 13: // Enter key
            if (document.activeElement && document.activeElement.click) {
                document.activeElement.click();
            }
            break;
        default:
            break;
    }
}
So, keep this in mind when deciding which tech stack to use to build webOS apps.
Testing your web app on an LG TV
Setup and connect to LG TV. Firstly, ensure that the Developer mode App is up and running on the TV with the options “Key Server” and “Dash” are enabled.
ares-setup-device
This then shows a list of all available devices and asks whether you want to add, modify, remove devices

Select ‘add’ and then you are prompted to enter a name for the device(LG TV) you desire

Once device name is entered, add the IP address of the TV that you can see on your Developer Mode App on your LG TV.


Ensure all the correct details are entered, here in this image I just put the localhost address, and it is not my actual TV IP address. Once you have entered all the necessary and correct details you will prompted the following:

Once you have ensured that the “Key Server” button is enabled in your Developer Mode App on your LG TV enter the command below
ares-novacom --device <device_name> --getkey
This will then attempt to connect to your TV through ssh. Upon running this command it will prompt you to enter a passphrase. Again, go back to the Developer Mode App on your TV and enter the passphrase that is displayed there and finally you will be successfully connected to your TV!
Deploying the app to your TV
Go to the folder where your .ipk file and appinfo.json are located and run the following command to install the app on the TV:
ares-install --device <device_name> <ipk_filename>
#For example...
ares-install --device mylgtv com.sample.hosted_2.0.0_all.ipk
Finally, to launch the web application on the TV run the following command:
ares-launch <id mentioned in appinfo.json>
#For example...
ares-launch com.example.mywebapp
Further to close the app on the TV run the command below:
ares-launch --close com.example.mywebapp
And to uninstall the app, run:
ares-install --device mylgtv --remove com.example.mywebapp
Debugging Web Apps on LG TV
I had come across this issue where my application was running successfully on my laptop’s browser, as well as the webOS Simulator. However, I was facing some errors while testing and running on the LG TV. Though I added console logs, there was practically no way I could view these logs.
Problem:
Upon going through LG’s documentation and StackOverflow I found a command that opens up the app running on your TV, in your browser to view the logs.
ares-inspect -d mylgtv -a com.sample.hosted
Though this does open up on my laptop’s browser, to my luck it was working as expected. All I could see was a blank screen and could not see the real time logs.
Solution:
Hence, I then came up with the idea of designing a log view that is visible on my app itself as an overlay. This then allowed me to view all the console logs in real-time and was then able to identify the issues and bottlenecks of my code. I have incorporated this in my HTML-CSS-JS folder of my GitHub repo, below is a short code snippet below of the visual logger overlay:
 // Create debug panel for on-screen logging
(function createDebugPanel() {
    // Create a debug panel if it doesn't exist
    if (!document.getElementById('debug-panel')) {
        const debugPanel = document.createElement('div');
        debugPanel.id = 'debug-panel';
        debugPanel.style.position = 'fixed';
        debugPanel.style.bottom = '0';
        debugPanel.style.left = '0';
        debugPanel.style.width = '100%';
        debugPanel.style.maxHeight = '30%';
        debugPanel.style.overflow = 'auto';
        debugPanel.style.backgroundColor = 'rgba(0, 0, 0, 0.8)';
        debugPanel.style.color = '#4CAF50';
        debugPanel.style.fontFamily = 'monospace';
        debugPanel.style.fontSize = '14px';
        debugPanel.style.padding = '10px';
        debugPanel.style.zIndex = '9999';
        debugPanel.style.border = '1px solid #4CAF50';
        document.body.appendChild(debugPanel);
    }
})();

// On-screen logging utilities
window.debugLog = function(message, type = 'info') {
    console.log(message); // Still log to console

    const debugPanel = document.getElementById('debug-panel');
    if (!debugPanel) return;

    const logEntry = document.createElement('div');
    const timestamp = new Date().toLocaleTimeString();
    const typeColors = {
        'info': '#4CAF50',
        'error': '#FF5252',
        'warning': '#FFC107'
    };

    logEntry.style.color = typeColors[type] || typeColors.info;
    logEntry.style.borderBottom = '1px solid rgba(255,255,255,0.1)';
    logEntry.style.padding = '4px 0';

    let displayMessage = message;
    if (typeof message === 'object') {
        try {
            displayMessage = JSON.stringify(message);
        } catch (e) {
            displayMessage = "[Object]";
        }
    }

    logEntry.textContent = `[${timestamp}] [${type.toUpperCase()}] ${displayMessage}`;
    debugPanel.appendChild(logEntry);
    debugPanel.scrollTop = debugPanel.scrollHeight;
};

window.debugError = function(message) {
    window.debugLog(message, 'error');
};
Initialization: The
createDebugPanel()function is immediately invoked when the script loads.DOM Injection: The function creates a
<div>element with IDdebug-paneland appends it directly todocument.body.Positioning & Visibility:
It uses fixed positioning (
position: fixed) to stay at the bottom of the viewport i.e. screenTakes full width (
width: 100%) with limited height (maxHeight: 30%)Has a z-index (9999) to display above other page elements (ovverlay)
Uses semi-transparent black background with green text for visibility
Logging Functions:
window.debugLog()- Adds entries to the panel with different colors based on message typewindow.debugError()- Shorthand for error-type messages
Log Entry Creation: Each log entry is a new
<div>dynamically created and appended to the debug panel.
Then wherever I would want to log and see the log in the debugpanel I would simply write:
window.debugLog("Loading charts.js module");
Here’s a picture of how it would look below:

And we can then successfully view logs in the LG TVs!
Conclusion
Mate, if you have got this far through the extensive and comprehensive blog, you must be a dedicated learner and developer!
In conclusion, developing applications for LG TVs using webOS offers a unique opportunity to leverage web technologies in a smart TV environment. By understanding the differences between packaged and hosted web apps, and carefully selecting the appropriate tech stack, developers can create efficient and user-friendly applications. Whether using traditional HTML/CSS/JS, the Enact framework, or React, each approach has its own set of advantages and challenges. My approach of Testing and debugging on actual LG TVs ensures that the final product meets user expectations and performs optimally. With the right tools and knowledge, building apps for webOS can be a rewarding experience that enhances the smart TV ecosystem.
<p align="center">Thank you for Reading, hope I haven’t confused you much!</p>
Subscribe to my newsletter
Read articles from Pradyumna Jonnalagadda directly inside your inbox. Subscribe to the newsletter, and don't miss out.
Written by