Micro-Segmentation Strategies in DevSecOps
 Subhanshu Mohan Gupta
Introduction
Traditional perimeter security is no longer sufficient in today’s dynamic and threat-laden IT environments. Micro-segmentation: The process of dividing your network into granular zones ensures that the blast radius remains contained even if one component is compromised. When integrated into a DevSecOps workflow, micro-segmentation isolates critical infrastructure components and automates security practices, enhancing your overall security posture.
In this article, we’ll dive into how micro-segmentation can be applied in a Kubernetes environment and discuss the concepts and benefits with a step-by-step guide to implement this architecture.
What is Micro-Segmentation?
Micro-segmentation involves breaking your network into smaller, secure segments. Each segment is isolated from others by enforcing strict network policies meaning that even if an attacker breaches one segment, lateral movement is significantly limited. In DevSecOps, this granular security measure can be automatically enforced as part of your continuous integration and deployment processes.
Benefits Include:
Reduced Blast Radius: Limits the impact of potential breaches.
Enhanced Visibility: Fine-grained policies improve monitoring and logging.
Compliance and Governance: Helps meet regulatory requirements by isolating sensitive data.
Automated Security: Integrates with CI/CD pipelines to ensure security is baked into every deployment.
Architectural Overview
Imagine your infrastructure as a mini city where every application, service, or microservice operates within its secure neighbourhood. Communication between these neighbourhoods is tightly controlled via defined policies. This is the essence of micro-segmentation.
Common implementation platforms include:
Kubernetes with Network Policies: Leverage Kubernetes’ native capabilities along with plugins like Calico or Cilium.
Service Meshes (e.g., Istio): Enforce secure service-to-service communication using mutual TLS and fine-grained routing rules.
Virtualized Environments: Use hypervisor-level segmentation and next-gen firewalls to control east-west traffic.
Implementing Micro-Segmentation in a Kubernetes Environment
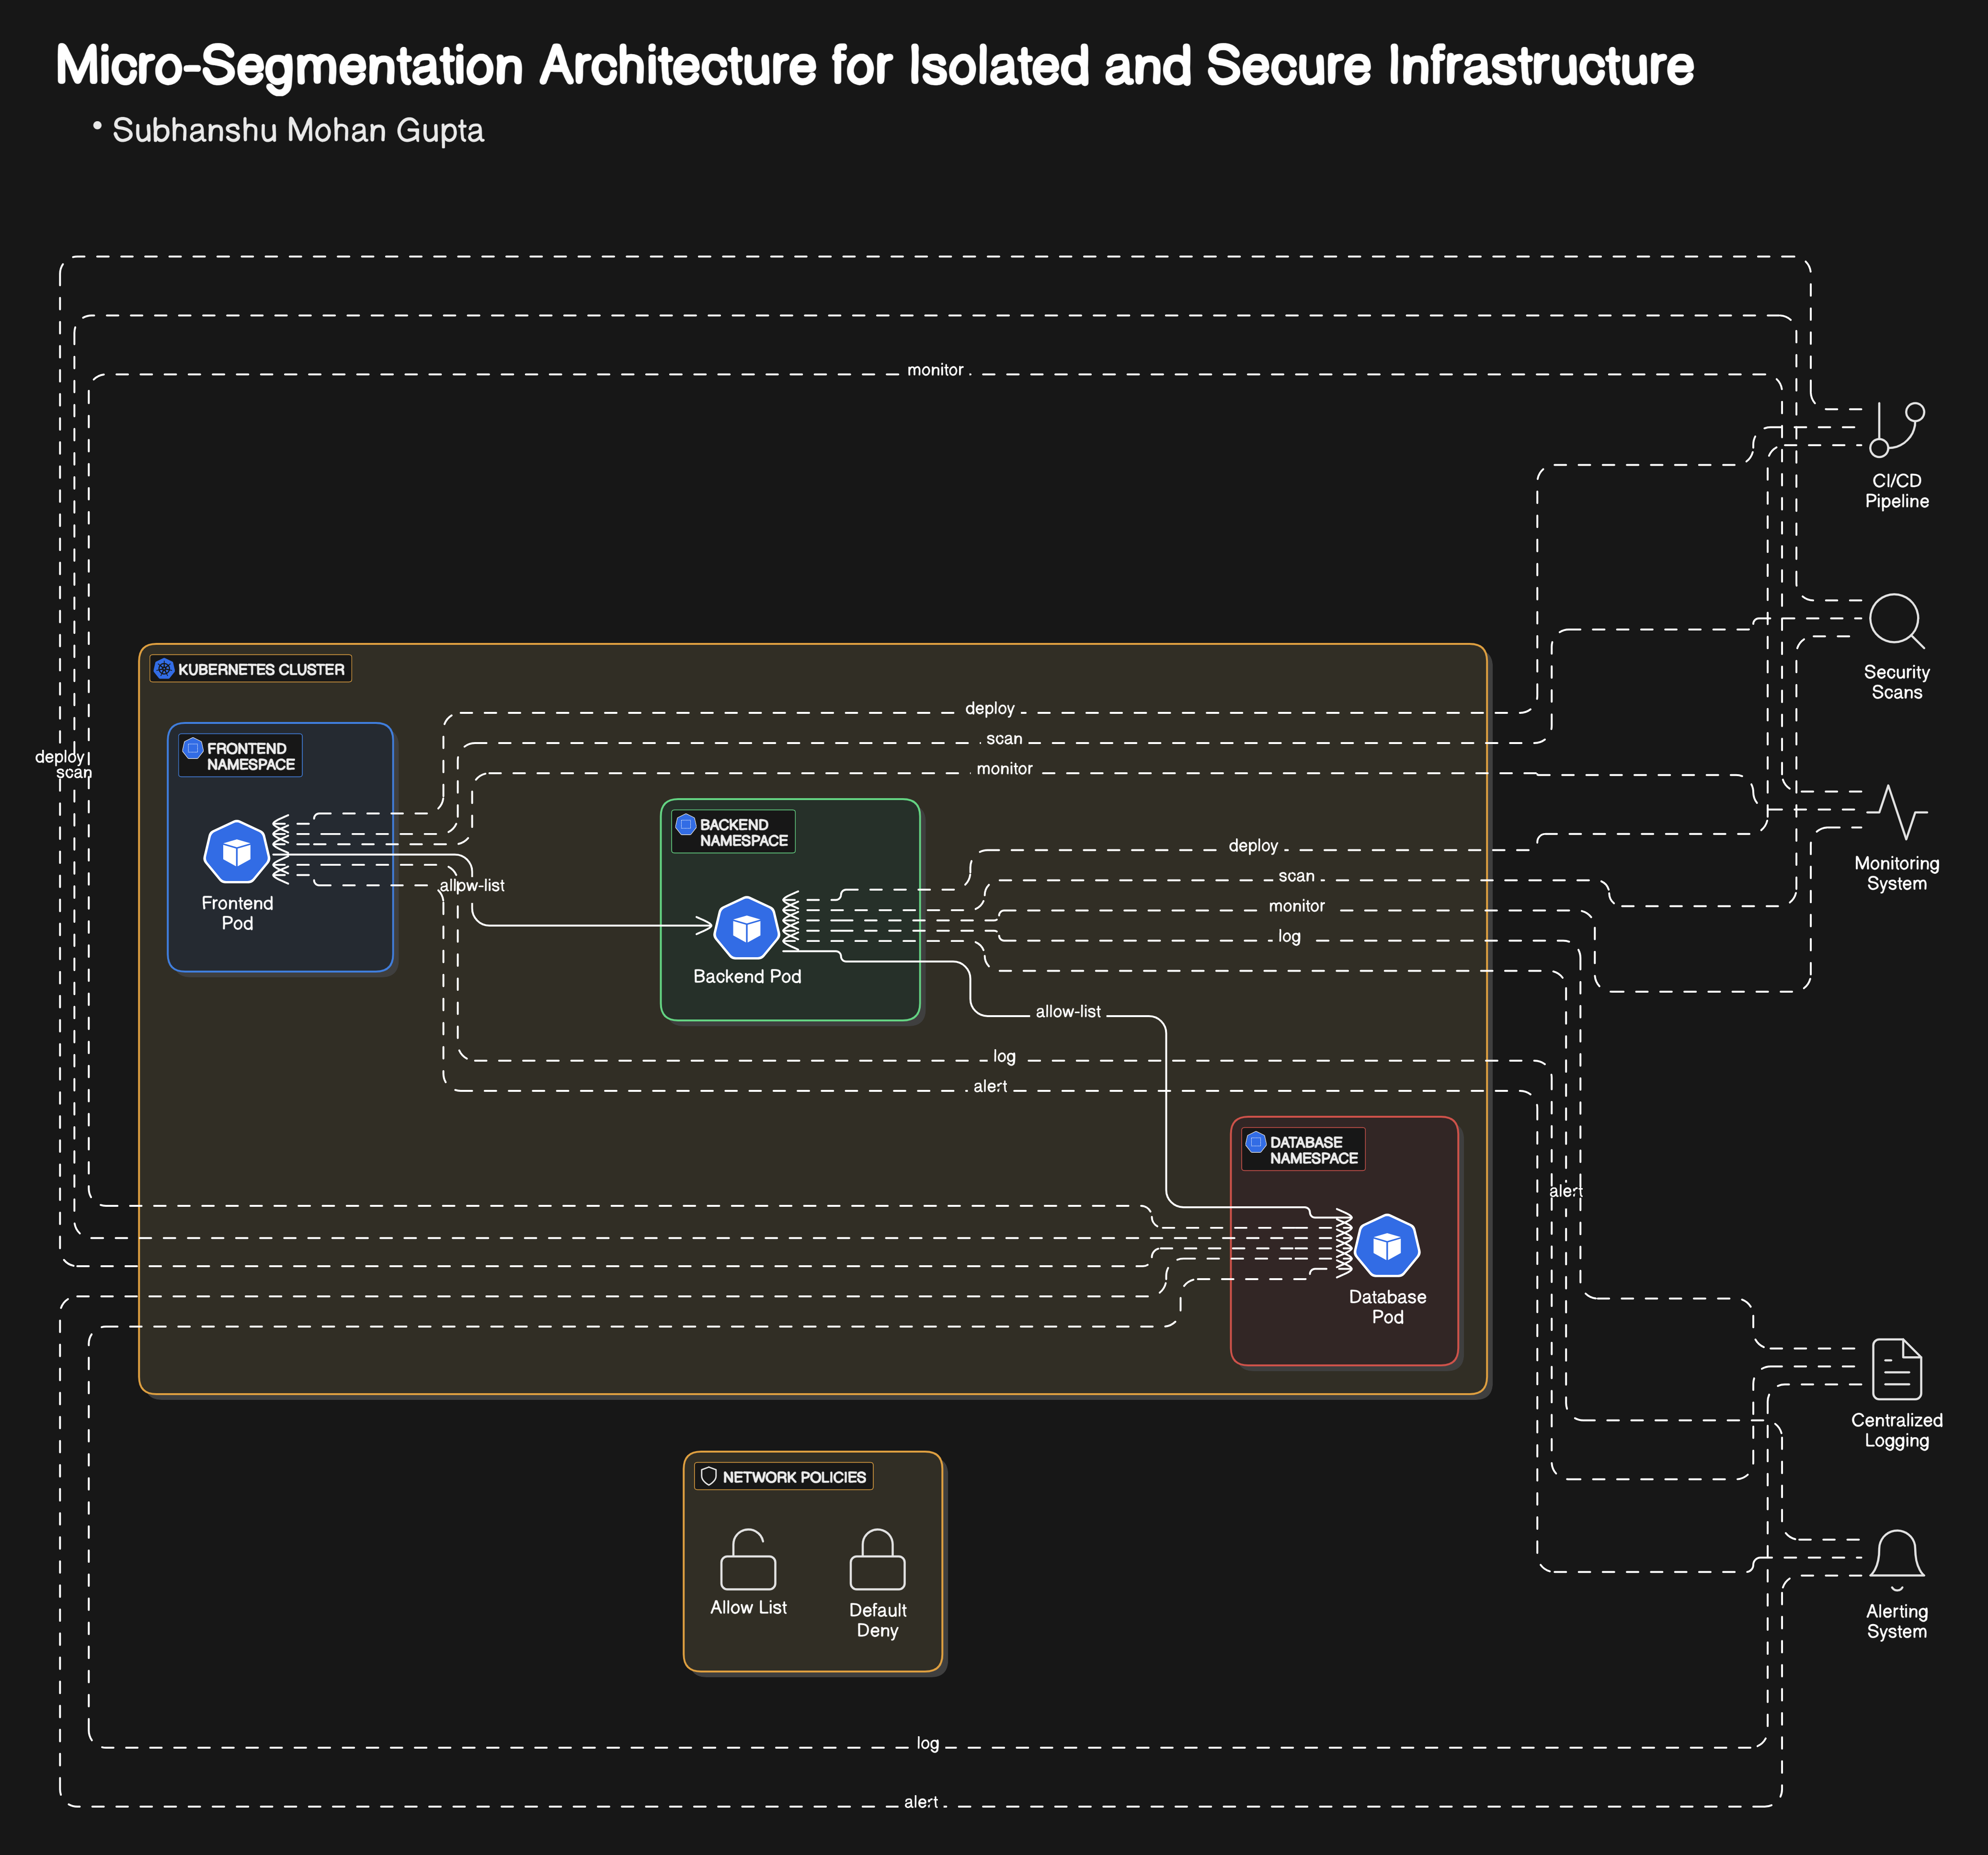
Below is a precise, step-by-step guide to achieving micro-segmentation using Kubernetes network policies with Calico as the network plugin. In this example, we’ll create two separate namespaces - frontend and backend and enforce policies that allow only specific traffic between them.
Diagram overview
Step 1: Set Up Your Kubernetes Cluster
If you haven’t already, set up a local Kubernetes cluster using tools like Minikube or Kind.
# For Minikube, you can start your cluster with:
minikube start
Step 2: Install a Network Policy Engine
Calico is a popular choice for enforcing Kubernetes Network Policies. Follow Calico’s installation guide or use the following command for a quick setup:
kubectl apply -f https://docs.projectcalico.org/manifests/calico.yaml
Step 3: Create Namespaces for Segmentation
Create separate namespaces for your frontend and backend applications.
kubectl create namespace frontend
kubectl create namespace backend
Step 4: Deploy Sample Applications
Let’s deploy a simple Nginx frontend and an HTTPD backend.
Frontend Deployment (frontend namespace)
# frontend-deployment.yaml
apiVersion: apps/v1
kind: Deployment
metadata:
  name: frontend
  namespace: frontend
spec:
  replicas: 2
  selector:
    matchLabels:
      app: frontend
  template:
    metadata:
      labels:
        app: frontend
        role: frontend
    spec:
      containers:
      - name: nginx
        image: nginx:stable
        ports:
        - containerPort: 80
Apply the deployment:
kubectl apply -f frontend-deployment.yaml
Backend Deployment (backend namespace)
# backend-deployment.yaml
apiVersion: apps/v1
kind: Deployment
metadata:
  name: backend
  namespace: backend
spec:
  replicas: 2
  selector:
    matchLabels:
      app: backend
  template:
    metadata:
      labels:
        app: backend
    spec:
      containers:
      - name: httpd
        image: httpd:alpine
        ports:
        - containerPort: 80
Apply the deployment:
kubectl apply -f backend-deployment.yaml
Step 5: Apply a Default-Deny Policy
By default, we want to block all inbound traffic to the backend. This is our “default deny” policy.
# default-deny-ingress.yaml
apiVersion: networking.k8s.io/v1
kind: NetworkPolicy
metadata:
  name: default-deny-ingress
  namespace: backend
spec:
  podSelector: {}
  policyTypes:
  - Ingress
Apply the policy:
kubectl apply -f default-deny-ingress.yaml
Step 6: Create an Allow-List Policy for Specific Traffic
Now, create a policy that permits traffic only from the frontend namespace to the backend pods on port 80.
# allow-frontend-ingress.yaml
apiVersion: networking.k8s.io/v1
kind: NetworkPolicy
metadata:
  name: allow-frontend-ingress
  namespace: backend
spec:
  podSelector:
    matchLabels:
      app: backend
  ingress:
  - from:
    - namespaceSelector:
        matchLabels:
          name: frontend  # We’ll label the namespace accordingly.
      podSelector:
        matchLabels:
          role: frontend
    ports:
    - protocol: TCP
      port: 80
Before applying this policy, label the frontend namespace:
kubectl label namespace frontend name=frontend
Now apply the allow-list policy:
kubectl apply -f allow-frontend-ingress.yaml
Step 7: Testing the Network Policies
To ensure your policies are working as intended, you can deploy a test pod (e.g., busybox) in both namespaces and attempt to access the backend service.
Test from the Frontend Namespace
kubectl run test-frontend --rm -it --image=busybox --namespace=frontend -- /bin/sh
Inside the busybox shell, try:
wget -qO- http://<backend-service-ip>:80
Test from the Backend Namespace (should be blocked)
kubectl run test-backend --rm -it --image=busybox --namespace=backend -- /bin/sh
Inside the shell, try accessing the backend service:
wget -qO- http://<backend-service-ip>:80
If the policies are correctly enforced, only traffic originating from the frontend namespace should successfully reach the backend service.
Wrapping Up
By integrating micro-segmentation into your DevSecOps pipeline, you not only isolate critical components but also reduce the potential impact of a breach. The granular network policies we implemented using Kubernetes and Calico are a powerful step toward a more secure and resilient architecture.
Key Takeaways
Micro-segmentation limits lateral movement: An attacker compromising one segment cannot easily pivot to others.
DevSecOps integration: Security is continuously enforced throughout the CI/CD pipeline.
Scalable and maintainable: Policies can be versioned and managed alongside your application code.
Embrace the granular control and continuous security validation that micro-segmentation offers, and transform your DevSecOps practices to be resilient in today’s challenging cyber landscape.
Happy Securing!
Subscribe to my newsletter
Read articles from Subhanshu Mohan Gupta directly inside your inbox. Subscribe to the newsletter, and don't miss out.
Written by
Subhanshu Mohan Gupta
Subhanshu Mohan Gupta
A passionate AI DevOps Engineer specialized in creating secure, scalable, and efficient systems that bridge development and operations. My expertise lies in automating complex processes, integrating AI-driven solutions, and ensuring seamless, secure delivery pipelines. With a deep understanding of cloud infrastructure, CI/CD, and cybersecurity, I thrive on solving challenges at the intersection of innovation and security, driving continuous improvement in both technology and team dynamics.