Connecting an Android Studio Project with Firebase Realtime Database
 Programming Concepts
Table of contents
- Watch the video tutorial on YouTube
- Step 1: Navigate to the Firebase Website
- Step 2: Access the Firebase Console
- Step 3: Create a New Project
- Step 1: Expand the Build Menu
- Step 2: Select Realtime Database
- Step 3: Click on Create Database
- Step 4: Select Server Location
- Step 5: Understanding Firebase Security Rules
- Step 6: Click on Enable
- Step 1: Click on the Plus (+) Button Next to the Database URL
- Step 2: Create the Root Node ("IoT")
- Step 3: Add the "Temperature" Field
- Step 4: Add the "Humidity" Field
- Step 5: Add the "FanBtn" Field
- Creating an Android Studio Project and Connecting Firebase Realtime Database
- Step 1: Open Android Studio
- Step 2: Create a New Project
- Step 3: Configure the Project
- Step 4: Display the Menu Bar (if not visible)
- Step 5: Open Firebase Assistant in Android Studio
- Step 6: Set Up Firebase Realtime Database
- Step 7: Connect Android Studio Project to Firebase
- Step 8: Add Firebase Realtime Database SDK to Your App
- Designing the UI for IoT Android App in Android Studio
- Writing Java Code for Firebase Realtime Database Integration in Android Studio
- Step 1: Add Required Imports
- Step 2: Declare Variables
- Step 3: Initialize Variables in onCreate() Method
- Step 4: Implement Fan Button Click Event
- Creating a Java Class for Storing Realtime Database Data
- Step 1: Create a New Java Class
- Why Do We Need This Class?
- Explanation of the Code
- How This Class Works with Firebase
- Fetch Real-Time Data from Firebase
- Call GetData() in onCreate()
- Adding Internet Permissions in AndroidManifest.xml
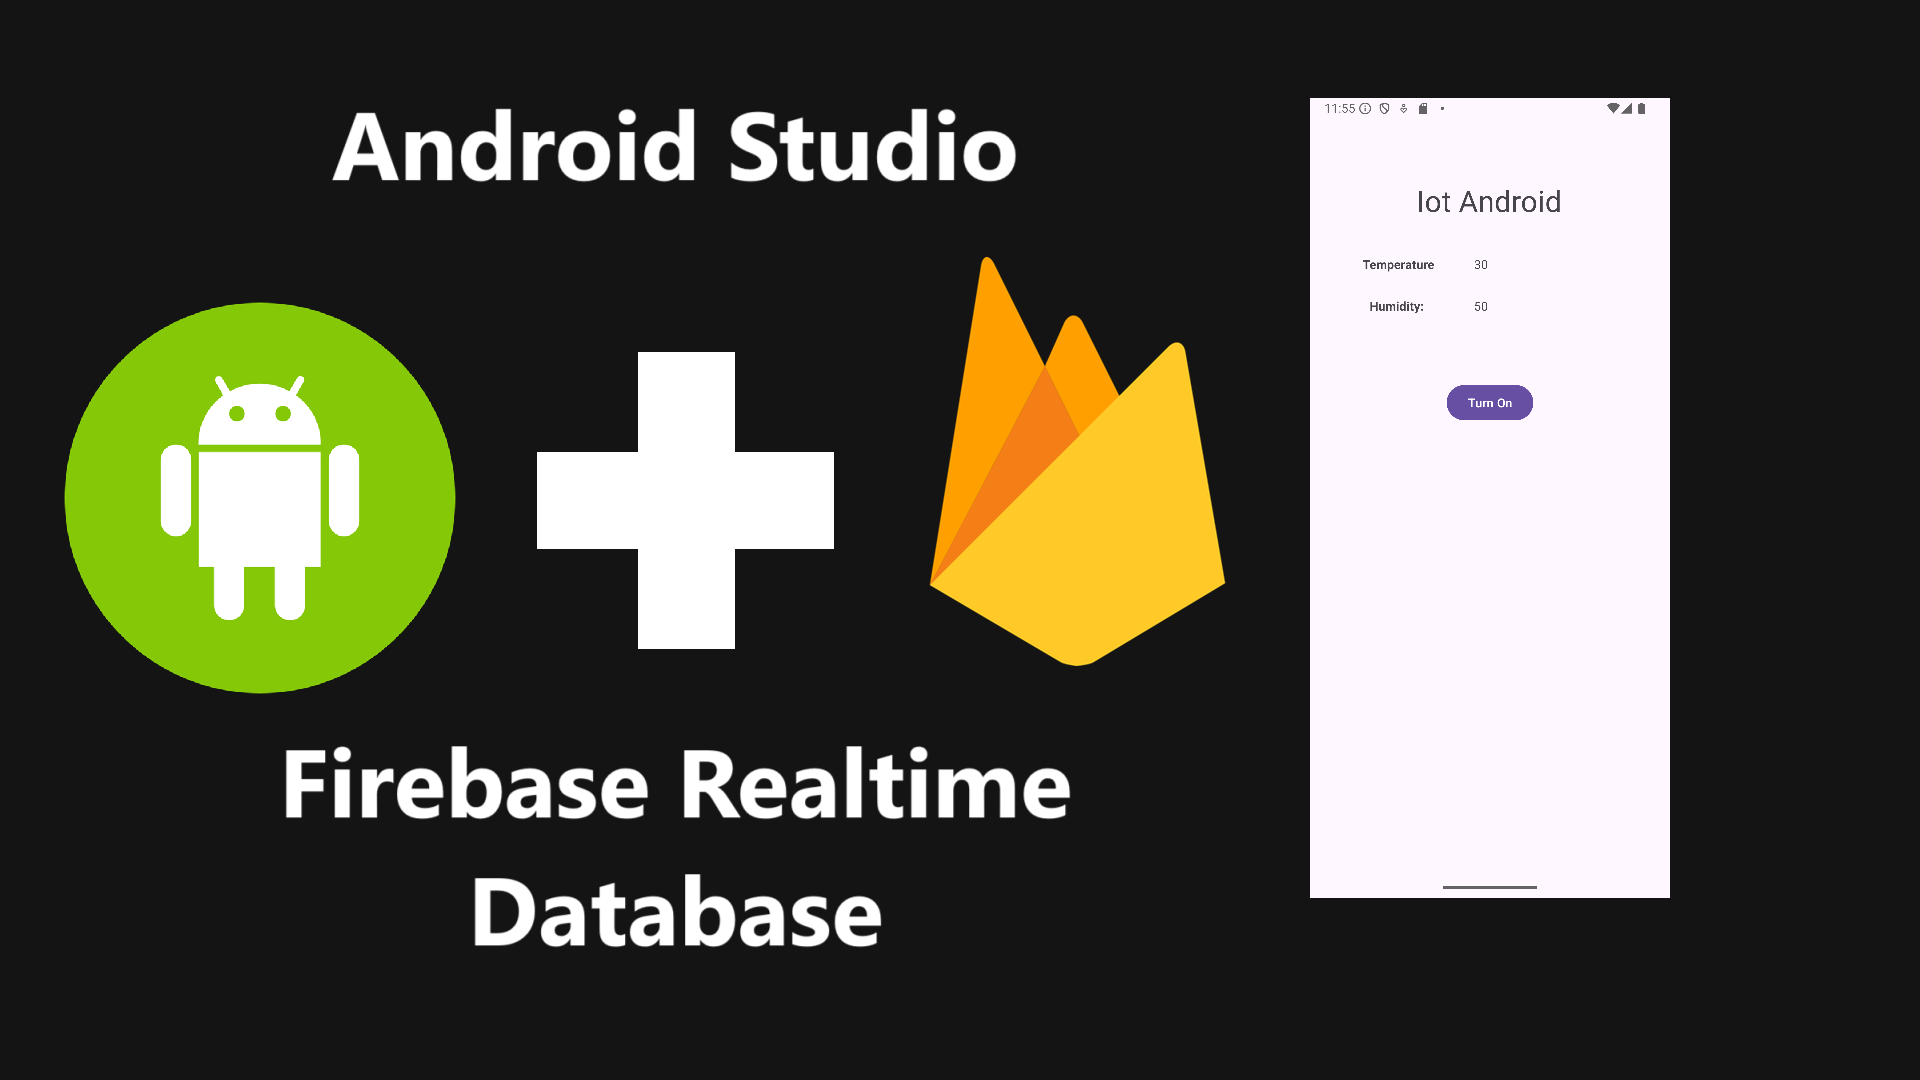
Firebase Realtime Database is a cloud-hosted NoSQL database that allows seamless synchronization of data across multiple clients. In this tutorial, I will guide you through the process of connecting your Android Studio project with Firebase Realtime Database. We will go step by step, and I have included screenshots for each stage to make it easier to follow.
Watch the video tutorial on YouTube
Step 1: Navigate to the Firebase Website
To begin, open your browser and go to the official Firebase website:
Firebase is a platform developed by Google that provides backend services such as authentication, databases, and cloud functions for mobile and web applications.
Step 2: Access the Firebase Console
Once you’re on the Firebase website, click on the Go to console button in the top-right corner. This will take you to the Firebase Console, where you can manage all your Firebase projects.
Alternatively, you can directly go to the Firebase Console using this link:
👉 https://console.firebase.google.com

Step 3: Create a New Project
Now, let’s create a new Firebase project:
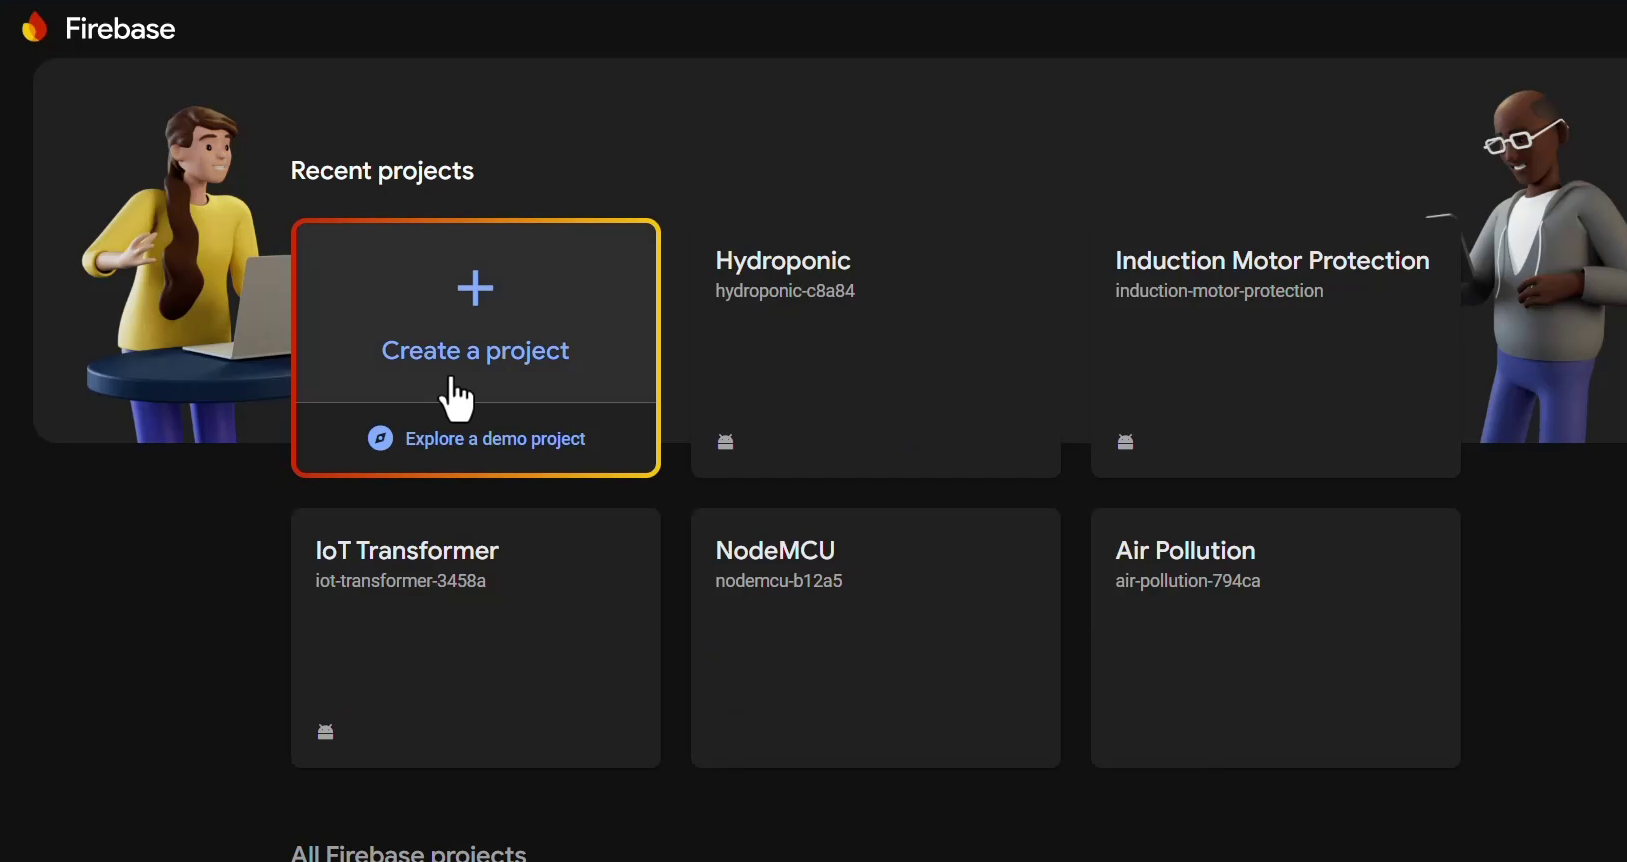
Click on the Create a project button.
Enter a Project Name – Choose a meaningful name that represents your Android application.
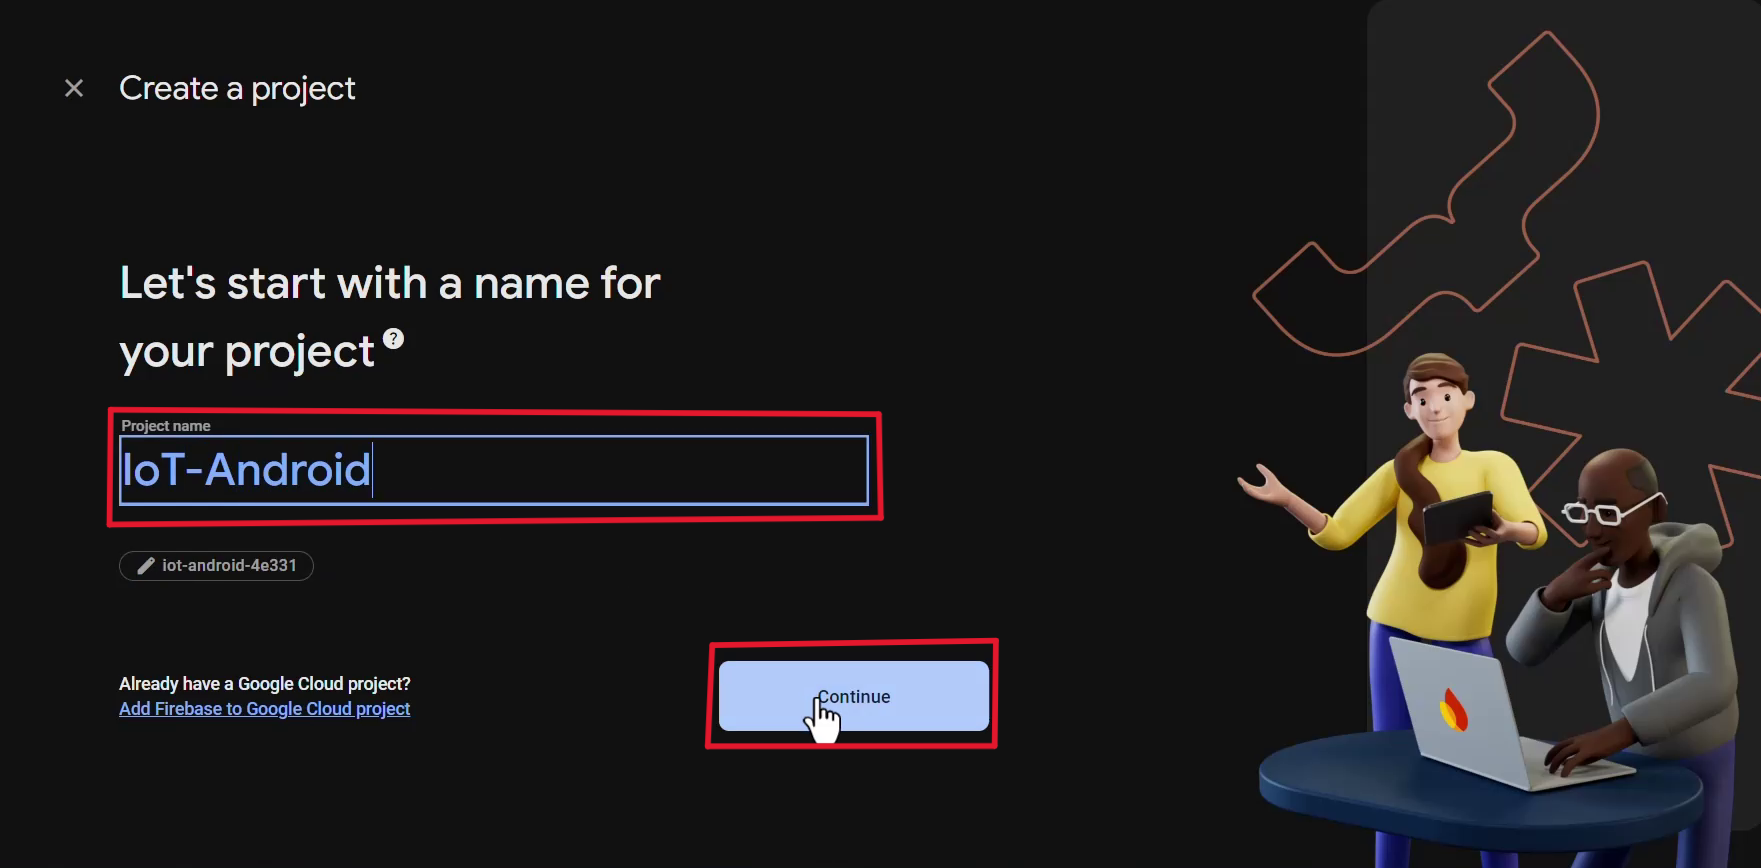
Click Continue to proceed.
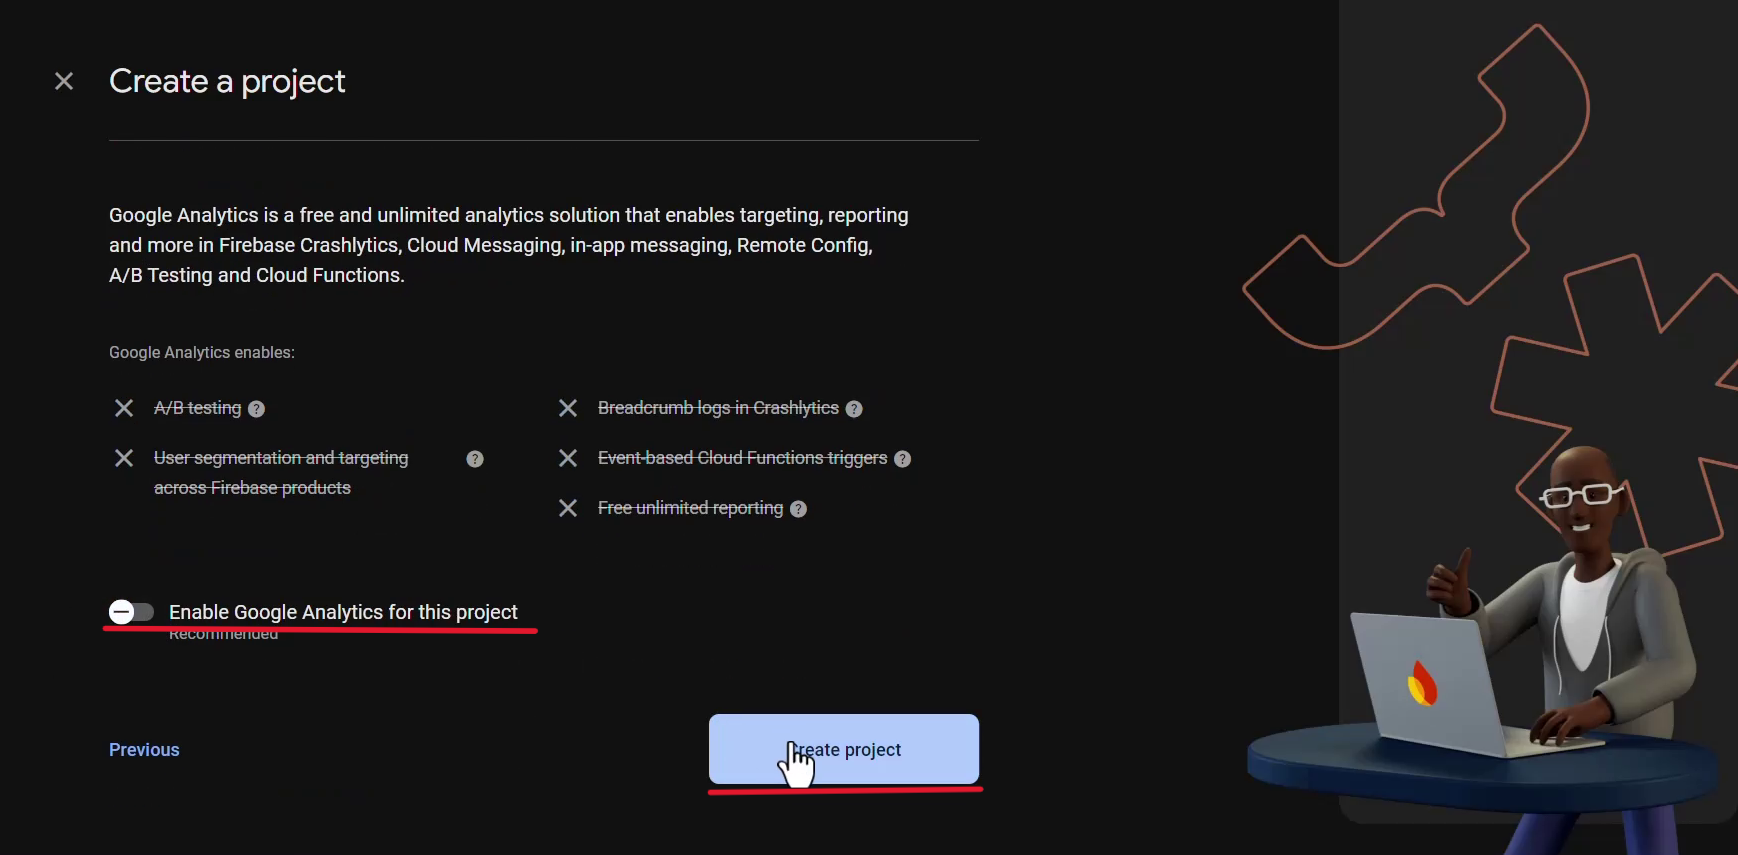
Enabling Google Analytics (Optional)
During the setup process, Firebase will ask if you want to enable Google Analytics for your project. You can choose to enable it or skip it depending on your preference. If you enable Google Analytics, make sure to select the appropriate Google Analytics account.
Click Continue and wait for Firebase to create your project.
Once the setup is complete, click Continue to navigate to the Firebase Project Dashboard.
In the previous steps, we created a Firebase project and set up the basic configuration. Now, let’s move forward and set up the Realtime Database for our Android Studio project.
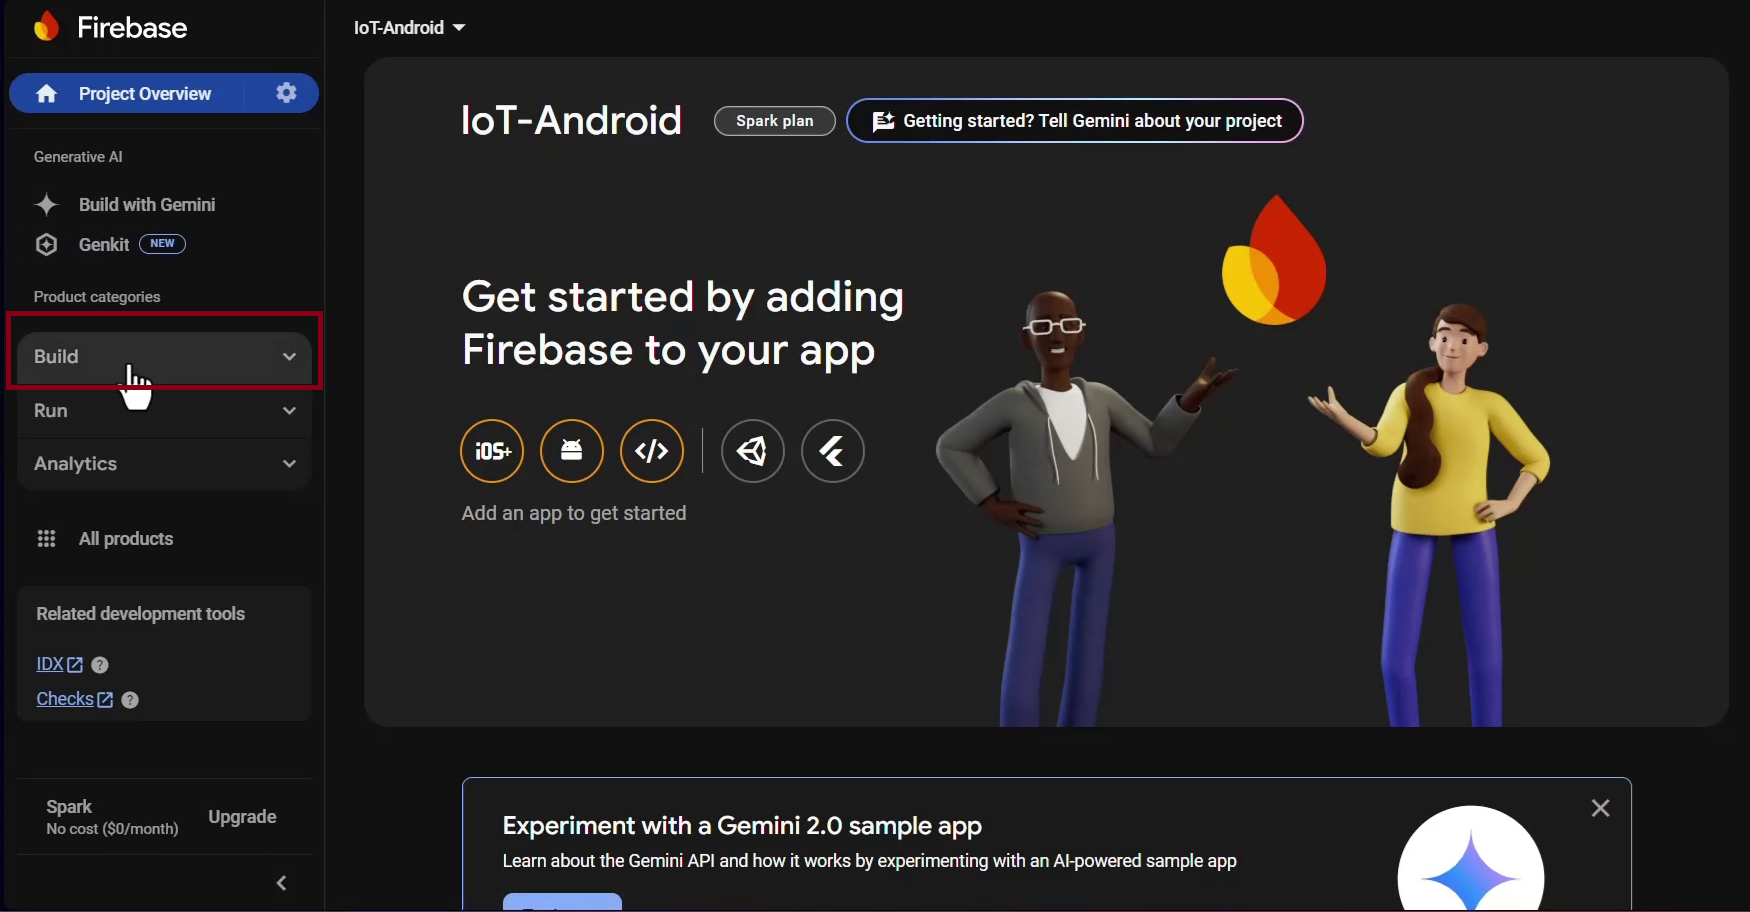
Step 1: Expand the Build Menu
On the Firebase console dashboard, you’ll see a left sidebar with multiple options. Click on the Build menu to expand it. This menu contains all the backend services that Firebase provides, such as Firestore, Realtime Database, Authentication, and more.
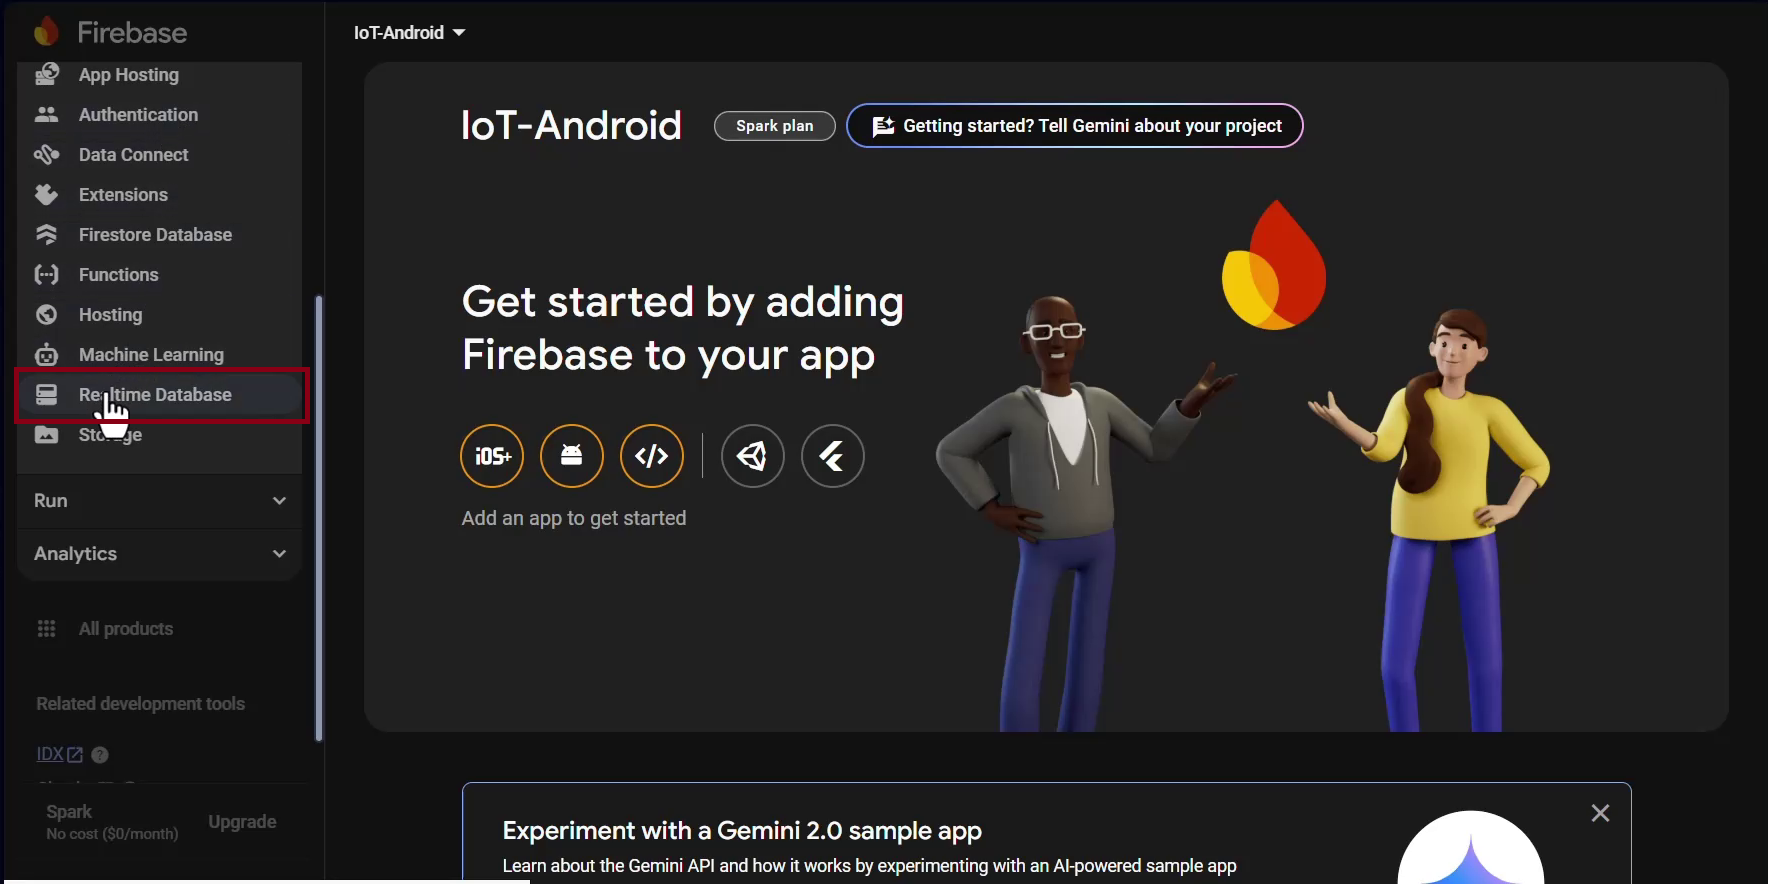
Step 2: Select Realtime Database
From the expanded Build menu, find and click on Realtime Database. This will open the Realtime Database setup page, where you can create and configure your database.
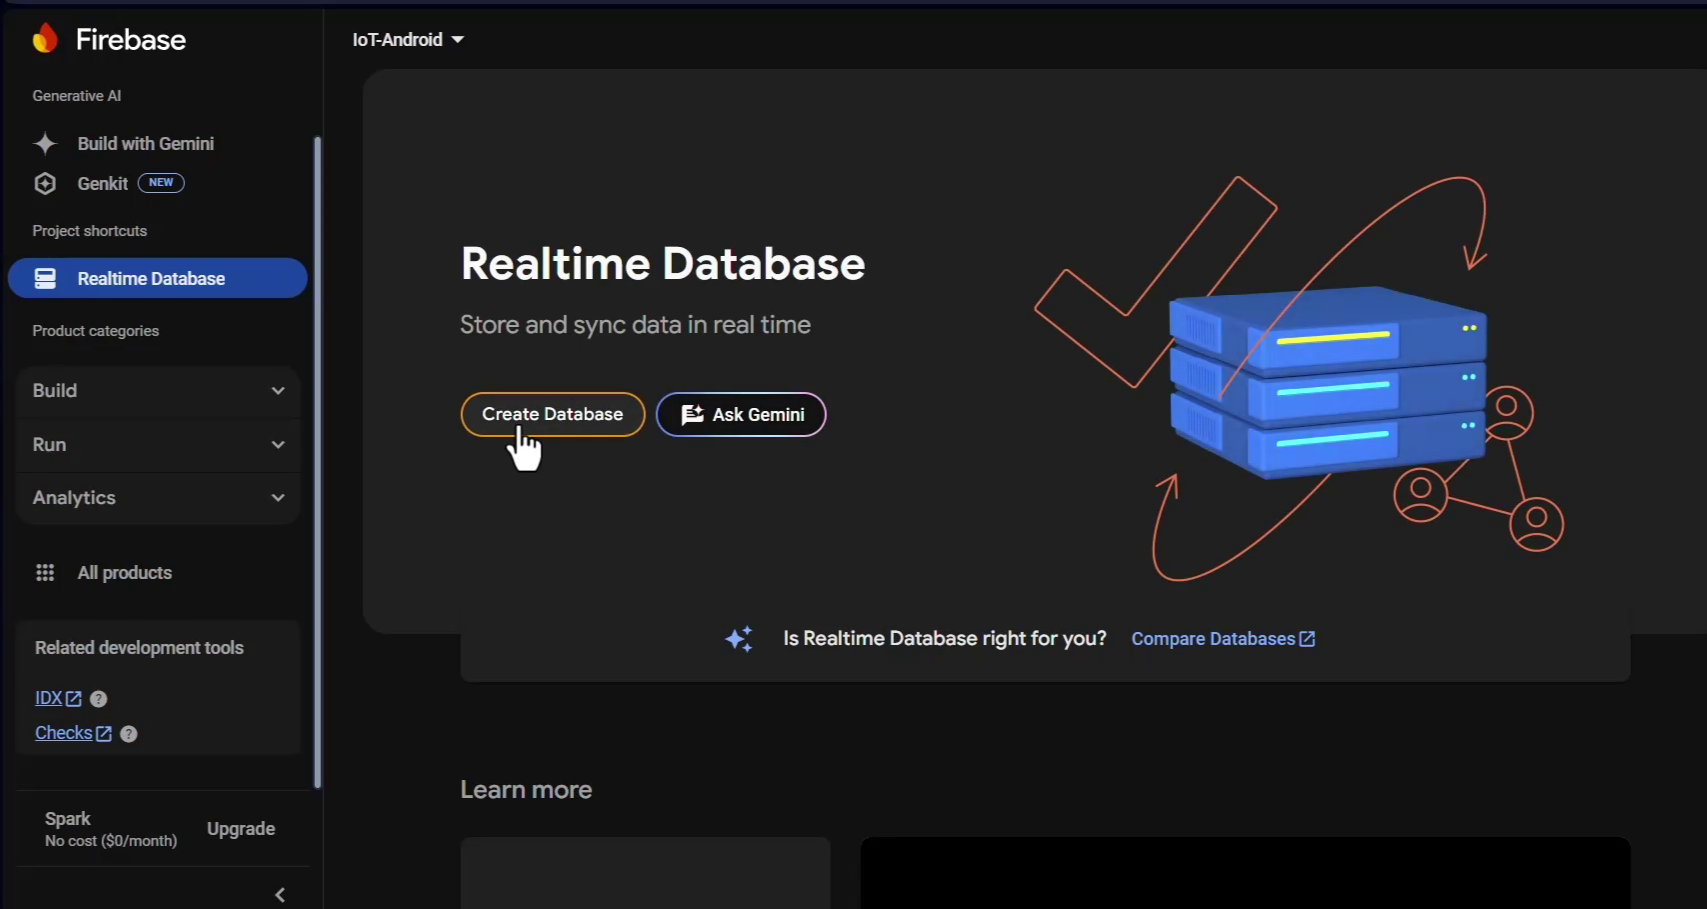
Step 3: Click on Create Database
On the Realtime Database page, you will see an option to Create Database. Click on it to begin the setup process.
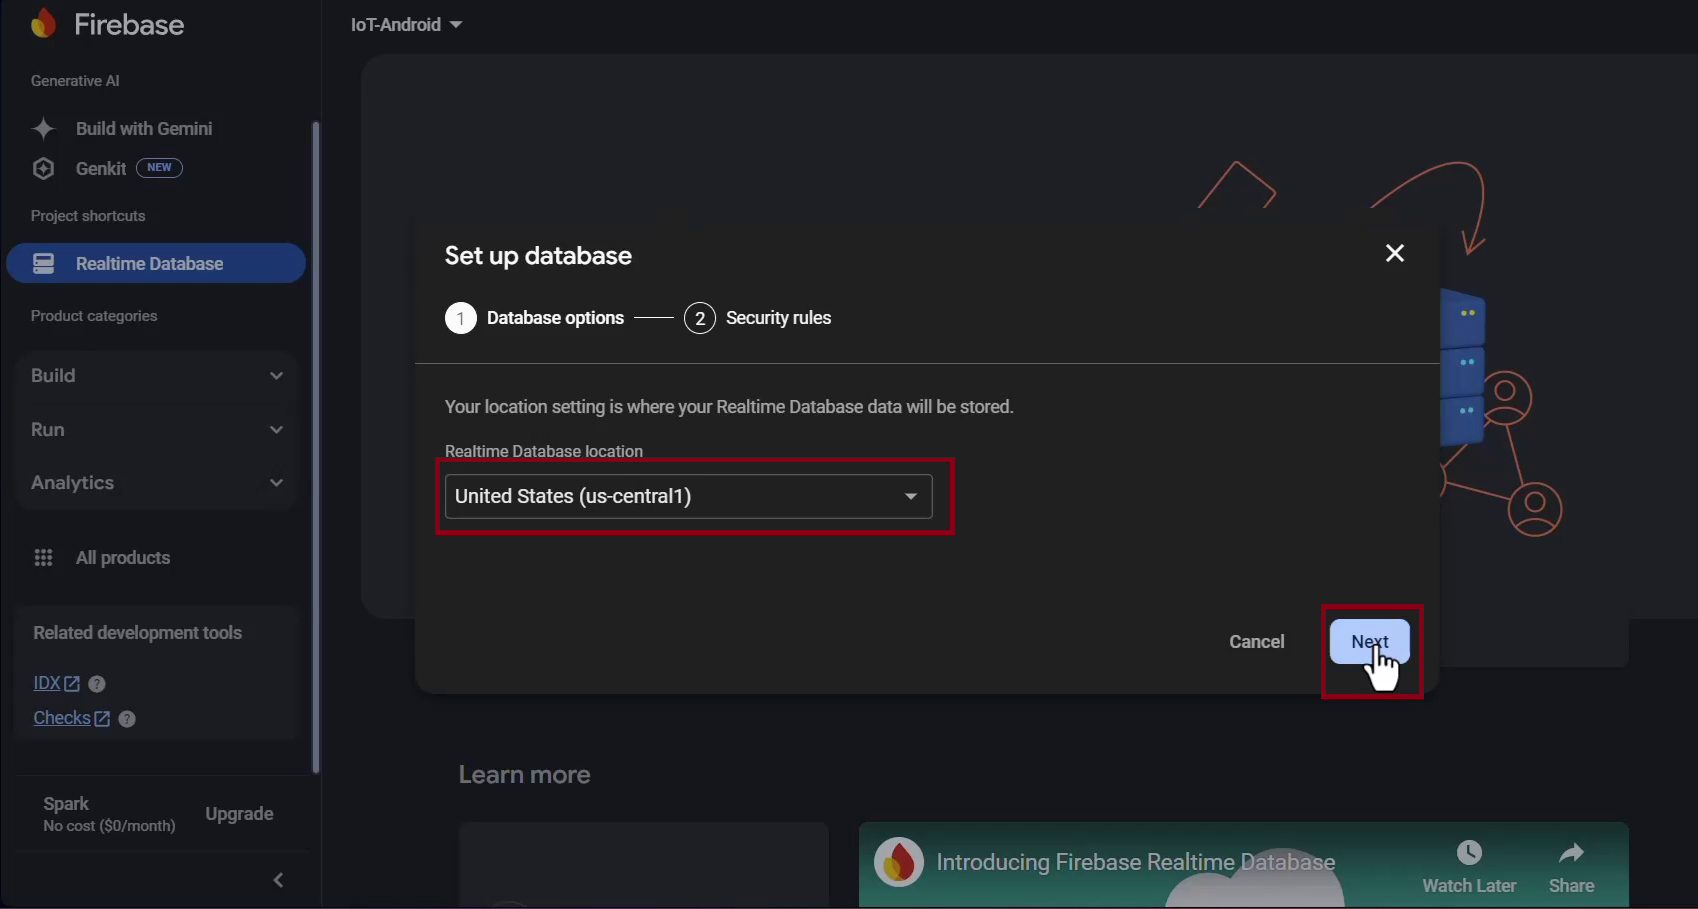
Step 4: Select Server Location
After clicking on "Create Database," Firebase will ask you to choose a server location for storing your database.
Recommendation:
It's best to keep the default server location suggested by Firebase, as it is optimized based on your region. However, if your app has specific geographic requirements, you can select a different location.
Step 5: Understanding Firebase Security Rules
Before enabling the database, Firebase will ask you to choose between Lock Mode and Test Mode.
🔒 Lock Mode (Recommended for Production)
Only authenticated users can read/write data.
Best for production apps to prevent unauthorized access.
Requires Firebase Authentication setup.
🛠 Test Mode (Recommended for Development & Testing)
Allows anyone to read/write data without authentication.
Useful during development when you need easy database access.
Not safe for production (must be changed later).
For now, select "Start in Test Mode" to simplify the setup. You can update the security rules later when integrating Firebase Authentication.
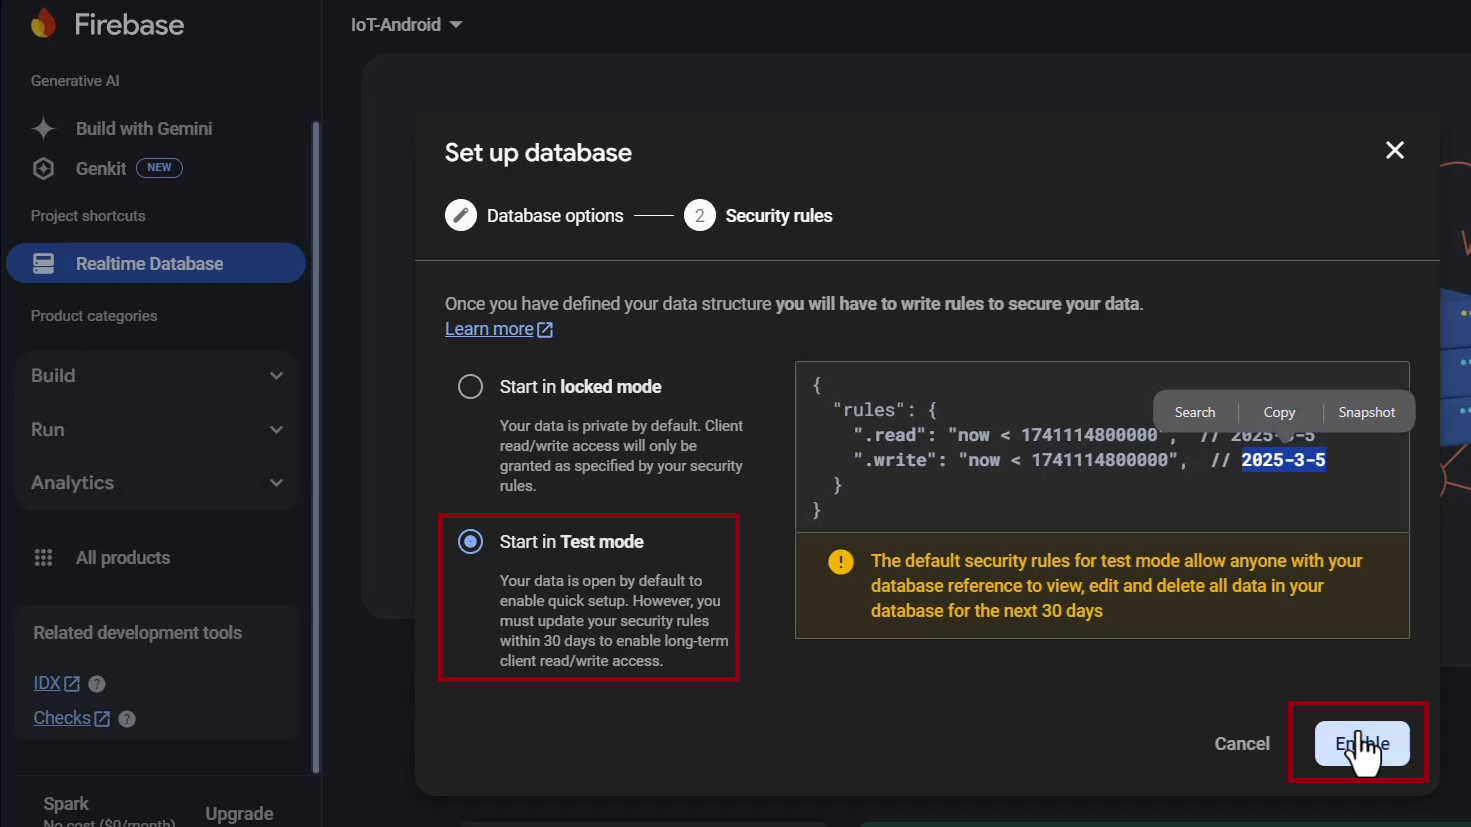
Step 6: Click on Enable
Finally, click Enable to create your Realtime Database. Firebase will now initialize the database and display the structure where you can start adding data.
Done! You have successfully set up Firebase Realtime Database. In the next steps, we will setup the structure of real-time database for storing data.
Now that we have set up the Firebase Realtime Database, let’s create the data structure to store IoT sensor values like temperature, humidity, and fan control. Follow these steps carefully:
Step 1: Click on the Plus (+) Button Next to the Database URL
Open the Realtime Database tab in the Firebase console.
You will see the database URL displayed at the top (e.g.,
https://your-project-id-default-rtdb.firebaseio.com/).Next to the database URL, you will find a plus (+) button. Click on it to create a new data entry.
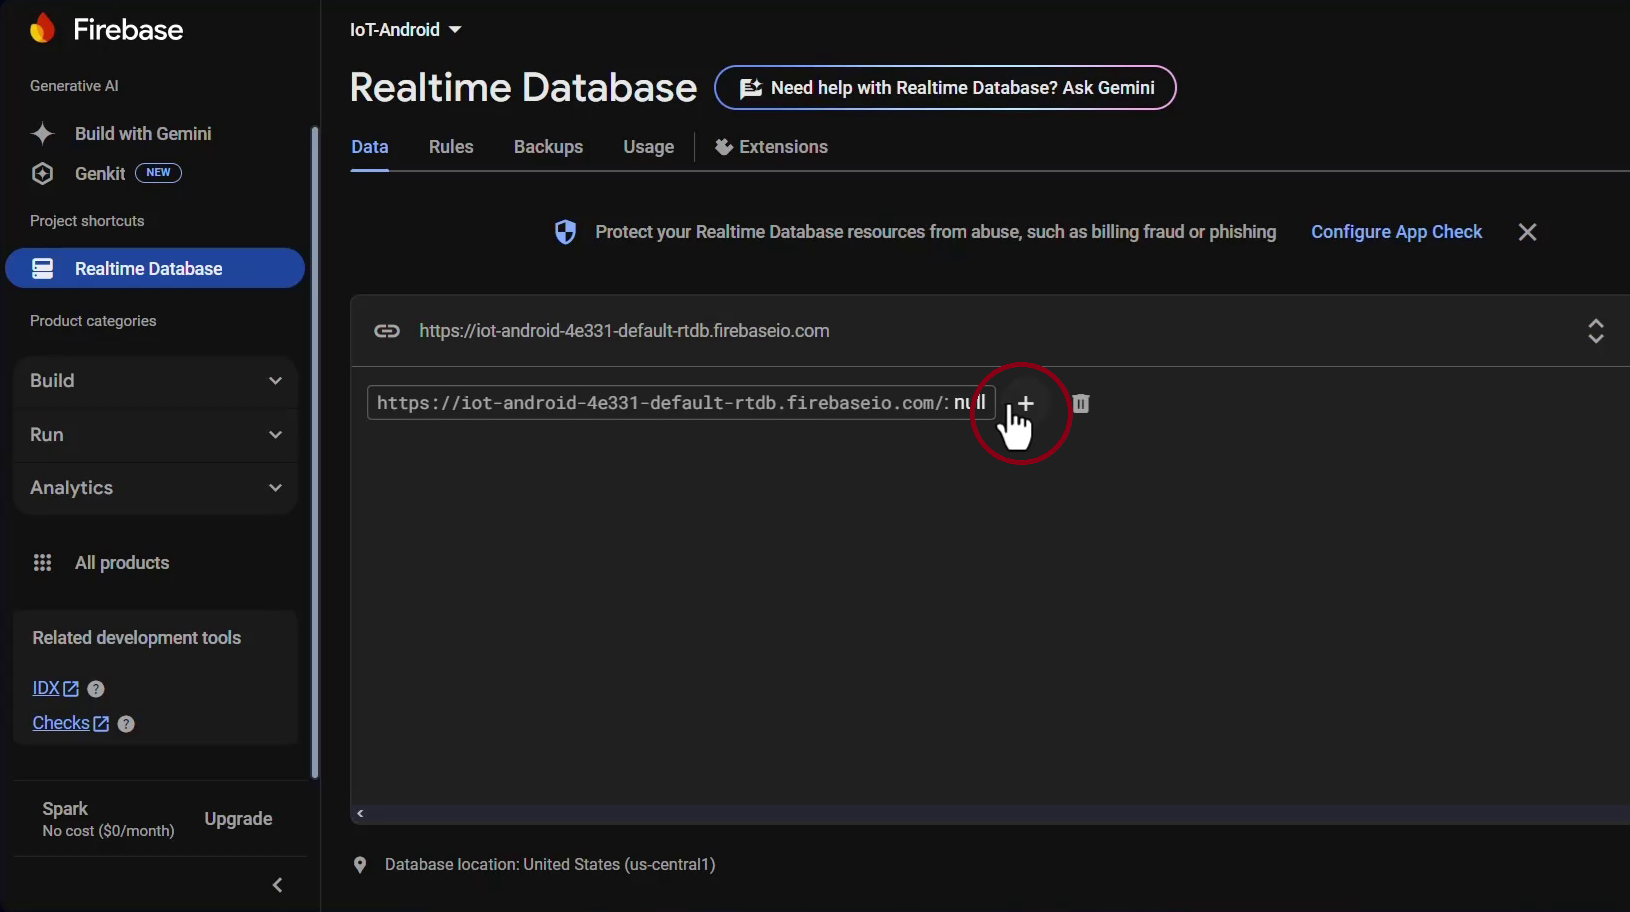
Step 2: Create the Root Node ("IoT")
In the New Child Key field, enter "IoT" (without quotes).
Click on the plus (+) button again. This will allow you to create subfields under the "IoT" node.
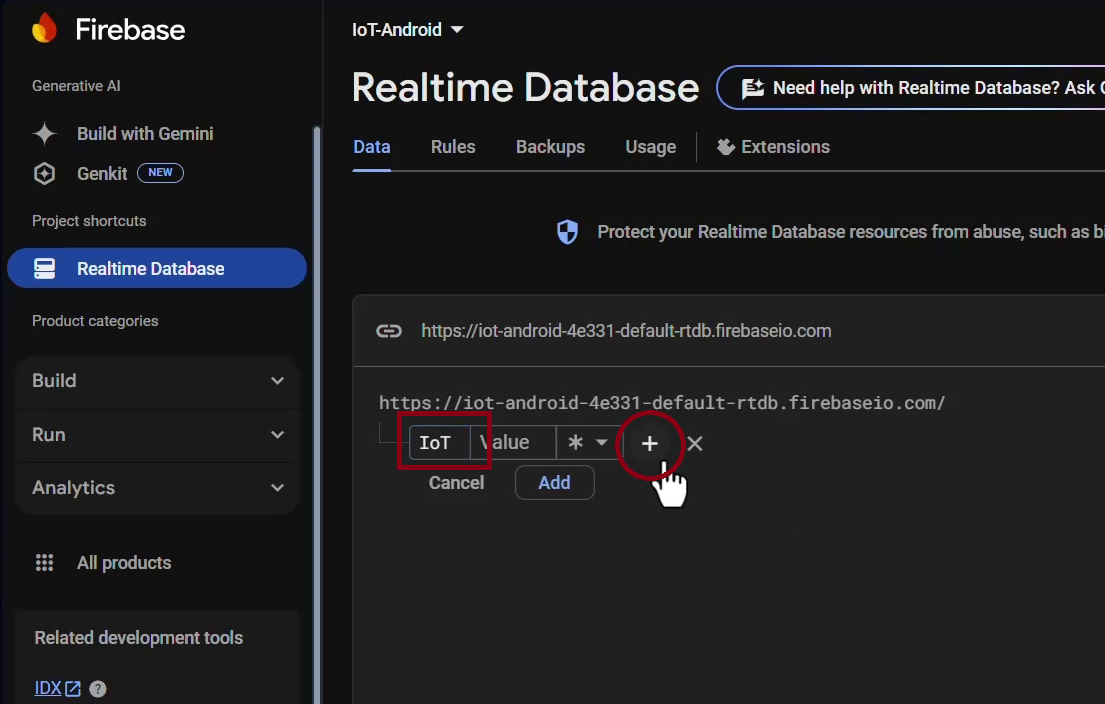
Step 3: Add the "Temperature" Field
Under the IoT node, click the plus (+) button to add a new field.
In the Name field, enter "Temperature".
In the Default Value field, enter
0(this is optional, but it helps initialize the data).In the Data Type, select Number.
Click on the Add button to save the field.
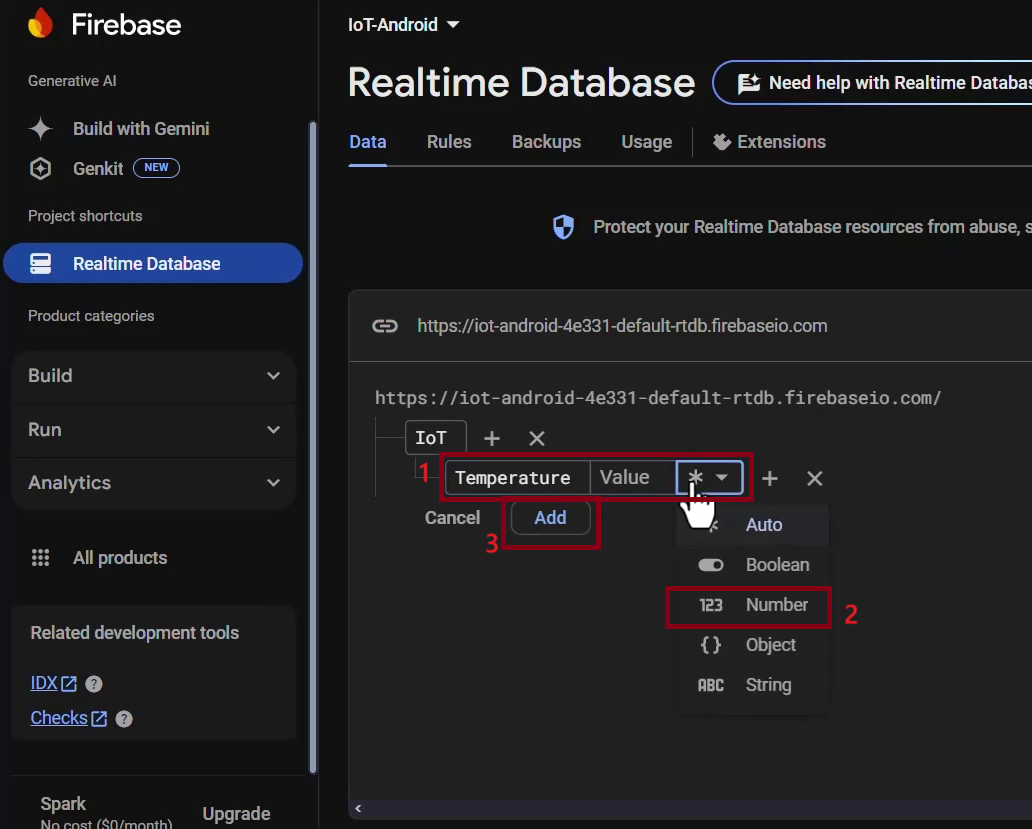
Step 4: Add the "Humidity" Field
Repeat the same process for Humidity:
Click the plus (+) button under IoT.
Enter
"Humidity"as the Name.Set the Default Value to
0.Choose Number as the Data Type.
Click Add.
Step 5: Add the "FanBtn" Field
Again, click the plus (+) button under IoT.
Enter
"FanBtn"as the Name.Set the Default Value to
false(this will be used to turn a fan on/off).Choose Boolean as the Data Type.
Click Add.
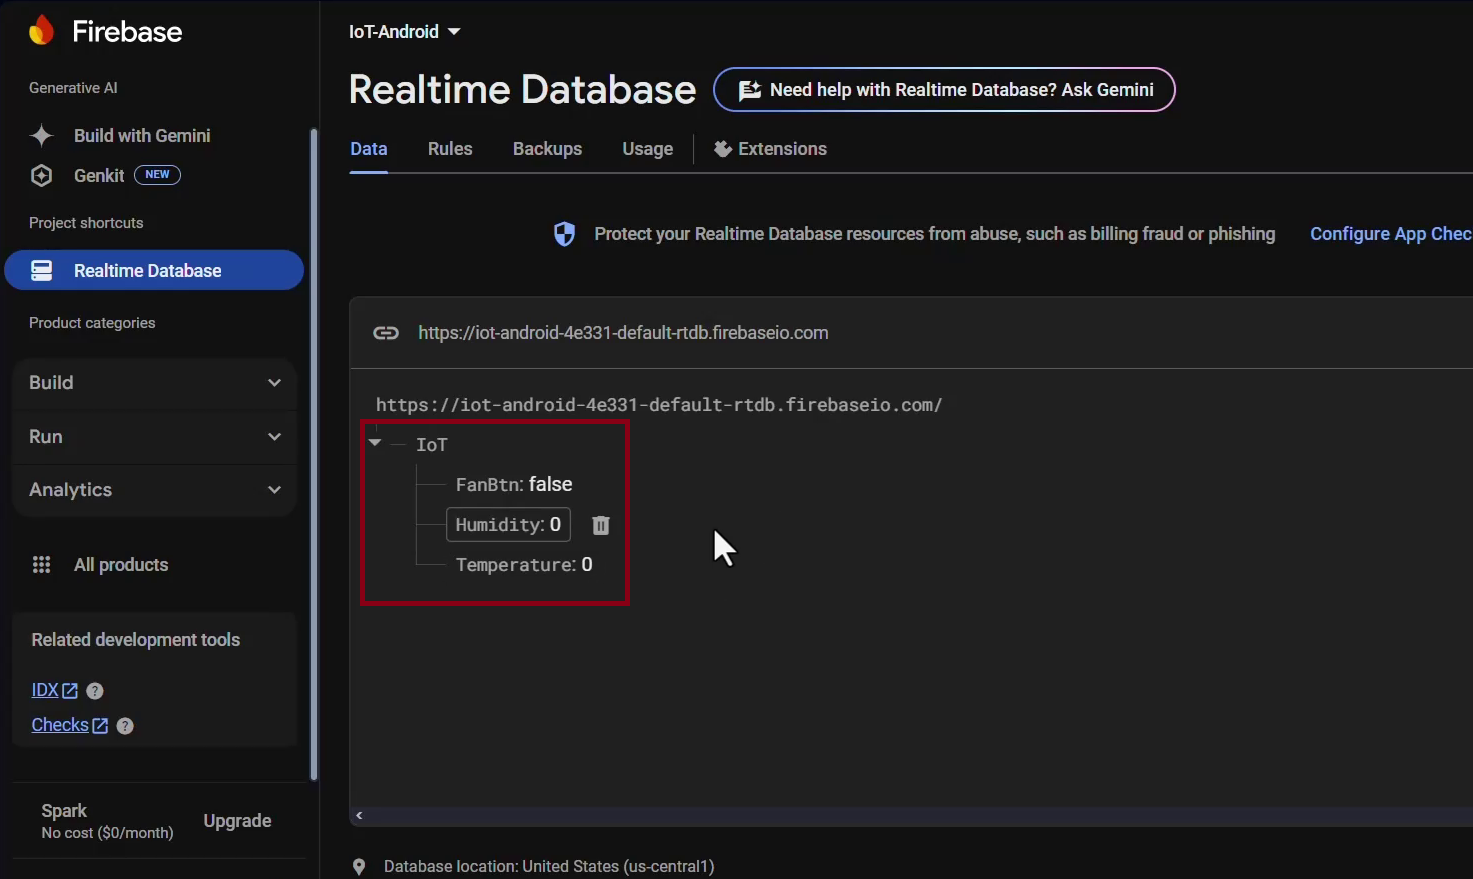
Congratulations! You have successfully created a structured Firebase Realtime Database to store IoT sensor data.
Creating an Android Studio Project and Connecting Firebase Realtime Database
In this section, we will create a new Android Studio project and connect it to Firebase Realtime Database. Follow the step-by-step guide below:
Step 1: Open Android Studio
Launch Android Studio on your computer.
If you don’t have Android Studio installed, download it from the official site: developer.android.com.
Step 2: Create a New Project
Click on “Create New Project”.
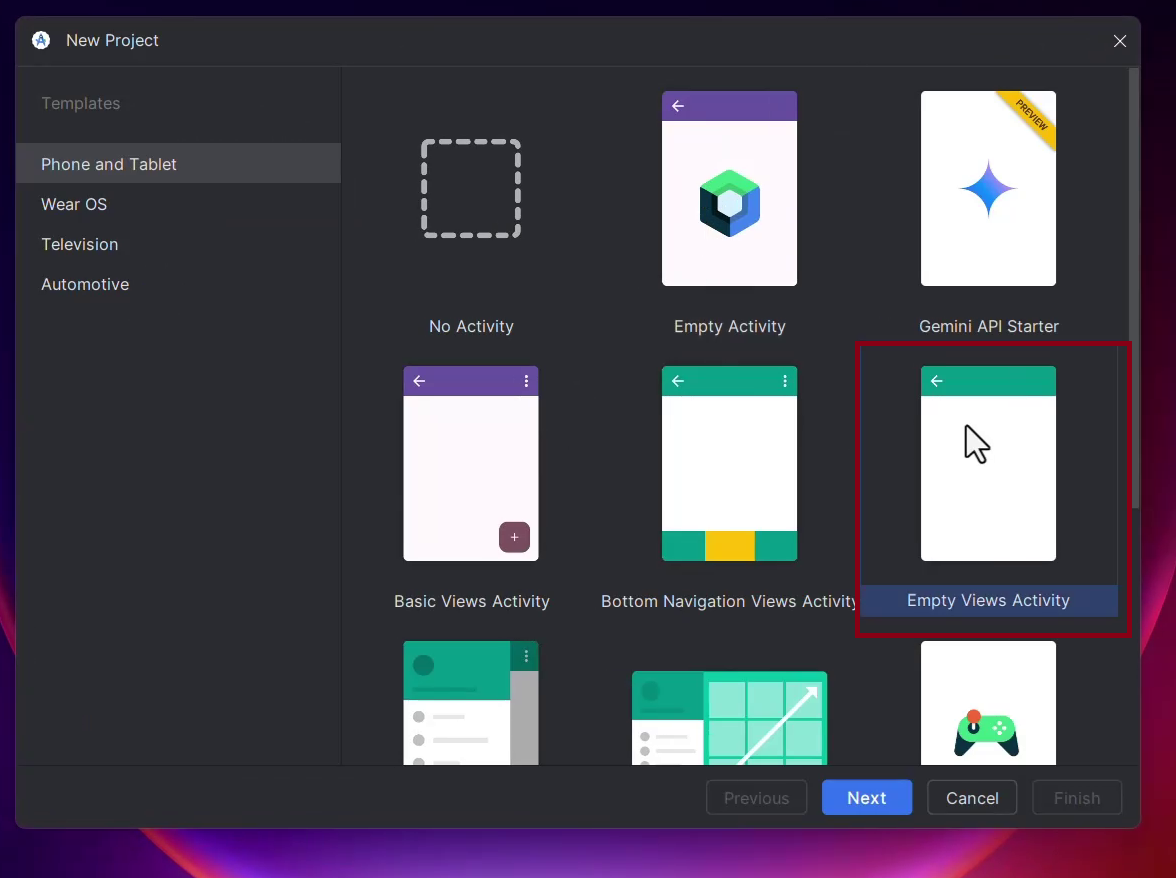
Choose “Empty Views Activity” (or Empty Activity in older versions).
Click Next.
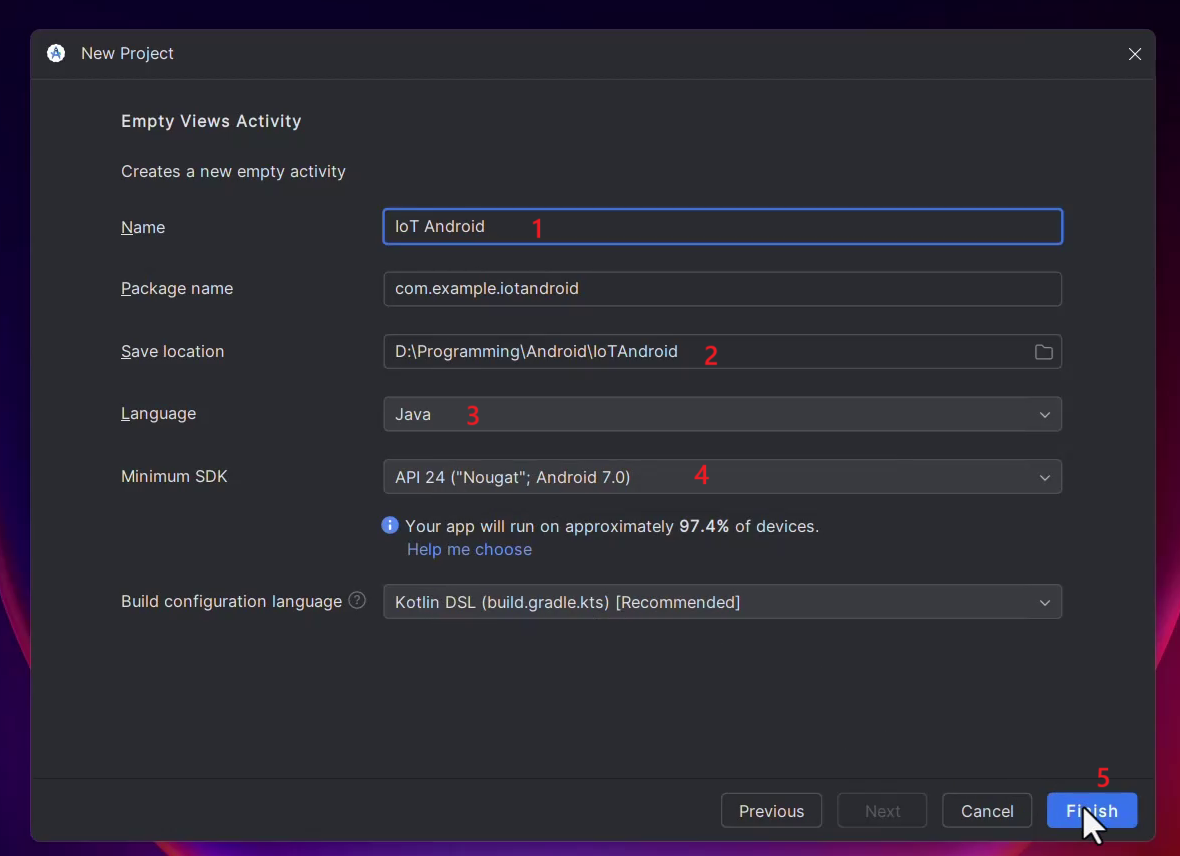
Step 3: Configure the Project
Name your project (e.g.,
FirebaseIoT).Select Save Location where you want to store the project files.
Choose Java as the programming language.
Set Minimum SDK (I selected API 24: Android 7.0 (Nougat)).
Click Finish.
Step 4: Display the Menu Bar (if not visible)
Once the project template is ready, if you don’t see the menu bar:
Right-click on the top window border.
Select "Show Main Menu in Separate Toolbar" to make it visible.

Step 5: Open Firebase Assistant in Android Studio
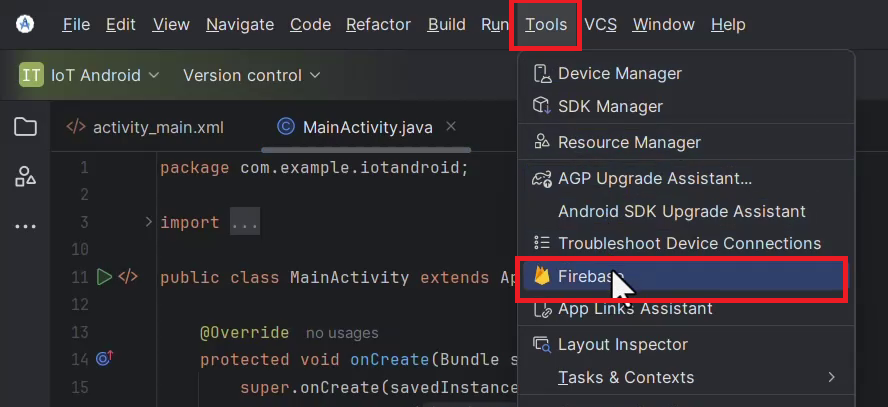
Go to Tools in the top menu bar.
Scroll down and select Firebase.
Step 6: Set Up Firebase Realtime Database
In the Firebase Assistant window, find "Realtime Database".
Click on “Get started with Realtime Database”.
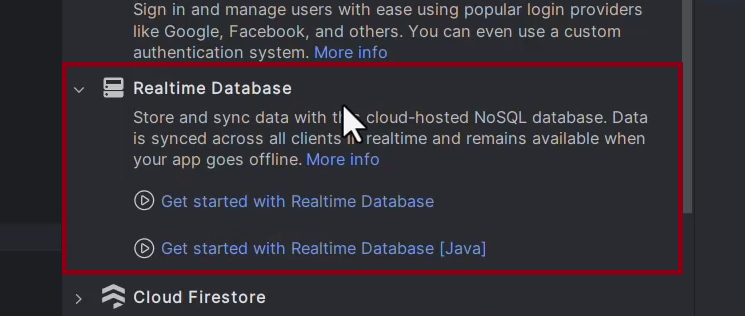
Step 7: Connect Android Studio Project to Firebase
Click on "Connect to Firebase".
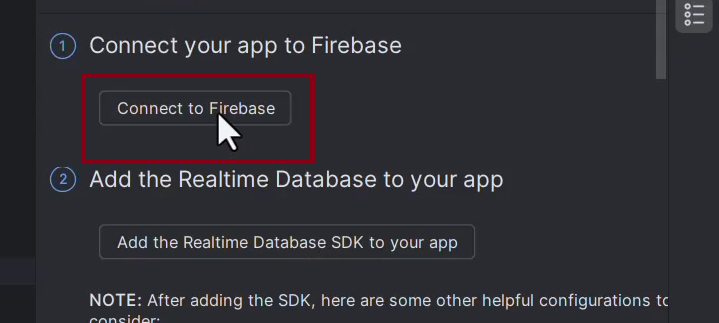
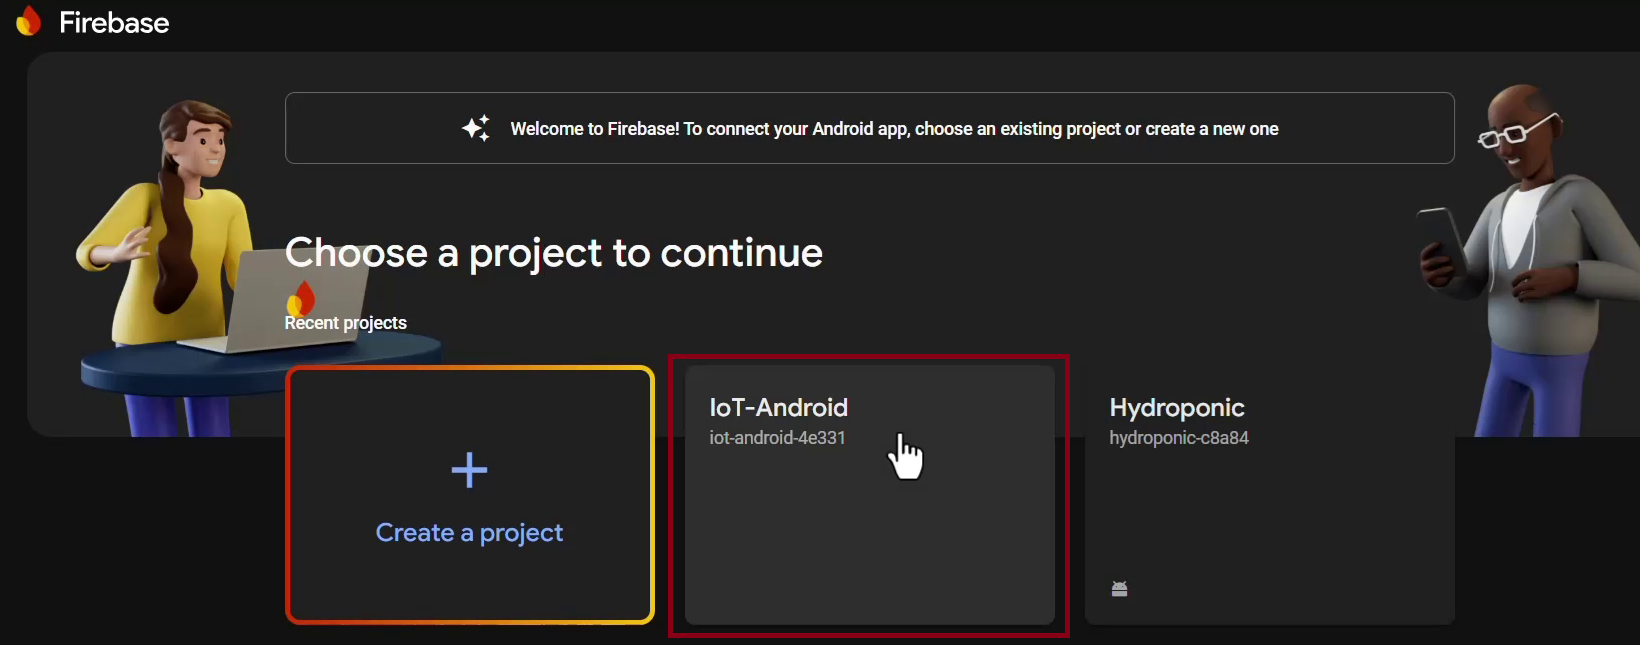
A browser window will open, directing you to the Firebase Console.
Select the previously created Firebase project.
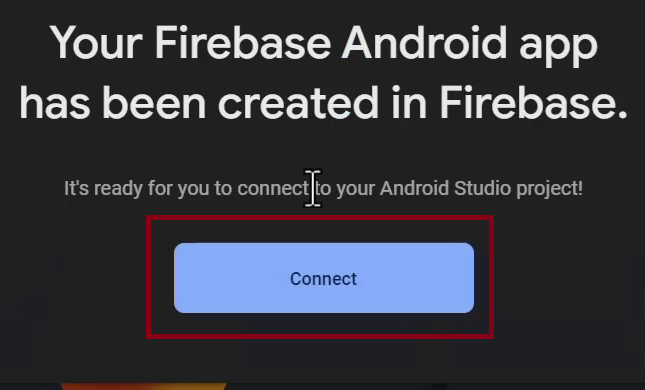
Click "Connect" to link Firebase with your Android Studio project.
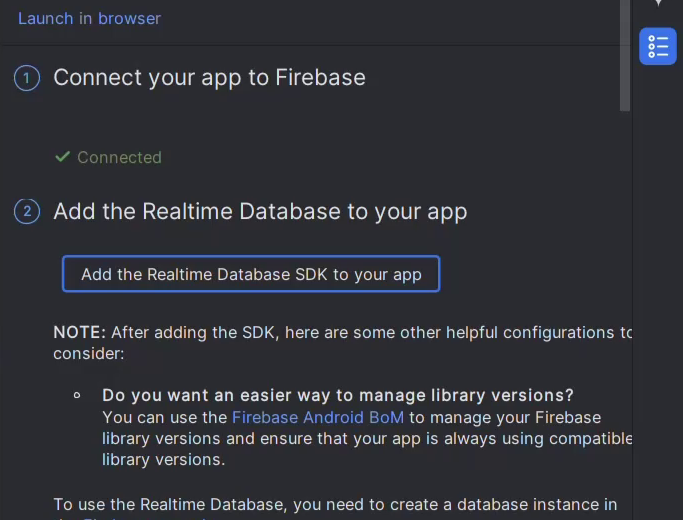
Step 8: Add Firebase Realtime Database SDK to Your App
- After connecting Firebase, click the second button:
"Add Realtime Database SDK to your app".
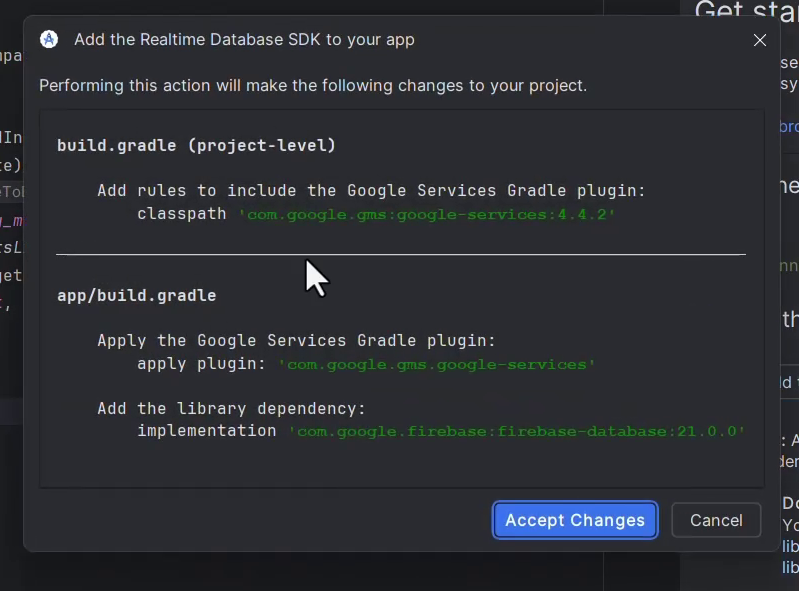
- A new window will appear. Click “Accept Changes” to add the required Firebase dependencies to your project.
Designing the UI for IoT Android App in Android Studio
Now that we have set up our Firebase Realtime Database connection, it's time to design the UI for our IoT Android app. The interface will display Temperature and Humidity values from Firebase and include a button to control the fan.
Step 1: Open the XML Layout File
Open activity_main.xml (or the XML file associated with your activity).
Switch to Design View or Code View as per your preference.
Design following layout using TextView and Button.
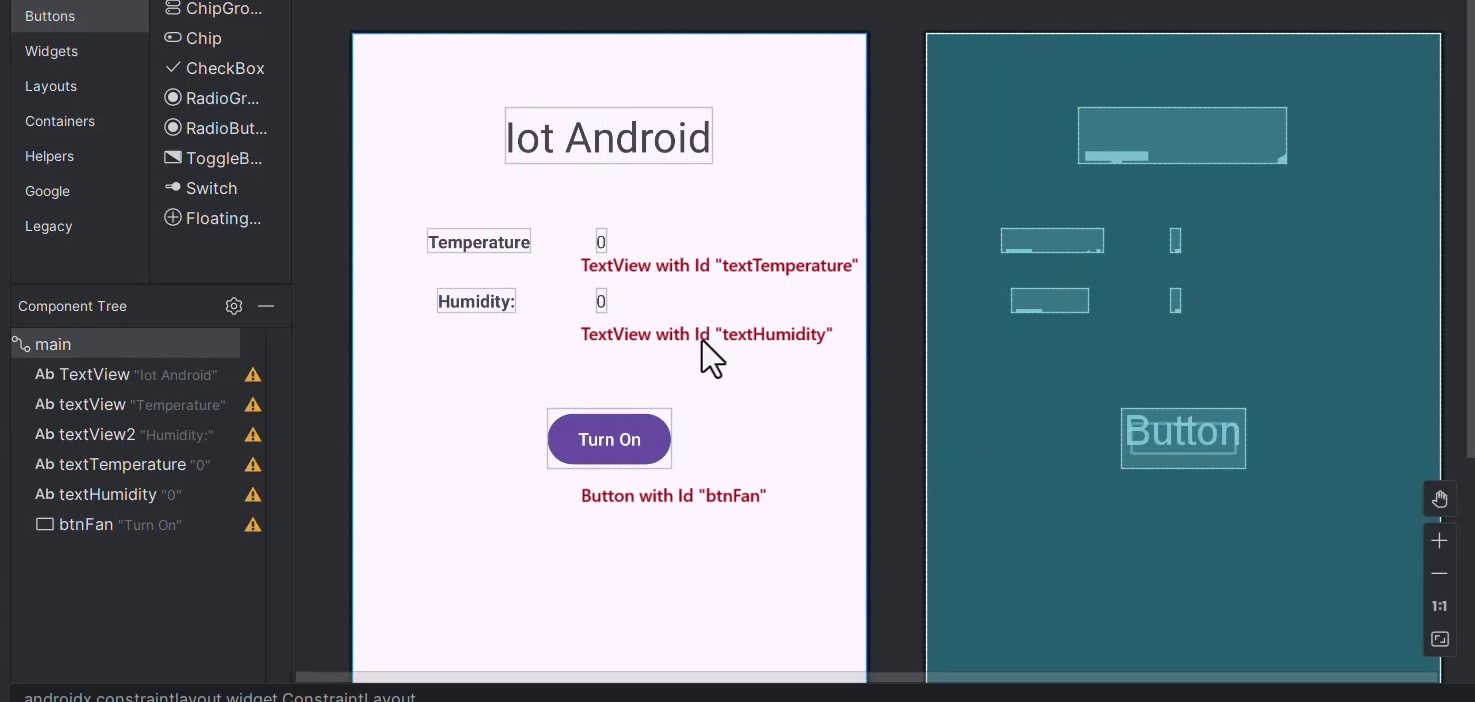
Final UI Overview
After completing these steps, the UI will look like this:
✔ IoT Android (Title at the top, larger font)
✔ Temperature label and value displayed
✔ Humidity label and value displayed
✔ Fan ON/OFF button at the bottom
Congratulations! The UI for your IoT Android app is now complete!
Writing Java Code for Firebase Realtime Database Integration in Android Studio
Now that we have designed the UI for our IoT Android app, let’s write the Java code to fetch real-time data from Firebase and control the fan with a button click.
Step 1: Add Required Imports
Open MainActivity.java and add the following imports at the top of the file:
import android.os.Bundle;
import android.view.View;
import android.widget.Button;
import android.widget.TextView;
import android.widget.Toast;

import androidx.activity.EdgeToEdge;
import androidx.annotation.NonNull;
import androidx.appcompat.app.AppCompatActivity;
import androidx.core.graphics.Insets;
import androidx.core.view.ViewCompat;
import androidx.core.view.WindowInsetsCompat;

import com.google.firebase.database.DataSnapshot;
import com.google.firebase.database.DatabaseError;
import com.google.firebase.database.FirebaseDatabase;
import com.google.firebase.database.DatabaseReference;
import com.google.firebase.database.ValueEventListener;
These imports include:
✔ UI components (TextView, Button, Toast)
✔ Firebase database classes.
Step 2: Declare Variables
Inside the MainActivity class (before the onCreate method), declare the following variables:
TextView labTemperature;
TextView labHumidity;

Button btnFan;

FirebaseDatabase firebaseDatabase;
DatabaseReference firebaseReference;
These variables will be used to:
✔ Display Temperature and Humidity
✔ Control the fan using a button
✔ Connect to Firebase Realtime Database
✅ Screenshot Suggestion: Show variable declarations inside MainActivity.java.
Step 3: Initialize Variables in onCreate() Method
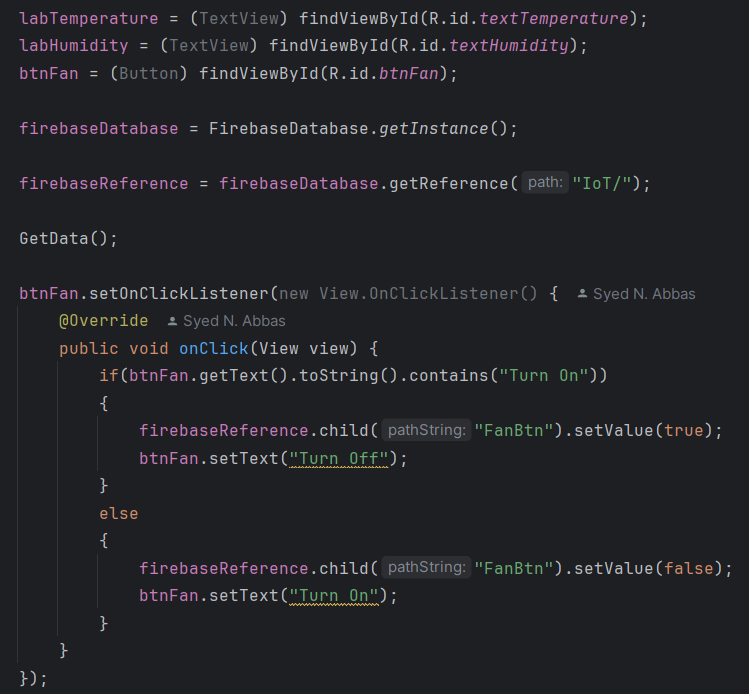
Inside the onCreate() method, after the pre-written code, add:
labTemperature = (TextView) findViewById(R.id.textTemperature);
labHumidity = (TextView) findViewById(R.id.textHumidity);
btnFan = (Button) findViewById(R.id.btnFan);

firebaseDatabase = FirebaseDatabase.getInstance();
firebaseReference = firebaseDatabase.getReference("IoT/");
This code:
✔ Maps UI elements using findViewById()
✔ Gets an instance of Firebase Database
✔ References the "IoT" root node in Firebase
✅ Screenshot Suggestion: Show how UI elements are mapped using findViewById().
Step 4: Implement Fan Button Click Event
Still inside the onCreate() method, below the previous code, add:
btnFan.setOnClickListener(new View.OnClickListener() {
    @Override
    public void onClick(View view) {
        if(btnFan.getText().toString().contains("Turn On"))
        {
            firebaseReference.child("FanBtn").setValue(true);
            btnFan.setText("Turn Off");
        }
        else
        {
            firebaseReference.child("FanBtn").setValue(false);
            btnFan.setText("Turn On");
        }
    }
});
This code:
✔ Checks the button’s text (Turn On/Off)
✔ Updates the Firebase database (FanBtn value)
✔ Changes button text accordingly
Creating a Java Class for Storing Realtime Database Data
To efficiently manage and retrieve data from Firebase Realtime Database, we need to create a Java model class. This class will represent the structure of our Firebase data, making it easier to fetch and update values.
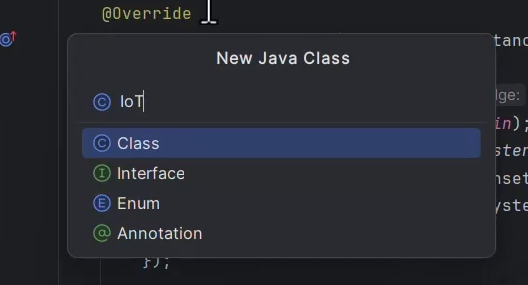
Step 1: Create a New Java Class
Follow these steps to create the IoT class:
1️⃣ In the Project Explorer, navigate to:
📂 Android > App > Java > com.example.iotandroid (your package name)
2️⃣ Right-click on the package name (com.example.iotandroid)
3️⃣ Click on New
4️⃣ Select Java Class
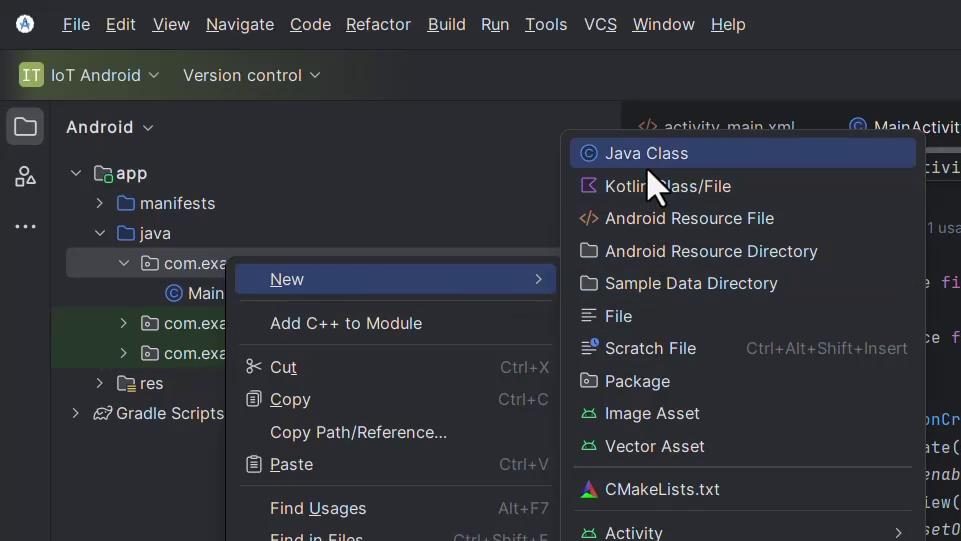
5️⃣ Name it IoT
6️⃣ Press Enter to create the class
Why Do We Need This Class?
The IoT class acts as a data model that helps:
✔ Retrieve data from Firebase into objects
✔ Push new data to Firebase easily
✔ Follow structured data storage
Copy and paste the following code inside your IoT.java file:
public class IoT {
    public int Temperature;
    public int Humidity;
    public boolean FanBtn;

    public IoT() {
        Temperature = 0;
        Humidity = 0;
        FanBtn = false;
    }

    public IoT(int Temperature, int Humidity, boolean FanBtn) {
        this.Temperature = Temperature;
        this.Humidity = Humidity;
        this.FanBtn = FanBtn;
    }
}
Explanation of the Code
1️⃣ Fields (Attributes)
Temperature→ Stores the temperature value as an integerHumidity→ Stores the humidity value as an integerFanBtn→ Stores the fan's state (truefor ON,falsefor OFF)
2️⃣ Default Constructor
This constructor initializes
Temperature,Humidity, andFanBtnwith default values (0andfalse).Firebase requires an empty constructor when mapping data to Java objects.
3️⃣ Parameterized Constructor
- This constructor allows setting custom values when creating an
IoTobject.
How This Class Works with Firebase
When Firebase retrieves data, it automatically maps the database values to this class based on the attribute names.
Fetch Real-Time Data from Firebase
Go back to MainActivity and outside the onCreate() method, define the GetData() method:
private void GetData()
{
    firebaseReference.addValueEventListener(new ValueEventListener() {
        @Override
        public void onDataChange(@NonNull DataSnapshot snapshot) {

            IoT iot = snapshot.getValue(IoT.class);

            if(iot != null){

                labTemperature.setText(Integer.toString(iot.Temperature));
                labHumidity.setText(Integer.toString(iot.Humidity));

                if(iot.FanBtn)
                {
                    btnFan.setText("Turn Off");
                }
                else {
                    btnFan.setText("Turn On");
                }
            }
        }

        @Override
        public void onCancelled(@NonNull DatabaseError error) {
            // calling on cancelled method when we receive
            // any error or we are not able to get the data.
            Toast.makeText(MainActivity.this, "Fail to get data.", Toast.LENGTH_SHORT).show();
        }
    });
}
This method:
✔ Listens for changes in Firebase data
✔ Retrieves "Temperature", "Humidity", and "FanBtn" values
✔ Updates UI dynamically
✔ Handles errors gracefully
Call GetData() in onCreate()
Now, go back to the onCreate() method and call GetData() at the end:
GetData();
This ensures data is fetched immediately when the app starts.
Adding Internet Permissions in AndroidManifest.xml
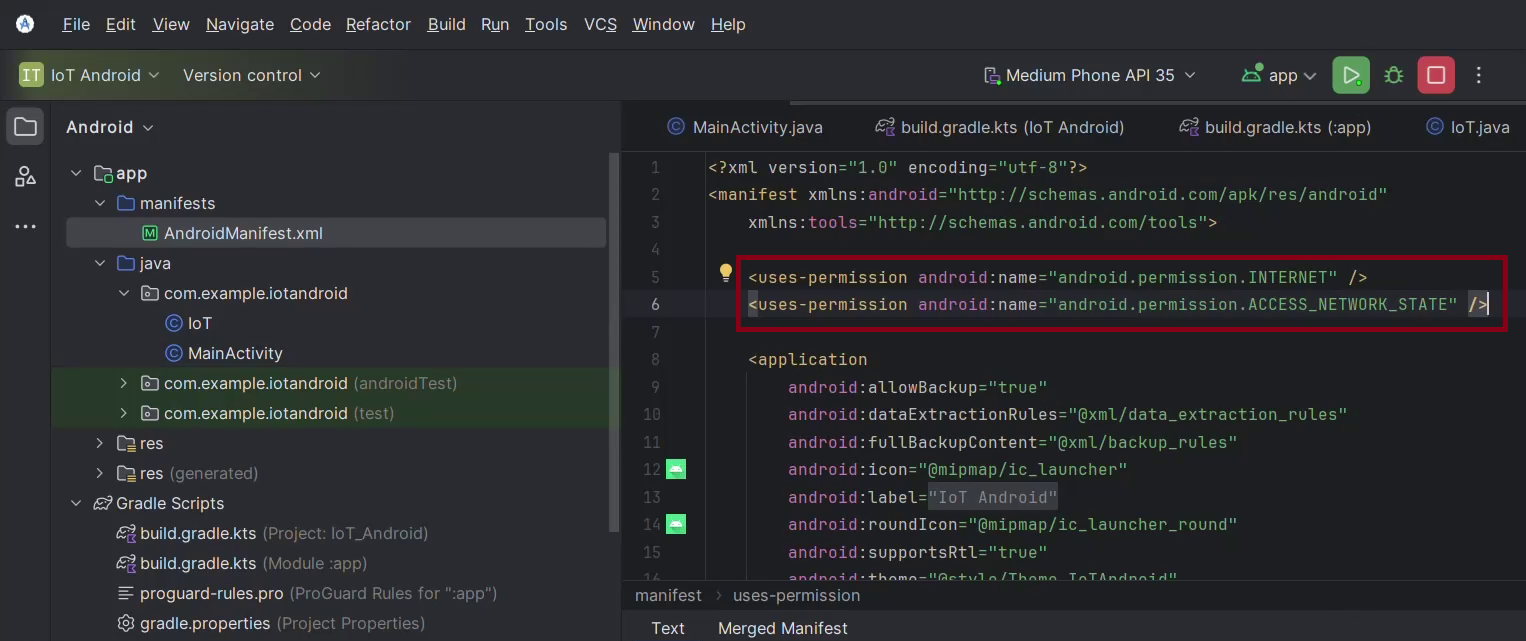
For the Firebase Realtime Database to work correctly, your app must have Internet access. We need to declare this permission in the AndroidManifest.xml file.
Steps to Add Internet Permission:
1️⃣ Open AndroidManifest.xml in your Android Studio project.
2️⃣ Locate the <manifest> tag at the top of the file.
3️⃣ Add the following permission inside the <manifest> tag but outside <application>:
<uses-permission android:name="android.permission.INTERNET" />
<uses-permission android:name="android.permission.ACCESS_NETWORK_STATE" />
🛠️ Testing the Firebase Realtime Database Integration
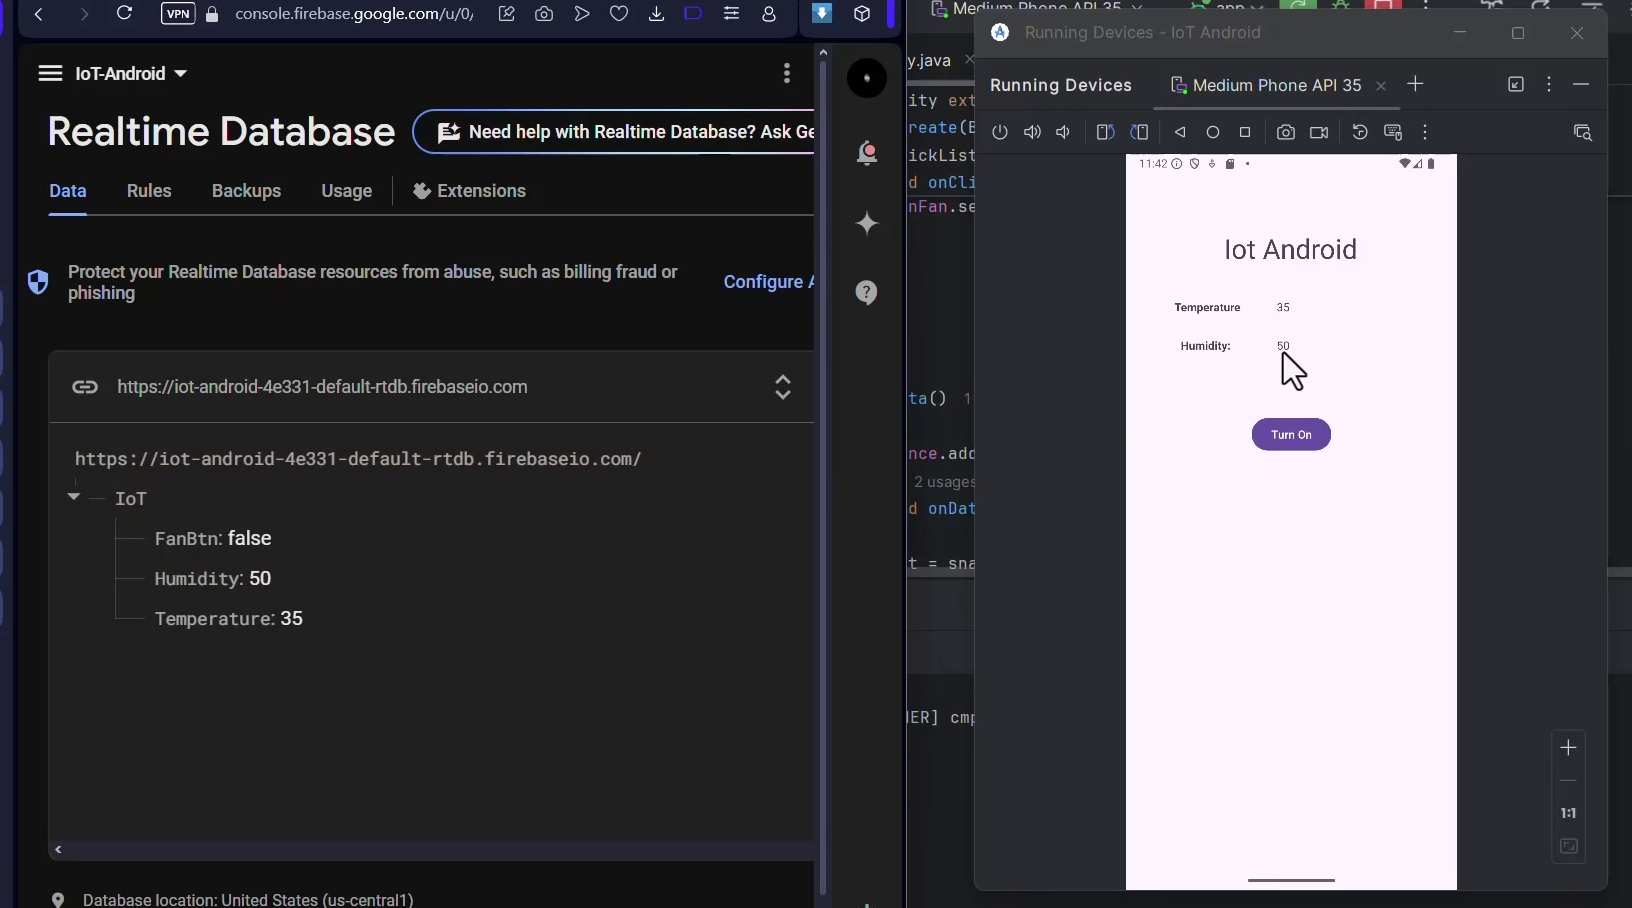
Now that we've successfully set up our Android app with Firebase, it's time to test the system to ensure real-time data synchronization.
1️⃣ Open Firebase Realtime Database in a Browser
Go to Firebase Console.
Select your project (the one connected to the Android app).
From the left sidebar, expand the Build section and click Realtime Database.
You will see your database structure (the "IoT" node with Temperature, Humidity, and FanBtn).
2️⃣ Run the Android App on an Emulator or Physical Device
Open Android Studio.
Click on the Run (▶) button to launch the app on an emulator or physical device.
Make sure your device is connected to the internet.
🔹 Test 2: Change Fan Button State from App
✅ Press the Fan Button in the App:
Click the "Turn On" button in the app.
This should update FanBtn in Firebase to
true.The button text should now change to "Turn Off".
✅ Now, check Firebase Console:
- The FanBtn value should be updated in real-time (
trueorfalsebased on the button state).
📌 Expected Behavior:
Pressing "Turn Off" should update Firebase and reflect the change in the database.
The app and Firebase database should stay in sync at all times.
🎯 What to Check if Something Doesn't Work?
✔ Ensure Firebase Rules allow read/write access.
✔ Check Internet permissions in AndroidManifest.xml (already added).
✔ Ensure Firebase SDK is correctly added in Gradle dependencies.
✔ Make sure the app is using the correct Firebase Database URL.
📺 Watch the Full Video Tutorial
If you prefer a step-by-step video walkthrough, check out my YouTube tutorial on this topic:
Don't forget to like, share, and subscribe for more tutorials! 🚀
Subscribe to my newsletter
Read articles from Programming Concepts directly inside your inbox. Subscribe to the newsletter, and don't miss out.
Written by
Programming Concepts
Programming Concepts
Hey there! I'm Syed Naveed Abbas – a passionate software developer, educator, and tech enthusiast. I specialize in .NET (ASP.NET, WPF, .NET MAUI), Python (AI, Machine Learning, Computer Vision), Embedded Systems (Arduino, ESP32, STM32), and Cybersecurity. On my blog, I share in-depth tutorials, coding best practices, project-based learning, and insights into modern software development. My goal is to simplify complex concepts and help developers, students, and tech enthusiasts learn efficiently and build real-world applications. I also run the Programming Concepts YouTube channel, where I create practical coding tutorials on topics like Inventory Management Systems, AI-powered applications, Firebase integration, and ethical hacking (for educational purposes). Join me on this journey of learning and innovation! Let's code, build, and grow together. Follow me for: ✅ Hands-on coding tutorials ✅ Open-source projects ✅ Software development best practices ✅ AI & Machine Learning experiments ✅ IoT & Embedded Systems guides Let’s connect! Drop a comment, ask a question, or share your thoughts. I love engaging with fellow developers and learners.