Deployed a 3-Tier Architecture on AWS
 Ankita Lunawat
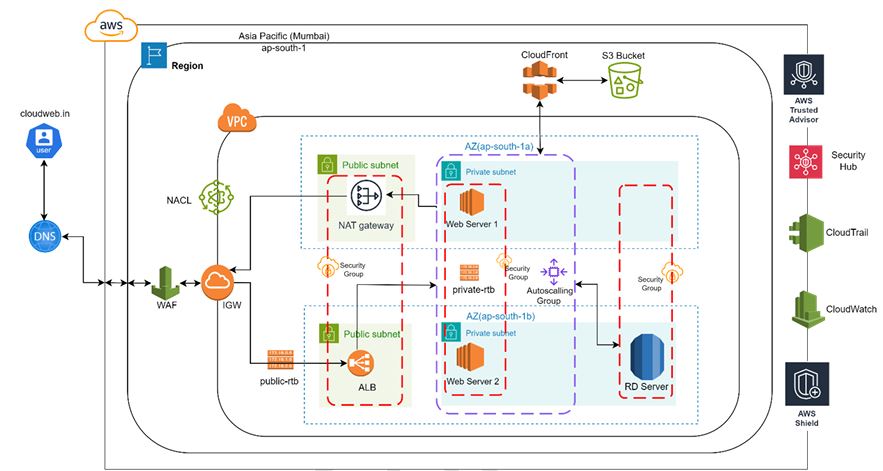
A 3-tier architecture project using a range of AWS services to create a scalable, secure, and highly available infrastructure.
Key Services :
1. Networking:-
VPC: To keep the network layer separate.
Subnets: Public and private subnets spread across multiple AZs.
Route Tables: For directing traffic between different layers.
Internet Gateway (IGW) & NAT Gateway: To allow secure internet access for resources.
NACL (Network Access Control Lists): For extra security at the subnet level.
2. Compute:-
EC2 Instances:For hosting the application and database layers..
Launch Templates: To set up EC2 configurations.
Auto Scaling: To automatically adjust the number of EC2 instances based on demand..
Target Groups: To send traffic to the right instances.
3. Load Balancing:-
Elastic Load Balancer (ELB): For spreading incoming traffic across EC2 instances.
4. Security:-
IAM: To securely manage access.
AWS WAF: Web Application Firewall (WAF) to block harmful traffic.
AWS Shield: DDoS protection for better security.
Security Hub: Centralized monitoring for security and compliance.
AWS Trusted Advisor:For ongoing best practice advice.
5. Monitoring & Logging:-
AWS CloudTrail: For tracking API activity.
CloudWatch:For keeping track of application and infrastructure metrics.
6. DNS & Content Delivery:-
Amazon Route 53: For DNS routing.
AWS CloudFront: For delivering content quickly with low delay.
7. Database:-
Amazon RDS: For reliable and scalable database management.
8. Storage:-
S3 Bucket: For safe and long-lasting data storage.
Building a 3-tier infrastructure in AWS usually means setting up a web tier, an application tier, and a database tier, focusing on high availability, security, and scalability. Here are the main steps to create a 3-tier architecture.
Step 1 - Create VPC.
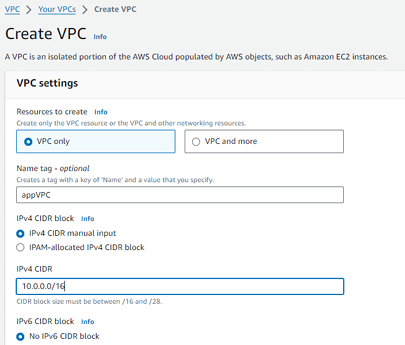
Step 2 - Create 4 subnets in your VPC for different availability zones (2 public and 2 private)
Note - Divide the CIDR range to create a 4-subnet address.
1.Public Subnet 1: 10.0.1.0/24 in AZ1.
2.Public Subnet 2: 10.0.2.0/24 in AZ2.
3.Private Subnet 1: 10.0.3.0/24 in AZ1.
4.Private Subnet 2: 10.0.4.0/24 in AZ2.
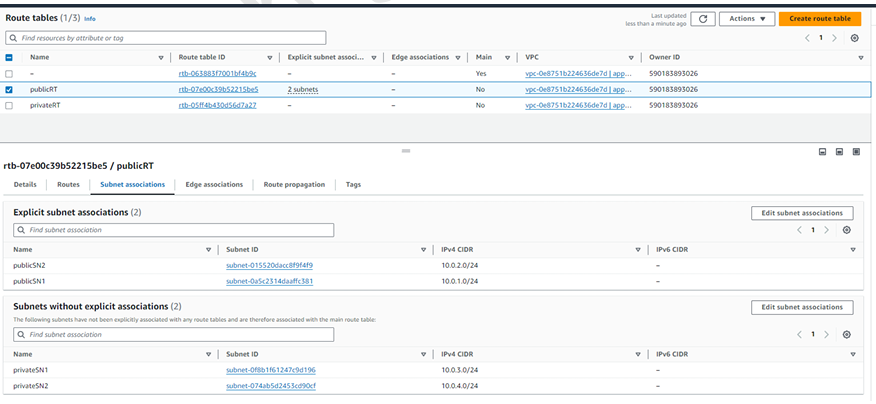
Step 3 - Create 2 route table .

Note – You can use the default route table as a public. (In the Main column it is mentioned as ‘Yes’.)
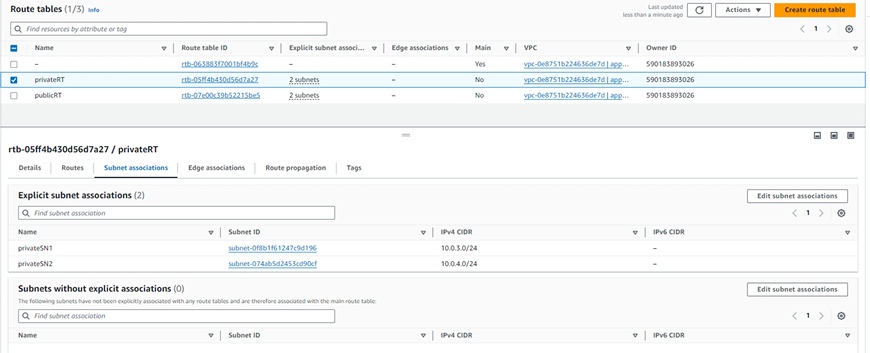
Step 4 - Add a public and private subnet into the public and private route table using subnet association.
1. Public route table.
2. Private route table.
Step 7 - Create IGW.

Step 6 - Attached IGW to VPC.

Step 7 – Edit the public route table and add IGW through Routes
Step 8 - Create a NAT gateway with a public subnet and allocate an elastic IP Address.
Step 9 - Add NAT Gateway to the private route table by editing the Routes
1. For ALB 2. For Instances 3. For Database
Step 10 - Create Target Group.
Step 11 - Create 3 security groups: one for the load balancer (ALB), one for the EC2 instance, and one for the database.
Step 12 - Create an ALB (Application Load Balancer) and set it up in the public subnets.

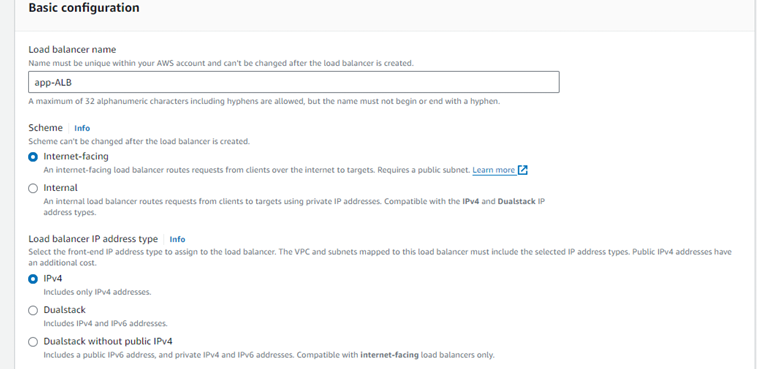
Step 13 - Create a Launch Template.

Note –use the following user data in Additional Details.
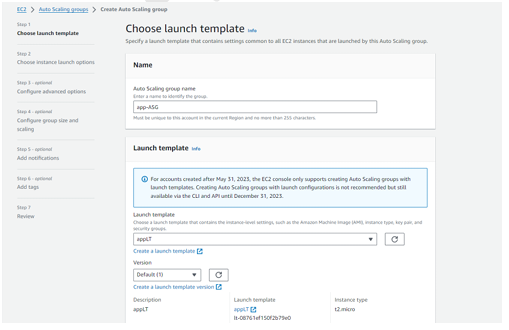
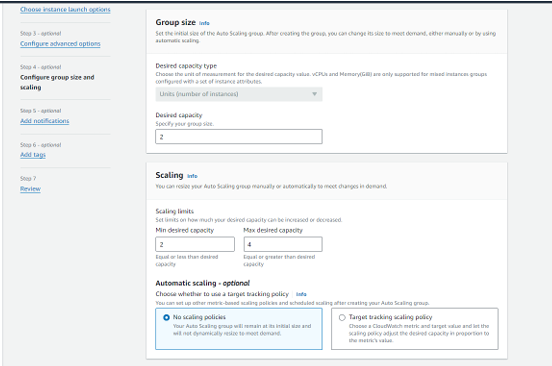
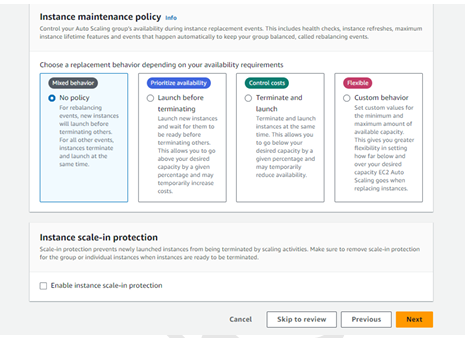
Step 14 - Create an Auto Scaling group.
#!/bin/bash
yum update -y
yum install -y httpd
systemctl start httpd
systemctl enable httpd
Note – use the below user data in Addition Details.
echo "<html><h1>Welcome to the Web Server</h1></html>" > /var/www/html/index.html
Note – Two instances should be created automatically.

Step 15 – EDIT the inbound rule of the security group of a load balancer (ALB)
Step 16 - Edit the inbound rule of the security group of an Instance.
Step 17 – Copy the DNS name of the Load balancer and browse it.

The application deployed successfully.
Step 18 – Create a Database to store, retrieve, and manage application data.
Creation method – standard
Engine option – MySQL
Engine version
Template – Production
Availability – Multi-AZ DB Instance (for high availability)
Give DB name and password
Set Storage (can’t set less than 100 GB for the MySQL DB)
Connectivity Select the right VPC where the application is deployed
(Note – After the Database is created, we can’t change its VPC)
Note - After successfully creating the database. Check the below configuration
1.Storage Auto Scaling enables the scalability and increase the performance
2.Encryptions is enabled for the security.
3.Multi-AZ DB provides high-availability.
Step 19 – EDIT the inbound rule of the security group of a Database and allow the traffic to only come from the application.
Step 20 – Create an S3 Bucket for storing the Objects.

Step 21 – Enable static website hosting to host a static website if needed.
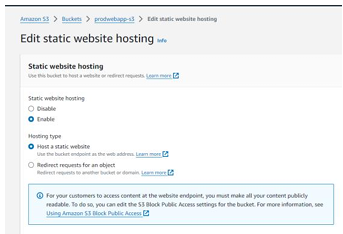
Step 22 – Create CloudFront to make content delivery faster.

CloudFront was enabled successfully. Connect the application to RDS and CloudFront using endpoint connectivity.
Step 23 – Turn on the following services
Note – For production env always enable Security Hub, CloudTrail, and CloudWatch to your AWS Account. also attach WAF, and DNS to your account.
AWS Security Hub: Gathers all security alerts and compliance information in one place, helping you keep your AWS environment safe and meet industry rules.
AWS CloudTrail: It helps store all API logs. It records all actions taken in your AWS account, such as who did what and when. This is important for keeping track of changes and staying secure.
AWS CloudWatch: Keeps an eye on your AWS resources, tracks performance, and sends alerts if something goes wrong. It's key to making sure everything runs smoothly and fixing problems quickly.
Firewall: The firewall controls incoming and outgoing network traffic based on predetermined security rules. it creates a barrier between a trusted internal network and untrusted external networks.
Route 53: Route 53 helps translate human-readable domain names (e.g., www.example.com) into IP addresses (e.g., 192.0.2.44) so that computers can communicate with each other.
AWS Shield: AWS Shield protects against DDoS attacks by offering automated detection and mitigation to safeguard your AWS infrastructure.
Hence, Deployed a 3-Tier Architecture on AWS
Happy Learning,Have a good day…!
Subscribe to my newsletter
Read articles from Ankita Lunawat directly inside your inbox. Subscribe to the newsletter, and don't miss out.
Written by

Ankita Lunawat
Ankita Lunawat
Hi there! I'm a passionate AWS DevOps Engineer with 2+ years of experience in building and managing scalable, reliable, and secure cloud infrastructure. I'm excited to share my knowledge and insights through this blog. Here, you'll find articles on: AWS Services: Deep dives into core AWS services like EC2, S3, Lambda, and more. DevOps Practices: Best practices for CI/CD, infrastructure as code, and automation. Security: Tips and tricks for securing your AWS environments. Serverless Computing: Building and deploying serverless applications. Troubleshooting: Common issues and solutions in AWS. I'm always eager to learn and grow, and I hope this blog can be a valuable resource for fellow DevOps enthusiasts. Feel free to connect with me on [LinkedIn/Twitter] or leave a comment below!