Linux Training : Section 8 (Part-3)
 Aditya Dev Shrivastava
Samba
Samba is a Linux tool or utility that allows sharing for Linux resources such as files and printers to with other OS.
It works exactly like NFS but the difference is NFS shared within Linux or Unix like system whereas Samba shares with other OS (e.g., Windows, MAC etc)
For Example, Computer “A“ shared its filesystem with computer “B“ using Samba then computer “B“ will see that shared filesystem as if it is mounted as the local filesystem.
Samba shares its filesystem through a protocol called SMB (Server Message Block) which was invented by IBM
Another protocol used to share Samba is through CIFS (Common Internet File System) invented by Microsoft and also NMB (NetBios Name server)
CIFS became the extension of SMB and now Microsoft has introduced newer version of SMB v2 and v3 that are mostly used in the industry
Most people, when they use either SMB or CIFS, are talking about the same exact thing. The two are interchangeable not only in discussion, but also in application – i.e., a client speaking CIFS can talk to a server speaking SMB and vice versa. Why? Because CIFS is a form of SMB
Step by steps installation instructions
First please make sure to take a snapshot of your VM
Install samba packages
# Become root user# yum install samba samba-client samba-common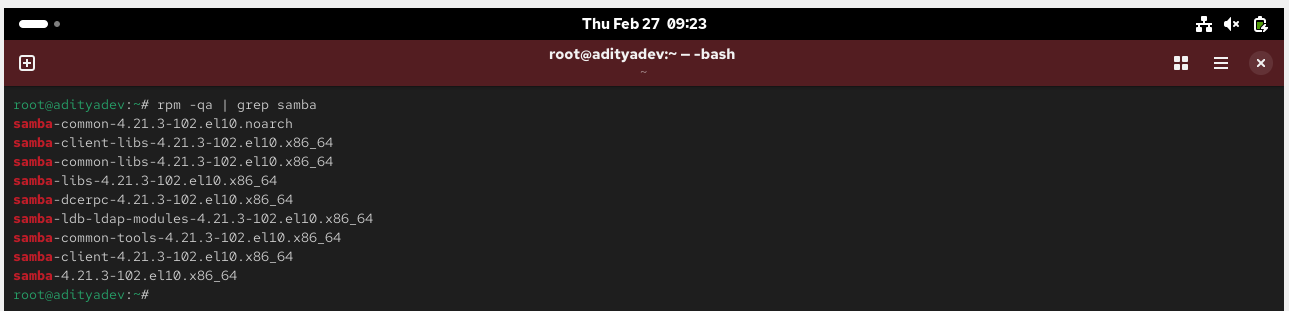
Enable samba to be allowed through firewall (Only if you have firewall running)
# firewall-cmd --permanent --zone=public --add-service=samba# firewall-cmd –reloadTo stop and disable firewall or iptables
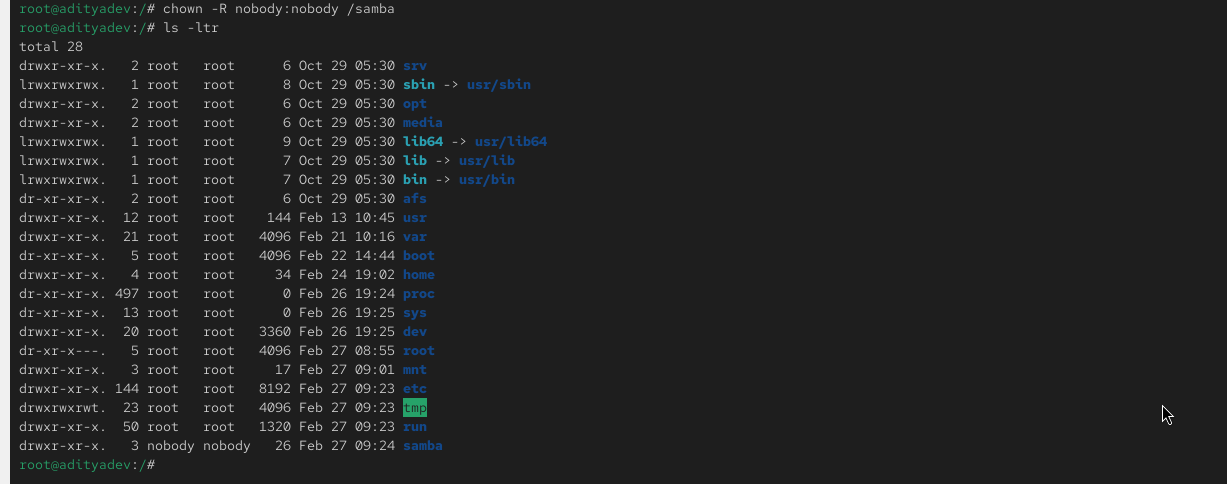
# systemctl stop firewalld# systemctl stop iptables# systemctl disable firewalld# systemctl disable iptablesCreate Samba share directory and assign permissions
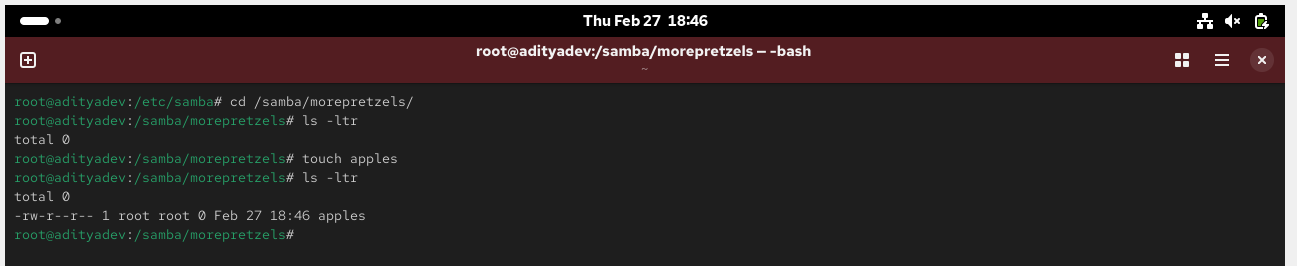
# mkdir -p /samba/morepretzels# chmod a+rwx /samba/morepretzels# chown -R nobody:nobody /samba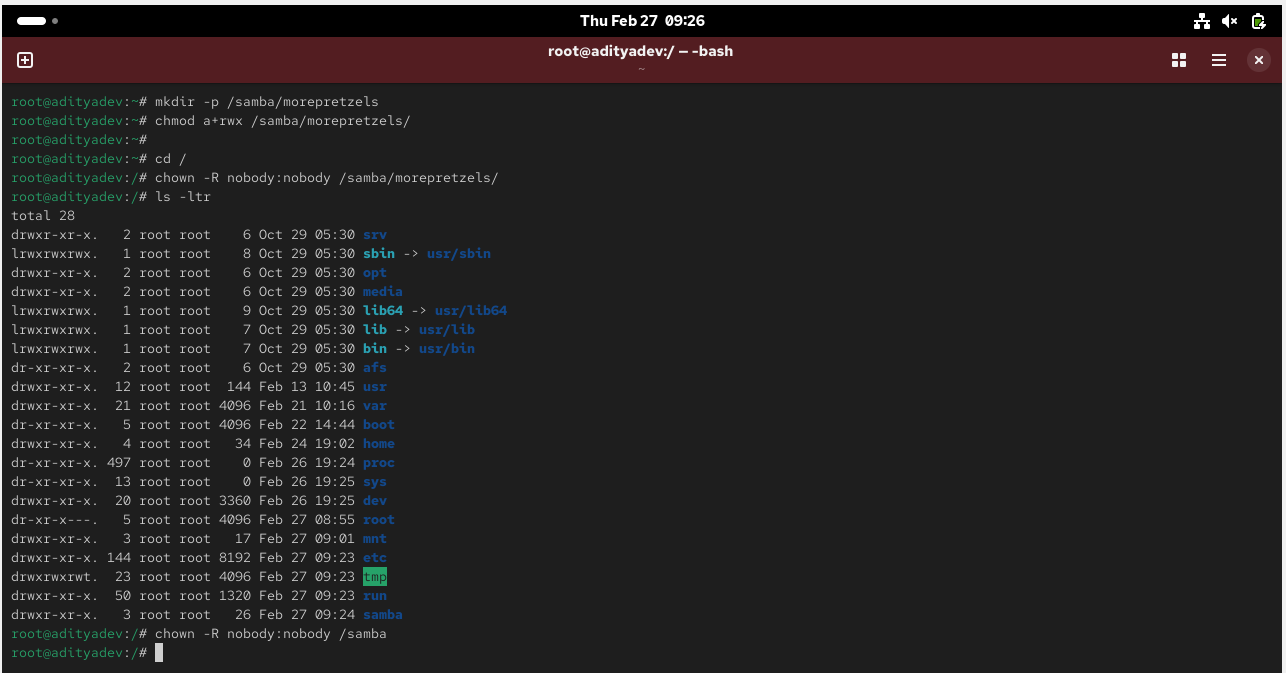
Also, you need to change the SELinux security context for the samba shared directory as follows: (Only if you have SELinux enabled)
# chcon -t samba_share_t /samba/morepretzels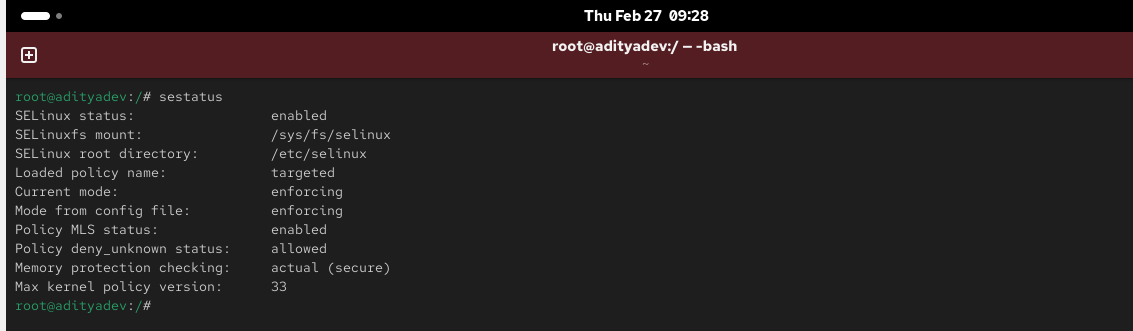
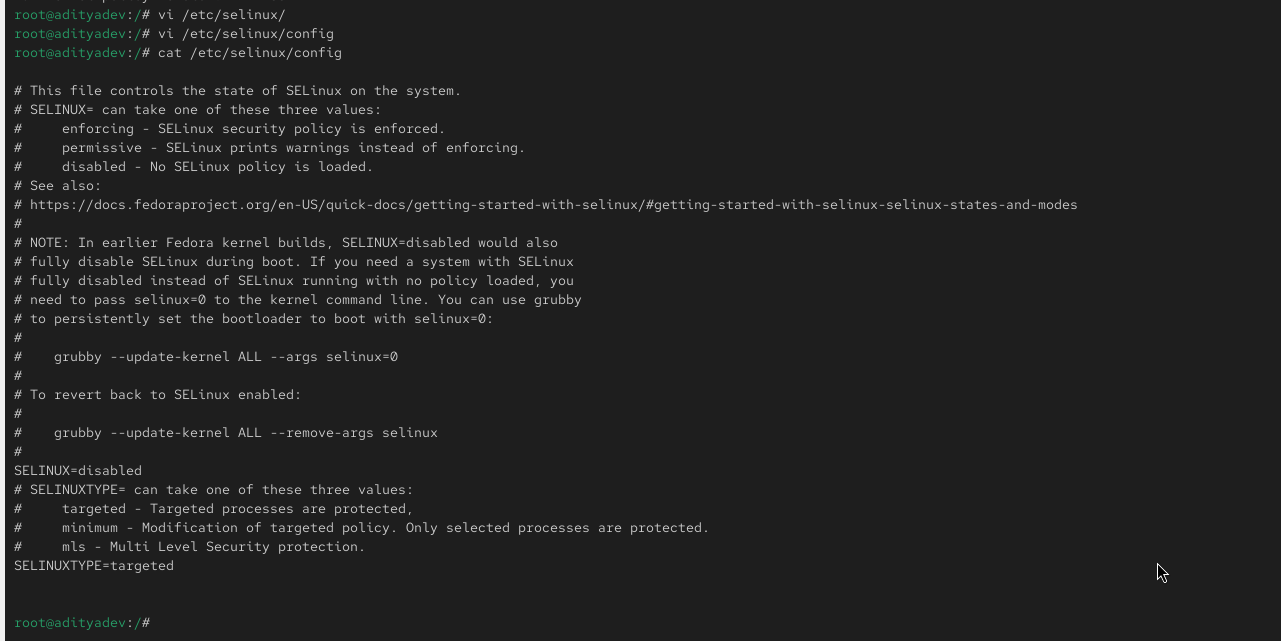
If you want to disable SELinux, follow these instructions
# sestatus To check the SELinux status)# vi /etc/selinux/configChange SELINUX=enforcing To SELINUX=disabled# reboot
Modify
/etc/samba/smb.conffile to add new shared filesystem (Make sure to create a copy of smb.conf file) Delete everything from smb.conf file and add the following parameters
[global]workgroup = WORKGROUPnetbios name = centossecurity = usermap to guest = bad userdns proxy = no[Anonymous]path = /samba/morepretzelsbrowsable = yeswritable = yesguest ok = yesguest only = yesread only = no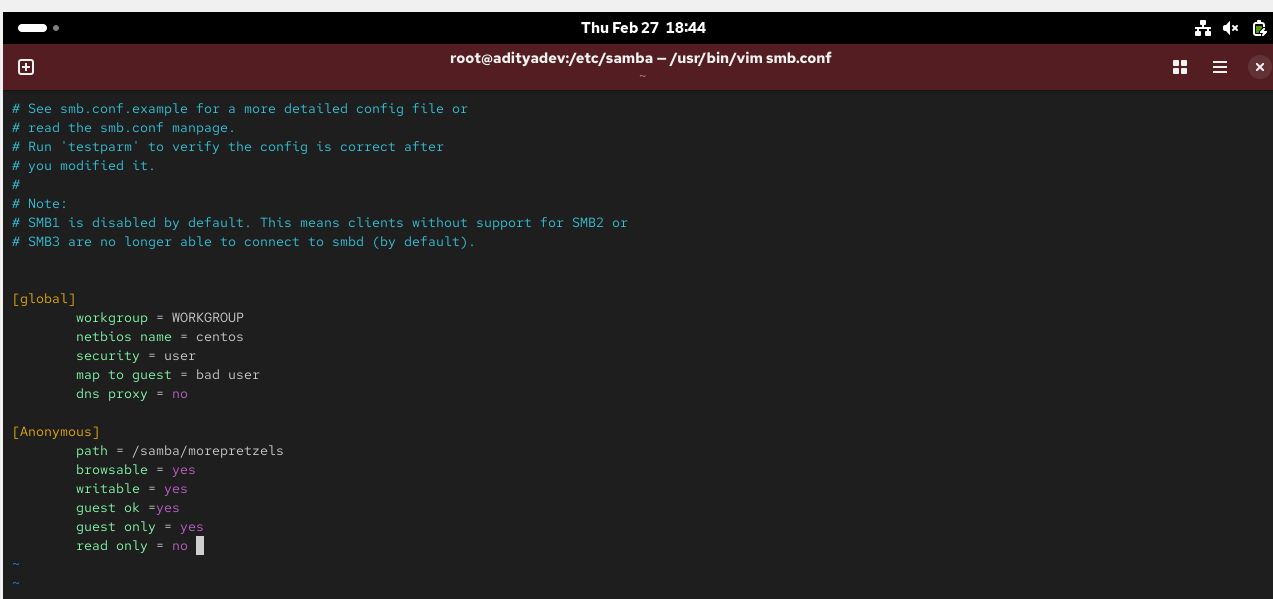
Verify the setting
# testparm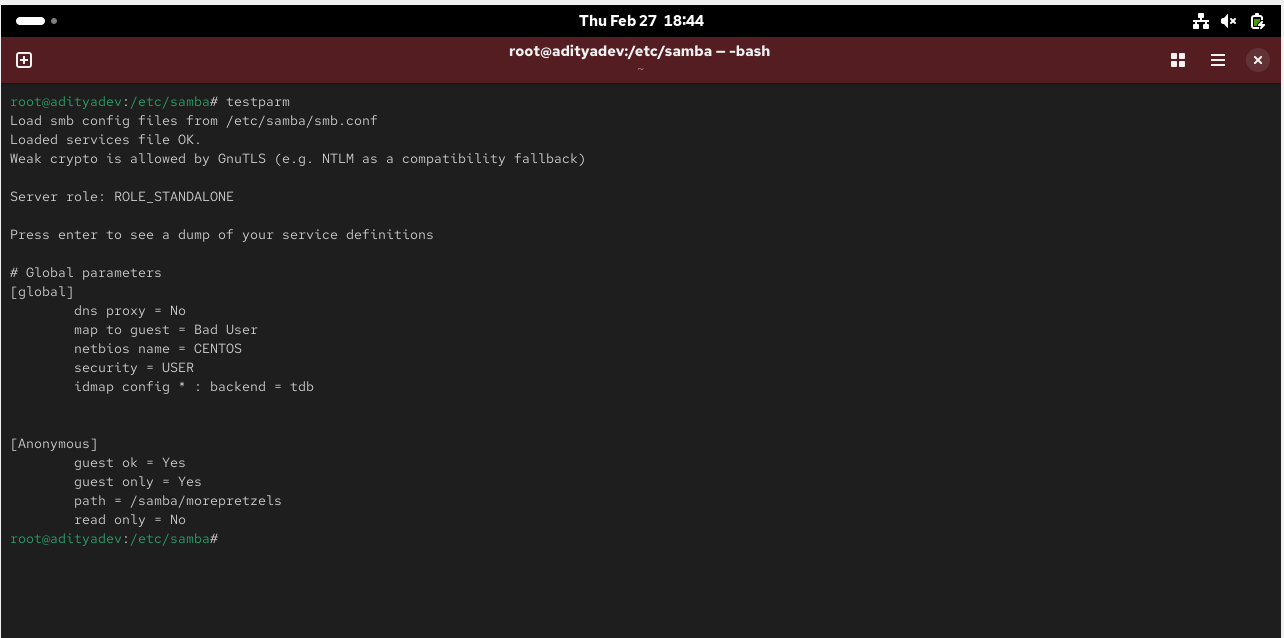
Once the packages are installed, enable and start Samba services
# systemctl enable smb# systemctl enable nmb# systemctl start smb# systemctl start nmb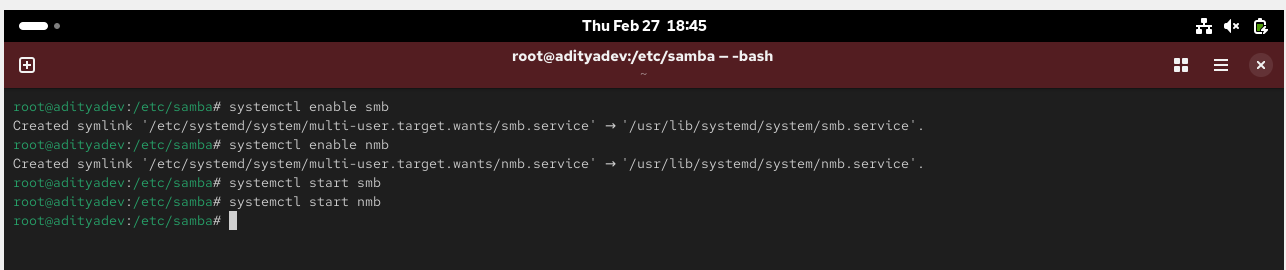
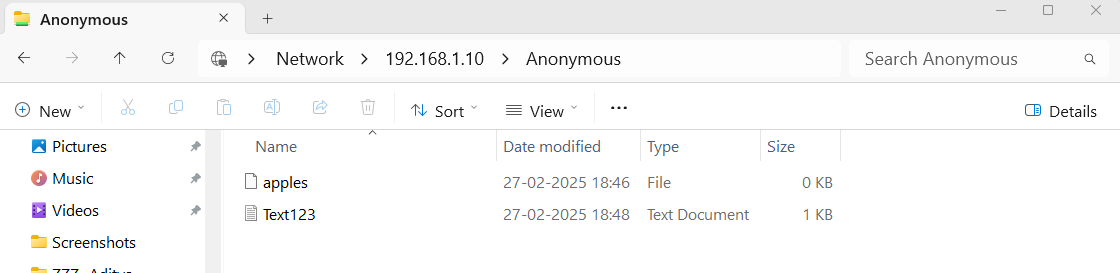
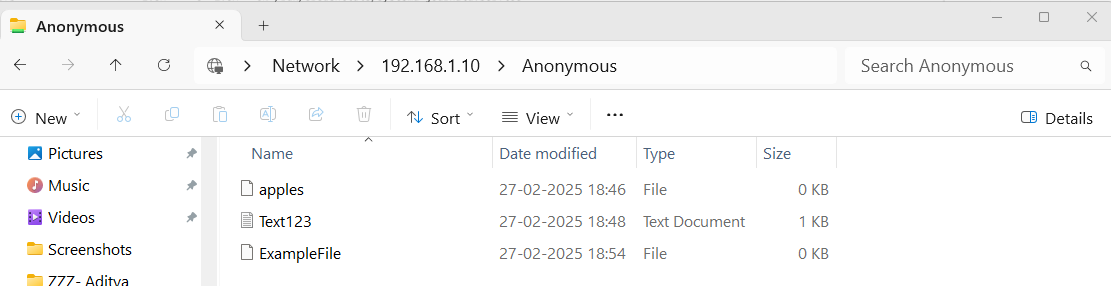
Mount on Windows client
Go to startGo to search barType \\192.168.1.95 (This is my server IP, you can check your Linux CentOS IP by running the command ifconfig)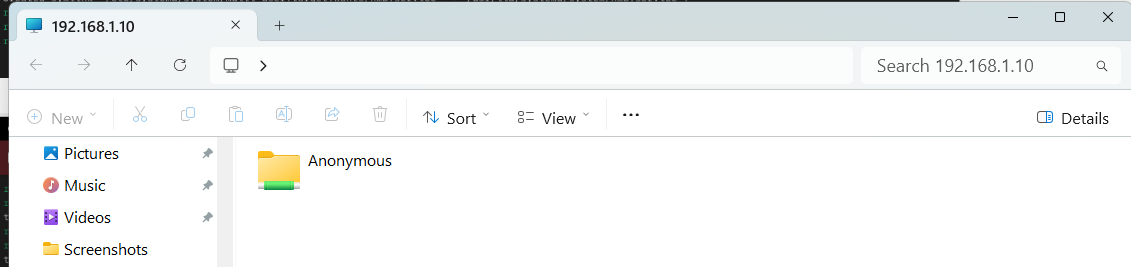

Mount on Linux client
Become root
# yum -y install cifs-utils samba-client
Create a mount point directory
# mkdir /mnt/sambashareMount the samba share
# mount -t cifs //192.168.1.95/Anonymous /mnt/sambashare/# Entry without password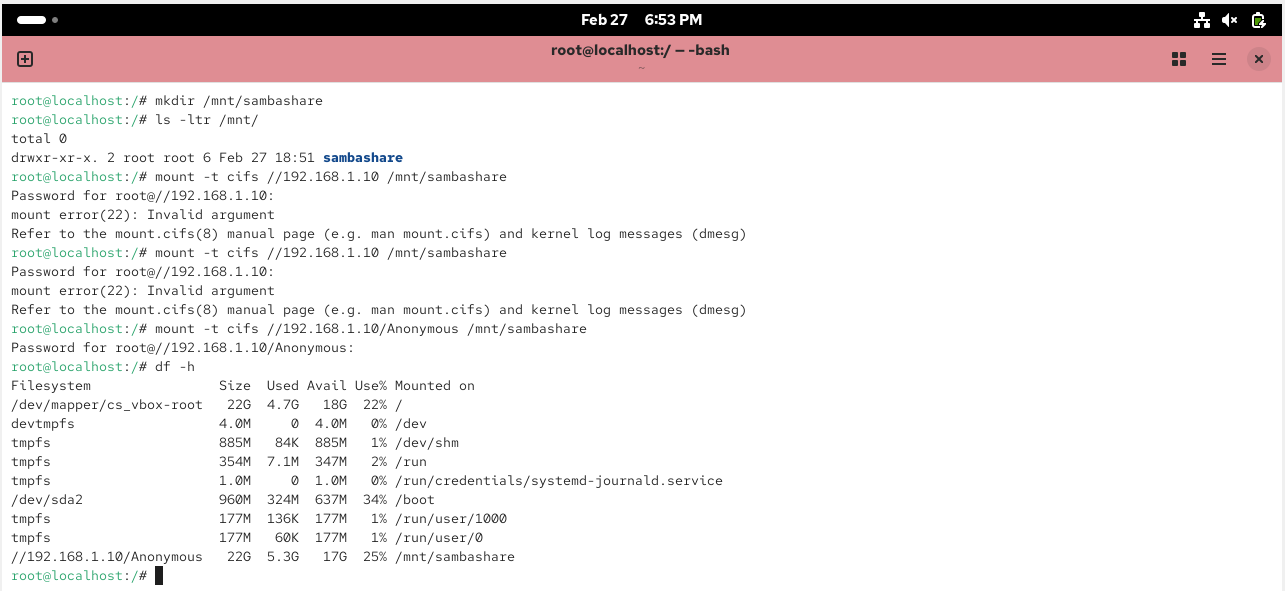


Secure Samba Server
Create a group smbgrp & user larry to access the samba server with proper authentication
# useradd larry# groupadd smbgrp# usermod -a -G smbgrp larry# smbpasswd -a larryNew SMB password: YOUR SAMBA PASSRetype new SMB password: REPEAT YOUR SAMBA PASSAdded user larryCreate a new share, set the permission on the share:
# mkdir /samba/securepretzels# chown -R larry:smbgrp /samba/securepretzels# chmod -R 0770 /samba/securepretzels# chcon -t samba_share_t /samba/securepretzelsEdit the configuration file /etc/samba/smb.conf (Create a backup copy first)
# vi /etc/samba/smb.confAdd the following lines
[Secure]path = /samba/securepretzelsvalid users = @smbgrpguest ok = nowritable = yesbrowsable = yesRestart the services
# systemctl restart smb# systemctl restart nmb
NAS Device for NFS or Samba
- Network-attached storage (NAS) is a file-dedicated storage device that makes data continuously available for employees to collaborate effectively over a network.
SATA and SAS
SATA stands for Serial Advanced Technology Attachment and SAS stands for Serial Attached SCSI (Small Computer System Interface, typically pronounced as “scuzzy“)
Both SATA and SAS utilize serial communication. Serial communication means that the highway has both lanes.
The main difference between them is that SAS drives are faster and more reliable then SATA drives.
SAS is generally more expensive, it’s better suited for use in servers or in processing-heavy computer workstations. SATA is less expensive, and it’s better suited for desktop file storage
In a SATA cable, all 4 wires are placed within the same cable. In a SAS cable, the 4 wires are separated into 2 different cables.
Why divide the wires between 2 cables??
So you can connect more devices to one another. With a SATA cable, you can only link the motherboard and the storage drive. You could hook up an expansion device, but that takes up valuable room inside your computer.
With a SAS cable, you can hook up the motherboard to both a storage drive and another piece of hardware that has SAS connectors.
Here’s what the highways look like, metaphorically:
SATA Cable: Bhopal to Indore
SAS Cable: Bhopal to Indore or Bhopal to Ujjain
MYSQL and MariaDB
A database is a structured collection of data that can be stored electronically. It can include text, numbers, images, videos, and files.
As a relational database system, MySQL stores data in rows and columns defined by schemas. MySQL derives part of its name from the SQL language, which is used for managing and querying data in databases. MySQL offers full ACID transactions and can handle a high volume of concurrent connections.
MariaDB is a community-developed, commercially supported fork of the MySQL relational database management system (RDBMS), intended to remain free and open-source software under the GNU General Public License.
Install and Configure MariaDB & MySQL
Step 1: Install and Start MariaDB
dnf install mariadb-server mariadb -y
systemctl start mariadbsystemctl enable mariadbsystemctl status mariadb
Step 2: Secure MariaDB Installation
mysql_secure_installation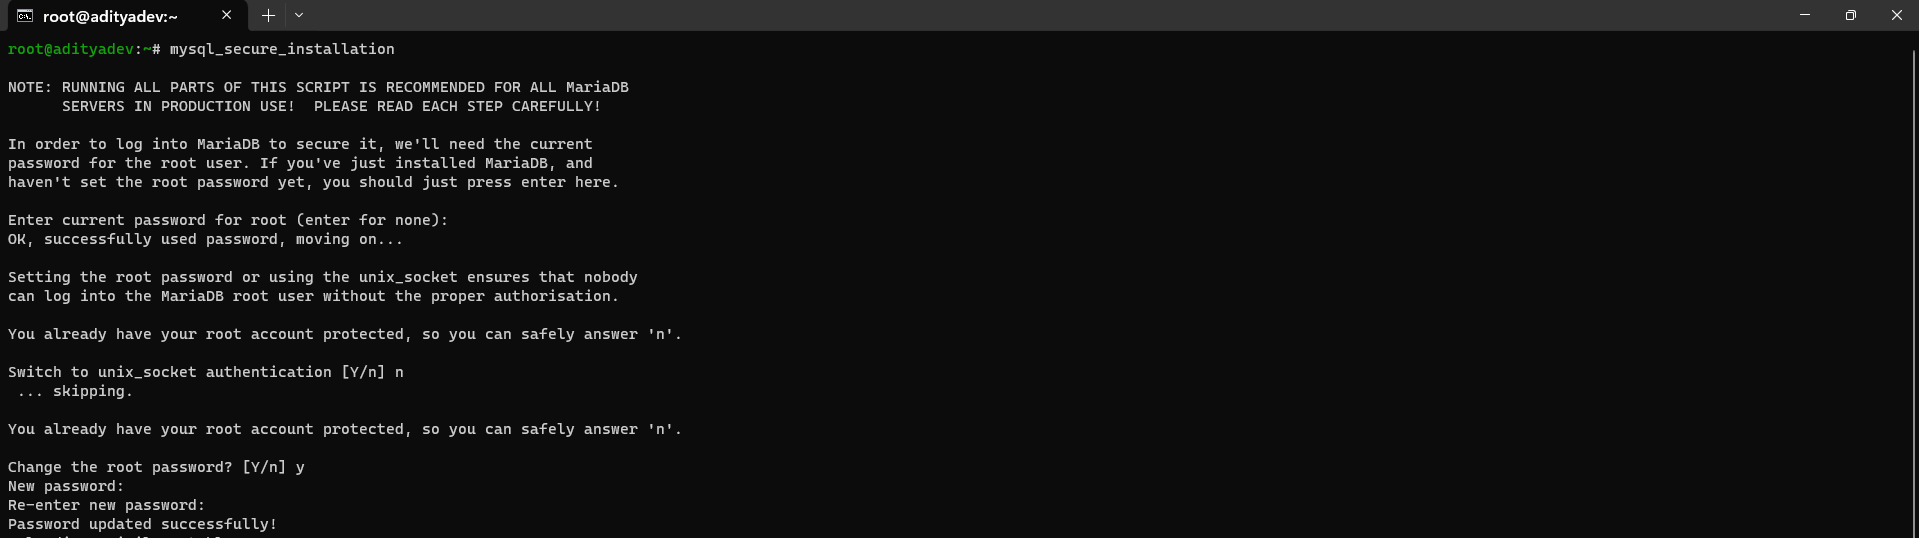
Step 3: Create Database and User in MariaDB
mysql -u root -p
CREATE DATABASE first_MariaDB;CREATE USER 'aditya'@'localhost' IDENTIFIED BY '123';GRANT ALL PRIVILEGES ON first_MariaDB.* TO 'aditya'@'localhost';FLUSH PRIVILEGES;SHOW DATABASES;EXIT;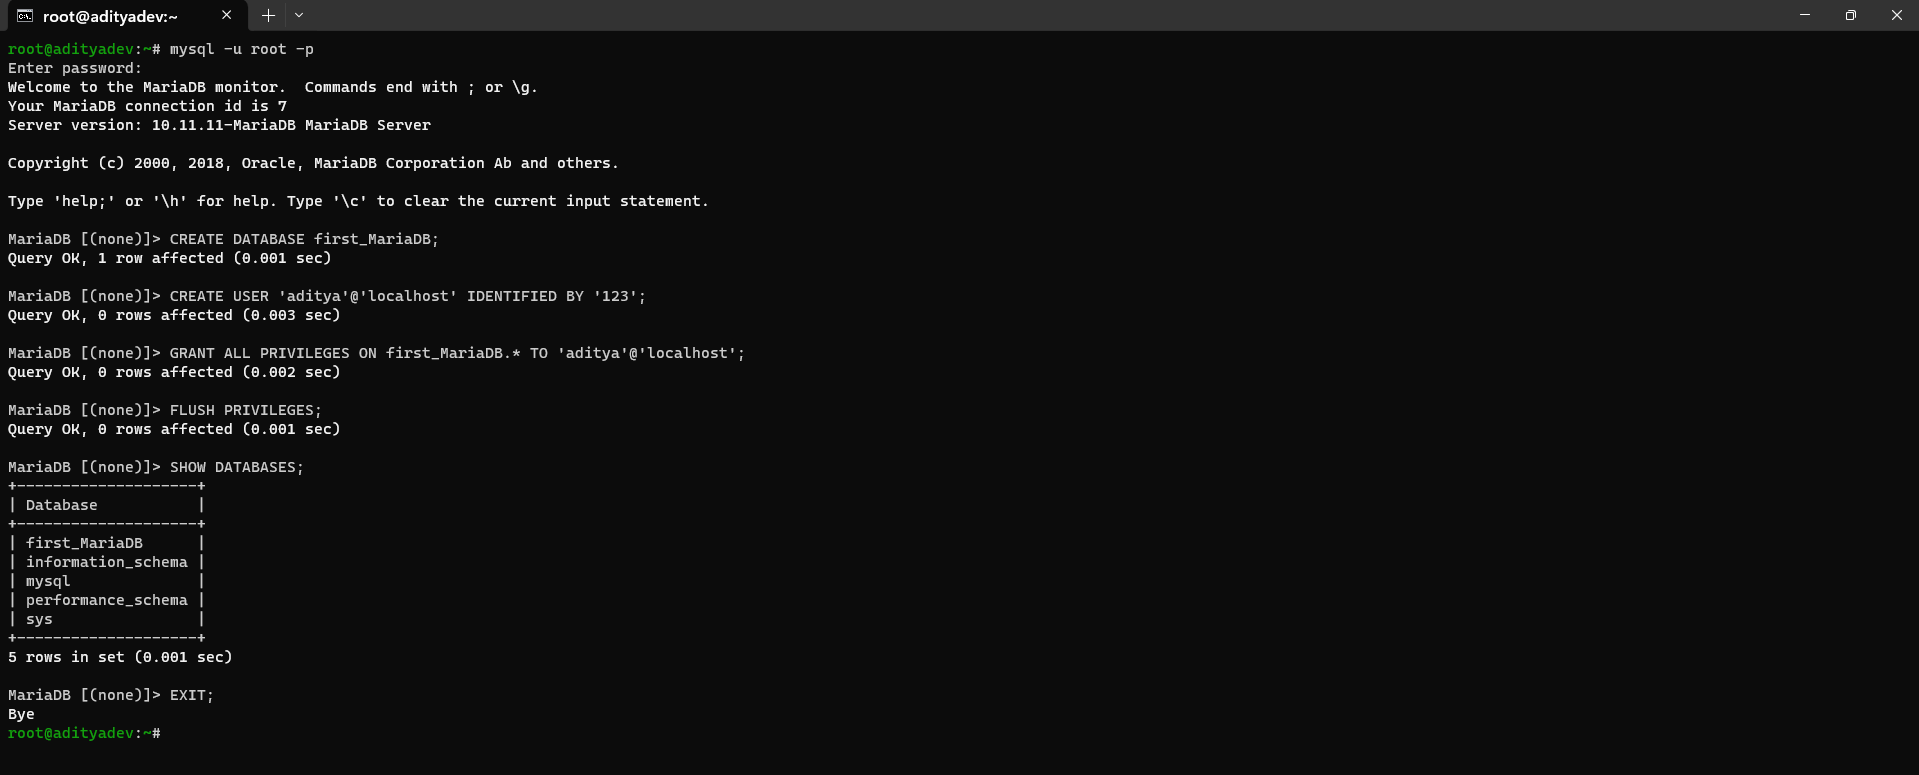
Step 4: Create Table and CURD operation

Now, Press CNTL + L

vi /etc/nginx/nginx.confUSE first_MariaDB;CREATE TABLE people (id INT PRIMARY KEY AUTO_INCREMENT, name VARCHAR(100), profession VARCHAR(100) );INSERT INTO people (name, profession) VALUES ('Alice', 'Engineer'), ('Bob', 'Doctor'), ('Charlie', 'Teacher');SELECT * FROM people;UPDATE people SET profession = 'Principal' WHERE name = 'Charlie';DELETE FROM people WHERE name = 'Bob';EXIT;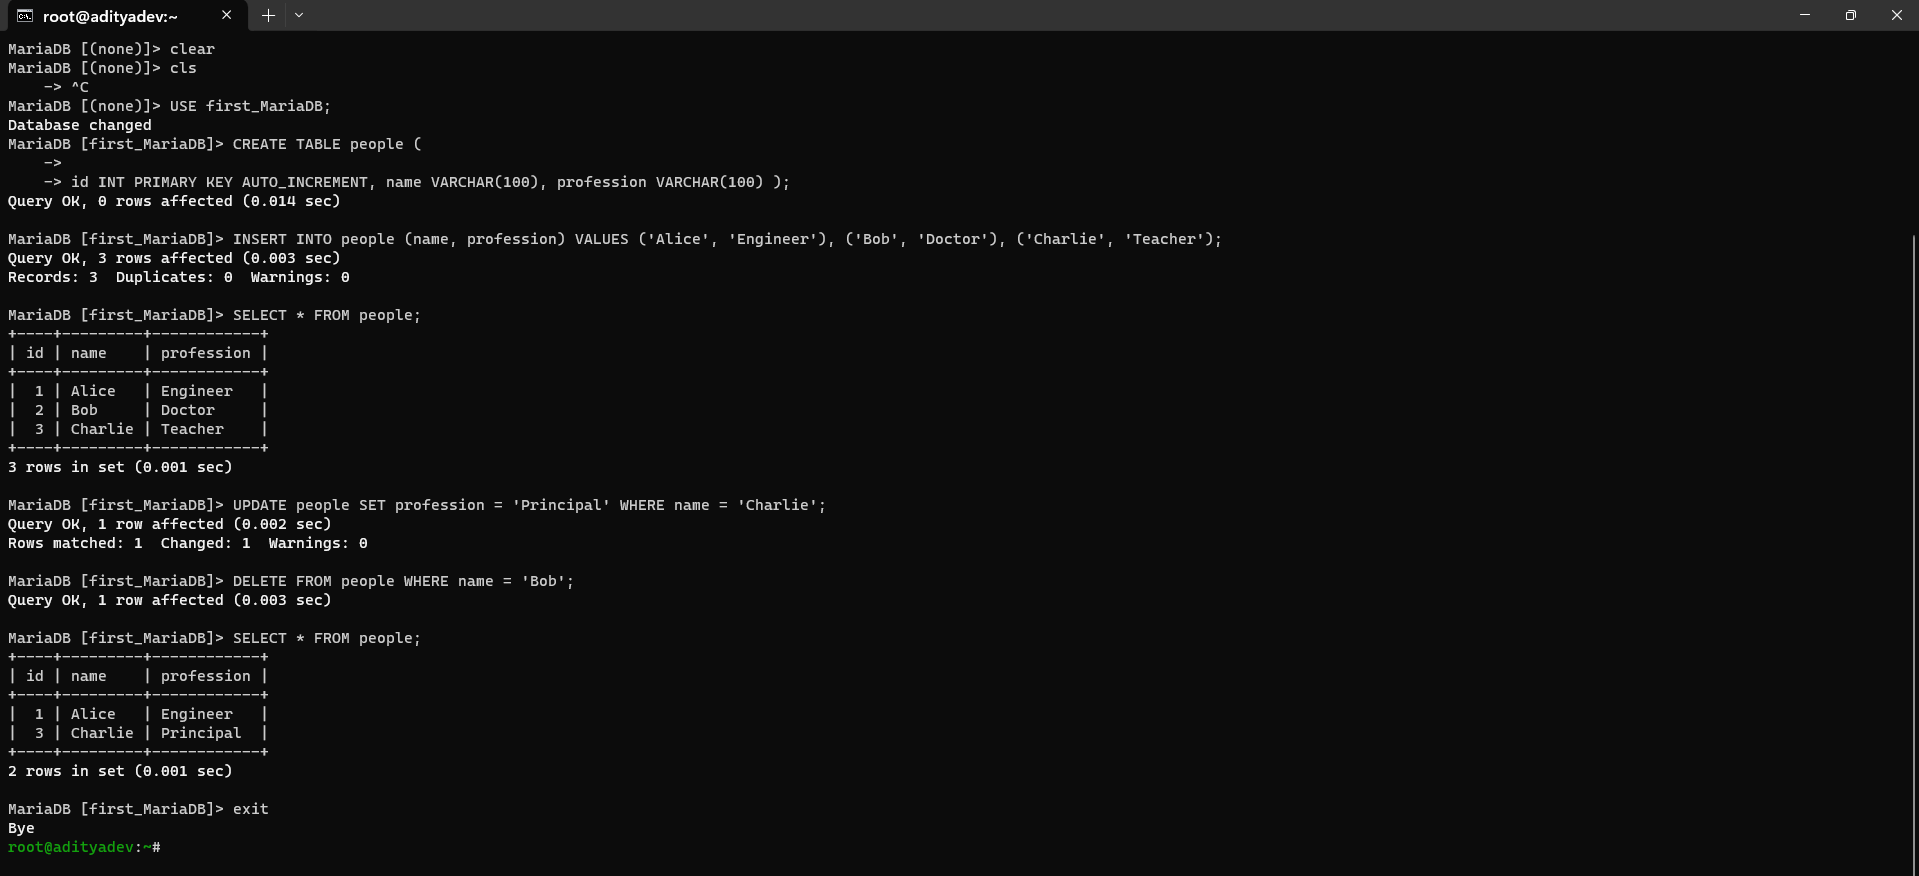
Step 5: Uninstall MariaDB
systemctl stop mariadbdnf remove mariadb mariadb-server
rm -rf /var/lib/mysqlrm -rf /etc/my.cnf
Step 6: Install and Setup MySQL
dnf install mysql-server -ysystemctl start mysqldsystemctl enable mysqldsystemctl status mysqldmysql_secure_installation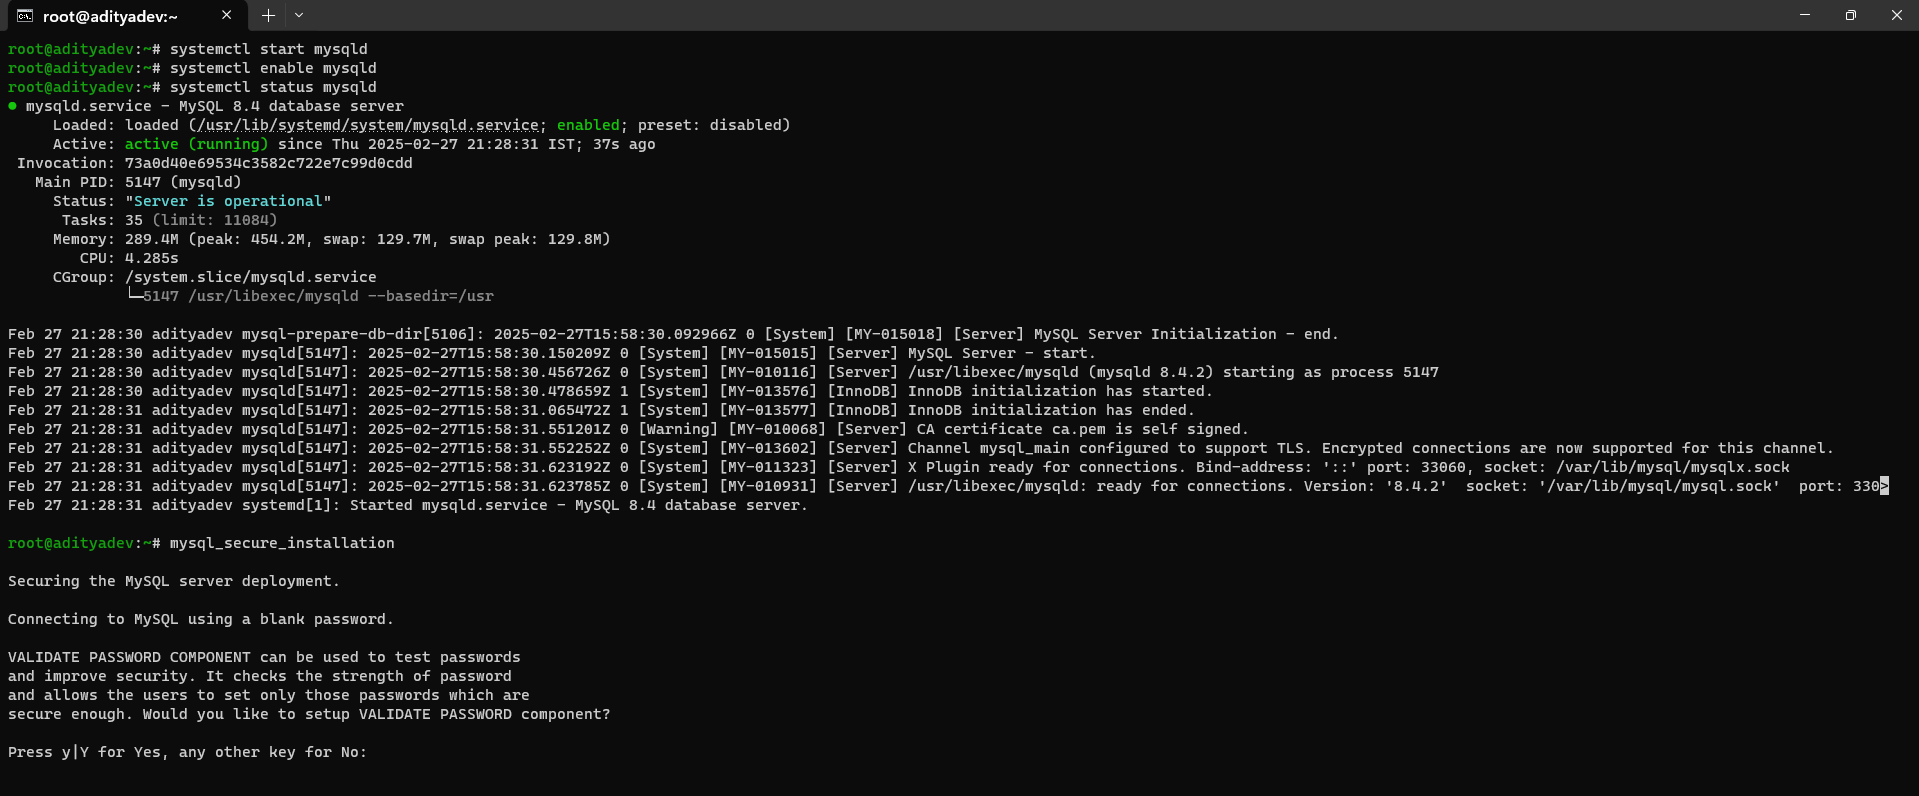
After this, all the steps are same as MariaDB.
LAMP Stack
L » Linux
A » Apache
M » MySQL
P » PHP
Thanks for going through this blog, Happy Learning !! 😁
Subscribe to my newsletter
Read articles from Aditya Dev Shrivastava directly inside your inbox. Subscribe to the newsletter, and don't miss out.
Written by