My AWS Cloud Resume Challenge ✨👩🏽💻
 Laura Diaz
Table of Contents
Introduction 🩵
My Architecture diagram 👩🎨
Step 1: Certification ☁️
Step 2: Convert my resume into HTML 👷🏽♀️
Step 3: Add minimal styles with CSS 🪄
Step 4: Deploy my static website to S3 🪣
Step 5: Add Security with HTTPS 🔐
Step 6: DNS 👈
Step 7: Javascript 🦹
Step 8: Database 💾
Step 9: API ✨
Step 10: Python 🐍
Step 11: Tests
Step 12: Infrastructure as Code (IaC) 👩🏽💻
Step 13: Source Control
Step 14: CI/CD (Back end)🏄
Step 15: CI/CD (Front end) 🏄♀️
🚨🚨Beyond the Requirements: My Extended Contribution 🚨🚨
Step 16: Blog post ✏️
A Heartfelt Thank You to My Mentor 🙏
Introduction 🩵
Some time ago, my mentor Mariano González shared with me this amazing challenge, it’s called “The Cloud Resume Challenge” by Forrest Brazeal. This challenge isn’t a tutorial or a how-to guide, it tells you what the outcome of the project should be. It's a hands-on project designed to help you move from cloud certification to a cloud job. Includes many skills that real cloud and DevOps engineers use every day✨.
In my case I chose to do it with AWS. The challenge consisted on 16 steps and are free for anyone to try.
In this blog, I will share about my experience with this challenge.
The Architecture 👩🎨
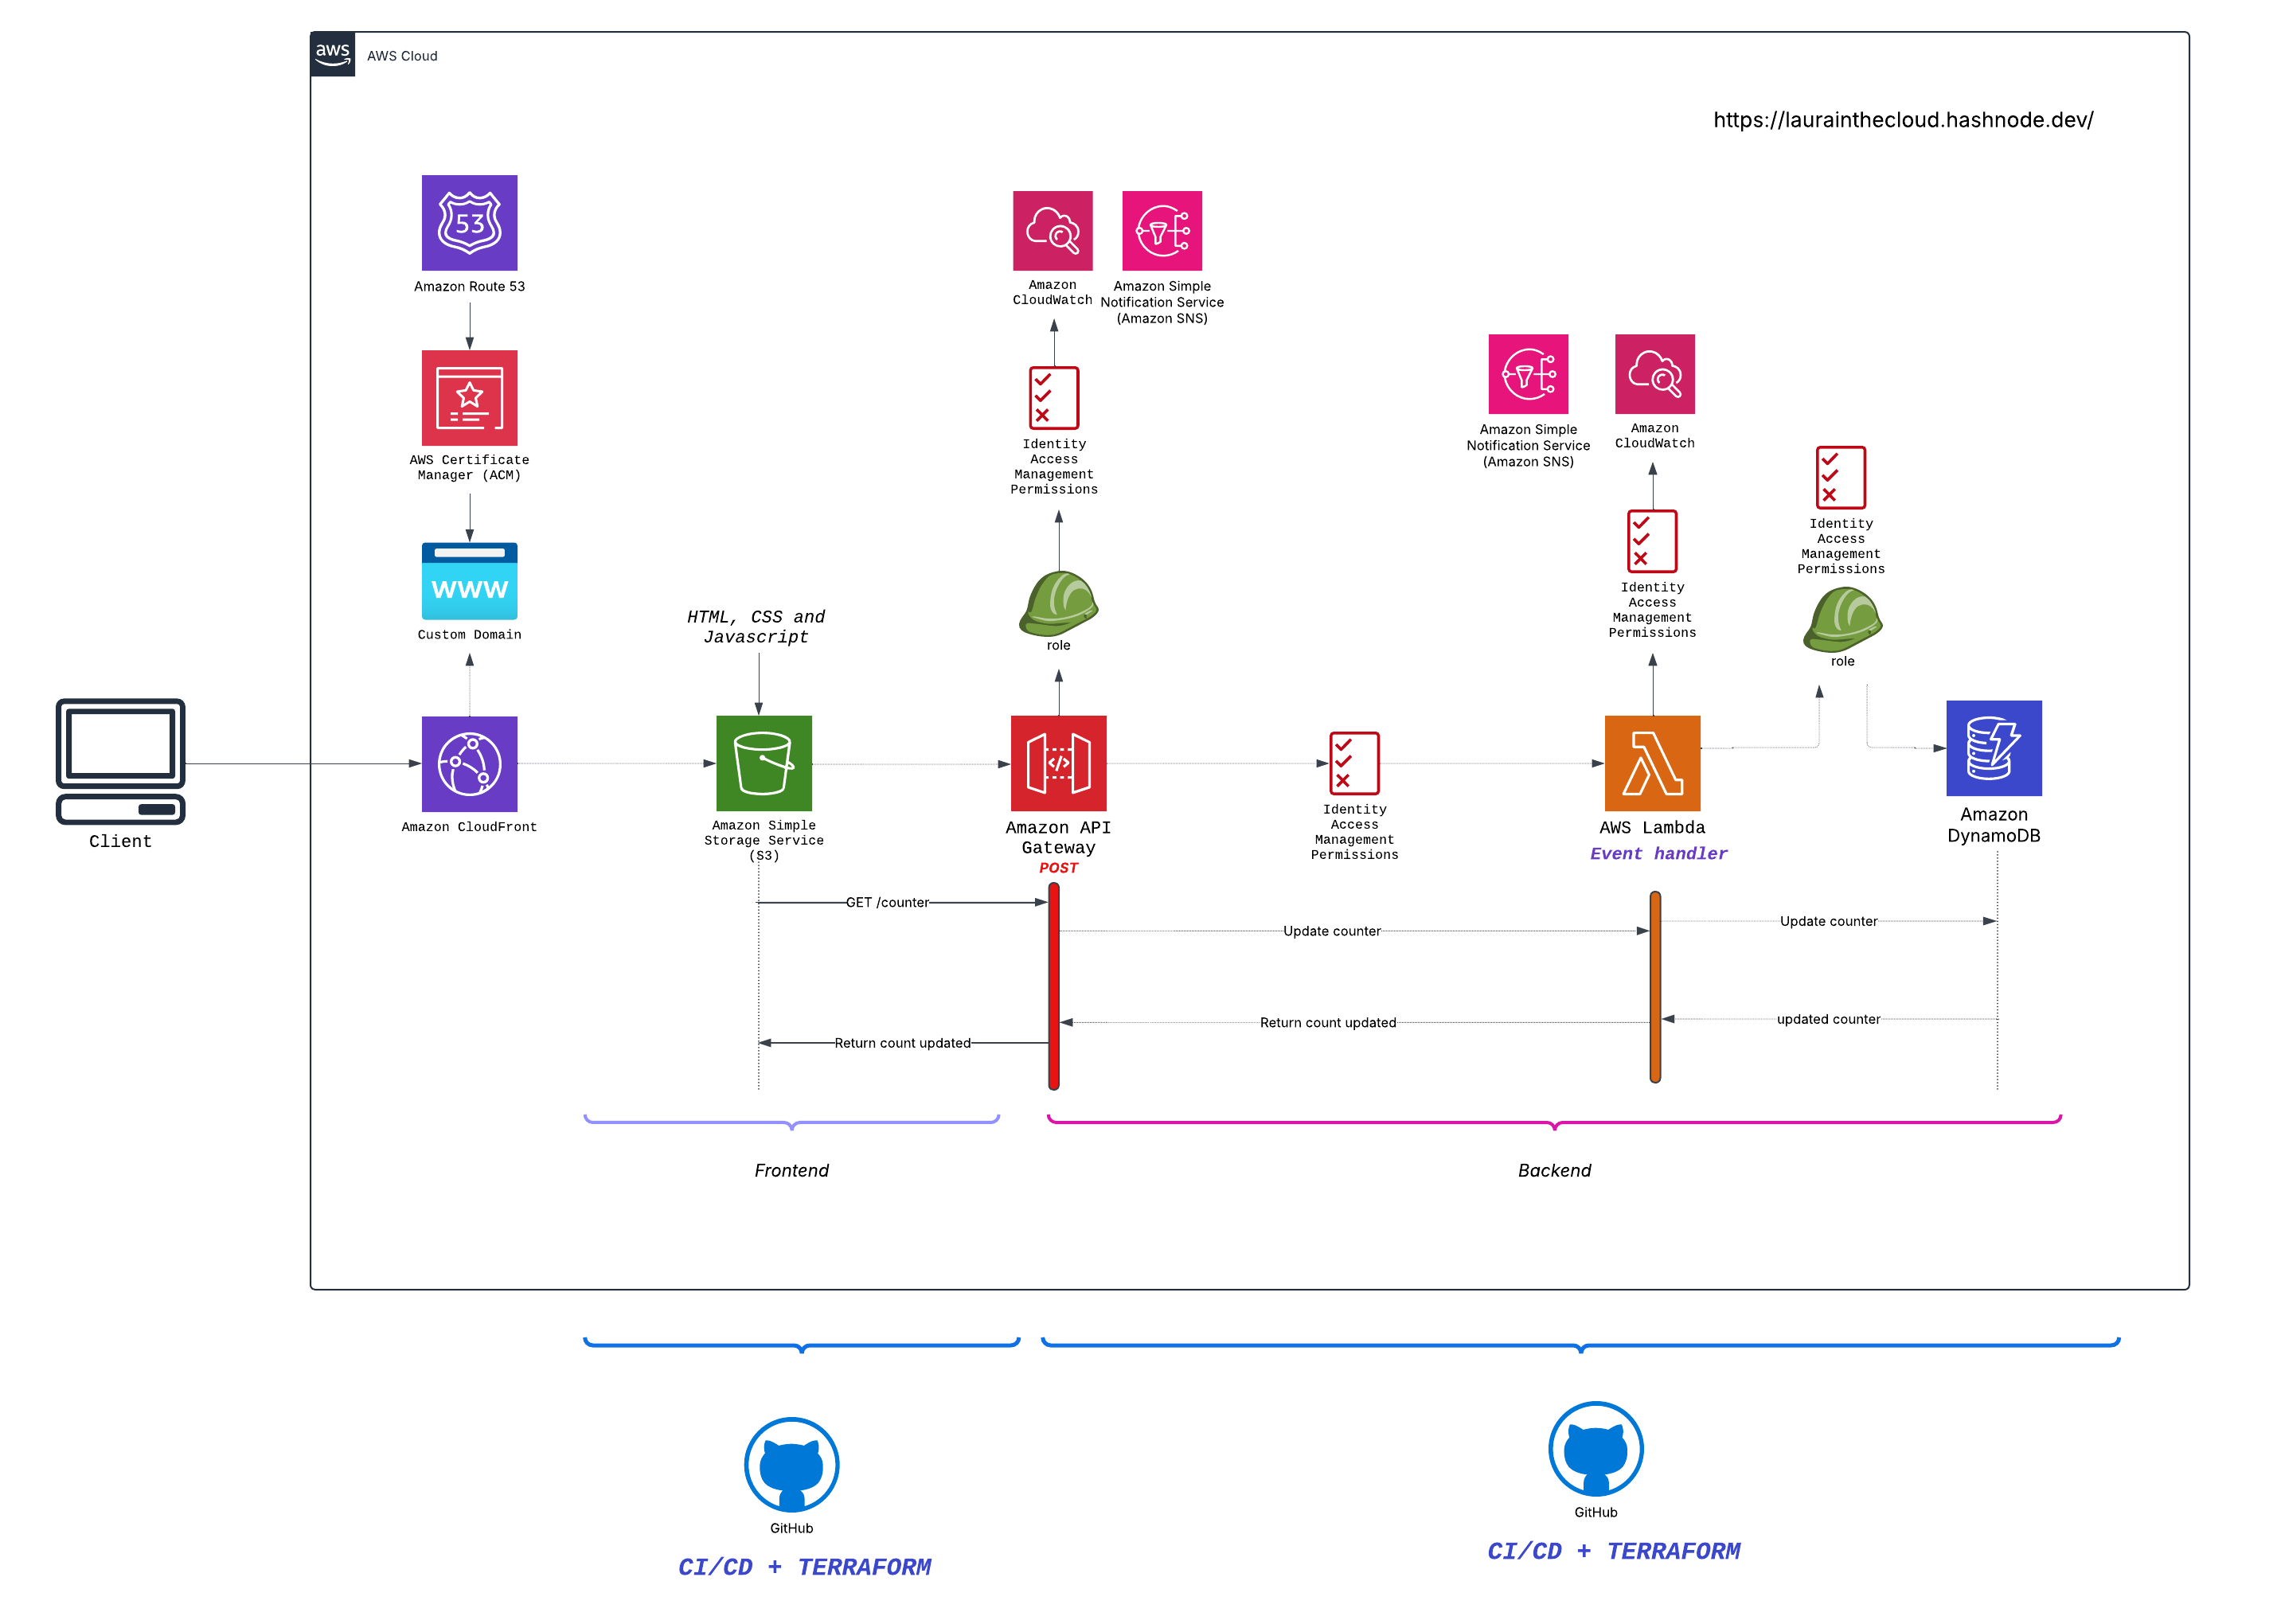
This is the application's architecture diagram I created. I know it looks a bit small and is hard to read, but hopefully, the icons help. The purpose of sharing the entire architecture diagram is to provide an overview of the services I used to solve the challenge and the enhancements I added myself. I will also share detailed diagrams for each step so you can get more information about them.
Step 1: Certification ☁️
The first step was to have the AWS Cloud Practitioner certification on my resume. I already had this certification, and I wrote a blog about it.
Looking ahead, after completing this challenge, my next immediate step is to obtain the Developer Associate Certification.
Step 2: Convert My Resume into HTML 👷🏽♀️
The next step was to convert my resume into HTML (HyperText Markup Language) format. I had been a Frontend Developer for the past 4 years, so luckily I knew what HTML is but if you don’t have any coding experience, don’t get intimidated by this. It was pretty easy and straightforward to learn. Here’s a good resource to learn from Mozilla HTML Docs.
Since my main experience is as a Frontend Developer and I already had experience with React, I could choose to use React or work on the infrastructure of my own portfolio. However, for this challenge, as you will see in the following steps, the goal was to understand DNS and HTTP on my own and use S3 instead of using a pre-built static website service like AWS Amplify.
Step 3: Add Minimal Styles with CSS 🪄
After converting it to HTML, I needed to apply some basic styles using CSS. This made the resume look more polished and visually appealing. I chose to use very simple and minimal styles since the focus of this project is to continue learning Cloud skills.
Step 4: Deploy my static website to S3 🪣
The next step involved using a popular AWS service called Amazon S3, this is an object storage service that stores data for millions of customers worldwide. I used this service to deploy my project.
Step 5: Add Security with HTTPS 🔐
Ready up for step 5, this step involved a new service called Amazon CloudFront. Amazon CloudFront is a content delivery network (CDN) service that quickly and reliably distributes your static and dynamic content with low latency. Amazon S3 + CloudFront enables storing, securing, and delivering your static content at scale.
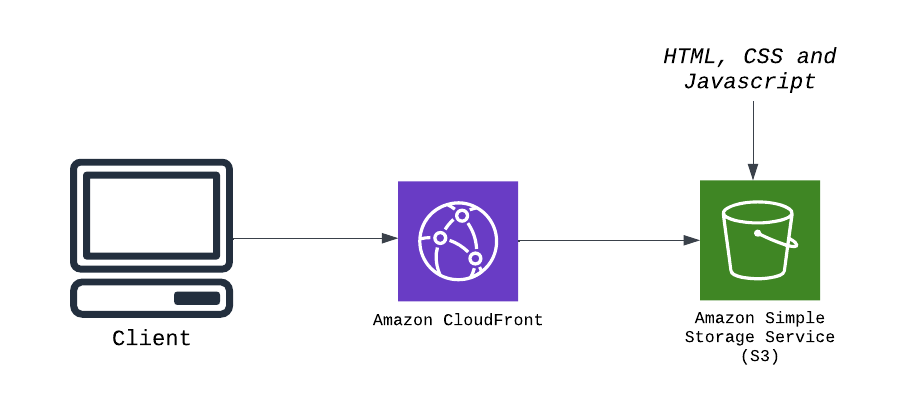
After completing the configurations, I was able to access the distribution. The distribution's URL looked something like this:

I had experience creating an S3 bucket before, but this was the first time I created a CloudFront distribution, and I really enjoyed it.
Step 6: DNS 👈
This next step was an exciting one!🫰
In this one, I had to point a custom DNS domain name to the CloudFront distribution I just created, so the resume could be accessed at something like lauradiazcloudengineer.com. For this step I could use any other DNS provider or Amazon Route 53 as my DNS provider.
After I bought my domain name and the status became successful, I checked the documentation to learn how to route traffic to an Amazon CloudFront using the domain name I just purchased, lauradiazcloudengineer.com instead of the domain name that CloudFront assigned by default. As you may noticed in the previous step, when you create a distribution, CloudFront assigns a domain name to the distribution, this would look something like foobar.cloudfront.net.
The first thing I needed to do was request a public certificate so that Amazon CloudFront could use HTTPS. For this, I used an AWS service called AWS Certificate Manager (ACM) to obtain a public certificate.
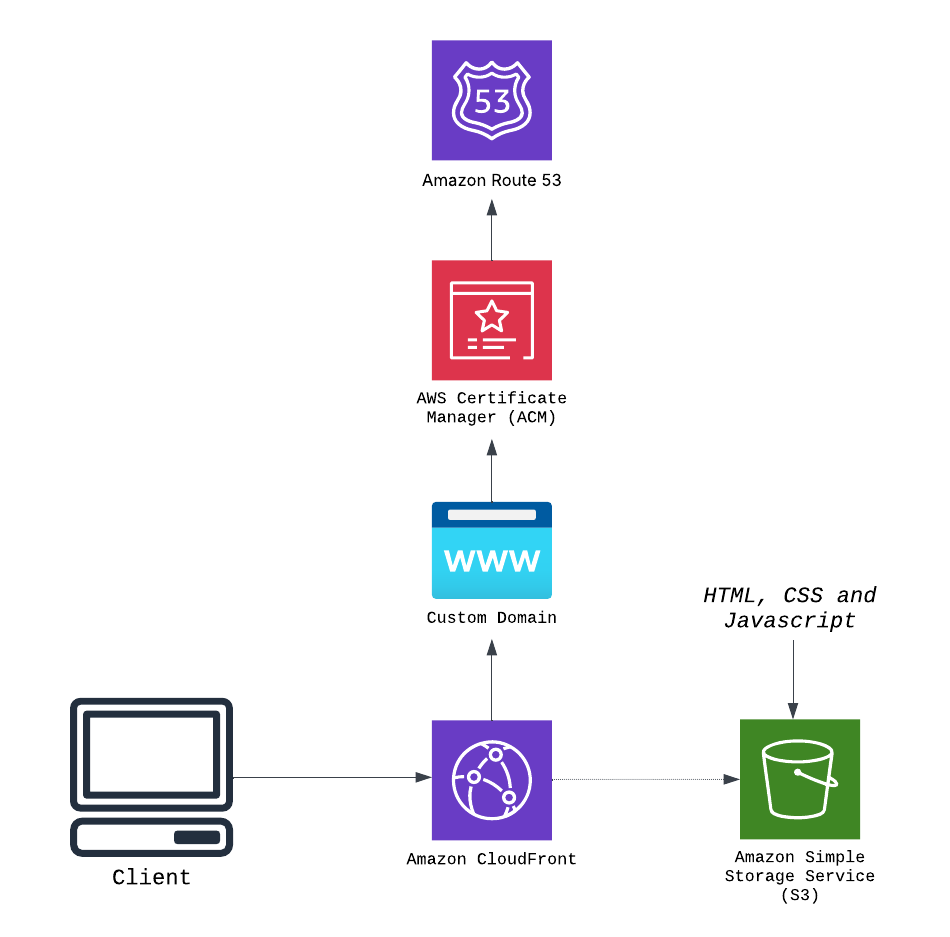
And finally, I needed to configure Amazon Route 53 to route traffic to a CloudFront.

Step 7: Javascript 🦹
I really enjoyed working on this step because I have been working with JavaScript for 4 years now. When I saw JavaScript included in the challenge, I was quite happy 😊. It included a visitor counter that displays how many people have accessed the site.
Step 8: Database 💾
Because the visitor counter needed to retrieve and update its count in a database somewhere, I worked with an AWS service called DynamoDB. It is a powerful, serverless, fast, and flexible NoSQL database that is fully managed.
Step 9: API ✨
I used AWS’s API Gateway and Lambda as my serverless backend. I followed the following architecture pattern:
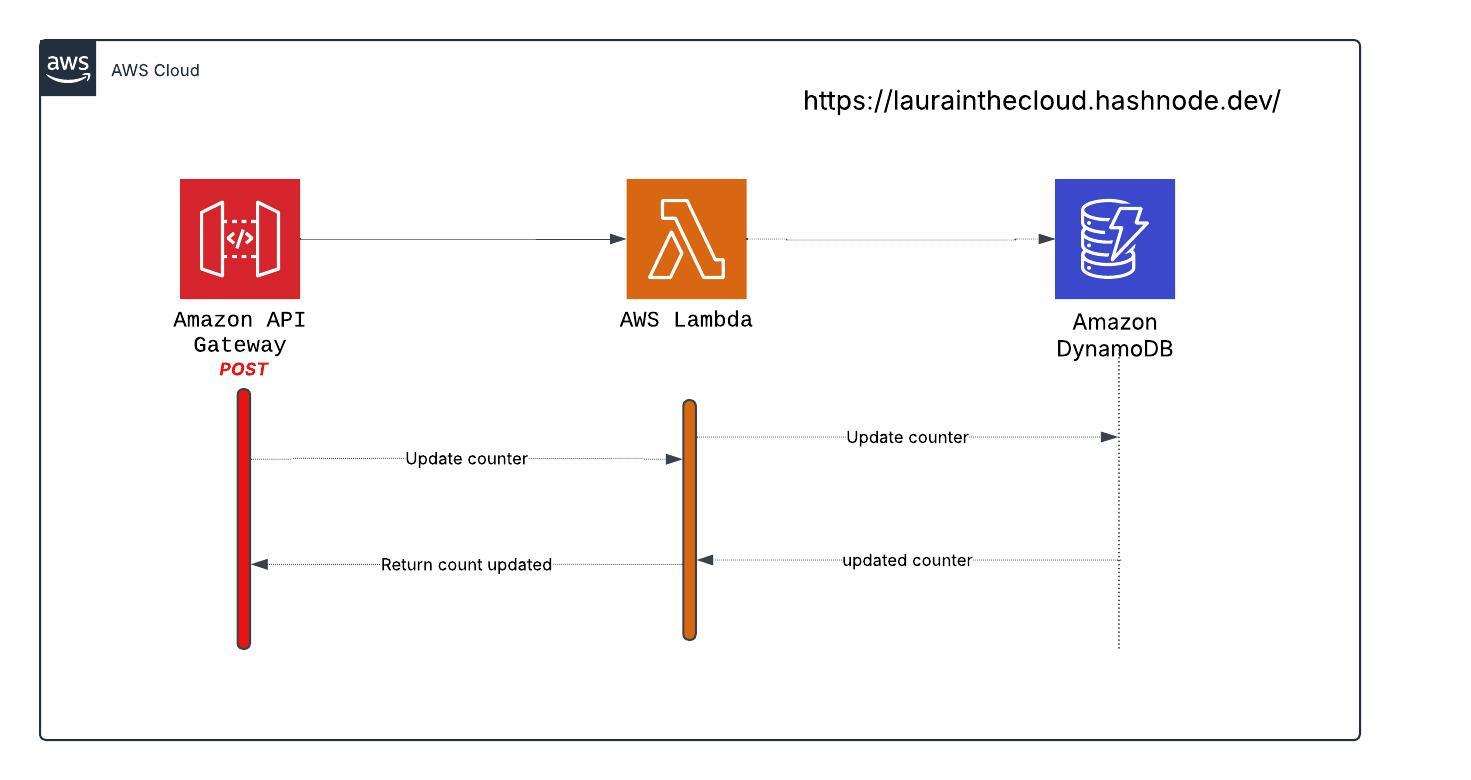
✅ I created a serverless API to update the visitor counter from a DynamoDB table.
✅ I created a Lambda function as my backend.
✅ I created an HTTP API using the API Gateway.
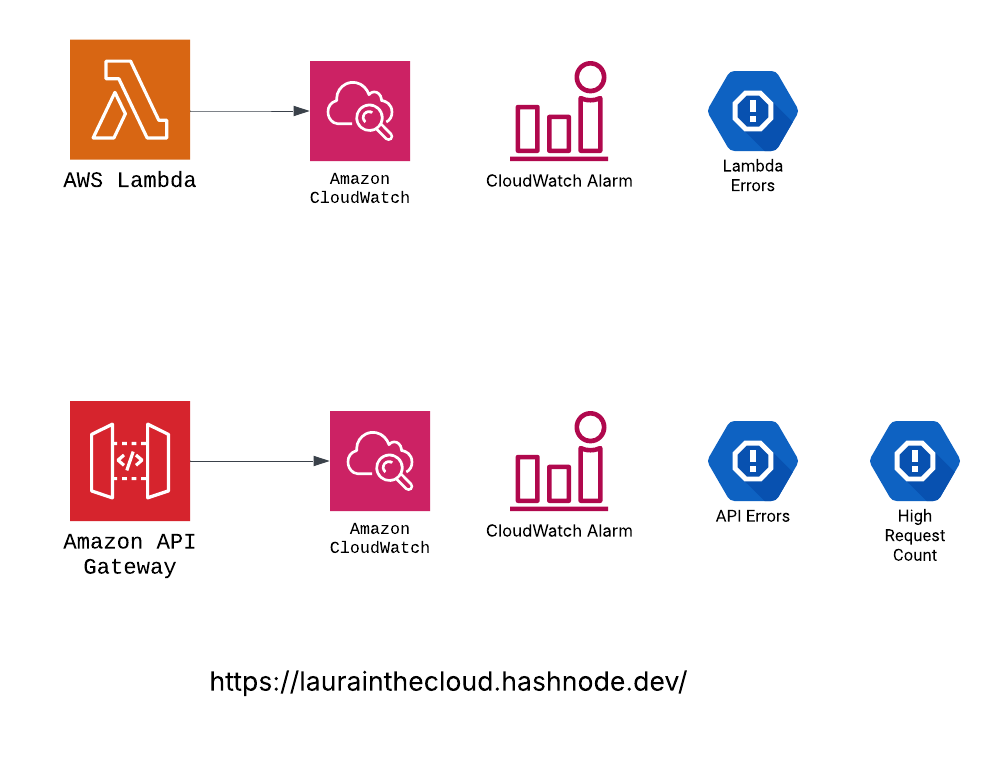
From a DevOps perspective, it was important to get notified when my running services did something unexpected. For this, I set up CloudWatch (more details in the upcoming sections).
Step 10: Python 🐍
For step number 10, I used a service called Lambda, which is a service that ran my code in response to events and automatically manages the computing resources. I don't have much experience with Python but I decided to give it a try.
Step 11: Tests
Testing was the only step that was not added to the current iteration of this challenge. Although I understood this was a crucial step and very important one, this choice was made on purpose to allow more time to learn proper testing methods and apply them effectively in future updates.
Step 12: Infrastructure as Code (IaC) 👩🏽💻
I needed to write the infrastructure as code so I wouldn't have to create the services manually. The challenge suggested I could use AWS Serverless Application Model (SAM) template and deploy using AWS SAM CLI. However, since I had experience working with Terraform and wanted to tackle this EXTRA challenge, it was my preferred choice.
A SIDE NOTE 👀:
In case you are curious about my experience with Terraform, here’s my previous post: IaC: Deploying a Node Secrets Viewer with Terraform. This project demonstrates the deployment of my NodeJS application that retrieves and displays secrets from AWS Secrets Manager. The infrastructure is provisioned using Terraform, showcasing Infrastructure as Code (IaC) capabilities with AWS services.
This step involves another challenge: Terraform Your Cloud Resume Challenge.
Step 13: Source Control
I created two different repositories, one for the backend and other for the frontend. The purpose of this step was to update the site automatically whenever you made a change to the code.
You can view the repositories here:
Step 14: CI/CD (Back end) 🏄
In the backend repository, there is a Terraform directory that contains all my Infrastructure as Code. Each file contains the code for the specific AWS service, so it’s more organized and clear to understand.
The Python Lambda code is part of the workflow but was not committed, as requested by the challenge's creator.
Step 15: CI/CD (Front end) 🏄♀️
The frontend repository has a directory named resume that contains the HTML and CSS. The JavaScript code is part of the workflow but is not committed, as requested by the challenge's creator.
I set up a main.tf file with my Terraform IaC, so when the GitHub Actions CI/CD pipeline ran, the new website code is pushed to the S3 bucket and updated automatically.
🚨🚨 Beyond the Requirements: My Extended Contribution 🚨 🚨
Okay, but this was not the end!
I wanted to share other AWS services I used to make my infrastructure more robust to cover important DevOps topics like monitoring, logging and notifications.
Additional S3 relevant configurations:
✅ I enabled bucket versioning. About versioning here.
✅ Configured a lifecycle policy for an S3 bucket: Automatically cleaned up old versions of objects in your S3 bucket that were tagged with "TheCloudResumeChallenge" after 90 days.
Cost Allocation and Management and Resource Organization
- ✅ Added tags “TheCloudResumeChallenge” to my resources to easily track cost by project and filter resources if needed.
Cloudfront:
✅ Added Cloudfront Response Security Headers Policy.
✅ Added Cloudfront cache policy: This policy was designed to optimize cache efficiency by minimizing the values that CloudFront included in the cache key.
API Gateway:
- ✅ Added custom domain name to the api gateway url and the respective mappings.
Simple Notification Service (SNS):
- ✅ Created a topic and subscribed my email to get notifications when there’s an alarm.
CloudWatch:
✅ Added configuration settings for CloudWatch logs.
✅ Created API Gateway log groups.
✅ Created CloudWatch alarms for Lambda errors.
✅ Created CloudWatch alarms for API Gateway: errors and high request count.
Step 16: Blog post ✏️
Finally, writing a blog post was the last step of this amazing challenge 🤩.
I am so happy and proud of myself for finishing it. It was challenging and difficult at times, but definitely rewarding.
I had been blogging about different topics and you could subscribe to my newsletter on hashnode to get notified whenever I post a new blog post.
My experience taught me that the magic happens when people openly exchange ideas and expertise. This belief in democratizing knowledge drives me to contribute to the tech community while continuously learning from others 💖.
A Heartfelt Thank You to My Mentor 🙏
To Mariano,
Your guidance as a mentor has been invaluable to my journey as a cloud engineer, and I am very grateful for that ✨. Thank you for always being there to answer my questions and for guiding me to discover solutions on my own, which has helped me develop problem-solving skills that will benefit my career.
I am especially grateful for the time you've spent reviewing my work and providing detailed feedback, as your insights have pushed me to improve and revealed aspects I might have missed.
Subscribe to my newsletter
Read articles from Laura Diaz directly inside your inbox. Subscribe to the newsletter, and don't miss out.
Written by

Laura Diaz
Laura Diaz
I'm a frontend developer with a passion for AWS cloud solutions. My journey in tech has been primarily self-taught. I'm originally from Argentina but these days I'm calling the beautiful city of Montevideo home. I started this blog because I wanted to share my learning journey, especially with folks who, like me, don't have a computer science degree but are still passionate about breaking into tech. This is my little corner of the internet where I document my discoveries, share the hurdles I've overcome, and recommend resources that have helped me level up.🙃