Build text embeddings from Google Drive for RAG
 LJ
LJ
Overview
In this blog, we will show you how to use CocoIndex to build text embeddings from Google Drive for RAG step by step including how to setup Google Cloud Service Account for Google Drive. CocoIndex is an open source framework to build fresh indexes from your data for AI. It is designed to be easy to use and extend.
You can find the full code here. Have your data pipeline running within ~50 lines of Python code in minutes, check it out 🤗!
It'd mean a lot to us if you could give Cocoindex on Github a star to support us if you like our work. Thank you so much with a warm coconut hug 🥥🤗.
Prerequisites
Install Postgres
If you don't have Postgres installed, please refer to the installation guide.
Enable Google Drive access by service account
CocoIndex provides native builtin to support Google Drive as a source. You could find the full documentation here.
1. Register / login in Google Cloud.
First, you need to create a Google Cloud account if you don't have one already. Go to the Google Cloud Console and sign up or sign in.

2. Select or create a GCP project
Once you've logged into Google Cloud Console, you need to select an existing project or create a new one. Click on the project selector dropdown at the top of the page:
If you already have a project, you can select from here:

If you are new to Google Cloud, it look like this:

3. Create a Service Account
In Google Cloud Console, search for Service Accounts, to enter the IAM & Admin / Service Accounts page.
Click on "CREATE SERVICE ACCOUNT" at the top of the page:
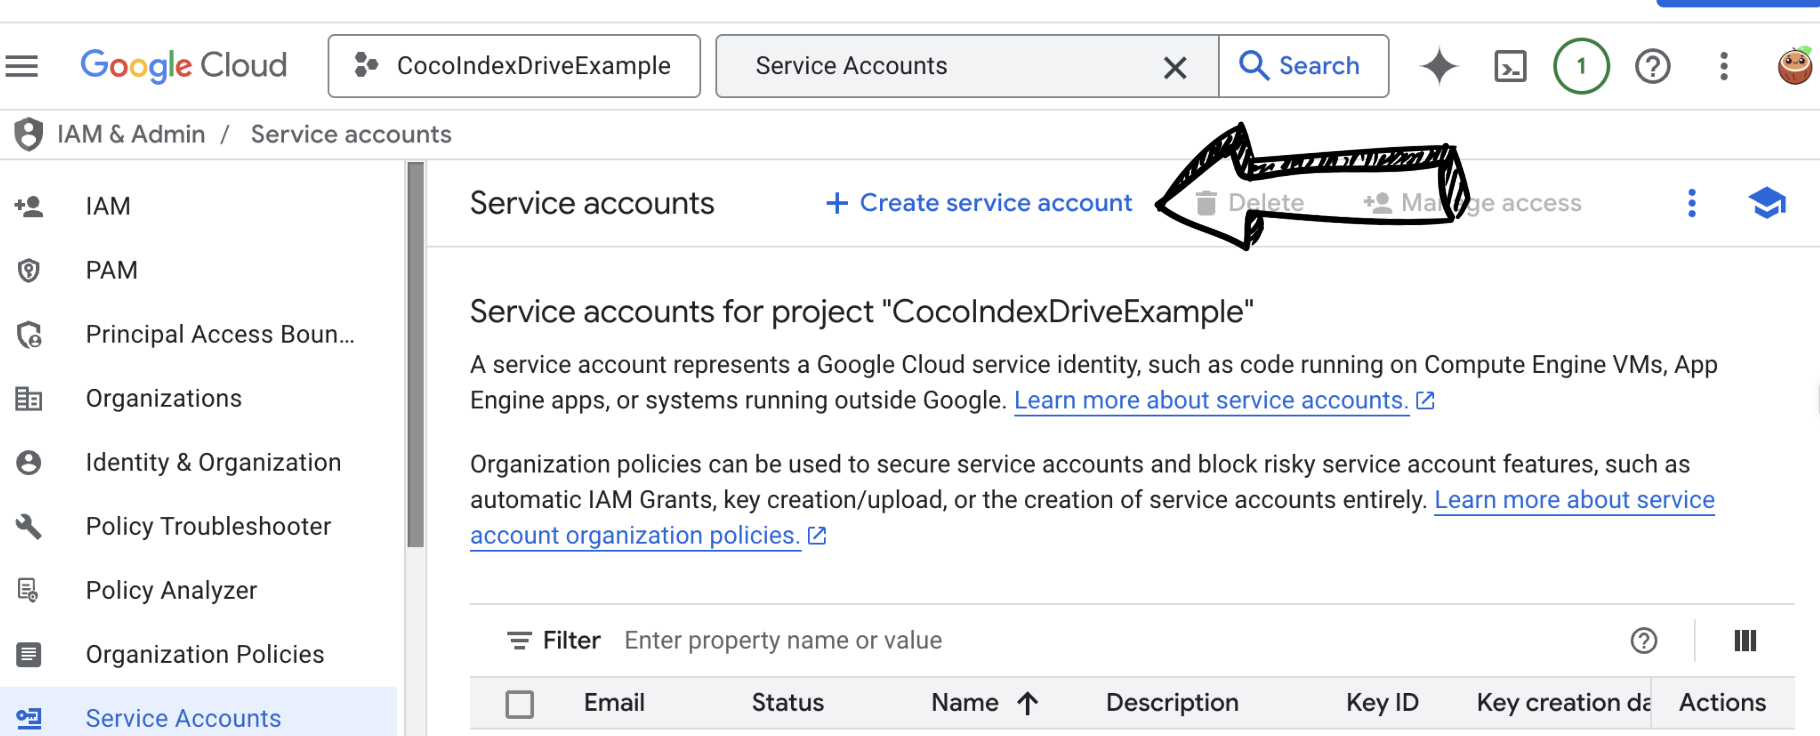
Fill in the service account name, e.g.
cocoindex-test.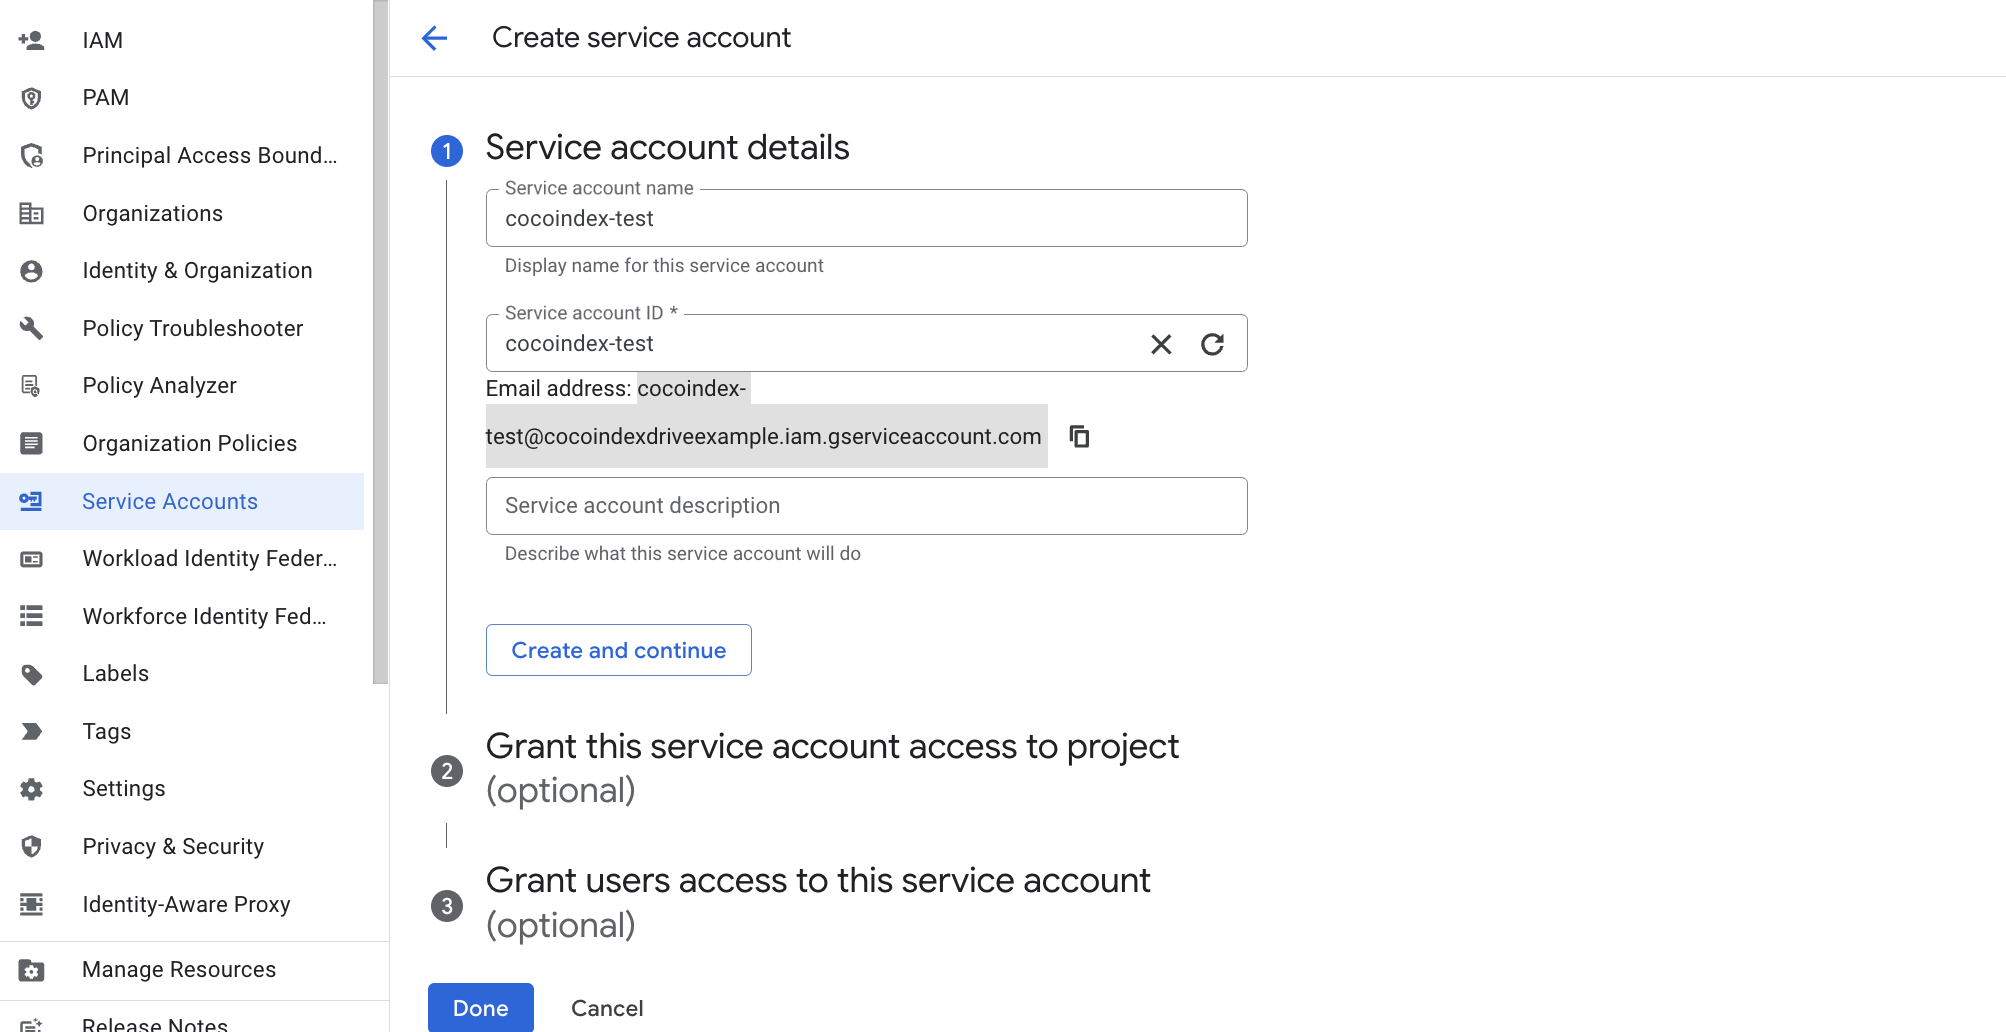
And make a note on that email address, you will need it in the later step.
Click on "CREATE" to create the service account. You will see the service account created successfully.
4. Create and download the key for the service account
Click on "Actions" and select "Manage Keys".
Select "Add Key" and select "Create new key".
Choose "JSON" as the key type and click "Create".
The key file will be downloaded to your computer. Depends on the browser setting, it start download automatically or may pop up a dialog to for the location to download. Keep this file secure as it provides access to your Google Drive resources.

It looks like this:
 {
 "type": "service_account",
 "project_id": "cocoindexdriveexample",
 "private_key_id": "key_id",
 "private_key": "PRIVATE_KEY",
 "client_email": "cocoindex-test@cocoindexdriveexample.iam.gserviceaccount.com",
 "client_id": "id",
 "auth_uri": "https://accounts.google.com/o/oauth2/auth",
 "token_uri": "https://oauth2.googleapis.com/token",
 "auth_provider_x509_cert_url": "https://www.googleapis.com/oauth2/v1/certs",
 "client_x509_cert_url": "https://www.googleapis.com/robot/v1/metadata/x509/cocoindex-test%40cocoindexdriveexample.iam.gserviceaccount.com",
 "universe_domain": "googleapis.com"
 }
5. Enable Google Drive API
Search for "Google Drive API" and select it.

Make sure it is enabled. You can check it from the page.

6. Prepare and share a folder
Create a new folder or use an existing folder in your Google Drive.
For this project, we will create a folder in my own Google Drive, and share it with the service account email address we created in Step 3. For example,
cocoindex-test@cocoindexdriveexample.iam.gserviceaccount.com.My example Google Drive folder is here.
The files are also available in the example repo.
Share the folder with the service account. Enter the service account email address (e.g.,
cocoindex-test@cocoindexdriveexample.iam.gserviceaccount.com) and give it "Viewer" access.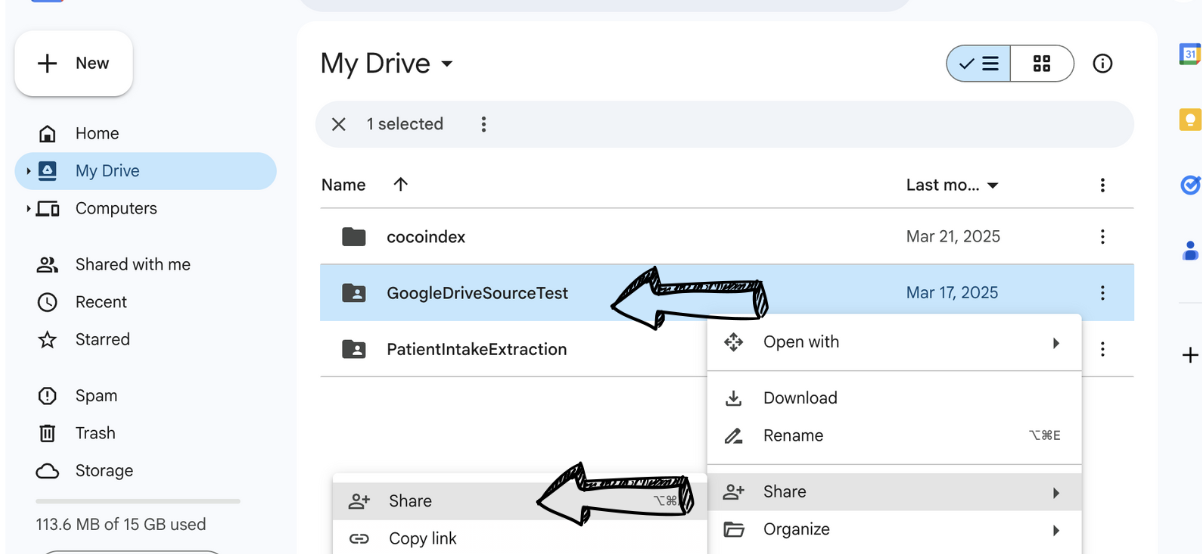
Note the folder ID from the URL when you open the folder. The URL will look like:
https://drive.google.com/drive/folders/1AbCdEfGhIjKlMnOpQrStUvWxYzThe folder ID is the part after
folders/(in this example:1AbCdEfGhIjKlMnOpQrStUvWxYz). You'll need this folder ID when connecting to the Google Drive API.
Now you are all set! 🎉 You can start to build your text embeddings from Google Drive. 📁✨
Project setup
Create a
pyproject.tomlfile in the root directory.[project] name = "gdrive-text-embedding" version = "0.1.0" description = "Simple example for cocoindex: build embedding index based on Google Drive files." requires-python = ">=3.11" dependencies = ["cocoindex>=0.1.12", "python-dotenv>=1.0.1"]Setup
.envCreate a.envfile in the root directory and add the following: You can copy it from the.env.examplefile.# Postgres database address for cocoindex COCOINDEX_DATABASE_URL=postgres://cocoindex:cocoindex@localhost/cocoindex # Google Drive service account credential path. #! PLEASE FILL IN GOOGLE_SERVICE_ACCOUNT_CREDENTIAL=/path/to/service_account_credential.json # Google Drive root folder IDs, comma separated. #! PLEASE FILL IN YOUR GOOGLE DRIVE FOLDER ID GOOGLE_DRIVE_ROOT_FOLDER_IDS=1AbCdEfGhIjKlMnOpQrStUvWxYz
Define CocoIndex Flow
Let's define the CocoIndex flow to build text embeddings from Google Drive.
First, let's load the files from Google Drive as a source. CocoIndex provides a GoogleDrive source as a native built-in source. You just need to provide the service account credential path and the root folder IDs.
1. Load the files from Google Drive
@cocoindex.flow_def(name="GoogleDriveTextEmbedding")
def gdrive_text_embedding_flow(flow_builder: cocoindex.FlowBuilder, data_scope: cocoindex.DataScope):
    """
    Define an example flow that embeds text into a vector database.
    """
    credential_path = os.environ["GOOGLE_SERVICE_ACCOUNT_CREDENTIAL"]
    root_folder_ids = os.environ["GOOGLE_DRIVE_ROOT_FOLDER_IDS"].split(",")

    data_scope["documents"] = flow_builder.add_source(
        cocoindex.sources.GoogleDrive(
            service_account_credential_path=credential_path,
            root_folder_ids=root_folder_ids))

    doc_embeddings = data_scope.add_collector()
flow_builder.add_source will create a table with the following sub fields, see documentation here.
filename(key, type:str): the filename of the file, e.g.dir1/file1.mdcontent(type:strifbinaryisFalse, otherwisebytes): the content of the file
2. Embed the text
After loading the files, we can simply iterate each of the documents, and split them into chunks, and then embed the chunks. Super easy! We have a very detailed video to walk you through with how the embedding works with CocoIndex concepts explained. You can find it here.
...
with data_scope["documents"].row() as doc:
    # Split the document into chunks, put into `chunks` field
    doc["chunks"] = doc["content"].transform(
        cocoindex.functions.SplitRecursively(),
        language="markdown", chunk_size=2000, chunk_overlap=500)

    # Transform data of each chunk
    with doc["chunks"].row() as chunk:
        # Embed the chunk, put into `embedding` field
        chunk["embedding"] = chunk["text"].transform(
            cocoindex.functions.SentenceTransformerEmbed(
                model="sentence-transformers/all-MiniLM-L6-v2"))
        doc_embeddings.collect(filename=doc["filename"], location=chunk["location"],
            text=chunk["text"], embedding=chunk["embedding"])
SentenceTransformerEmbed is a built-in function in CocoIndex. You can find the full documentation here. It uses the Sentence Transformers library from Hugging Face, which provides state-of-the-art pre-trained models for text embeddings. There are 12k models available.
3. Build the index
Select any field you want to support the vector search and export it as a table.
    doc_embeddings.export(
        "doc_embeddings",
        cocoindex.storages.Postgres(),
        primary_key_fields=["filename", "location"],
        vector_index=[("embedding", cocoindex.VectorSimilarityMetric.COSINE_SIMILARITY)])
4. Define a simple query handler to query the index
CocoIndex provides a simple query handler to query the index. Make sure you use same model as the one used in your data flow, here it should be sentence-transformers/all-MiniLM-L6-v2.
query_handler = cocoindex.query.SimpleSemanticsQueryHandler(
    name="SemanticsSearch",
    flow=text_embedding_flow,
    target_name="doc_embeddings",
    query_transform_flow=lambda text: text.transform(
        cocoindex.functions.SentenceTransformerEmbed(
            model="sentence-transformers/all-MiniLM-L6-v2")),
    default_similarity_metric=cocoindex.VectorSimilarityMetric.COSINE_SIMILARITY)
Plug it into the main function to for an interactive query interface in the terminal.
@cocoindex.main_fn()
def _run():
    # Run queries in a loop to demonstrate the query capabilities.
    while True:
        try:
            query = input("Enter search query (or Enter to quit): ")
            if query == '':
                break
            results, _ = query_handler.search(query, 10)
            print("\nSearch results:")
            for result in results:
                print(f"[{result.score:.3f}] {result.data['filename']}")
                print(f"    {result.data['text']}")
                print("---")
            print()
        except KeyboardInterrupt:
            break

if __name__ == "__main__":
    load_dotenv(override=True)
    _run()
Query and test your index
🎉 Now you are all set!
Install the dependencies:
pip install -e .Run following commands to setup and update the index.
 python main.py cocoindex setup
 python main.py cocoindex update
You'll see the index updates state in the terminal. For example, you'll see the following output:
documents: 3 added, 0 removed, 0 updatedInteract with the index in the terminal
python main.pyIt triggers the query interface in the terminal. You can type a query there and press Enter to see the results. For example: search for
llm
It shows top matched results with Cosine similarity score, filename of the document, and snippet of the matchedcontent. To learn more about Cosine similarity, you can refer to this wikipedia page.
Interact with the index in CocoInsight
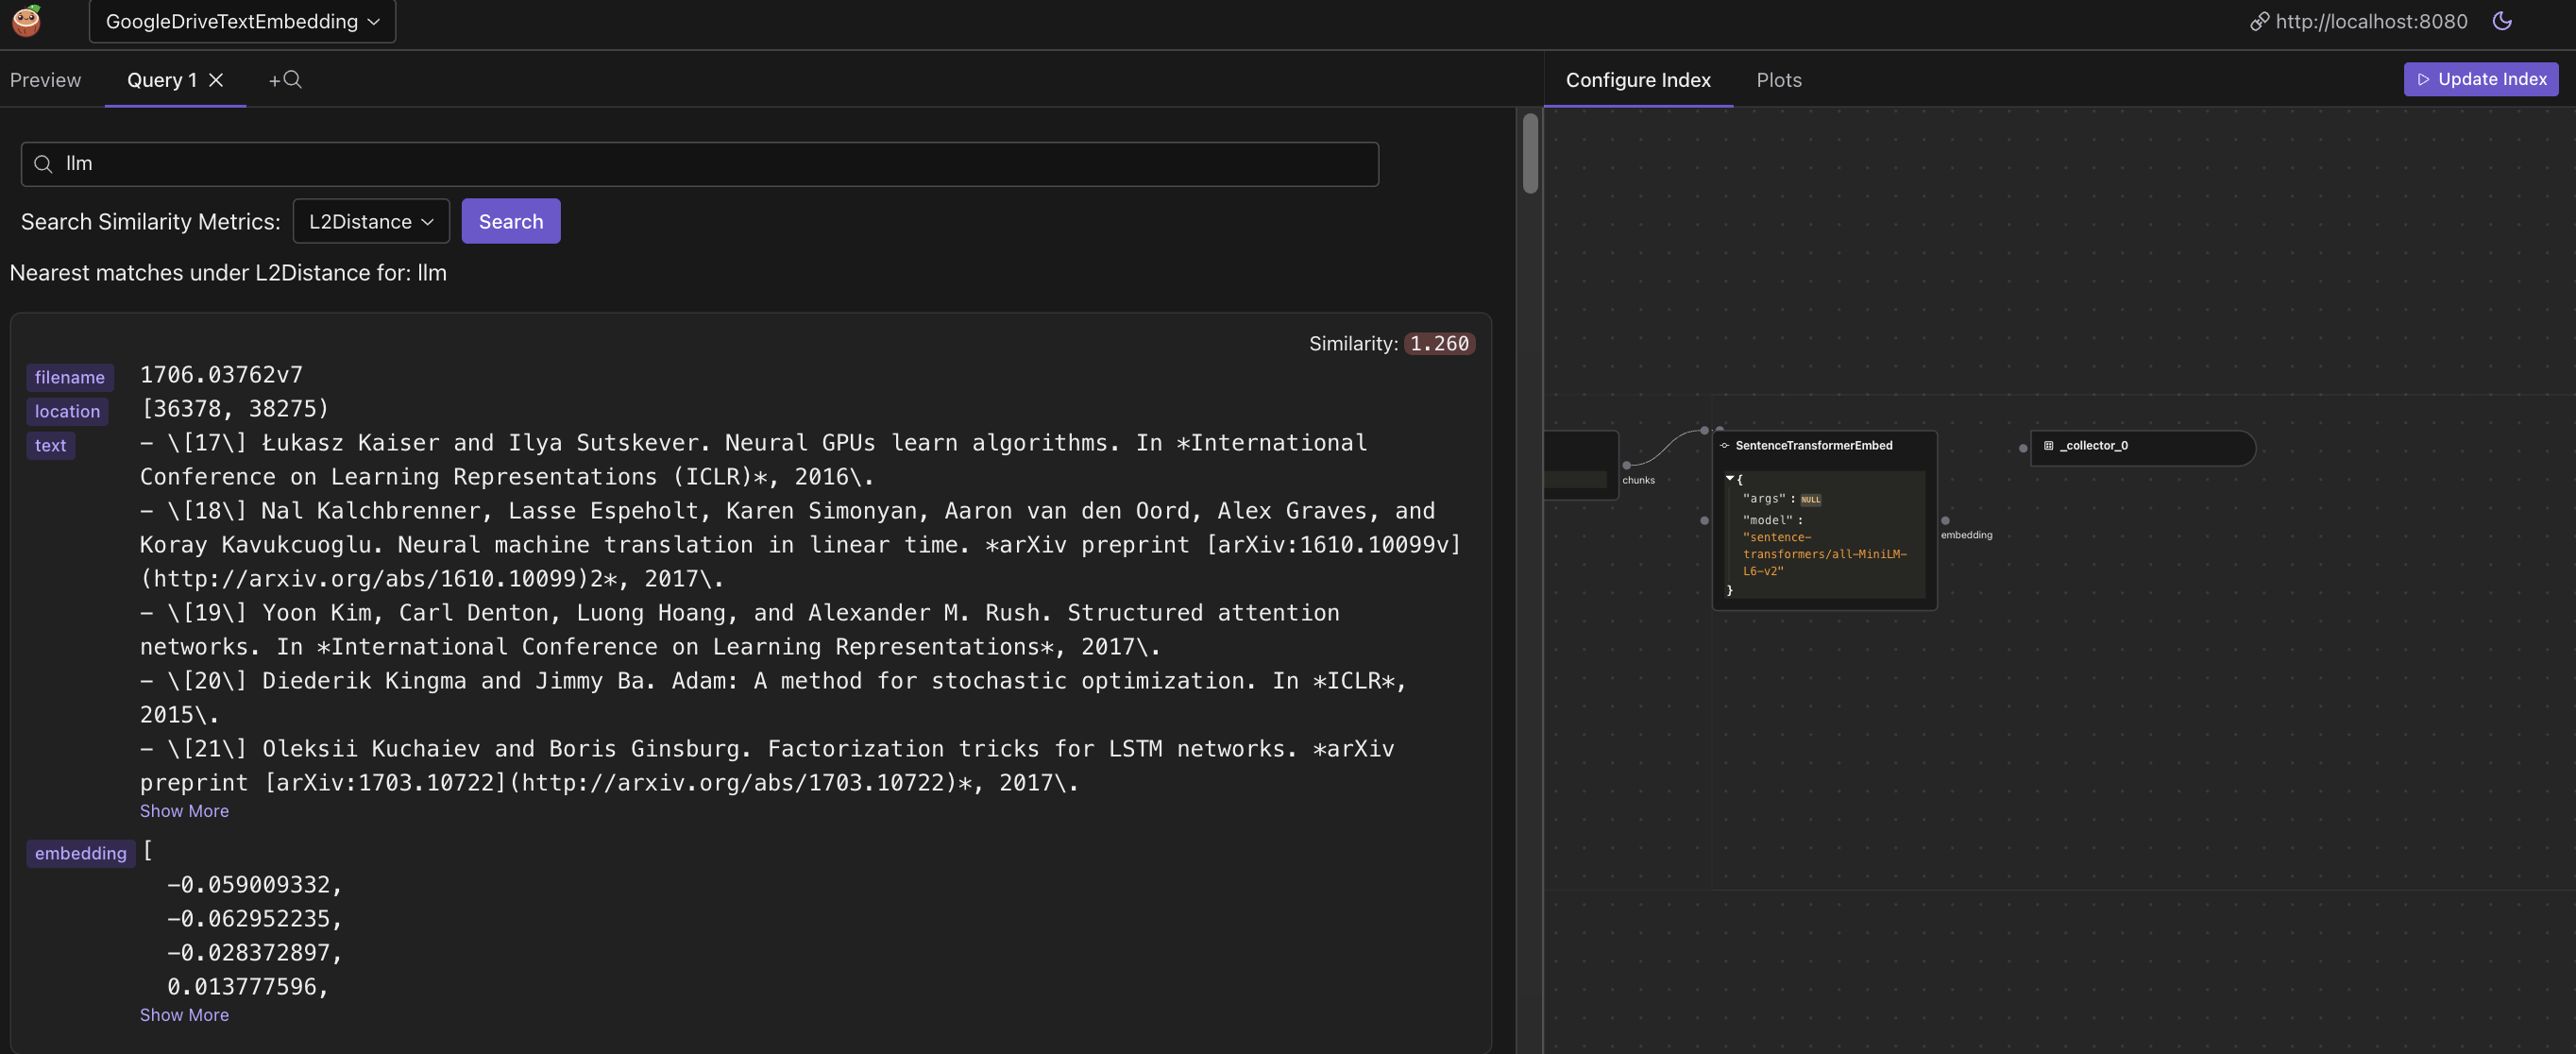
CocoInsight is a comprehesive web interface to understand your data pipeline and interact with the index. CocoInsight has zero data rentention with your pipeline data.
python main.py cocoindex server -c https://cocoindex.ioThen open the CocoInsight UI at https://cocoindex.io/cocoinsight.

On the left side, you can see the data preview with detailed information from your data pipeline with source from Google Drive. On the right side, you can inspect the data pipeline data flow.
Click on
viewbutton from the chunks, there is an interactive view to inspect and troubleshoot the content of the chunk.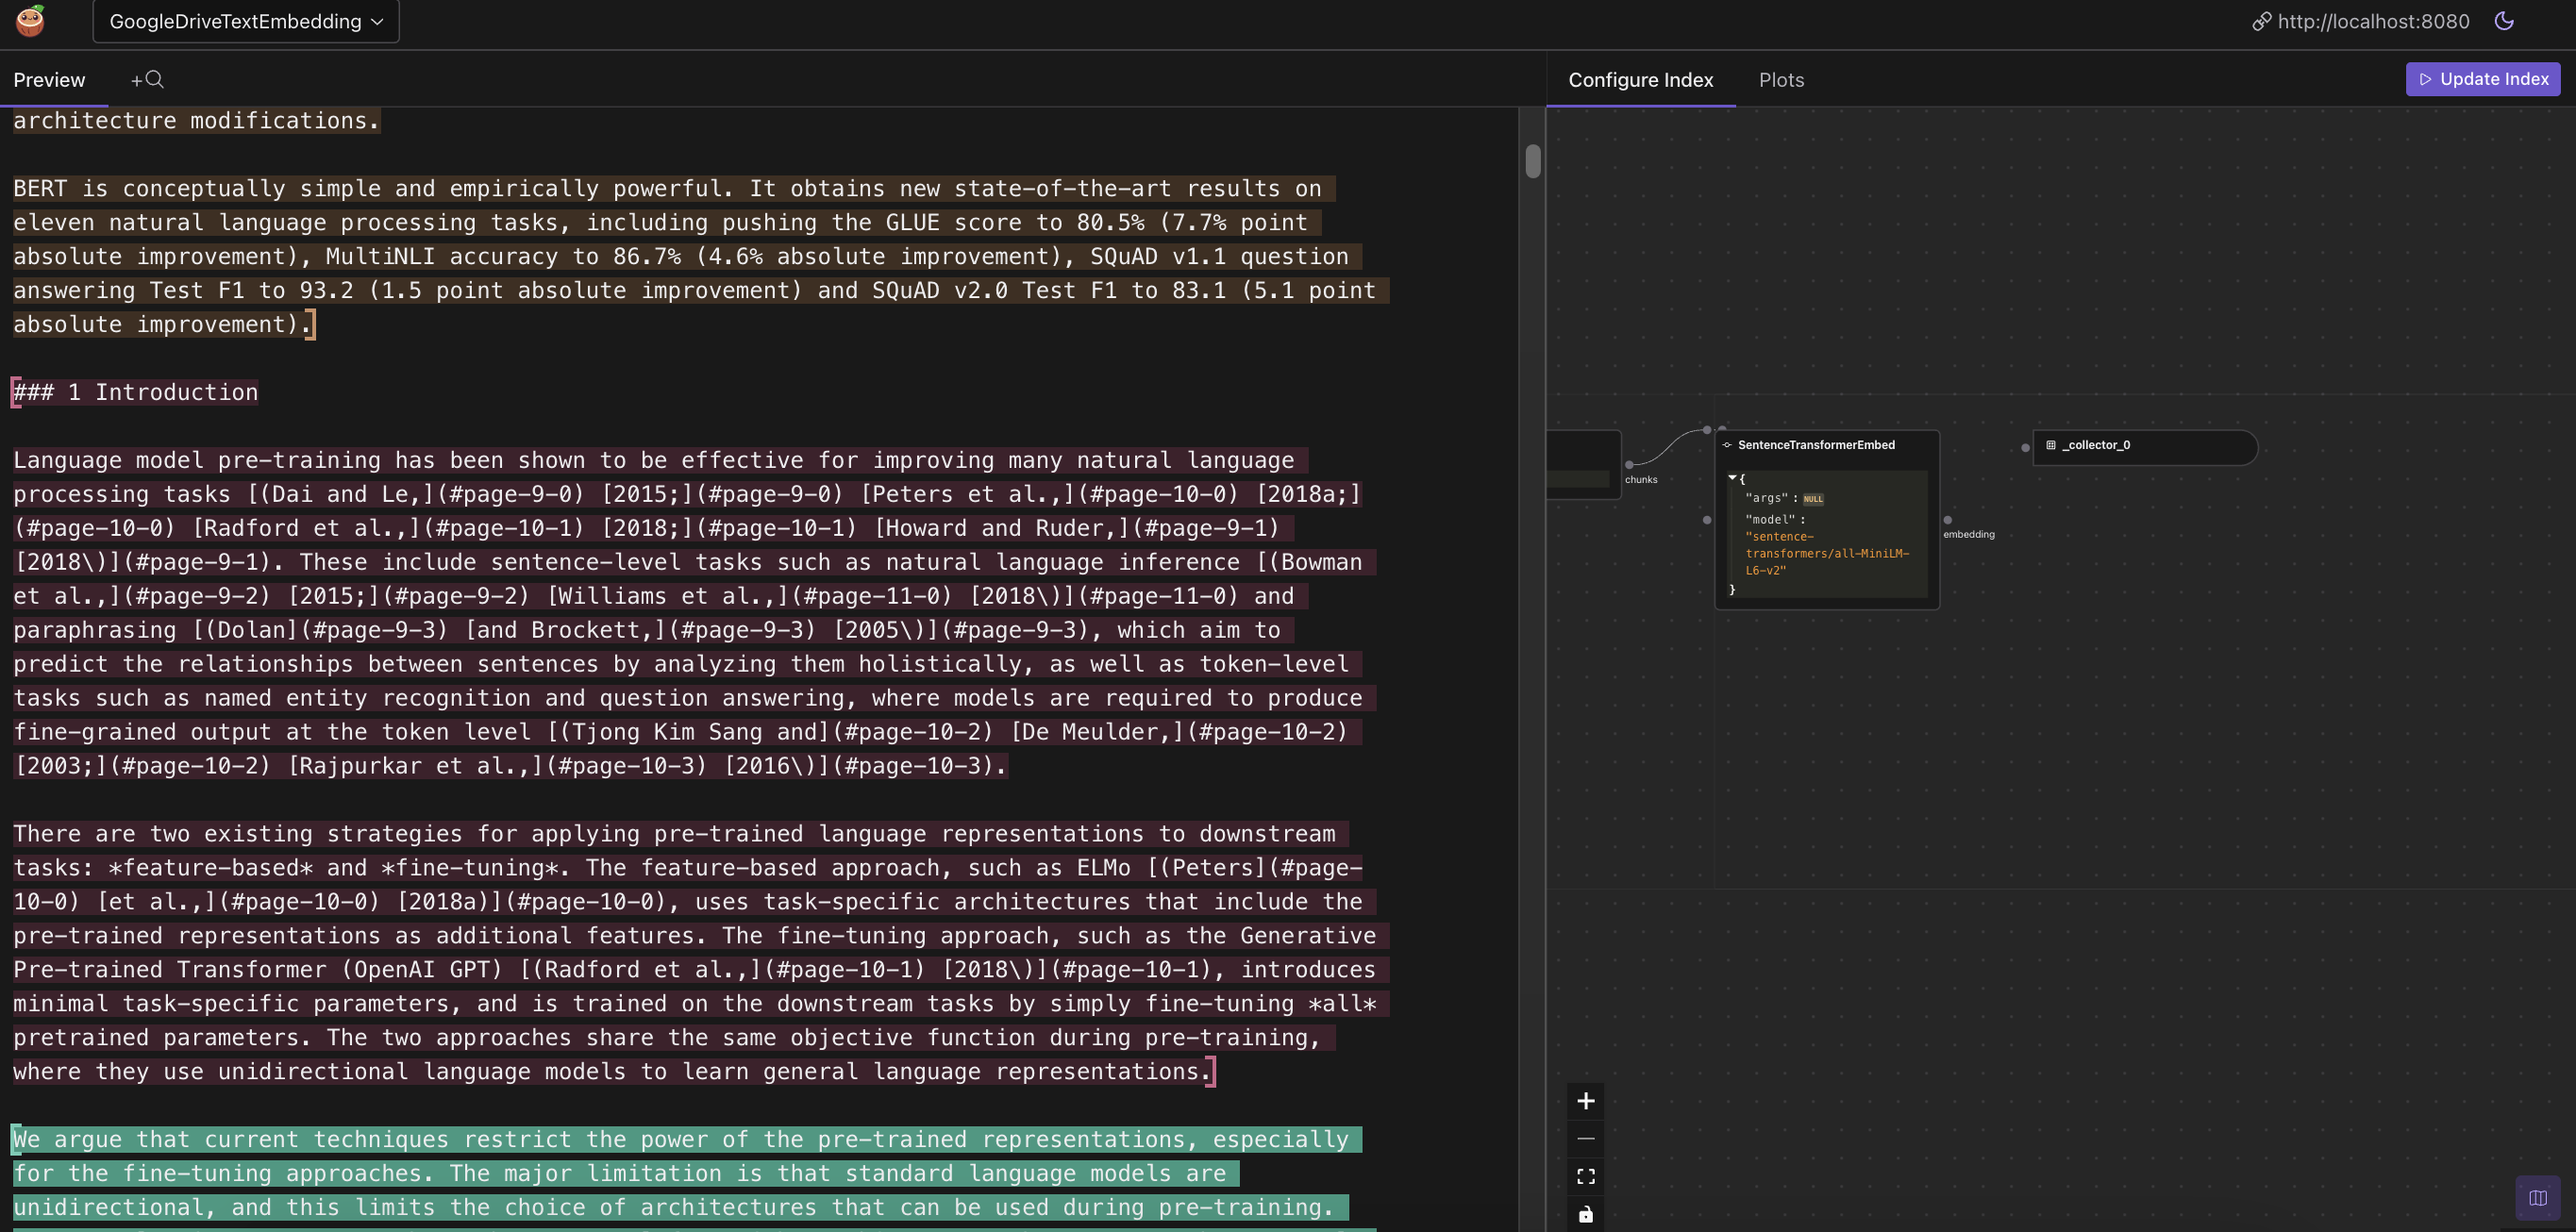
Click on the search icon on the tab, you can add as many queries as you want.
That's it! 🎉 Now you are ready to build any semantic search application or RAG runtime from the index to build your own application that is backed by Google Drive! 🚀🥥 If you like this post and our work, please support Cocoindex on Github with a star ⭐. Thank you with a warm coconut hug 🥥🤗.
Community
We love to hear from the community! You can find us on Github and Discord.
Subscribe to my newsletter
Read articles from LJ directly inside your inbox. Subscribe to the newsletter, and don't miss out.
Written by

