🏷️ Adding a Badge to Shell Tab Bar in .NET MAUI Android 🚀
 Ali Raza
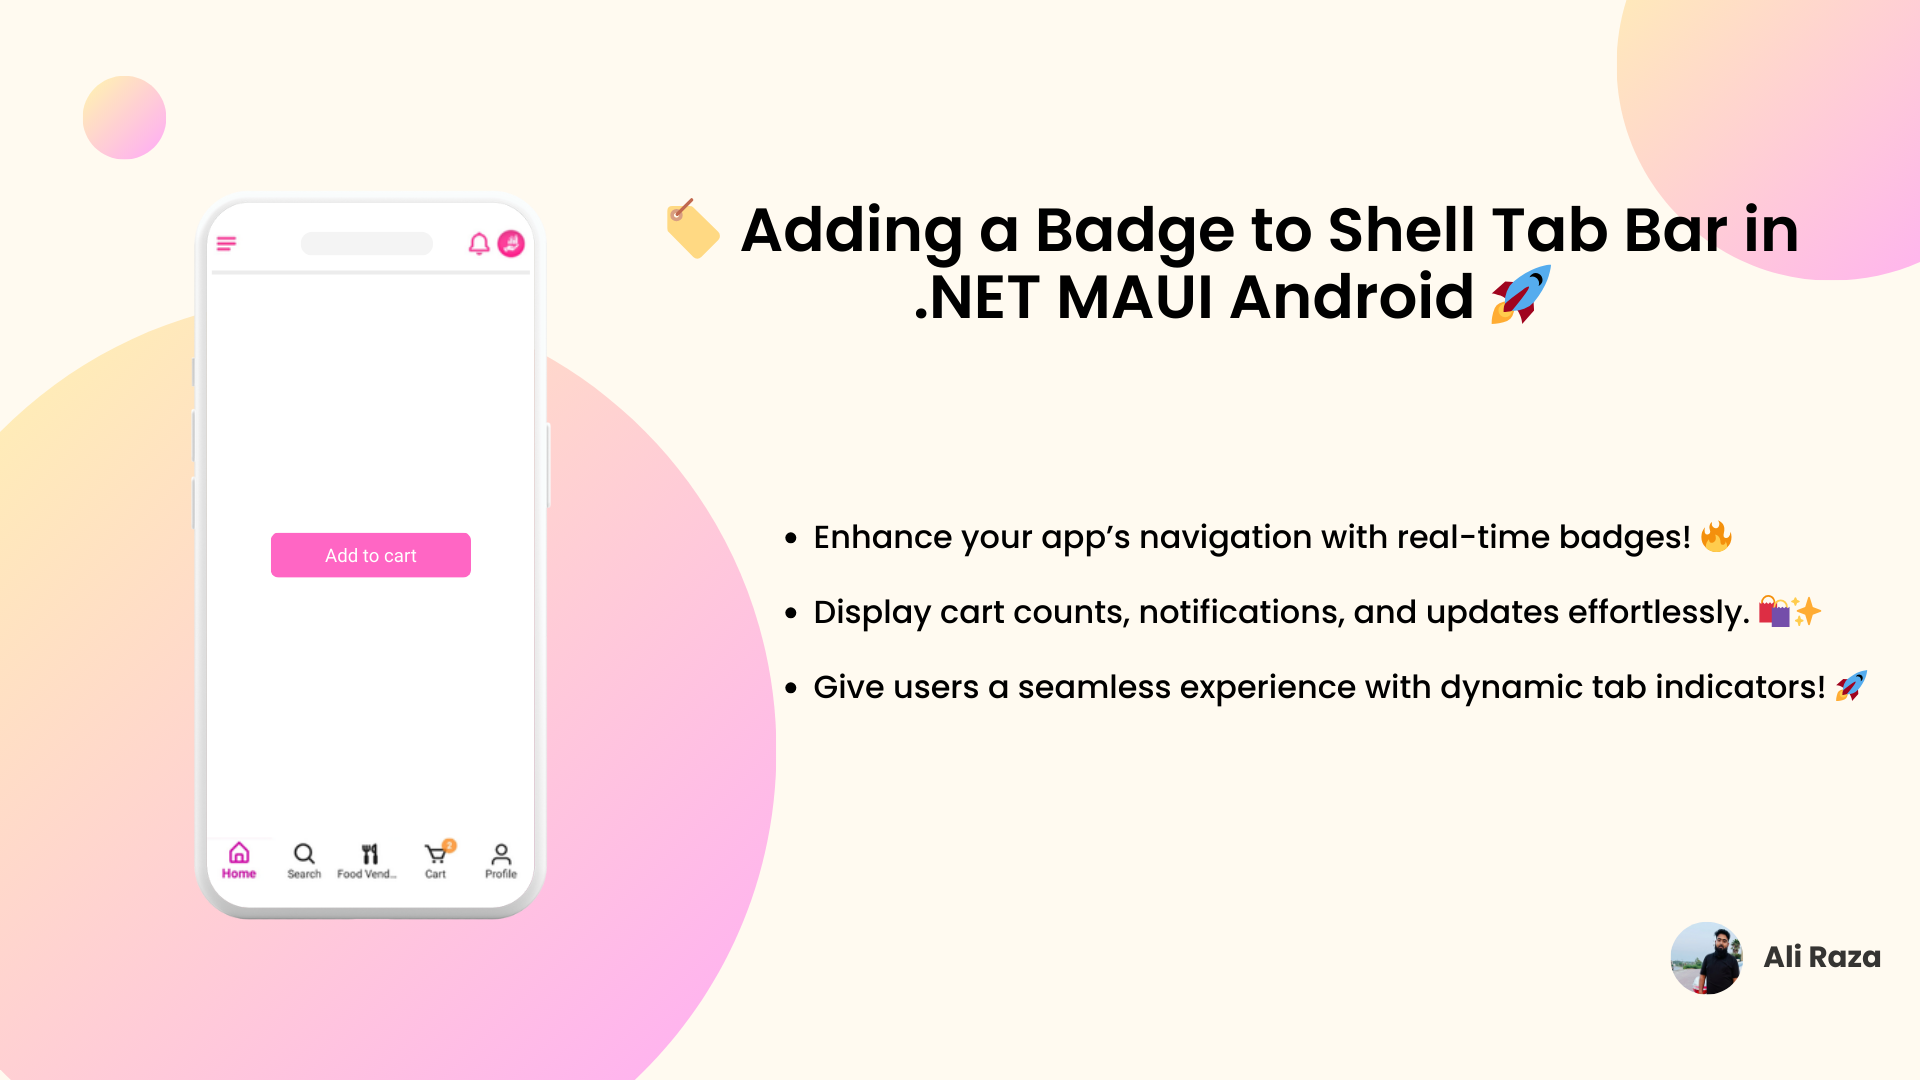
In modern mobile applications, a badge on a tab bar enhances user experience by displaying notifications, cart counts, or other important updates. This article covers how to add a badge to the Shell Tab Bar in .NET MAUI Android using a custom Shell Renderer.
📌 Steps to Implement the Badge
1️⃣ Ensure You Have a Custom Shell Renderer
Before adding the badge, ensure you have a CustomShellRenderer in place. If you haven't created one, follow the basic setup of Shell Renderer in .NET MAUI Android.
 public class CustomShellRenderer : ShellRenderer
 {
     public CustomShellRenderer() : base()
     {
     }
     public CustomShellRenderer(Context context) : base(context)
     {
     }

     protected override IShellItemRenderer CreateShellItemRenderer(ShellItem shellItem)
     {
         return new CustomShellItemRenderer(this);
     }
 }

  public class CustomShellItemRenderer : ShellItemRenderer
  {
      private bool _isDisposed;

      private TextView _cartBadgeView; // 🔴 Badge TextView for Cart

      private BottomNavigationView _bottomNavigationView;
      private bool FirstTimeEnteringForCart { get; set; } = true; // Added to handle the bottom tab cart count
      private int CartCount { get; set; }

      public CustomShellItemRenderer(ShellRenderer shellRenderer) : base(shellRenderer)
      {
          // 🔴 Listen for cart updates
          // Explained in 2nd Step
          WeakReferenceMessenger.Default.Register<Helpers.WeakRefMessages.ShellTab.AddOrUpdateCartNumber>(this, (r, count) =>
          {
              CartCount = count.Value;
              UpdateTabBadge(CartCount);
          });
      }
}
2️⃣ Register a Message to Update the Badge
We'll use WeakReferenceMessenger to listen for cart updates dynamically and update the badge accordingly.
// 🔴 Listen for cart updates
WeakReferenceMessenger.Default.Register<Helpers.WeakRefMessages.ShellTab.AddOrUpdateCartNumber>(this, (r, count) =>
{
    CartCount = count.Value;
    UpdateTabBadge(CartCount);
});
3️⃣ Implement the GetBottomNav Method 🛍️
This method gets the Bottom Nav.
        private BottomNavigationView GetBottomNav()
        {
            var viewGroup = (ViewGroup)this.View;
            if (viewGroup != null)
                for (int i = 0; i < viewGroup.ChildCount; i++)
                {
                    var child = viewGroup.GetChildAt(i);
                    if (child is BottomNavigationView tabLayout)
                    {
                        return tabLayout;
                    }
                }
            return null;
        }
4️⃣ Implement the UpdateTabBadge Method 🛍️
This method finds the correct tab, creates a TextView badge, and updates the count dynamically.
 private void UpdateTabBadge(int count)
 {
     try
     {
         if (_bottomNavigationView == null || _bottomNavigationView.Context == null)
             _bottomNavigationView = GetBottomNav(); // Ensure it's assigned

         if (_bottomNavigationView == null || _bottomNavigationView.Context == null)
             return;

         var menuView = _bottomNavigationView.MenuView as BottomNavigationMenuView;
         if (menuView == null)
             return;

         for (int i = 0; i < menuView.ChildCount; i++)
         {
             var itemView = menuView.GetChildAt(i) as BottomNavigationItemView;
             if (itemView == null)
                 continue;

             if (itemView.ItemData.TitleFormatted.ToString() == "Cart") // 🎯 Match Cart
             {
                 if (_cartBadgeView == null)
                 {
                     _cartBadgeView = new TextView(_bottomNavigationView.Context)
                     {
                         Gravity = GravityFlags.Center,
                         TextSize = 10,
                         Typeface = Typeface.DefaultBold // Semi-bold text
                     };

                     // 🎨 Set text color correctly
                     _cartBadgeView.SetTextColor(global::Android.Content.Res.ColorStateList.ValueOf(global::Android.Graphics.Color.White));

                     var background = new GradientDrawable();
                     background.SetShape(ShapeType.Oval);
                     background.SetColor(global::Android.Graphics.Color.ParseColor("#CCFF891D")); // Transparent center
                     background.SetStroke(1, global::Android.Graphics.Color.ParseColor("#CCFF891D")); // Ring effect

                     _cartBadgeView.Background = background;

                     // ⚙️ Adjust badge position
                     var layoutParams = new FrameLayout.LayoutParams(50, 50) // Reduce size for better fit
                     {
                         LeftMargin = itemView.Width / 2 + 20, // Adjust positioning
                         TopMargin = 7
                     };

                     _cartBadgeView.LayoutParameters = layoutParams;

                     // 🛠️ Use Post to add the badge after layout calculations
                     itemView.Post(() =>
                     {
                         itemView.AddView(_cartBadgeView);
                     });

                 }

                 _cartBadgeView.Text = count > 0 ? count.ToString() : "";
                 _cartBadgeView.Visibility = count > 0 ? ViewStates.Visible : ViewStates.Gone;
             }
         }
     }
     catch (Exception ex) { SentrySdk.CaptureException(ex); }
 }
5️⃣ Testing the Badge 🧪
Send a message with the cart count:
WeakReferenceMessenger.Default.Send(new Helpers.WeakRefMessages.ShellTab.AddOrUpdateCartNumber(5));
The badge should now appear on the Cart tab with the number 5.
If the count is 0, the badge will be hidden automatically.
🎯 Conclusion
By implementing a custom Shell Renderer, we can easily add a badge to a tab in .NET MAUI Android. This feature enhances usability by providing visual feedback to users. 🚀
Start implementing it today and give your app a professional touch! 🎉
Subscribe to my newsletter
Read articles from Ali Raza directly inside your inbox. Subscribe to the newsletter, and don't miss out.
Written by
Ali Raza
Ali Raza
🚀 Tech Lead | .NET MAUI Expert | Mobile App Developer I'm Ali Raza, a passionate Tech Lead with over 6 years of experience in mobile app development. I specialize in .NET MAUI/Xamarin and have led multiple high-impact projects, including enterprise apps, fintech solutions, and eSIM technology. 🔹 What I Do: ✔ .NET MAUI & Xamarin – Building cross-platform apps with robust architectures ✔ eSIM & Fintech Apps – Leading innovations in digital connectivity & finance ✔ Performance Optimization – Creating high-quality, scalable mobile solutions ✔ Mentorship & Community Sharing – Helping developers master .NET MAUI 📢 Sharing Weekly Insights on .NET MAUI/Xamarin to help developers level up! Follow me for deep dives into Native Interop, API Optimization, and Advanced UI/UX techniques. Let’s connect and build something amazing! 🚀