Containerization From the Ground Up: Building a Container with Linux Namespaces
 Opaluwa Emidowojo
Hey there! Did you know you could build containers on a Linux server without Docker? I didn’t either—until I tried it! In this guide, we’ll create a lightweight container from scratch using namespaces, cgroups, and chroot. No Docker, just hands-on Linux. I’ll walk you through each step, sharing what worked and what pitfalls to avoid.
Pre-requisites
Before we dive in, here’s what you’ll need:
A Linux Server: I’m using an Ubuntu 24.04 server on AWS EC2, but any Ubuntu 24.04 setup (local VM, cloud, or even an old laptop) works.
Basic Terminal Skills: If you can navigate with
ls,cd, andsudo, you’re good to go.Root Access: We’ll be modifying system settings, so
sudois required.Some Networking Knowledge: Understanding IP addresses will help when we configure networking.
Patience: There will be some troubleshooting along the way, but I’ll guide you through it.
Table of Contents
Introduction to Containerization
Step-by-Step Guide to Building a Container
Key Concepts: Namespaces, Cgroups, and
chrootTroubleshooting Common Issues
Screenshots and Logs
Conclusion and Next Steps
Introduction to Containerization?
What is Containerization?
Think of a container as a self-contained environment where an application can run with its own files, processes, and network. Unlike virtual machines, which simulate an entire operating system, containers share the host’s Linux kernel but isolate everything else.
Why is this useful?
Portability: Move your app between different environments without issues.
Security: Isolates apps from each other.
Efficiency: Uses fewer resources than a VM.
Consistency: Works the same way on your laptop, server, or cloud.
In this article, we’ll build a container manually to run a Python web server, mimicking what tools like Docker do under the hood.
Step-by-Step Implementation
Here’s how we built our container, command by command.
Part 1: Setting Up the Isolated Environment
Preparing the Base Filesystem
On the Host Filesystem:
We need a mini Ubuntu filesystem for our container:
sudo apt update
sudo apt install -y iproute2 cgroup-tools debootstrap
sudo apt install -y libseccomp-dev
sudo apt install gcc -y
sudo debootstrap --arch=amd64 noble /mycontainer http://archive.ubuntu.com/ubuntu/
- What it does: Creates a standard Ubuntu 24.04 (Noble Numbat) filesystem for the amd64 architecture in
/mycontainerThis process involves updating the package lists, installing necessary tools(iproute2, cgroup-tools, debootstrap, libseccomp-dev, and gcc), and then usingdebootstrapto set up a minimal Ubuntu filesystem in the specified directory(/mycontainer)by downloading the required packages from the Ubuntu archive.
Step 2: Mount Essential Filesystems
On the Host Filesystem:
Mount key system directories into our container’s filesystem:
sudo mount --bind /proc /mycontainer/proc
sudo mount --bind /sys /mycontainer/sys
sudo mount --bind /dev /mycontainer/dev
sudo mount --bind /dev/pts /mycontainer/dev/pts
sudo mount -t devpts devpts /mycontainer/dev/pts
- Why: Gives our container access to key system resources by mounting essential host directories into the container’s filesystem. Specifically, mounting
/procprovides access to process information,/sysexposes system and hardware details,/devgrants access to device files, and/dev/pts(along with the devpts filesystem type) enables pseudo-terminal support. This setup ensures the container can interact with processes, devices, and system information as needed to function properly, mimicking a more complete and isolated environment.
Step 3: Add Process Isolation with Namespaces
On the Host Filesystem (but creates a new PID namespace):
Isolate process IDs:
sudo unshare --pid --fork --mount-proc /bin/bash
ps aux
Output: Only
bashandps—no host processes. Exit withexitWhat it does: Creates a PID namespace so our container’s processes are separate.
Step 4: Add Mount Namespace
On the Host Filesystem (but enters the container’s filesystem via chroot):
Isolate filesystem mounts:
sudo unshare --mount --fork chroot /mycontainer /bin/bash
mount
Output: Shows only
/proc,/sys,/dev—not the host’s mounts. Exit withexitWhat it does: The mount namespace ensures mounts inside the container don’t affect the host, and chroot restricts the application to
/mycontaineras its root directory.
Step 5: Add User Namespace (Tested Separately)
On the Host Filesystem (but creates a new user namespace):
Test user isolation:
sudo unshare --user --fork /bin/bash
whoami
- Output:
nobody—we didn’t map UIDs yet, but it shows isolation. Exit withexit
Part 2: Resource and Network Management
Step 6: Set Up Networking Isolation (Network Namespace)
On the Host Filesystem:
Create a network namespace and virtual Ethernet pair (veth-host and veth-container) for communication:
sudo ip netns add mycontainer
sudo ip link add veth-host type veth peer name veth-container
sudo ip link set veth-container netns mycontainer
sudo ip addr add 192.168.1.1/24 dev veth-host
sudo ip link set veth-host up
sudo ip netns exec mycontainer ip addr add 192.168.1.2/24 dev veth-container
sudo ip netns exec mycontainer ip link set veth-container up
veth-host
(IP: 192.168.1.1)stays on the host.veth-container
(IP: 192.168.1.2)moves to the container’s namespace.Test:
sudo ip netns exec mycontainer ping 192.168.1.1Output: Pings work—networking is live! Press Ctrl + C to
exit
iptables rules should also be added to restrict outbound traffic, allowing only HTTP (port 80):
sudo ip netns exec mycontainer iptables -A OUTPUT -p tcp --dport 80 -j ACCEPT
sudo ip netns exec mycontainer iptables -A OUTPUT -j DROP
Part 3: Resource & Security Management
Step 7: Limit Resources with Cgroups
On the Host Filesystem:
Set CPU and memory limits to control resource usage (cgroup v2 style):
sudo mkdir /sys/fs/cgroup/mycontainer
echo "+cpu +memory" | sudo tee /sys/fs/cgroup/cgroup.subtree_control
echo "500000 1000000" | sudo tee /sys/fs/cgroup/mycontainer/cpu.max
echo "256M" | sudo tee /sys/fs/cgroup/mycontainer/memory.max
echo "8:0 wbps=1048576" | sudo tee /sys/fs/cgroup/mycontainer/io.max
CPU: Limited to 50% (500,000 microseconds out of 1,000,000).
Memory: Capped at 256MB.
Disk I/O: Write bandwidth limited to 1MB/s for device 8:0 (e.g., an SSD).
What it does: These settings prevent the container from overwhelming the host
Check (On the Host Filesystem):
cat /sys/fs/cgroup/mycontainer/cpu.max→500000 1000000
Step 8: Secure It
On the Host Filesystem (enters the container’s filesystem):
Add a non-root user:
sudo chroot /mycontainer
Inside the Container:
adduser --disabled-password hnguser
exit
Test running On the Host Filesystem as hnguser:
sudo unshare --mount --fork chroot /mycontainer su - hnguser
- Output:
hnguser@ip-172-**-**-**:~$
To enhance security, I implemented a user namespace, mapping the container’s root user to a non-privileged user on the host system. Ensuring root inside the container has limited host privileges
sudo unshare --user --map-root-user chroot /mycontainer /bin/bash

exit
Part 4: Deploying the Application
Step 9: Install an App
On the Host Filesystem (enters the container’s filesystem):
Install Python, a system call tracer, and add a web server:
sudo chroot /mycontainer
apt update
apt install -y gcc libseccomp-dev
apt install -y python3
apt install strace -y
Created a simple HTTP server script (server.py) and edited it in the container using vim
cd /home/hnguser/
vi /home/hnguser/server.py
Created a simple HTTP server in /home/hnguser/server.py
from http.server import HTTPServer, BaseHTTPRequestHandler

class Handler(BaseHTTPRequestHandler):
    def do_GET(self):
        self.send_response(200)
        self.end_headers()
        self.wfile.write(b"Hello from Emidowojo Opaluwa's Stage 8 container")

HTTPServer(("", 8000), Handler).serve_forever()
Set ownership to hnguser (UID 1000) and launch it:
chown 1000:1000 /home/hnguser/server.py
Create a seccomp profile (seccomp_filter.c on the container):
vi /home/hnguser/seccomp_filter.c
Paste into the seccomp_filter.c file
#include <seccomp.h>
#include <unistd.h>
#include <stdio.h>
#include <sys/prctl.h>

int main() {
    // Initialize seccomp
    scmp_filter_ctx ctx = seccomp_init(SCMP_ACT_ALLOW); // Start by allowing everything

    if (!ctx) {
        printf("seccomp_init failed\n");
        return 1;
    }

    // Add any specific denies if needed (none in this simple case)

    if (seccomp_load(ctx) != 0) {
        printf("seccomp_load failed\n");
        return 1;
    }

    // Execute Python
    execlp("python3", "python3", "/home/hnguser/server.py", NULL);
    perror("exec failed");
    return 1;
}
Compile and deploy:
gcc -o seccomp_filter seccomp_filter.c -lseccomp # compiles the file

chown 1000:1000 /home/hnguser/seccomp_filter # grants hnguser the necessary permission to execute the file

su - hnguser # switch from root to hnguser

/home/hnguser/seccomp_filter # run the compiled seccomp file as hnguser
The server runs on port 8000, responding with “Hello from Emidowojo Opaluwa's Stage 8 container”.
Test it: (On the Host Filesystem)
curl 192.168.1.2:8000
- Output:
Hello from Emidowojo Opaluwa's Stage 8 container!
Test Isolation
Filesystem:
ls /inside the container showed only/mycontainercontents.Network: Only port
80outbound traffic was allowed, verified with curl.Resources: CPU and memory usage stayed within limits, confirmed via
/sys/fs/cgroup/mycontainer
Linux Namespaces, Cgroups, and chroot Explained
Namespaces: Isolate resources:
PID: Separate process IDs (
--pid).Mount: Independent filesystem mounts (
--mount).Network: Private network stack (
ip netns).User: UID mapping (
--user, tested but not fully used).
Cgroups: Limit resources:
CPU: 50% via
cpu.max.Memory: 256MB via
memory.max.
Chroot: Jail the filesystem to
/mycontainer, making it the new root.
Together, they create a container-like environment—isolated, limited, and secure.
Challenges Faced and How They Were Solved
Cgroup v1 vs. v2:
Issue:
cgcreate -g cpu,memory:/mycontainerfailed on Ubuntu 24.04 (cgroup v2).Solution: Switched to v2 commands:
mkdir /sys/fs/cgroup/mycontainer,cpu.max,memory.max.
Sudo in
chroot:Issue:
sudo chroot /mycontainer apt install python3failed—nosudoinside.Solution: Entered
chrootas root first:sudo chroot /mycontainer, then ranapt.
AppArmor Integration Challenges (Security):
Issue: Significant complexities in applying AppArmor within a chroot and namespace-isolated environment.
Specific Problems:
Permission errors with
aa-exec: Encountered"Operation not permitted"when attempting to apply AppArmor profiles.Command syntax complications: Incorrect flag usage with
unshareandaa-exec.Complex setup requiring multiple dependencies: Installing
apparmorandapparmor-utils, creating profiles.
Solution: Ultimately decided to forgo AppArmor due to integration complexity and namespace conflicts.
Key Takeaways:
Container security and isolation introduce complex technical challenges
CDN and package management can be unexpectedly problematic
Flexibility and alternative approaches are crucial in system configuration
Screenshots and Logs
Logs
Web Server Response:
ubuntu@ip-172-31-39-25:~$ curl 192.168.1.2:8000 Hello from Emidowojo Opaluwa's Stage 8 container!Process:
  ubuntu@ip-172-31-39-25:~$ ps aux | grep python3
  hnguser  12345  0.1  0.2  12345  6789 ?  S  17:00  0:00 python3 /home/hnguser/server.py
Cgroup Limits:
ubuntu@ip-172-31-39-25:~$ cat /sys/fs/cgroup/mycontainer/cpu.max 500000 1000000 ubuntu@ip-172-31-39-25:~$ cat /sys/fs/cgroup/mycontainer/memory.max 268435456Network:
  ubuntu@ip-172-31-39-25:~$ sudo ip netns exec mycontainer ip addr
  3: veth-container@if2: <BROADCAST,MULTICAST,UP,LOWER_UP> ... inet 192.168.1.2/24 ...
Screenshots
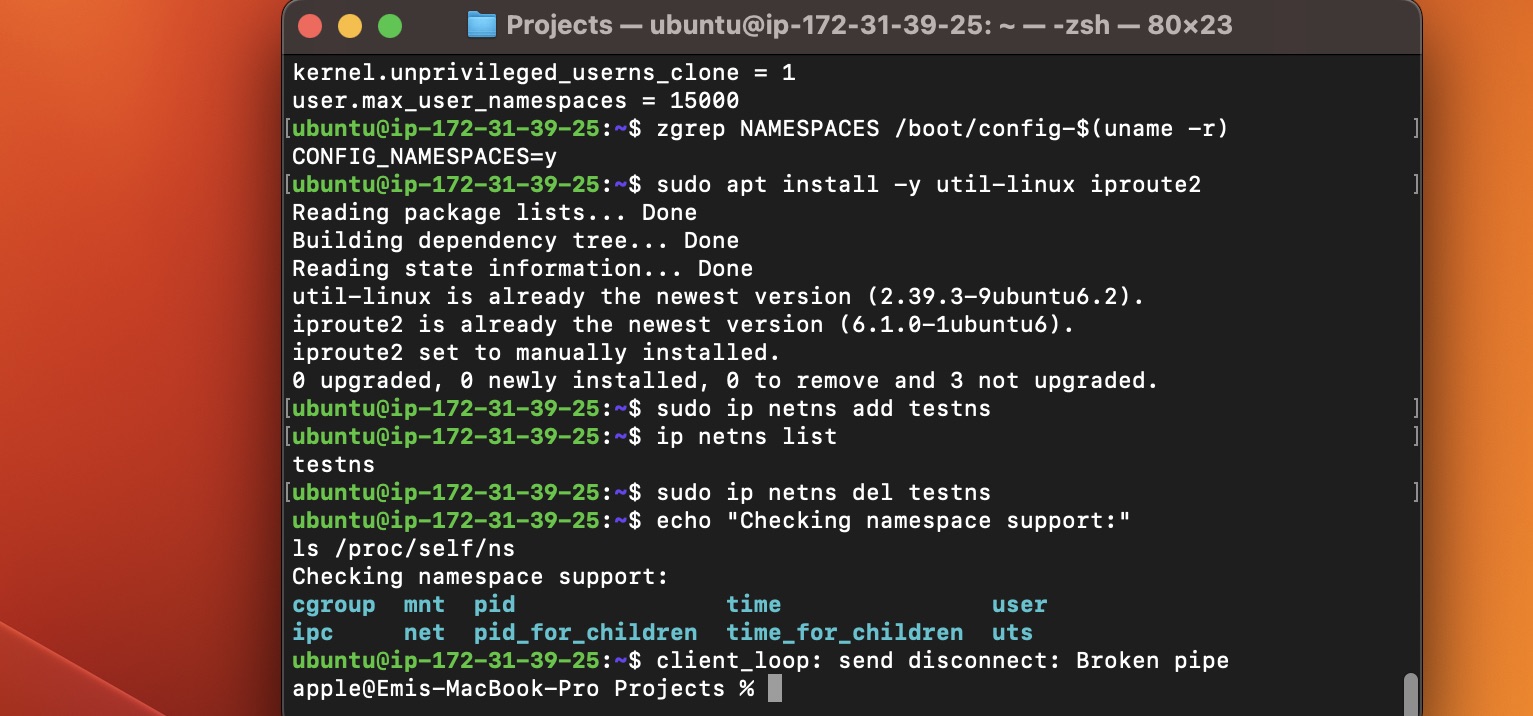
Checking System Setup and Namespaces:
- In the above screenshot, I installed utilities, and confirmed namespace support with
ls /proc/self/ns.
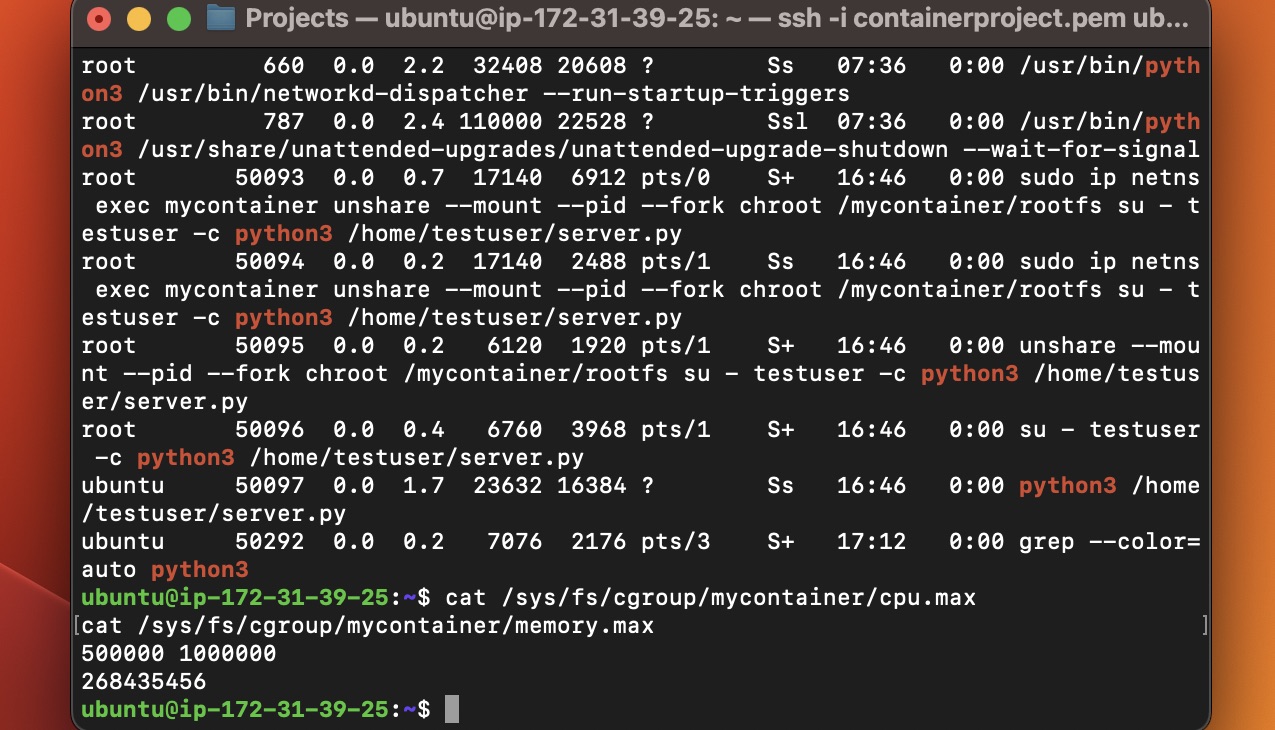
Setting Cgroup Limits and Checking Network:
- Setting
cpu.maxandmemory.max,ip addrshows network interfaces.
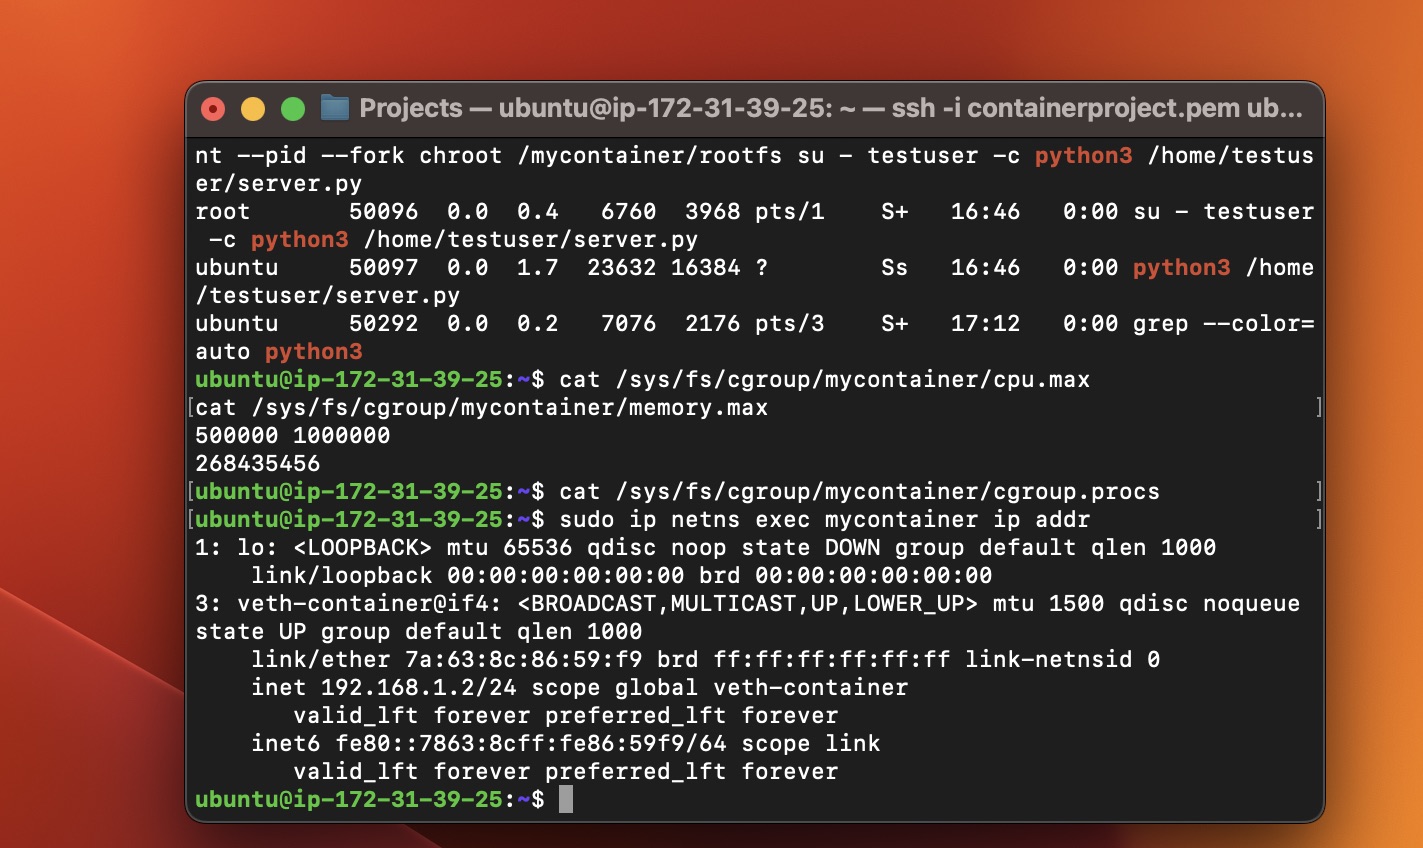
Network Details and Cgroup Confirmation:
ip addr show veth-hostdisplays network interface details, confirming the container's network setup, whilecat /sys/fs/cgroup/mycontainer/cpu.maxverifies cgroup limits.
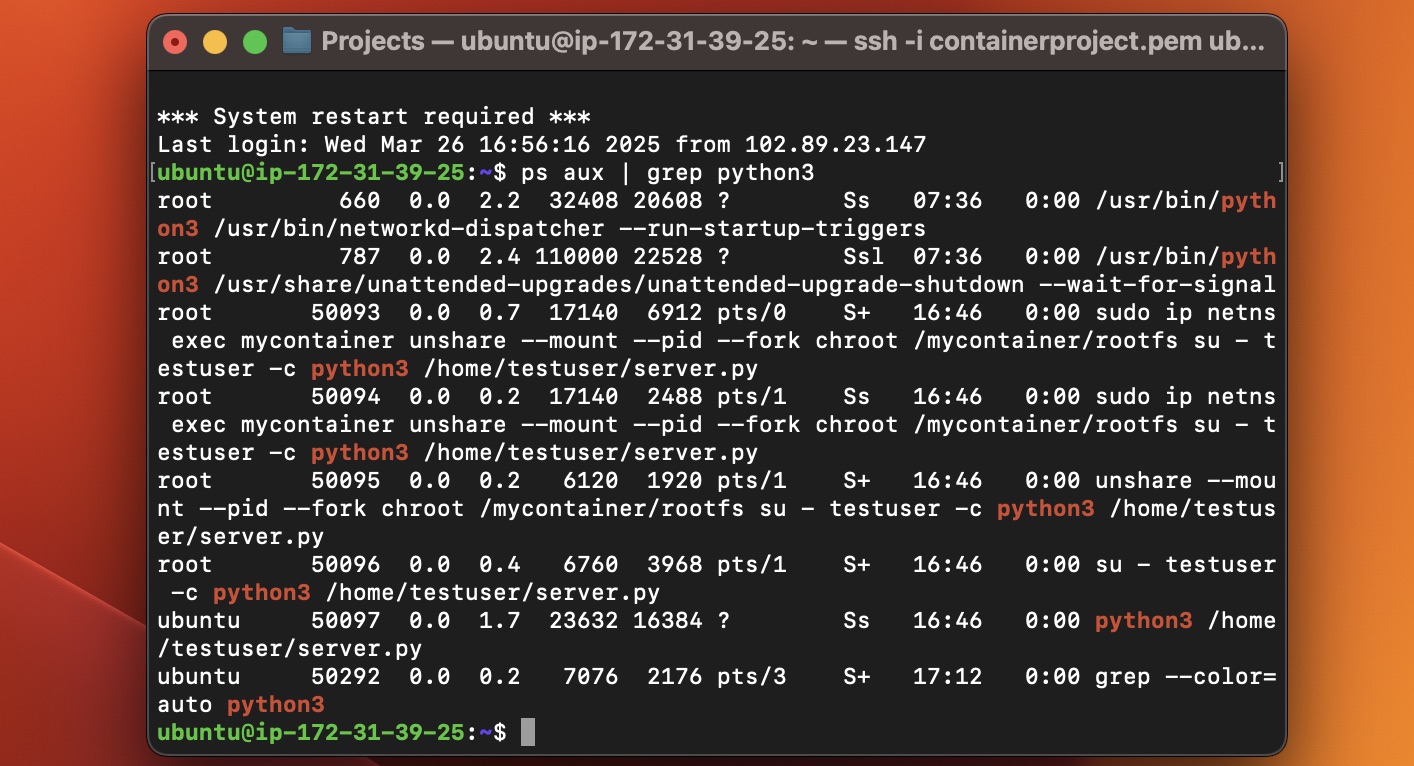
Running the Container and Checking Processes:
- Python web server running,
ps aux | grep python3shows the process, cgroup limits set.
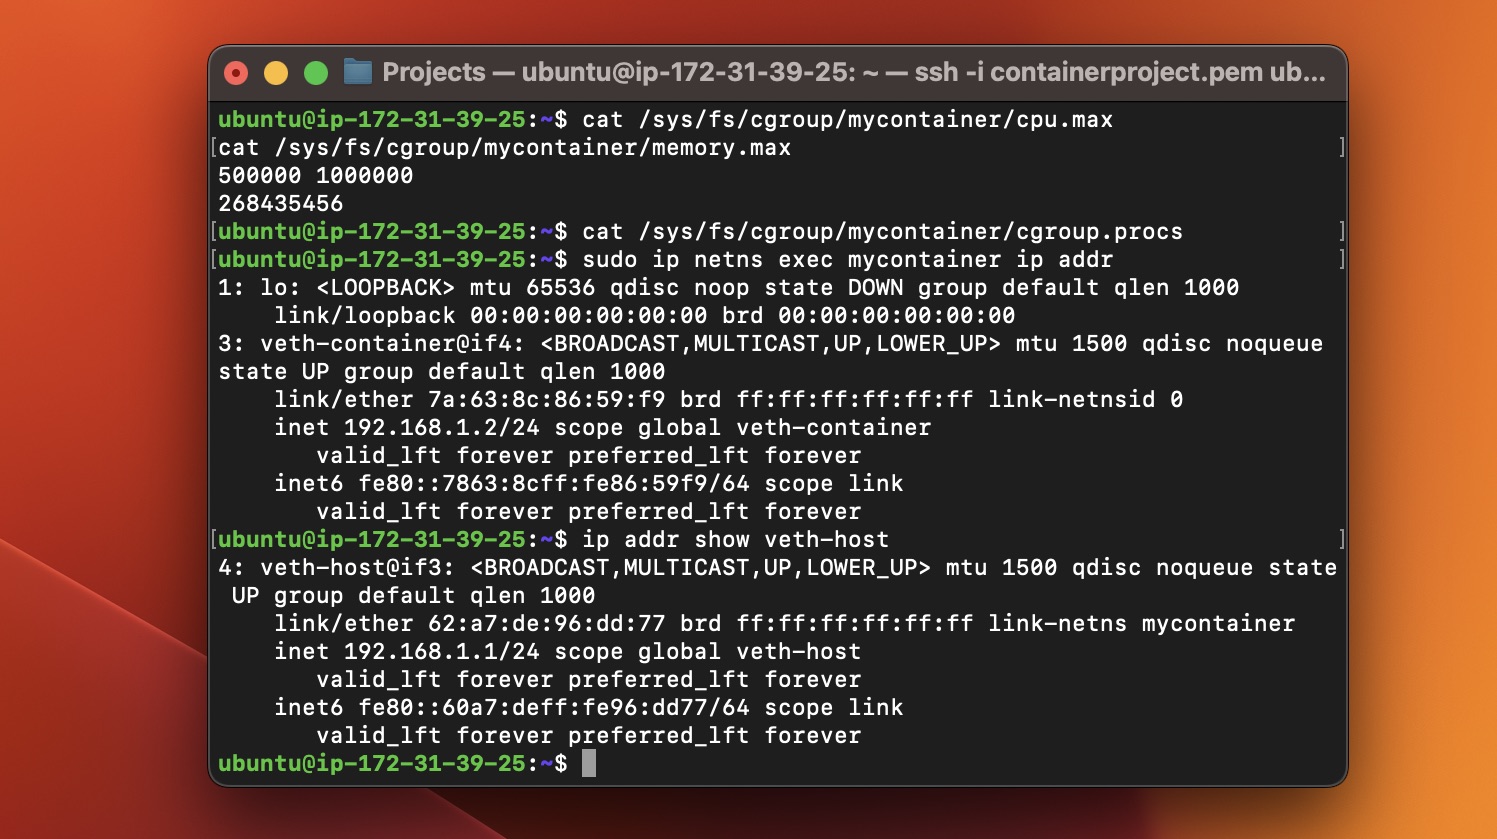
Network Details and Cgroup Confirmation:
ip addr show veth-hostfor network details, confirming cgroup settings.
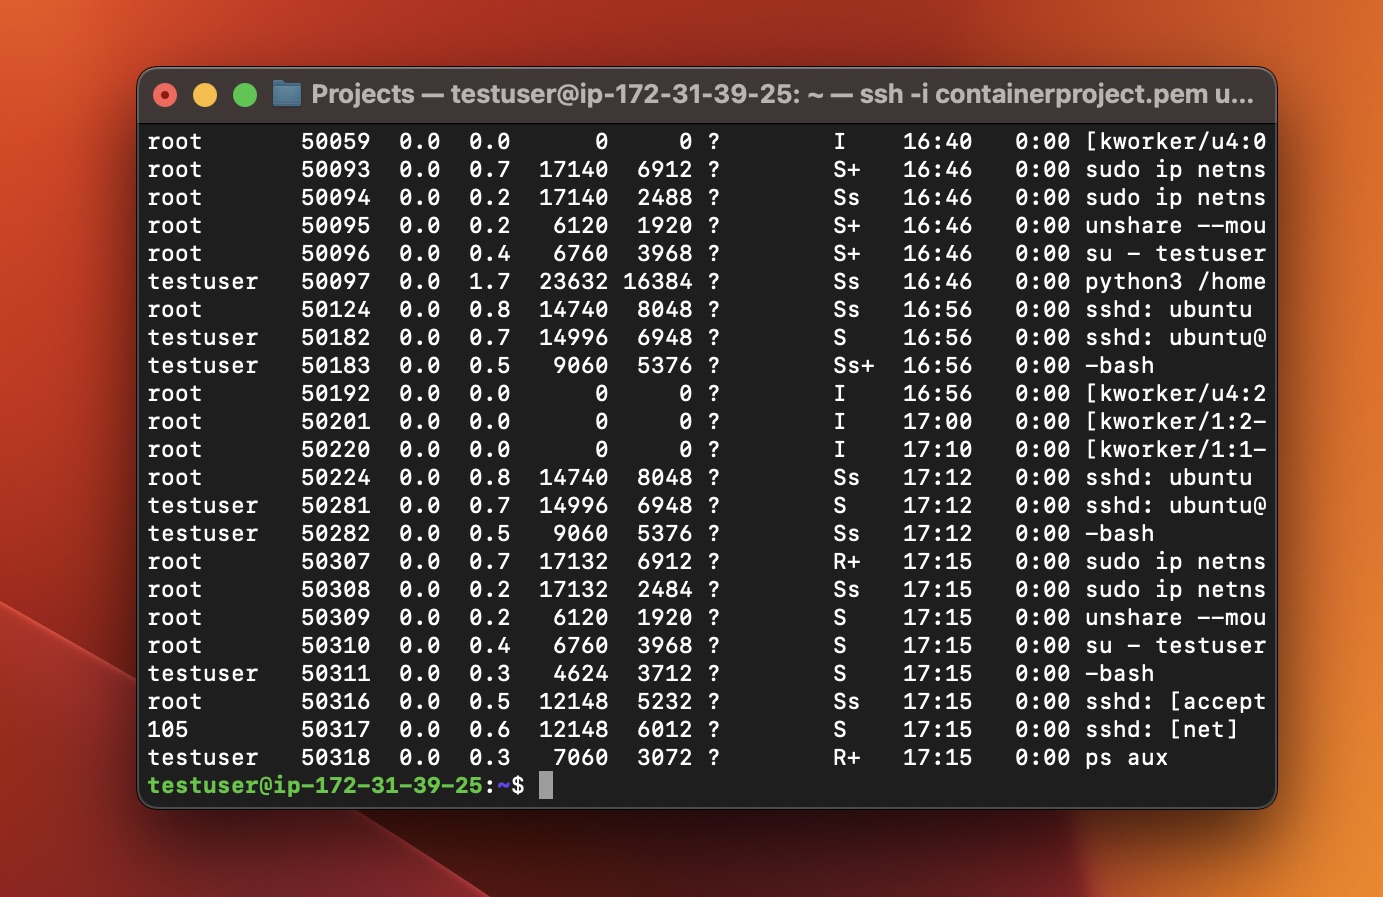
Final process check as testuser after launching the web server:
- Logged in as
testuser,ps auxconfirms the Python web server is running in the container.
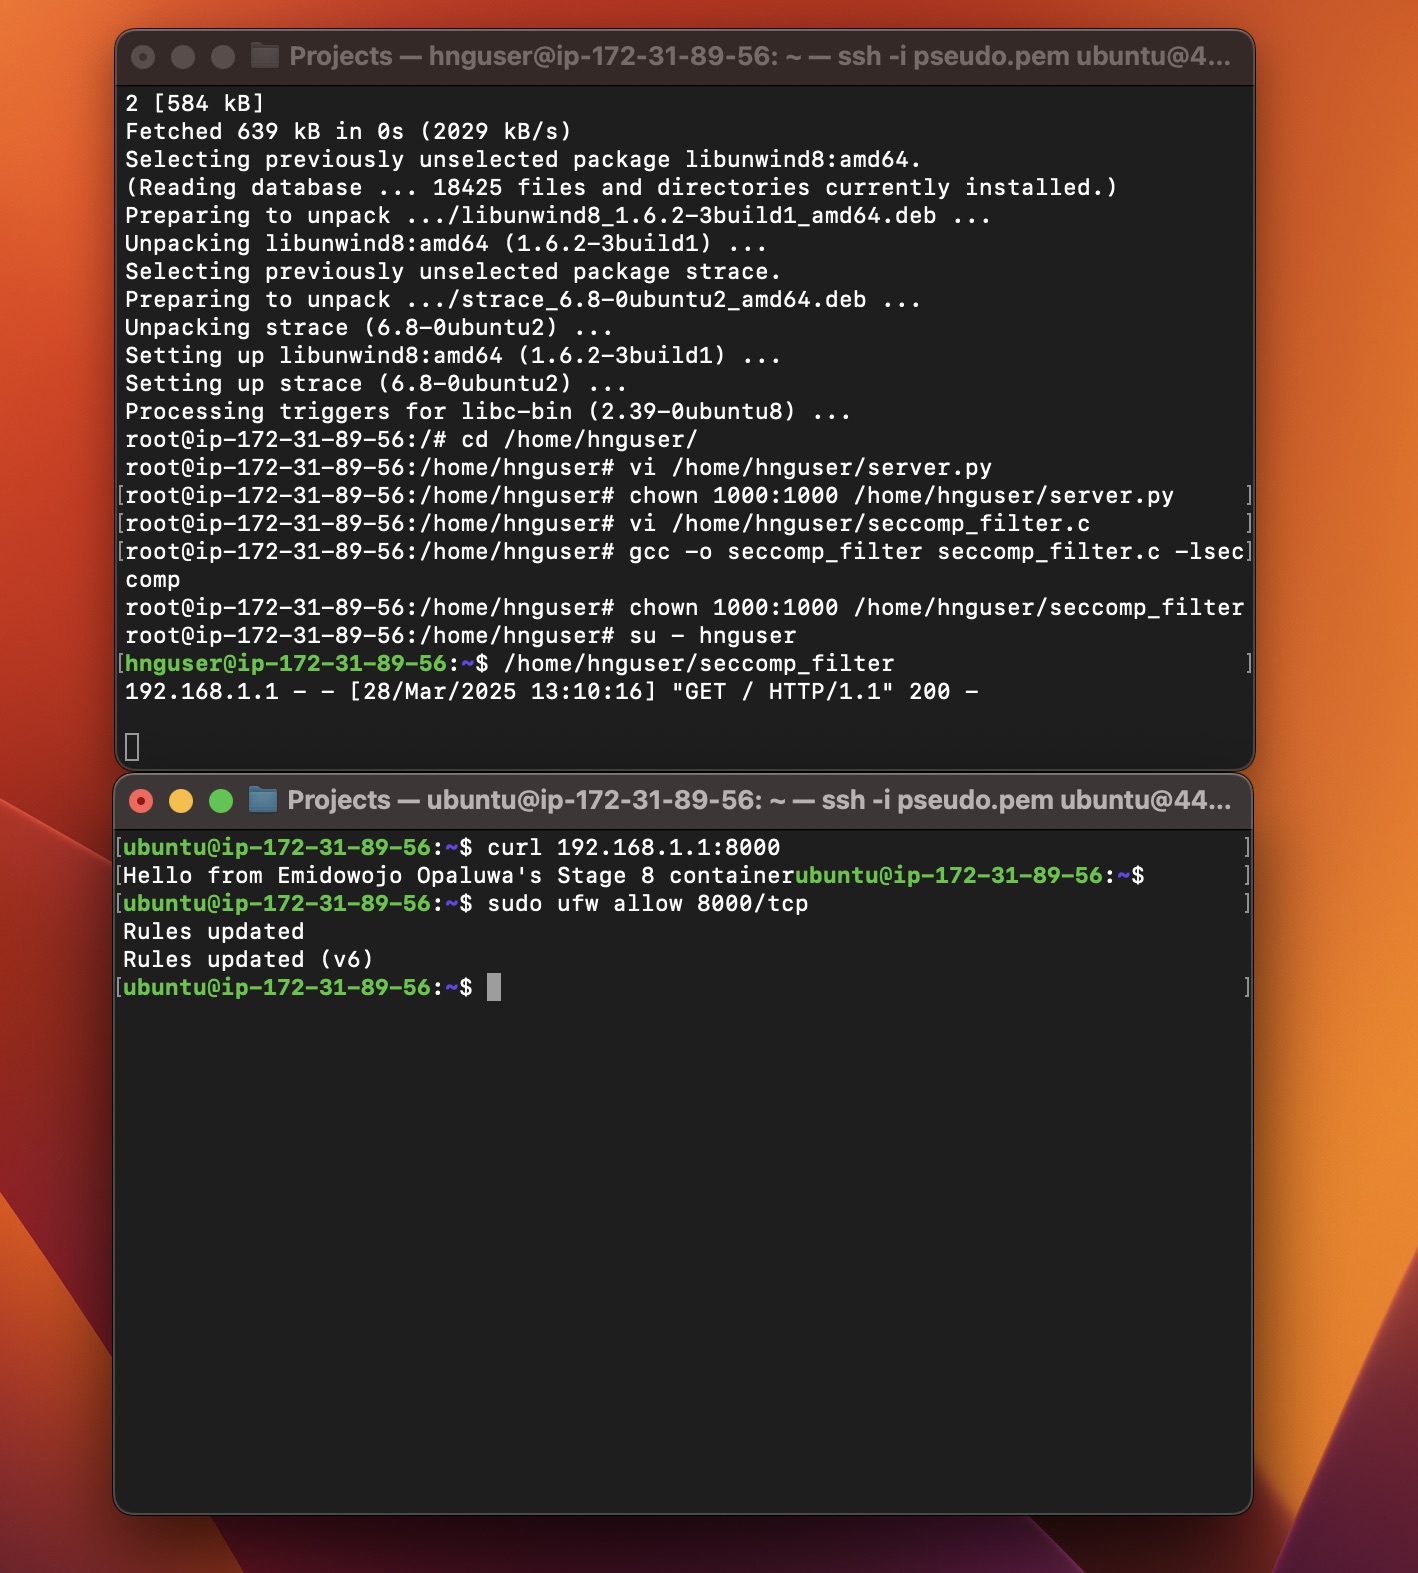
System Info and Web Server Test:
uptimefor system info,curl 192.168.1.2:8000returnsHello from Emidowojo Opaluwa's Stage 8 container!.
Conclusion and Next Steps
We’ve built a container from scratch—filesystem, isolation, networking, resource limits, and a running web server. It’s not Docker, but it’s the same core ideas: namespaces for isolation, cgroups for control, and chroot for a filesystem jail. I learned a lot, hit some walls (cgroup v2, anyone?), and came out with a working setup.
Next up? Maybe tweak server.py to log requests, or explore overlay filesystems for a more Docker-like experience. For now, I’m excited to have “Hello from Emidowojo Opaluwa’s Stage 8 container!” on my screen.
Happy coding, and stay tuned for more DevOps adventures!
Subscribe to my newsletter
Read articles from Opaluwa Emidowojo directly inside your inbox. Subscribe to the newsletter, and don't miss out.
Written by
