How to Set Up Full-Stack XM Cloud Local Development for Multiple Code Bases
 Amit Kumar
Table of contents
- 🤔Introduction to XM Cloud Local Development
- 👀Why Set Up a Local Development Environment for Multiple Code Bases?
- 🧩Prerequisites for Setting Up XM Cloud Local Environment
- 🧰Step-by-Step Guide to Setting Up XM Cloud Local Development
- ❇Benefits of This Setup
- 🤝A Special Thanks to the Sitecore Demo Team
- 💡Conclusion
- 🙏Credit/References
- 🏓Pingback

🤔Introduction to XM Cloud Local Development
XM Cloud is a powerful platform for managing and delivering personalized digital experiences. However, when working with multiple websites, each with its own codebase and hostname, setting up a local development environment can be challenging. This article explains how to configure your environment using PowerShell scripts, Docker commands, and environment-specific variables to ensure seamless transitions between different projects.
👀Why Set Up a Local Development Environment for Multiple Code Bases?
When managing multiple websites in XM Cloud, each site may have unique requirements, such as:
Different rendering hosts
Different code bases
Unique API endpoints and credentials
Custom environment variables
A well-configured local development environment allows developers to: 🔝
Test code changes separately
Easily switch between different code bases
Handle different hostnames
Manage unique API endpoints
Use specific environment variables for each website
Set up a flexible and organized local development environment
Maintain consistency across development, staging, and production environments
🧩Prerequisites for Setting Up XM Cloud Local Environment
Before you begin, ensure you have the following: 🔝
System Requirements: Minimum 16GB RAM (32GB recommended), quad-core CPU, and at least 30GB of free disk space
Software Tools:
Docker with Windows Containers enabled.
PowerShell.
Node.js LTS version.
.NET Core SDK and Framework.
A valid Sitecore license file.
Sitecore XM Cloud access and necessary API keys
A code repository with your website-specific code bases. 🔝
🧰Step-by-Step Guide to Setting Up XM Cloud Local Development
1. Code Base Structure Overview for XM Cloud
Suppose we have a code base structure that uses two different code bases for two separate websites:
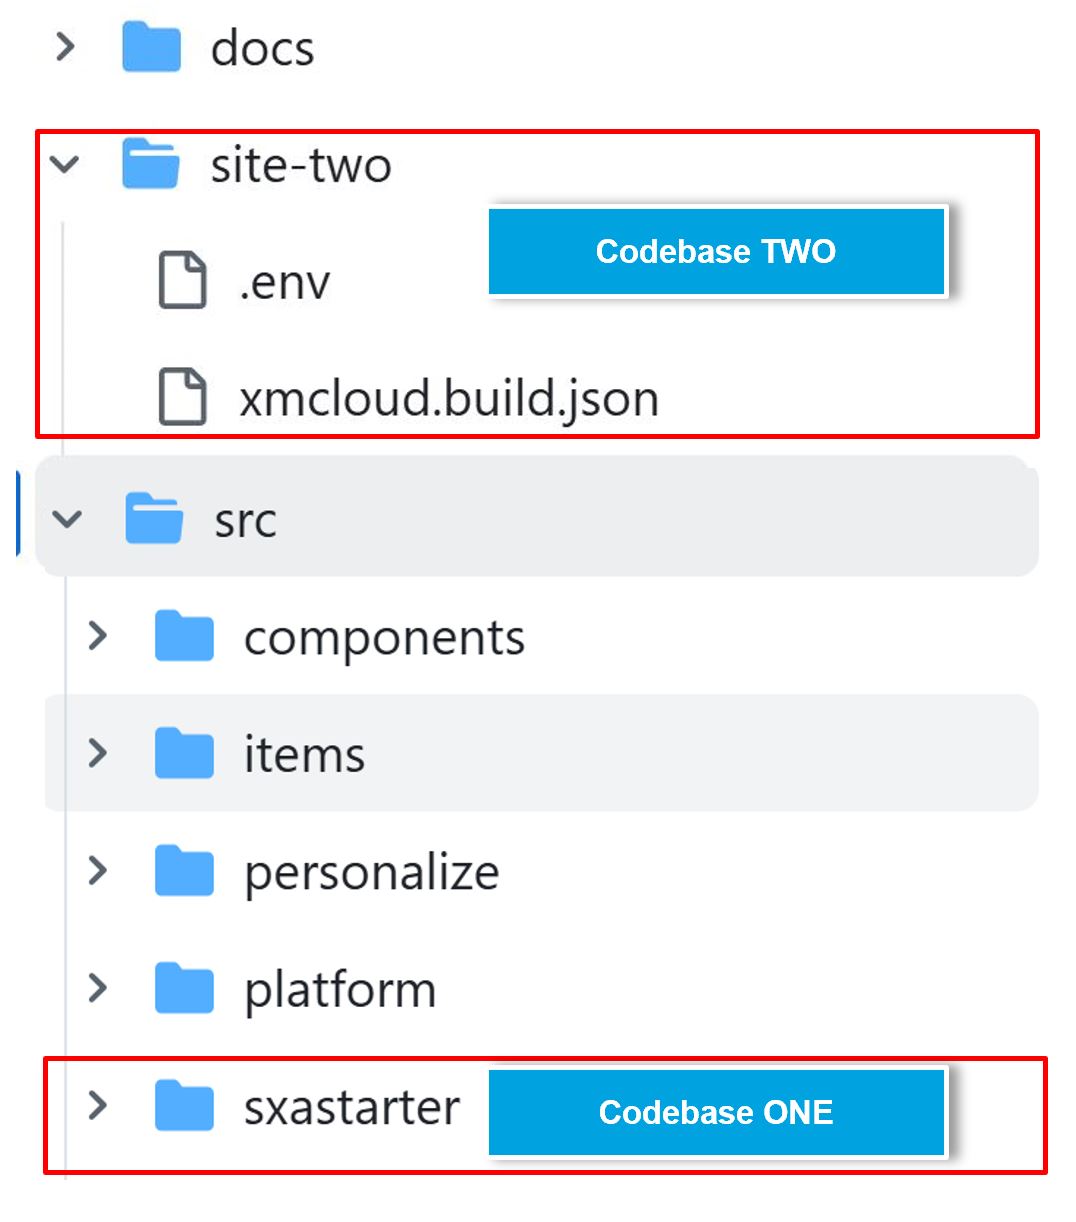
You can clone the needed code repository that has the code base for your websites.
2. Using PowerShell Scripts for Automation
We will leverage three essential scripts: 🔝
init.ps1- this existing PowerShell script initializes the project with predefined settings.up.ps1- this existing PowerShell script starts the required containers and services.clean-install.ps1- this new PowerShell script performs a fresh installation.
The diagram below shows how our PowerShell scripts handle multiple code bases:
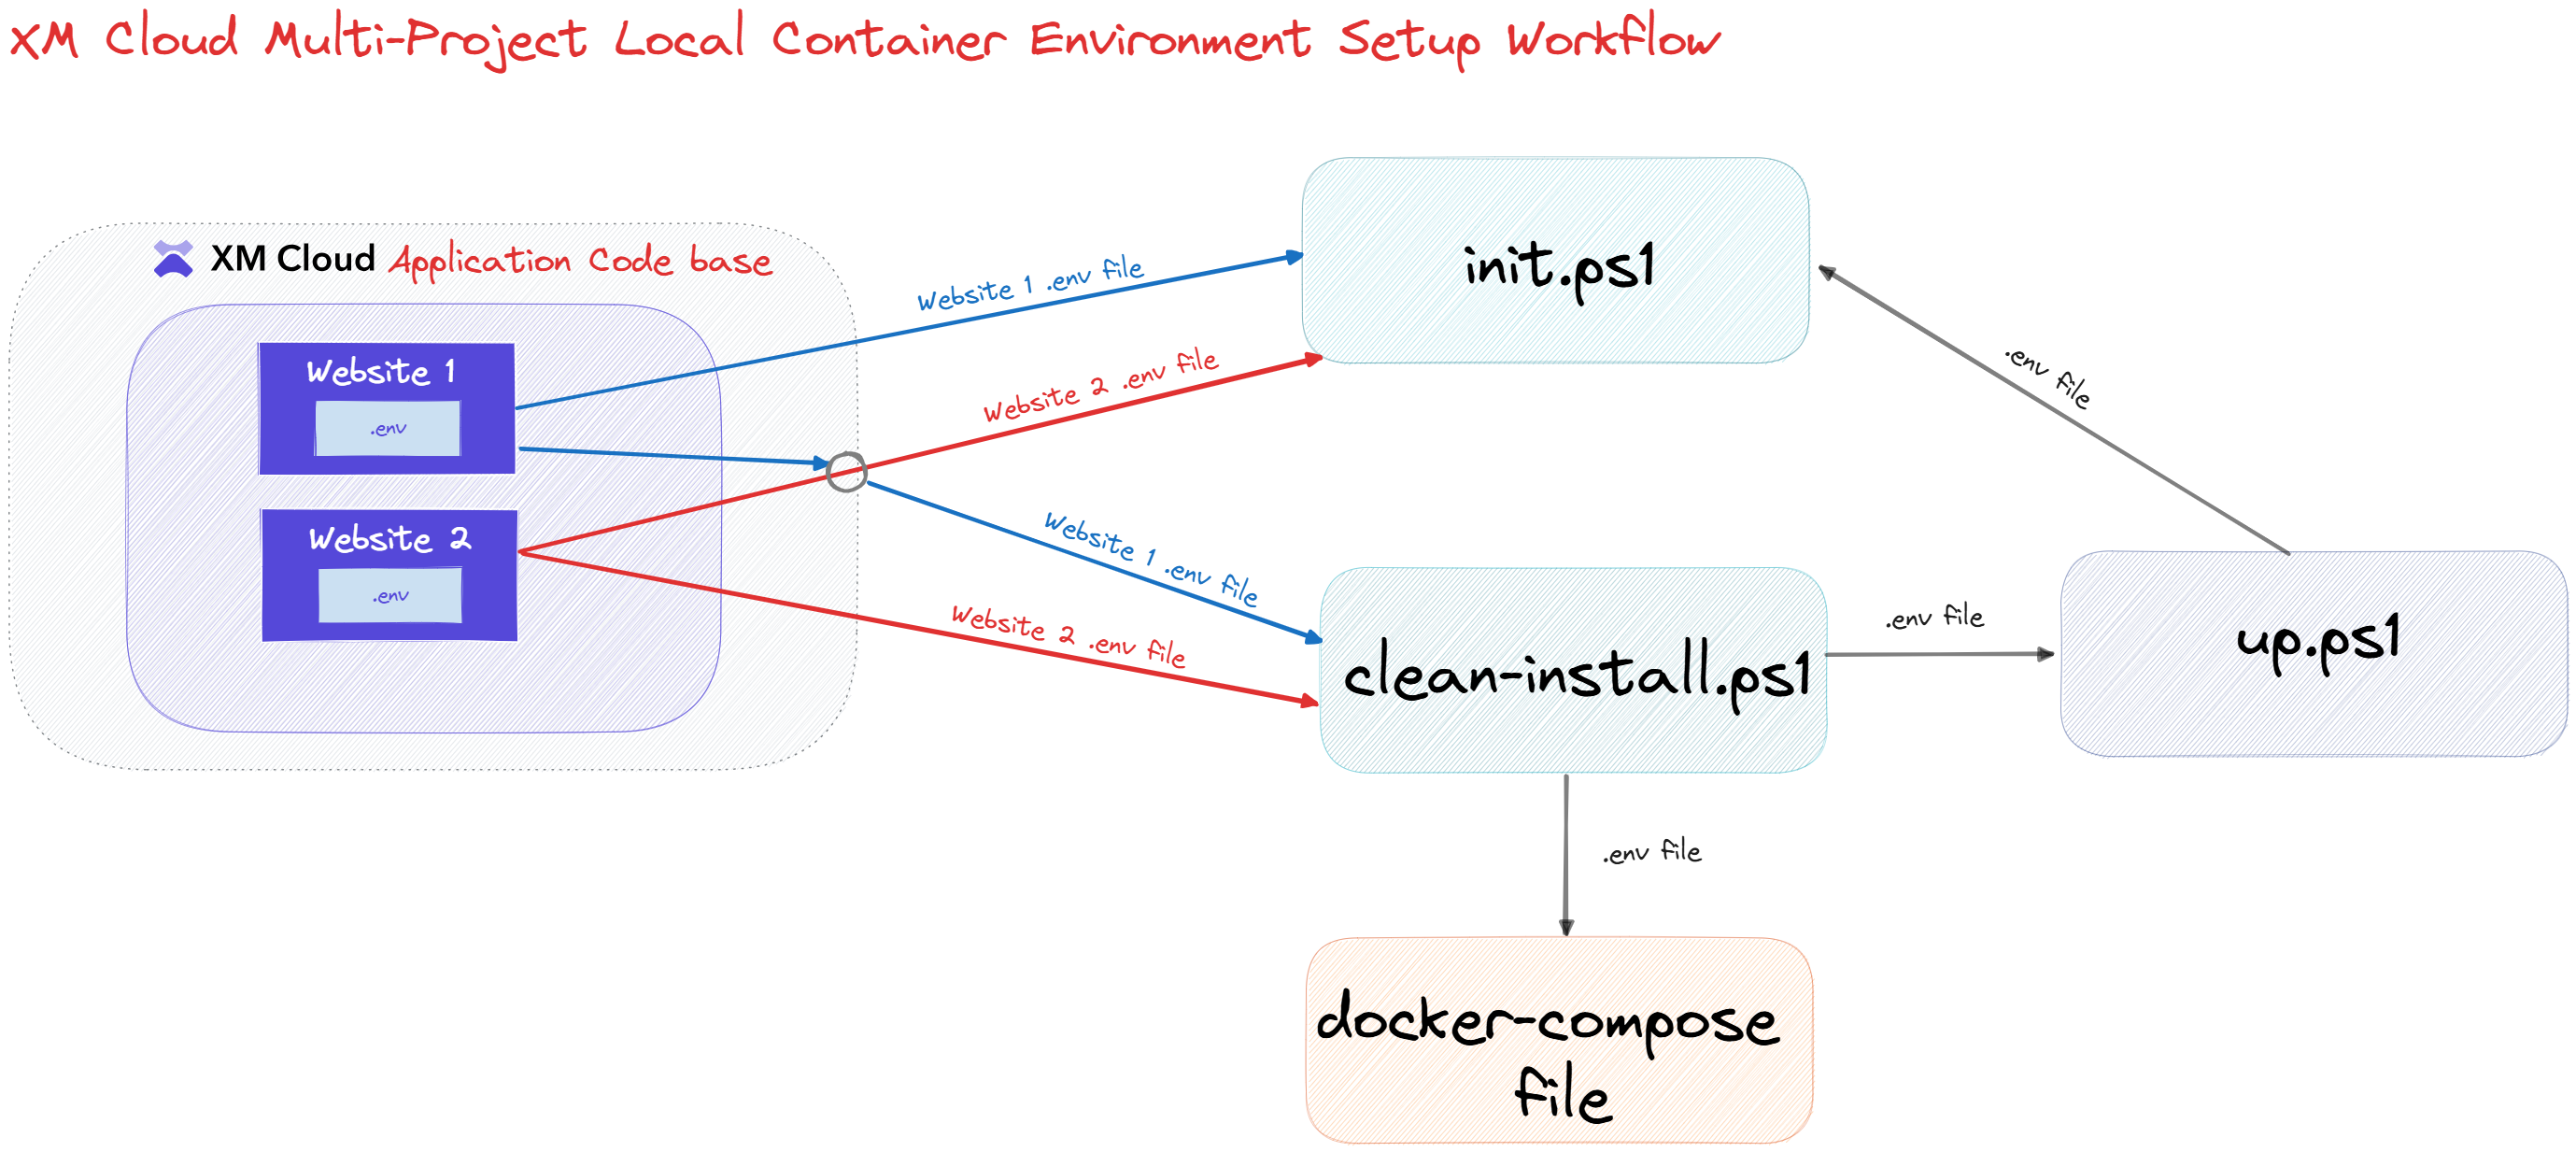
i). init.ps1 Script:
This script starts the Sitecore XM Cloud Full-stack local development environment by setting up necessary services, configuring environment variables, and making sure all required components are running.
To support different code bases or settings for various websites, I have parameterized the .env files based on the website we are setting up for XM Cloud development. These customizations help initialize the required settings for your website. Here are some details about these customizations:
⚡ Access Environment Variables from a .env File:
I created the custom GetEnvVariable function to access the path of the .env file and the name of the environment variable you need the value for: 🔝
# Get the environment variable from the .env file
function GetEnvVariable {
    param(
        [Parameter(Mandatory = $true, HelpMessage = "Specifies the path of the .env file.")]
        [string]$filePath = ".env",  # Default path for the .env file
        [Parameter(Mandatory = $true, HelpMessage = "Specifies the .env name.")]
        [string]$varName  # Name of the environment variable to retrieve
    )

    Write-Host "Inside GetEnvVariable"  # Log entry into the function

    $envFilePath = Resolve-Path "$PSScriptRoot\$filePath"  # Resolve the full path of the .env file

    if (Test-Path $envFilePath) {  # Check if the .env file exists
        if ($varName -ne "" -and $envFilePath -ne "") {  # Ensure parameters are not empty
            Write-Host "Using .env file: $envFilePath" -ForegroundColor Cyan  # Log the file being used
            # Read the contents of the .env file
            $envFileContent = Get-Content -Path $envFilePath  # Load the file content into an array

            # Iterate through each line to find the variable
            foreach ($line in $envFileContent) {
                if ($line -match "^\s*$varName\s*=\s*(.+)\s*$") {  # Check if the line matches the variable name
                    $varValue = $matches[1].Trim()  # Extract the variable value
                    Write-Host "Environment variable '$varName' found with value '$varValue'."  # Log success message
                    return $varValue  # Return the found value
                }
            }

            Write-Host "Environment variable '$varName' not found in the .env file." -ForegroundColor Yellow  # Log if not found
            return $null  # Return null if not found
        } else {
            Write-Host "Invalid parameters" -ForegroundColor Red  # Log error for invalid parameters
            return $null  # Return null for invalid parameters
        }
    } else {
        Write-Error "The .env file does not exist at the specified path: $envFilePath"  # Log error if file doesn't exist
        return $null  # Return null if file doesn't exist
    }
}
Using the syntax below, you can call this function:
GetEnvVariable -filePath $EnvFileName -varName "CM_HOST"
⚡ Set Environment Variables in a .env File:
I created the custom SetEnvVariable function to set the required environment variable in the .env file you provide as a parameter: 🔝
# Set the environment variable in the .env file
function SetEnvVariable {
    param(
        [string]$filePath=".env",  # Default path for the .env file
        [string]$varName,          # Name of the environment variable to set
        [string]$varValue          # Value to assign to the environment variable
    )

    Write-Host "Inside SetEnvVariable"  # Log entry into the function

    $envFilePath = Resolve-Path "$PSScriptRoot\$filePath"  # Resolve the full path of the .env file

    if (Test-Path $envFilePath) {  # Check if the .env file exists
        if ($varName  -ne "" -and  $varValue  -ne "" -and $envFilePath  -ne "") {  # Ensure parameters are not empty
            Write-Host "Using .env file: $envFilePath" -ForegroundColor Cyan  # Log the file being used
            # Read the contents of the .env file
            $envFileContent = Get-Content -Path $envFilePath  # Load the file content into an array

            # Initialize a flag to check if the variable was found
            $variableFound = $false  # Flag to track if the variable exists

            # Iterate through each line and update the variable if found
            $updatedContent = $envFileContent | ForEach-Object {
                if ($_ -match "^\s*$varName\s*=") {  # Check if the line matches the variable name
                    $variableFound = $true  # Set flag to true if found
                    "$varName=$varValue"  # Update the line with the new value
                } else {
                    $_  # Keep the line unchanged if not matched
                }
            }

            # If the variable was not found, add it to the end of the file
            if (-not $variableFound) {
                $updatedContent += "$varName=$varValue"  # Append the new variable to the content
            }

            # Write the updated content back to the .env file
            Set-Content -Path $envFilePath -Value $updatedContent -Force  # Save changes to the file

            Write-Host "Environment variable '$varName' set to '$varValue' in the .env file."  # Log success message
        } else {
            Write-Host "Invalid parameters" -ForegroundColor Red  # Log error for invalid parameters
        }
    }
    else {
        Write-Error "The .env file does not exist at the specified path: $envFilePath"  # Log error if file doesn't exist
    }
}
Using the syntax below, you can call this function:
SetEnvVariable $EnvFileName "JSS_DEPLOYMENT_SECRET_xmcloudpreview" $jsonContent.renderingHosts.xmcloudpreview.jssDeploymentSecret
I have used this function in the init.ps1 script whenever I'm not using the default .env file. This way, I don't disrupt the script's default flow, preventing any errors. 🔝
ii). up.ps1 Script:
This script accesses the needed environment variables from the .env file and checks them before running the docker-compose commands to ensure the necessary settings are correct, preventing any Sitecore Docker Container errors.
⚡ Validate the Path of a .env File:
I updated the file and passed the .env file as a parameter to this script. Before accessing the .env file, I am checking if the file exists: 🔝
$envFilePath = Resolve-Path "$PSScriptRoot\$EnvFileName"
if (Test-Path $envFilePath) {
    Write-Host "Using .env file: $envFilePath" -ForegroundColor Cyan
} else {
    Write-Error "The .env file does not exist at the specified path: $envFilePath"
    return
}
⚡ Improvement added to the up.ps1 script:
Earlier, to access an environment variable, we used a two-step process. First, we retrieved the entire line from the .env file for the specific variable. Second, we split the line to get the variable's value:
# Retrieve the environment variable line from the .env file
$envContent = Get-Content .env -Encoding UTF8
$xmCloudHost = $envContent | Where-Object { $_ -imatch "^CM_HOST=.+" }

#Split the environment variable line to get the variable's value from the .env file.
$xmCloudHost = $xmCloudHost.Split("=")[1]
I combined these two steps into one by using the custom function GetEnvVariable. 🔝
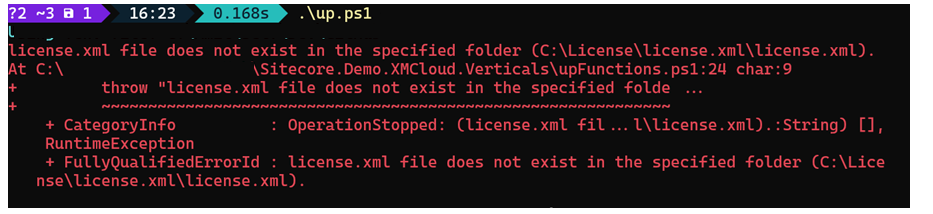
⚡ Added error handling to the Validate-LicenseExpiry function in the upFunctions.ps1 script:
In the up.ps1 script, we load custom functions from the upFunctions.ps1 script to check if the Sitecore License is valid, preventing docker container issues early on. The current Validate-LicenseExpiry function does not check:
✔ If the HOST_LICENSE_FOLDER environment variable is null
✔ If the HOST_LICENSE_FOLDER environment variable already contains the license.xml string
Sometimes, we forget to run the init.ps1 script or accidentally provide the wrong license file path, which usually results in an error like this: 🔝
license.xml file does not exist in the specified folder (C:\License\license.xml\license.xml)
⚡ Loading Environment Variables from Your Chosen .env File
The current up.ps1 script loads environment variables from the default .env file. However, we need it to handle different configurations for various websites, load different code bases, or pass environment-specific variables to Sitecore Container Services.
To meet these needs, I changed the script to accept a specific .env file: 🔝
# Current method to call the docker-compose command to build the Sitecore Container services
docker compose build

# Pass the .env file as a parameter to the docker-compose command to use variables
# from a specific .env file in a docker-compose.yml file.

# Build all containers in the Sitecore instance, forcing a pull of the latest base containers
docker compose --env-file $envFilePath build

# Start the Sitecore instance in detached mode
docker compose --env-file $envFilePath up -d
ii). clean-install.ps1 Script:
This script performs a clean installation of the Sitecore XM Cloud Full-stack local development environment.
⚡ Stops Containers Associated with the Compose Project Name:
In this script, I will read the environment variable COMPOSE_PROJECT_NAME from the specific .env file you choose and stop all the related containers: 🔝
# Stops containers matching the project name
docker container stop $(docker container ls -q --filter name=$composeProjectName*);

# Stops and removes all containers defined in the docker-compose file
docker-compose stop; docker-compose down
⚡ Prune unused Docker resources:
Pruning unused Docker resources frees up disk space by removing stopped containers, unused networks, dangling images, and build cache. Running the docker system prune command regularly keeps your Docker environment clean and efficient, avoiding unnecessary use of resources.
# Removes all unused data
docker system prune

# Removes images related to the project
docker rmi $(docker images --format "{{.Repository}}:{{.Tag}}" | findstr $composeProjectName)
⚡ Optimizing Your Environment- Stopping IIS and Restarting HNS for Sitecore Docker Setup:
Before starting the Sitecore Docker setup, you should stop IIS and restart the Host Network Service (HNS). This ensures proper networking and prevents port conflicts. Doing this keeps the environment clean and allows Docker containers to work smoothly without interference from other services. 🔝
# Stops IIS and restarts the HNS
iisreset /stop; net stop hns; net start hns
⚡ Executing the Up Script for XM Cloud Docker Setup:
Once the environment is optimized, execute the Up Script for XM Cloud Docker Setup to initialize and start the necessary containers and services efficiently.
# Executes the up script with the specified .env file
.\up.ps1 -EnvFileName $EnvFileName
3. Test and Validate
After setup, verify that: 🔝
You can also try running the script individually to set up your local XM Cloud Development environment:
  # init.ps1:
  .\init.ps1 -InitEnv:$true -LicenseXmlPath C:\License\license.xml -EnvFileName "site-two\.env"

  # up.ps1:
  .\up.ps1 -EnvFileName "site-two\.env"

  # CleanInstall.ps1:
  .\clean-install.ps1 -EnvFileName "site-two\.env"
Each website loads correctly with its unique hostname.
API endpoints and credentials are functioning as expected.
The Pages Editor allows seamless content editing.
❇Benefits of This Setup
Flexibility: Easily switch between different code bases.
Isolation: Test changes on one website without impacting others.
Efficiency: Simplify development workflows with automated scripts.
Consistency: Keep local, staging, and production environments in sync.
🤝A Special Thanks to the Sitecore Demo Team
The code repository I used here is XM Cloud Vertical, provided by Sitecore. It contains all the scripts and resources needed to implement this setup. Additionally, this repository offers valuable insights into XM Cloud implementation and best practices—essential for any developer looking to improve their workflow.
The updated forked version of the XM Cloud Vertical, which includes the new scripts, can be accessed using the link below. 🔝
💡Conclusion
By following this guide, you can easily manage multiple code bases in a full-stack XM Cloud local development setup. This method offers flexibility, efficiency, and improved project isolation.
🙏Credit/References
🏓Pingback
| What is an Editing Host in XM Cloud? A Beginner’s Guide: Learn what an editing host is in XM Cloud, its role in enabling WYSIWYG editing, and how it differs from a rendering host. | Mastering Multi-Codebase Development in the XM Cloud: Explore strategies for managing multiple code bases within the XM Cloud local development environment, complete with best practices and practical examples. | Essential PowerShell Scripts for XM Cloud Local Development: Discover the most useful PowerShell scripts to automate your XM Cloud local development environment setup and management. 🔝 |
| Docker Commands Every XM Cloud Developer Should Know: Master these crucial Docker commands to efficiently manage your XM Cloud containers and local development environment. | How to Manage Multiple .env Files in XM Cloud Projects: Learn best practices for handling multiple environment variable files when working with different XM Cloud code bases. | Troubleshooting Common XM Cloud Local Development Issues: Solve frequent problems developers encounter when setting up XM Cloud local environments with these expert tips. |
| Optimizing IIS for XM Cloud Development Environments: A complete guide to configuring IIS for optimal performance in your XM Cloud local development setup. | The Complete Guide to Sitecore XM Cloud API Keys: Understand how to properly generate, manage, and use API keys in your XM Cloud development workflow. | How to Implement CI/CD for XM Cloud Projects: Learn how to set up continuous integration and deployment pipelines for your XM Cloud solutions. 🔝 |
| Using Docker Compose for XM Cloud Development: A deep dive into using Docker Compose to streamline your XM Cloud local development process. | Clean Installation Essentials for XM Cloud Developers: Learn how to ensure clean installations in your XM Cloud local development environment using targeted scripts and commands. | Docker Tips for XM Cloud Full-Stack Development: Enhance your XM Cloud workflow with these Docker Compose tips for handling multiple websites and diverse code bases. |
| Sitecore graphql queries | Getting Started with Sitecore XM Cloud: A Beginner’s Guide to Learning Resources | find sitecore version |
| how does sitecore search work | what is indexing in Sitecore Search? | Sitecore Search API |
| Sitecore Search API Crawler | Improve Sitecore Search | Step-by-Step Guide to XM Cloud Docker Environment Setup: Set up a fully functional XM Cloud environment using Docker and PowerShell scripts for seamless development. |
| Mastering Website Content Indexing with Sitecore Search | Troubleshooting Sitecore XM Cloud Local Setup and Sitecore JSS Errors | Deploying Sitecore XM Cloud & JSS Apps to Vercel with Azure DevOps Pipeline: A Step-by-Step Guide 🔝 |
Subscribe to my newsletter
Read articles from Amit Kumar directly inside your inbox. Subscribe to the newsletter, and don't miss out.
Written by
Amit Kumar
Amit Kumar
My name is Amit Kumar. I work as a hands-on Solution Architect. My experience allows me to provide valuable insights and guidance to organizations looking to leverage cutting edge technologies for their digital solutions.As a Solution Architect, I have extensive experience in designing and implementing robust and scalable solutions using server-side and client-side technologies. My expertise lies in architecting complex systems, integrating various modules, and optimizing performance to deliver exceptional user experiences. Additionally, I stay up-to-date with the latest industry trends and best practices to ensure that my solutions are always cutting-edge and aligned with business objectives.