A Beginner's Guide : Setting Up an Express.js and MongoDB Project with Mongoose
 Santwan Pathak
Introduction
In this guide, we'll walk through setting up an Express.js server, connecting it to MongoDB with Mongoose, and configuring essential tools like dotenv, cors, and more. Whether you're starting fresh or integrating with an existing database, this step-by-step journey will help you understand not just the how, but also the why behind each decision.
Let’s begin
Crate a folder named as fullstack and open the terminal . run these any command
npm init: Starts an interactive process asking for project details (name, version, description, entry point, test command, git repository, keywords, author, license) before creating apackage.jsonfile.npm init -y: Skips the interactive prompts and generatespackage.jsonwith default values immediately.
Here , we will be using the npm init command to go through the very raw process
Give the input one by one like this terminal accordingly
package name: (fullstack) //it automatically takes the folder name as default name, if want you can overwrite
version: (1.0.0)
description: A node project for authentication
entry point: (index.js) //by default
test command: //we will se it later , as a beginner just skip this
git repository:
keywords:
author: santwanpathak
license: (ISC) // by default , just accept it right now,
Now hit enter and it will show you are preview on the terminal and asking your permission . Then hit enter, it will create a package.json file.
Based on your inputs, the generated package.json will look like this:
{
  "name": "fullstack",
  "version": "1.0.0",
  "description": "A node project for authentication",
  "main": "index.js",
  "scripts": {
    "test": "echo \"Error: no test specified\" && exit 1"
  },
  "author": "santwanpathak",
  "license": "ISC",
}
Now as you mention (by deault ) the entry point index.js , then you need to create a file with same name as index.js inside the fullstack file.
require and import. These methods belong to two different module systems: require belongs to the CommonJS (CJS) module system, which has been the standard in Node.js for a long time. import belongs to the ECMAScript Modules (ESM) system, which is the modern JavaScript standard introduced in ES6."type": "module" in package.json.After modifying the package.json file , Come to index.js file .
Setting Up Express in Our Project
So, What is Node.js ?
Node.js is a runtime environment that allows us to run JavaScript outside the browser. It uses Chrome’s V8 engine to execute JavaScript efficiently.
Unlike traditional JavaScript (which runs in browsers), Node.js can handle file systems, databases, and server-side logic.
Then why Express.js?
Express.js is a minimal and flexible web framework built on top of Node.js. It simplifies handling HTTP requests, managing routes, middleware, and building APIs. Instead of manually setting up everything in Node.js, Express provides a structured and efficient way to build server-side applications.
But How Node.js and Express Work Together ?
Node.js provides the environment to run JavaScript on the backend.
Express.js builds on Node.js, making it easier to handle requests, responses, and routing without writing excessive boilerplate code.
Now, let’s install and set up Express in our Node.js project!
1. Installing Express
First, install Express in your project using:
npm install express
This will add Express as a dependency and update your package.json accordingly.
2. Creating a Basic Express Server
Now, modify your index.js file to set up a simple Express server: Copy the text from here or Express website.
const express = require('express'); // Import Express
const app = express(); // Create an Express app
const PORT = 3000; // Define a port

// Define a basic route
app.get('/', (req, res) => {
    res.send('Hello, Express!');
});

// Start the server
app.listen(PORT, () => {
    console.log(`Server is running on http://localhost:${PORT}`);
});
3. Running the Express Server
Start your server on the terminal with :
node index.js
Now, open a browser and visit http://localhost:3000 — you should see "Hello, Express!" displayed on the page.
The Flow
Before writing anycode, let’s take a quick look about what happens when you interact with a web app. If you have idea about how web application works, then you can skip this part, donot read this section. Now, Imagine you’re signing up on a website—what’s really going on behind the scenes?
You Make a Request (Client-Side Action) 🏁
You open a website and hit "Sign Up" or type https://example.com/users in your browser.
Your browser (the client) sends a request to the server, asking for data or to perform an action.
Express.js Handles the Request 🛠️
The request lands on the server, where Express.js is listening. It checks:
What kind of request is this? (GET, POST, etc.)
Which function should handle it?
Talking to the Database 📦
If your request needs data (like fetching users or saving your signup details), Express asks MongoDB for help via Mongoose.
MongoDB responds:
✅ "Here’s the data!" (if it exists)
✅ "Done! Your data is saved." (if you're adding something new)
Server Responds Back
Once the server gets what it needs, it sends back a response—usually in JSON format.
Browser Updates, You See the Magic! ✨
The client receives the response, updates the page, and boom—you see the list of users or a "Signup Successful" message!
Quick Recap of the Flow
Client → Sends request (e.g., GET /users)
Express → Receives & processes it
MongoDB → Fetches/saves data
Express → Sends a response
Client → Displays the result
Understand The Code of Index.js
Now Get back to the index.js file. Here we have to made some changes as we will be using import instead of require.
Delete this line from the index.js: const express = require(“express”)
Add this line : import express from “express”
import express from “express” // Import Express
const app = express(); // Create an Express app
const PORT = 3000; // Define a port

// Define a basic route
app.get('/', (req, res) => {
    res.send('Hello, Express!');
});

// Start the server
app.listen(PORT, () => {
    console.log(`Server is running on http://localhost:${PORT}`);
});
We first import Express and create an app instance to manage our server. Next, we define a port, 3000, where the server will listen for incoming requests.
Now, we set up a route using app.get('/'). When someone visits http://localhost:3000/, Express detects the request and runs the provided callback function. Inside this function, req represents the incoming request, and res is the response object. We use res.send('Hello, Express!') to send back a simple text response.
Finally, we call app.listen(PORT), which starts the server and tells Express to keep listening for requests. Once running, it logs a message to the console, confirming that the server is live at http://localhost:3000/.
You can your server by writting node index.js on the terminal
Now you can define multiple routes using app.get(). Inside this method, you specify the route path and a callback function, which determines what happens when that route is visited.
Like this app.get('/about', (req, res) => { res.send('This is the About Page.'); }); When a user visits a specific route, Express matches it and executes the callback function. Also, You’re not limited to just app.get(). Express allows handling different HTTP methods like POST, PUT, and DELETE, which are essential for building APIs.
Improving workflow with Nodemon
Now that we've covered defining routes and handling different request methods in Express, let's improve our development workflow with Nodemon.
By default, every time we make a change to our Node.js app, we need to manually stop and restart the server. This is time-consuming and inefficient. Nodemon solves this by automatically restarting the server whenever we modify our code.
To install Nodemon globally, run:
as a dev dependency for just this project:
npm install --save-dev nodemon

//or use line

npm i -D nodemon
Now, instead of running: node index.js
You can start your server with: nodemon index.js
Nodemon will watch for changes in your project files and automatically restart the server, making development much smoother.
npm install package-name adds it to "dependencies", whereas npm install --save-dev package-name adds it to "devDependencies". In production, only dependencies are installed unless you explicitly include devDependencies. This keeps your app lightweight and optimized.You will also see in package.json that nodemon is listed under "devDependencies", while regular dependencies appear under "dependencies". This helps distinguish between essential runtime packages and development-only tools.
Creating Custom Command
In package.json, there's a "scripts" section where you can define custom commands to run your project efficiently. By default, it looks like this:
"scripts": {
  "test": "echo \"Error: no test specified\" && exit 1"
}
We can modify this to use Nodemon for automatic restarts. Open package.json and update the scripts:
"scripts": {
  "start": "node index.js",
  "dev": "nodemon index.js"
}
Now, instead of manually running node index.js or nodemon index.js, you can simply run:
npm run dev
When you run npm run dev, npm looks inside package.json, finds the "dev" script, and executes it. Since we set "dev": "nodemon index.js", npm runs Nodemon, which starts index.js and watches for changes. If any file updates, Nodemon automatically restarts the server.
Making the Configurable PORT
A server doesn’t guarantee which port it will run on, so it’s best to make it configurable. Instead of hardcoding the port, we can use environment variables. In the .env file, you can write variables in uppercase or lowercase, but it's an industry standard to use uppercase for better readability and consistency. This helps distinguish environment variables from regular variables in the code. Now, create or open a .env file in your project's root directory and define a port:
PORT=3000
By convention, environment variables are written in UPPERCASE to maintain clarity and follow industry standards.
Now you need to import this environmental variable from .env file to index.js
You might think of manually importing the .env file like a regular module, but environment variables hold sensitive and critical configuration data, so they should be managed properly. Direct imports can expose these values and break portability. dotenv ensures that environment variables are securely loaded into process.env, following best practices while keeping the codebase clean and flexible. install dotenv, a package that loads environment variables from a .env file into process.env:
npm install dotenv
process.envis a global object in Node.js that holds the system’s environment variables. When using dotenv, it loads values from the.envfile intoprocess.env, making them accessible throughout your application.
Next, update index.js to use dotenv and dynamically assign the port: I have commented the unchanged code .
// import express from "express";
import dotenv from "dotenv";

dotenv.config(); // Load environment variables

// const app = express();
const PORT = process.env.PORT || 3000; // Use PORT from .env, fallback to 3000

//app.get("/", (req, res) => {
 // res.send("Hello, Express!");
//});

//app.listen(PORT, () => {
//  console.log(`Server is running on http://localhost:${PORT}`);
//});
Here’s what happens:
dotenv.config() loads variables from
.envintoprocess.env.The
PORTvariable is retrieved fromprocess.env, ensuring flexibility.If
PORTisn't set, it defaults to3000, preventing errors.
.env file will always be inside the root folder. By default, dotenv looks for .env in the root directory, but if it’s located elsewhere, you need to specify its path. The dotenv.config() method loads environment variables, and you can pass a custom path like this:dotenv.config({ path: './config/.env' });
CORS
In traditional backend frameworks like PHP or Laravel, the frontend and backend are usually not separate entities. They are often served from the same origin—meaning both the client-side code (HTML, CSS, JavaScript) and the backend logic run from the same domain. Since there’s no cross-origin request happening, CORS issues are rare in such setups.
However, in modern JavaScript-based full-stack applications, the frontend (React, Vue, Angular) and backend (Node.js with Express) are often developed separately and run on different ports during development. For example:
Frontend:
http://localhost:3000Backend:
http://localhost:5000
Since these are different origins, browsers enforce CORS policies, blocking unauthorized requests. That’s why we need the cors package in Express to allow controlled communication between frontend and backend.
To enable CORS in an Express app, install the package first:
npm install cors
Then, use it in your server file:
import cors from "cors";
app.use(cors());
By default, this allows requests from any origin. While this is fine in development, in production, you should restrict access to specific origins for security.
app.use(cors(
    { origin: "http://localhost:3000" ,
}));
In production, this issue often disappears if both frontend and backend are served from the same domain, like:
- Frontend & Backend:
https://yourapp.com
But if your API is hosted separately (api.yourapp.com), you still need CORS to define allowed origins.
Without handling CORS, you might see errors like:
“ Access to fetch at 'http://localhost:5000/api' from origin 'http://localhost:3000' has been blocked by CORS policy. “
That’s why enabling CORS properly is crucial for smooth frontend-backend communication.
Now can define many other configuration also inside the cors method. Here is an updated code
app.use(cors({
    origin: "hhtp://localhost:3000",
    credentials: true,
    methods: ['GET', 'POST', 'DELETE', 'OPTION'],
    allowedHeaders: ['Content-Type', 'Authorization']
}));
1. origin: process.env.BASE_URL or origin: "hhtp://localhost:3000"
This defines which domains are allowed to make requests to your backend. Instead of allowing all origins (*), we restrict access to only the URL defined in BASE_URL inside the .env file or directly mention the url. This is a good security practice, especially for production.
During development,
BASE_URLcould behttp://localhost:3000.In production, it could be
https://yourfrontend.com.
2. credentials: true
This allows the backend to accept requests that include cookies or authentication headers. It is necessary when using JWT-based authentication or sessions, as browsers block credentialed requests unless explicitly allowed.
credentials: true is enabled, the origin cannot be "*"; it must be a specific domain.3. methods: ['GET', 'POST', 'DELETE', 'OPTION']
This specifies the HTTP methods that are allowed for cross-origin requests. By default, CORS permits only GET and HEAD. Adding other methods ensures the client can send POST (for data submission), DELETE (for removing resources), and OPTIONS (for preflight checks).
4. allowedHeaders: ['Content-Type', 'Authorization']
This specifies which headers the client is allowed to send in requests.
Content-Type→ Ensures the client can send JSON data in requests.Authorization→ Allows passing authentication tokens (like JWT).
Without explicitly setting this, browsers may block requests that contain these headers.
By configuring CORS properly, we avoid unnecessary security risks while ensuring our frontend can communicate smoothly with the backend. It prevents CORS errors and ensures secure API interactions, especially when dealing with authentication.
Parsing JSON data from incoming request
By default, Express doesn’t automatically parse incoming JSON data from requests. This is where express.json() comes into play.
When we add the following middleware:
app.use(express.json());
it tells Express to automatically parse JSON data from incoming requests and attach it to req.body.
Why is this needed?
Whenever the frontend sends a POST or PUT request with a JSON payload, the backend needs to understand and extract that data. Without express.json(), req.body would be undefined, making it impossible to access the request data.
How it works?
Let's say the frontend sends a POST request like this:
{
    "name": "Santwan Pathak",
    "email": "santwan@example.com"
}
Without express.json(), trying to access req.body.name on the backend would result in undefined. But with express.json(), Express automatically parses the incoming JSON and makes it accessible via req.body, so we can do:
app.post('/user', (req, res) => {
    console.log(req.body.name); // Outputs: "John Doe"
    res.send('User received');
});  //if you donot able to understand this it's okey.. all you need have idea what express.JSON() does and its significance
You should use it
When handling
POST,PUT, orPATCHrequests that send JSON data.When building APIs that accept structured data from clients.
Anytime the frontend communicates with the backend using JSON.
Content-Type: application/json. If you're handling form data or files, you'll need additional middleware like express.urlencoded() that is just discussed belowParsing URL-Encoded Data in Express
just like express.json(), the express.urlencoded() middleware is used to parse incoming request data, but specifically for form submissions.
app.use(express.urlencoded({
  extended: true,
})); //add this line of code in the index.js file
When you submit a form, spaces and special characters are encoded to ensure they can be safely transmitted over the internet. For example:
piyush sharma → piyush%20sharma
email@example.com → email%40example.com
The browser encodes spaces as %20, @ as %40, and so on.
Since the browser sends form data in this encoded format, Express doesn’t automatically decode it. We need to explicitly tell the backend,
"Hey, the incoming data is URL-encoded—please parse it properly."
That’s exactly what app.use(express.urlencoded({ extended: true })) does! It decodes %20piyush back to "piyush sharma" and makes it available in req.body.
You should use it
When handling form submissions in Express.
When processing data from HTML forms.
When building APIs that accept URL-encoded data.
Connecting to DB
Now that our Express server is set up, it's time to connect it to a database. In this project, we'll be using MongoDB, a NoSQL database, along with Mongoose, an ODM (Object Data Modeling) library that helps in structuring and interacting with MongoDB easily.
To begin, install Mongoose:
npm install mongoose
Now, First create a utils folder where we will storing our different utilities for our project. The utils folder keeps the project organized by storing reusable functions like database connections, logging, and error handling. It prevents clutter in the main server file, improves maintainability, and makes scaling easier.
inside the uitls folder create a new file as db.js where we write the code to connect the MongoDB to our project.
if you don’t have a MongoDB database, create one on MongoDB Atlas. Set up a free cluster, create a database and collection, then copy the connection string. Now, use this URI in your connectDB or db function to establish the connection. If you have then you are good to go.
Securing Your Database URL
Your MongoDB connection string includes sensitive credentials like the username, password, and cluster details. Hardcoding this in your application code db.js file can expose it to security risks, especially if the code is shared or pushed to a public repository. To prevent this, store the URL inside the .env file as MONGO_URI.
@, #, or $, MongoDB might misinterpret them. For example, P@ssword123 becomes P%40ssword123. Save yourself from connection errors! Try to avoid special characters in your DB password otherwise errors will occur.When needed, you can access it in your application using process.env.MONGO_URI. This keeps credentials hidden and allows flexibility, making it easier to switch databases across different environments (development, testing, production) without modifying the code. Additionally, ensure your .env file is listed in .gitignore to prevent accidental exposure in version control systems like Git.
First, open your .env file and add your MongoDB connection string like this:
MONGO_URI=mongodb+srv://yourUsername:yourPassword@cluster.mongodb.net/yourDatabaseName
Now, in your database configuration file (e.g., db.js inside the utils folder), retrieve this URL using process.env.MONGO_URI. This ensures your credentials remain secure and aren’t hardcoded in your source code.
Now we will be importing this URL into the db.js just like what we did just few minutes ago with the PORT in index.js file.
import mongoose from "mongoose";
import dotenv from "dotenv"
dotenv.config()

const db = () => {
    mongoose.connect(process.env.MONGO_URL)
    .then(()=> {
        console.log("Connected to MONGODB")
    })
    .catch((error)=>{
        console.log("Error connecting to MONGODB")
    })
}

export default db
As you are importing this function db , then definitely you are gong to import it in the index.js file. So , open the index.js file and make some changes.
import db from "./utils/db.js" //import the database connnceting function inside the indexjs file

//and now just write db() to run this funcntion
db()
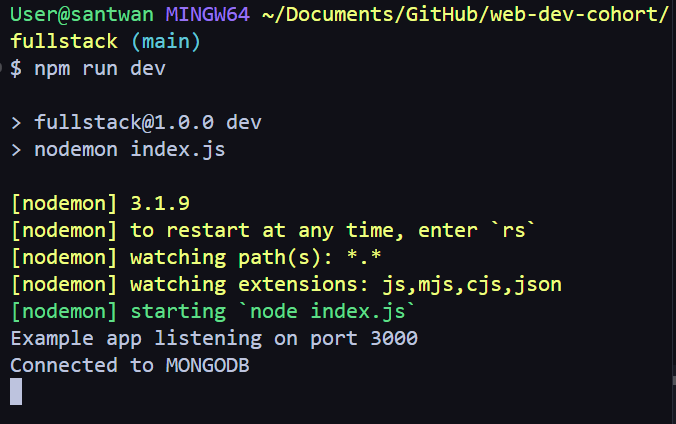
If everything goes right , after running the server you will see the succesful message on the terminal and f it failed to connect with MONGODB databse , then an error message will bepopped out on the terminal and you will be able to see this. If connection failed then please ensure that the URL is correct and also the password and username of your database.
Run this command : npm run dev
This will show on the terminal
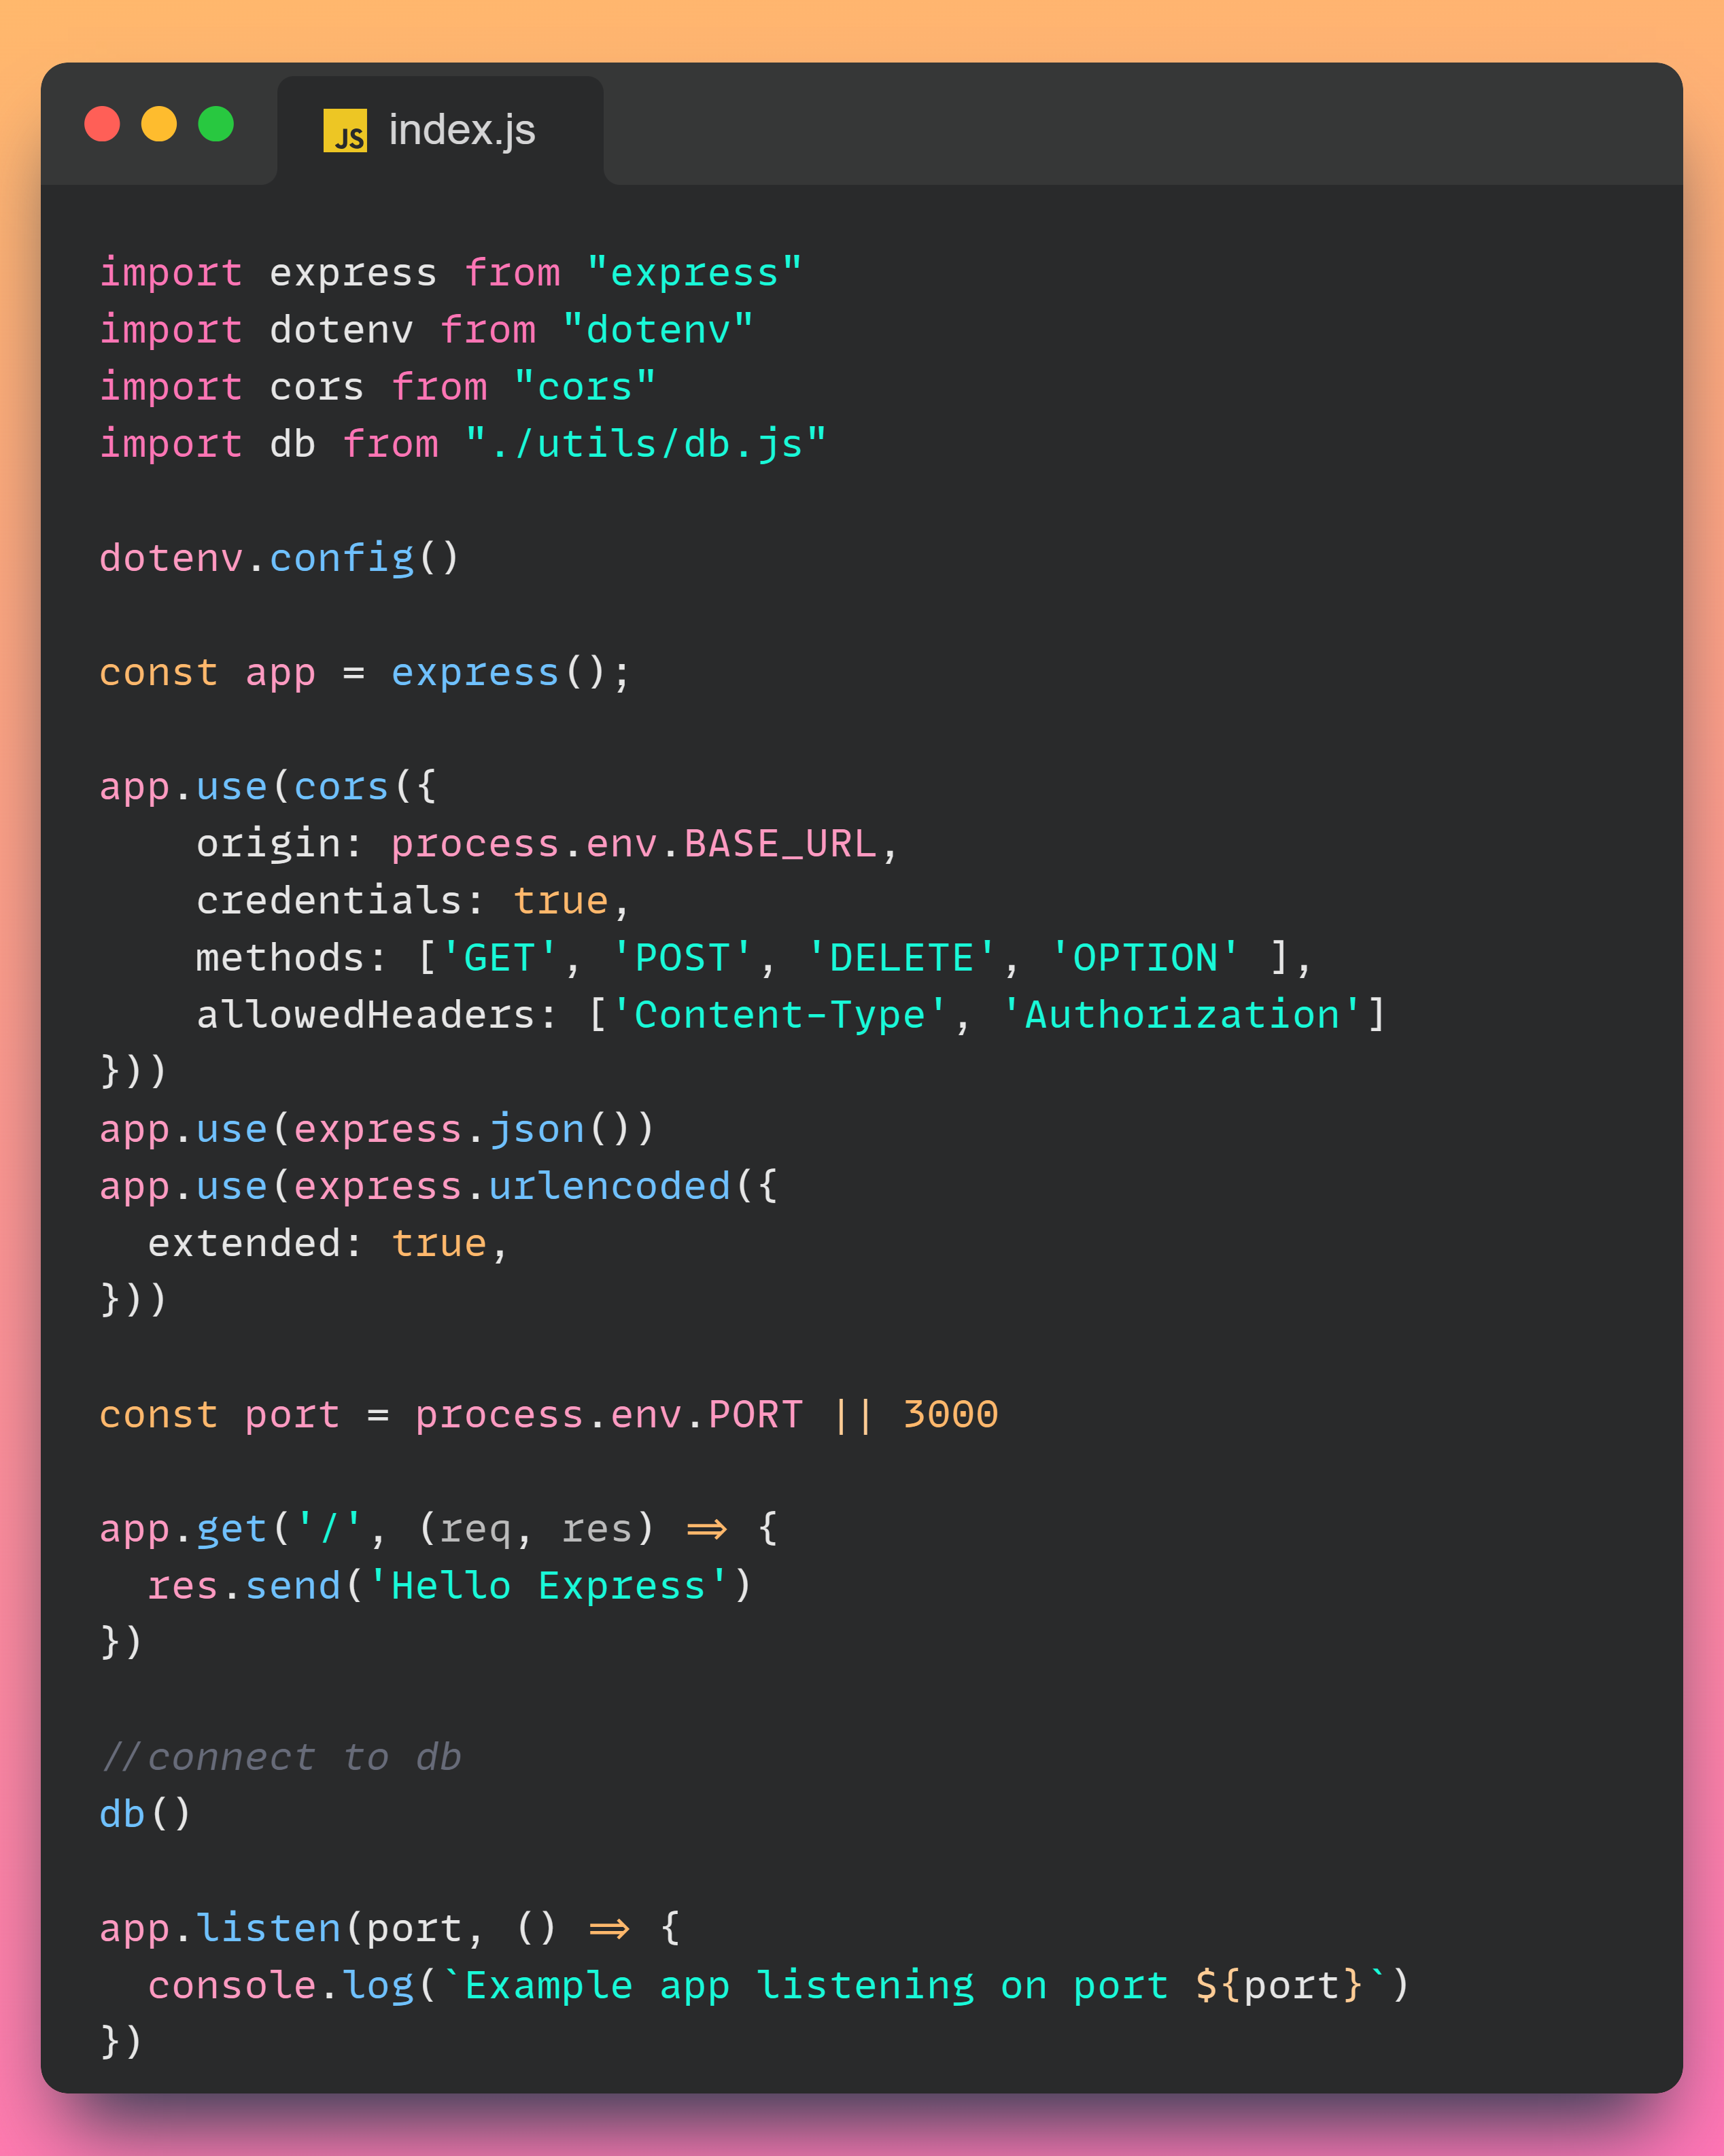
You Final index.js file should look like this , please ensure there is no error .
Subscribe to my newsletter
Read articles from Santwan Pathak directly inside your inbox. Subscribe to the newsletter, and don't miss out.
Written by
Santwan Pathak
Santwan Pathak
"A beginner in tech with big aspirations. Passionate about web development, AI, and creating impactful solutions. Always learning, always growing."