Deploying Azure SQL VMs with PowerShell Azure Bastion + dbatools
 Kay Sauter
What happened?
About a year ago, my original script from my blog post “Deploy Azure Sql Server Vm With PoSh” (blog, substack) from 2021 broke due to a change in the underlying model. In last August, Microsoft updated its documentation regarding deploying Azure SQL Server VMs on Azure. Therefore, I was able to redevelop the code, and below, you’ll find the new code along with some new updates that Microsoft made. There are some changes around the model of Azure VMs and the model for Azure Bastion.
In the next chapter, you’ll find a script that deploys an Azure SQL Server VM together with Azure Bastion. Azure Bastion is a service by Microsoft that could be seen as something like “Security as Service” by Microsoft. If you want to use RDP via open internet, make sure you protect your RDP connection. Azure Bastion covers your RDP connection with a TLS tunnel and it is very easy to use. Another way is to use VPN or a private endpoint, but then you have to manage the network security yourself. If you are just a database engineer / DBA like myself or similar, then possibility don’t know how to do this, and Azure Bastion is an excellent option as it won’t expose your VMs IP-Address to the internet.
For who is this script?
If you are a DBA or DB dev at a smaller company or a smaller IT team or just want to have a proof of concept, but your IT team is not able to provide you something like this, this may be for you. Also, if you want to learn Azure Powershell and are a DBA, this is a great start. If you however want to have a solution on a bigger scale, be or adaptions more frequently, you probably will find either Bicep by Microsoft or something like Terraform by Hashicorp more helpful. I personally started to develop this script a during the pandemic years when I was a DB developer and wanted to have a platform on which a small team could develop new things and showcase it to customers, even give them the VM as a means to try the data warehouse solution we’ve built for a core banking system provider.
The execution of the whole script, including the installation of dbatools takes about 25 mins in total, even though not the whole setup is fully automated yet; I’m working on it to bring it to the fullest automation though. I’ll post a bit more in-depth information about how to adapt this script in future. That post will give you an understanding of the underlying structure that ARM (Azure Resource Manager) gives you to work with PowerShell, but actually also for anything like Bicep and Terraform, as they also have to work with ARM in the end.
The new script
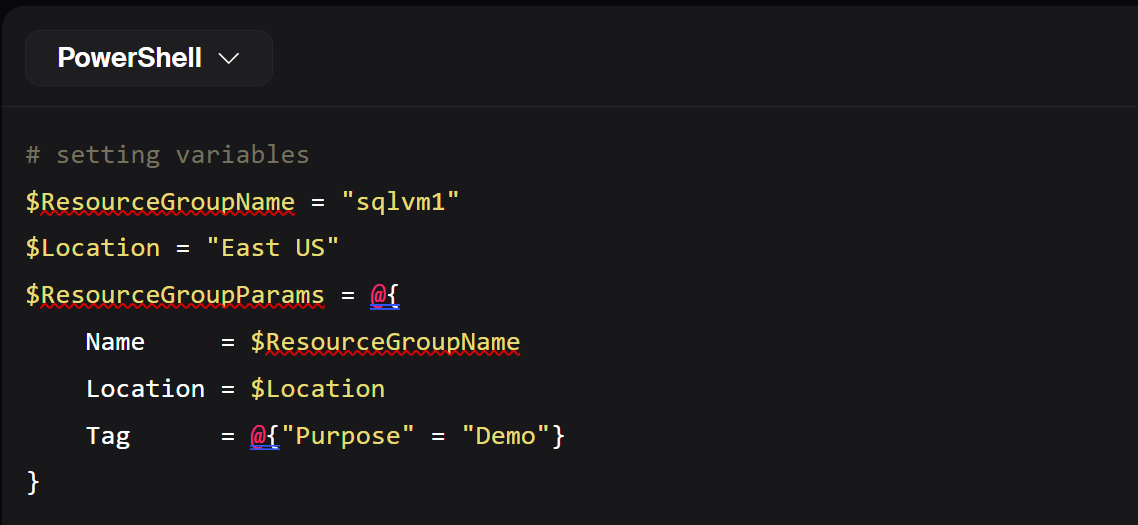
I’m not going to give much more details on the script here, but I think I’ve put comments within the script relatively extensively:
# Existing code
$ResourceGroupName = "sqlvm1"
$Location = "East US"
$ResourceGroupParams = @{
    Name     = $ResourceGroupName
    Location = $Location
    Tag      = @{"Purpose" = "Demo" }
}

New-AzResourceGroup @ResourceGroupParams

$SubnetName = $ResourceGroupName + "subnet"
$VnetName = $ResourceGroupName + "vnet"
$PipName = $ResourceGroupName + $(Get-Random)

# Create a subnet configuration
$SubnetConfig = New-AzVirtualNetworkSubnetConfig -Name $SubnetName `
    -AddressPrefix 192.168.1.0/24

# Create a virtual network
$Vnet = New-AzVirtualNetwork -ResourceGroupName $ResourceGroupName `
    -Location $Location `
    -Name $VnetName -AddressPrefix 192.168.0.0/16 `
    -Subnet $SubnetConfig

# Create a public IP address and specify a DNS name
$Pip = New-AzPublicIpAddress -ResourceGroupName $ResourceGroupName -Location $Location `
    -AllocationMethod Static -IdleTimeoutInMinutes 4 -Name $PipName

# Rule to allow remote desktop (RDP)
$NsgRuleRDP = New-AzNetworkSecurityRuleConfig -Name "RDPRule" -Protocol Tcp `
    -Direction Inbound -Priority 1000 -SourceAddressPrefix * -SourcePortRange * `
    -DestinationAddressPrefix * -DestinationPortRange 3389 -Access Allow

# Rule to allow SQL Server connections on port 1433
$NsgRuleSQL = New-AzNetworkSecurityRuleConfig -Name "MSSQLRule"  -Protocol Tcp `
    -Direction Inbound -Priority 1001 -SourceAddressPrefix * -SourcePortRange * `
    -DestinationAddressPrefix * -DestinationPortRange 1433 -Access Allow

# Create the network security group
$NsgName = $ResourceGroupName + "nsg"
$Nsg = New-AzNetworkSecurityGroup -ResourceGroupName $ResourceGroupName `
    -Location $Location -Name $NsgName -SecurityRules $NsgRuleRDP, $NsgRuleSQL

$InterfaceName = $ResourceGroupName + "int"
$Interface = New-AzNetworkInterface -Name $InterfaceName `
    -ResourceGroupName $ResourceGroupName -Location $Location `
    -SubnetId $VNet.Subnets[0].Id -PublicIpAddressId $Pip.Id `
    -NetworkSecurityGroupId $Nsg.Id

# Define a credential object
# For a proof of concept or demo, this is fine, but you should really use
# a key vault to store your secrets otherwise.
$userName = "azureadmin"
$SecurePassword = ConvertTo-SecureString 'YourSecretPassword' `
    -AsPlainText -Force
$Cred = New-Object System.Management.Automation.PSCredential ($userName, $SecurePassword)

# Create a virtual machine configuration
# Note that you can change eg. SKU to an SQL Server SKU of your choice, eg
# standard or enterprise edition.
$VMName = $ResourceGroupName + "VM"
$VMConfig = New-AzVMConfig -VMName $VMName -VMSize Standard_DS13_V2 |
Set-AzVMOperatingSystem -Windows -ComputerName $VMName `
    -Credential $Cred -ProvisionVMAgent -EnableAutoUpdate |
    Set-AzVMSourceImage -PublisherName "MicrosoftSQLServer" `
    -Offer "sql2022-ws2022" -Skus "sqldev-gen2" -Version "latest" |
    Add-AzVMNetworkInterface -Id $Interface.Id

# Create the VM
New-AzVM -ResourceGroupName $ResourceGroupName -Location $Location -VM $VMConfig

# New code to deploy Azure Bastion
$BastionSubnetName = "AzureBastionSubnet"
$BastionSubnetConfig = New-AzVirtualNetworkSubnetConfig `
    -Name $BastionSubnetName -AddressPrefix 192.168.2.0/24

# Update the virtual network with the Bastion subnet
$vnet = Get-AzVirtualNetwork -Name $VnetName -ResourceGroupName $ResourceGroupName
Add-AzVirtualNetworkSubnetConfig -Name $BastionSubnetName `
    -VirtualNetwork $vnet -AddressPrefix "192.168.2.0/24" | Set-AzVirtualNetwork

# Create a public IP address for Bastion (standard sku)
$BastionPipName = $ResourceGroupName + "bastionpip"
$BastionPip = New-AzPublicIpAddress -ResourceGroupName $ResourceGroupName -Name $BastionPipName -Location $Location `
    -AllocationMethod Static -IdleTimeoutInMinutes 4 -Sku Standard

# Create the Bastion host
$BastionName = $ResourceGroupName + "bastion"
New-AzBastion -ResourceGroupName $ResourceGroupName -Name $BastionName `
    -PublicIpAddressRgName $ResourceGroupName -PublicIpAddressName $BastionPipName `
    -VirtualNetworkRgName $ResourceGroupName -VirtualNetworkName $VnetName -Sku "Basic"

$StorageAccountName = "kaysbackstorageacc"  # Use lowercase letters and numbers only
$FileShareName = "sqlbackupshare"

# Check if the storage account exists
$storageAccount = Get-AzStorageAccount -ResourceGroupName $ResourceGroupName `
    -Name $StorageAccountName -ErrorAction SilentlyContinue
if (-not $storageAccount) {
    # Create the storage account if it doesn't exist
    New-AzStorageAccount -ResourceGroupName $ResourceGroupName -Name $StorageAccountName `
    -Location $Location -SkuName "Standard_LRS"
    Write-Host "Storage account '$StorageAccountName' created."
}
else {
    Write-Host "Storage account '$StorageAccountName' already exists."
}

# Get storage account context
$StorageAccountKey = (Get-AzStorageAccountKey -ResourceGroupName $ResourceGroupName `
    -Name $StorageAccountName)[0].Value
$Context = New-AzStorageContext -StorageAccountName $StorageAccountName `
    -StorageAccountKey $StorageAccountKey

# Check if the file share exists
$fileShare = Get-AzStorageShare -Context $Context -Name $FileShareName `
    -ErrorAction SilentlyContinue
if (-not $fileShare) {
    # Create the file share if it doesn't exist
    New-AzStorageShare -Context $Context -Name $FileShareName
    Write-Host "File share '$FileShareName' created."
}
else {
    Write-Host "File share '$FileShareName' already exists."
}

# install the stuff to the vm
$script1 = @"
# Install NuGet and dbatools
Install-PackageProvider -Name NuGet -MinimumVersion 2.8.5.201 -Force
Install-Module -Name dbatools -Force
"@

Invoke-AzVMRunCommand -ResourceGroupName $ResourceGroupName -Name $VMName -CommandId 'RunPowerShellScript' -ScriptString $script1
More on Azure Bastion
So Azure Bastion now comes in some different flavors, which is a relatively new offering. Bastion now has some different SKUs respectively tiers: Basic, Standard and Premium. Furthermore, you can choose from a private-only and developer offer. As for a better understanding of the SKUs, I recommend reading the quite long feature overview table. The main takeaway is though that if you want to use to an azure sql vm and connect to it via RDP, don’t pick the basic SKU, but a higher tier. The basic SKU won’t support SSL protected RDP connection.
How to use the script
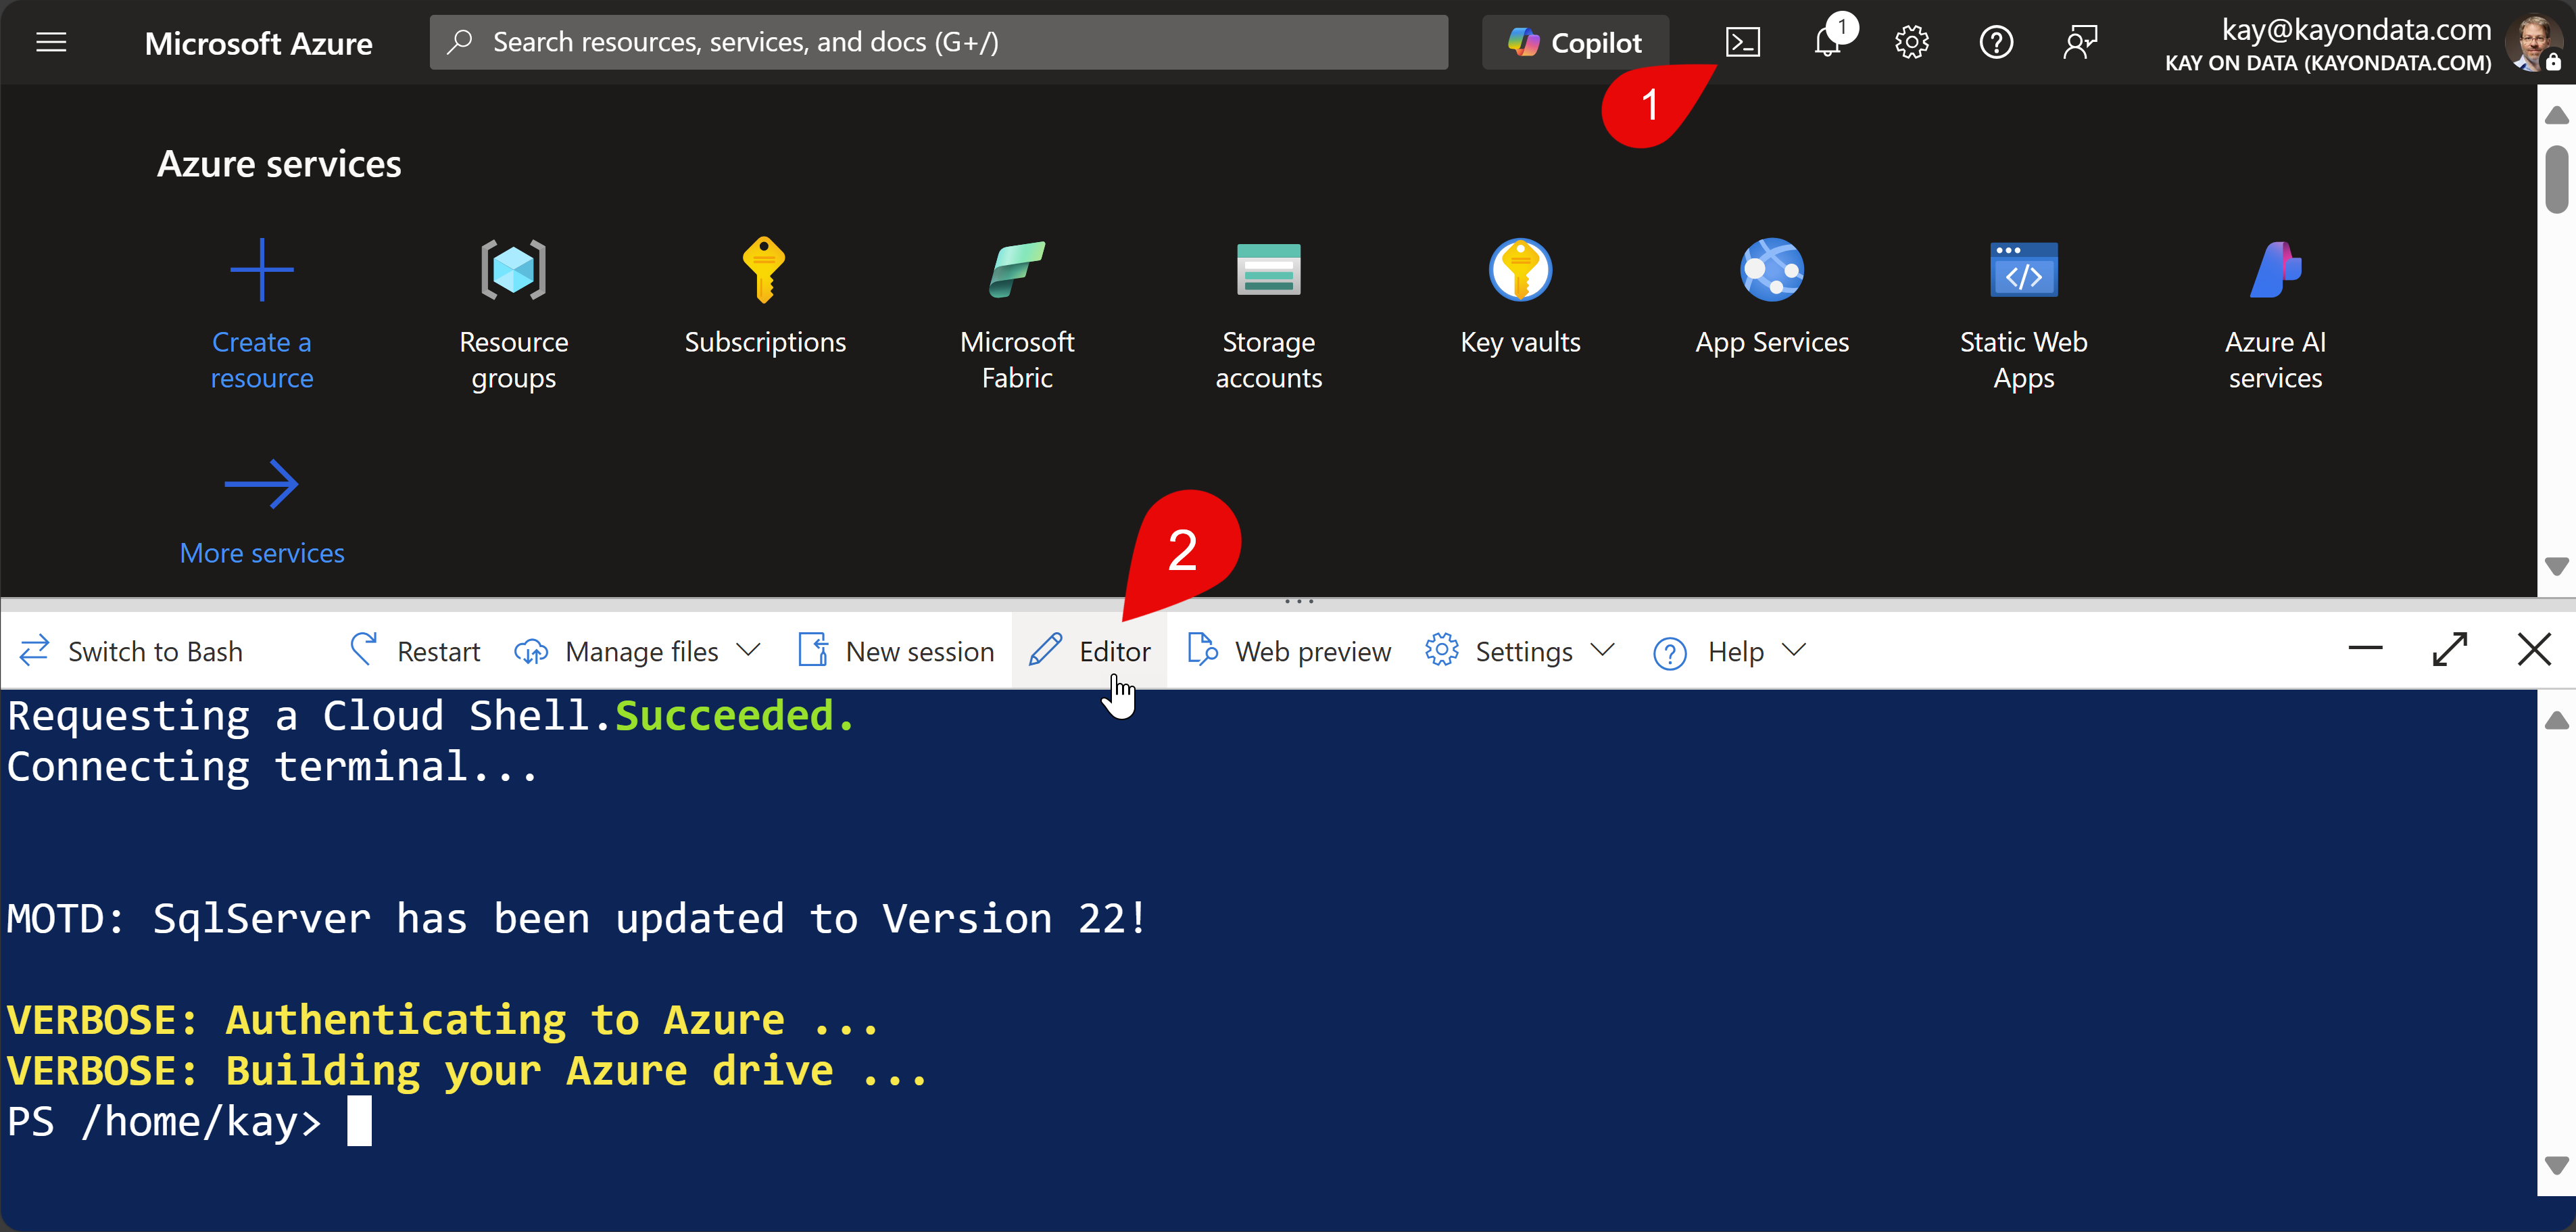
I recommend to use Azures Cloud Shell as this is the easiest way to use and you can share the script with your team, too. I like to create a folder with mkdir where you can store such kind of scripts. In the following picture, you’ll see how to get to the Azure Editor that is heavily inspired by vscode.

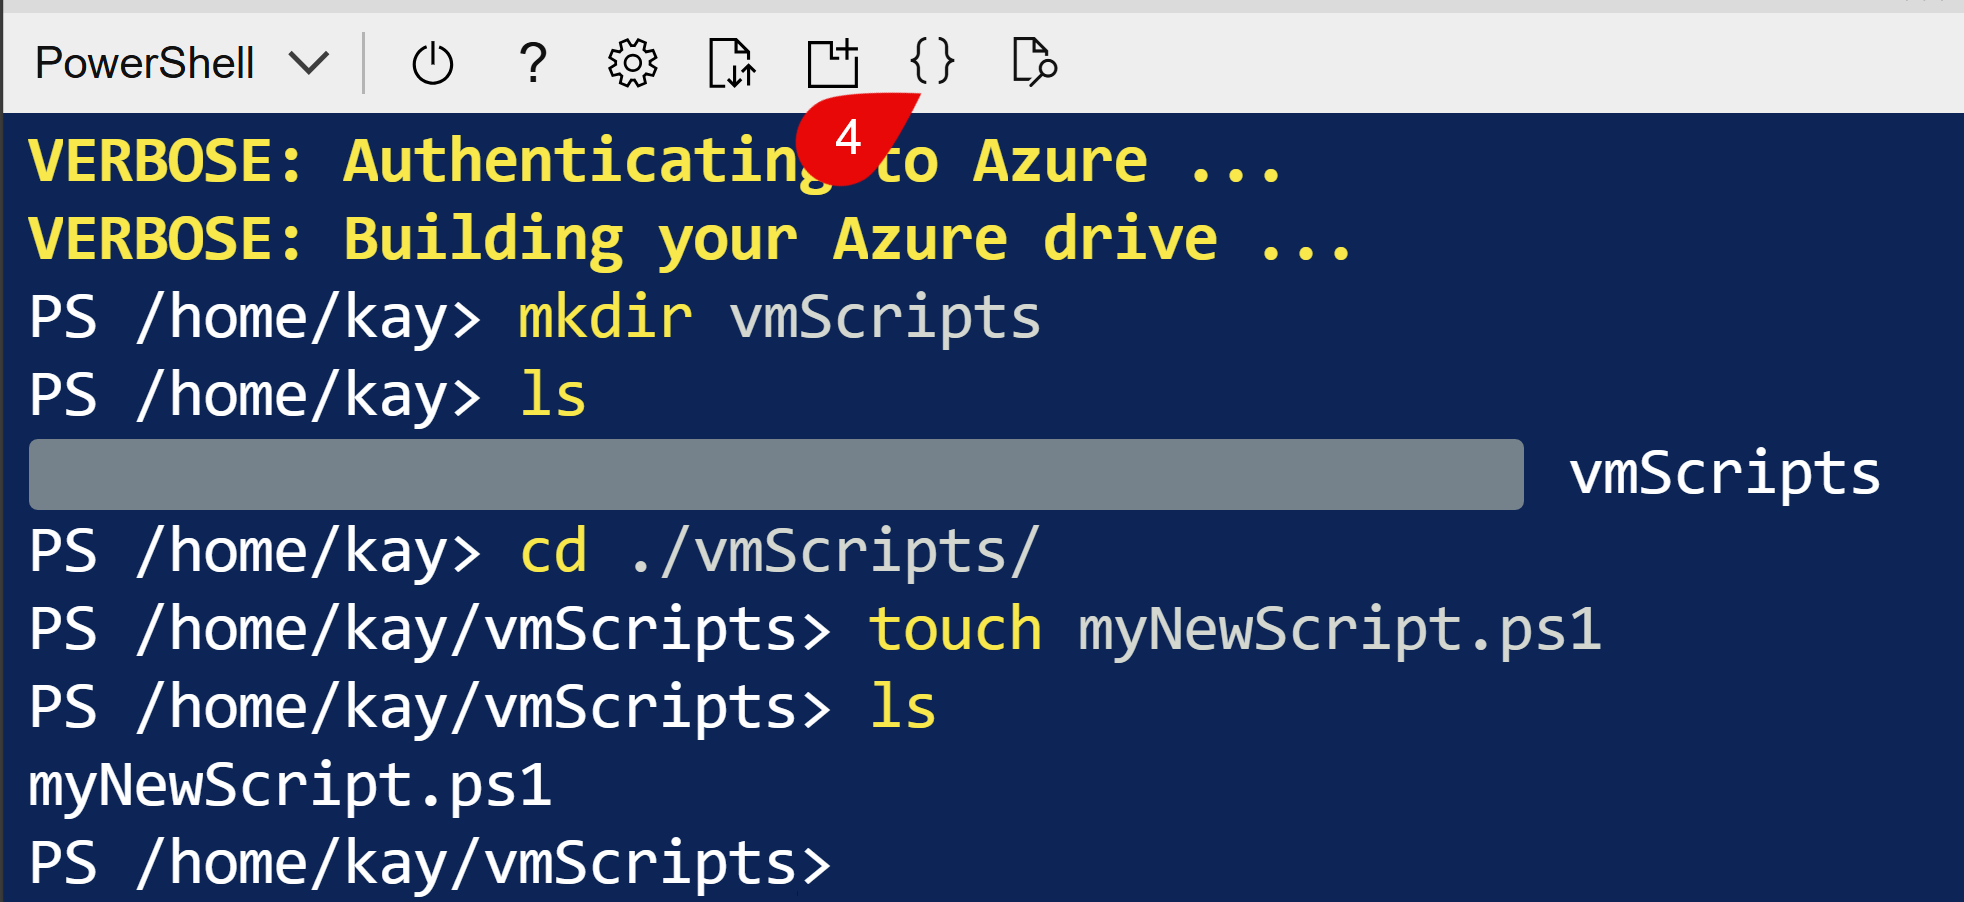
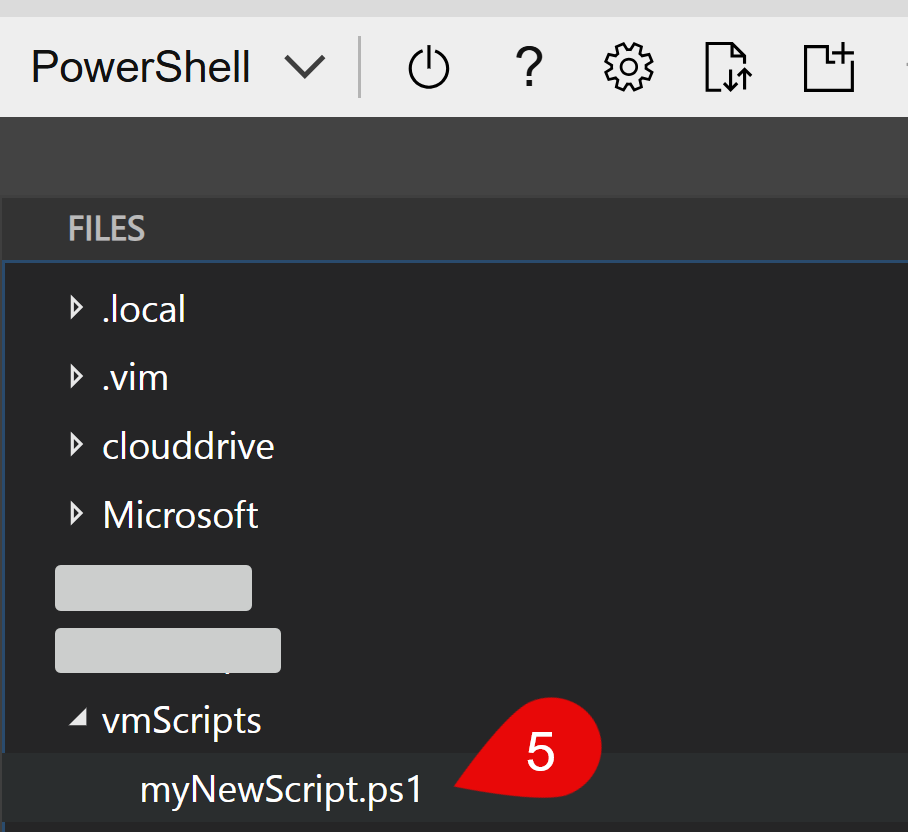
Create a *.ps1 file with the name you like (see screenshot above, you can use touch to create a file). Open it with the editor (mouse click no. 4 in above image and click no. 5 in below image) and copy & paste the script from above inside. You can save the script with [ctrl]+[s] or via the menu of the editor.
More to come for full automation
Currently, my script that executes a PowerShell script against the created VM via Invoke-AzVMRunCommand, unfortunately does not create a working attached network storage yet.
There is an issue that I am still investigating and hoping that I can resolve it in the next few weeks. Once I’ll figure that one out (or if you have a tip for me - please let me know!), then I’ll post it to complete this script. Until then you can use the following post deployment script on the vm directly as a workaround:
# Map the network drive
$connectTestResult = Test-NetConnection -ComputerName sqldatabasebaks.file.core.windows.net -Port 445
if ($connectTestResult.TcpTestSucceeded) {
    # Save the password so the drive will persist on reboot
    # For a proof of concept / demo, this approach is fine,
    # but normally, you should want a key vault to store your secrets!
    cmd.exe /C "cmdkey /add:`"sqldatabasebaks.file.core.windows.net`" /user:`"localhost\sqldatabasebaks`" /pass:`"YourPassword`""
    # Mount the drive
    New-PSDrive -Name Z -PSProvider FileSystem -Root "\\sqldatabasebaks.file.core.windows.net\sqlbaks" -Persist
}
else {
    Write-Error -Message "Unable to reach the Azure storage account via port 445. Check to make sure your organization or ISP is not blocking port 445, or use Azure P2S VPN, Azure S2S VPN, or Express Route to tunnel SMB traffic over a different port."
}


# copy to mssql folder for restore with dbatools
# you may need to adapt the folder path according to your own file storage system
Copy-Item -Path "Z:\*.bak" `
    -Destination "C:\Program Files\Microsoft SQL Server\MSSQL16.MSSQLSERVER\MSSQL\Backup" `
    -Recurse


# use dbatools for restore dbs
Set-DbatoolsConfig -FullName sql.connection.trustcert `
    -Value $true # to ensure that dbatools trusts the certificate
Restore-DbaDatabase -SqlInstance sqlvm1VM -Path "C:\Program Files\Microsoft SQL Server\MSSQL16.MSSQLSERVER\MSSQL\Backup"
How to connect to the VM via Bastion
First, go to your resource group and click on the VM so you get into its information window:

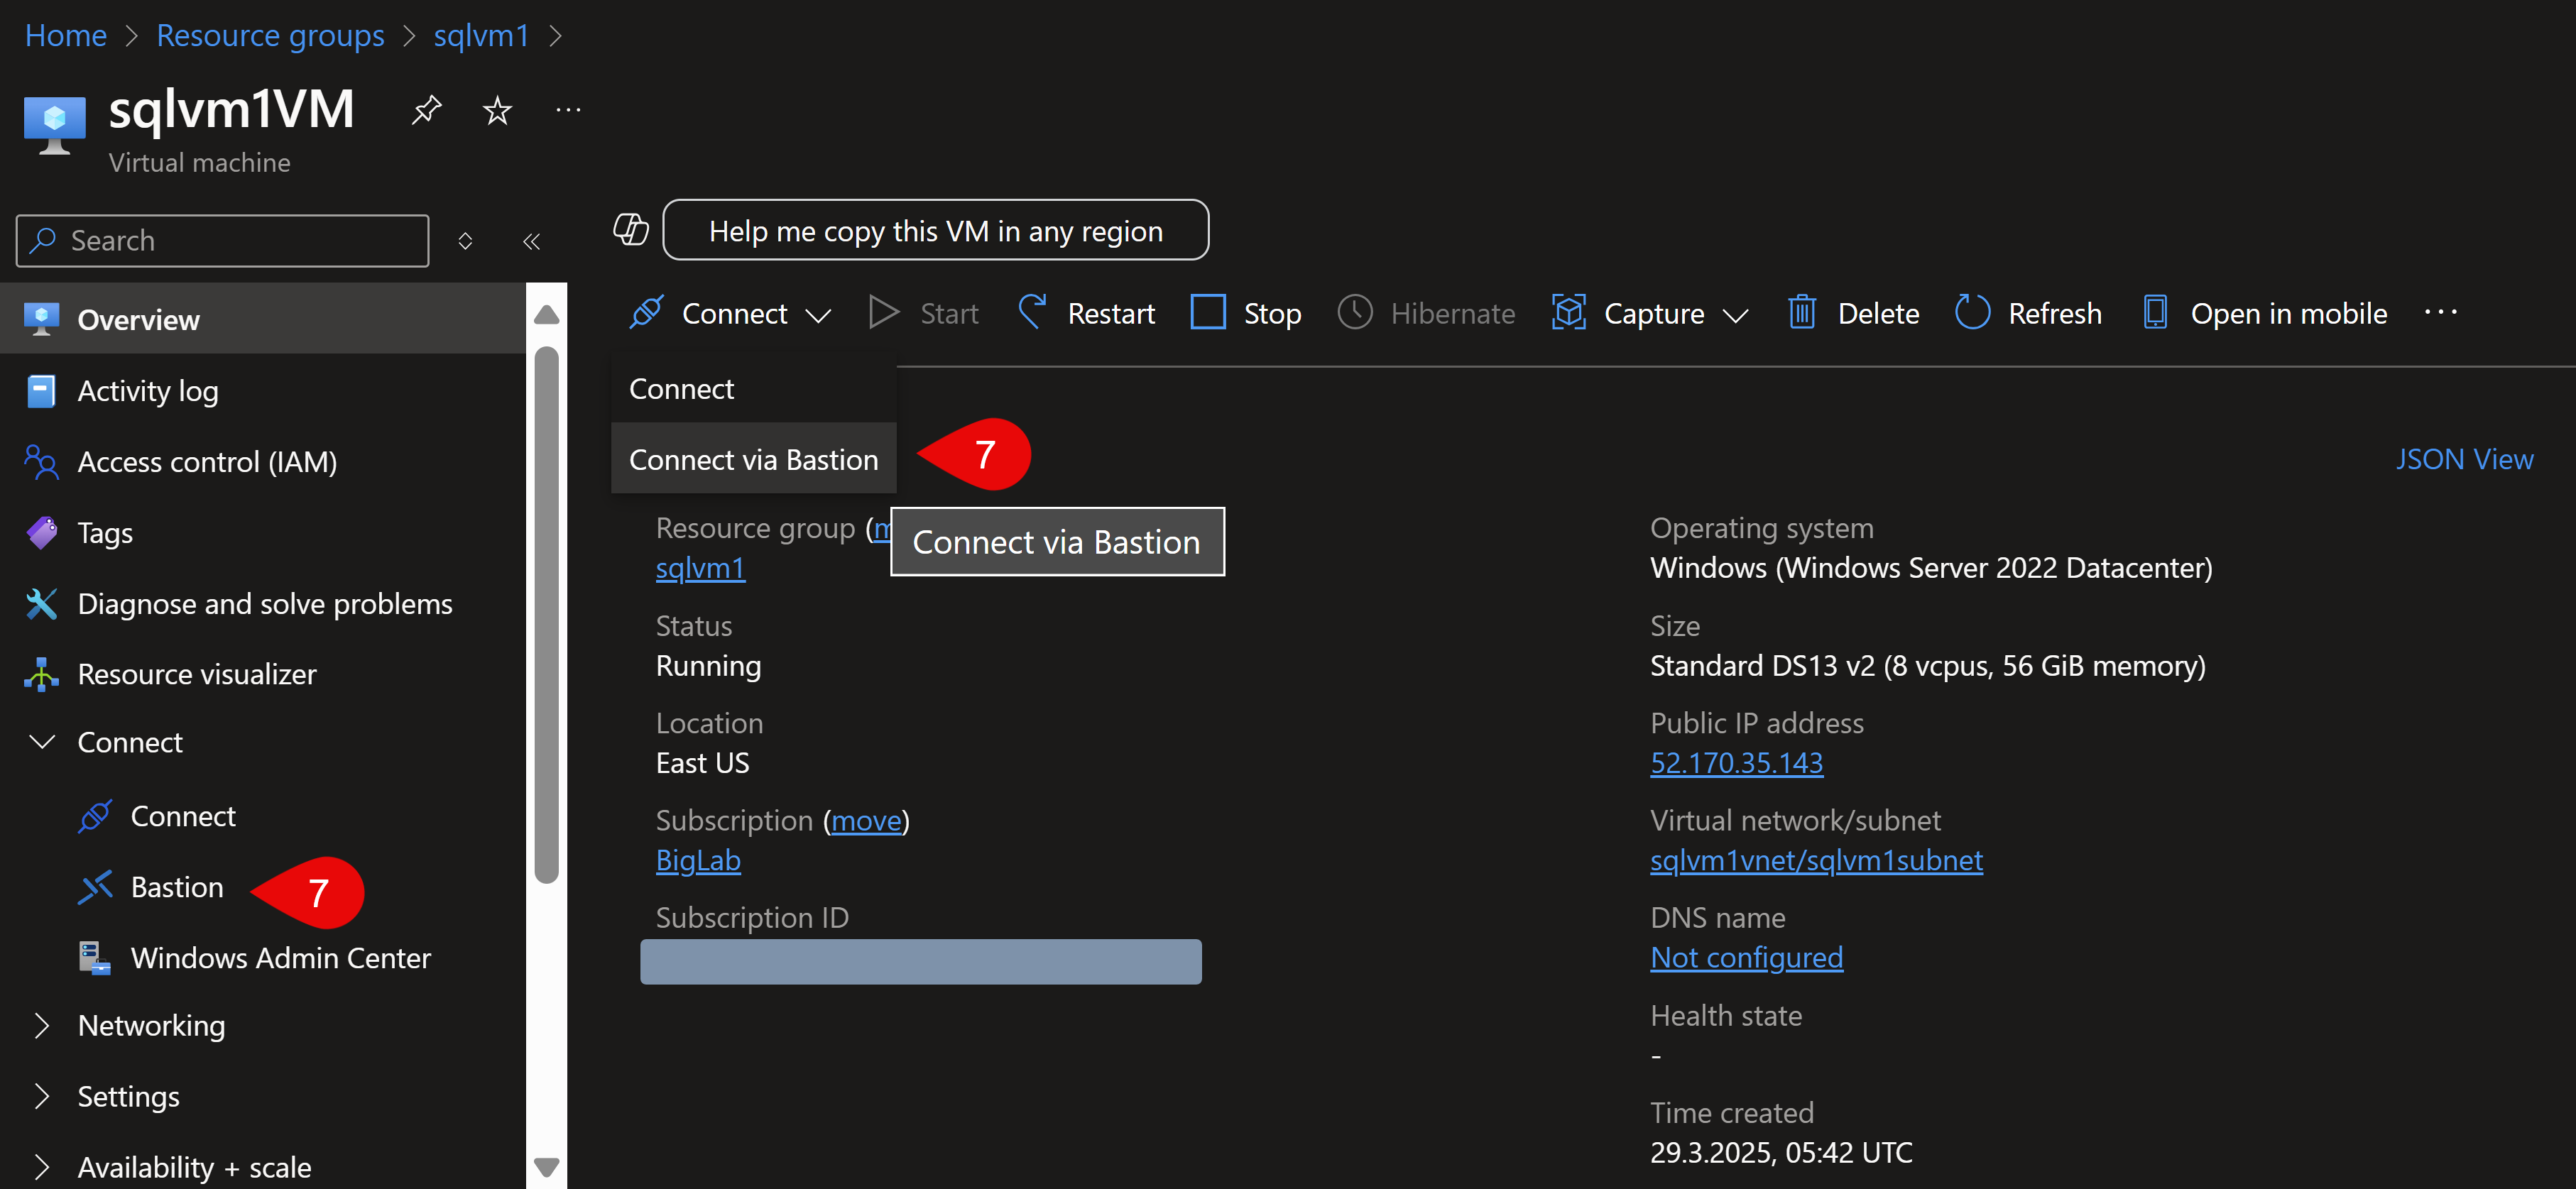
After this, you have 2 ways to connect to the VM via Azure Bastion, both ways are marked with the click no 7 in the screenshot below. Either you use the left side vertical menu or the horizontal menu.
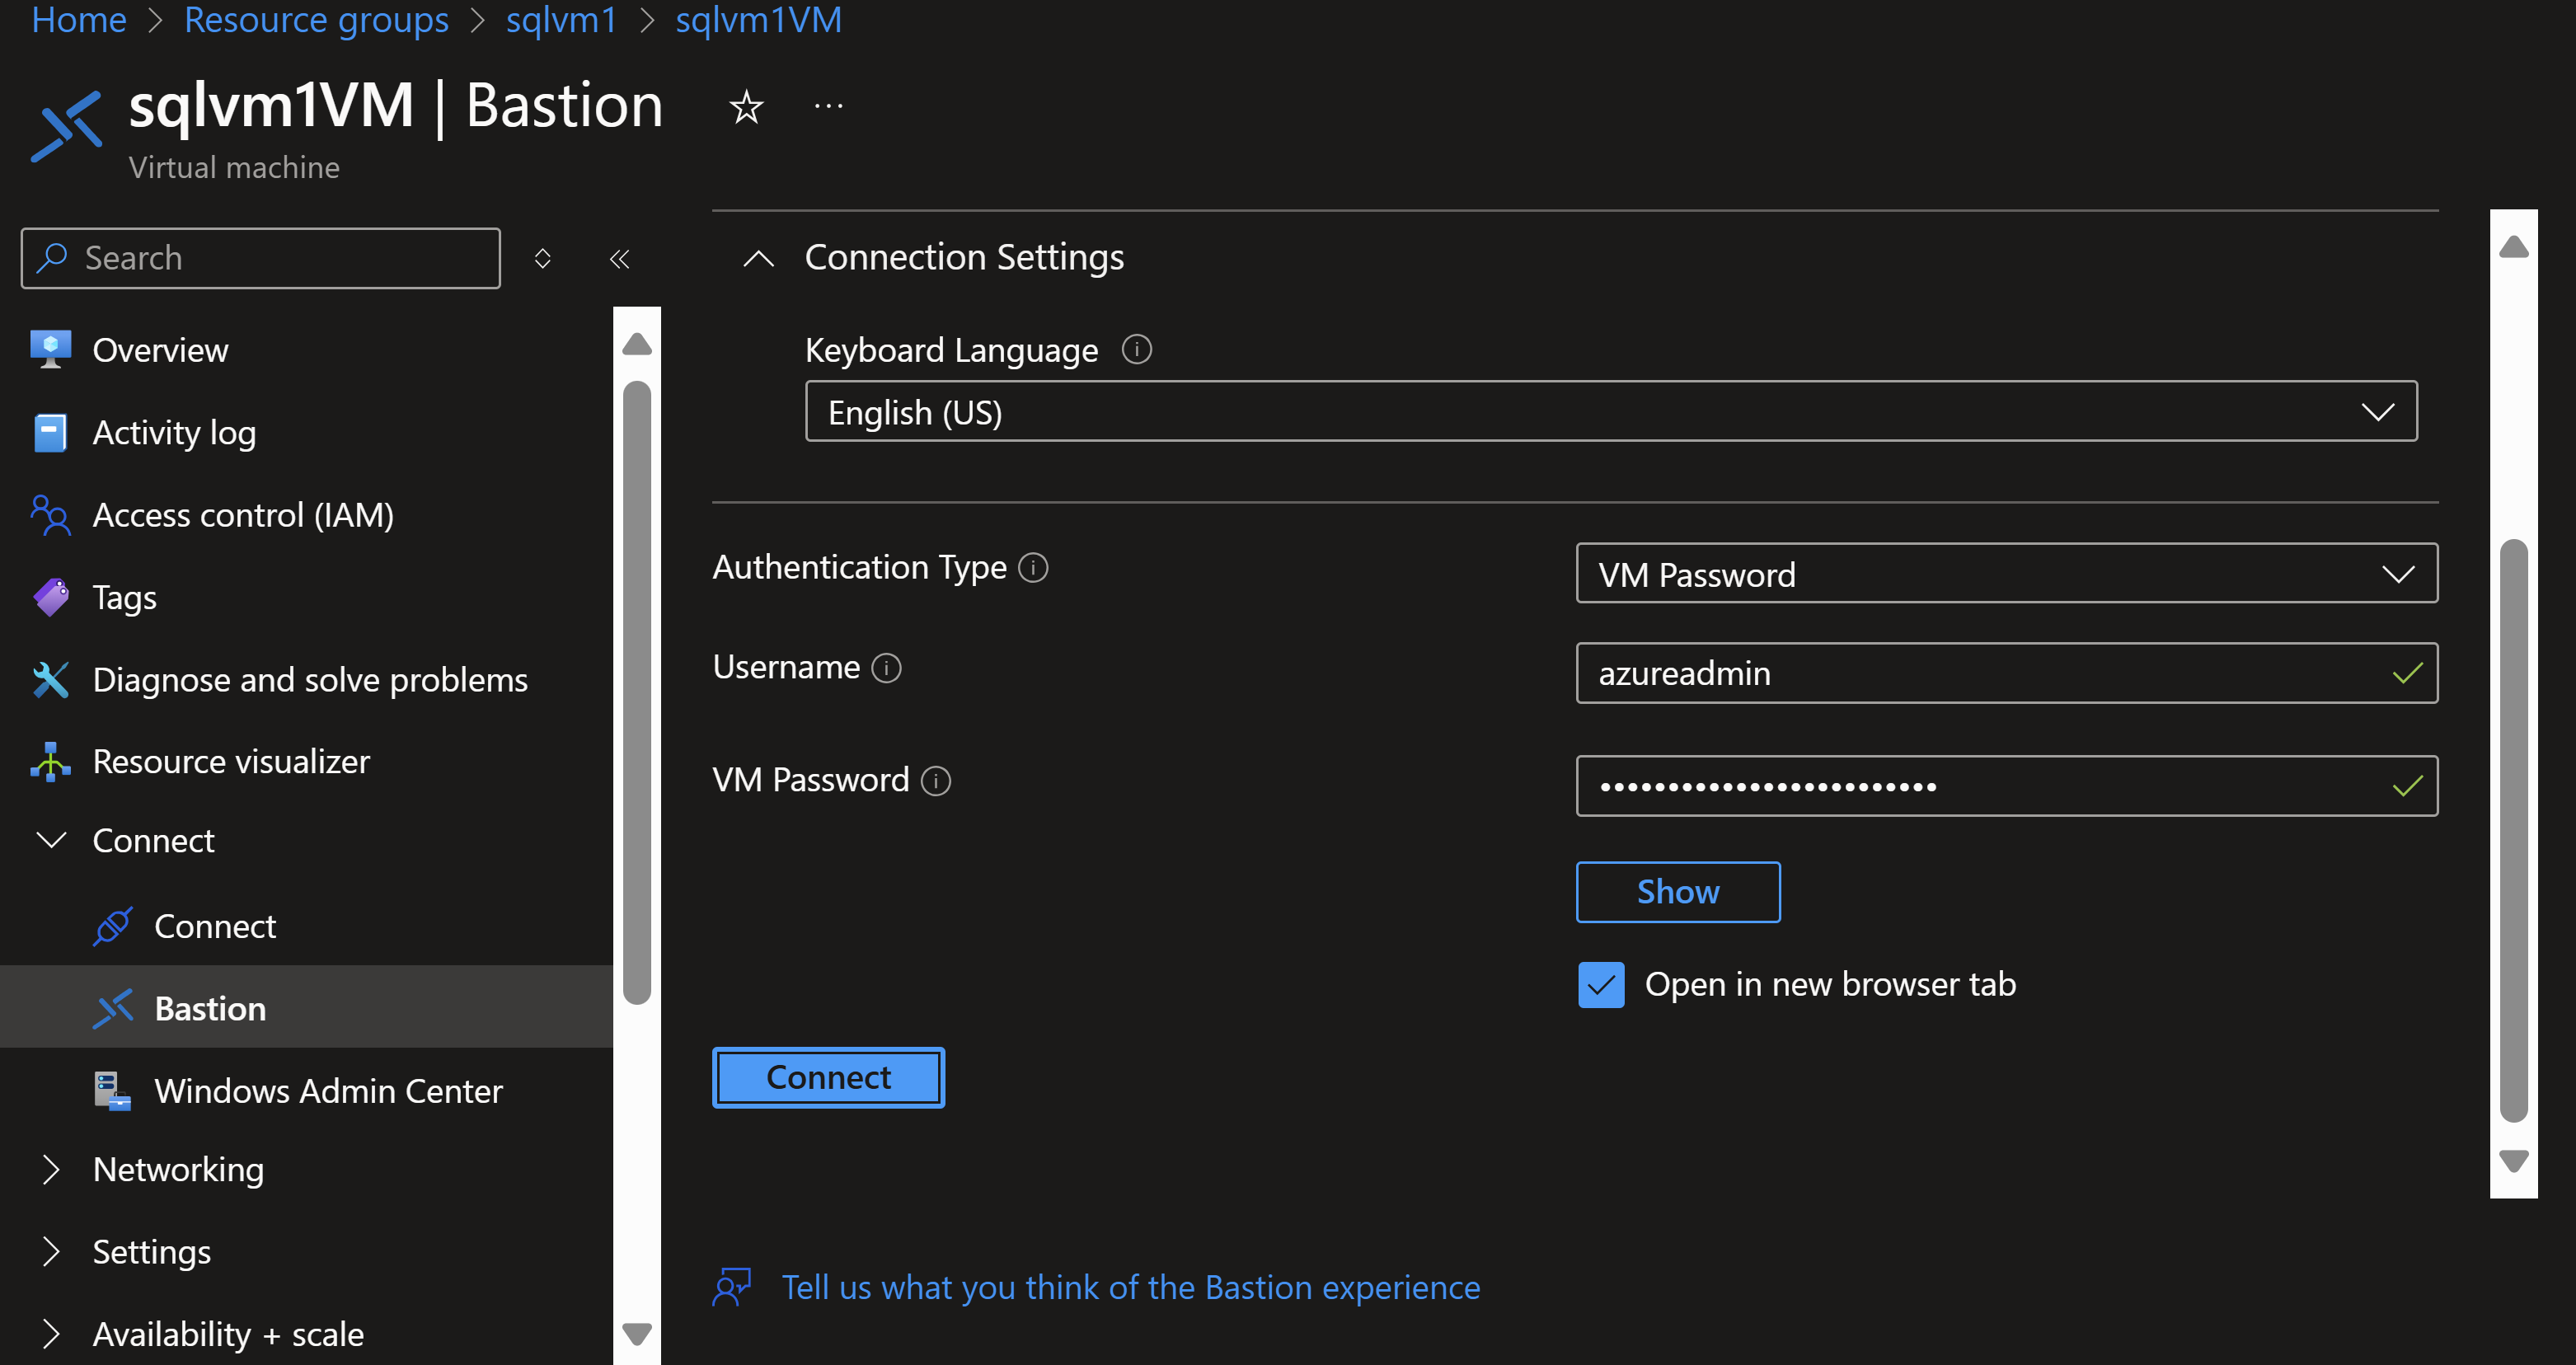
After this you get to the menu where you enter the credentials you already used in the script (that is hopefully stored in a key vault). Click on connect.
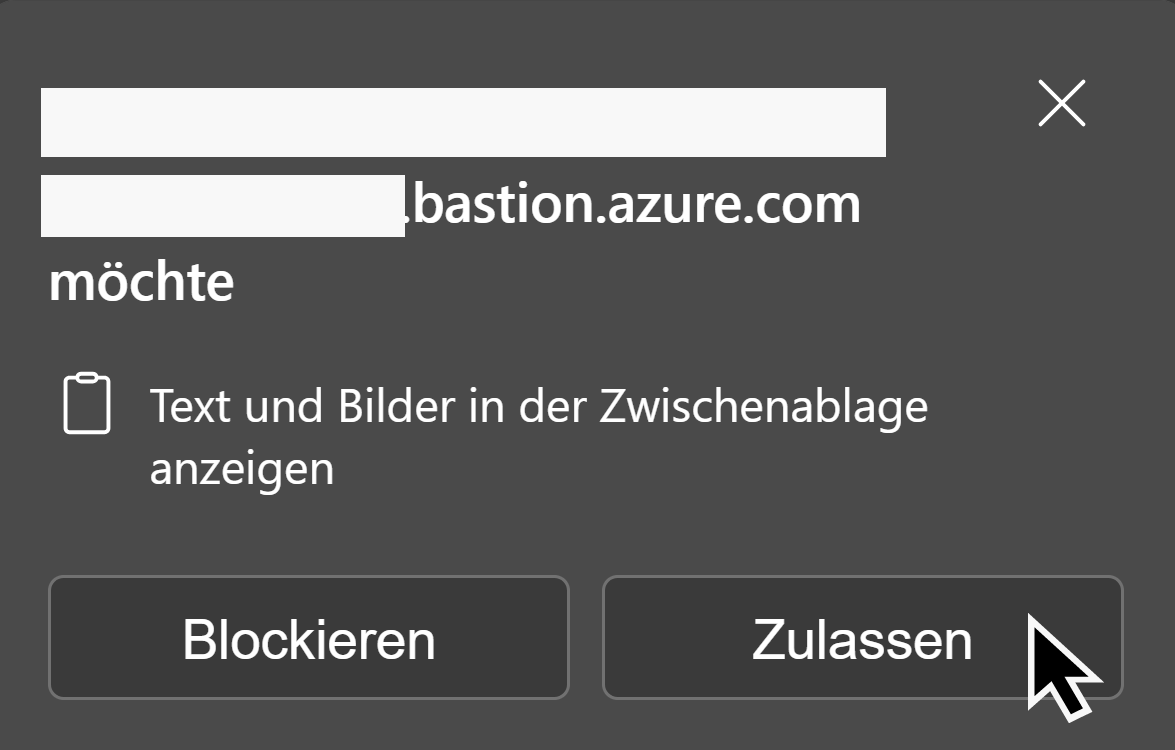
After this, a new browser tab opens and on the top left, you’ll be asked if you allow to transfer text data to the VM, which you want for this script. In the next screenshot, you’ll see “Zulassen” which is German for “Allow”. Click on allow.
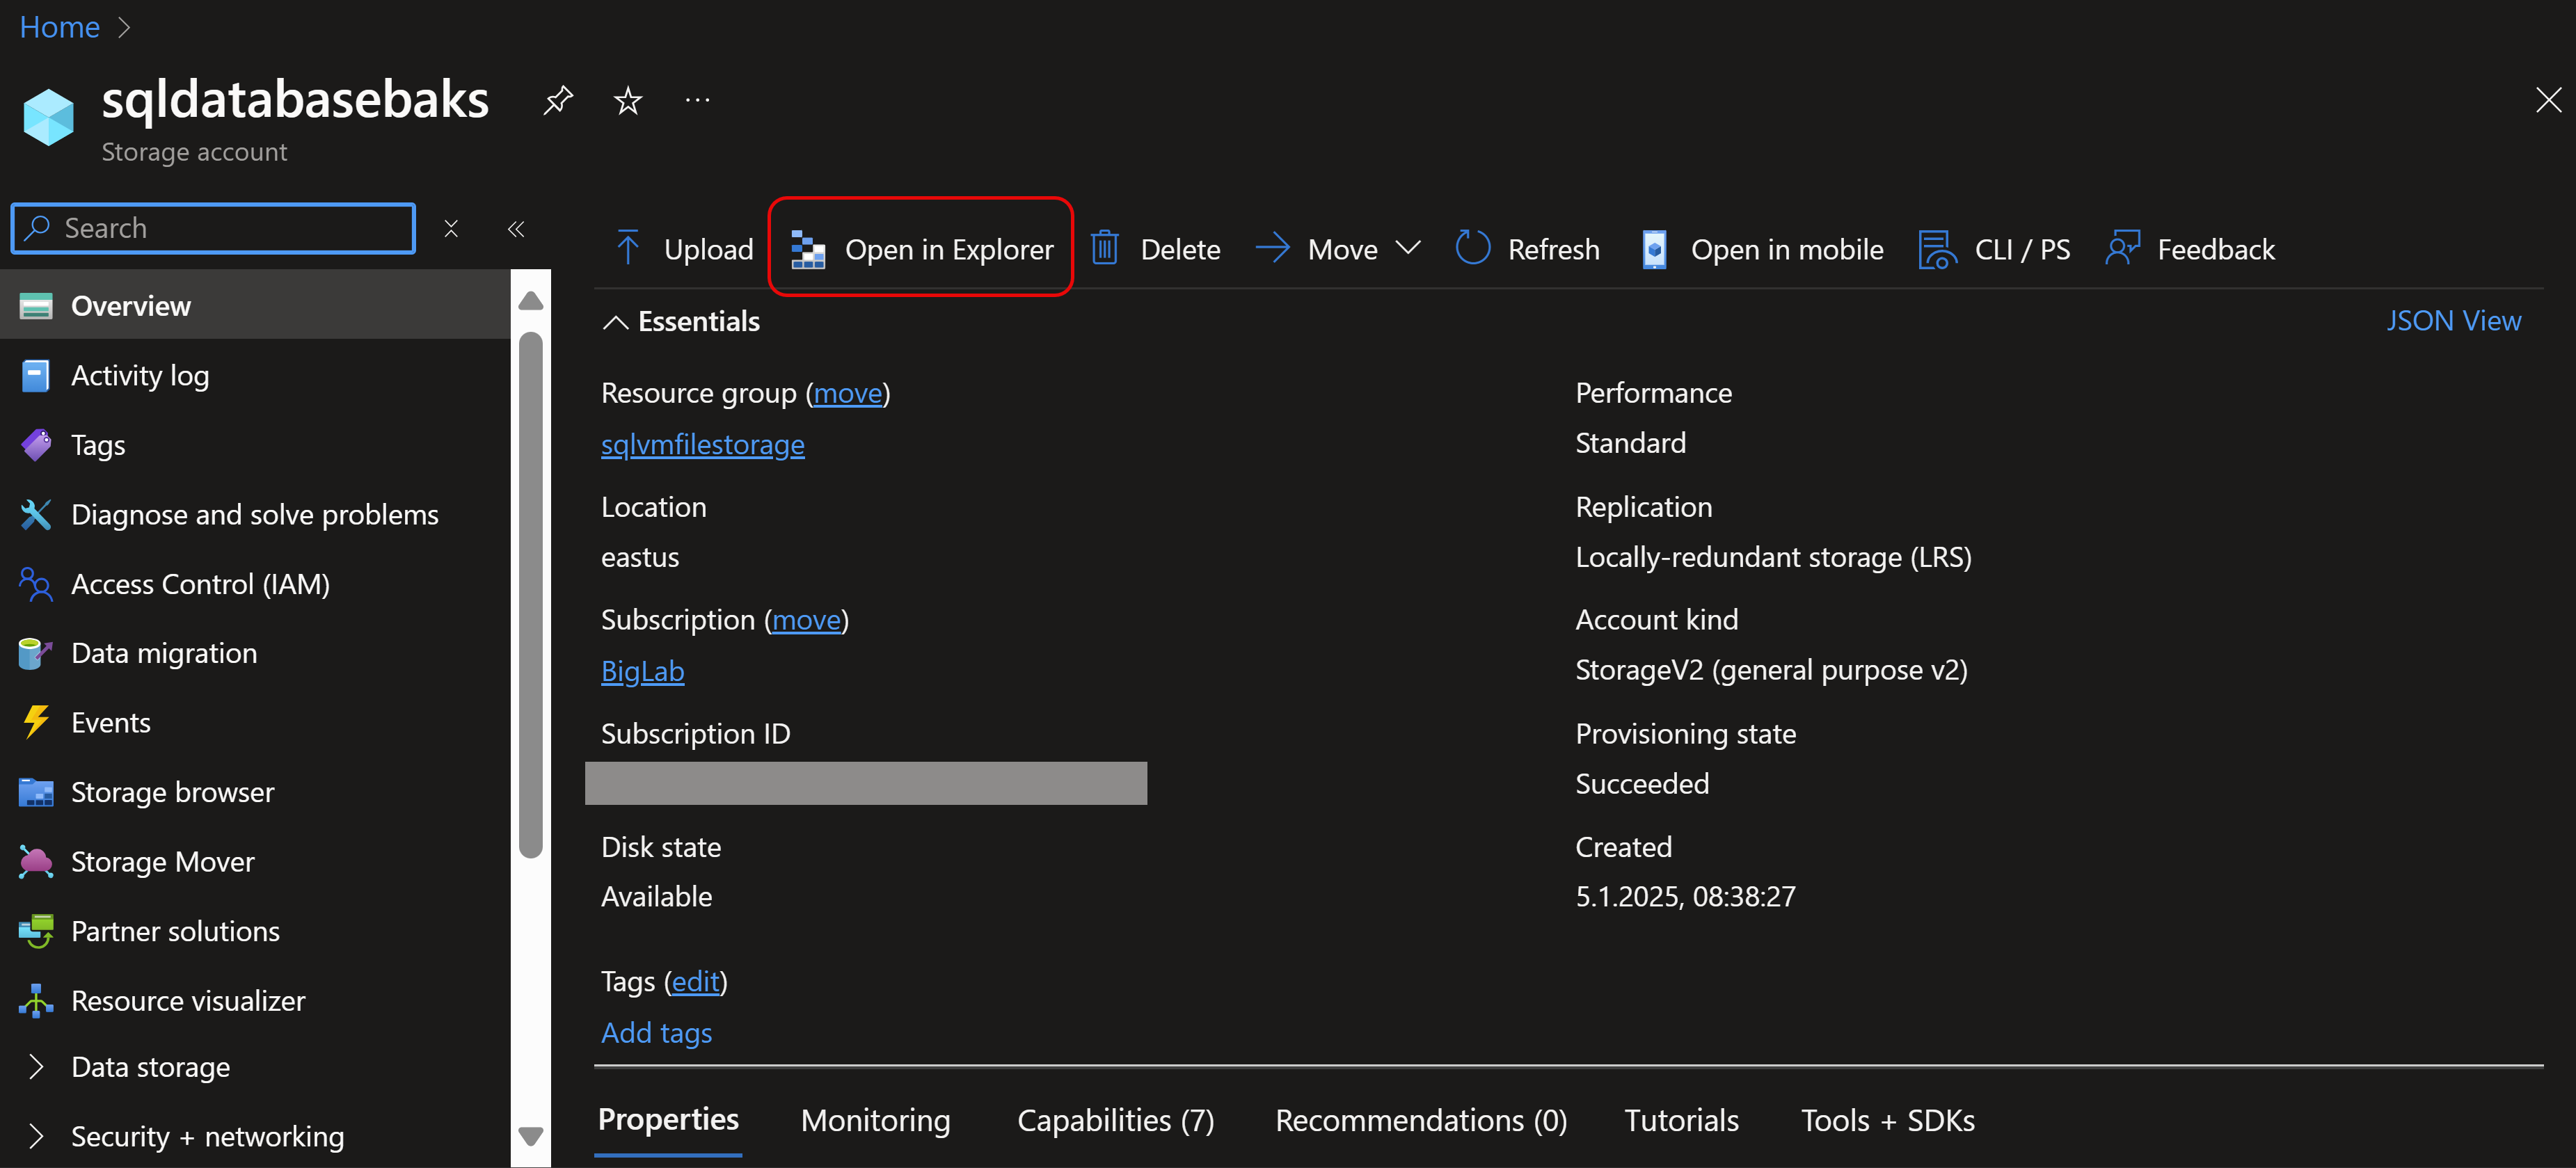
For the backups, I like to use Azure File Storage which is a relatively cheap storage. I use this for SQL Server backups. That storage can be mapped to a network drive on the VM. So in order to retrieve the password and as well the script to do so, lets go to its resource group. I recommend to use a different resource group for the storage than the VM. That allows you to delete the VM from time to time to save costs or for a fresh setup. To do so, you simply can delete its resource group, and because your file storage is in another, your backup resource group will stay. If you want to upload backups to your file storage, you can do this very easy this way: Go to your storage account, and here you’ll have the possibility to click on a button that opens Azure Storage Explorer for you.
In there, you need to go to your file storage and drag and drop your files to upload. The next screenshots show you how to retrieve the code for your own environment, for your password and your own storage:
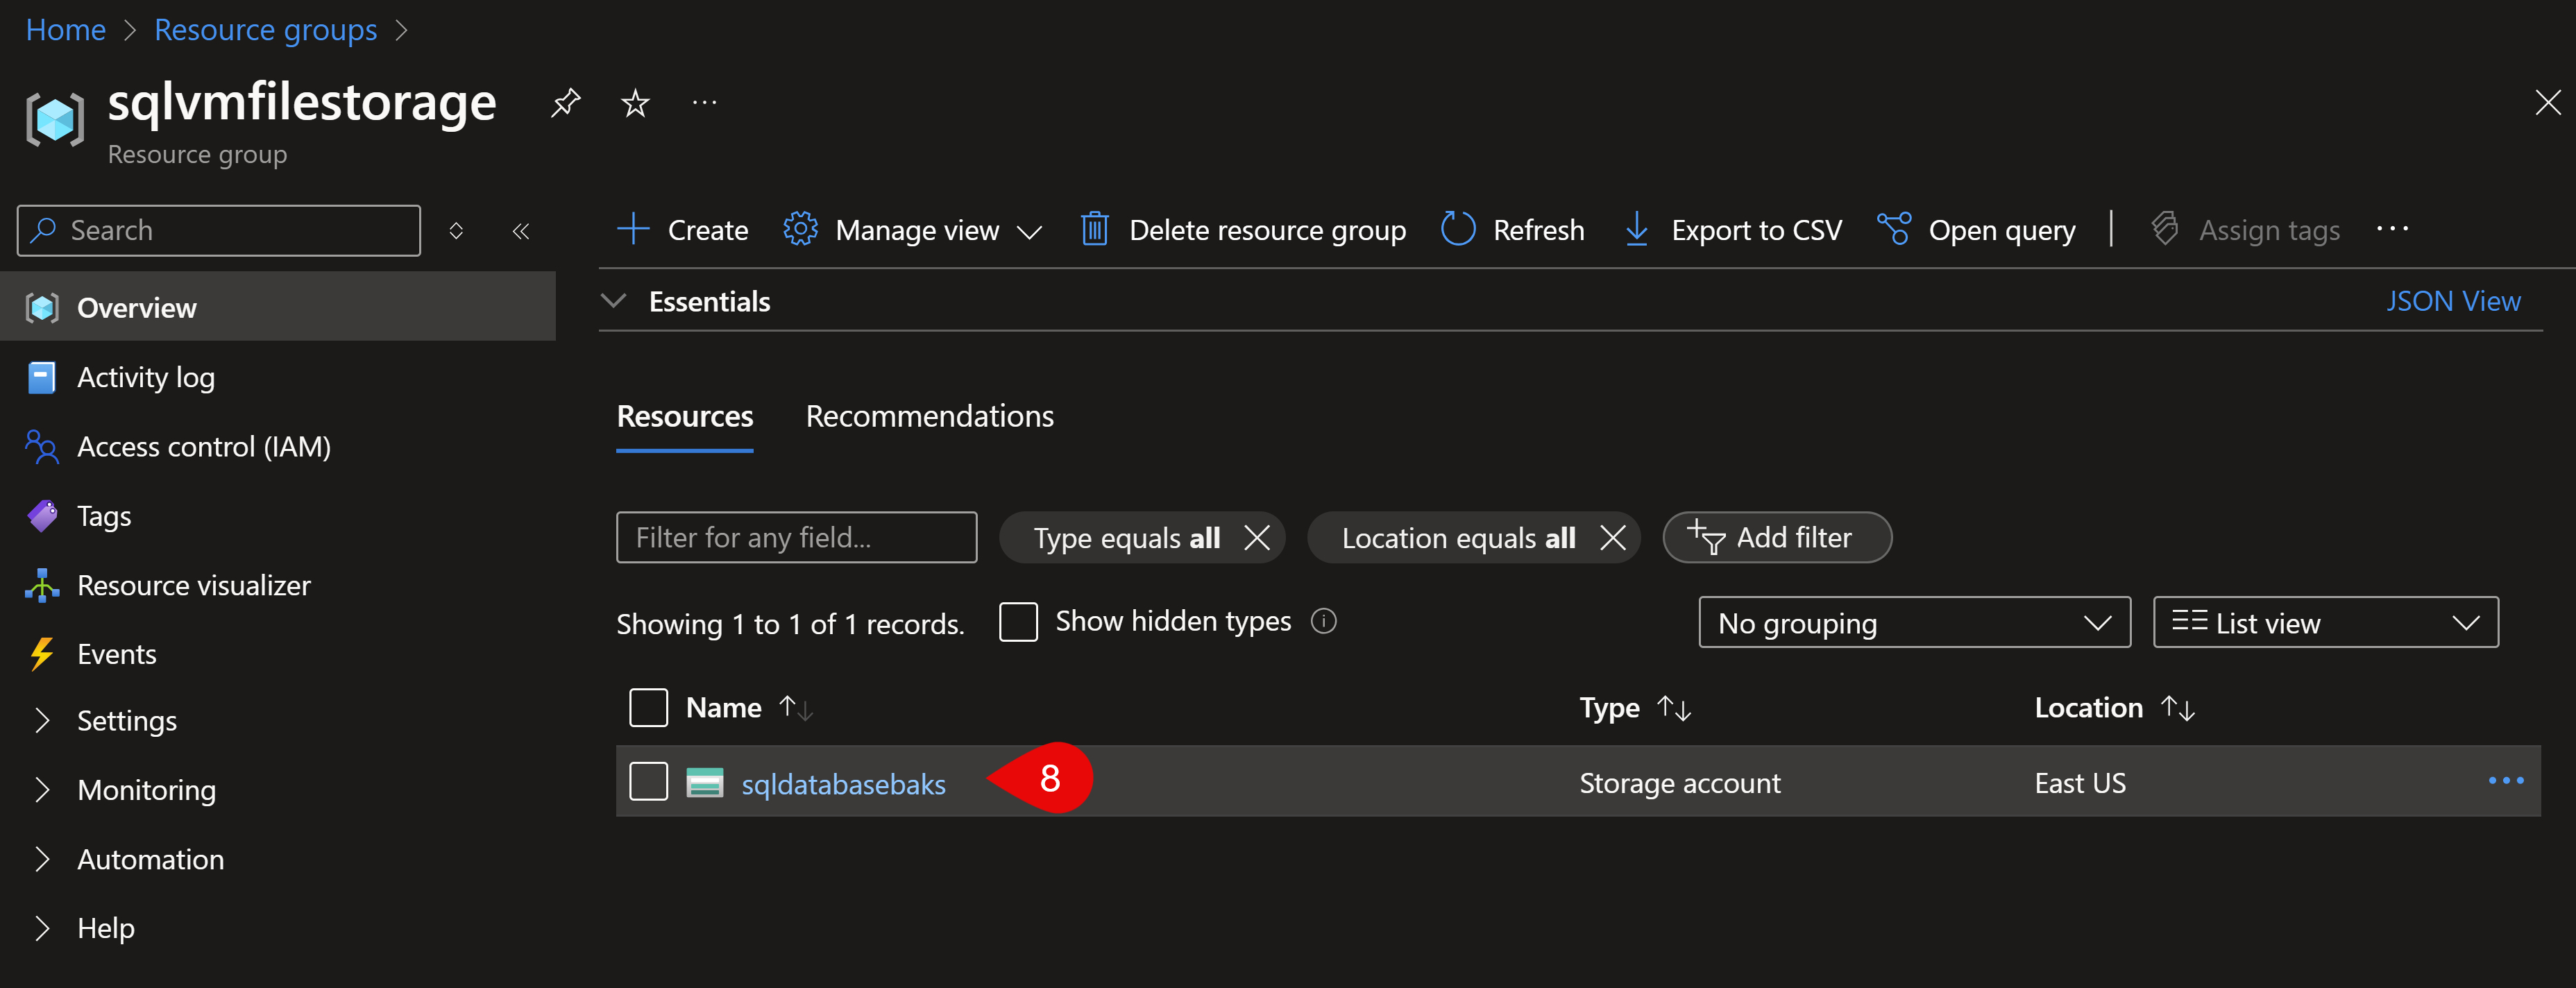

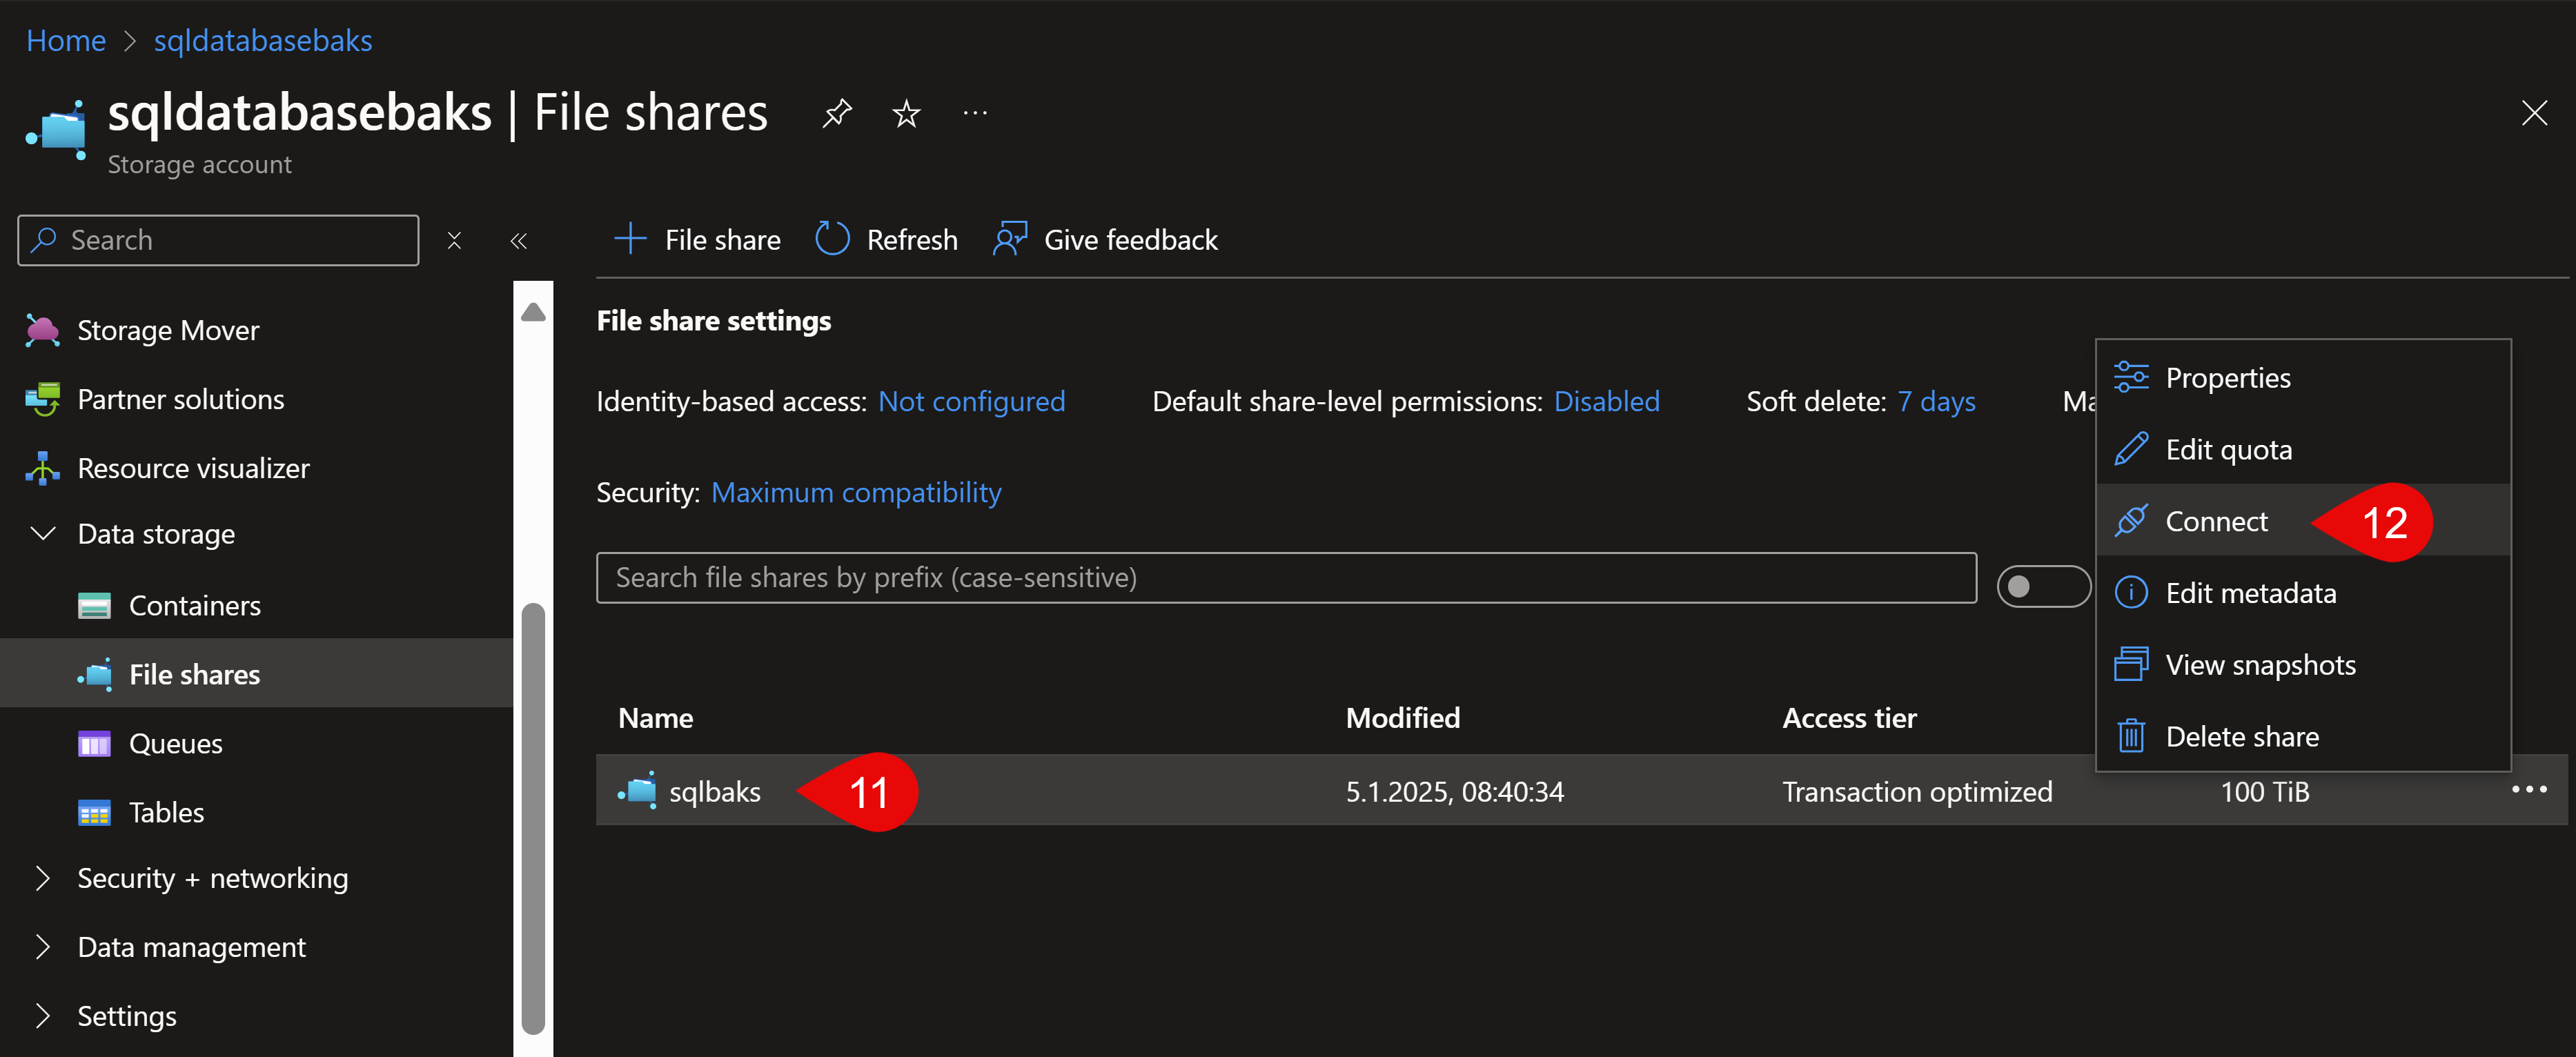
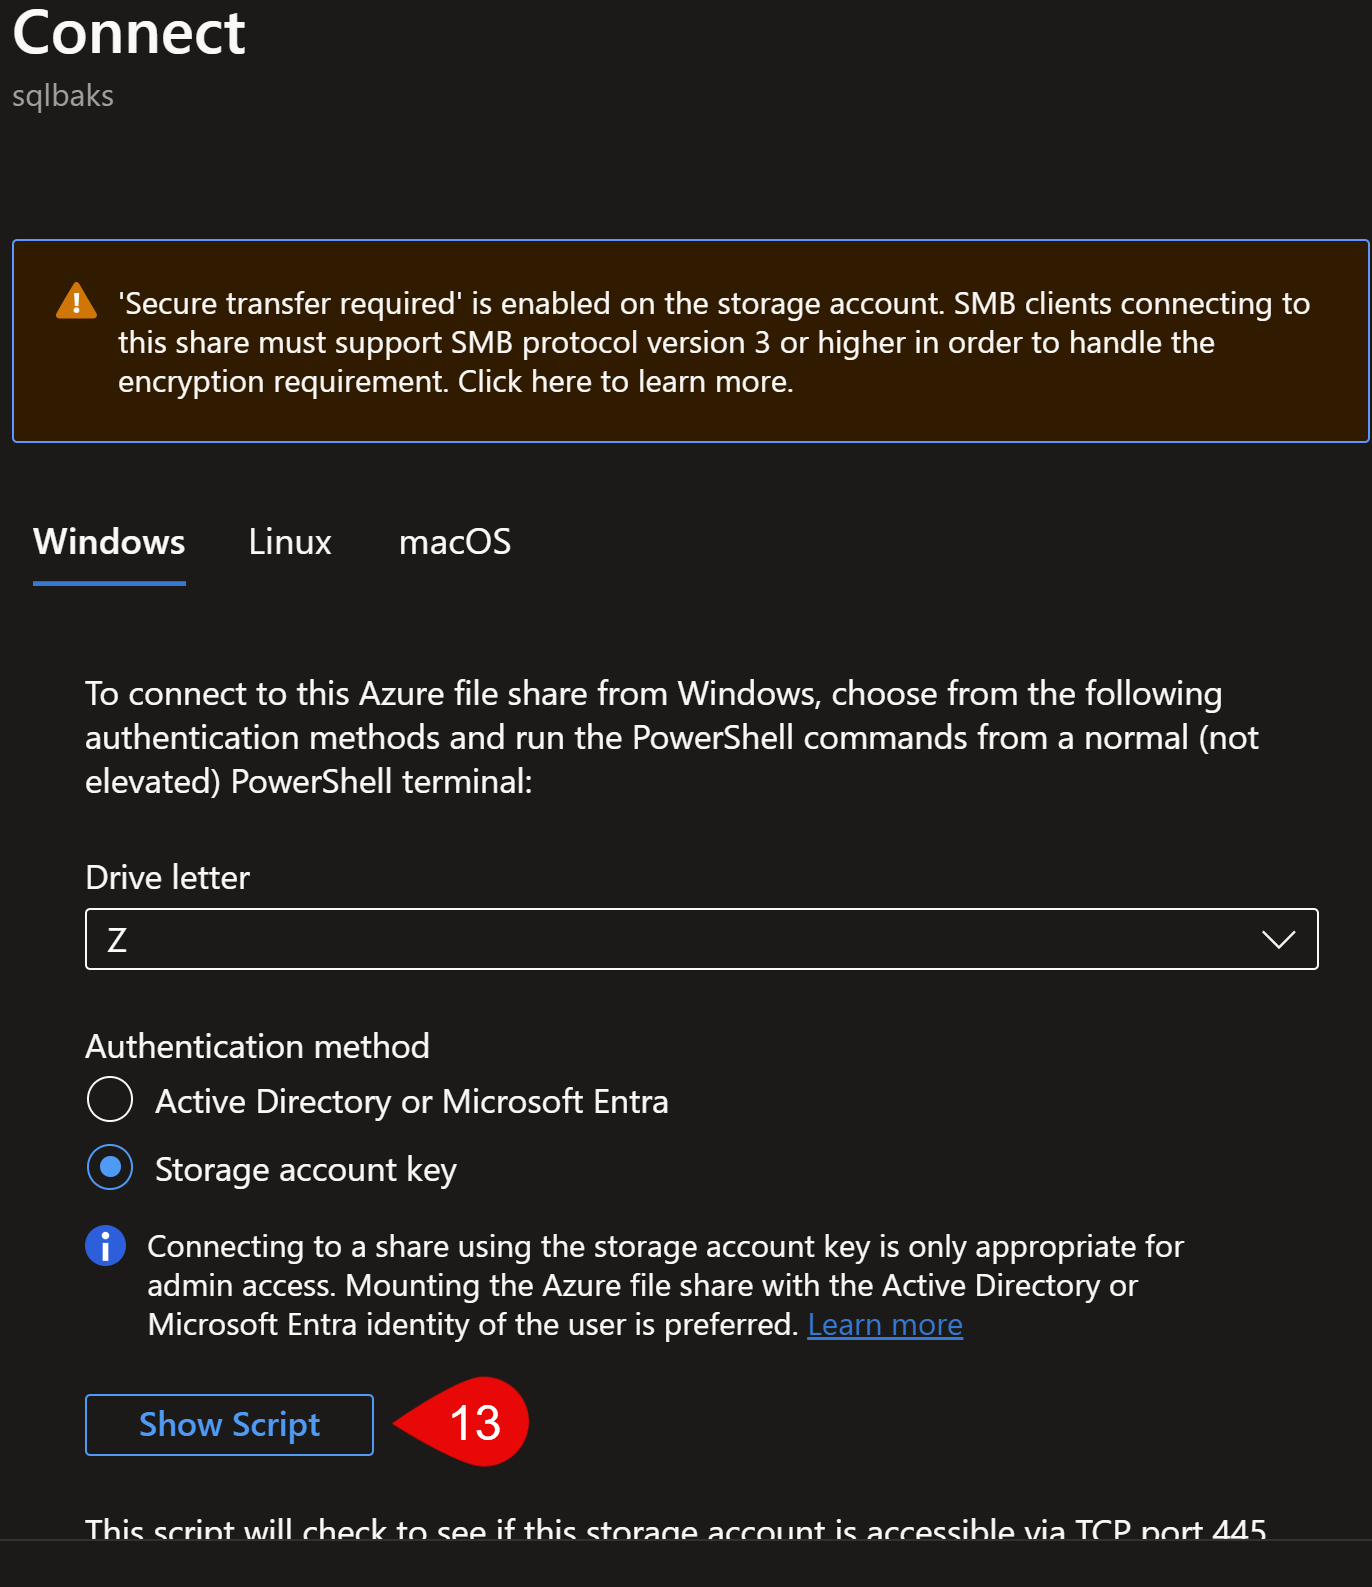
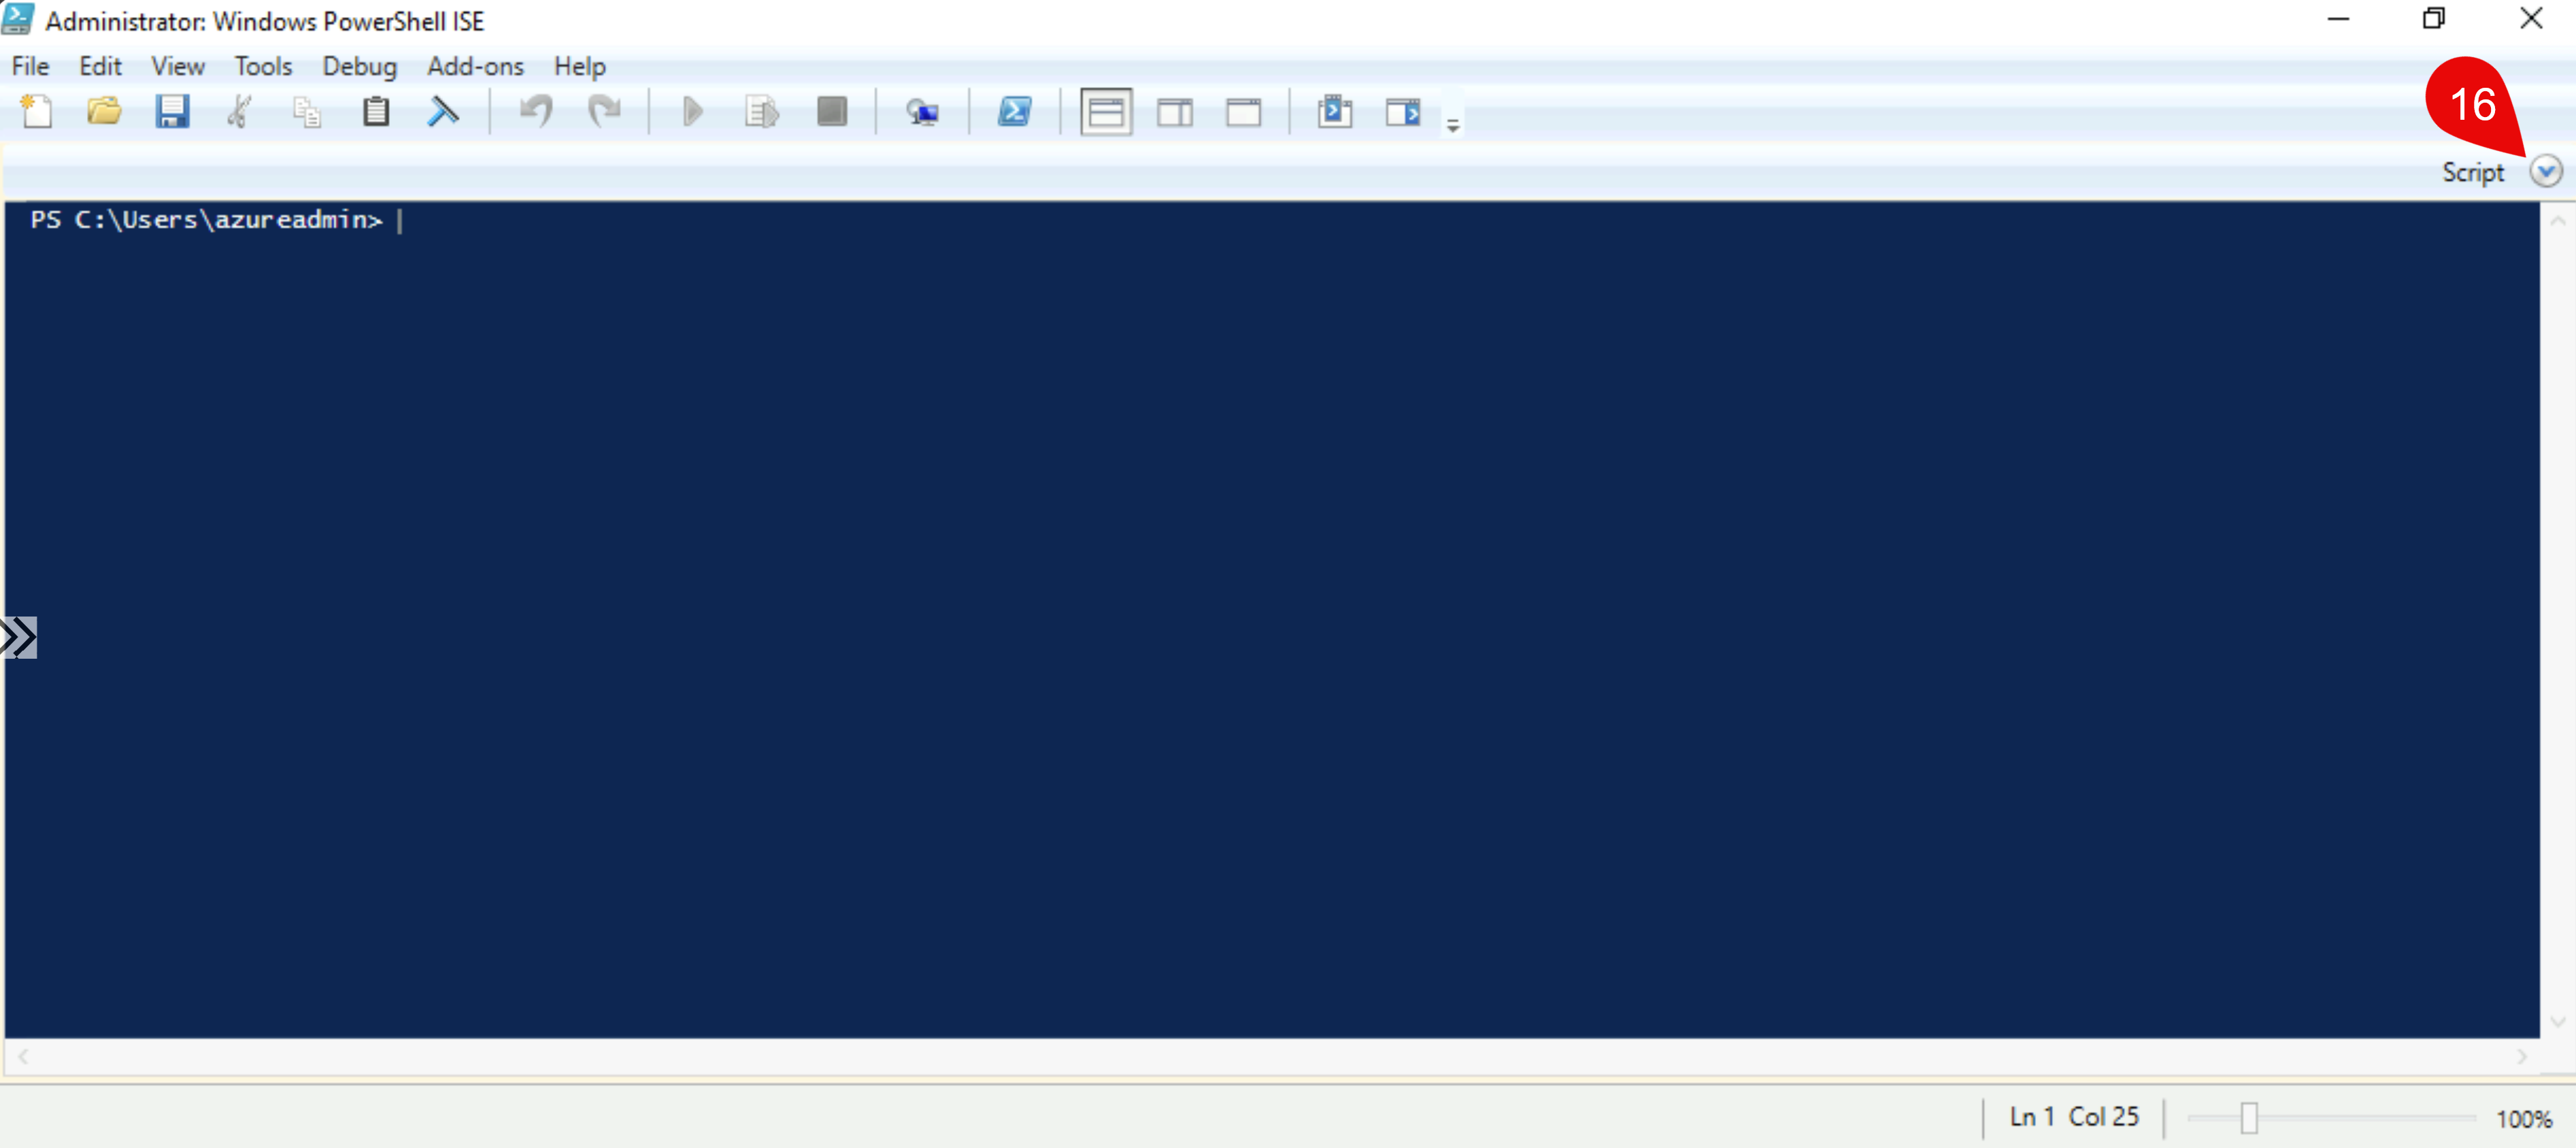
Use this script and overwrite this part in my deployment script, so you’ll have exactly what you’ll need for your own file storage. After you executed the deployment script (takes about 20 mins) copy the post deployment script (the last code block above) and copy it into PowerShell ISE, then run it:
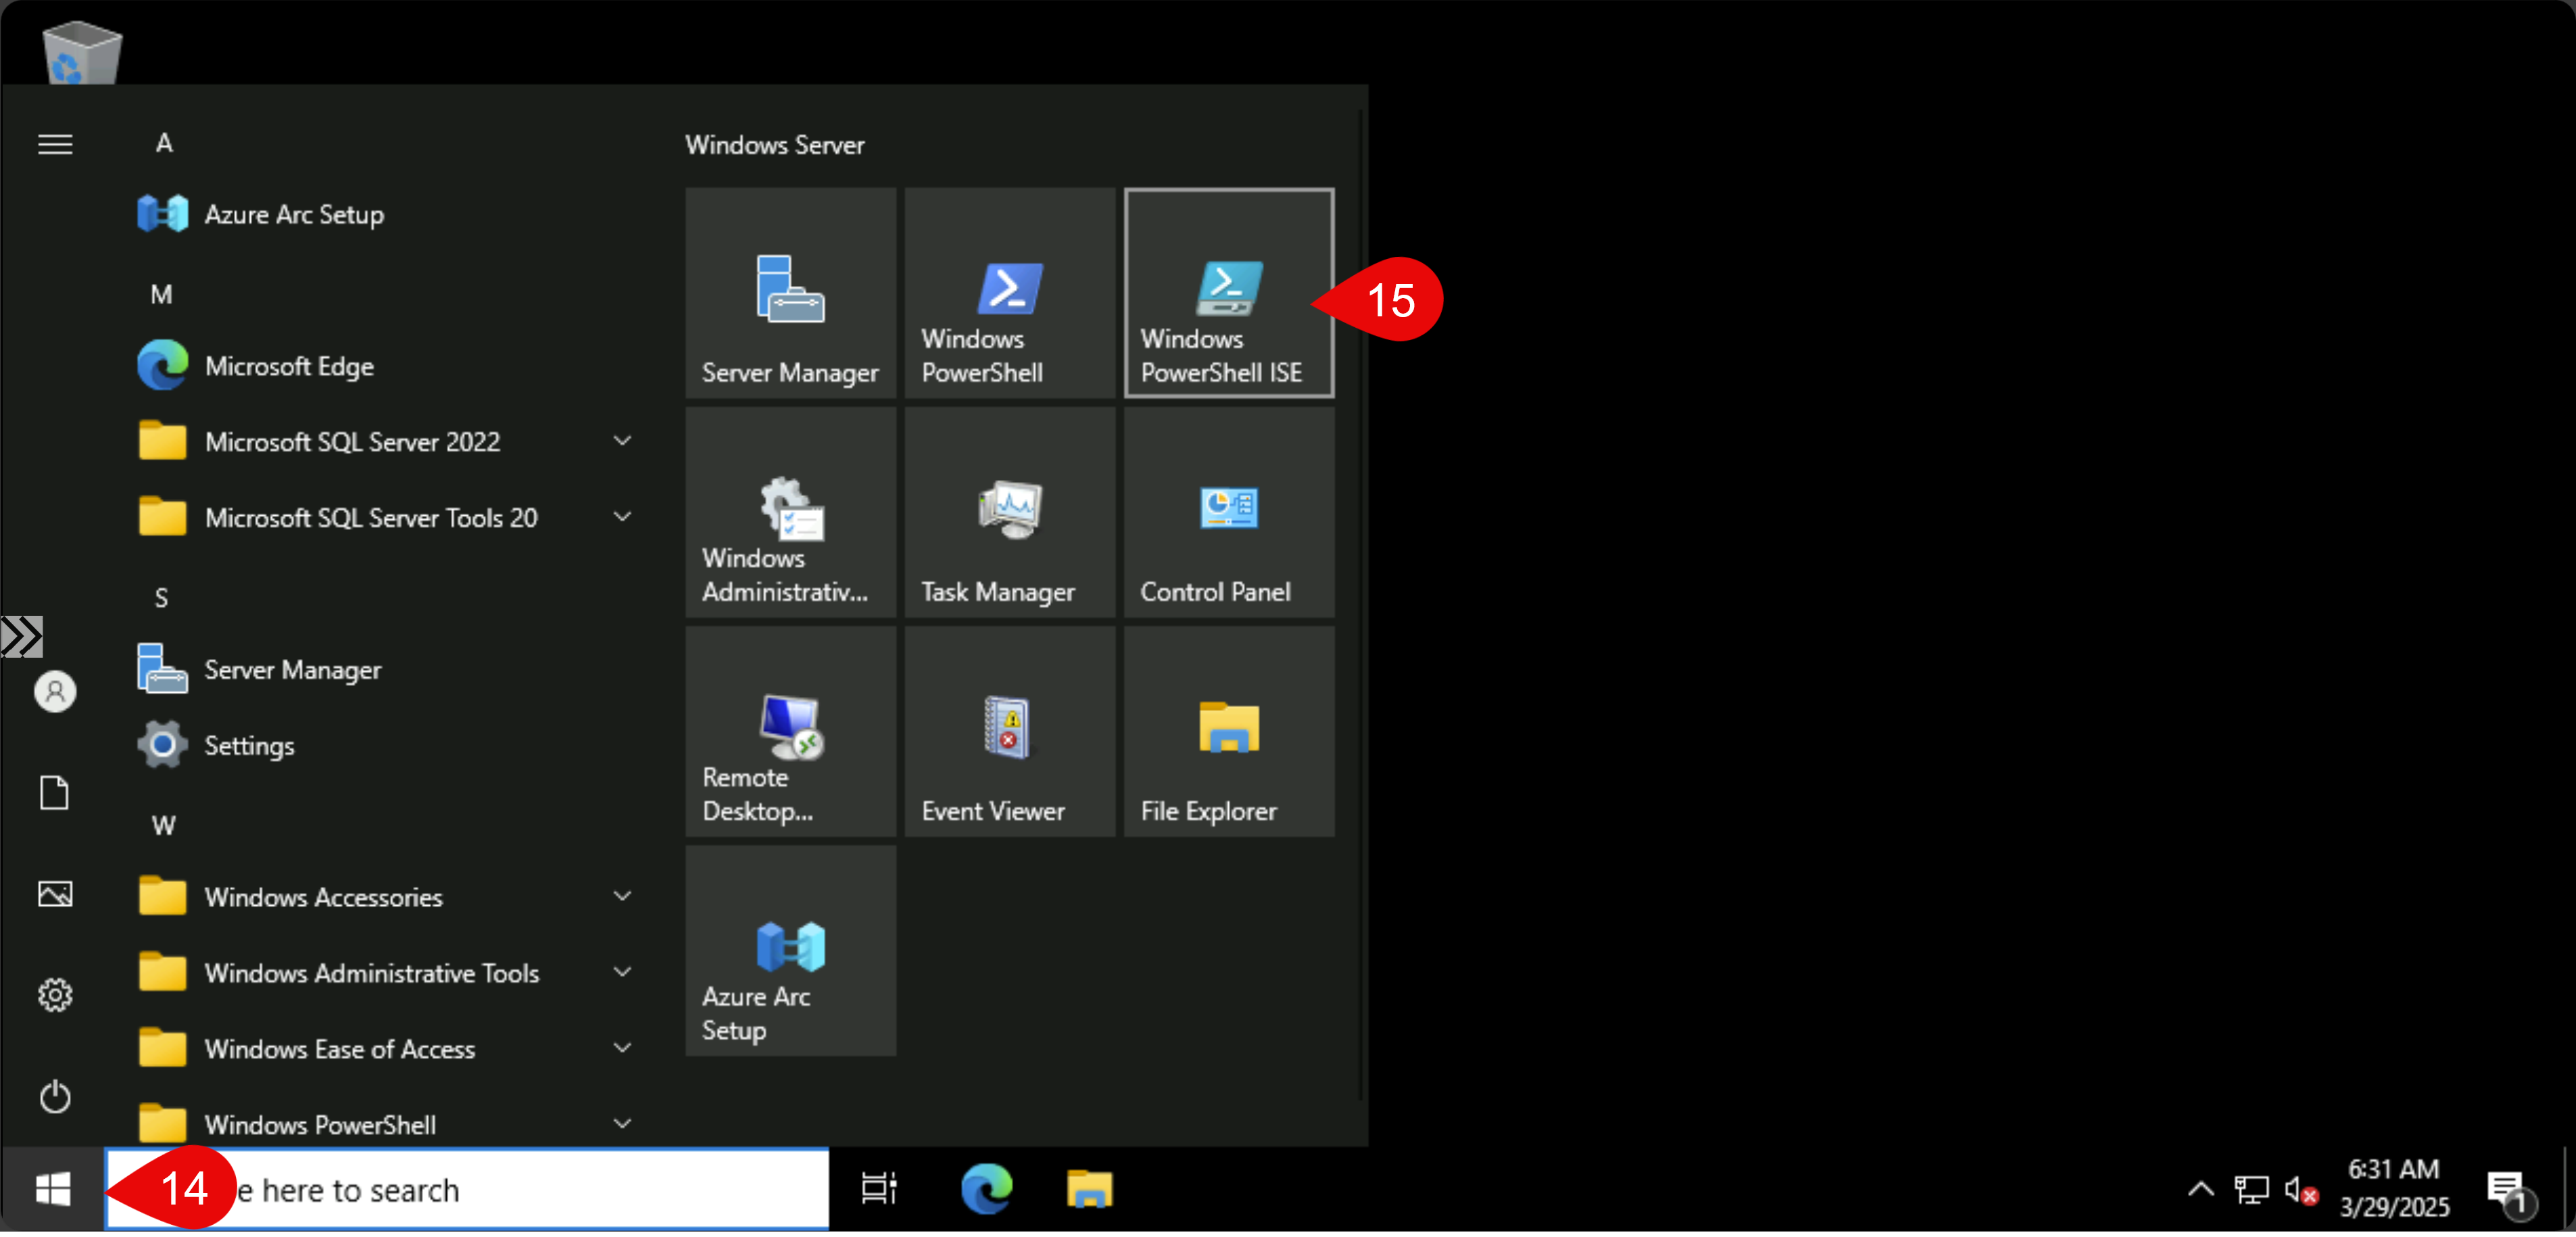

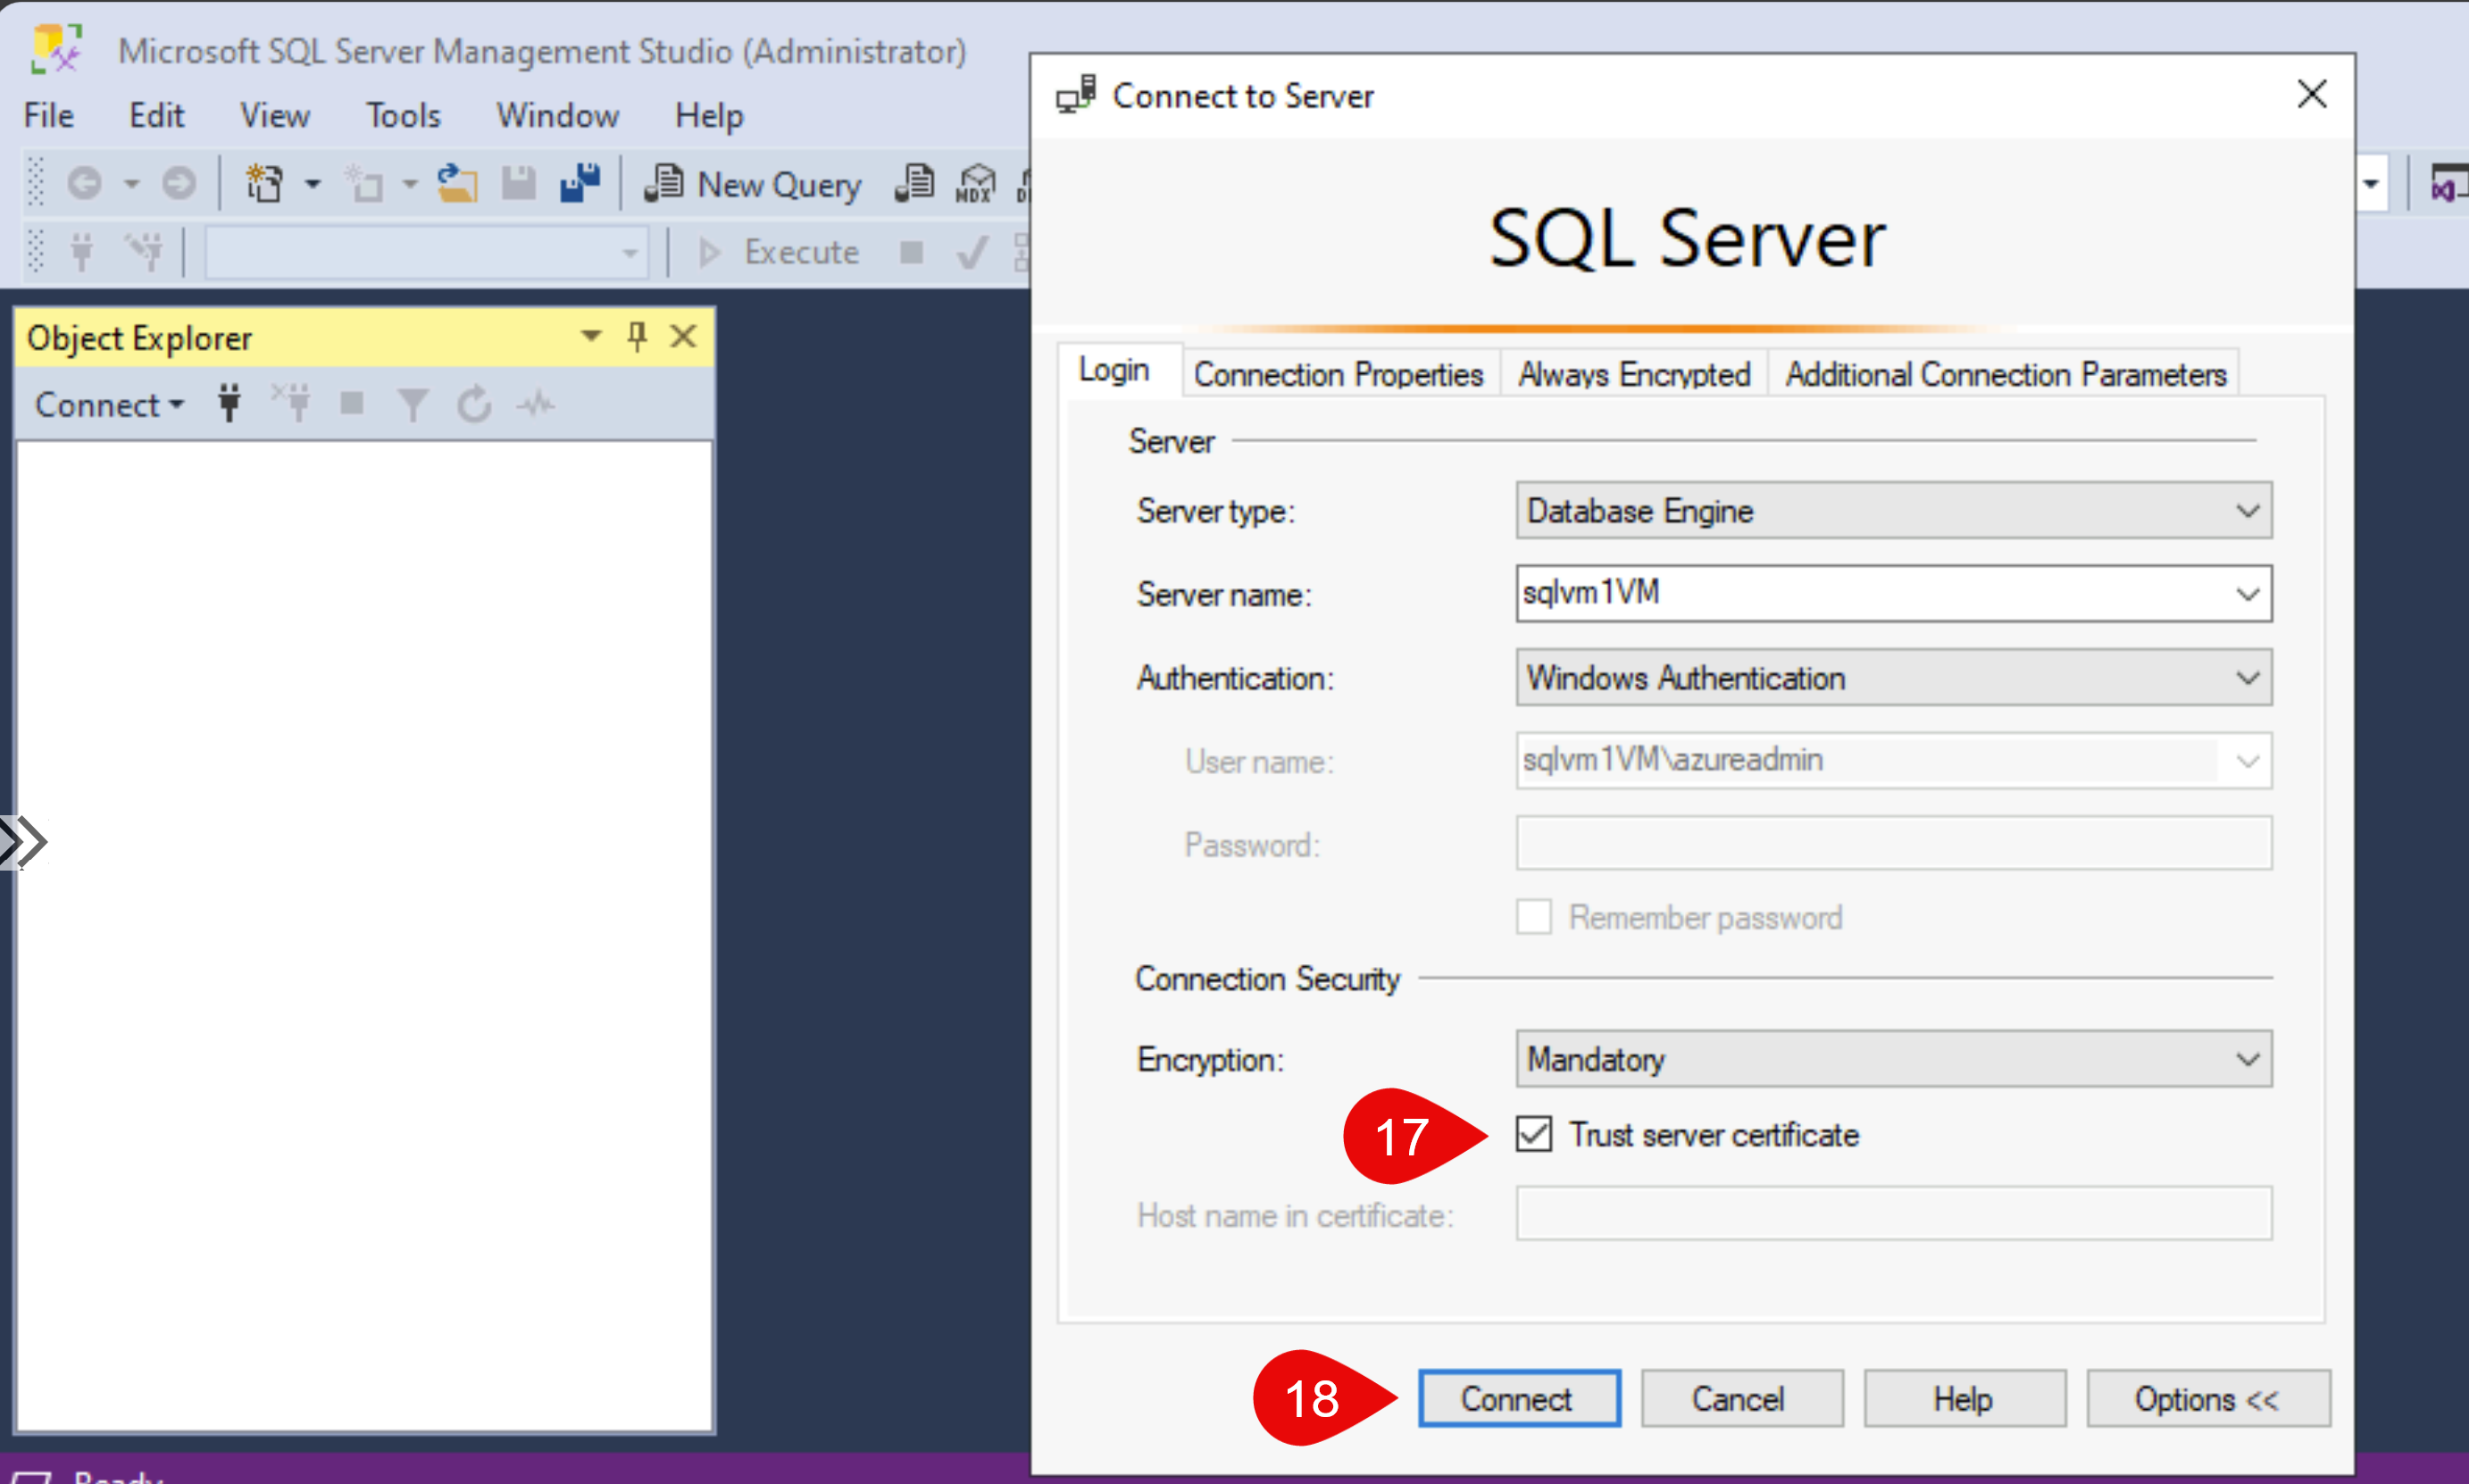
After you’ve run, open SSMS and make sure that you’ll tick “Trust server certificate” as we don’t have a server certificate on this VM.
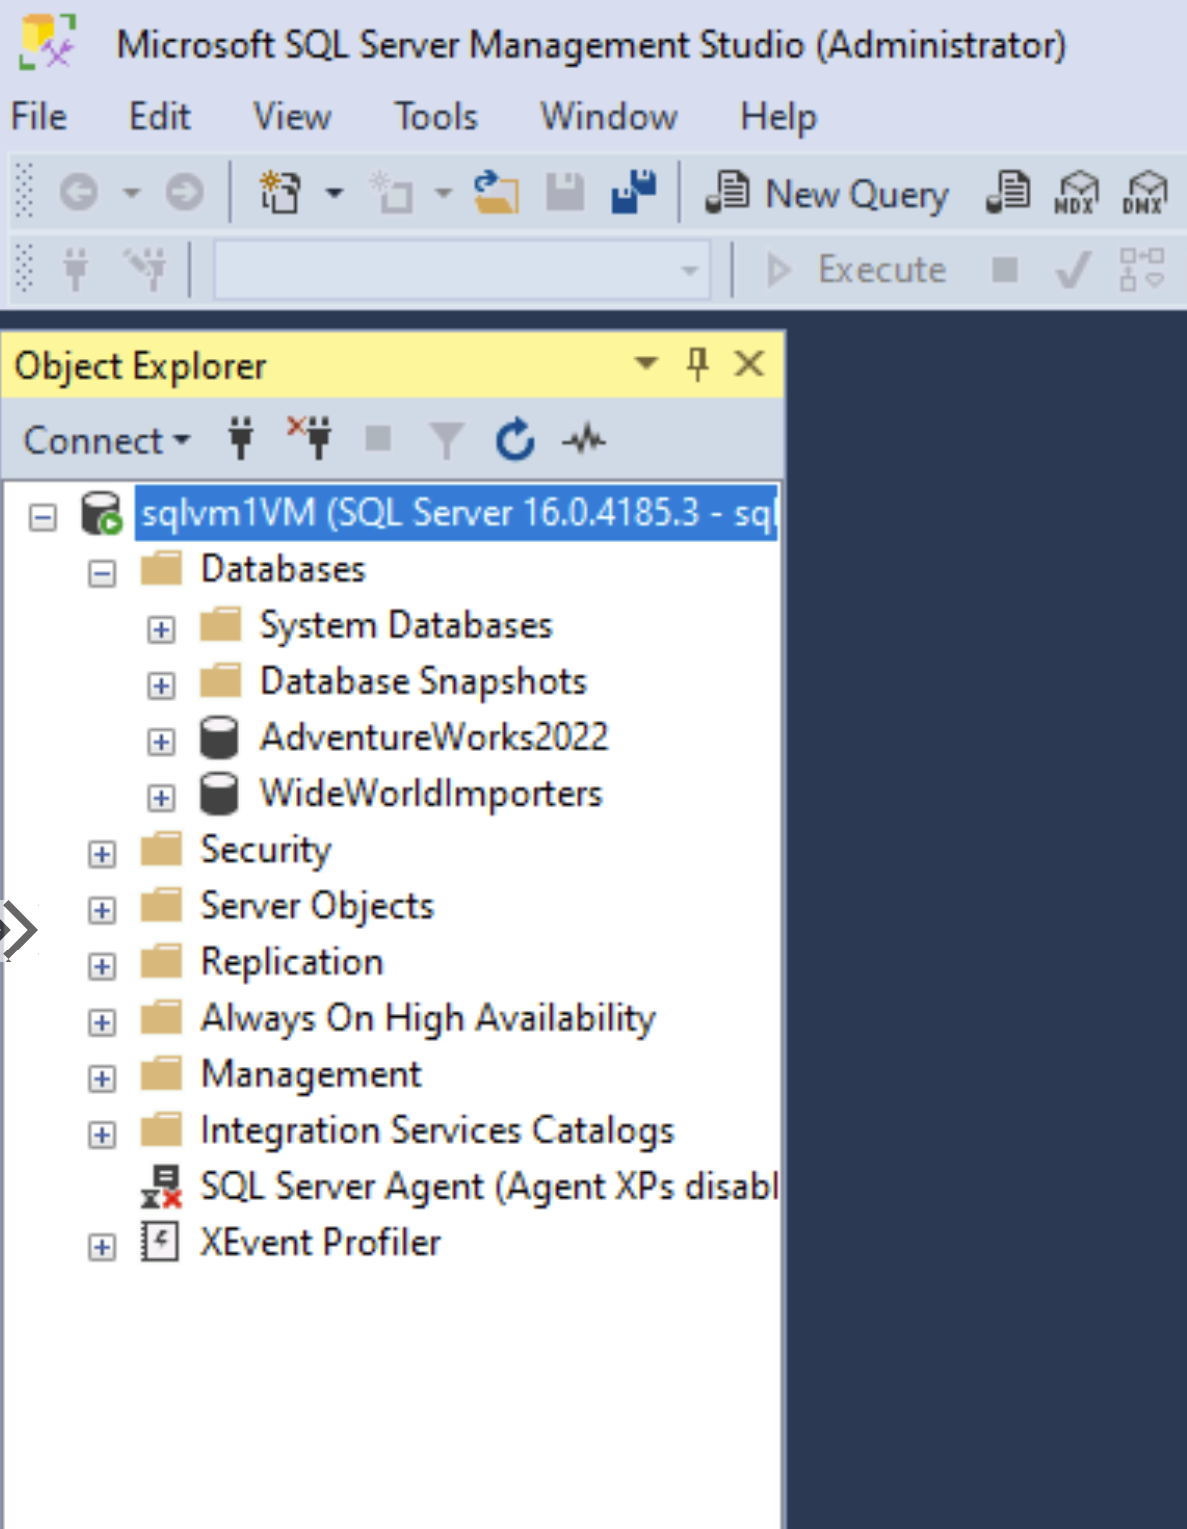
Now, finally, you’ll see that, in my example case, AdventureWorks2022 and WideWorldImporters got restored. The restore part was magically done by dbatools, with just a few lines of code!
Do you have any questions? Any feedback? Could I have done anything better? You want to give input to improve my code? Let me know in the comments or send me a message!
Subscribe to my newsletter
Read articles from Kay Sauter directly inside your inbox. Subscribe to the newsletter, and don't miss out.
Written by

Kay Sauter
Kay Sauter
Kay Sauter has been working with SQL Server since 2013. His expertise covers SQL Server, Azure, Data Visualization, and Power BI. He is a Microsoft Data Platform MVP. Kay blogs on kayondata.com and is actively involved in various community projects like Data TGIF, databash.live, data-conference.ch, and Data Platform Data Platform DEI Virtual Group. He is based in Zurich, Switzerland and in his free time, together with his wife, he loves to travel to discover new cultures and perspectives.