The Basics of MQTT for IoT
 Gabriela Madalosso
Over the past few months, I’ve been diving into small IoT projects as a cool hobby. With each project, I kept running into something called MQTT — this mysterious protocol that everyone seemed to be using to connect devices here and there. I tried it several times, it worked several times, but I didn’t really understand what was going on behind the scenes.
Eventually, I decided to dig deeper and learn how MQTT actually works and why it’s so widely used in the IoT world. That’s why I decided to write this article — to share what I’ve learned and to solidify my own understanding of what MQTT is all about.
So… let’s get started? 🚀
What is MQTT?
The first thing you’ll probably discover when you Google MQTT for the first time is that it stands for "Message Queuing Telemetry Transport" and that it’s a messaging protocol. Sounds complicated — and honestly, that doesn’t tell you much. Let’s try to make it simple…
At its core, MQTT is built around a very simple concept: it helps devices talk to each other. That’s it.
But not only that — it was designed to be a lightweight protocol, meant for devices with limited processing power, limited memory, or unreliable network connections. And those three conditions? They happen a lot in the IoT world.
Now, a little bit of a history lesson…
MQTT was originally developed back in 1999 by engineers at IBM, in collaboration with a company called Arcom. It was created for a very specific use case: monitoring oil pipelines via satellite networks. That meant the protocol had to be extremely efficient, consume as little bandwidth as possible, and work reliably even with unreliable or intermittent connectivity — all while running on low-power hardware out in the middle of nowhere.
That original design goal — reliability in harsh, low-resource environments — is exactly what makes MQTT such a smart choice for IoT today.
Today, MQTT is everywhere: powering smart homes, wearables, industrial systems, environmental monitoring, fleet tracking, and more. Its ability to transmit small packets of data quickly and efficiently has made it a go-to protocol for IoT developers across industries.
Now, this is all very interesting — but it begs the question: how does it actually do that? 🤔
How does MQTT work?
MQTT works by using a publish/subscribe model of communication.
Sounds complicated, but it’s actually very clever for one important reason: it allows devices to communicate without needing to know anything about each other.
Instead of sending messages directly from one device to another, everything goes through a central component called the MQTT broker (remember that name — it’s important).
Devices can publish messages to a topic (which is just a string that describes what the message is about), and other devices can subscribe to that topic to receive those messages.
It’s also important to note that devices can be both publishers (those that send messages) and subscribers (those that receive messages). These roles are not mutually exclusive — a device can do both at the same time, depending on what it needs to do.
Let’s take a look at an example to understand how this works:

Note: In this setup, all devices interact only via the MQTT broker — they’re not directly wired or connected to each other in any way.
In this diagram, we have the following devices:
A temperature sensor
- Publishes temperature measurements to the topic
home/temp
- Publishes temperature measurements to the topic
A fan
- Subscribed to the topic
home/fanand receives commandson/off
- Subscribed to the topic
A microcontroller
Subscribed to the topic
home/tempand receives temperature measurementsPublishes commands
on/offto the topichome/fan
All of these devices are connected to the MQTT broker, each playing a different role: the sensor is a publisher, the fan is a subscriber, and the microcontroller acts as both.
Now that all devices are connected through the MQTT broker, we can define a simple automation rule for how they interact:
The temperature sensor continuously publishes readings to the topic
home/temp(e.g.,28.5,30.2,31.0).The microcontroller, which is subscribed to
home/temp, receives each temperature value.Based on the temperature value, the microcontroller applies the following logic:
If the temperature is greater than or equal to 30°C, it publishes the message
onto the topichome/fan.If the temperature is below 30°C, it publishes the message
offto the topichome/fan.
The fan, which is subscribed to
home/fan, receives the message and turns itself on or off accordingly.
This setup allows the fan to automatically react to temperature changes in real time — without any of the devices needing to talk to each other directly. They all rely on the broker to route the right messages to the right place.
Hands-on Example
Alright, so let’s get our hands dirty and build a real-world example of MQTT communication using:
An ESP32
Three LEDs (+ 220Ω resistors)
A computer running a MQTT Broker
In this example, we’ll use the computer to manually publish messages to a topic named led. The ESP32 will be subscribed to this topic and will listen for messages in the format <color>:<state>, such as red:on or blue:off. Based on the message it receives, the ESP32 will turn the corresponding LED on or off. This demonstrates how a device can interpret structured MQTT commands and act as a remotely controlled IoT actuator.
Wiring
Below is the wiring diagram showing how to connect the ESP32 and the LEDs:
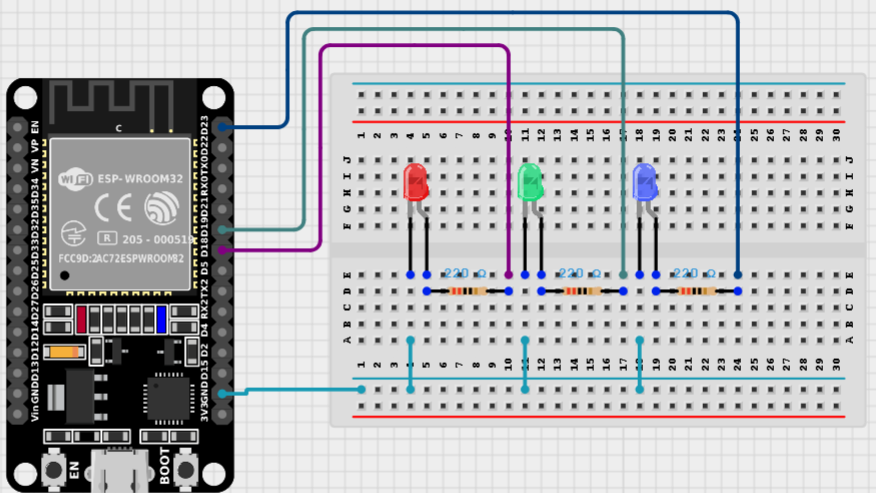
Note: This diagram was created using Cirkit Designer.
MQTT Setup
For this demonstration, I’ll be using Eclipse Mosquitto as the MQTT broker, installed and running directly on my Windows machine.
There are several MQTT brokers out there, but I chose Mosquitto because it’s lightweight, easy to set up, and perfect for small projects like this one.
If you’re interested in learning more or downloading it yourself, check out the official Mosquitto website:
➡️ https://mosquitto.org
I won’t go into detail on how to set up Mosquitto in this post — at least for now — since the focus here is on getting the ESP32 up and running.
For now, I’m running Mosquitto directly from the Windows command line, and it's available on my local network.
To send messages to the led topic, I’ll be using the Windows command line with the mosquitto_pub command. This allows me to manually publish messages to the broker and control the ESP32 remotely. Each message follows the format <color>:<state>, such as red:on or blue:off. The ESP32, which is subscribed to the led topic, receives these messages, parses the color and state, and turns the corresponding LED on or off accordingly. For example:
mosquitto_pub -h 192.168.3.126 -t led -m "red:on"
mosquitto_pub -h 192.168.3.126 -t led -m "green:on"
mosquitto_pub -h 192.168.3.126 -t led -m "blue:off"
When the ESP32 receives "red:on", it turns on the red LED. If it receives "blue:off", it turns off the blue one. This demonstrates how the ESP32 can act as an MQTT-controlled device, responding instantly to remote commands over the network.
Now that our broker is ready, let’s dive into the ESP32 code and make everything work together.
Code
Here’s the ESP32’s code used in this demonstration:
#include <WiFi.h>
#include <PubSubClient.h>

// Wi-Fi credentials
const char* ssid = "your-wifi-ssid";
const char* password = "your-wifi-password";

// MQTT Broker IP
const char* mqtt_broker_ip = "your-mqtt-broker-ip";

// ESP32 pins for the LEDs
const int redPin = 18;
const int greenPin = 19;
const int bluePin = 23;

WiFiClient espClient;
PubSubClient client(espClient);

// Connects ESP32 to Wi-Fi
void setup_wifi() {
  delay(10);
  Serial.println();
  Serial.print("Connecting to wifi");

  WiFi.begin(ssid, password);
  while (WiFi.status() != WL_CONNECTED) {
    delay(500);
    Serial.print(".");
  }
}

// Handles incoming MQTT messages
void callback(char* topic, byte* payload, unsigned int length) {
  String message;
  for (unsigned int i = 0; i < length; i++) {
    message += (char)payload[i];
  }

  Serial.print("Message received on topic ");
  Serial.print(topic);
  Serial.print(": ");
  Serial.println(message);

  // Parse the message format "color:state"
  int separatorIndex = message.indexOf(':');
  if (separatorIndex == -1) return;

  String color = message.substring(0, separatorIndex);
  String state = message.substring(separatorIndex + 1);

  bool turnOn = (state == "on");

  if (color == "red") {
    digitalWrite(redPin, turnOn ? HIGH : LOW);
  } else if (color == "green") {
    digitalWrite(greenPin, turnOn ? HIGH : LOW);
  } else if (color == "blue") {
    digitalWrite(bluePin, turnOn ? HIGH : LOW);
  }
}

// MQTT reconnect logic
void reconnect() {
  while (!client.connected()) {
    Serial.print("Attempting MQTT connection...");
    if (client.connect("ESP32Client")) {
      Serial.println("connected");
      client.subscribe("led");
    } else {
      Serial.print("failed, rc=");
      Serial.print(client.state());
      Serial.println(" — trying again in 5 seconds");
      delay(5000);
    }
  }
}

void setup() {
  pinMode(redPin, OUTPUT);
  pinMode(greenPin, OUTPUT);
  pinMode(bluePin, OUTPUT);
  Serial.begin(115200);

  setup_wifi();
  client.setServer(mqtt_broker_ip, 1883);
  client.setCallback(callback);
}

void loop() {
  if (!client.connected()) {
    reconnect();
  }
  client.loop();
}
This code uses two key libraries:
WiFi.h— provides the functionality for connecting the ESP32 to a Wi-Fi network. It’s part of the ESP32 core and handles all the networking.PubSubClient.h— a MQTT client library for Arduino-compatible devices. It allows the ESP32 to connect to an MQTT broker, publish messages and subscribe to topics.
Basically, this code makes the ESP32 act as an MQTT-controlled actuator. Once connected to the Wi-Fi network and the MQTT broker, it listens for commands on the led topic in the format <color>:<state>. It parses those messages and controls the LEDs in real time.
Demonstration
Here’s a quick video showing the ESP32 in action — LEDs turning on and off as messages are published to the MQTT topic:
Conclusion
I hope this article helped lay out the basics of MQTT in a clear and practical way — just as it helped me understand how the core of the protocol works behind the scenes.
Writing this article — from the research and building to the testing and debugging — really helped me understand how devices can communicate using MQTT.
I’m excited to take this understanding into my future IoT projects and I’ll definitely be sharing more of them here on the blog as I go.
Thanks for following along and see you in the next one!
Subscribe to my newsletter
Read articles from Gabriela Madalosso directly inside your inbox. Subscribe to the newsletter, and don't miss out.
Written by