Step-by-Step Approach to Use Onion Architecture in .NET
 Anil gurau
Alright, let's start coding! Before we dive into the code, let's quickly recap the core principles of Onion Architecture. If you want a more in-depth look, you can always check out my previous post on https://anilgurau.hashnode.dev/why-choose-onion-architecture-for-better-software-development-practicese.
But for those who just need a quick refresher, here's the gist:
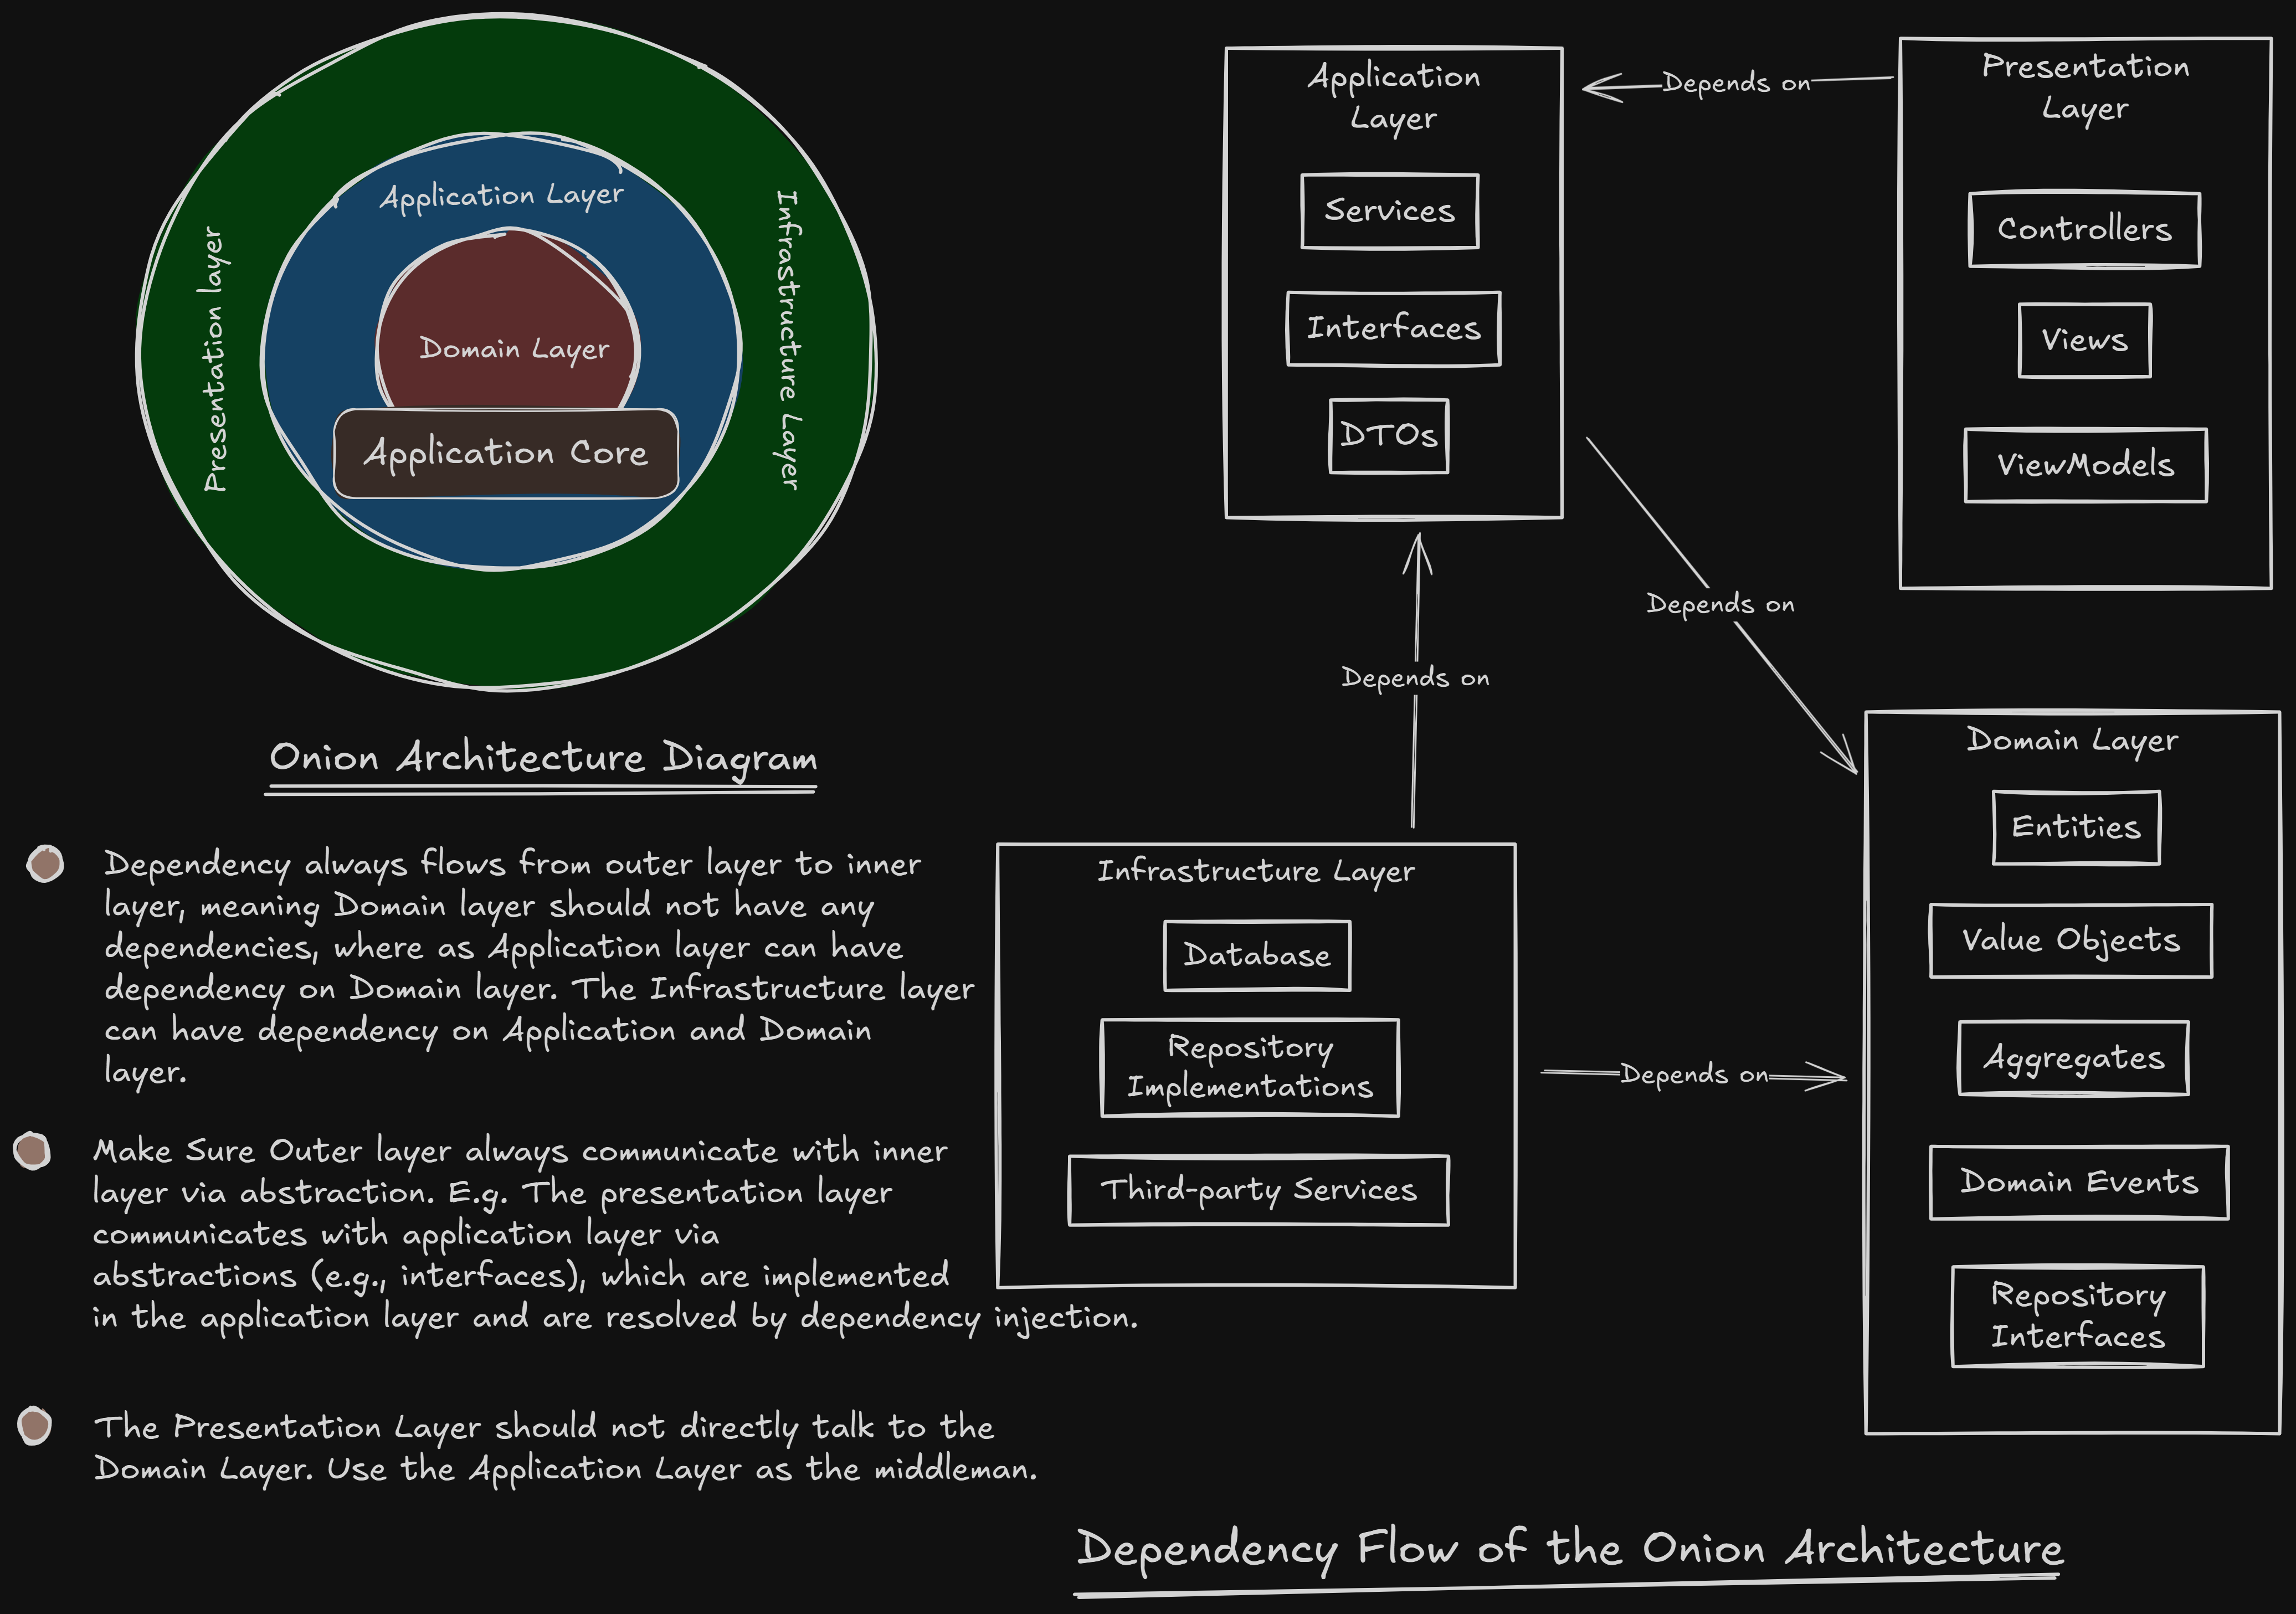
As you can see, the key idea is that dependencies point inwards, towards the domain core. But there's another crucial aspect: layers communicate exclusively through abstractions, not concrete implementations. This keeps our application flexible, maintainable, and testable. Each layer has a specific responsibility, and we'll be exploring how to implement them step by step in the following posts.
We're going to focus on the practical application of these principles, so let's get started!
Project Setup: Creating the Solution and Layers
Create Solution and Solution Folders:
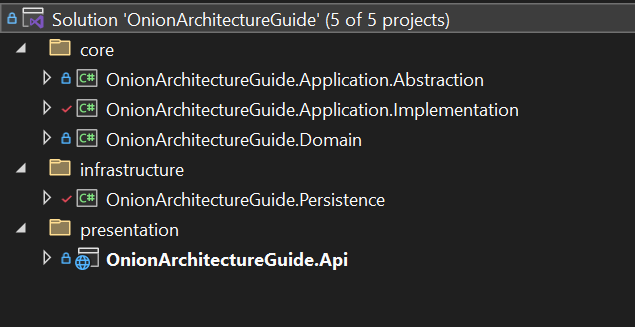
In Visual Studio, create a new "Blank Solution" named "
OnionArchitectureGuide".Create Solution Folders named "Core", "Infrastructure", and "Presentation".
Create Domain Layer:
- Inside the "Core" Solution Folder, add a new "Class Library (.NET Standard/.NET Library)" project named "
OnionArchitectureGuide.Domain".
- Inside the "Core" Solution Folder, add a new "Class Library (.NET Standard/.NET Library)" project named "
Create Application Layer:
Inside the "Core" Solution Folder, add a new "Class Library (.NET Standard/.NET Library)" project named "
OnionArchitectureGuide.Application.Abstraction".Inside the "Core" Solution Folder, add a new "Class Library (.NET Standard/.NET Library)" project named "
OnionArchitectureGuide.Application.Implementation".
Create Infrastructure Layer:
- Inside the "Infrastructure" Solution Folder, add a new "Class Library (.NET Standard/.NET Library)" project named "
OnionArchitectureGuide.Persistence".
- Inside the "Infrastructure" Solution Folder, add a new "Class Library (.NET Standard/.NET Library)" project named "
Create Presentation Layer:
- Inside the "Presentation" Solution Folder, add a new "ASP.NET Core Web API" project named "
OnionArchitectureGuide.Api".
- Inside the "Presentation" Solution Folder, add a new "ASP.NET Core Web API" project named "
Note: Application layer is split into OnionArchitectureGuide.Application.Abstraction and OnionArchitectureGuide.Application.Implementation. The Presentation layer communicates with the Application layer, but it should not have direct access to implementations. Placing service interfaces and their implementations together violates the principles of Onion Architecture and creates tight coupling between layers. The outer layer should interact with the inner layer only through abstractions, not concrete implementations.
Your Folder Structure Look like this:
Setting up Project Dependencies:
Now, we need to set up the project dependencies according to the Onion Architecture principles. Remember, dependencies should point inwards.
OnionArchitectureGuide.Application.ImplementationreferencesOnionArchitectureGuide.DomainandOnionArchitectureGuide.Application.Abstraction.OnionArchitectureGuide.InfrastructurereferencesOnionArchitectureGuide.Application.AbstractionandOnionArchitectureGuide.Domain.OnionArchitectureGuide.ApireferencesOnionArchitectureGuide.Application.Abstraction
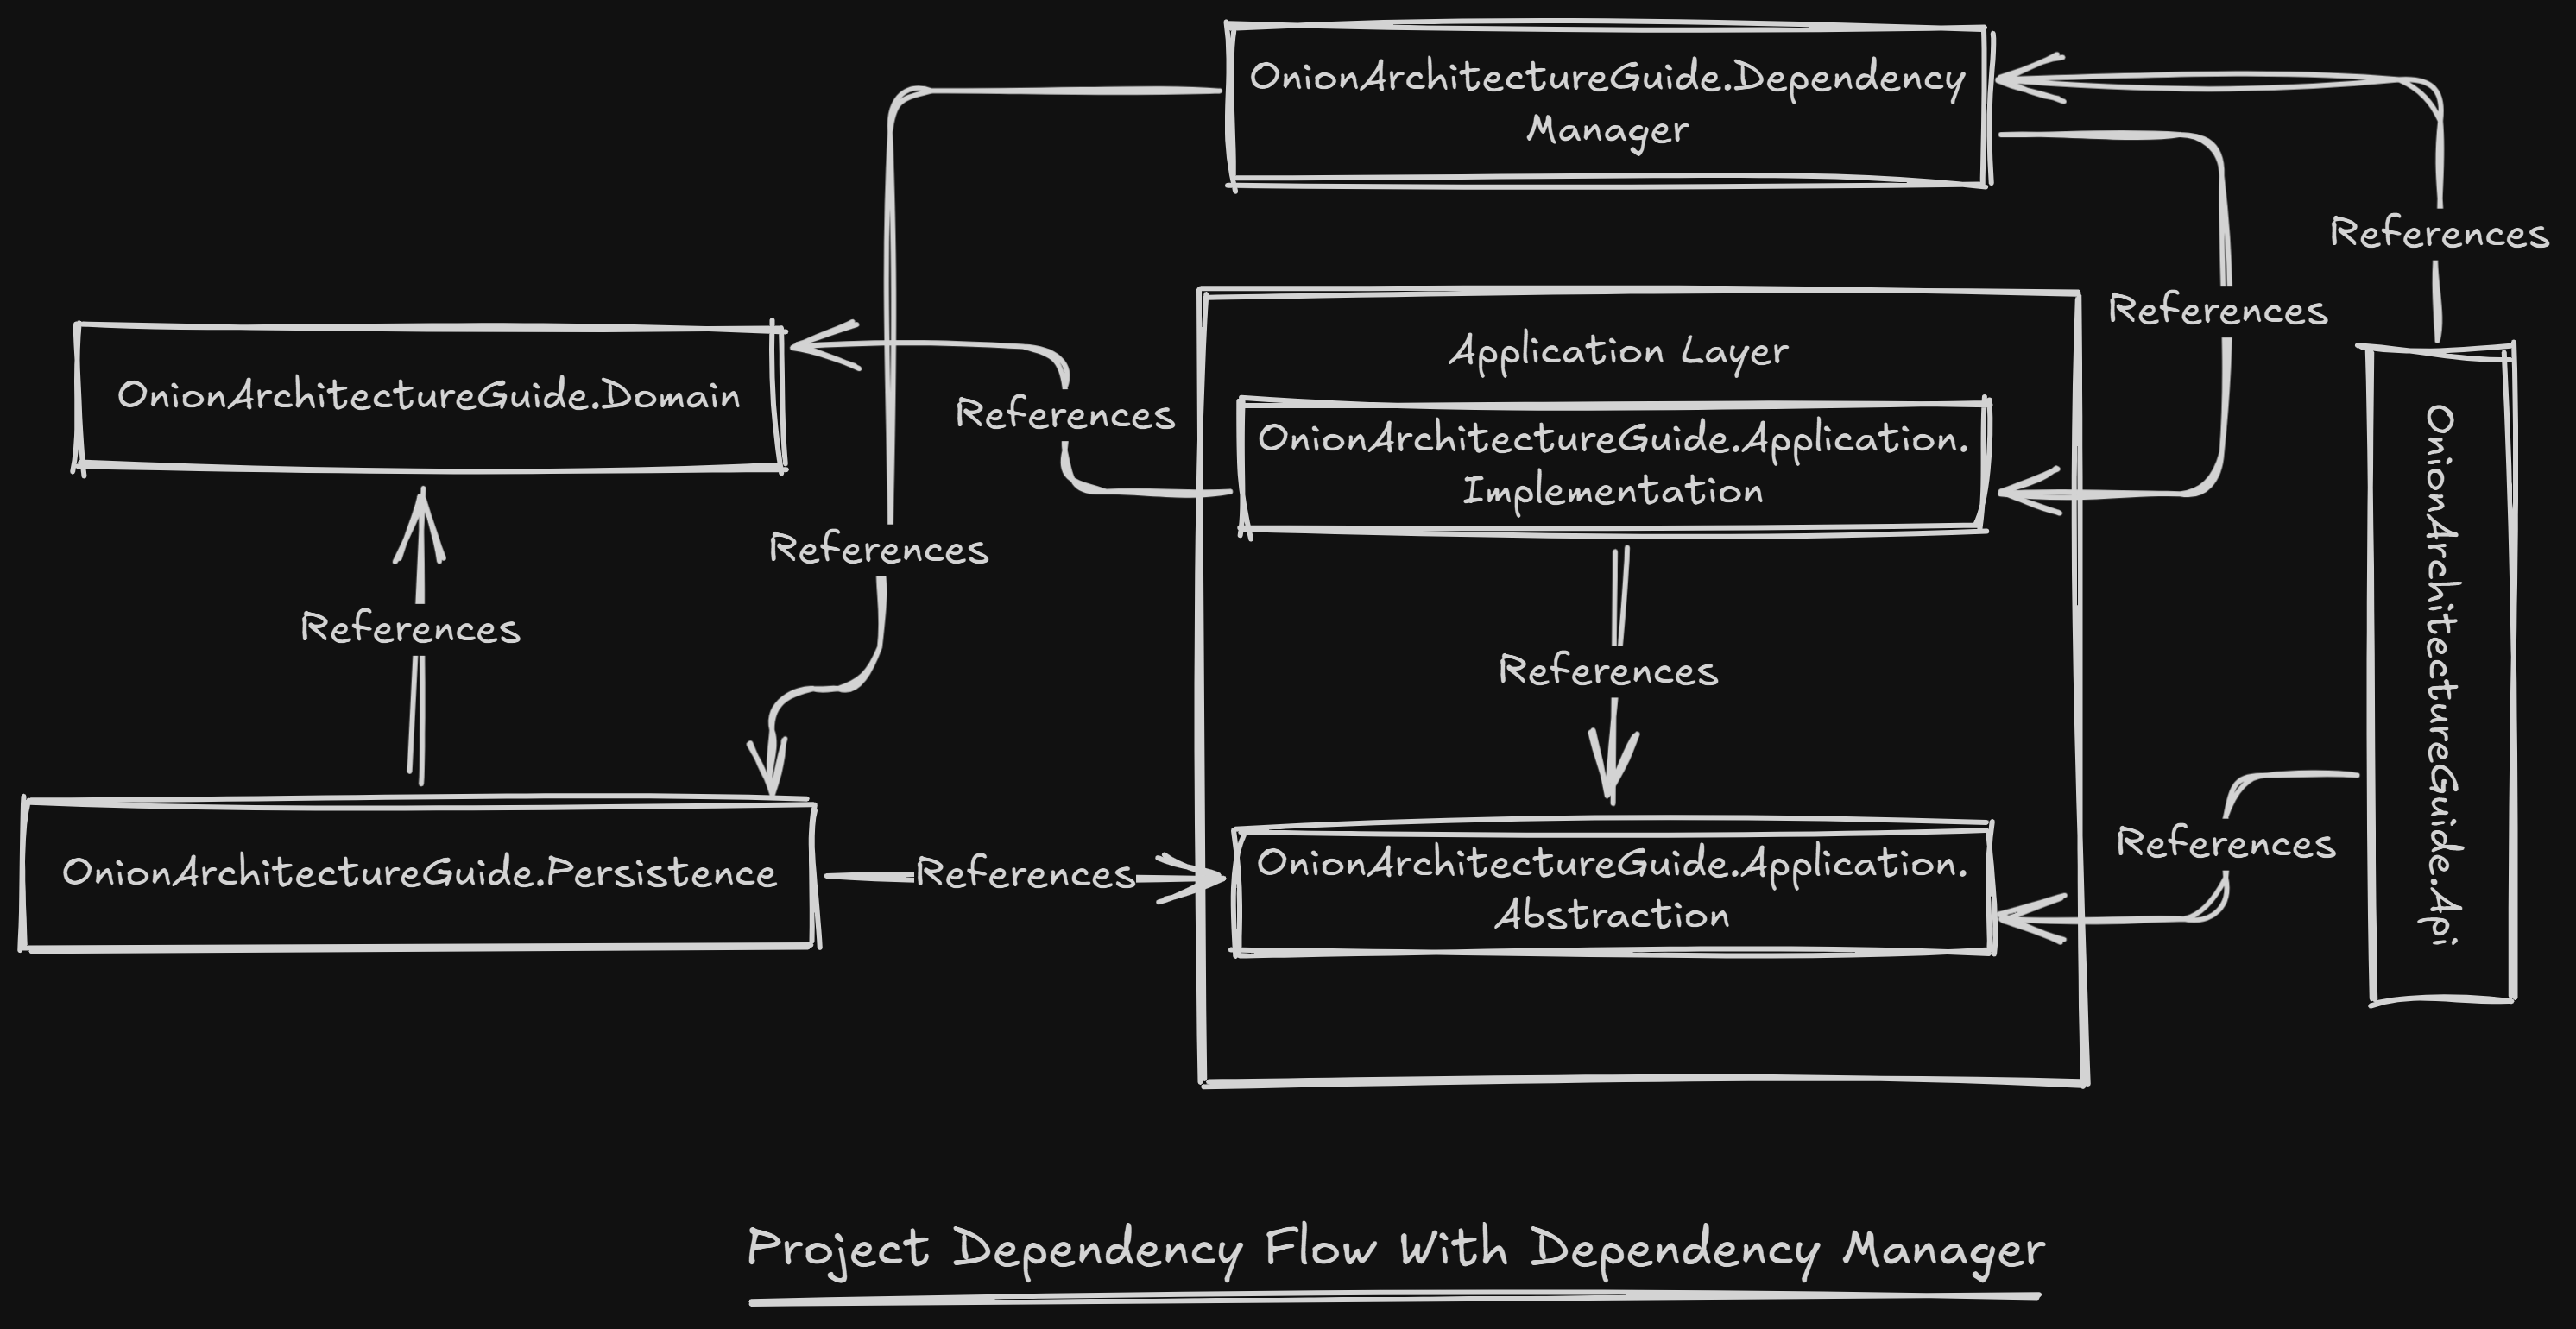
Here is a visual Representation of the Project Dependencies.
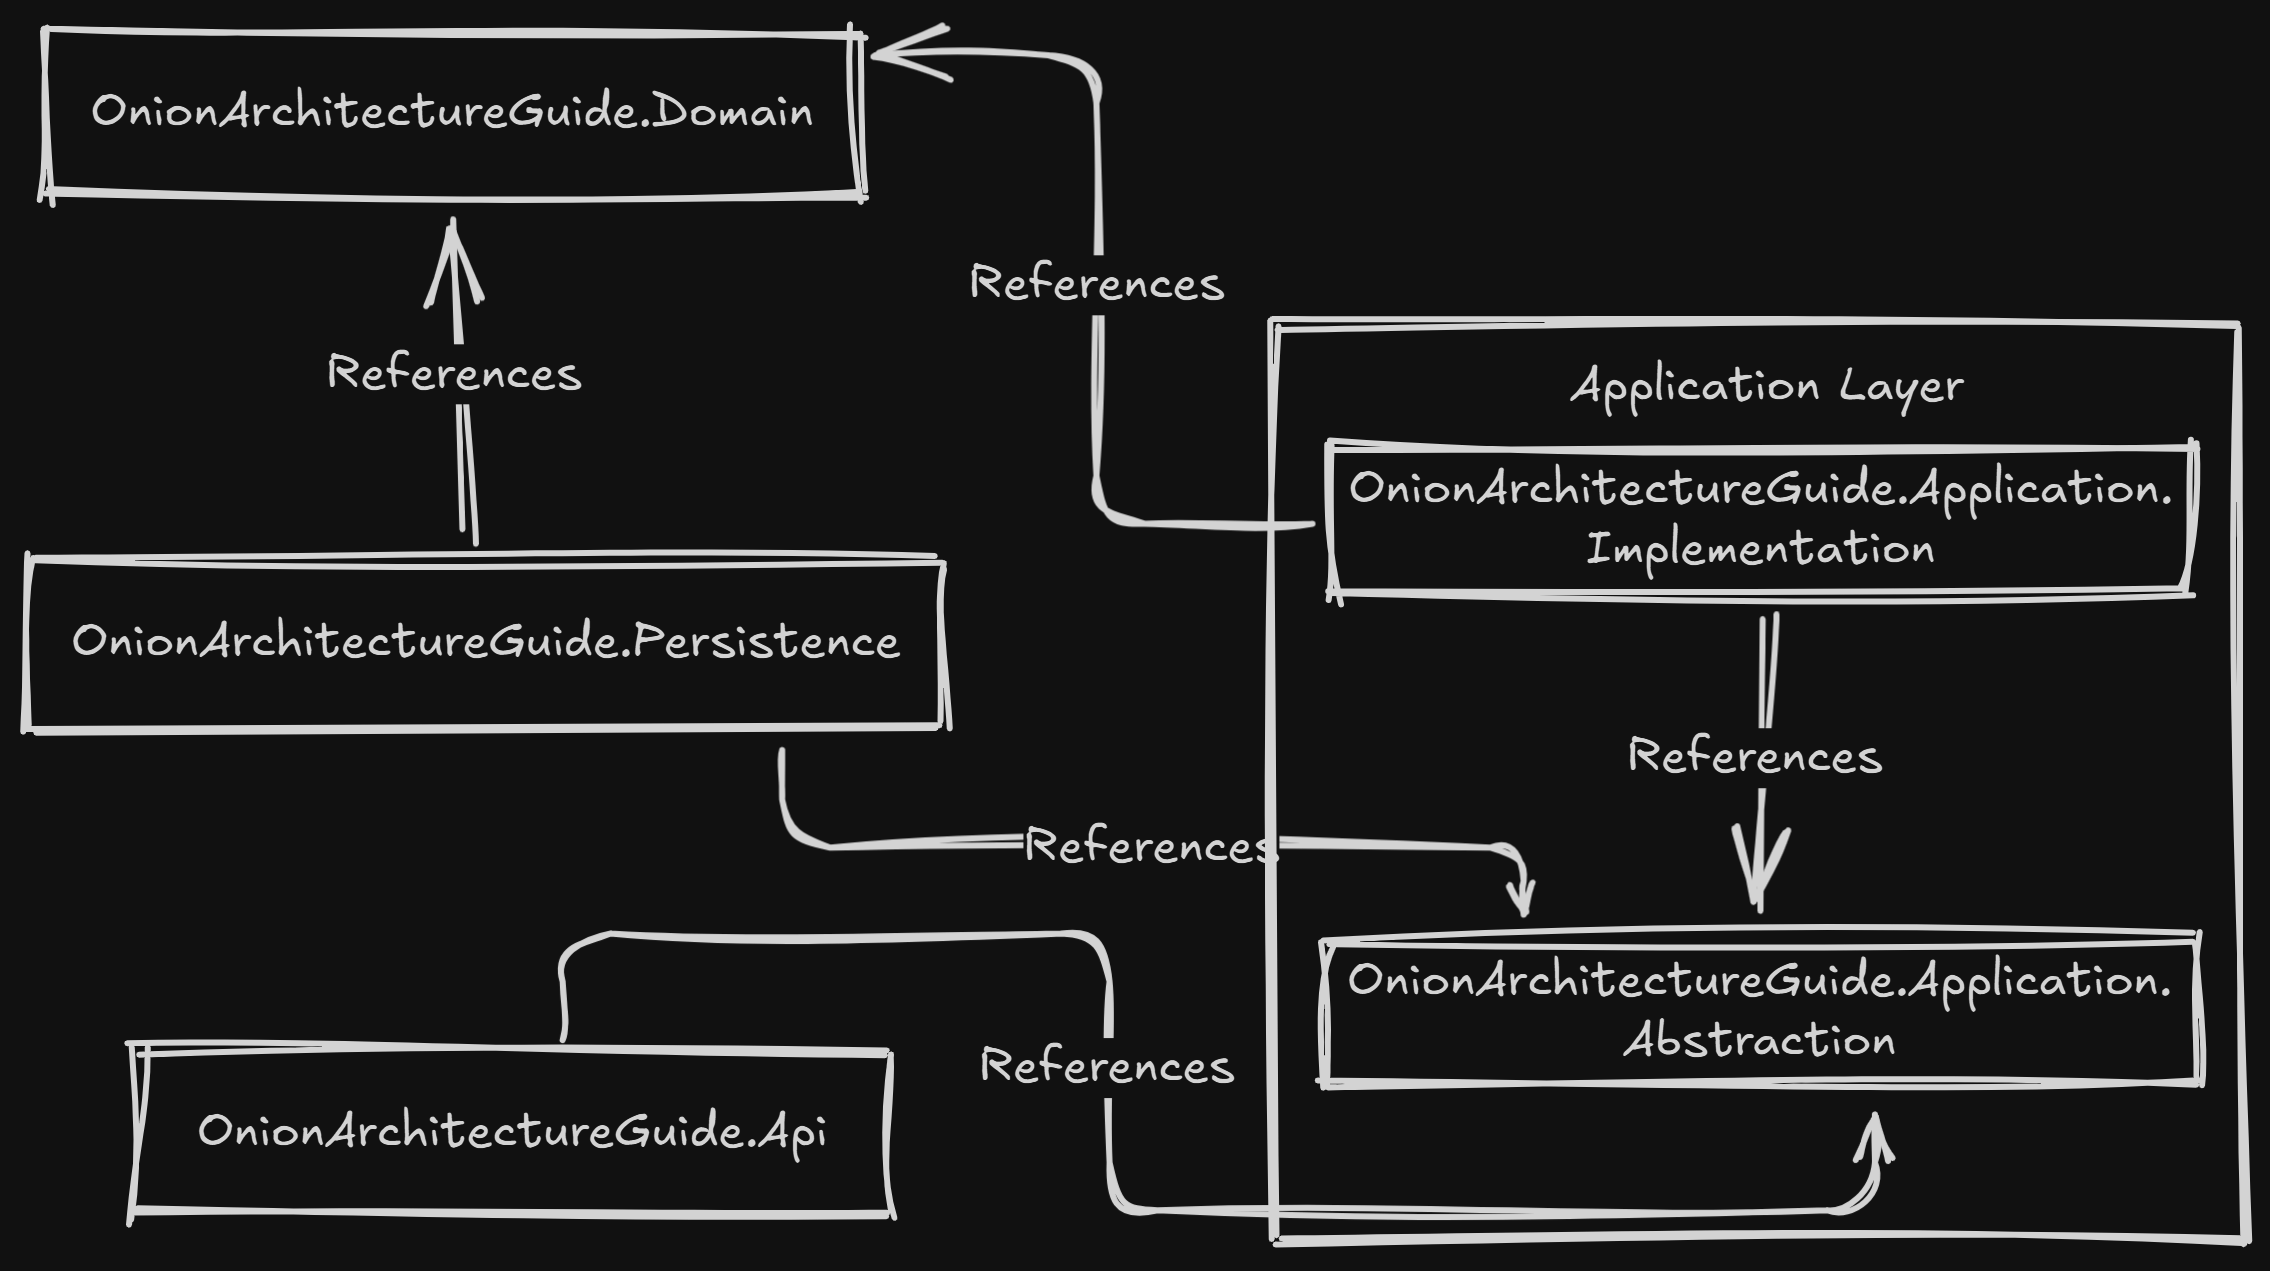
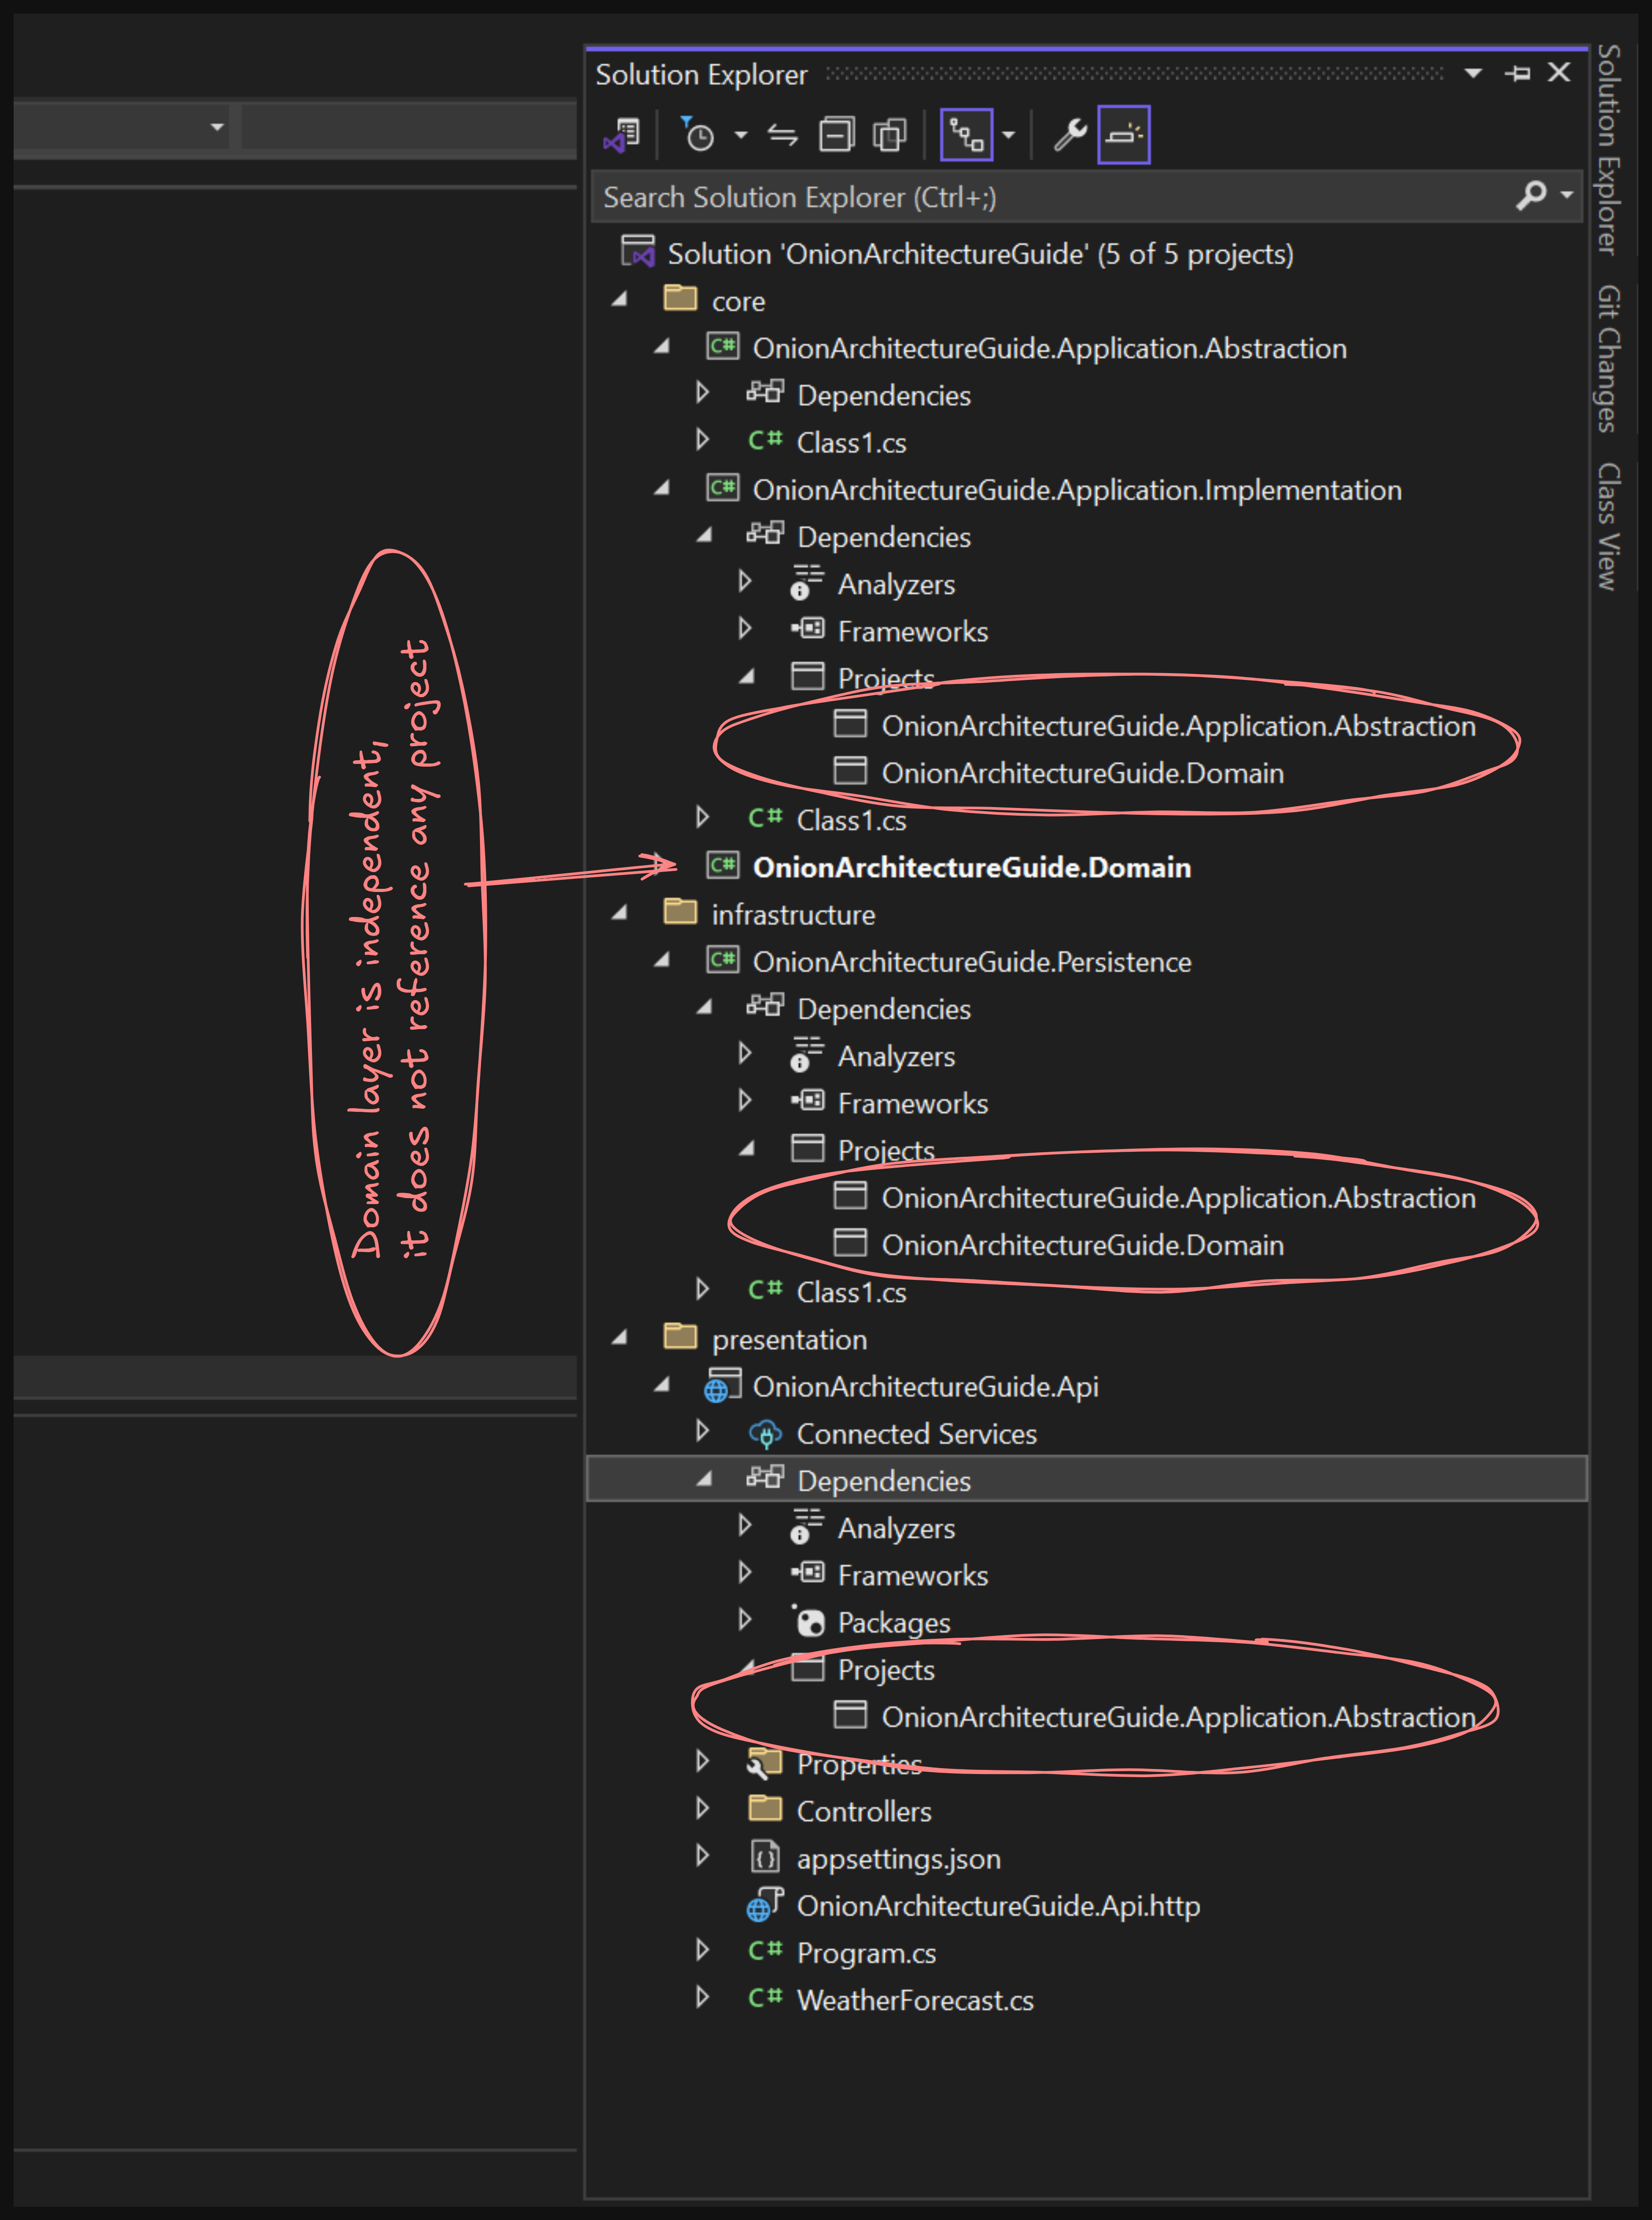
This dependency structure is crucial. The API depends on the Application layer, and Infrastructure depends on the Application and Domain Layer, and finally Application layer depends on the Domain layer. This keeps our core logic independent and allows us to easily swap out implementations. This inward dependency flow also ensures that changes in outer layers have minimal impact on the inner layers, enhancing stability. Furthermore, it allows for better testability as the core business logic can be tested in isolation.
We now have the basic project structure set up. In the next post, we'll start implementing Onion Architecture layer by layer.
Layer-by-Layer Implementation
Alright, we've laid the foundation, now lets construct Domain layer.
Constructing Domain Layer
Now, let's define our domain entities and repository interfaces within the OnionArchitectureGuide.Domain project. This layer holds our core business objects and their contracts.
Create Folder named Entities inside OnionArchitectureGuide.Core project and add classes:
public class Book
{
    public int BookId { get; set; }
    public string Title { get; set; }
    public DateTime PublishedOn { get; set; }
    public int AuthorId { get; set; }
    public Author Author { get; set; }
}
public class Author
{
    public int AuthorId { get; set; }
    public string Name { get; set; }
    public List<Book> Books { get; set; }
}
Create Contracts Folder inside OnionArchitectureGuide.Core project and add Repository Interfaces:
public interface IBookRepository
{
    Task<List<Book>> GetAllAsync();
}
public interface IAuthorRepository
{
    Task<List<Author>> GetAllAsync();
}
Your Domain layer should look like this:

The Core layer holds our domain model, free from external dependencies. This ensures core logic is reusable and maintainable.
Next, we'll create abstractions in the OnionArchitectureGuide.Application.Abstraction before implementing these contracts in the OnionArchitectureGuide.Application.Implementation.
Building Application Contracts (Abstraction)
Now that we've defined our domain entities and repository contracts in the Domain layer, let's move on to creating the application contracts in the OnionArchitectureGuide.Application.Abstraction project. This layer will define the DTOs and interfaces that our application services will implement.
Inside the OnionArchitectureGuide.Application.Abstraction project, create a folder named Contracts. This folder will hold our service interface definitions.
public interface IBookService
{
    Task<List<BookDto>> GetAllBooks();
}
public interface IAuthorService
{
    Task<List<AuthorDto>> GetAllAuthors();
}
Create DTOs Folder inside OnionArchitectureGuide.Application.Abstraction project and add Data transfer objects:
public class BookDto
{
    public int BookId { get; set; }
    public string Title { get; set; }
    public DateTime PublishedOn { get; set; }
}
public class AuthorDto
{
    public int AuthorId { get; set; }
    public string Name { get; set; }
}
Your OnionArchitectureGuide.Application.Abstraction project should look like this:
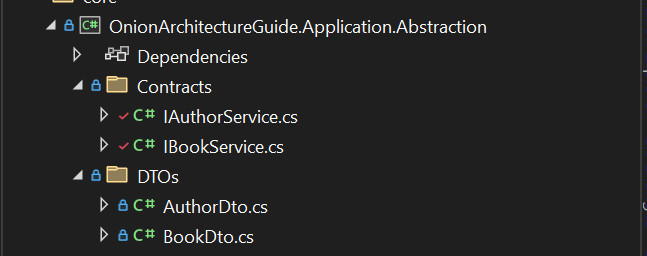
By defining these service interfaces and DTOs in a separate OnionArchitectureGuide.Application.Abstraction layer, we decouple our application's core logic from the specific implementations and the data transfer details. This allows us to easily switch out implementations or change data transfer formats without affecting the rest of the application.
Next, we'll implement these service contracts in the OnionArchitectureGuide.Application.Implementation.
Implementing Application Services
Alright, let's move on to the OnionArchitectureGuide.Application.Implementation project. We'll be focusing on implementing the service contracts and utilizing the DTOs we defined in the OnionArchitectureGuide.Application.Abstraction.
Before Implementing this layer, lets first install required packages from Nuget package manager or package manager console.
NuGet\Install-Package AutoMapper -Version 14.0.0
Lets Create Mapping Profiles now. Create Folder named Mappings inside OnionArchitectureGuide.Application.Implementation project and add AutoMapper profiles:
internal class ApplicationProfile: Profile
{
    public ApplicationProfile()
    {
        CreateMap<BookDto, Book>().ReverseMap();
        CreateMap<Author, AuthorDto>().ReverseMap();
    }
}
Create Folder named Services inside OnionArchitectureGuide.Application.Implementation project and add service implementations:
public class BookService : IBookService
{
    private readonly IBookRepository _bookRepository;
    private readonly IMapper _mapper;
    public BookService(IBookRepository bookRepository, IMapper mapper)
    {
        _bookRepository = bookRepository;
        _mapper = mapper;
    }
    public async Task<List<BookDto>> GetAllBooks()
    {
        return _mapper.Map<List<BookDto>>(await _bookRepository.GetAllAsync());
    }
}
internal class AuthorService : IAuthorService
{
    private readonly IAuthorRepository _authorRepository;
    private readonly IMapper _mapper;
    public AuthorService(IAuthorRepository authorRepository, IMapper mapper)
    {
        _authorRepository = authorRepository;
        _mapper = mapper;
    }
    public async Task<List<AuthorDto>> GetAllAuthors()
    {
        return _mapper.Map<List<AuthorDto>>(await _authorRepository.GetAllAsync());
    }
}
This layer contains the core business logic of our application. By keeping it separate from the presentation and infrastructure layers, we ensure that our business logic is reusable and testable.
Before implementing Infrastructure layer, lets register all the Dependencies for this layer.
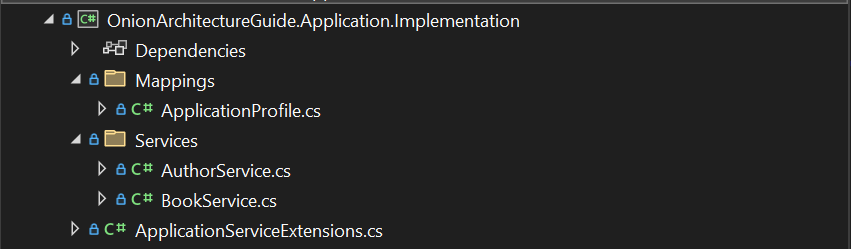
Create a file named ApplicationServiceExtensions.cs in the root level of the OnionArchitectureGuide.Application.Implementation project.
The OnionArchitectureGuide.Application.Implementation layer should look like this:
Now, register all the dependencies for this project:
public static class ApplicationServiceExtensions
{
    public static void AddApplicationServices(this IServiceCollection services)
    {
        //Registering all the automapper profiles
        services.AddAutoMapper(Assembly.GetExecutingAssembly());

        services.AddScoped<IBookService,BookService>();
        services.AddScoped<IAuthorService,AuthorService>();
    }
}
Next, we'll integrate the infrastructure layer to handle data access and implement repositories.
Integrating Infrastructure
Now that we've implemented our application services in the OnionArchitectureGuide.Application.Implementation project, let's integrate the Infrastructure layer (OnionArchitectureGuide.Persistence). The main purpose of this layer is to handle data access, external API integrations, and other infrastructure-related concerns. Since this is a simple implementation, we will only focus on data access and Repository implementation.
Make sure you have installed Microsoft.EntityFrameworkCore , Microsoft.EntityFrameworkCore.SqlServer and Microsoft.EntityFrameworkCore.Tools packages for SQL Server connection, Database operations and Migrations.
Run these commands in Package Manager Console:
NuGet\Install-Package Microsoft.EntityFrameworkCore -Version 9.0.3
NuGet\Install-Package Microsoft.EntityFrameworkCore.SqlServer -Version 9.0.3
NuGet\Install-Package Microsoft.EntityFrameworkCore.Tools -Version 9.0.3
After packages are installed, create Data Folder, which will hold our data access(DbContext).
internal class ApplicationDbContext : DbContext
{
    public ApplicationDbContext(DbContextOptions options) : base(options)
    {
    }

    public DbSet<Book> Books { get; set; }
    public DbSet<Author> Authors { get; set; }
}
Create Folder named Repositories, which holds the repository implementations that we declared in the domain layer.
internal class BookRepository : IBookRepository
{
    private readonly ApplicationDbContext _context;

    public BookRepository(ApplicationDbContext context)
    {
        _context = context;
    }

    public async Task<List<Book>> GetAllAsync()
    {
        return await _context.Books.ToListAsync();
    }
}
internal class AuthorRepository : IAuthorRepository
{
    private readonly ApplicationDbContext _context;

    public AuthorRepository(ApplicationDbContext context)
    {
        _context = context;
    }

    public async Task<List<Author>> GetAllAsync()
    {
        return await _context.Authors.ToListAsync();
    }
}
Now lets register all the dependencies for the Infrastructure layer in the Dependency Injection container.
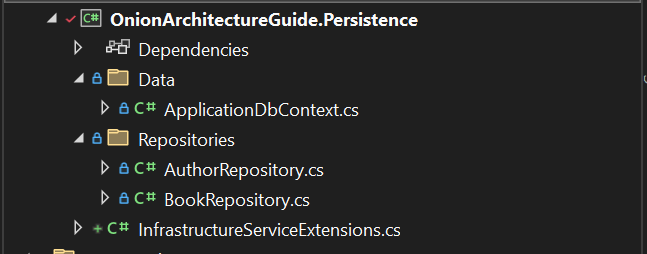
Create a file named InfrastructureServiceExtensions.cs in the root level of the OnionArchitectureGuide.Persistence project.
Your OnionArchitectureGuide.Presistence should look like this:
Register Infrastructure Dependencies as:
public static class InfrastructureServiceExtensions
{
    public static void AddInfrastructureServices(this IServiceCollection services, string connectionString)
    {
        //Registering Application DbContext and Seeding Values
        services.AddDbContext<ApplicationDbContext>(options =>
        {
            options.UseSqlServer(connectionString);
            options.UseSeeding((context, _) =>
            {
                var book = context.Set<Book>().FirstOrDefault();
                if (book == null)
                {
                    context.Set<Book>().AddRange(BookSeeds());
                    context.SaveChanges();
                }
            })
            .UseAsyncSeeding(async (context, _, cancellationToken) =>
                {
                    var book = context.Set<Book>().FirstOrDefaultAsync();
                    if (book == null)
                    {
                        context.Set<Book>().AddRange(BookSeeds());
                        await context.SaveChangesAsync();
                    }
                });

        });
        services.AddScoped<IBookRepository, BookRepository>();
        services.AddScoped<IAuthorRepository, AuthorRepository>();
    }
    private static List<Book> BookSeeds()
    {
        return new List<Book> {
            new Book { Title = "Book 1", Author= new Author(){ Name ="XXX"} },
            new Book { Title = "Book 2", Author= new Author(){ Name ="YYY"} }
            };
    }
}
Infrastructure layer isolates our application's core logic from specific data access and external dependencies. This allows us to easily switch out data access implementations or integrate with different external systems without affecting the rest of the application.
Next, we'll expose our application through an API in the Presentation layer.
Exposing the Application (API)
Now that we've integrated the Infrastructure layer, let's expose our application's functionality through an API in the Presentation layer. This layer will handle incoming requests and outgoing responses. We'll also configure our dependencies and set up the connection string for our data access.
Inside the OnionArchitectureGuide.Api/Controllers, add new API controllers BookController.cs and AuthorController.cs and create endpoints as shown below.
[Route("api/[controller]")]
[ApiController]
public class BookController : ControllerBase
{
    private readonly IBookService _bookService;
    public BookController(IBookService bookService)
    {
        _bookService = bookService;
    }

    [HttpGet("get-books")]
    public async Task<IActionResult> GetBooks()
    {
        return Ok(await _bookService.GetAllBooks());
    }
}
[Route("api/[controller]")]
[ApiController]
public class AuthorController : ControllerBase
{
    private readonly IAuthorService _authorService;

    public AuthorController(IAuthorService authorService)
    {
        _authorService = authorService;
    }

    [HttpGet("get-authors")]
    public async Task<IActionResult> GetBooks()
    {
        return Ok(await _authorService.GetAllAuthors());
    }
}
We're almost there, but first, we must register all necessary dependencies from OnionArchitectureGuide.Application.Implementation and OnionArchitectureGuide.Infrastructure.
Currently, our OnionArchitectureGuide.Api project only references OnionArchitectureGuide.Application.Abstraction. While we could add references to OnionArchitectureGuide.Application.Implementation and OnionArchitectureGuide.Infrastructure directly, I prefer to handle dependency registration in a separate class library dedicated to managing these dependencies. This keeps our API project cleaner.
The OnionArchitectureGuide.Api project should not directly communicate with OnionArchitectureGuide.Application.Implementation or OnionArchitectureGuide.Infrastructure via concrete implementations. We should avoid using ApplicationDbContext, repositories, or service implementations directly in the API project. This is why all implementations have internal access modifiers.
To achieve this, let's create a new "Class Library (.NET Standard/.NET Library)" project named OnionArchitectureGuide.DependencyManager within the 'Presentation' solution folder. Then, add project references to OnionArchitectureGuide.Application.Implementation and OnionArchitectureGuide.Infrastructure to this new project.
The Dependency Flow should look like this:
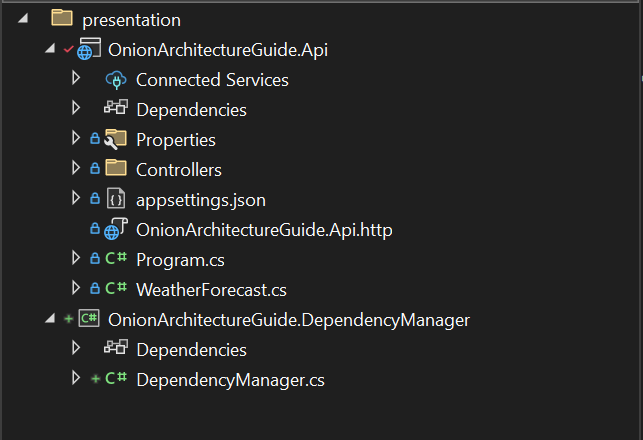
Here is a screenshot of the OnionArchitectureGuide.Api and Dependency Manager.
Lets manage dependencies:
public static class DependencyManager
{
    public static void RegisterApplicationDependencies(this IServiceCollection services)
    {
        services.AddApplicationServices();
    }

    public static void RegisterInfrastructureDependencies(this IServiceCollection services, string connectionString)
    {
        services.AddInfrastructureServices(connectionString);
    }
}
Register all Dependencies in Program.cs of OnionArchitectureGuide.Api project.
//Register Application and Infrastructure services using Dependency manager
// you can also register directly from OnionArchitectureGuide.Application.Implementation and OnionArchitectureGuide.Presistence
//E.g. builder.Services.AddApplicationServices(); and builder.Services.AddInfrastructureServices(builder.Configuration.GetConnectionString("DefaultConnection") ?? String.Empty);

builder.Services.RegisterApplicationDependencies();
builder.Services.RegisterInfrastructureDependencies(builder.Configuration.GetConnectionString("DefaultConnection")?? String.Empty);
Add ConnectionString to appsettings.json
"ConnectionStrings": {
  "DefaultConnection":  "Your connection string"
}
One last step before we run our application.
Running Migration:
Install Microsoft.EntityFrameworkCore.Design package in OnionArchitectureGuide.Api project, for the migration to work.
NuGet\Install-Package Microsoft.EntityFrameworkCore.Design -Version 9.0.3
Open Package Manager Console, set Default project to
OnionArchitectureGuide.Persistence.Set a Project Startup to
OnionArchitectureGuide.Api.Run:
Add-Migration InitialMigrationthenUpdate-Database
add-migration initialMigration
update-database
We're now ready to run our application. Ensure all dependencies are correctly registered and the connection string is properly configured before proceeding.
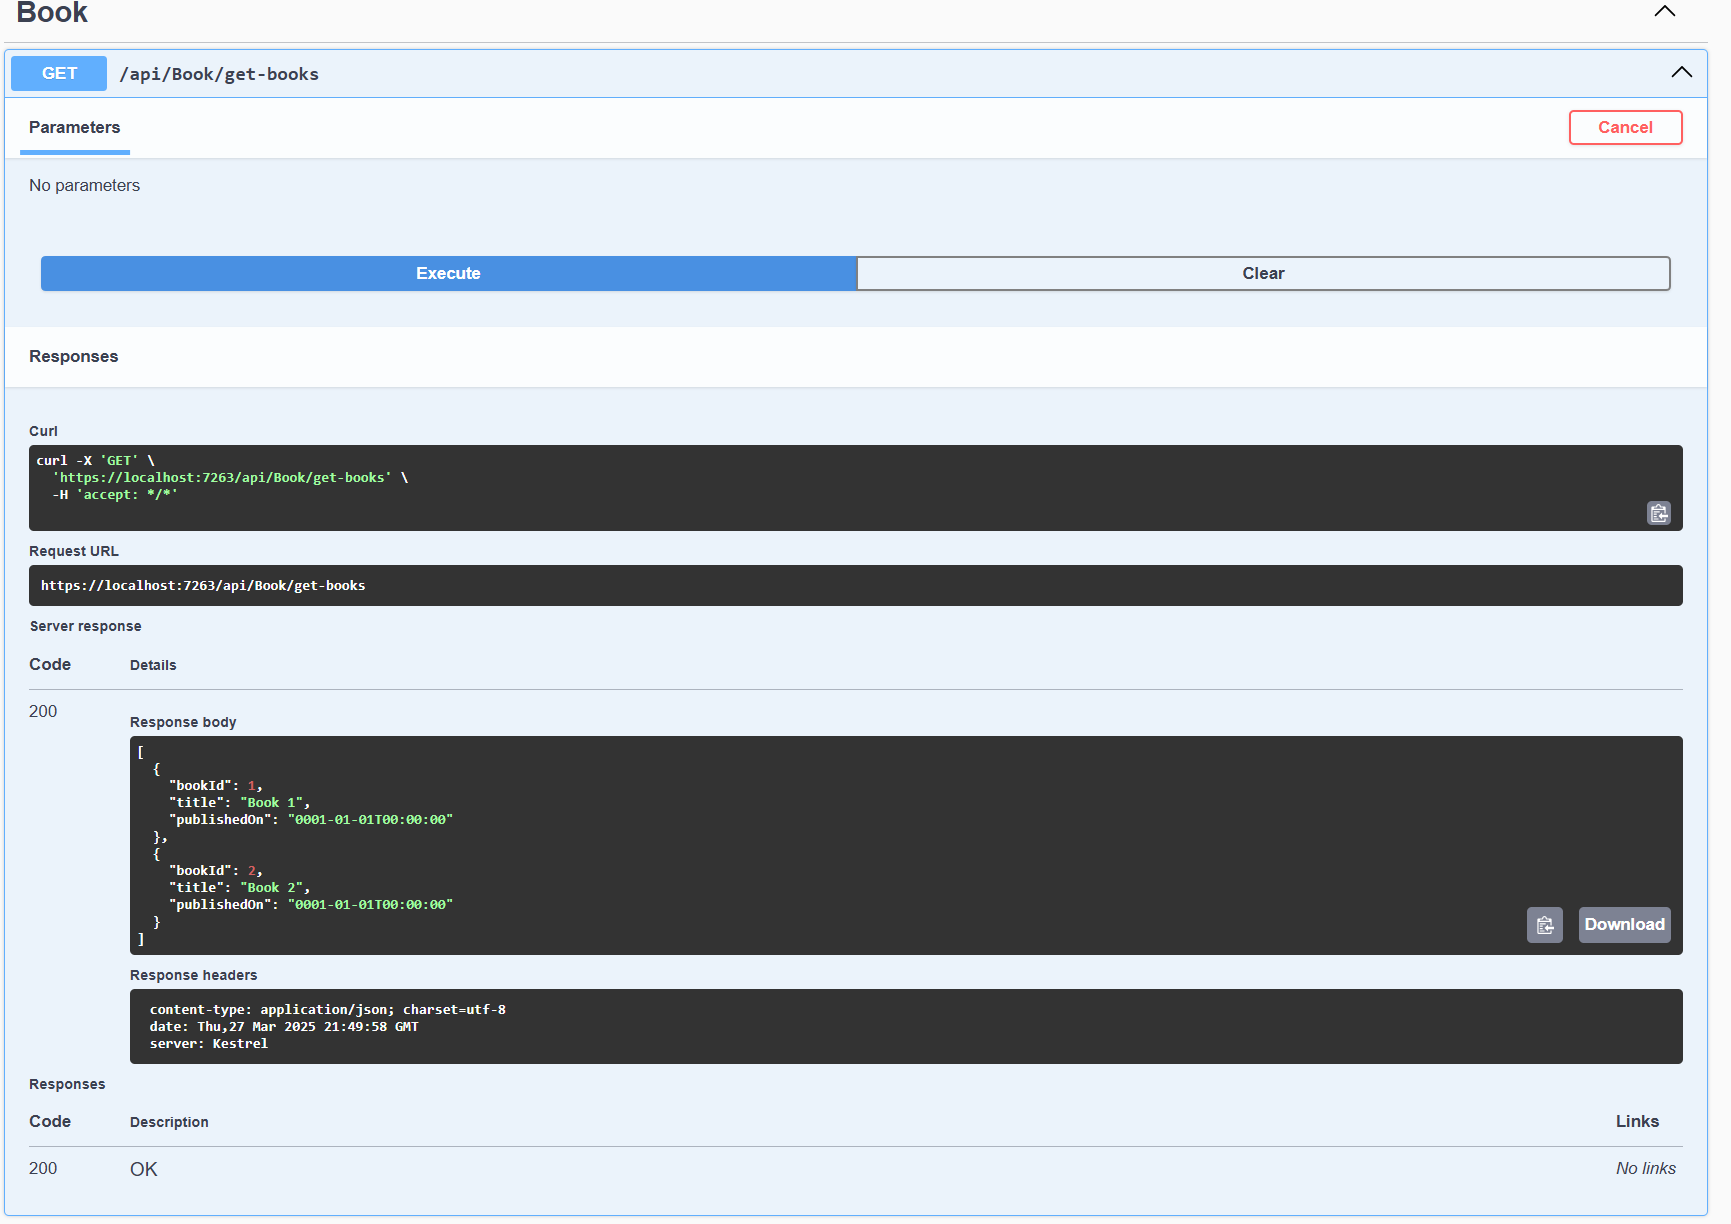
Run the
OnionArchitectureGuide.Apiproject.Use Postman or Swagger to send requests to the API endpoints.
Example Output:
Congratulations! You've successfully built a simple application using Onion Architecture. We've navigated through each layer, implementing the core logic and exposing it through an API.
Now that you've grasped the fundamentals, it's time to put this knowledge into practice. Start by exploring how you can apply these principles to your own projects. Consider:
Refactoring existing code: Identify areas where you can apply Onion Architecture to improve maintainability.
Expanding your application: Add new features and functionalities, ensuring they fit within the established architecture.
Experimenting with different technologies: Explore how Onion Architecture can be adapted to various databases, frameworks, and external systems.
Keep exploring, keep coding, and keep building robust applications. Thank you for joining me on this practical journey. Happy Coding!
Subscribe to my newsletter
Read articles from Anil gurau directly inside your inbox. Subscribe to the newsletter, and don't miss out.
Written by