Streamlining Configuration Management: Using Spring Cloud Config Server with Git and Vault
 Shailendra Singh
In modern software development, managing configurations efficiently is crucial for maintaining scalable and secure applications. Spring Cloud Config Server provides a centralized approach to handling externalized configurations across distributed systems. In this article we will learn to implement Spring Cloud Config server with GIT and Hashicorp Vault. Additionally, we will discuss how to leverage EnvironmentPostProcessor to minimize the code changes when adding Vault to an existing system.
What is Spring Cloud Config Server?
Spring Cloud config server is a sub-project within the Spring’s Spring Cloud project. It helps to externalize configuration properties in a distributed system (like microservices) to a central place like GIT, Vault, file system etc. or combination of these. It allows applications to retrieve config properties from a central source, ensuring consistency and ease of management.
Key Features of Spring Cloud Config server
Centralized configuration management
Can work with multiple backends like GIT, Vault, File system, JDBC
Dynamically refresh properties without needing to restart the application
Secure storage and retrieval of sensitive data (by storing secrets in vault)
How It Integrates with Spring Boot application?
In a Spring Boot application, using config server is as easy as setting the property spring.config.import in application.yml or application.properties file. This property will configure the application to be able to load the properties from Spring Config Server.
Implementing Spring Cloud Config Server with GIT
We will first create a GIT repository with the config properties for different environments and add some properties like DB configuration and others.

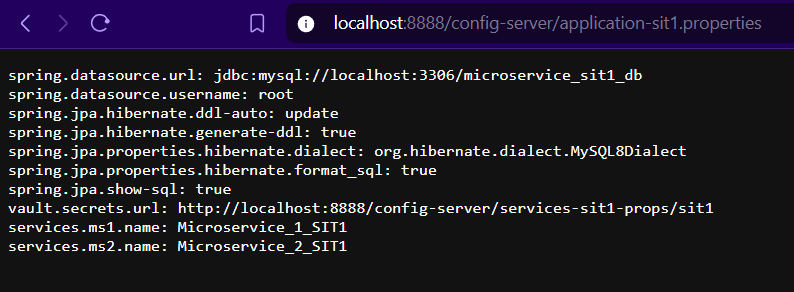
application-sit1.properties
spring.datasource.url=jdbc:mysql://localhost:3306/microservice_sit1_db
spring.datasource.username=root
spring.jpa.hibernate.ddl-auto=update
spring.jpa.hibernate.generate-ddl=true
spring.jpa.properties.hibernate.dialect=org.hibernate.dialect.MySQL8Dialect
spring.jpa.properties.hibernate.format_sql=true
spring.jpa.show-sql=true

vault.secrets.url=http://localhost:8888/config-server/services-sit1-props/sit1

services.ms1.name=Microservice_1_SIT1
services.ms2.name=Microservice_2_SIT1
application-sit2.properties
spring.datasource.url=jdbc:mysql://localhost:3306/microservice_sit2_db
spring.datasource.username=root
spring.jpa.hibernate.ddl-auto=update
spring.jpa.hibernate.generate-ddl=true
spring.jpa.properties.hibernate.dialect=org.hibernate.dialect.MySQL8Dialect
spring.jpa.properties.hibernate.format_sql=true
spring.jpa.show-sql=true

vault.secrets.url=http://localhost:8888/config-server/services-sit2-props/sit2

services.ms1.name=Microservice_1_SIT2
services.ms2.name=Microservice_2_SIT2
Next, we will create the spring config server application using Spring Initializr. Add the Config server dependency in the project.
<dependency>
    <groupId>org.springframework.cloud</groupId>
    <artifactId>spring-cloud-config-server</artifactId>
</dependency>
To enable the service to work as config server, we need to add the annotation @EnableConfigServer.
import org.springframework.boot.SpringApplication;
import org.springframework.boot.autoconfigure.SpringBootApplication;
import org.springframework.cloud.config.server.EnableConfigServer;

@SpringBootApplication
@EnableConfigServer
public class ConfigServerApplication {

    public static void main(String[] args) {
        SpringApplication.run(ConfigServerApplication.class, args);
    }

}
In application.yml add the below properties to configure the GIT repository URI and credentials to access the repository.
spring:
  cloud:
    config:
      server:
         git:
          uri: https://github.com/ishailendra/spring-cloud-config-server-demo
          username: ishailendra
          password: 46cdc38edf7a64628c5c328b9a43f254ff3a8ff7
Spring Config server exposes REST Endpoints where we can see the properties loaded from the GIT.
If we send a GET request to the API http://localhost:8888/config-server/application-sit1.properties ,it will load all the properties from the file application-sit1.properties stored on Git.
Integrating Vault with the Config server
Hashicorp Vault is a solution which helps to securely store and tightly controls access to tokens, passwords, certificates, API keys and other secrets in modern computing.
In application.yml, we need to configure the connection details like host, port, credential for the vault. Also, as in this example we will be using combination of GIT and Vault to store the properties, we will set the profile in config server as below:
spring:
  application:
    name: config-server
  profiles:
    active: git, vault
  cloud:
    config:
      server:
        git:
          uri: https://github.com/ishailendra/spring-cloud-config-server-demo
          username: ishailendra
          password: iz8TlibgIYbNbHO5S1MKls1mOteoolRoF5YCFSJChryPEHdQ
          order: 2
        vault:
          host: 127.0.0.1
          skipSslValidation: 'true'
          token: hvs.BDiKqYb2Cn0Duphl1YDk2D4t
          kvVersion: '2'
          port: '8200'
          backend: application
          profileSeparator: /
          scheme: http
          order: 1
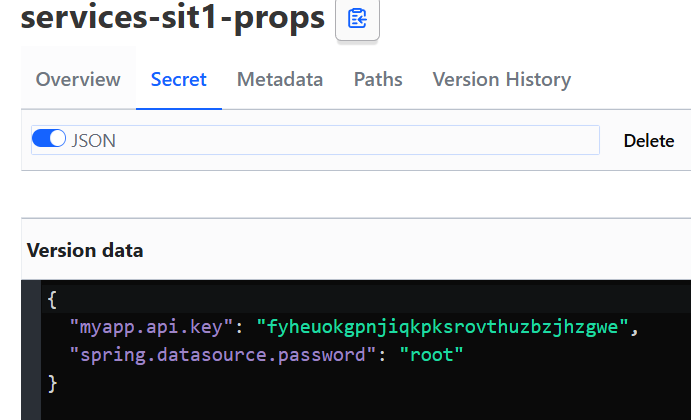
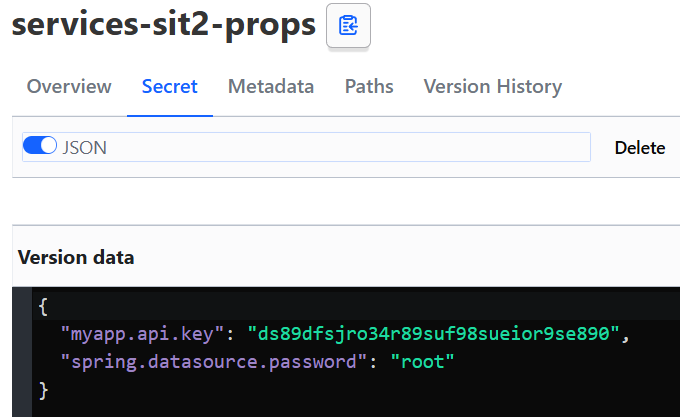
In the vault, we will set some sample properties for the application. We will also move the datasource password to the vault.
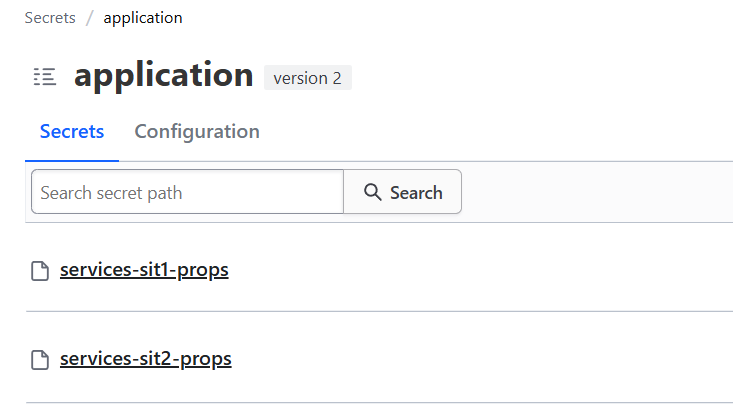
SIT1 properties
SIT2 properties
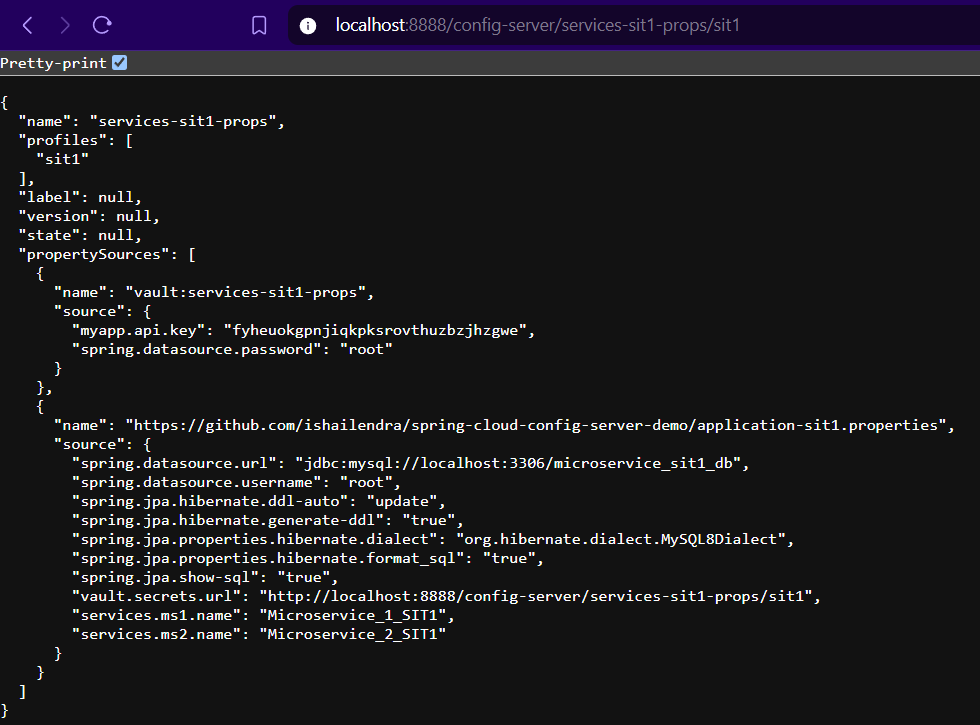
Spring Config Server with vault as backend exposes REST APIs in below format for properties
http://localhost:8888/config-server/<property-key-in-vault>/profile
We can validate our config server working by sending a REST call to the URL
http://localhost:8888/config-server/services-sit1-props
Connecting microservice to use Vault properties
Now let’s create a microservice, to utilize vault properties in our application. Add below dependencies in the application:
<dependency>
    <groupId>org.springframework.boot</groupId>
    <artifactId>spring-boot-starter-web</artifactId>
</dependency>
<dependency>
    <groupId>org.springframework.cloud</groupId>
    <artifactId>spring-cloud-starter-config</artifactId>
</dependency>

<dependency>
    <groupId>org.springframework.boot</groupId>
    <artifactId>spring-boot-starter-test</artifactId>
    <scope>test</scope>
</dependency>
<dependency>
    <groupId>org.springframework.boot</groupId>
    <artifactId>spring-boot-starter-data-jpa</artifactId>
</dependency>
<dependency>
    <groupId>com.mysql</groupId>
    <artifactId>mysql-connector-j</artifactId>
</dependency>
<dependency>
    <groupId>org.json</groupId>
    <artifactId>json</artifactId>
    <version>20240303</version>
</dependency>
We will need to implement a class to load the vault properties using REST API call. And then the properties will be used in datasource configuration.
VaultPropertiesLoader.java
@Component
public class VaultPropertiesLoader {

    Map<String, Object> vaultProps = new HashMap<>();

    @Autowired
    private RestTemplate restTemplate;

    @PostConstruct
    public void loadVaultProperties() {
        String secret = restTemplate.getForObject("http://localhost:8888/config-server/services-sit1-props/sit1", String.class);
        JSONObject root = new JSONObject(secret);
        JSONArray propSrcArr = root.getJSONArray("propertySources");

        for (Object obj : propSrcArr) {
            JSONObject propSrcObj = (JSONObject) obj;
            var name = propSrcObj.getString("name");
            if (StringUtils.hasText(name) && name.startsWith("vault")) {
                JSONObject source = propSrcObj.getJSONObject("source");
                vaultProps = source.toMap();
            }
        }
    }

    public Object getProperty (String key) {
        return vaultProps.get(key);
    }

    public Map<String, Object> getAllVaultProps() {
        return vaultProps;
    }
}
In the above code, REST API call is made to the config server REST endpoint, and from the response received (as shown in previous image) vault-specific properties are parsed and stored in the Map vault props.
The class also provides method getProperty (String key) which can be used to get any specific property from the vaultProps Map by passing the key.
DatabaseConfig.java
@Configuration
@EnableJpaRepositories(basePackages = "dev.techsphere", entityManagerFactoryRef = "entityManager", transactionManagerRef = "transactionManager")
public class DatabaseConfig {

    @Autowired
    private VaultPropertiesLoader vaultProps;

    @Autowired
    private Environment env;

    @Bean
    public LocalContainerEntityManagerFactoryBean entityManager() {
        final LocalContainerEntityManagerFactoryBean em = new LocalContainerEntityManagerFactoryBean();
        em.setDataSource(dataSource());
        em.setPackagesToScan("dev.techsphere");

        final HibernateJpaVendorAdapter vendorAdapter = new HibernateJpaVendorAdapter();
        em.setJpaVendorAdapter(vendorAdapter);
        final HashMap<String, Object> properties = new HashMap<>();
        properties.put("hibernate.hbm2ddl.auto", "create-drop");
        properties.put("hibernate.dialect", "org.hibernate.dialect.MySQL8Dialect");
        properties.put("hibernate.show_sql", true);
        properties.put("hibernate.format_sql", true);
        em.setJpaPropertyMap(properties);

        return em;
    }

    @Bean
    public DataSource dataSource() {
        HikariConfig config = new HikariConfig();
        config.setDriverClassName("com.mysql.cj.jdbc.Driver");
        config.setJdbcUrl(env.getProperty("spring.datasource.url"));
        config.setUsername(env.getProperty("spring.datasource.username"));
        config.setPassword(String.valueOf(vaultProps.getProperty("spring.datasource.password")));
        config.setMaximumPoolSize(Integer.parseInt("10"));
        config.setMaxLifetime(Long.parseLong("1800000"));
        config.setPoolName("HikariPool");
        config.setConnectionTimeout(Long.parseLong("30000"));
        config.setMinimumIdle(Integer.parseInt("10"));
        config.setIdleTimeout(Long.parseLong("600000"));

        return new HikariDataSource(config);
    }

    @Bean
    public PlatformTransactionManager transactionManager() {
        final JpaTransactionManager transactionManager = new JpaTransactionManager();
        transactionManager.setEntityManagerFactory(entityManager().getObject());
        return transactionManager;
    }
}
In the above code, datasource, transaction manager and entity manager are configured.
Datasource properties like URL and username are loaded from environment which is stored in GIT in application-<profile>.properties file.
And datasource password is loaded from vault property which was loaded in the VaultPropertiesLoader class and stored in class level Map.
MicroserviceController.java
The below code will used to return all the properties stored in the class level Map in VaultPropertiesLoader.java class.
@RestController
@RequestMapping("/api")
public class MicroserviceController {

    @Autowired
    private VaultPropertiesLoader loader;

    @GetMapping("/vault-props")
    public Map<String, Object> printVaultProps() {
        return loader.getAllVaultProps();
    }
}
Product.java
The entity will be used to demo datasource connection working.
@Entity
@Table(name = "product")
public class Product {

    @Id
    private Integer productId;
    private String name;
    private String description;
    private Double cost;
    //Getter & Setter
}
application.yml
In the application.yml, we need to provide the config server Uri details
spring:
  config:
    activate:
      on-profile: sit1
    import:
      - "configserver:"
  cloud:
    config:
      enabled: true
      fail-fast: true
      uri: http://localhost:8888/config-server

---
spring:
  config:
    activate:
      on-profile: sit2
    import:
      - "configserver:"
  cloud:
    config:
      enabled: true
      fail-fast: true
      uri: http://localhost:8888/config-server
Testing
Let’s start the application, it should be able to connect to the database automatically and in the logs we should be able to see DDL created for the entity class Product. To start the application and activate profile SIT1 we need to pass the environment variable as SPRING_PROFILES_ACTIVE=sit1.

http://localhost:8080/api/vault-props
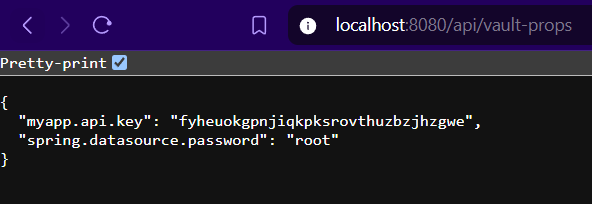
This concludes that our Spring Cloud config server is working as expected and we are able to use both GIT and Vault as backend for our config server.
Adding Vault in Existing Config server setup
In an existing setup, if we migrate some properties to vault which were used in @Value annotation would not work as the property will not be available in the application environment; or in the previous example we see we had to write the database configuration as spring autoconfiguration was not able to autoconfigure the Datasource because the datasource password property which is stored in Vault is not available in environment at the time of Bean creation.
Leveraging EnvironmentPostProcessor with Config Data API
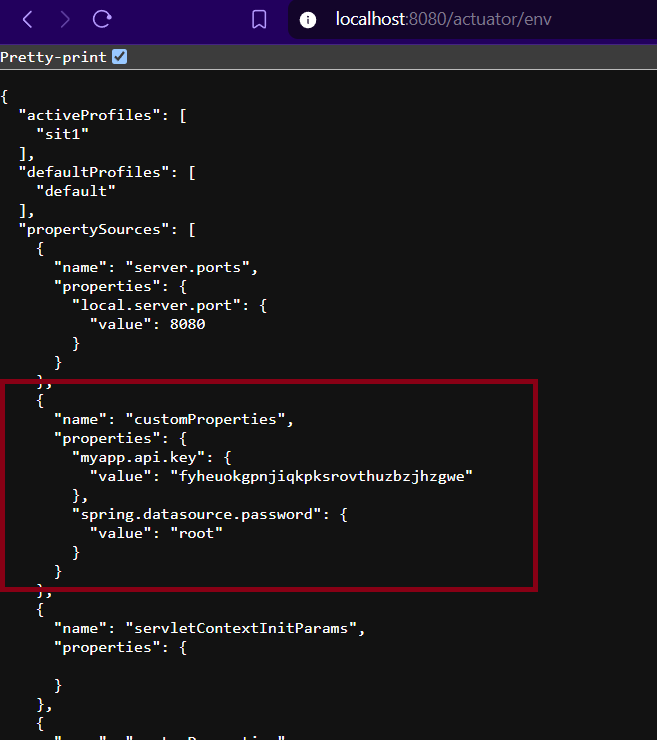
The workaround for this is to load the vault properties in the spring application environment before the application context is initialized and Beans are created. To do this we can implement the EnvironmentPostProcessor interface that allows dynamic modification of environment properties before the application context is initialized.
@Order(Ordered.LOWEST_PRECEDENCE)
public class CustomEnvironmentPostProcessor implements EnvironmentPostProcessor {

    @Override
    public void postProcessEnvironment(ConfigurableEnvironment environment, SpringApplication application) {

        String url = environment.getProperty("vault.secrets.url");

        if (StringUtils.hasText(url)) {
            RestTemplate template = new RestTemplate();
            String secret = template.getForObject(url, String.class);
            JSONObject root = new JSONObject(secret);
            JSONArray propSrcArr = root.getJSONArray("propertySources");

            for (Object obj : propSrcArr) {
                JSONObject propSrcObj = (JSONObject) obj;

                var name = propSrcObj.getString("name");

                if (StringUtils.hasText(name) && name.startsWith("vault")) {
                    JSONObject source = propSrcObj.getJSONObject("source");

                    Map<String, Object> dynamicProperties = source.toMap();

                    // Registering/Adding to the environment
                    environment.getPropertySources().addFirst(new MapPropertySource("customProperties", dynamicProperties));
                }
            }

        }

    }
}
In the above code, REST API call is made to the config server REST endpoint, and from the response received (as shown in previous image) vault-specific properties are parsed and are then registered/added in the application environment.
Also, we need to register our EnvironmentPostProcessor implementation with the SpringFactoriesLoader as below.
org.springframework.boot.env.EnvironmentPostProcessor=dev.techsphere.ms.config.CustomEnvironmentPostProcessor

Testing
Let’s start the application, it should be able to connect to the database automatically and in the logs we should be able to see DDL created for the entity class Product. To start the application and activate profile SIT1 we need to pass the environment variable as SPRING_PROFILES_ACTIVE=sit1.

We can also validate that our vault specific properties are loaded in the application environment using actuator /env.
Conclusion
In this article, we saw how to implement spring cloud config server with GIT and Vault backend. We also learned how we can leverage EnvironementPostProcessor and minimize code changes if we want to integrate vault in existing codebvase.
As always all the code used in this article can be found on my GITHUB
Subscribe to my newsletter
Read articles from Shailendra Singh directly inside your inbox. Subscribe to the newsletter, and don't miss out.
Written by

Shailendra Singh
Shailendra Singh
👨💻 Shailendra - Software Engineer 👨💻 Hello there! I'm Shailendra, a software engineer with 7 years of invaluable experience in the tech industry. My coding toolkit primarily consists of Java and Spring Boot, where I've honed my skills to craft efficient and scalable software solutions. As a secondary passion, I've dived into the world of React.js to create dynamic and interactive web applications.