Integrating a Custom Provider into the ONLYOFFICE AI Plugin
 Kseniya Fedoruk
The ONLYOFFICE AI plugin offers the flexibility to connect with any custom provider, giving users endless opportunities to expand its functionality. In this post, we’ll walk you through the process of integrating Tongyi Qianwen and Kimi services into the plugin.
Prerequisites
Before adding a custom provider, make sure you complete the following steps:
Obtain the necessary credentials: Retrieve the base URL, model version, and API key from your chosen provider.
Create a dedicated JavaScript file: Store the base URL, model version, and API key in a separate JavaScript file.
Here's a detailed breakdown of the essential credentials you'll require:
- Base URL: This is the web address where API requests are sent. In some cases, the base URL may include an endpoint that specifies the model being used:
https://dashscope.aliyuncs.com/compatible-mode/
- Model Version: This identifies the version of the model you are accessing. Sometimes, the model version is included in the base URL (in this example, the model version is v1):
https://api.moonshot.cn/v1
- API Key: A unique key provided by the service provider, used for authentication.
Creating the external JavaScript file
To add a custom provider and display it in the list of available providers within the AI Plugin, you need to create and upload an external JS file.
Custom providers parsed from this file are instances of the Provider class, which extends AI.Provider. This class manages all available providers within the plugin.
class Provider {
        /**
         * Provider base class.
         * @param {string} name  Provider name.
         * @param {string} url   Url to service.
         * @param {string} key   Key for service. This is an optional field. Some providers may require a key for access.
         * @param {string} addon Addon for url. For example: v1 for many providers.
         */
        constructor(name, url, key, addon) {
            this.name  = name  || "";
            this.url   = url   || "";
            this.key   = key   || "";
            this.addon = addon || "";

            this.models = [];
            this.modelsUI = [];
        }
Let's now explore our implementation of the Tongyi Qianwen service.
"use strict";


class Provider extends AI.Provider {


    constructor() {
        super("Alibab Cloud", "https://dashscope.aliyuncs.com/compatible-mode", "yourAPIKey", "v1");
    }


}
Where:
Alibaba Cloud: the name of the provider that will be displayed in the plugin.
dashscope.aliyuncs.com/compatible-mode: the web address to which we are sending the API request.
yourAPIKey: the API key issued by the provider.
v1: the version of the model to which we are sending the API request.
Implementation for the Kimi service is the following:
"use strict";


class Provider extends AI.Provider {


    constructor() {
        super("Kimi", " https://api.moonshot.cn", "yourAPIkey", "v1");
    }


}
Connecting the custom provider to the plugin
Launch ONLYOFFICE and open any editor. Switch to the Plugins tab on the top toolbar and launch the Plugin Manager. You will instantly see the AI plugin. Click the Install button and wait for a few seconds till the plugin gets installed.
Close the Plugin Manager and click the Background plugins button on the same tab. Turn on the corresponding slider. After activating the AI plugin, you will see a new tab after the Plugins tab — AI.
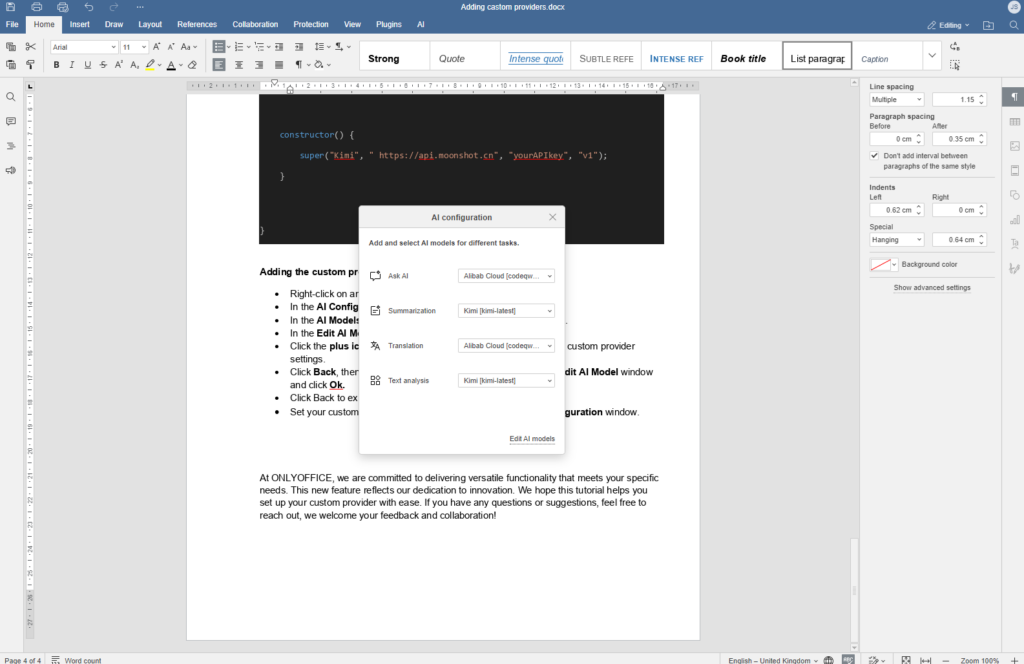
Switch to the newly appeared AI tab and click Settings. In the AI Configuration window, select Edit AI models.
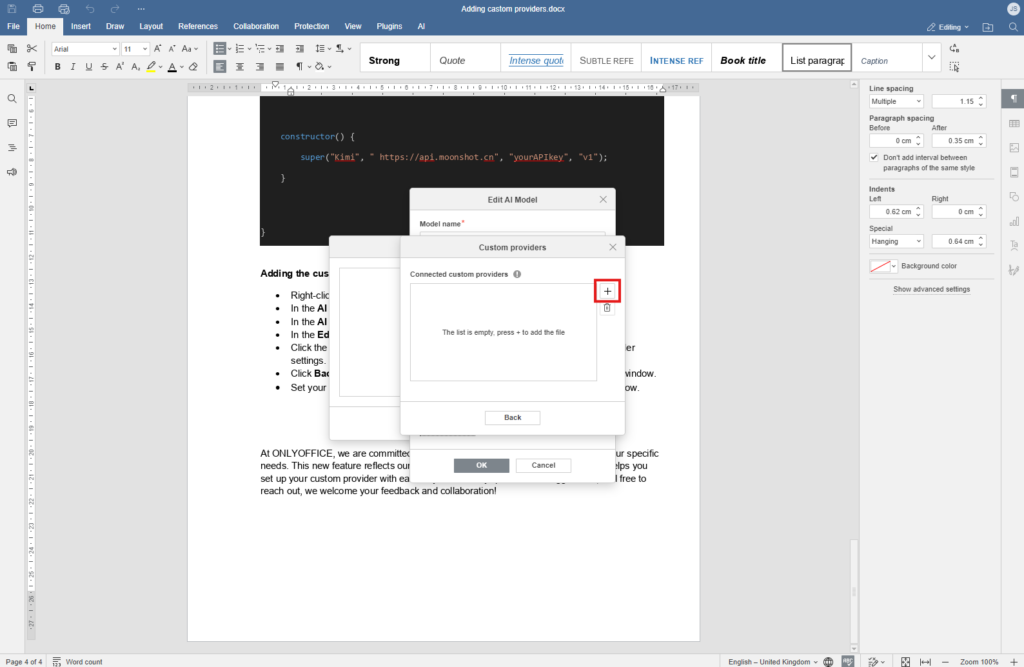
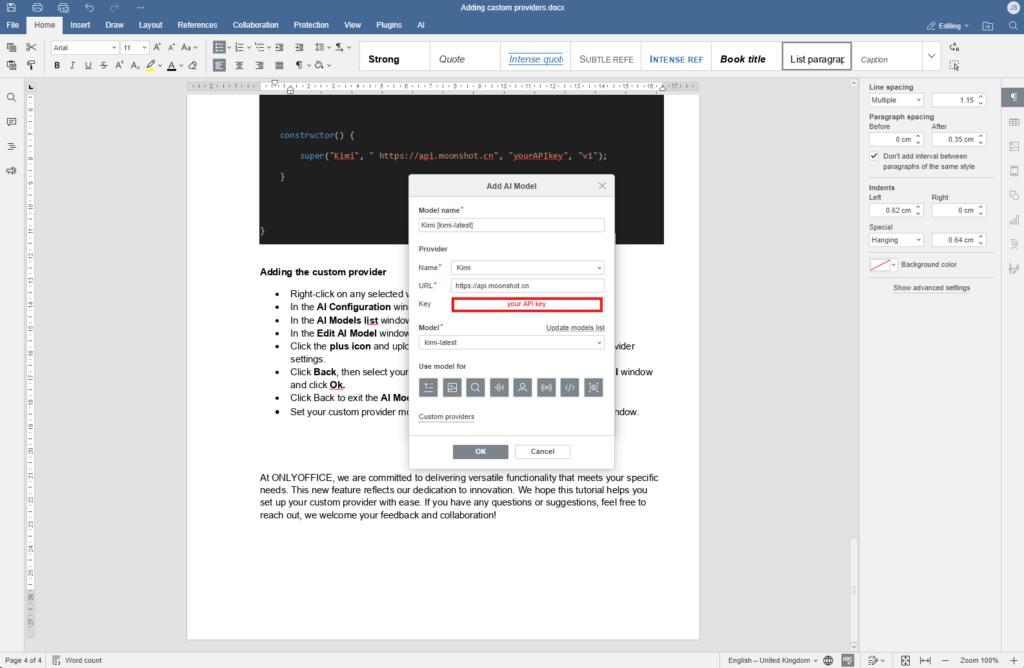
In the AI Models list window, click the pencil icon to edit models. In the Edit AI Model window, click Custom providers. Click the plus icon and upload the JavaScript file containing your custom provider settings.

- Select your custom provider from the list in the Add AI Model window and click OK.

- Click Back to exit the AI Models list window. Set your custom provider model for a specific task in the AI Configuration window.

After completing these steps, the AI plugin is fully configured and ready to assist with a wide variety of tasks!
Subscribe to my newsletter
Read articles from Kseniya Fedoruk directly inside your inbox. Subscribe to the newsletter, and don't miss out.
Written by

Kseniya Fedoruk
Kseniya Fedoruk
Tech content creator at ONLYOFFICE. Author of how-to articles, contributor on GitHub, switched from outdated Windows to Kubuntu, have been working with open-source office software since 2017.