How to Build and Deploy a Fibonacci Calculator Using React
 Thilaga anand
Overview:
1. CI/CD pipeline workflow:
- A pipeline can be created to automatically deploys the code when any push events occur in GitHub/GitLab.
React App code changes are pushed to GitHub repository
Jenkins detects the change and trigger a build
Jenkins then run tests and if it pass, deploy the code in AWS Elastic Bean Stalk.
- AWS Elastic Beanstalk Setup
EC2 Instance (Elastic compute cloud) – created by Elastic bean stalk automatically.
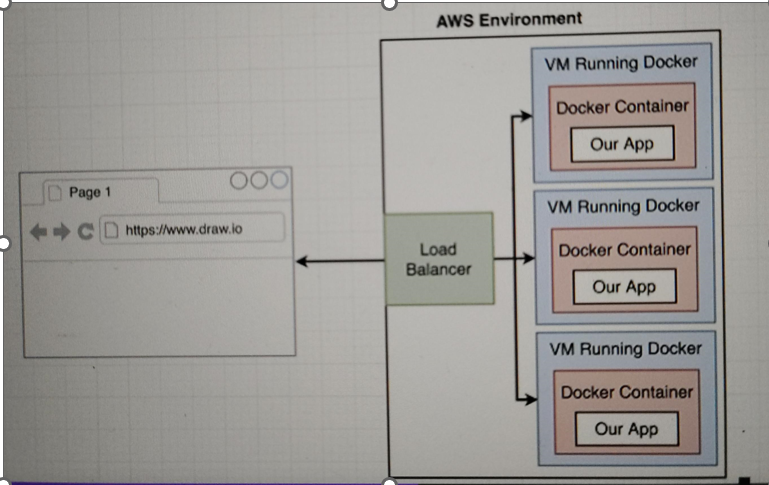
Load Balancers - Managed by Elastic Beanstalk to handle incoming traffic.
S3 Buckets - Used for application storage and deployment artifacts, also managed by Elastic Beanstalk.
Detailed steps:
- Setting up AWS Beanstalk
Go to AWS Console
search for "Elastic Beanstalk" and click on it
Click "Create Application" and follow the prompts to configure your application and environment
- Create IAM user and Access Generation keys
****Go to AWS Console
search for "IAM" and click on it
Click 'users' on the sidebars, then "Add user"
Enter 'user name' (eg: thilaga-deploy), select "Programmatic access" for access type, and click "Next."
****On the permissions page, choose "Attach existing policies directly."
Select "AdministratorAccess-AWSElasticBeanstalk" (or another policy with appropriate permissions).
Click "Next" and "Create user."
****After user creation, go to the "Security credentials" tab for the new user.
Scroll to "Access keys" and click "Create access key."
Choose "Command Line Interface (CLI)" and click "Next."
Save the Access Key ID and Secret Access Key securely.
Purpose of IAM (Identity Access Management) user creation and Access Generation keys:
IAM creates set of credentials which helps Jenkins to interact with AWS services without exposing root account credentials.
- Configuring Jenkins for CI/CD
Jenkins Installation on AWS EC2
-java Installation to install Jenkins in a server using apt
  sudo apt update -y
  sudo apt install openjdk-17-jdk -y
  java -version
-After, use the below cmds to install jenkins
  #This is the Debian package repository of Jenkins to automate installation and upgrade.
  #To use this repository, first add the key to your machine
  sudo wget -O /usr/share/keyrings/jenkins-keyring.asc \
      https://pkg.jenkins.io/debian/jenkins.io-2023.key
  # Then add a Jenkins apt repository entry:
  echo "deb [signed-by=/usr/share/keyrings/jenkins-keyring.asc]" \
      https://pkg.jenkins.io/debian binary/ | sudo tee \
      /etc/apt/sources.list.d/jenkins.list > /dev/null
  #Update your local package index, then finally install Jenkins:
  sudo apt-get update
  sudo apt-get install fontconfig openjdk-17-jre
  sudo apt-get install jenkins
  # start enable service
  sudo systemctl start jenkins
  sudo systemctl enable jenkins
  sudo systemctl status jenkins
  #initialAdminPassword
  sudo cat /var/lib/jenkins/secrets/initialAdminPassword
- with publicIP of EC2 instance with Port Number [https://<public_IP>:8080/)], can access jenkins. (in security inbound rule make sure to enable port needed)
- With InitilaAdminpassword and select install suggested Plugins, provide username and password and Set up Jenkins with the necessary plugins
Docker & Docker-Compose installation on server (AWS server):
Step 1: Create a Directory for the Keyring (if it doesn’t already exist):
sudo apt update
sudo apt install apt-transport-https ca-certificates curl software-properties-common
curl -fsSL https://download.docker.com/linux/ubuntu/gpg | sudo apt-key add -
sudo add-apt-repository "deb [arch=amd64] https://download.docker.com/linux/ubuntu $(lsb_release -cs) stable"
sudo apt update
sudo apt install docker-ce
sudo systemctl start docker
sudo systemctl enable docker
sudo docker --version
sudo usermod -aG docker $USER

sudo mkdir -p /etc/apt/trusted.gpg.d
Step 2: Add Docker’s GPG key using keyring files:
curl -fsSL https://download.docker.com/linux/ubuntu/gpg | sudo tee /etc/apt/trusted.gpg.d/docker.gpg > /dev/null
Add Docker repository and update package list:
sudo add-apt-repository "deb [arch=amd64] https://download.docker.com/linux/ubuntu $(lsb_release -cs) stable"
sudo apt-get update
Install Docker Engine:
sudo apt-get install -y docker-ce
Install Docker Compose:
VERSION=$(curl -s https://api.github.com/repos/docker/compose/releases/latest | grep 'tag_name' | cut -d\" -f4)
sudo curl -L "https://github.com/docker/compose/releases/download/${VERSION}/docker-compose-$(uname -s)-$(uname -m)" -o /usr/local/bin/docker-compose
sudo chmod +x /usr/local/bin/docker-compose

sudo systemctl start docker
sudo systemctl enable docker
sudo systemctl status docker
Verify Docker Compose installation:
docker-compose --version
sudo chmod 666 /var/run/docker.sock
Once Tested and if it passes, Proceeding to deployments to AWS Elastic Bean Stalk.
Things to know: Going to use Dockerrun.aws.json customized file to work directly with AWS.
Difference between Docker-compose.yml and Dockerrun.aws.json.
| Docker-compose.yml | Dockerrun.aws.json. |
| have direction on how to build image | no need to build image. |
| Going to use the image which already built | |
| local development and testing, allowing you to define and run multi-container | deploying Docker applications to AWS Elastic Beanstalk, |

Container Definition files.
to tell Elastic Beanstalk - how to work with our multiple containers.
Finding Docs on Container Definitions
Elastic Beanstalk doesn't actually know how to work with multiple containers.
So it's delegating that hosting off to another service that is provided in Amazon,called the Elastic Container Service (ECS).
- Work with ECS by creating files called Task Definitions**blueprint for our application, which image to use, required CPU, Memory to use, networking Configuration, environment Variables and other parameters as well.
https://docs.aws.amazon.com/AmazonECS/latest/developerguide/task_definitions.html
{
    "AWSEBDockerrunVersion":2,
    "containerDefinitions": [
        {
            "name": "client",
            "image": "thilaga219/react-test",
            "hostname": "client",
         //where to host this containe
            "essential": false
//if it is true - if for any reason this cont fails- next steps will n proceed
        },
        {
            "name": "server",
            "image": "thilaga219/multi-server",
            "hostname": "api",
            "essential": false
        },
        {
            "name": "worker",
            "image": "thilaga219/multi-worker",
            "hostname": "worker",
            "essential": false
        }
    ]
}
Information:
AWS Elastic beanstalk is a platform as a Service (PaaS) offered by AWS. Elastic beanstalk creates an environment includes Ec2 instances, load balancers, auto-scaling groups & security. (if needed still have control over Ec2 instances [ssh access..])
Benefits of Elastic beanstalk:
* Monitors amount of traffic coming into our VM - As soon as that traffic reaches threshold, Elastic beanstalk automatically adds VM to handle that traffic.


* automatically scale up everything for us. We need to just run app and EB will take care of rest including scaling(environment setup), monitoring the health, updates etc..
Subscribe to my newsletter
Read articles from Thilaga anand directly inside your inbox. Subscribe to the newsletter, and don't miss out.
Written by
