Automate 90% of Your Work with AI Agents (Real Examples & Code Inside)
 Anmol Baranwal
In 2025, agents can handle 90% of your workflow, freeing you and your team to focus on what truly matters.
Today, we’re diving into CoAgents (CopilotKit), the full-stack framework for building user interactive agents and copilots.
We’ll explore integrations with leading agentic frameworks like LangGraph and CrewAI, discuss workflow automation, and highlight common pitfalls and best practices for avoiding them.
You’ll also get real-world automation examples with source code to help you implement these strategies.
Let's jump in.
What is covered?
In a nutshell, we are covering these topics in detail.
What are CoAgents with core components?
Integration with CrewAI (Crews + Flows).
What workflow automation means and common misconceptions.
Some real-world examples with source code.
Common pitfalls and best practices involved.
Note: Copilotkit (the framework for building AI Copilots) recently launched CoAgents with the partnership of LangChain and CrewAI. That is what we will be discussing in this.
1. What are Agents?
AI agents are like really smart assistants. You just tell them what you need and they figure out how to get it done!!
The LLM acts as the brain of the system. When an AI has to communicate with the outside world, obtain data, or carry out particular tasks, it can utilize tools, which are external resources or APIs.
What are CoAgents?
It's like this: Copilot + Agents = CoAgents(CopilotKit), used to break down tasks into smaller steps, coordinate actions, and work alongside humans (Human-in-the-loop).
For example, imagine Dan who is a sales professional, submits a travel reimbursement in the wrong currency which causes a major error. The automated workflow didn't allow anyone else in the process to correct this mistake easily. CoAgents can step in, ask for human input at the right moment and correct things before they become bigger problems.

credits goes to Miraj Mohsin
The framework to help you build it.
CopilotKit is a framework for integrating AI copilots into products. It offers React components for AI chat, generative UI, and autocomplete, plus a runtime that improves AI agents with context, tools and skills based on user behavior.
Developers can build CoAgents for any vertical by using LangGraph SDK + CoAgents (Copilotkit). Just build a LangGraph agent attuned to your workflow, then use CoAgents to integrate custom actions and generative UI experiences.

You can follow Agents 101: How to build your first agent in 30 minutes, a step-by-step guide to help you build CoAgents.
Core Components.
This is done within a clean framework to manage CoAgents inside your application (thanks to LangGraph).
Let's understand the core components:
Shared State (Agent ↔ Application)- a synchronized state between the AI agent and the application, to make sure both have real-time access to the same information. This allows the agent to understand the application's context and the application to monitor the agent's actions.
const {state, setState} = useCoAgent("the agent name")
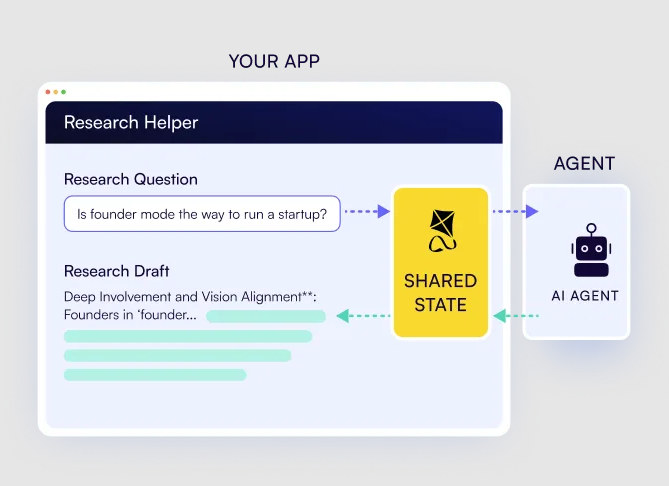
Agentic Generative UI- render the agent’s real-time state in the chat UI so the user can see what the agent is doing.
useCoagentStateRender(
  name: "research_agent",
  node: "download_progress",
  render: ({ state, nodeName, status }) => {
    return Progress logs={state.logs} /;
  });

Human-in-the-Loop- specify breakpoints in the agent process at which Human input or approval is required. This ensures greater safety as well as better agent performance.
useCopilotAction({
 name: "ApprovePlan",
 parameters: [
    { name: "planSteps", type: "string[]" }
 ],
 renderAndWait: ({ args, handler }) => (
    <ConfirmPlan
       planSteps={args.planSteps}
       onApprove={(approvedSteps) => handler({ ... })}
        onDeny={() => handler({ ... })}
     />
  );

Realtime frontend actions- send frontend actions to the LangGraph agent as they become available. This allows the agent to explicitly take action within the application's frontend in real-time, such as filling out forms.
useCopilotAction({
 name: "InsertItemInList",
 parameters: [
    { name: "city", type: "string" },
    { name: "country", type: "string" }
 ],
 handler: ({ args, status }) => {
   // ...
 }
});

As per the docs, the future versions will include agent steering, enabling end-users to realign errant agents and subgraph support, among others.
You can read more on copilotkit.ai/coagents which also has illustrative diagrams to help you understand.
If you want a quick overview, watch this 2-minute video by Atai (Co-founder of Copilotkit)!
2. Integration with CrewAI (Crews + Flows).

CrewAI is a framework for orchestrating role-playing AI agents. It allows developers to create a crew of AI agents, each with specific roles and responsibilities, to work together on complex tasks.
It kind of imitates human organizational structure, building upon the idea of multi-agent systems. If you're just starting, CrewAI is one of the most beginner-friendly frameworks out there.
If you're not aware, CrewAI provides two distinct approaches for managing AI workflows:
⚡ Crews - define the who (the agents working together). Choose this for tasks requiring autonomous problem-solving and creative collaboration.
⚡ Flows - define the how (the process they follow). Choose this for deterministic outcomes, structured workflows, and secure execution.

CrewAI also supports combining both for hybrid applications where Flows orchestrate the overall process while Crews handle complex subtasks requiring autonomy. You can read the difference, how it all works together and more on docs.
Copilotkit Integration with CrewAI
Copilotkit recently launched its integration with CrewAI. You can turn Flows and Crews into an agent-native app in minutes.
It's easy to use the components of CoAgents that we discussed earlier. Here's a quick look at the flow of the integration.
If you've built a CrewAI Crew agent before, integrating with Copilotkit is easy.
First, install CopilotKit in your frontend.
npm install @copilotkit/react-ui @copilotkit/react-core
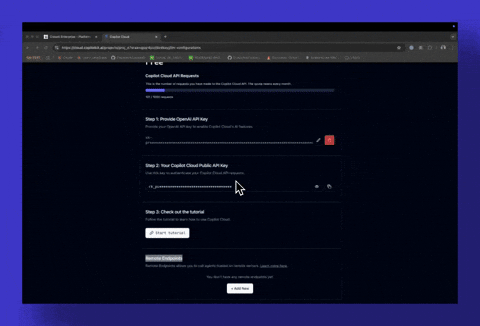
Make a note of your Crew API URL and Bearer token, then head over to cloud.copilotkit.ai to register your crew with Copilot Cloud.
You will need to create an endpoint and set up the Copilotkit provider.
The <CopilotKit> component must wrap the Copilot-aware parts of your application. In most cases, it's best to place it around the entire app, like in layout.tsx.
import "./globals.css";
import { ReactNode } from "react";
import { CopilotKit } from "@copilotkit/react-core";

export default function RootLayout({ children }: { children: ReactNode }) {
  return (
    <html lang="en">
      <body>
        {/* Use the public api key you got from Copilot Cloud  */}
        <CopilotKit
          publicApiKey="<your-copilot-cloud-public-api-key>"
          agent="sample_agent" // the name of the agent you want to use
        >
          {children}
        </CopilotKit>
      </body>
    </html>
  );
}
Then you need to set up your Copilot UI which will complete the integration.
import { CopilotPopup } from "@copilotkit/react-ui";

export function YourApp() {
  return (
    <>
      <YourMainContent />
      <CopilotPopup
        instructions={"You are assisting the user as best as you can. Answer in the best way possible given the data you have."}
        labels={{
          title: "Popup Assistant",
          initial: "Need any help?",
        }}
      />
    </>
  );
}
Check out their Restaurant Finder Crew demo and docs for the complete flow.
The easiest way to start is by cloning the crewAI crews with coagents template from Copilotkit's repo. It includes a sample Python Agent with a ready-to-use UI.

If you've built a CrewAI Flow agent before, integrating with Copilotkit is easy.
Install the Copilotkit package, start the agent locally, and create a remote endpoint on Copilotkit Cloud to connect with your CrewAI Flow.
Next, set up the Copilotkit provider and build the Chat UI as explained earlier.
Read the docs for a step-by-step integration guide.
The easiest way to start is by cloning the crewAI flows with coagents template from Copilotkit's repo. It includes a sample Python Agent with a ready-to-use UI.

By the way, if you've just started then you should learn from this short course by AndrewNg (Deeplearning) on how to build Multi AI Agent Systems with crewAI.

Now, it's time to learn a bit about workflow automation and break it down in general terms.
3. What workflow automation means and common misconceptions.
Automation is about making tasks run on their own.
At its core, it follows a simple rule: WHEN something happens, DO a specific action. Even the most complex automation can be broken down into this basic principle.
Like: When you get a new email from the lead, Then notify my sales team on the text communication channel.
Workflow is a repeatable set of steps within an app to achieve a result. Many confuse it with the process, but you can think of it this way:
process- what needs to be done (sending an invoice).workflow- how you are going to do that (creating an invoice in PayPal → uploading it to DocuSign → emailing it for signature → following up for payment)
So Workflow automation means automating repetitive tasks in your software. You should check out this workflow automation blog by Zapier. It has examples, ideas and very useful explanations.
Ryan Hutchinson automated 90% of his one-person business. Here’s the Whimsical link where you can analyze the flowchart.

Common misconceptions.
There are a lot of misconceptions about automation, so let's clarify things:
❌ It's just scripting - modern automation tools do more than execute simple scripts. They connect apps, handle complex workflows and even adapt to situations. CoAgents take this even further.
❌ Only developers can use it - while there are powerful frameworks for developers, no-code tools like Zapier and n8n can help anyone automate without coding skills.
❌ Expensive and complex - many automation tools are affordable and easy to set up, even for small teams.
There is a very interesting video you can watch on YouTube. It's related to AI agents but you can get a basic idea.
4. Some real-world examples with source code.
In this section, we will explore some potential application ideas and understand how it's automated.
You can check the quickstart guide because there are prerequisites like installing Docker and LangGraph CLI.
These examples involve how they work with technical explanation and if it's confusing, then please head over to the tutorial mentioned in each point.
✅ Research Agent Native Application

Let’s suppose you need a research agent, but letting it run autonomously will be risky. Mainly because AI models hallucinate which leads to the generation of irrelevant data.
That’s why CoAgents takes a different approach, it automates 90% of the work while keeping you in control.
You can follow this tutorial on the docs which has broken it into simple steps including the technical stuff. I won't be able to cover it all otherwise this will be too long.
🎯 How it works?
You provide a prompt and the agent suggests structured sections for your approval.
Submitting a research prompt

From here, you can approve or reject each topic before it moves forward.

Once approved, the agent generates detailed content based on your approved topics.
Behind the scenes, we use the useLangGraphInterrupt hook to handle approvals in the UI. It's a React hook that lets you customize the UI when using interrupt by LangGraph. When an Interrupt event is triggered, the hook runs, allowing you to collect user input with your preferred user experience. This is how it's implemented.
// ...
import { useLangGraphInterrupt } from "@copilotkit/react-core";
// ...

export default function HomePage() {
    // ...
    const { state: researchState, setResearchState } = useResearch()

    const streamingSection = useStreamingContent(researchState);


    useLangGraphInterrupt<Proposal>({
      render: ({ resolve, event }) => {
        return <ProposalViewer
          proposal={event.value}
          onSubmit={(approved, proposal) => resolve(
            JSON.stringify({
              ...proposal,
              approved,
            })
          )}
        />
      }
    })
    // ...
}
Once topics are finalized, the useCoAgent hook maintains a bidirectional connection between the agent state and the UI.
const { state, setState, run } = useCoAgent<ResearchState>({
    name: 'agent',
    initialState: {},
});
This enables a real-time research workflow, where users can track progress in the chat UI and make adjustments as needed.
We just need to add generative UI to the application so that we can visualize the agent state in the chat UI.
Generating responses based on approvals

Finally, you also get an option to edit it further if you need any changes.

By default, CopilotKit will intelligently route requests to the appropriate agent based on context. In this case, we only have a single agent and it is ideal to lock all requests to that agent.
You can check the GitHub Repository and live demo.
✅ AI Travel App

Let’s suppose you need a travel agent, which will search locations based on your preference and plan a complete trip.
Without using CoAgents, it will either be inaccurate or require a lot of manual effort. We can automate this using CopilotKit, LangGraph & Google Maps API.
You can follow this tutorial on the docs which has broken it into simple steps including the technical stuff. I won't be able to cover it all otherwise this will be too long.
🎯 How it works?
Let's suppose you ask the agent: Plan a trip to England but focus on filming set locations. Also, include a hotel near the area and some decent food. I will be there for 10 days.

The agent suggests trip locations and you can add them as needed.
To integrate the agent into this state, you need to setup a remote endpoint and use the useCoAgent hook to connect it. With LangGraph Studio installed, you can run and visualize that LangGraph agent.

Behind the scenes, it uses the useCoAgent hook to allow for a shared state between your UI and agent execution. For human-in-the-loop in the workflow, use the useCoAgentStateRender hook.
// ...
import { Trip, Place, AgentState, defaultTrips} from "@/lib/trips";
import { useCoAgent } from "@copilotkit/react-core";

export const TripsProvider = ({ children }: { children: ReactNode }) => {
  const { state, setState } = useCoAgent<AgentState>({
    name: "travel",
    initialState: {
      trips: defaultTrips,
      selected_trip_id: defaultTrips[0].id,
    },
  });

  // ...
You can specify a type that represents the state of the LangGraph agent. Just be careful that the state type matches your LangGraph agent's state.
Streaming Search Progress
Once you have integrated the LangGraph agent, you will need to stream the search progress to the user in real time. Use the copilotkit_emit_state CopilotKit SDK function in the search_node of your LangGraph agent.
With CoAgents, the LangGraph agent's state updates only when a node changes (like an edge is traversed). This means that in-progress work isn’t shown to the user by default. However, we can manually emit the state using the copilotkit_emit_state function.
Adding the custom CopilotKit config to the "search_node" to describe what intermediate state we'll be emitting.
# ...
from copilotkit.langgraph import copilotkit_emit_state, copilotkit_customize_config

async def search_node(state: AgentState, config: RunnableConfig):
    """
    The search node is responsible for searching the for places.
    """
    ai_message = cast(AIMessage, state["messages"][-1])


    config = copilotkit_customize_config(
        config,
        emit_intermediate_state=[{
            "state_key": "search_progress",
            "tool": "search_for_places",
            "tool_argument": "search_progress",
        }],
    )

    # ...
Now we can call copilotkit_emit_state to emit the intermediate state wherever we want. In this case, we'll be emitting its progress at the beginning of our search and as we receive results.
# ...
async def search_node(state: AgentState, config: RunnableConfig):
    """
    The search node is responsible for searching the for places.
    """
    ai_message = cast(AIMessage, state["messages"][-1])

    config = copilotkit_customize_config(
        config,
        emit_intermediate_state=[{
            "state_key": "search_progress",
            "tool": "search_for_places",
            "tool_argument": "search_progress",
        }],
    )

    # ^ Previous code

    state["search_progress"] = state.get("search_progress", [])
    queries = ai_message.tool_calls[0]["args"]["queries"]

    for query in queries:
        state["search_progress"].append({
            "query": query,
            "results": [],
            "done": False
        })

    await copilotkit_emit_state(config, state)

    # ...
The state of our search will be emitted to CopilotKit via the search_progress key. We can add this code to update this state as we receive results from our search.
# ...
    places = []
    for i, query in enumerate(queries):
        response = gmaps.places(query)
        for result in response.get("results", []):
            place = {
                "id": result.get("place_id", f"{result.get('name', '')}-{i}"),
                "name": result.get("name", ""),
                "address": result.get("formatted_address", ""),
                "latitude": result.get("geometry", {}).get("location", {}).get("lat", 0),
                "longitude": result.get("geometry", {}).get("location", {}).get("lng", 0),
                "rating": result.get("rating", 0),
            }
            places.append(place)
        state["search_progress"][i]["done"] = True
        await copilotkit_emit_state(config, state)

    state["search_progress"] = []
    await copilotkit_emit_state(config, state)

    # ...
Now we can render this state in the UI by displaying search_progress with the useCoAgentStateRender hook.
// ...
import { useCoAgent } from "@copilotkit/react-core";
import { useCoAgent, useCoAgentStateRender } from "@copilotkit/react-core";
import { SearchProgress } from "@/components/SearchProgress";

export const TripsProvider = ({ children }: { children: ReactNode }) => {
  // ...

  const { state, setState } = useCoAgent<AgentState>({
    name: "travel",
    initialState: {
      trips: defaultTrips,
      selected_trip_id: defaultTrips[0].id,
    },
  });


  useCoAgentStateRender<AgentState>({
    name: "travel",
    render: ({ state }) => {
      if (state.search_progress) {
        return <SearchProgress progress={state.search_progress} />
      }
      return null;
    },
  });

  // ...
}
Implementing Humans in the loop (which is the final step) works using Breakpoints. It's like a pause button that lets users approve the agent’s actions before it runs.

Here, trips_node acts as a proxy for perform_trips_node. Adding a breakpoint to trips_node pauses execution until the user approves the action.
# ...

graph = graph_builder.compile(
    checkpointer=MemorySaver(),
    interrupt_after=["trips_node"],
)
You will have to update the perform_trips_node to handle the user's decision, then emit the tool calls, update the frontend to display that, and send the user's decision back to the agent.
You can use the useCopilotAction hook with renderAndWait for each tool call.
Following the guide makes it easier to understand.
As the final output, you get a trip summary. You can view the locations directly on the Google Map displayed on the screen.

You can check the GitHub Repository and live demo.
You can also find a few others on the official examples in the CopilotKit repository.
5. Common pitfalls and best practices involved.
Automation is powerful but it’s easy to get it wrong. Here are some common pitfalls:
❌ Automation overkill - Don't automate everything just because you can. Sometimes that human touch is the real value, think about whether the automation improves the experience or makes it feel less personal.
Remember, CoAgents are teammates, not replacements.
💡 Case study
Let's take a real world example of too much automation in real estate.
Zillow's iBuying program relied on AI-powered home valuations called Zestimates to make purchase offers. But the model had blind spots:
a) When the AI set prices too high, it didn’t account for hidden issues like leaky basements, sellers accepted quickly and Zillow ended up buying overpriced homes that were tough to resell.
b) When the AI undervalued homes, sellers ignored Zillow and went with better offers from other buyers, reducing the volume of good purchases.
This resulted in self-selection bias, eventually forcing them to shut down their iBuying business in 2021 after massive financial losses.
Here is the CNET report on What happened at Zillow? How a prized real estate site lost at iBuying.

❌ Don't set it and forget it - try to monitor your Coagent's performance and gather feedback from users. In most of the cases, you will find something useful to improve the logic.
There is a very interesting article on Top automation pitfalls and how to avoid them by Maria on CIO.
Best practices.
✅ Keep humans in the loop - there are always downsides to removing humans from the workflow loop prematurely.

✅ Try to reduce hallucinations using different proven methods. Some startups can help you detect the accurate percentage as well.
The bottom line is Make CoAgents Work for You (Not Against You).
At the end of the day, time is greater than everything so automation helps you save it.
I hope this guide gave you something useful.
If you've automated a workflow or built something before, do share it with us in the comments.
Have a great day! Until next time :)
Check my work at anmolbaranwal.com and reach out to hi@anmolbaranwal.com for any collab or sponsorships.
You can connect me on GitHub, Twitter and LinkedIn if you loved the content :)

Subscribe to my newsletter
Read articles from Anmol Baranwal directly inside your inbox. Subscribe to the newsletter, and don't miss out.
Written by
Anmol Baranwal
Anmol Baranwal
Loves writing about new open source projects and anything I learn.