Celery and RabbitMQ with Django
 NonStop io Technologies
What is Celery?
Celery is a task queue for executing work outside a Python web application HTTP request-respond cycle. Celery can be defined as a task or process manager. It can execute tasks based upon demand or periodically using prioritization and execute tasks when resources are available.
Celery is Open Source. Celery is a Distributed Task Queue, basically, celery allows you to execute tasks asynchronously or synchronously.
What is RabbitMQ?
- RabbitMQ is an open-source message broker software. It accepts messages from producers and delivers them to consumers. It acts like a middleman which can be used to reduce loads and delivery times taken by web application servers.
Basic commands to set up the RabbitMQ in the System
- Install RabbitMQ Server
sudo apt-get install rabbitmq-server
2. Enable RabbitMQ Server
sudo systemctl enable rabbitmq-server
3. Status of RabbitMQ Server
sudo systemctl status rabbitmq-server
4. Stop RabbitMQ Server
sudo rabbitmqctl stop
Why Should I Use Celery?
Web applications work with request and response cycles. Ideally, this request and response cycle should be fast, otherwise, we would leave the user waiting for way too long.
When the user accesses a certain URL of your application the Web browser sends a request to your server. Django receives this request and does something with it. Usually, it involves executing queries in the database and processing data. While Django does his thing and processes the request, the user has to wait. When Django finalizes its job processing the request, it sends back a response to the user who finally will see something.
So the idea here is to respond to the user as quickly as possible, pass the time-consuming tasks to the queue so as to be executed in the background, and always keep the server ready to respond to new requests.
Now we want to install the celery with our Django application for that like any package we can install using the pip command.
Celery Basic Setup:
We need to follow the following steps for Celery setup in the Django project. Reference
- Install Celery
pip install celery
2. Consider the following Django project named demo with an app name app1:
├── app1
  ├── admin.py
  ├── apps.py
  ├── __init__.py
  ├── migrations
      └── __init__.py
  ├── models.py
  ├── tests.py
  └── views.py├── demo
  ├── asgi.py
  ├── __init__.py
  ├── __pycache__
    ├── __init__.cpython-38.pyc
    ├──settings.cpython-38.pyc
 ├── settings.py
 ├── urls.py
 ├── wsgi.py
 ├── manage.py
So in order to use celery in our Django project first, we must define an instance of celery or an instance of celery library.
3. Add the CELERY_BROKER_URL configuration to the settings.py file
CELERY_BROKER_URL = 'amqp://localhost'
4. Alongside the settings.py and urls.py files, let’s create a new file named celery.py.
import osfrom celery import Celery# Set the default Django settings module for the 'celery' program.
os.environ.setdefault('DJANGO_SETTINGS_MODULE', 'demo.settings')app = Celery('demo')# - namespace='CELERY' means all celery-related configuration keys
#   should have a `CELERY_` prefix.
app.config_from_object('django.conf:settings', namespace='CELERY')# With the below line Celery will automatically discover tasks from all of your installed apps, following the tasks.py convention.app.autodiscover_tasks()
5. Then you need to import this app in __init__.py module. Now edit the __init__.py file in the project root.
# This will make sure the app is always imported when
# Django starts so that shared_task will use this app.
from .celery import app as celery_app  __all__ = ['celery_app']
6. Now we will create a file called tasks.py inside the Django application that is app1.
from celery import shared_task@shared_task()
def prime(num):
   flag = False
   if(num > 1):
     for i in range(2, num):
       if (num % i) == 0:
         flag = True
         break
   if flag:
     print(num, "is not a prime number")
   else:
     print(num, "is a prime number")
7. I have created a task that will check whether a number is prime or not. Now we will start the celery worker using the below command:
$ celery -A demo worker -l info
Change demo to the name of your project. The result is something like this:
(env_ss_backend) madhuri@madhuri-Latitude5580:~/workspace/backend/demo$ celery -A demo worker -l info/home/madhuri/workspace/backend/lib/python3.8/site-packages/jose/backends/cryptography_backend.py:18: CryptographyDeprecationWarning: int_from_bytes is deprecated, use int.from_bytes insteadfrom cryptography.utils import int_from_bytes, int_to_bytes-------------- celery@madhuri-Latitude-5580 v5.2.3 (dawn-chorus)--- ***** ------- ******* ---- Linux-5.15.0-41-generic-x86_64-with-glibc2.29 2022-08-18 10:03:10
- *** --- * ---
- ** ---------- [config]
- ** ---------- .> app:         demo:0x7fbe7ace3490
- ** ---------- .> transport:   amqp://guest:**@localhost:5672//
- ** ---------- .> results:     disabled://
- *** --- * --- .> concurrency: 8 (prefork)
-- ******* ---- .> task events: OFF (enable -E to monitor tasks in this worker)
--- ***** -----
-------------- [queues]
.> celery           exchange=celery(direct) key=celery
For a complete listing of the command-line options available, use the help command:
celery --help
8. Celery provides delay and apply method to call task so we will use the delay method to call task.
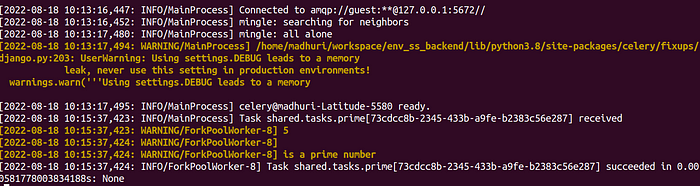
prime.delay(5)
Now go to your terminal where celery is running you will see the output.
Conclusion:
So far in this blog, we have seen how to install Celery and RabbitMQ as well as how to implement Celery and RabbitMQ with Django. I hope you liked it
References:
Thanks for reading!!!Happy learning 😃
Subscribe to my newsletter
Read articles from NonStop io Technologies directly inside your inbox. Subscribe to the newsletter, and don't miss out.
Written by
NonStop io Technologies
NonStop io Technologies
Product Development as an Expertise Since 2015 Founded in August 2015, we are a USA-based Bespoke Engineering Studio providing Product Development as an Expertise. With 80+ satisfied clients worldwide, we serve startups and enterprises across San Francisco, Seattle, New York, London, Pune, Bangalore, Tokyo and other prominent technology hubs.