Part 4: Expose & Secure Your EKS Apps — AWS Load Balancer Controller with TLS & Terraform
 Neamul Kabir Emon
In this article, I’m sharing a real-world networking challenge I encountered while deploying production applications on Amazon EKS—and how I resolved it by implementing the AWS Load Balancer Controller with TLS termination, powered by Terraform and Helm.
This isn’t just another walkthrough—it’s the actual setup I used to expose Kubernetes workloads securely to the internet using a production-ready ingress setup. We’re talking HTTPS with TLS, automated DNS via Route53, and Let’s Encrypt integration for certificate management.
Now I’m breaking it all down step-by-step, so you can replicate it in your environment with confidence.
🔗 If you haven’t followed Parts 1–3 yet, start here:
⚠️ The Real Problem
Once I had my EKS cluster up and running—with autoscaling in place—I ran into a critical challenge:
I needed to securely expose multiple applications to the internet.
Traffic had to be routed based on custom domains and paths.
I wanted to terminate HTTPS (TLS) at the ingress layer.
TLS certificates had to be managed automatically using Let’s Encrypt.
I initially tried using NGINX Ingress manually. While functional, it didn’t integrate smoothly with AWS ALB. Managing certificates was cumbersome, and DNS automation required extra tooling and effort.
✅ The Scalable Solution: AWS Load Balancer Controller + TLS
After exploring multiple options, I implemented the following architecture:
AWS Load Balancer Controller to dynamically provision ALBs from Kubernetes Ingress resources.
Ingress with Annotations to define domain-based routing and path rules.
Cert-Manager for automatic TLS certificate issuance and renewal via Let’s Encrypt.
ExternalDNS to automatically manage DNS records in Route53.
With this setup, any Kubernetes workload on EKS can be exposed to the internet with full HTTPS support—no manual DNS edits or certificate renewals required.
Step-by-Step: Deploy AWS Load Balancer Controller with Terraform
We start by provisioning IAM roles, policies, and Helm resources required to run the AWS Load Balancer Controller.
Terraform file: 15-aws-lbc.tf
data "aws_iam_policy_document" "aws_lbc" {
  statement {
    effect = "Allow"

    principals {
      type        = "Service"
      identifiers = ["pods.eks.amazonaws.com"]
    }

    actions = [
      "sts:AssumeRole",
      "sts:TagSession"
    ]
  }
}

resource "aws_iam_role" "aws_lbc" {
  name               = "${aws_eks_cluster.eks.name}-aws-lbc"
  assume_role_policy = data.aws_iam_policy_document.aws_lbc.json
}

resource "aws_iam_policy" "aws_lbc" {
  policy = file("./iam/AWSLoadBalancerController.json")
  name   = "AWSLoadBalancerController"
}

resource "aws_iam_role_policy_attachment" "aws_lbc" {
  policy_arn = aws_iam_policy.aws_lbc.arn
  role       = aws_iam_role.aws_lbc.name
}

resource "aws_eks_pod_identity_association" "aws_lbc" {
  cluster_name    = aws_eks_cluster.eks.name
  namespace       = "kube-system"
  service_account = "aws-load-balancer-controller"
  role_arn        = aws_iam_role.aws_lbc.arn
}

resource "helm_release" "aws_lbc" {
  name = "aws-load-balancer-controller"

  repository = "https://aws.github.io/eks-charts"
  chart      = "aws-load-balancer-controller"
  namespace  = "kube-system"
  version    = "1.7.2"

  set {
    name  = "clusterName"
    value = aws_eks_cluster.eks.name
  }

  set {
    name  = "serviceAccount.name"
    value = "aws-load-balancer-controller"
  }
  set {
    name  = "vpcId"
    value = aws_vpc.main.id
  }

  depends_on = [helm_release.cluster_autoscaler]
}
Now, create the AWS IAM policy JSON file at iam/AWSLoadBalancerController.json.
Since we define an IAM policy in the configuration, we need to create the policy JSON file in the iam/ folder.
AWSLoadBalancerController.json
{
    "Version": "2012-10-17",
    "Statement": [
        {
            "Effect": "Allow",
            "Action": [
                "iam:CreateServiceLinkedRole"
            ],
            "Resource": "*",
            "Condition": {
                "StringEquals": {
                    "iam:AWSServiceName": "elasticloadbalancing.amazonaws.com"
                }
            }
        },
        {
            "Effect": "Allow",
            "Action": [
                "ec2:DescribeAccountAttributes",
                "ec2:DescribeAddresses",
                "ec2:DescribeAvailabilityZones",
                "ec2:DescribeInternetGateways",
                "ec2:DescribeVpcs",
                "ec2:DescribeVpcPeeringConnections",
                "ec2:DescribeSubnets",
                "ec2:DescribeSecurityGroups",
                "ec2:DescribeInstances",
                "ec2:DescribeNetworkInterfaces",
                "ec2:DescribeTags",
                "ec2:GetCoipPoolUsage",
                "ec2:DescribeCoipPools",
                "elasticloadbalancing:DescribeLoadBalancers",
                "elasticloadbalancing:DescribeLoadBalancerAttributes",
                "elasticloadbalancing:DescribeListeners",
                "elasticloadbalancing:DescribeListenerAttributes",
                "elasticloadbalancing:DescribeListenerCertificates",
                "elasticloadbalancing:DescribeSSLPolicies",
                "elasticloadbalancing:DescribeRules",
                "elasticloadbalancing:DescribeTargetGroups",
                "elasticloadbalancing:DescribeTargetGroupAttributes",
                "elasticloadbalancing:DescribeTargetHealth",
                "elasticloadbalancing:DescribeTags",
                "elasticloadbalancing:DescribeTrustStores"
            ],
            "Resource": "*"
        },
        {
            "Effect": "Allow",
            "Action": [
                "cognito-idp:DescribeUserPoolClient",
                "acm:ListCertificates",
                "acm:DescribeCertificate",
                "iam:ListServerCertificates",
                "iam:GetServerCertificate",
                "waf-regional:GetWebACL",
                "waf-regional:GetWebACLForResource",
                "waf-regional:AssociateWebACL",
                "waf-regional:DisassociateWebACL",
                "wafv2:GetWebACL",
                "wafv2:GetWebACLForResource",
                "wafv2:AssociateWebACL",
                "wafv2:DisassociateWebACL",
                "shield:GetSubscriptionState",
                "shield:DescribeProtection",
                "shield:CreateProtection",
                "shield:DeleteProtection"
            ],
            "Resource": "*"
        },
        {
            "Effect": "Allow",
            "Action": [
                "ec2:AuthorizeSecurityGroupIngress",
                "ec2:RevokeSecurityGroupIngress"
            ],
            "Resource": "*"
        },
        {
            "Effect": "Allow",
            "Action": [
                "ec2:CreateSecurityGroup"
            ],
            "Resource": "*"
        },
        {
            "Effect": "Allow",
            "Action": [
                "ec2:CreateTags"
            ],
            "Resource": "arn:aws:ec2:*:*:security-group/*",
            "Condition": {
                "StringEquals": {
                    "ec2:CreateAction": "CreateSecurityGroup"
                },
                "Null": {
                    "aws:RequestTag/elbv2.k8s.aws/cluster": "false"
                }
            }
        },
        {
            "Effect": "Allow",
            "Action": [
                "ec2:CreateTags",
                "ec2:DeleteTags"
            ],
            "Resource": "arn:aws:ec2:*:*:security-group/*",
            "Condition": {
                "Null": {
                    "aws:RequestTag/elbv2.k8s.aws/cluster": "true",
                    "aws:ResourceTag/elbv2.k8s.aws/cluster": "false"
                }
            }
        },
        {
            "Effect": "Allow",
            "Action": [
                "ec2:AuthorizeSecurityGroupIngress",
                "ec2:RevokeSecurityGroupIngress",
                "ec2:DeleteSecurityGroup"
            ],
            "Resource": "*",
            "Condition": {
                "Null": {
                    "aws:ResourceTag/elbv2.k8s.aws/cluster": "false"
                }
            }
        },
        {
            "Effect": "Allow",
            "Action": [
                "elasticloadbalancing:CreateLoadBalancer",
                "elasticloadbalancing:CreateTargetGroup"
            ],
            "Resource": "*",
            "Condition": {
                "Null": {
                    "aws:RequestTag/elbv2.k8s.aws/cluster": "false"
                }
            }
        },
        {
            "Effect": "Allow",
            "Action": [
                "elasticloadbalancing:CreateListener",
                "elasticloadbalancing:DeleteListener",
                "elasticloadbalancing:CreateRule",
                "elasticloadbalancing:DeleteRule"
            ],
            "Resource": "*"
        },
        {
            "Effect": "Allow",
            "Action": [
                "elasticloadbalancing:AddTags",
                "elasticloadbalancing:RemoveTags"
            ],
            "Resource": [
                "arn:aws:elasticloadbalancing:*:*:targetgroup/*/*",
                "arn:aws:elasticloadbalancing:*:*:loadbalancer/net/*/*",
                "arn:aws:elasticloadbalancing:*:*:loadbalancer/app/*/*"
            ],
            "Condition": {
                "Null": {
                    "aws:RequestTag/elbv2.k8s.aws/cluster": "true",
                    "aws:ResourceTag/elbv2.k8s.aws/cluster": "false"
                }
            }
        },
        {
            "Effect": "Allow",
            "Action": [
                "elasticloadbalancing:AddTags",
                "elasticloadbalancing:RemoveTags"
            ],
            "Resource": [
                "arn:aws:elasticloadbalancing:*:*:listener/net/*/*/*",
                "arn:aws:elasticloadbalancing:*:*:listener/app/*/*/*",
                "arn:aws:elasticloadbalancing:*:*:listener-rule/net/*/*/*",
                "arn:aws:elasticloadbalancing:*:*:listener-rule/app/*/*/*"
            ]
        },
        {
            "Effect": "Allow",
            "Action": [
                "elasticloadbalancing:ModifyLoadBalancerAttributes",
                "elasticloadbalancing:SetIpAddressType",
                "elasticloadbalancing:SetSecurityGroups",
                "elasticloadbalancing:SetSubnets",
                "elasticloadbalancing:DeleteLoadBalancer",
                "elasticloadbalancing:ModifyTargetGroup",
                "elasticloadbalancing:ModifyTargetGroupAttributes",
                "elasticloadbalancing:DeleteTargetGroup"
            ],
            "Resource": "*",
            "Condition": {
                "Null": {
                    "aws:ResourceTag/elbv2.k8s.aws/cluster": "false"
                }
            }
        },
        {
            "Effect": "Allow",
            "Action": [
                "elasticloadbalancing:AddTags"
            ],
            "Resource": [
                "arn:aws:elasticloadbalancing:*:*:targetgroup/*/*",
                "arn:aws:elasticloadbalancing:*:*:loadbalancer/net/*/*",
                "arn:aws:elasticloadbalancing:*:*:loadbalancer/app/*/*"
            ],
            "Condition": {
                "StringEquals": {
                    "elasticloadbalancing:CreateAction": [
                        "CreateTargetGroup",
                        "CreateLoadBalancer"
                    ]
                },
                "Null": {
                    "aws:RequestTag/elbv2.k8s.aws/cluster": "false"
                }
            }
        },
        {
            "Effect": "Allow",
            "Action": [
                "elasticloadbalancing:RegisterTargets",
                "elasticloadbalancing:DeregisterTargets"
            ],
            "Resource": "arn:aws:elasticloadbalancing:*:*:targetgroup/*/*"
        },
        {
            "Effect": "Allow",
            "Action": [
                "elasticloadbalancing:SetWebAcl",
                "elasticloadbalancing:ModifyListener",
                "elasticloadbalancing:AddListenerCertificates",
                "elasticloadbalancing:RemoveListenerCertificates",
                "elasticloadbalancing:ModifyRule"
            ],
            "Resource": "*"
        }
    ]
}
Save this policy.
Deploy the Controller
Run the following command to apply the configuration:
terraform apply -auto-approve
It will take few min to install the load balancer controller to your eks cluster
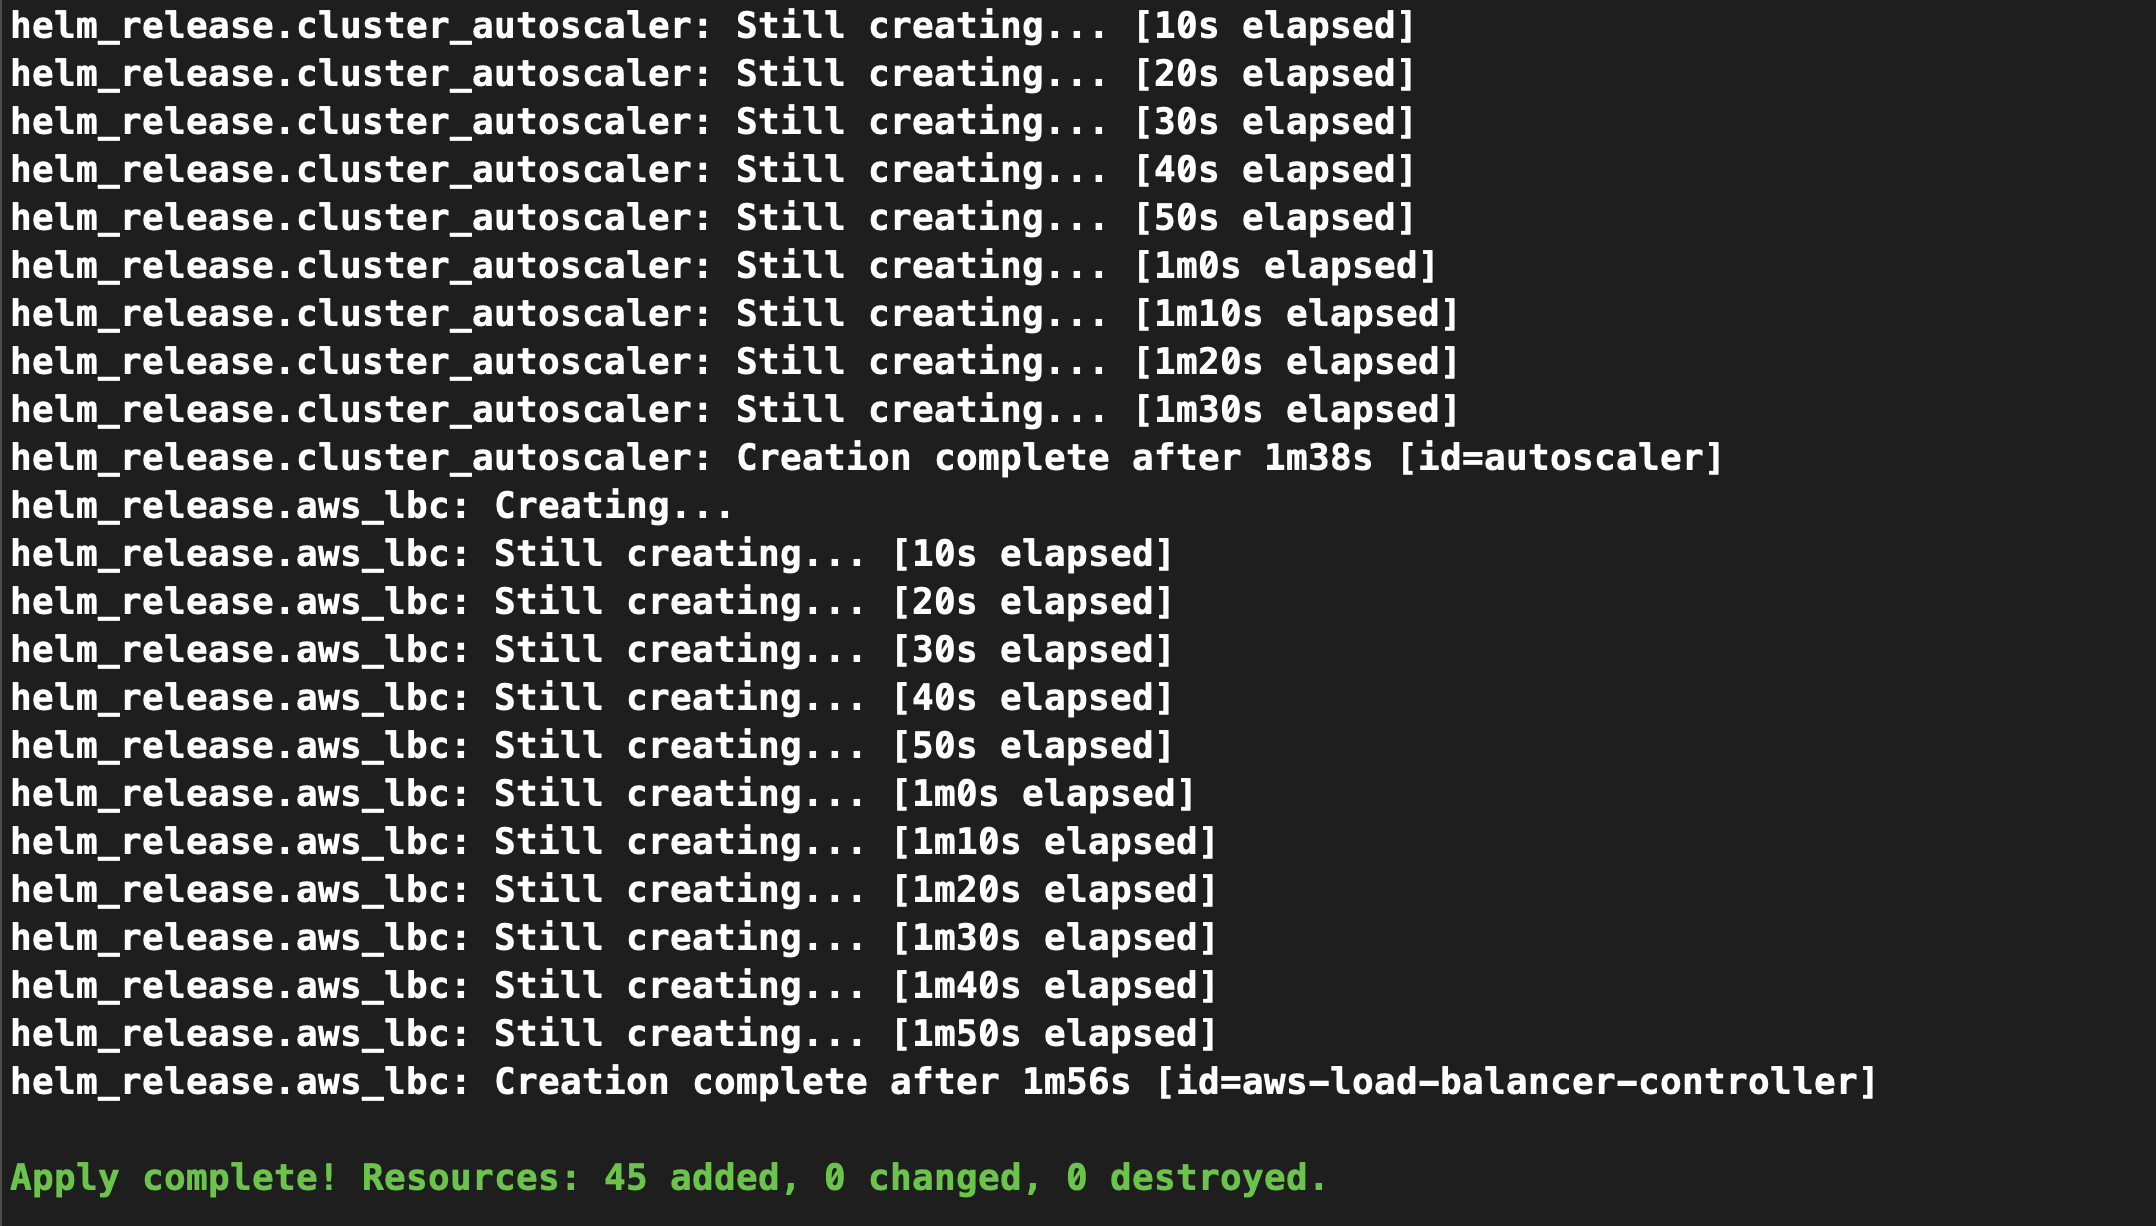
Once complete, verify the deployment:
kubectl get pods -n kube-system

You should see the aws-load-balancer-controller Pod running. ✅
Test Load Balancer with a Sample Deployment
Create a test app to validate the setup.
mkdir 05-service-with-aws-loadbalancer && cd 05-service-with-aws-loadbalancer
Namespace: 0-namespace.yaml
---
apiVersion: v1
kind: Namespace
metadata:
  name: 5-example
Deployment: 1-deployment.yaml
---
apiVersion: apps/v1
kind: Deployment
metadata:
  name: myapp
  namespace: 5-example
spec:
  replicas: 1
  selector:
    matchLabels:
      app: myapp
  template:
    metadata:
      labels:
        app: myapp
    spec:
      containers:
        - name: myapp
          image: aputra/myapp-195:v2
          ports:
            - name: http
              containerPort: 8080
          resources:
            requests:
              memory: 128Mi
              cpu: 100m
            limits:
              memory: 128Mi
              cpu: 100m
Service: 2-service.yaml
---
# Supported annotations
# https://kubernetes-sigs.github.io/aws-load-balancer-controller/v2.7/guide/service/annotations/
apiVersion: v1
kind: Service
metadata:
  name: myapp
  namespace: 5-example
  annotations:
    service.beta.kubernetes.io/aws-load-balancer-type: external
    service.beta.kubernetes.io/aws-load-balancer-nlb-target-type: ip
    service.beta.kubernetes.io/aws-load-balancer-scheme: internet-facing
    # service.beta.kubernetes.io/aws-load-balancer-proxy-protocol: "*"
spec:
  type: LoadBalancer
  ports:
    - port: 8080
      targetPort: http
  selector:
    app: myapp
Apply the configs:
cd ..
kubectl apply -f 05-service-with-aws-loadbalancer
kubectl get services -n 5-example

As you can see, the load balancer controller has created a load balancer. Let's check if it is working.
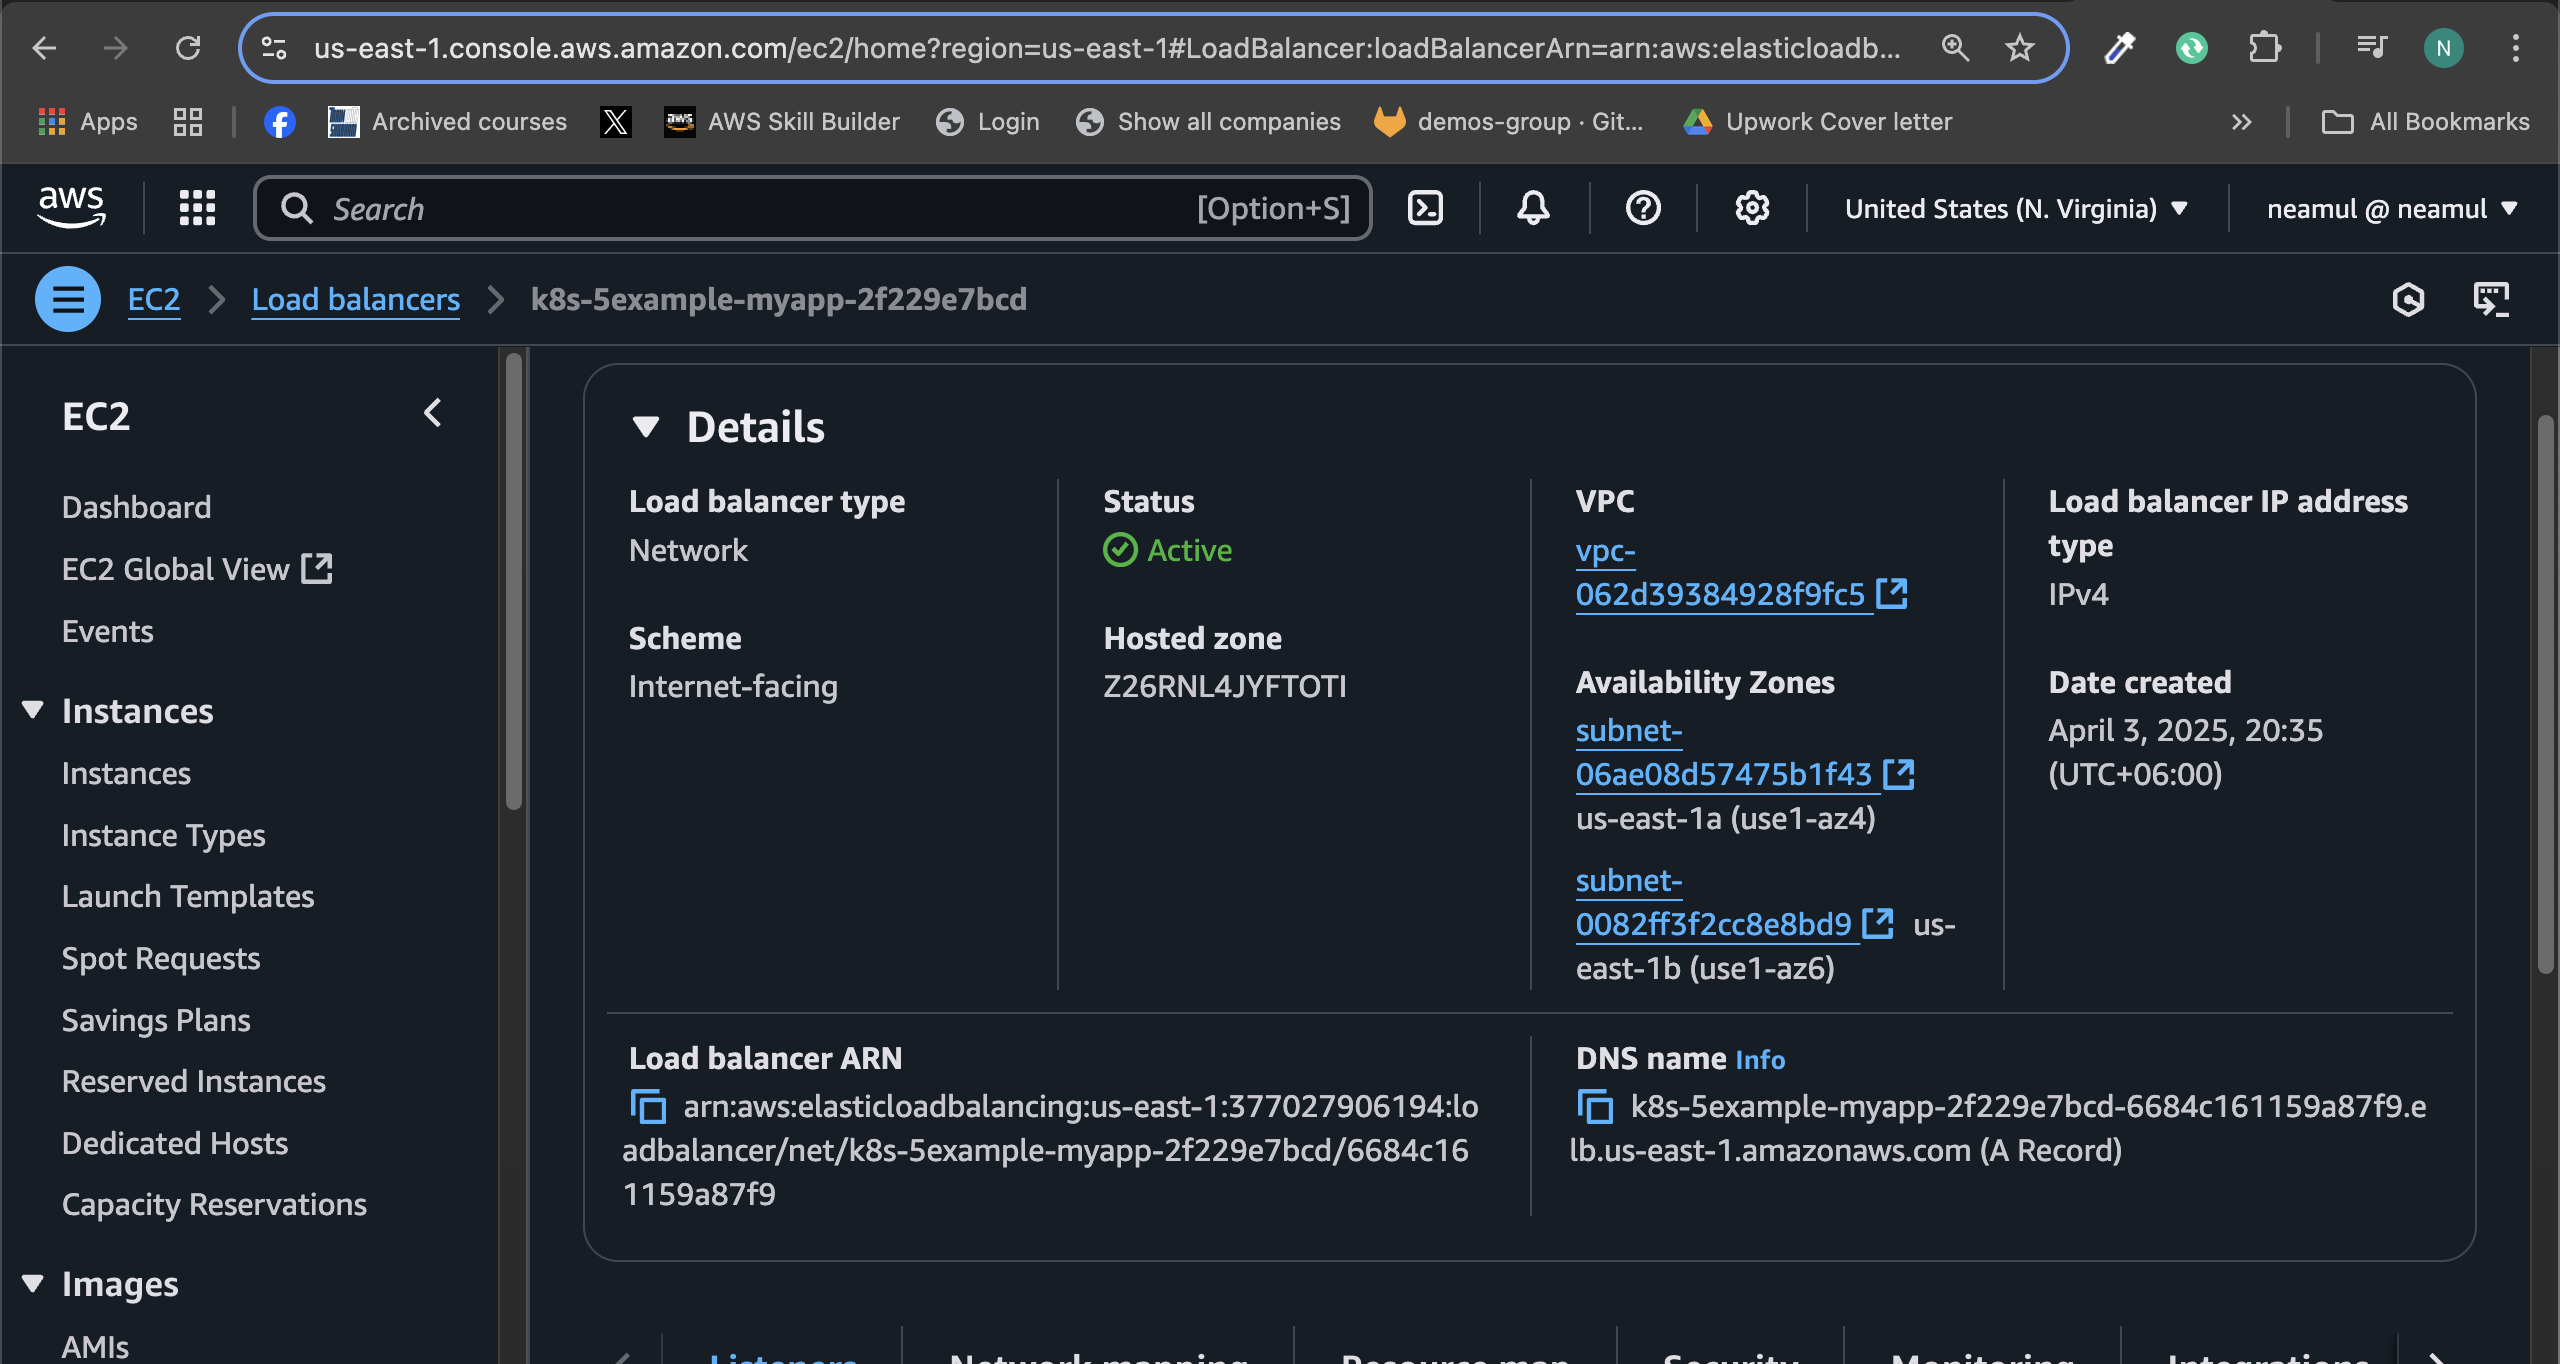
In the console, you can see that the Load Balancer type is network, and it is active and running.
Now, we will check the application using curl.
curl -i http://k8s-5example-myapp-2f229e7bcd-6684c161159a87f9.elb.us-east-1.amazonaws.com:8080/about

A 200 OK response confirms the deployment works. 🎯
🌐 Ingress with ALB (HTTP)
Let’s take it a step further by exposing the app via ALB Ingress.
mkdir 06-deployment-with-alb-ingress && cd 06-deployment-with-alb-ingress
Namespace: 0-namespace.yaml
---
apiVersion: v1
kind: Namespace
metadata:
  name: 6-example
Deployment & Service – Same structure as before, but change the namespace to 6-example.
Deployment: 1-deployment.yaml
---
apiVersion: apps/v1
kind: Deployment
metadata:
  name: myapp
  namespace: 6-example
spec:
  replicas: 1
  selector:
    matchLabels:
      app: myapp
  template:
    metadata:
      labels:
        app: myapp
    spec:
      containers:
        - name: myapp
          image: aputra/myapp-195:v2
          ports:
            - name: http
              containerPort: 8080
          resources:
            requests:
              memory: 128Mi
              cpu: 100m
            limits:
              memory: 128Mi
              cpu: 100m
Services: 2-service.yaml
---
apiVersion: v1
kind: Service
metadata:
  name: myapp
  namespace: 6-example
spec:
  type: ClusterIP
  ports:
    - port: 8080
      targetPort: http
  selector:
    app: myapp
Ingress: 3-ingress.yaml
---
# Supported annotations
# https://kubernetes-sigs.github.io/aws-load-balancer-controller/v2.7/guide/ingress/annotations/
apiVersion: networking.k8s.io/v1
kind: Ingress
metadata:
  name: myapp
  namespace: 6-example
  annotations:
    alb.ingress.kubernetes.io/scheme: internet-facing
    alb.ingress.kubernetes.io/target-type: ip
    alb.ingress.kubernetes.io/healthcheck-path: /health
spec:
  ingressClassName: alb
  rules:
    - host: ex6.neamulkabiremon.com
      http:
        paths:
          - path: /
            pathType: Prefix
            backend:
              service:
                name: myapp
                port:
                  number: 8080
Apply:
cd ..
kubectl apply -f 06-deployment-with-alb-ingress
kubectl get ingress -n 6-example

We have successfully exposed the app using ingress; now let's check it using the console.
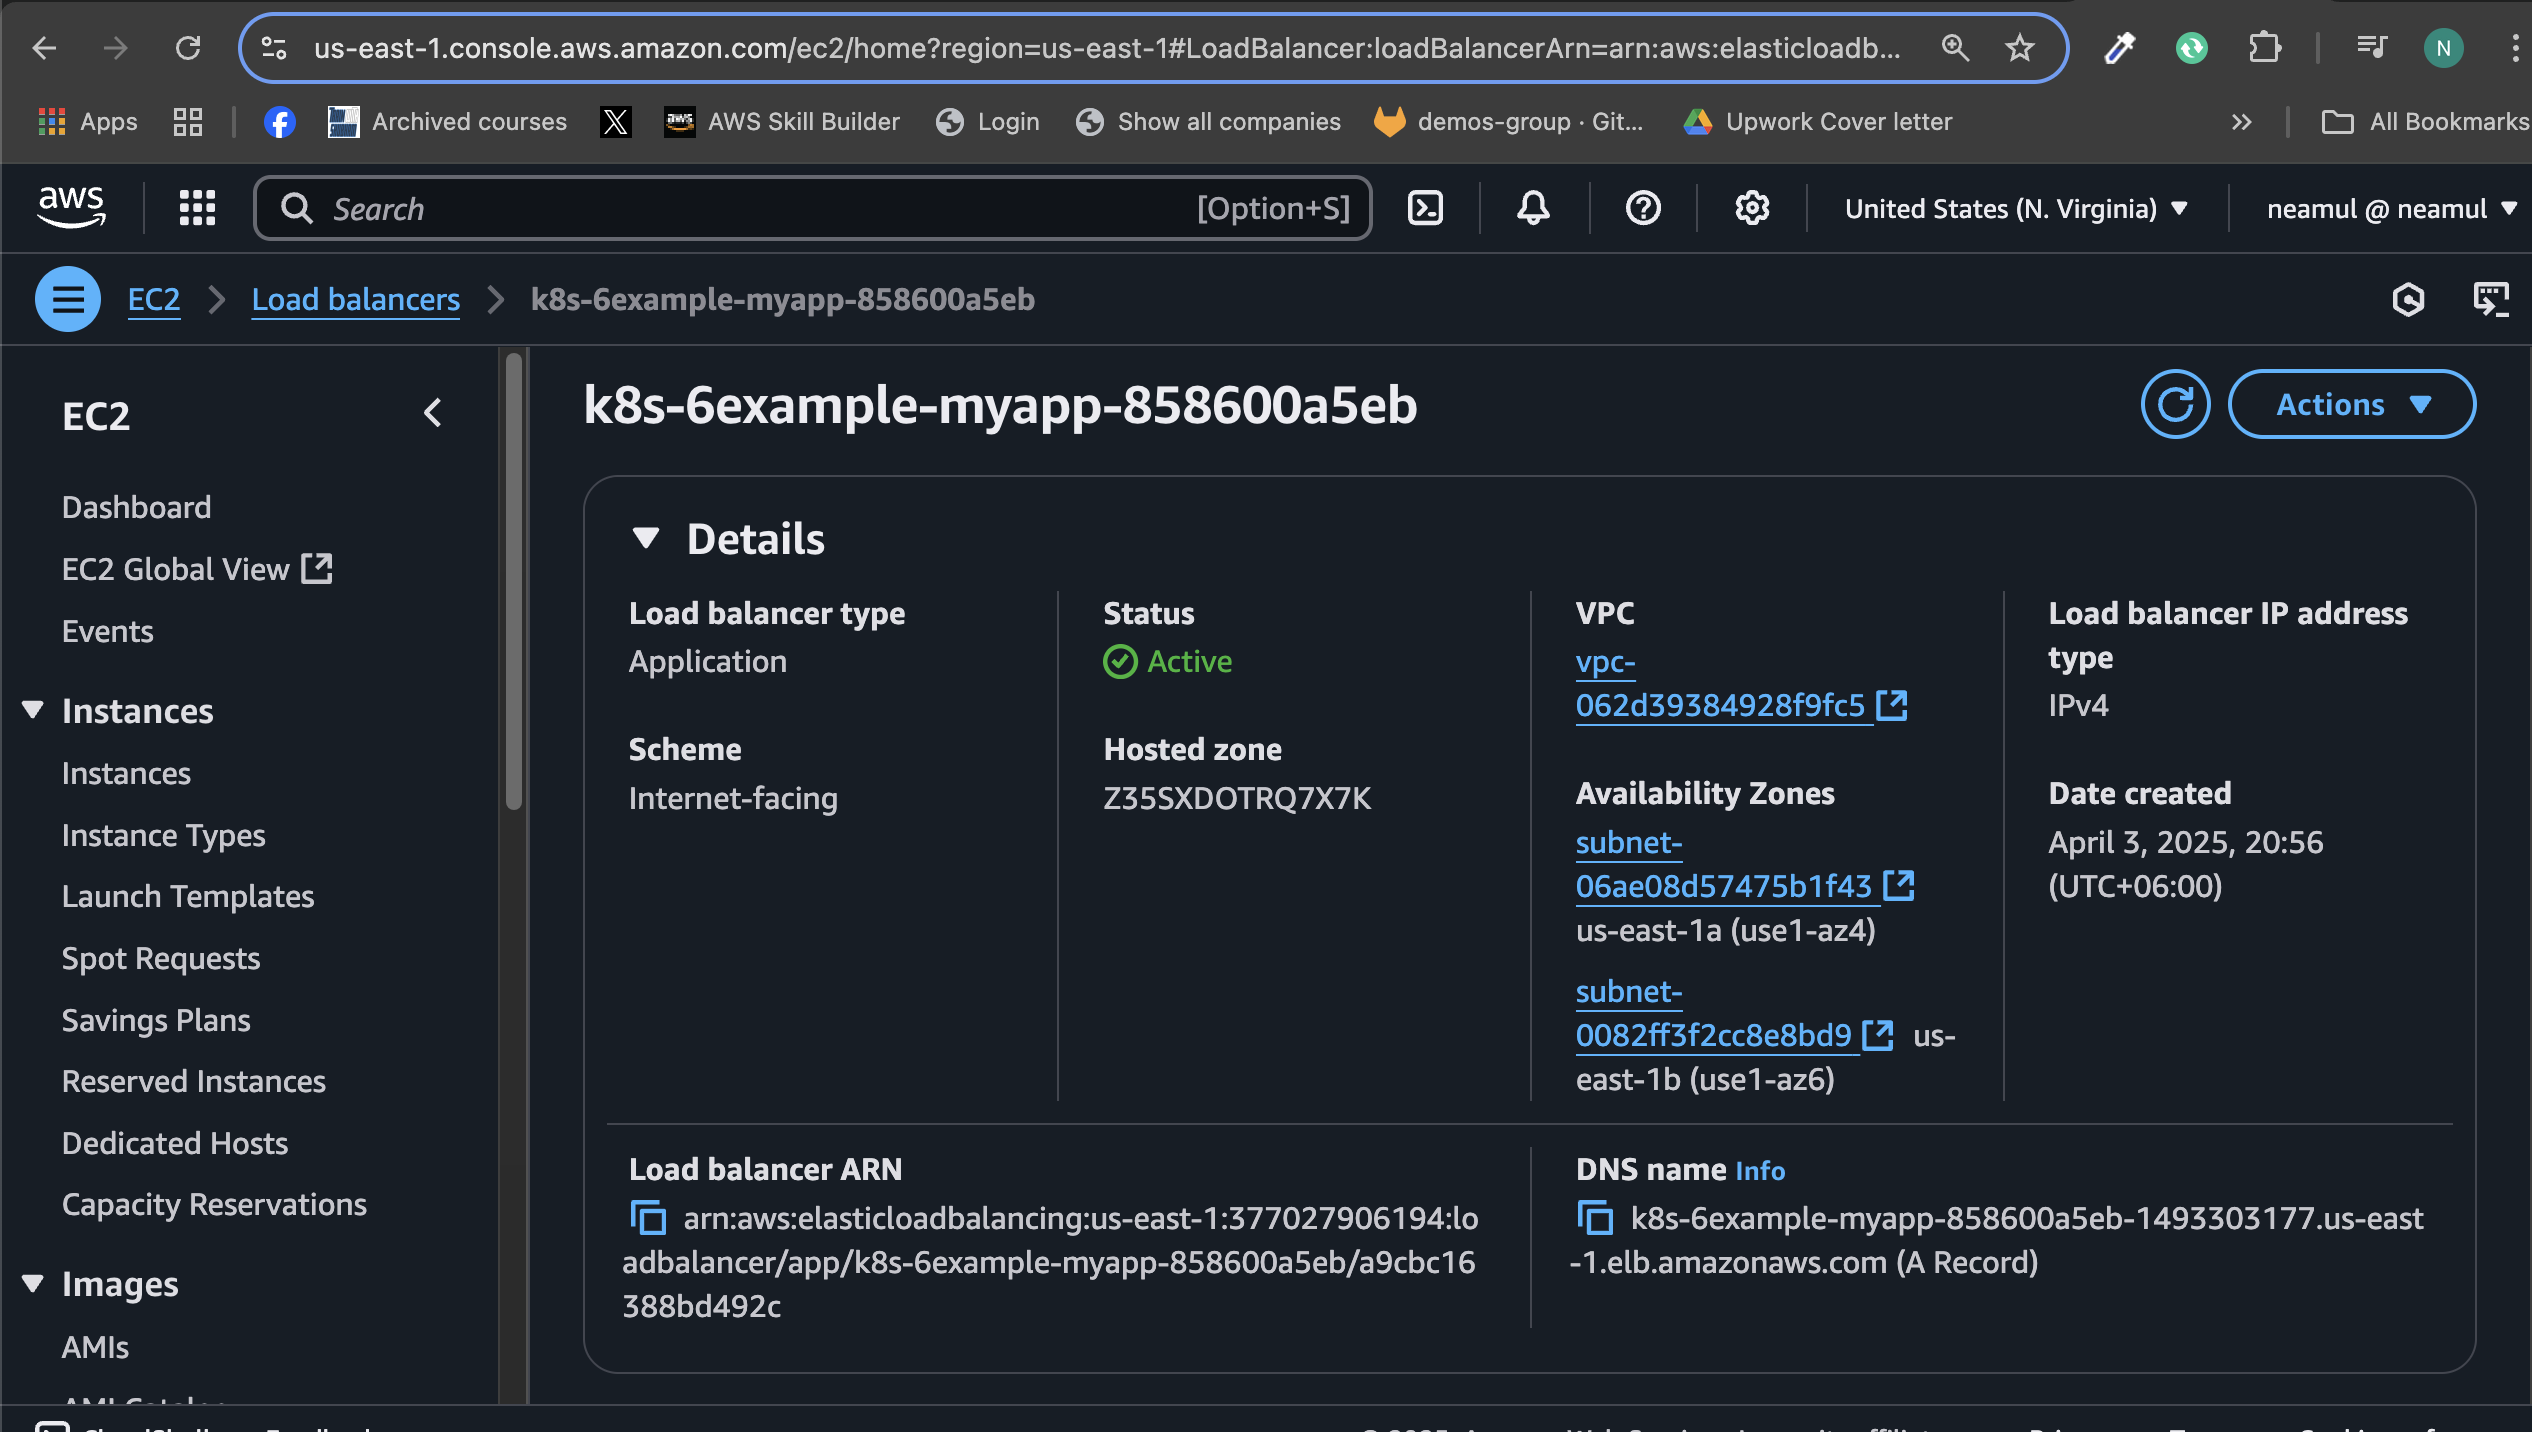
As you can see, the load balancer type is an application load balancer. Now, let's check if the application is working.
curl -i --header "Host: ex6.neamulkabiremon.com" http://<alb-dns>/about

As you can see, the app is running, and we are currently using ingress.
🔒 Bonus: Secure Ingress with TLS Termination on AWS ALB
In this final step, we’ll enable full HTTPS encryption for your Kubernetes workloads on EKS by terminating TLS at the Application Load Balancer (ALB). This ensures your users can securely access services via custom domains—protected by valid TLS certificates.
Since Let’s Encrypt certificates can’t be directly attached to ALBs, we’ll use AWS Certificate Manager (ACM) to issue and manage our TLS certificate.
Step 1: Issue a TLS Certificate via ACM
To issue your certificate:
Go to AWS ACM Console → Request Public Certificate
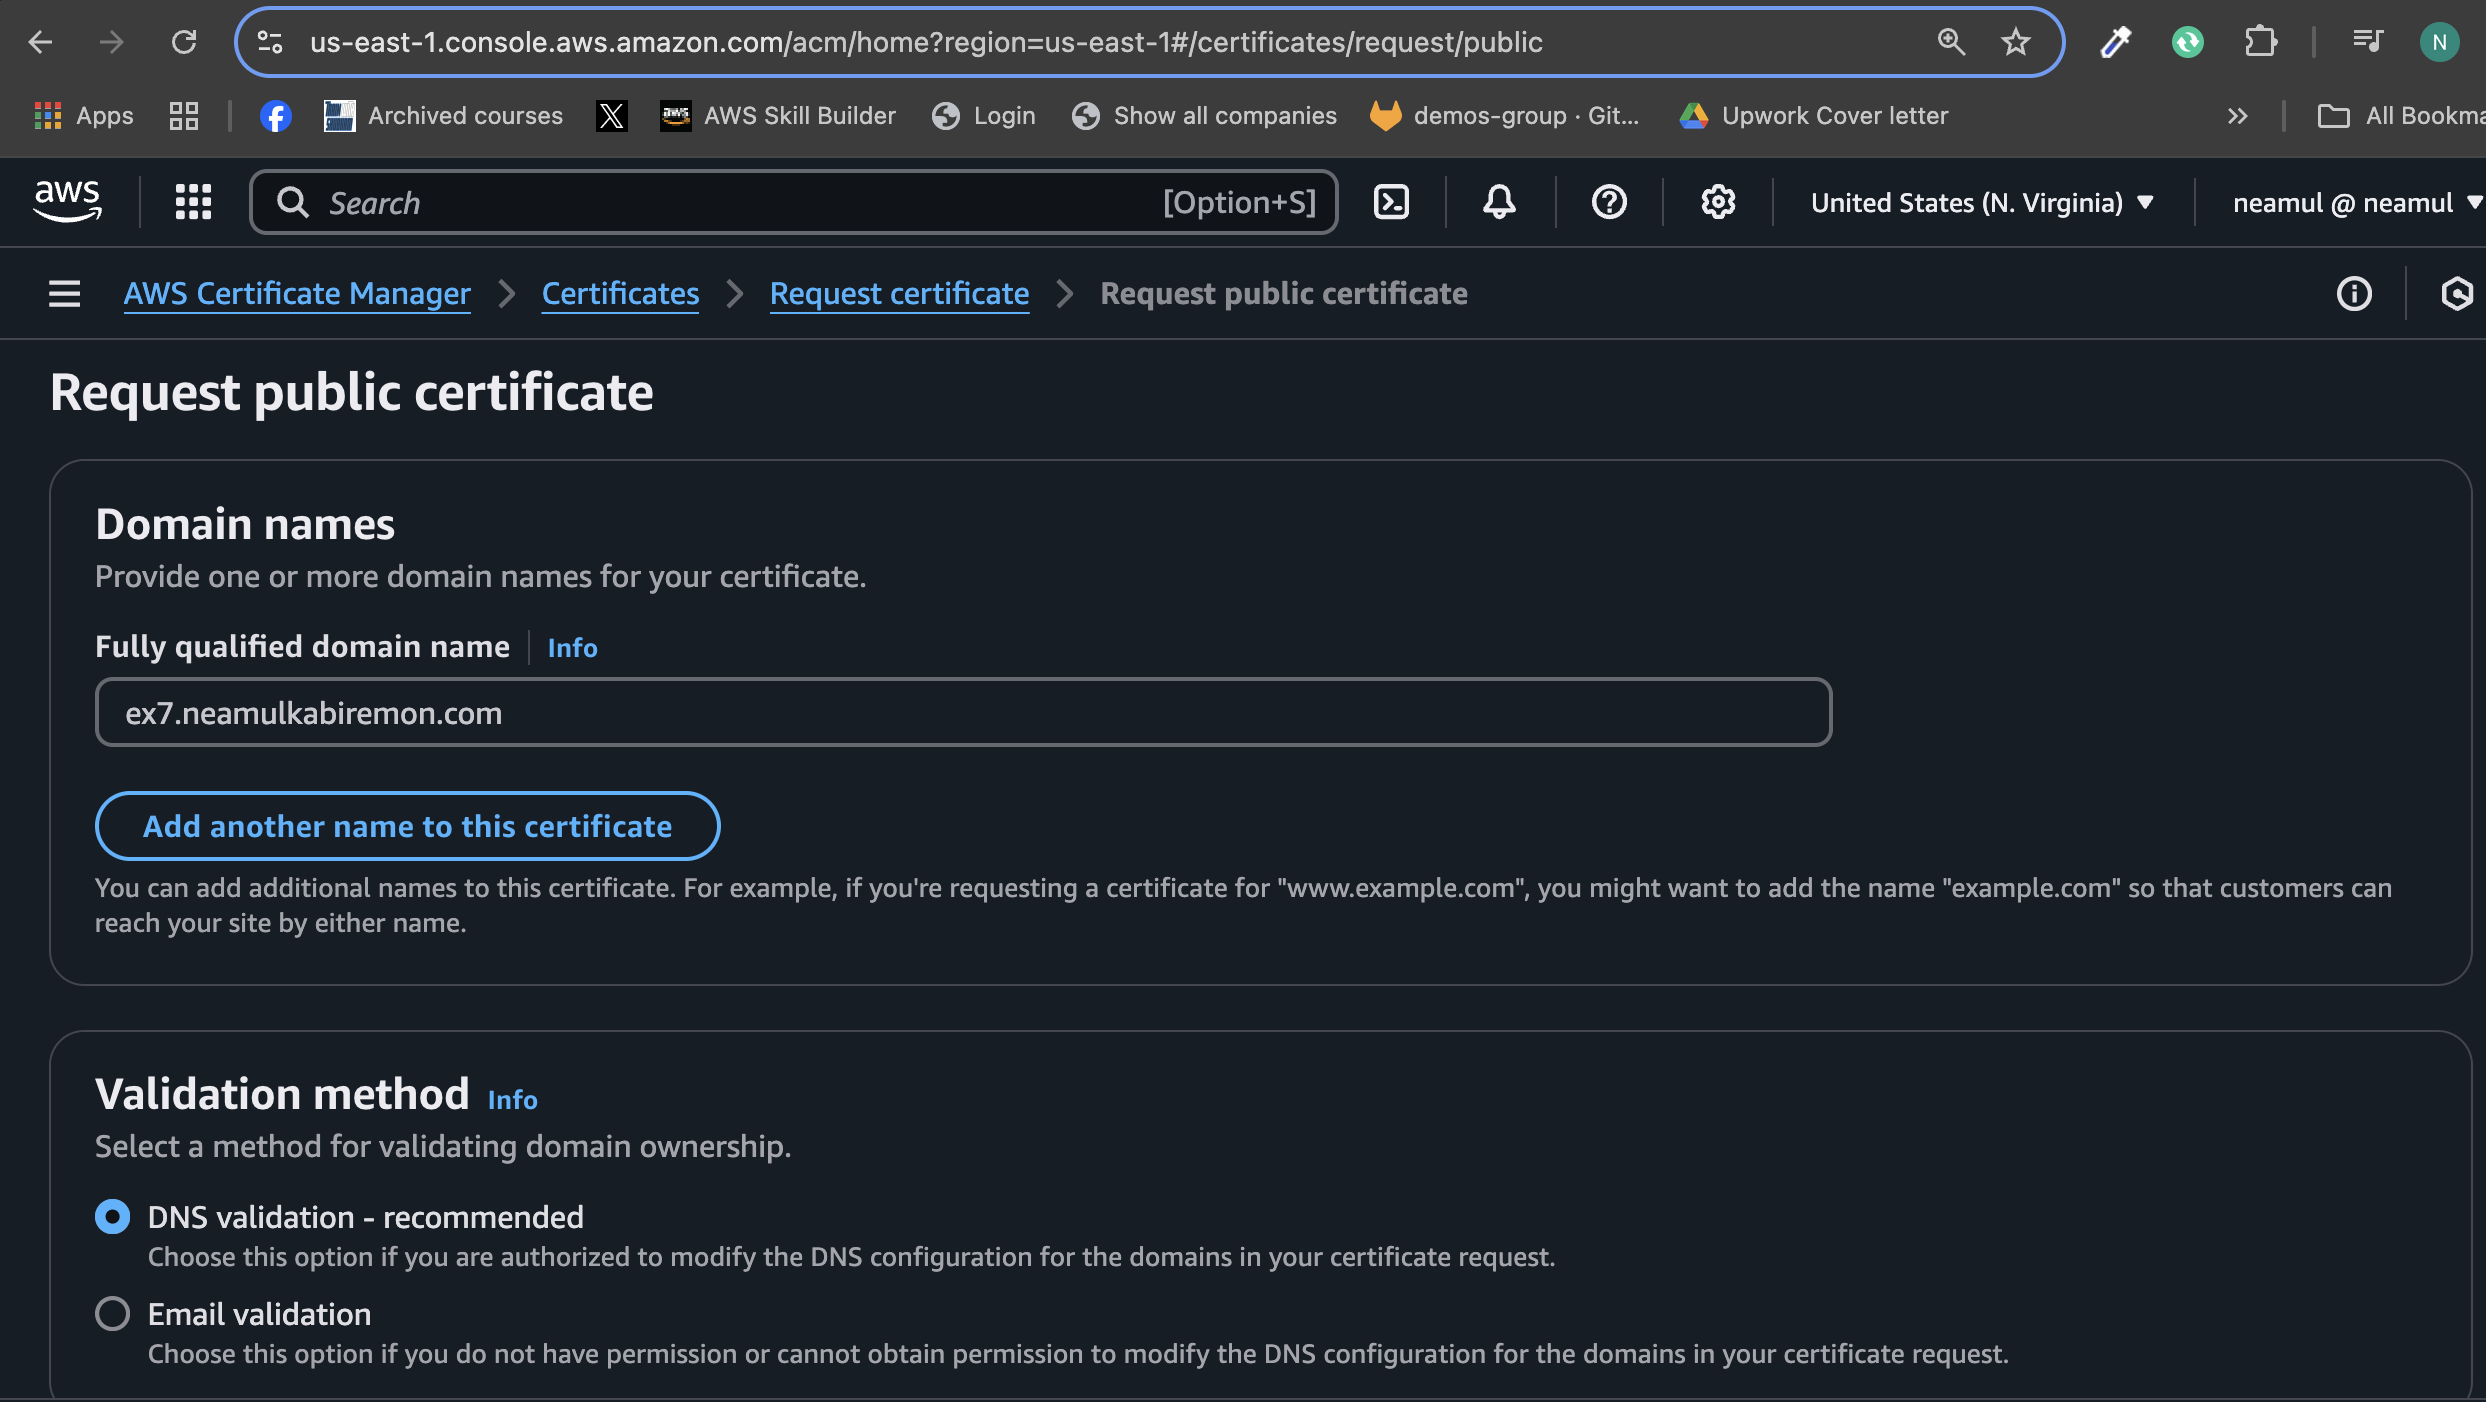
Enter your domain (e.g.,
ex7.neamulkabiremon.com) and proceed.Complete DNS validation by adding the provided CNAME record to your domain’s DNS.
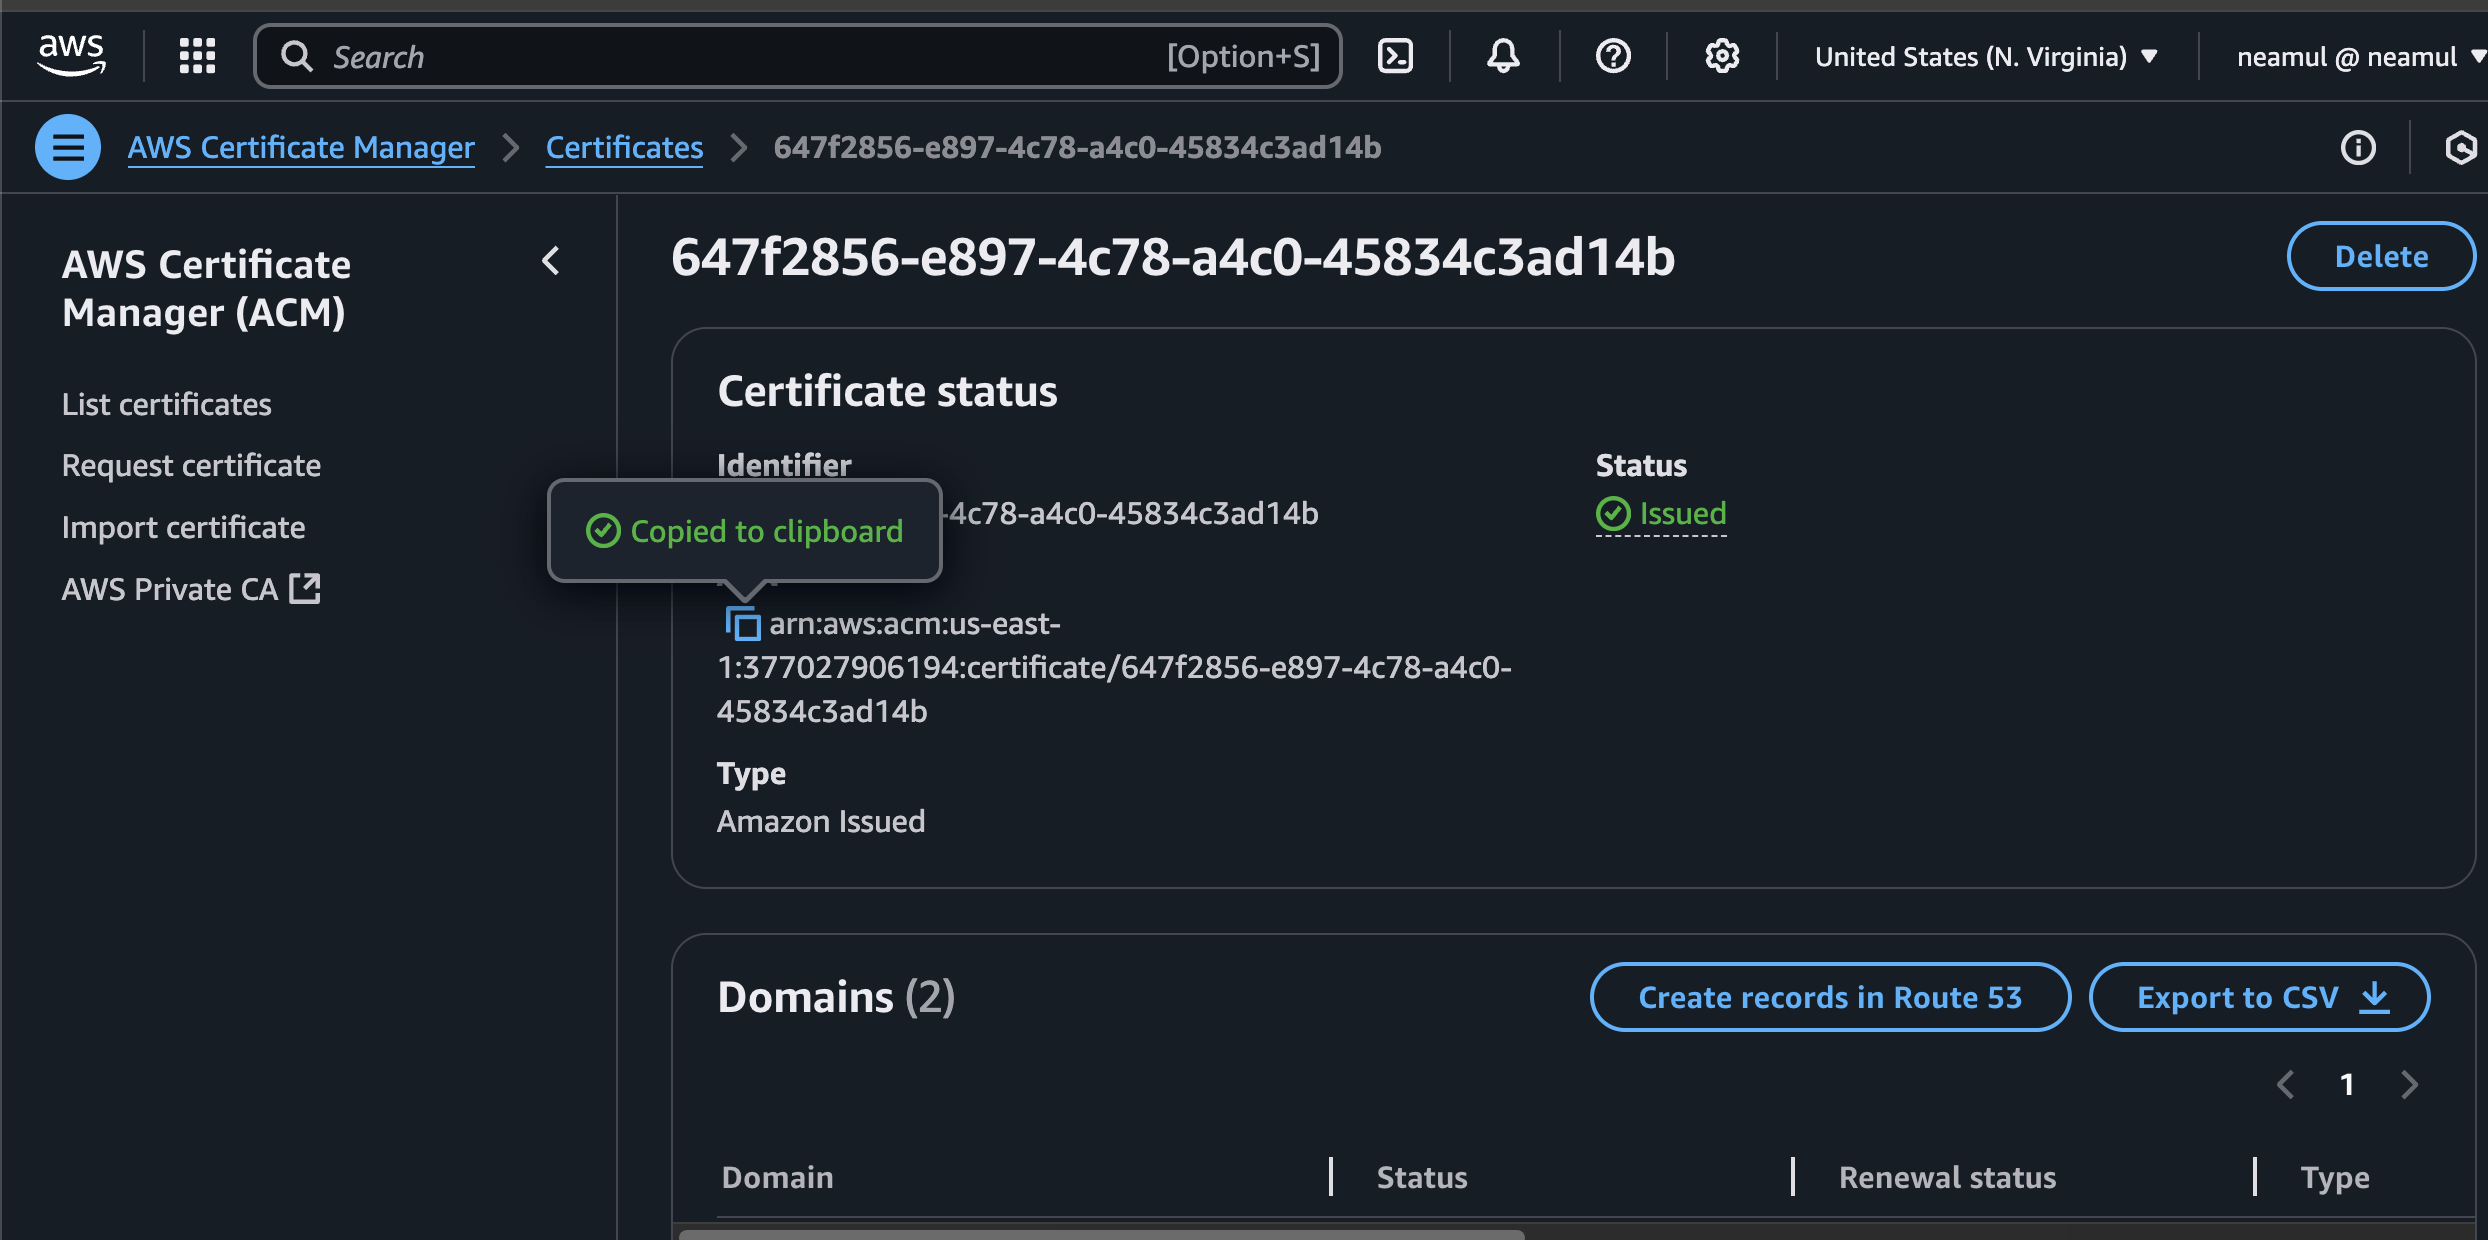
Once validated, copy the Certificate ARN.
📌 Example:
arn:aws:acm:us-east-1:377027906194:certificate/647f2856-e897-4c78-a4c0-45834c3ad14b
🛠️ Step 2: Deploy a Sample App with HTTPS Ingress
Let’s define the Kubernetes resources to deploy an app and expose it securely using HTTPS via ALB and ACM.
mkdir 07-https-ingress-alb-ssl && cd 07-https-ingress-alb-ssl
0-namespace.yaml
---
apiVersion: v1
kind: Namespace
metadata:
  name: 7-example
1-deployment.yaml
---
apiVersion: apps/v1
kind: Deployment
metadata:
  name: myapp
  namespace: 7-example
spec:
  replicas: 1
  selector:
    matchLabels:
      app: myapp
  template:
    metadata:
      labels:
        app: myapp
    spec:
      containers:
        - name: myapp
          image: aputra/myapp-195:v2
          ports:
            - name: http
              containerPort: 8080
          resources:
            requests:
              memory: 128Mi
              cpu: 100m
            limits:
              memory: 128Mi
              cpu: 100m
2-service.yaml
---
apiVersion: v1
kind: Service
metadata:
  name: myapp
  namespace: 7-example
spec:
  type: ClusterIP
  ports:
    - port: 8080
      targetPort: http
  selector:
    app: myapp
3-ingress.yaml
---
# Supported annotations
# https://kubernetes-sigs.github.io/aws-load-balancer-controller/v2.7/guide/ingress/annotations/
apiVersion: networking.k8s.io/v1
kind: Ingress
metadata:
  name: myapp
  namespace: 7-example
  annotations:
    alb.ingress.kubernetes.io/certificate-arn: # Replace it with your newly created certificate ARN
    alb.ingress.kubernetes.io/listen-ports: '[{"HTTP": 80}, {"HTTPS":443}]'
    alb.ingress.kubernetes.io/ssl-redirect: "443"
    alb.ingress.kubernetes.io/scheme: internet-facing
    alb.ingress.kubernetes.io/target-type: ip
    alb.ingress.kubernetes.io/healthcheck-path: /health
spec:
  ingressClassName: alb
  rules:
    - host: ex7.neamulkabiremon.com # Replace it with your actual domain name
      http:
        paths:
          - path: /
            pathType: Prefix
            backend:
              service:
                name: myapp
                port:
                  number: 8080
✅ Step 3: Apply the Resources
cd ..
kubectl apply -f 07-https-ingress-alb-ssl
kubectl get ingress -n 7-example

Once applied, AWS will provision an ALB for the ingress. Wait a few minutes for the DNS propagation.
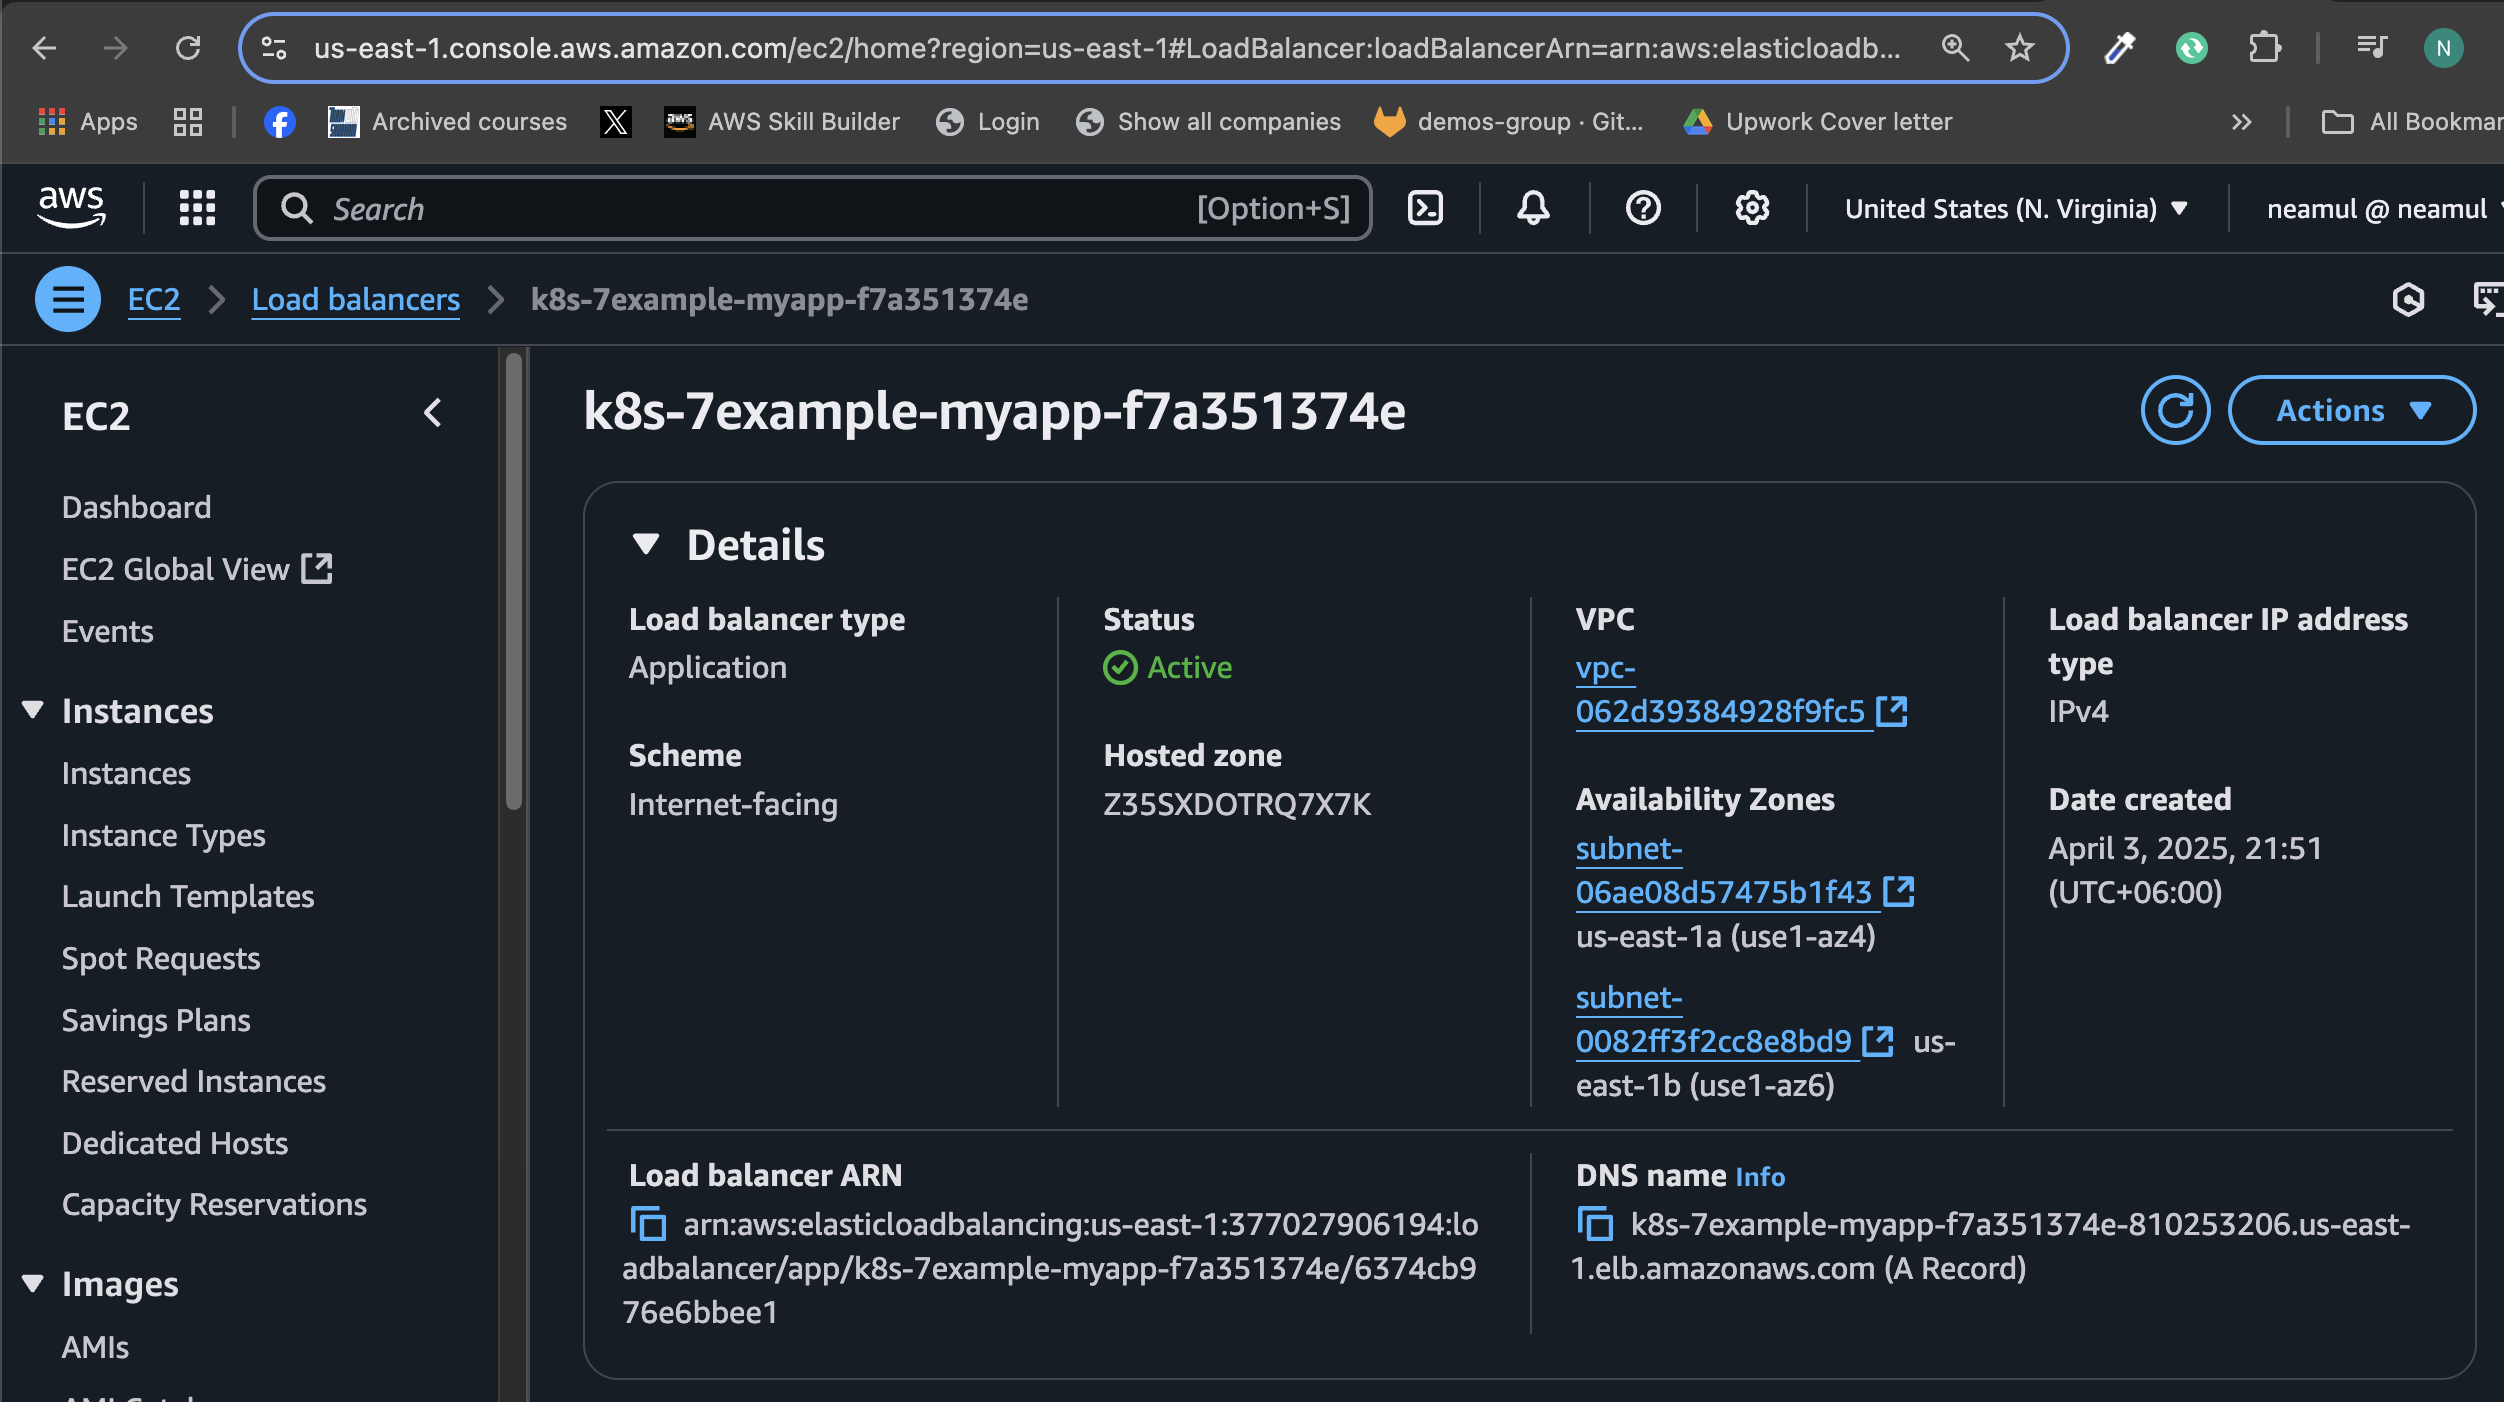
🌍 Step 4: Configure DNS via Route53
To expose your app on the internet using your domain:
Open Route53 (or your DNS provider).
Navigate to your hosted zone (e.g.,
neamulkabiremon.com).Click "Create Record".
Enter
ex7as the subdomain.Select Record Type:
CNAME.Paste the ALB DNS name from
kubectl get ingress(e.g.,k8s-7example-myapp-xxx.elb.amazonaws.com) as the value.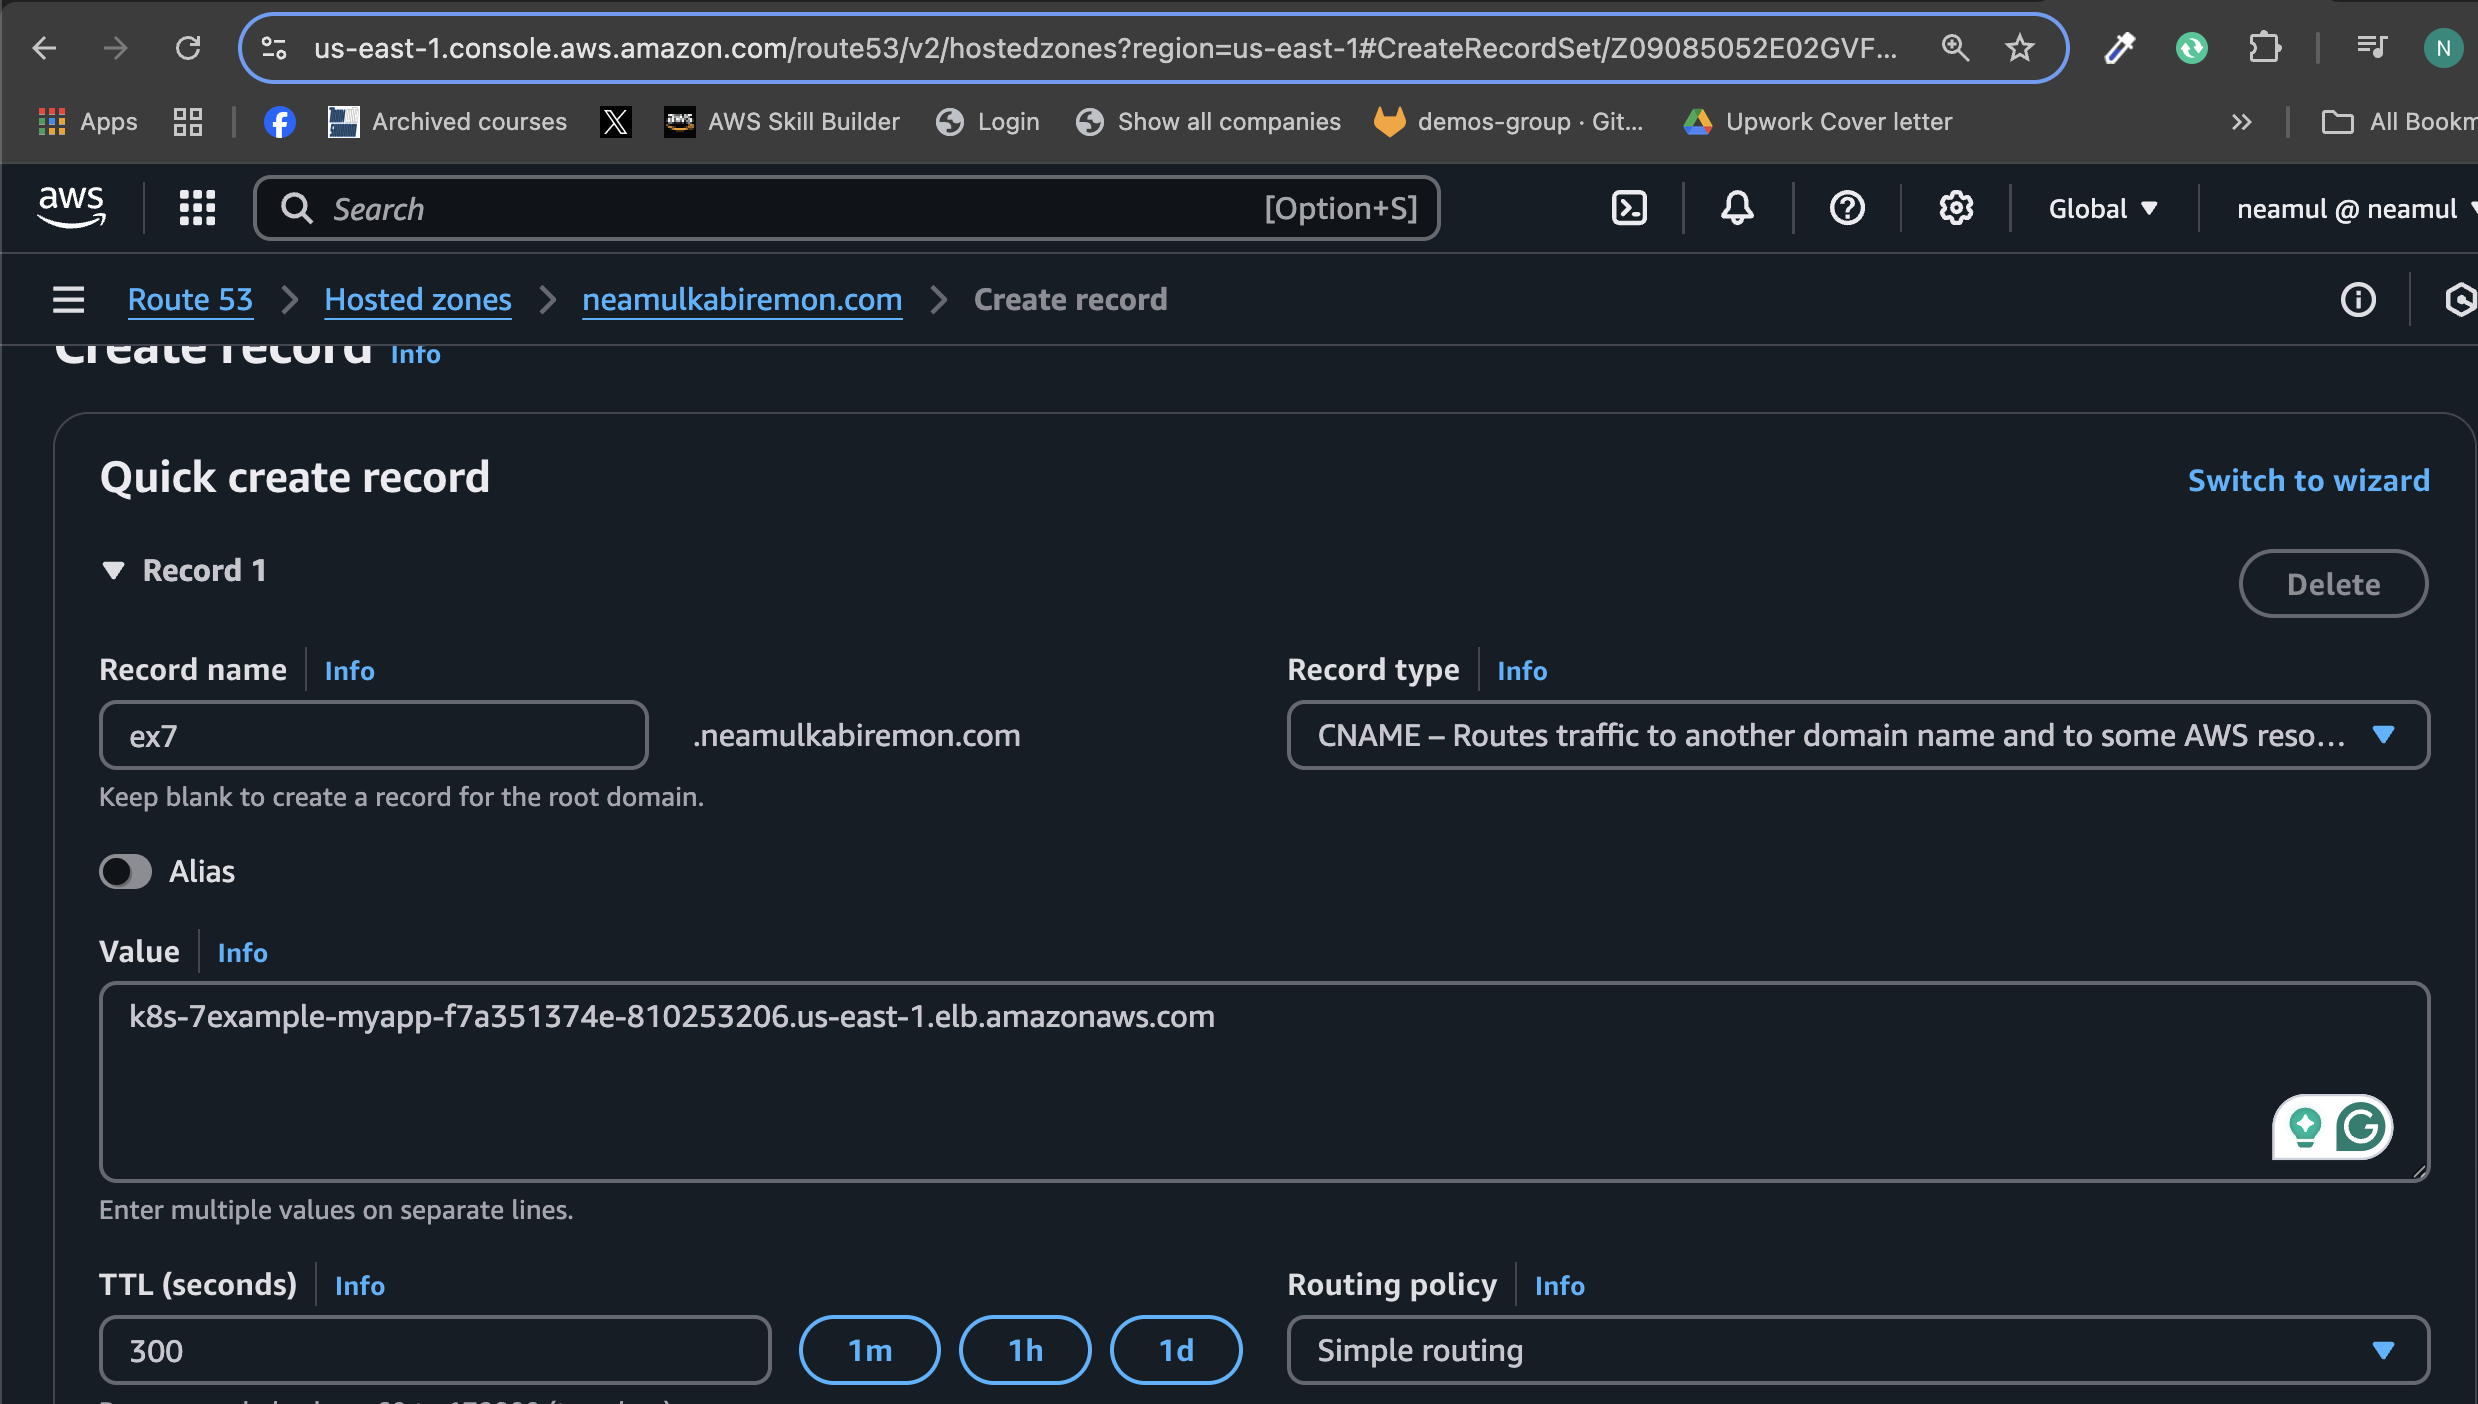
Save the record.
🕒 Wait a minute or two for DNS propagation. In some cases, it may take longer.
Step 5: Verify HTTPS Access
To test:
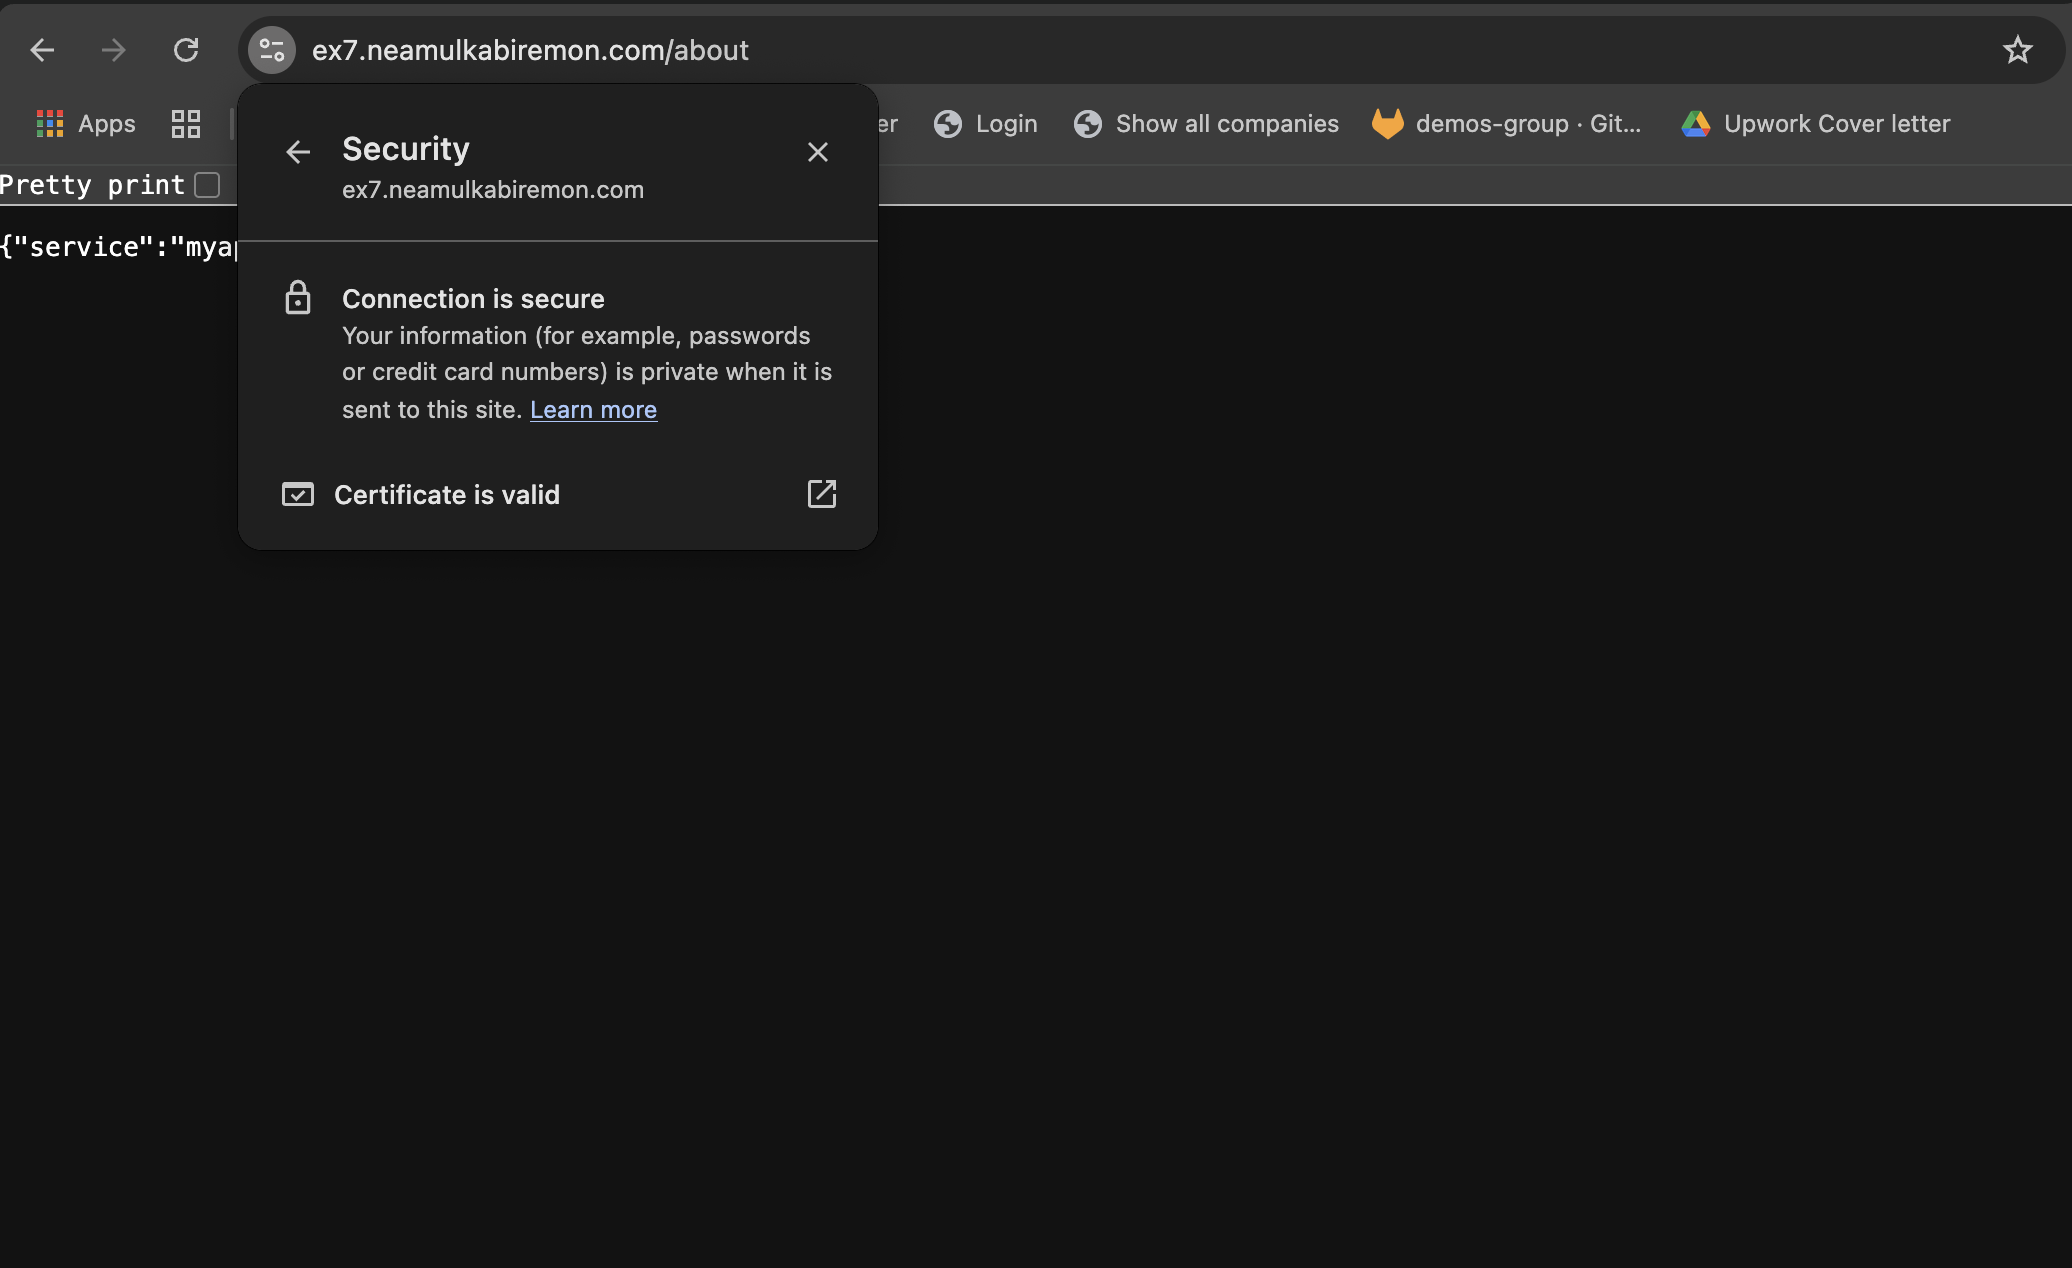
Open your browser and navigate to: https://ex7.neamulkabiremon.com/about
curl -i https://ex7.neamulkabiremon.com/about

✅ We receive a 200 OK and see a valid TLS certificate in the browser, we've successfully secured your app with HTTPS using ACM and ALB Ingress.
📌 Wrapping Up
In this guide, we:
🔓 Secured a Kubernetes workload using TLS termination with AWS ALB
🔐 Issued and attached a public certificate via AWS Certificate Manager (ACM)
🌐 Routed domain traffic using Route53 CNAME records
📦 Deployed resources with Kubernetes manifests for a real-world EKS environment
💬 Coming Up Next: In the next part of this series, I’ll show you how to use NGINX Ingress with cert-manager and Let’s Encrypt for fully automated TLS—including auto-renewal and ExternalDNS integration with Route53.
Follow along for more real-world EKS production patterns and DevOps deep dives!
Subscribe to my newsletter
Read articles from Neamul Kabir Emon directly inside your inbox. Subscribe to the newsletter, and don't miss out.
Written by

Neamul Kabir Emon
Neamul Kabir Emon
Hi! I'm a highly motivated Security and DevOps professional with 7+ years of combined experience. My expertise bridges penetration testing and DevOps engineering, allowing me to deliver a comprehensive security approach.