Mounting Amazon EFS on an EC2 Instance in AWS: A Step-by-Step Guide
 Oladosu Ibrahim Adeniyi
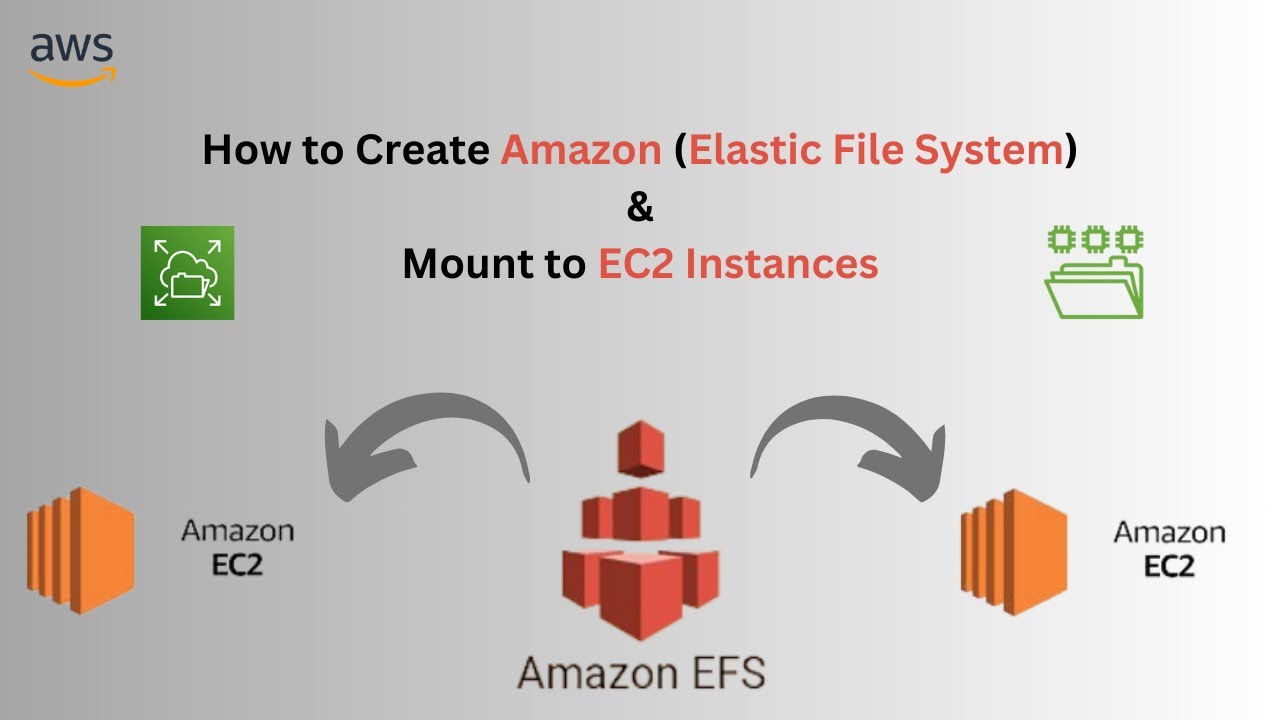
Introduction to Amazon EFS
Amazon Elastic File System (EFS) is a fully managed cloud file storage service that allows multiple EC2 instances to access and share data simultaneously using the NFS protocol. It automatically scales based on storage needs, providing high availability and durability across multiple Availability Zones.
EFS is ideal for use cases requiring shared storage, such as web applications, containerized workloads, and data analytics. It supports General Purpose (for low-latency operations) and Max I/O (for high-throughput workloads) performance modes. Additionally, it offers Standard and Infrequent Access (IA) storage classes to optimize costs.
What is Amazon EC2?
Amazon EC2 is a cloud-based virtual server service that provides scalable computing power. It supports various instance types optimized for different workloads and offers flexible pricing options, including On-Demand, Reserved, and Spot Instances.
EC2 allows users to run Linux or Windows, attach EBS for storage, and configure security groups for access control. It integrates with AWS services for networking, automation, and scaling, making it ideal for hosting applications, databases, and machine learning workloads.
What is Amazon EC2 Instance Connect?
Amazon EC2 Instance Connect is a secure and browser-based way to connect to EC2 instances running Amazon Linux or Ubuntu. It allows users to access instances via SSH without needing a manually configured key pair.
With EC2 Instance Connect, you can open a secure shell session directly from the AWS Management Console, CLI, or API. It uses temporary, time-limited keys to enhance security and eliminates the need to store private SSH keys.
It is especially useful for quick troubleshooting, as it requires no prior SSH setup and ensures controlled access with IAM-based authentication.
Creating a New Amazon EFS File System in AWS
To use Amazon Elastic File System (EFS) with an EC2 instance, you first need to create an EFS file system in the AWS Management Console. Follow these steps to create and configure EFS properly:
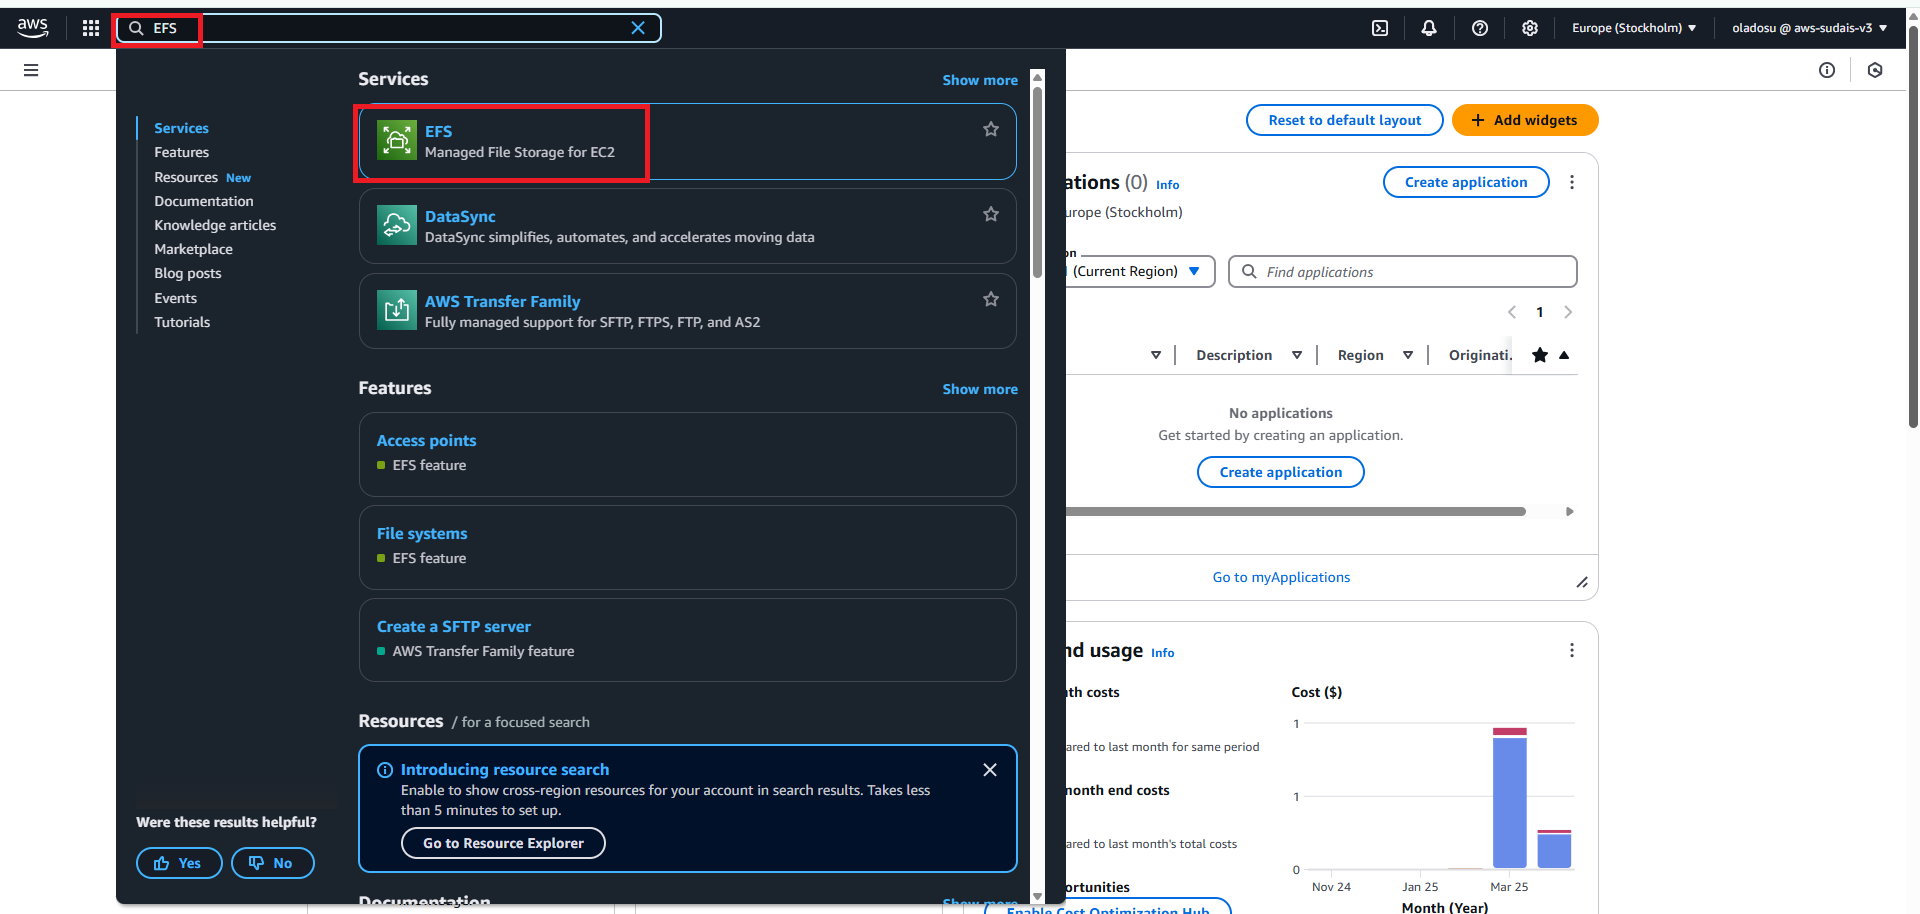
Step 1: Navigate to the EFS Console
Log in to AWS Management Console.
Search for EFS (Elastic File System) in the AWS services search bar.
Click on Amazon Elastic File System to open the EFS dashboard.
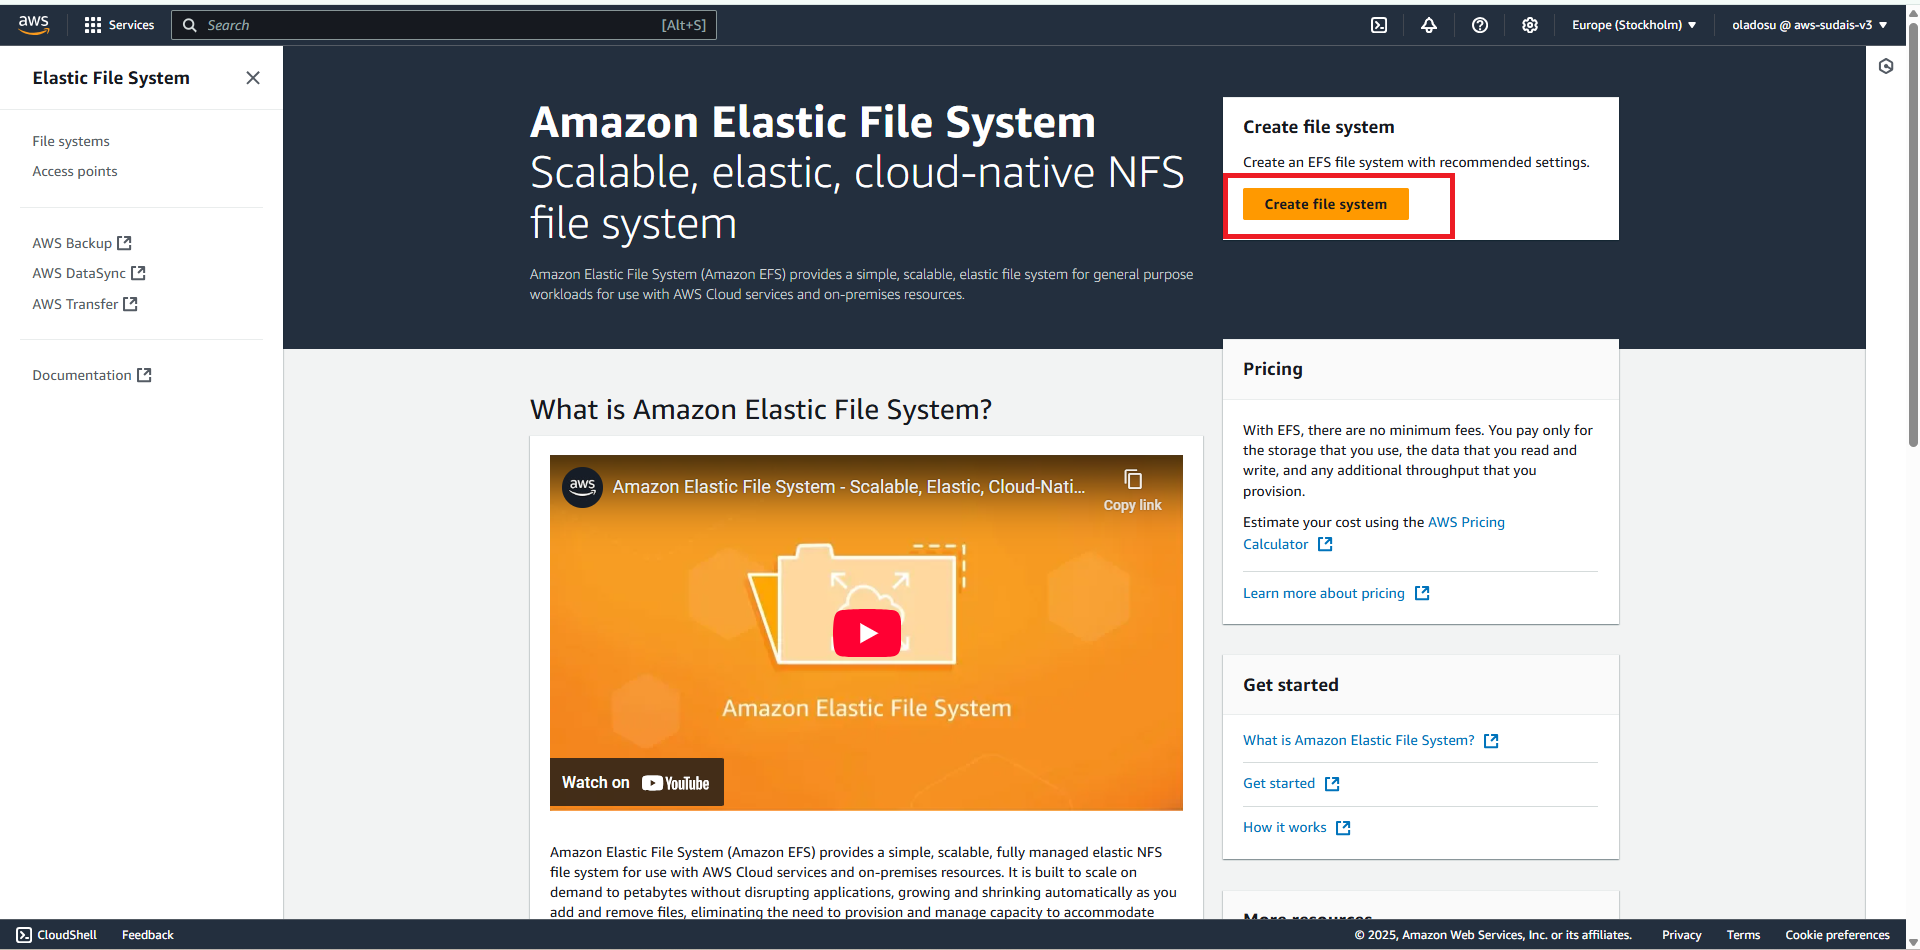
Step 2: Create a New EFS File System
Click on Create file system to begin the setup process.
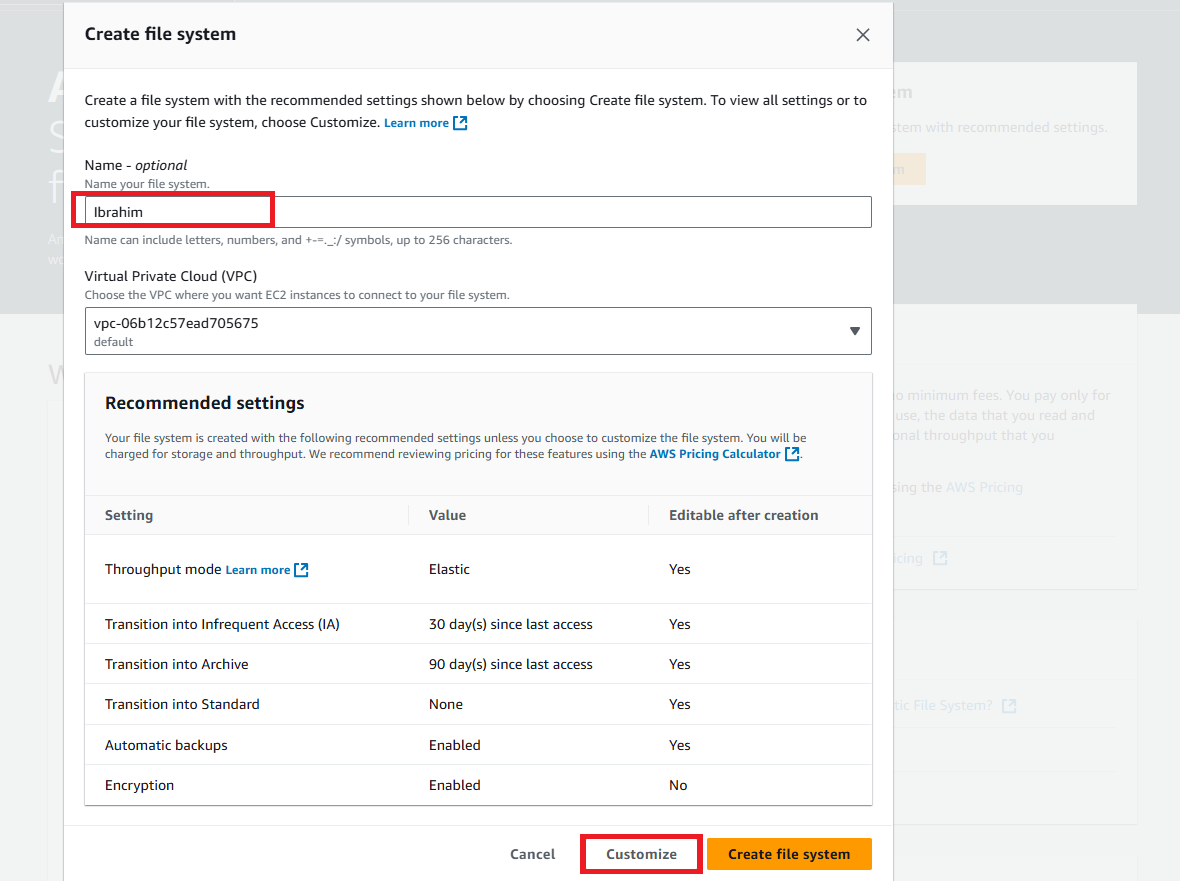
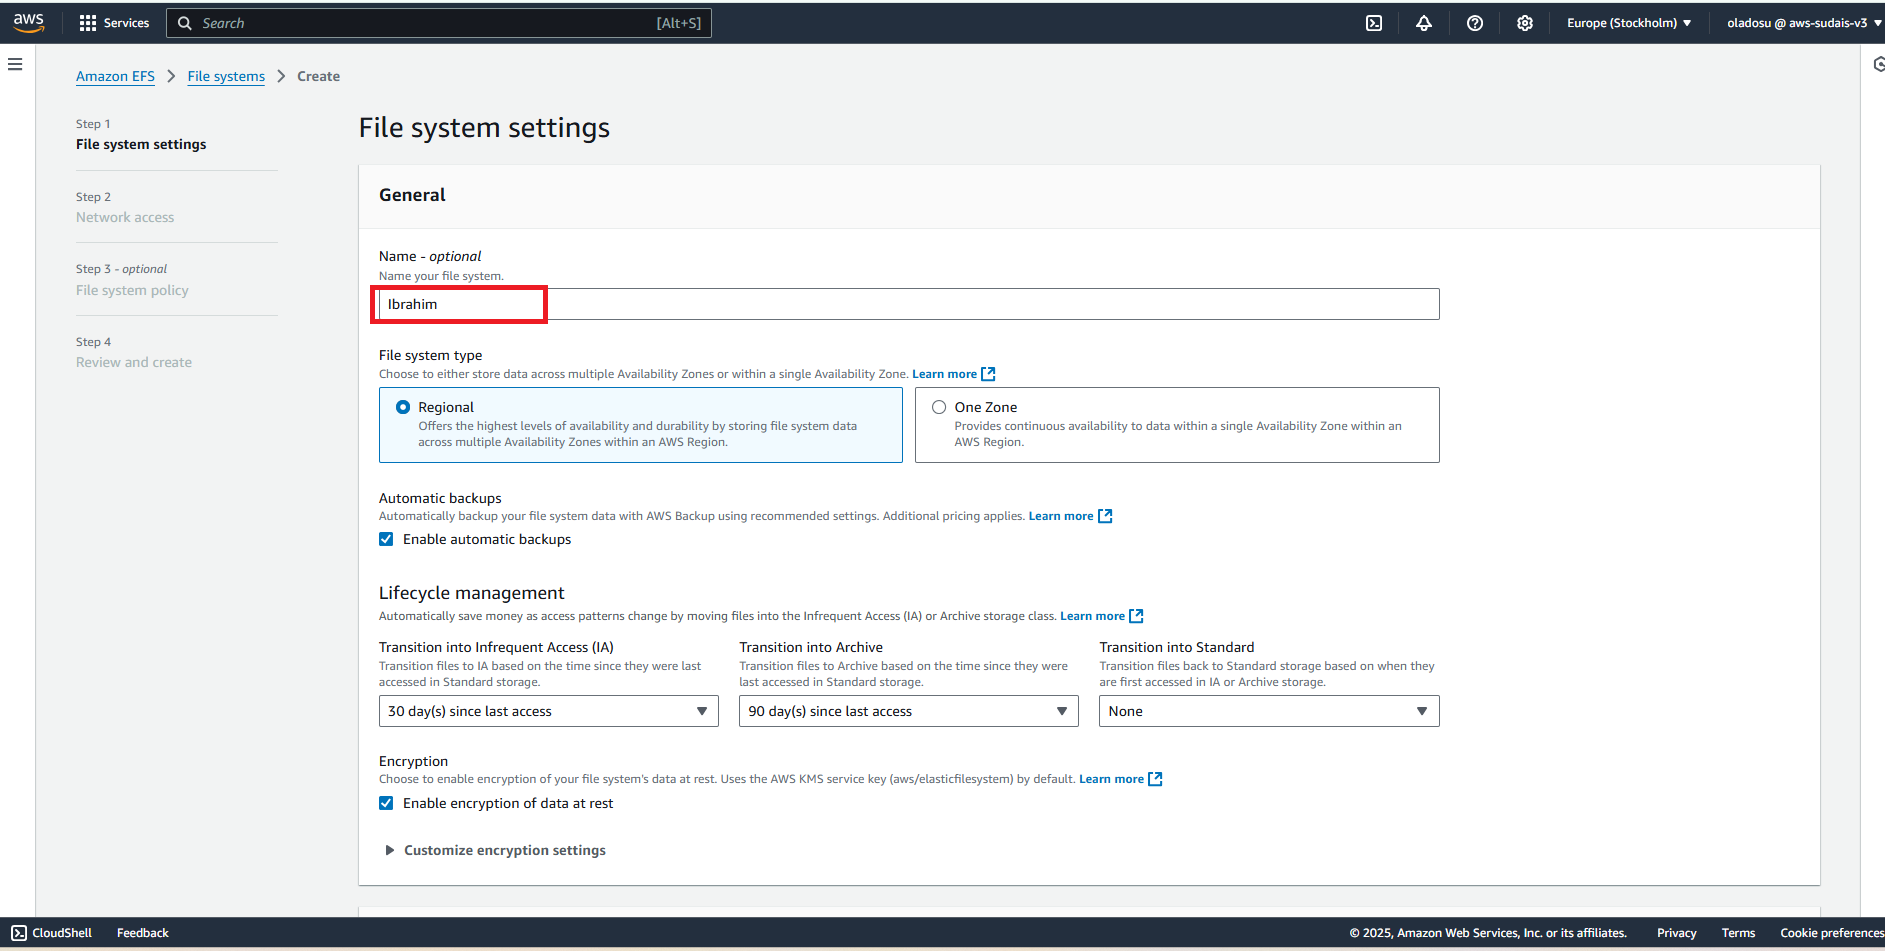
Name the EFS File System:
- Under File system settings, enter an appropriate name for the file system (e.g., Ibrahim).
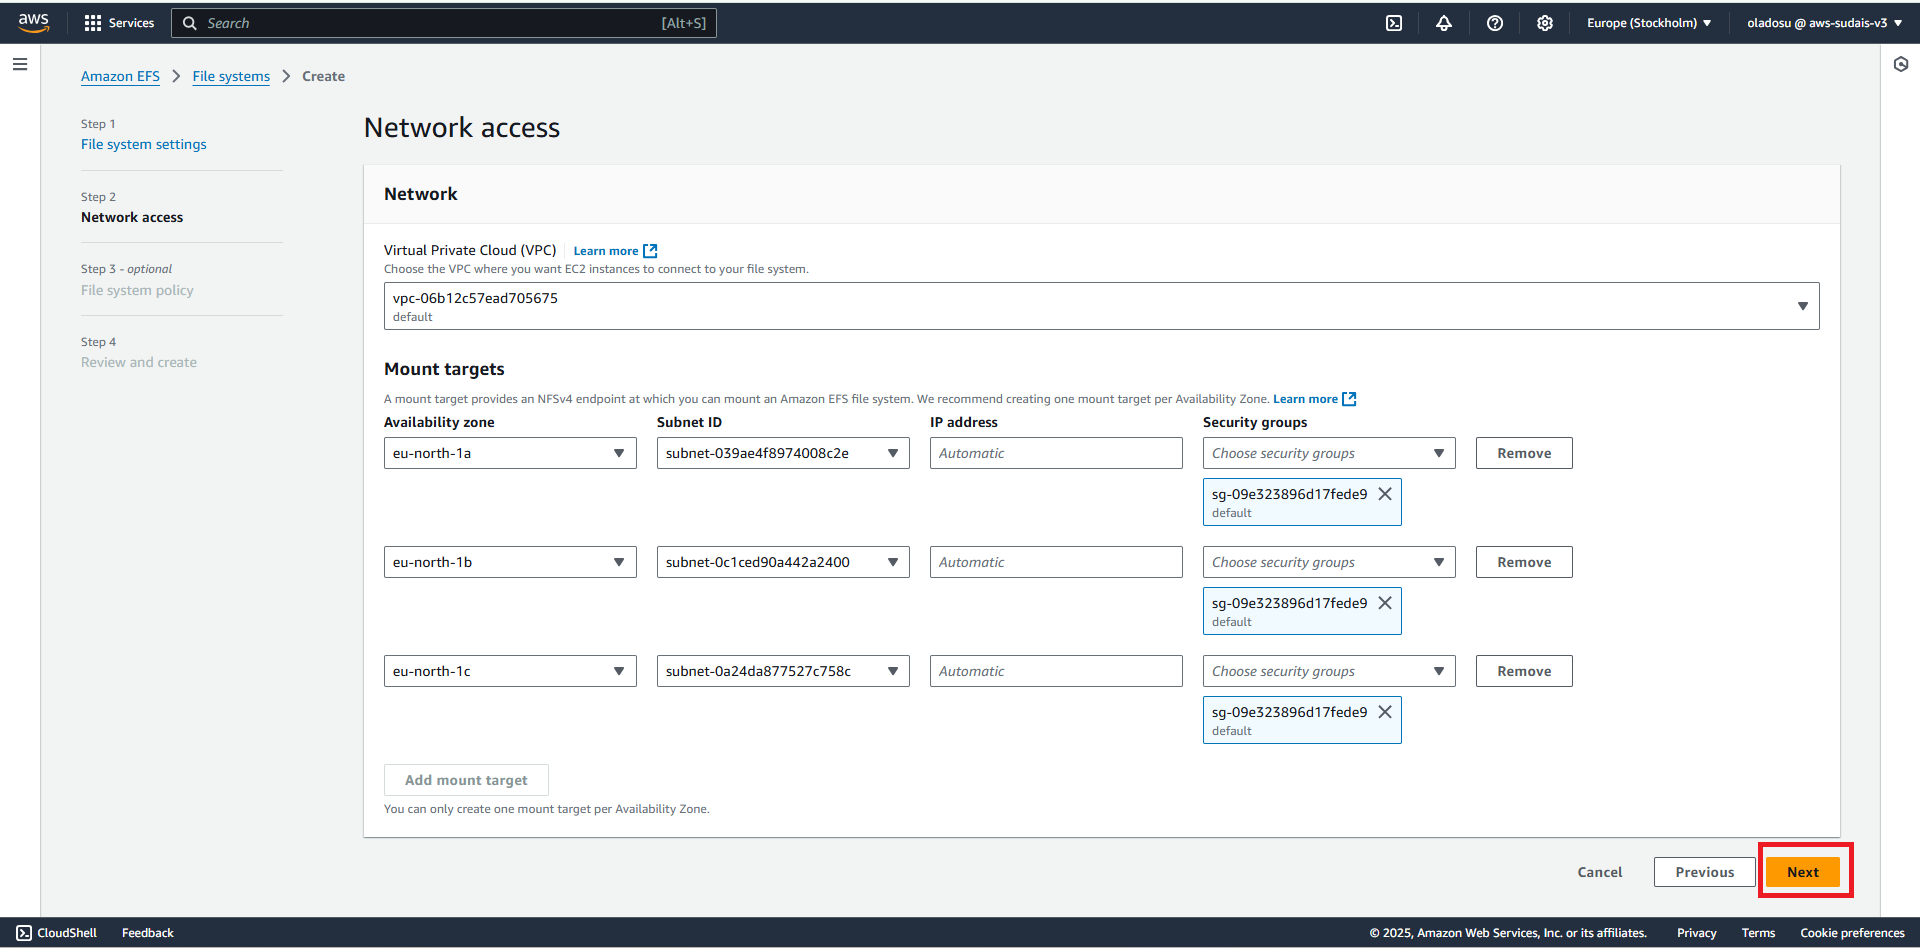
Select the Virtual Private Cloud (VPC):
- Choose the default VPC or the same VPC where your EC2 instance is running.
Click on Customize to modify additional file system settings.
Step 3: Configure EFS File System Settings
Performance Mode:
- Leave the default General Purpose (recommended) mode unless you need high-throughput workloads, in which case select Max I/O.
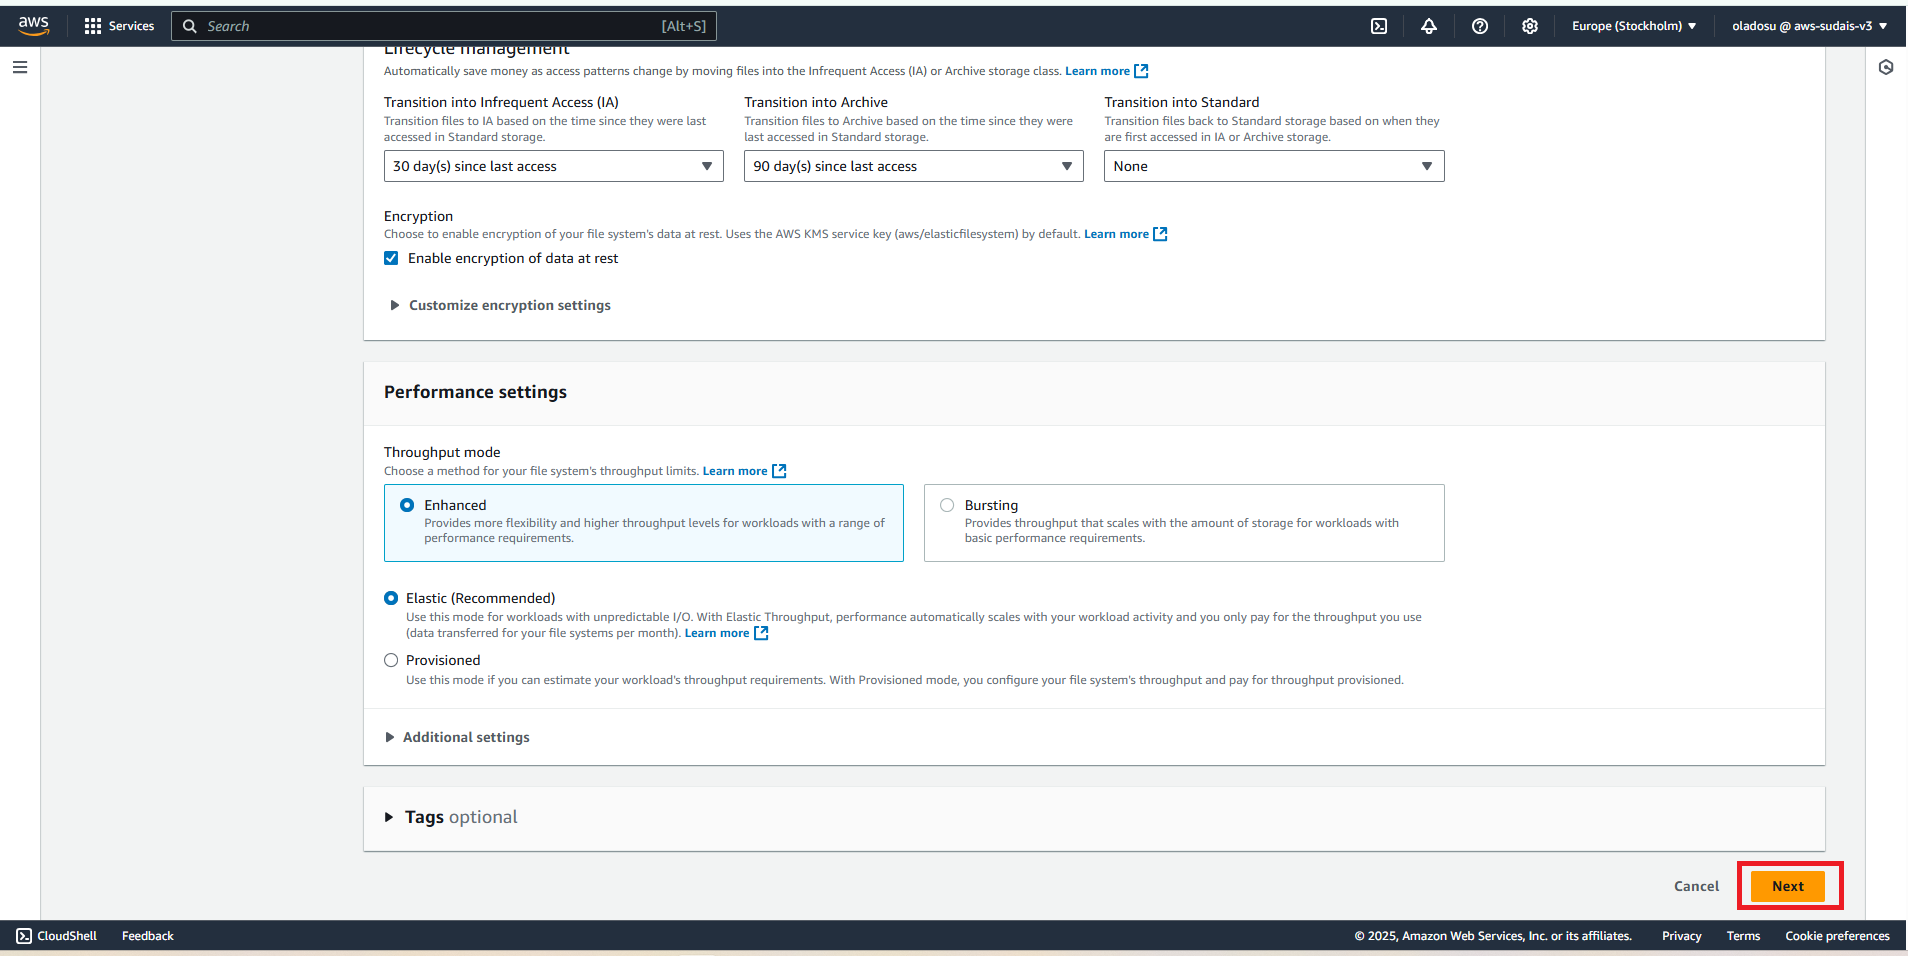
Throughput Mode:
- Choose between Bursting (default) or Provisioned throughput (for consistent performance).
Storage Class:
- Select Standard (for frequently accessed data) or Infrequent Access (for cost-saving storage).
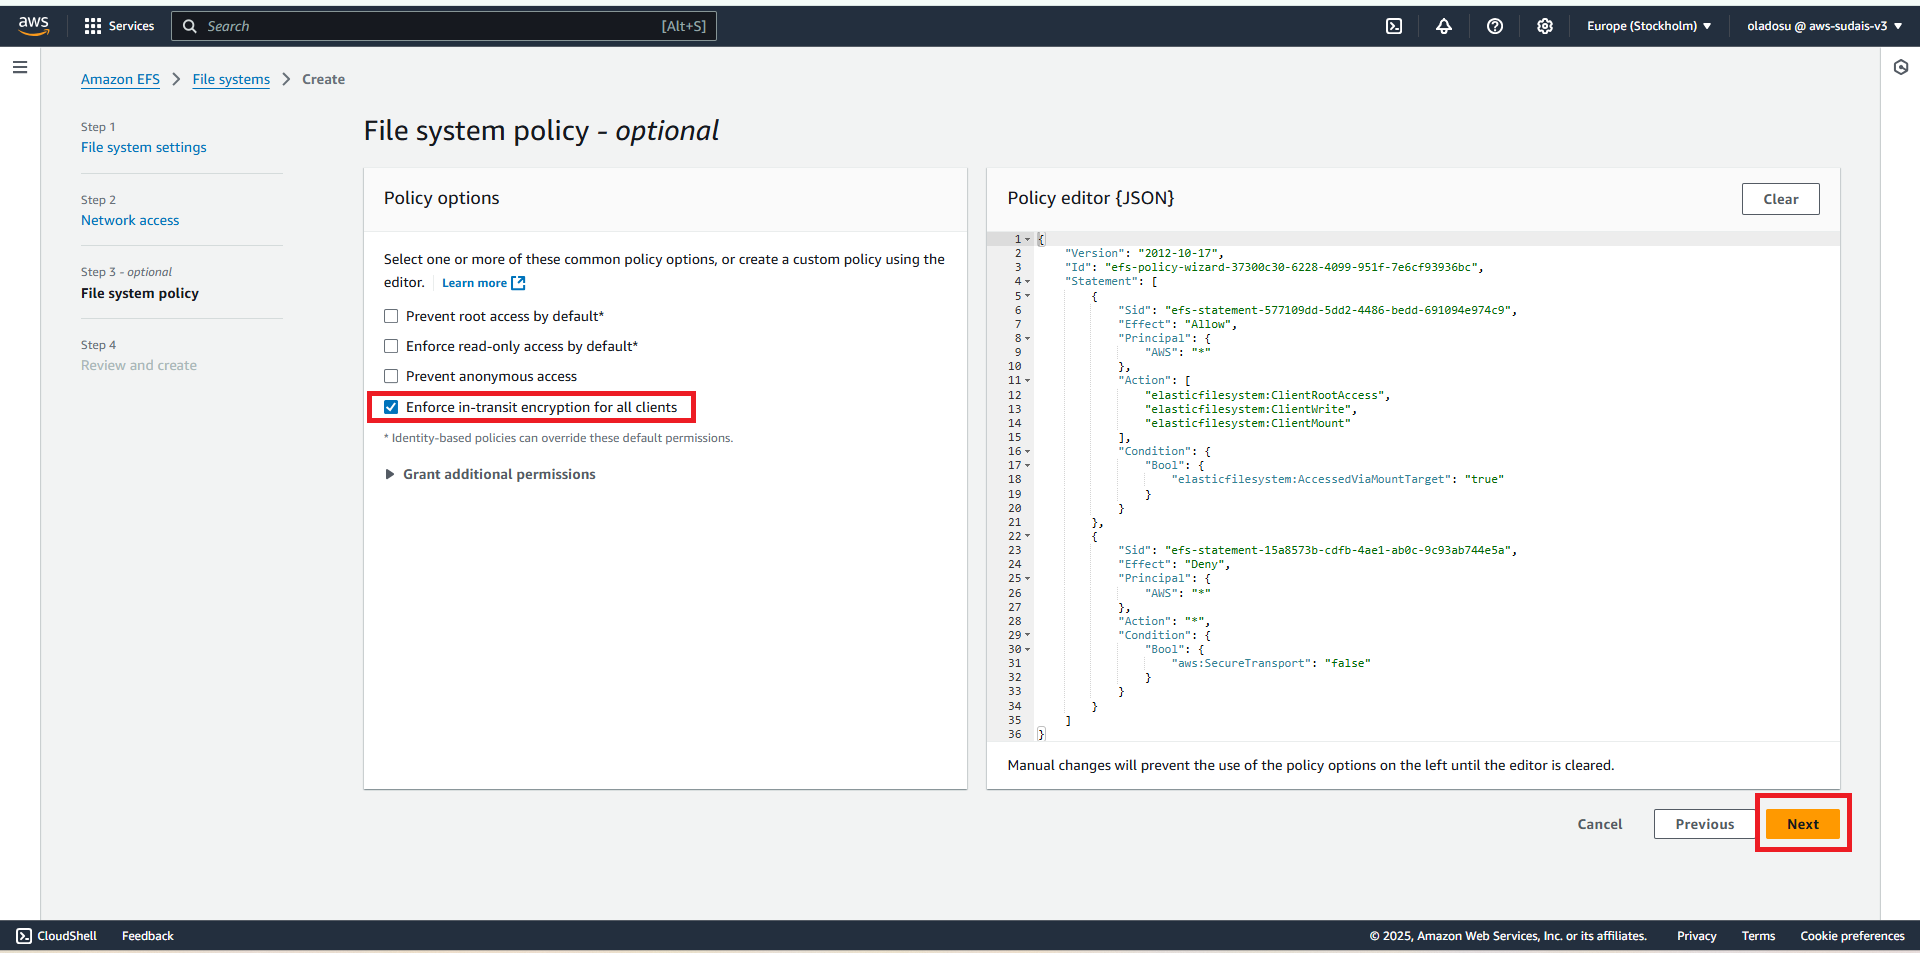
Step 4: Enable Encryption for Security
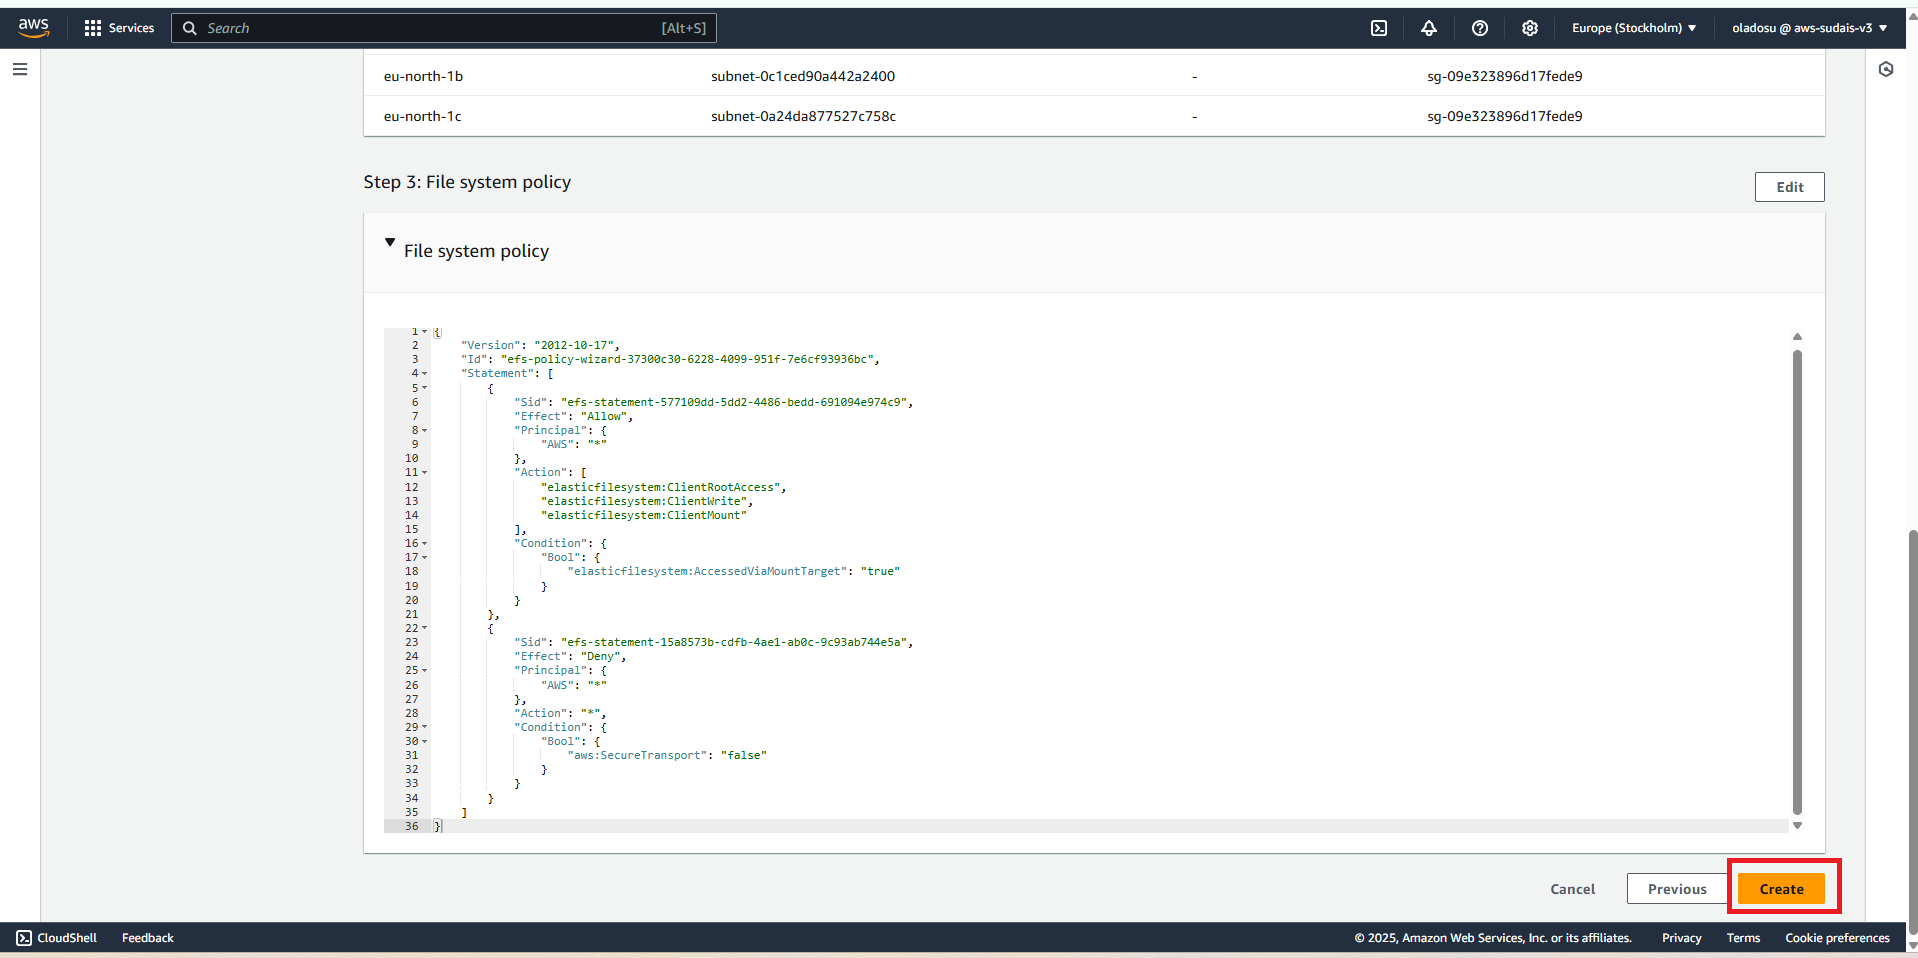
Check the box for "Enforce in-transit encryption for all clients" to ensure secure data transfers between EC2 and EFS.
Click Next to continue.
Step 5: Create the EFS File System
Click Create to finalize the EFS setup.
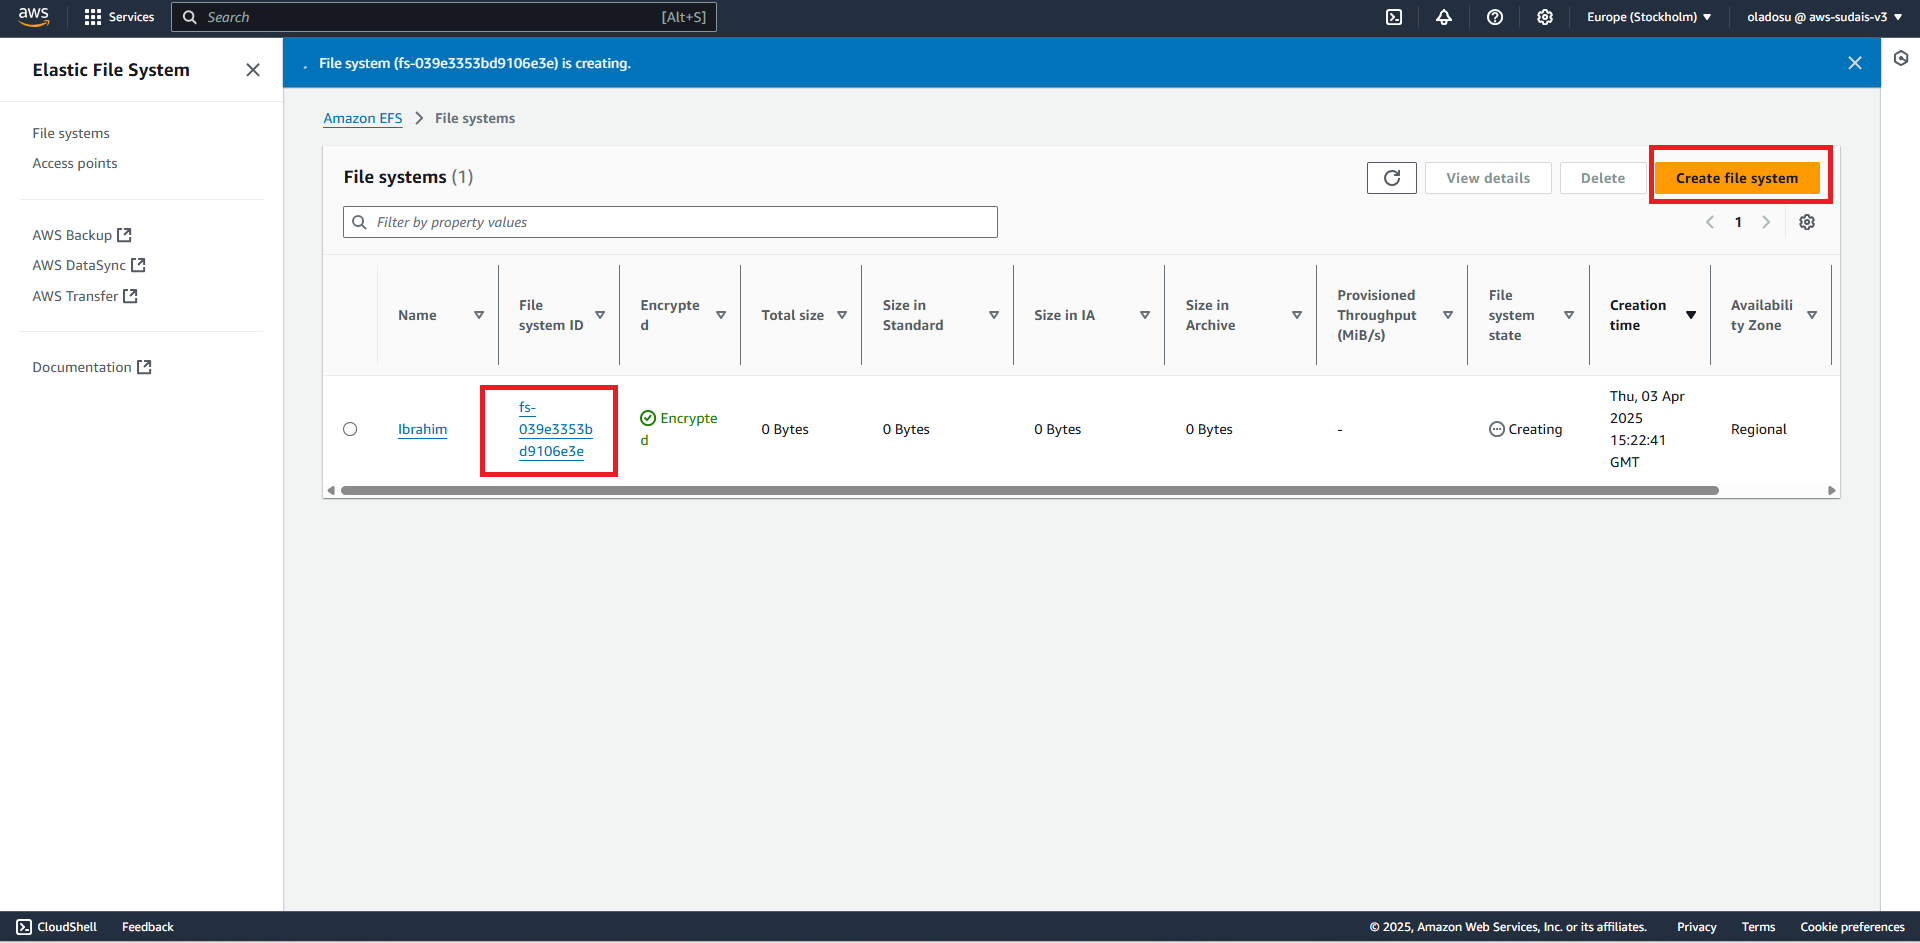
Wait for AWS to provision the file system. This may take a few moments.
Once the EFS file system is created, click on the newly created file system in the list.
Step 6: Attach the EFS to an EC2 Instance
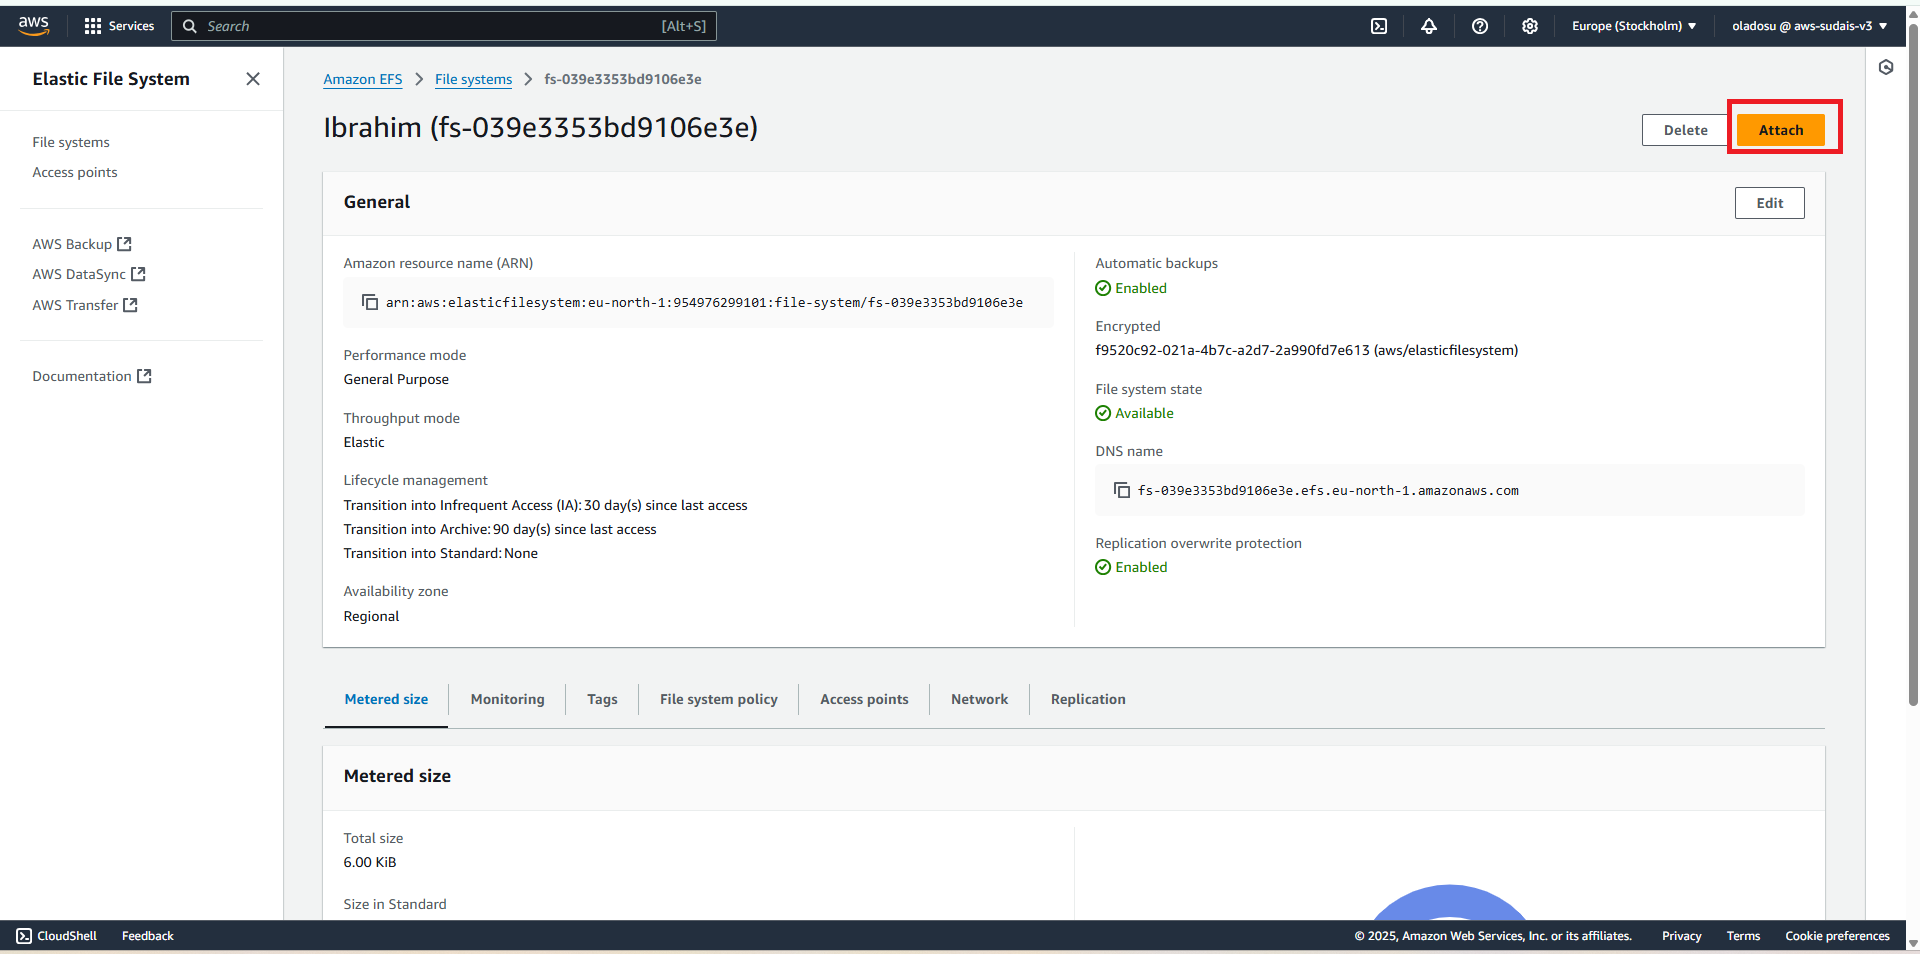
Click on the Attach button at the top of the page.
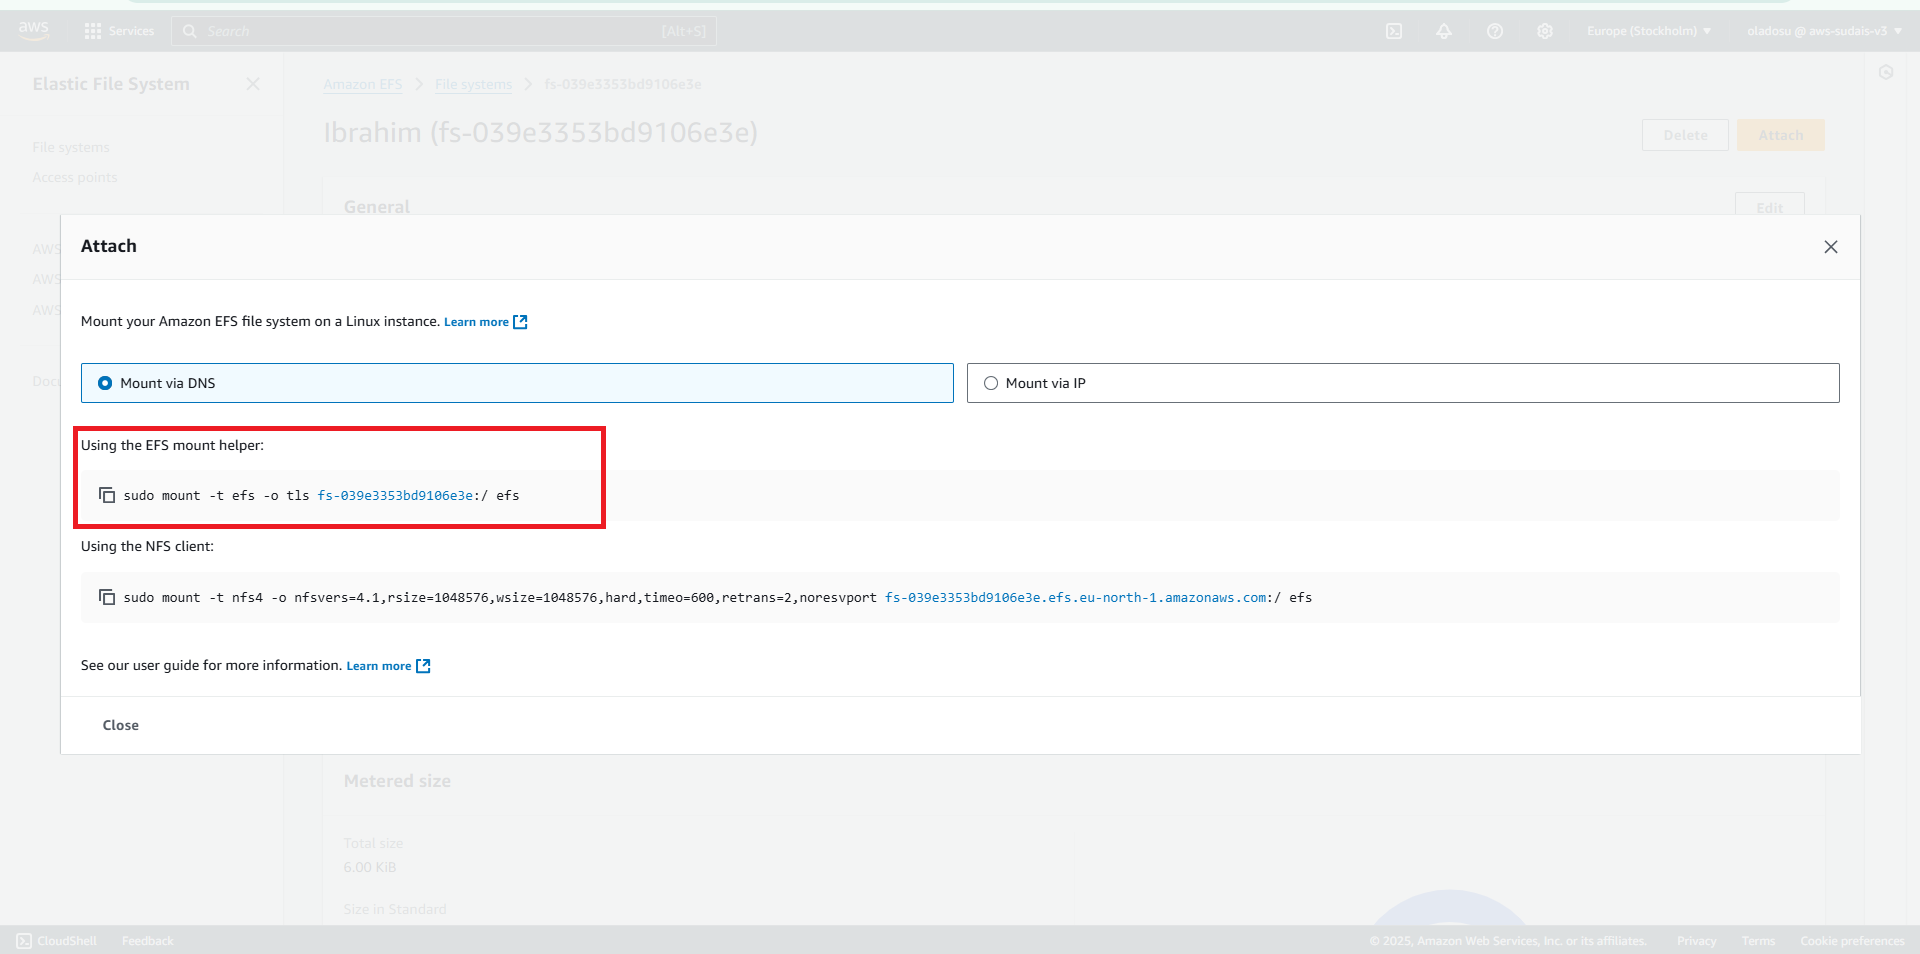
AWS will provide mount instructions for different operating systems.
Copy and save the EFS mount helper command, as you will need it when mounting EFS on your EC2 instance.
With the EFS file system now created and configured, the next step is to configure the EC2 instance and mount the EFS using the mount helper.
Launching and Configuring an EC2 Instance
To use EFS, you need an EC2 instance that will connect to it.
Step 1: Navigate to the EC2 Dashboard
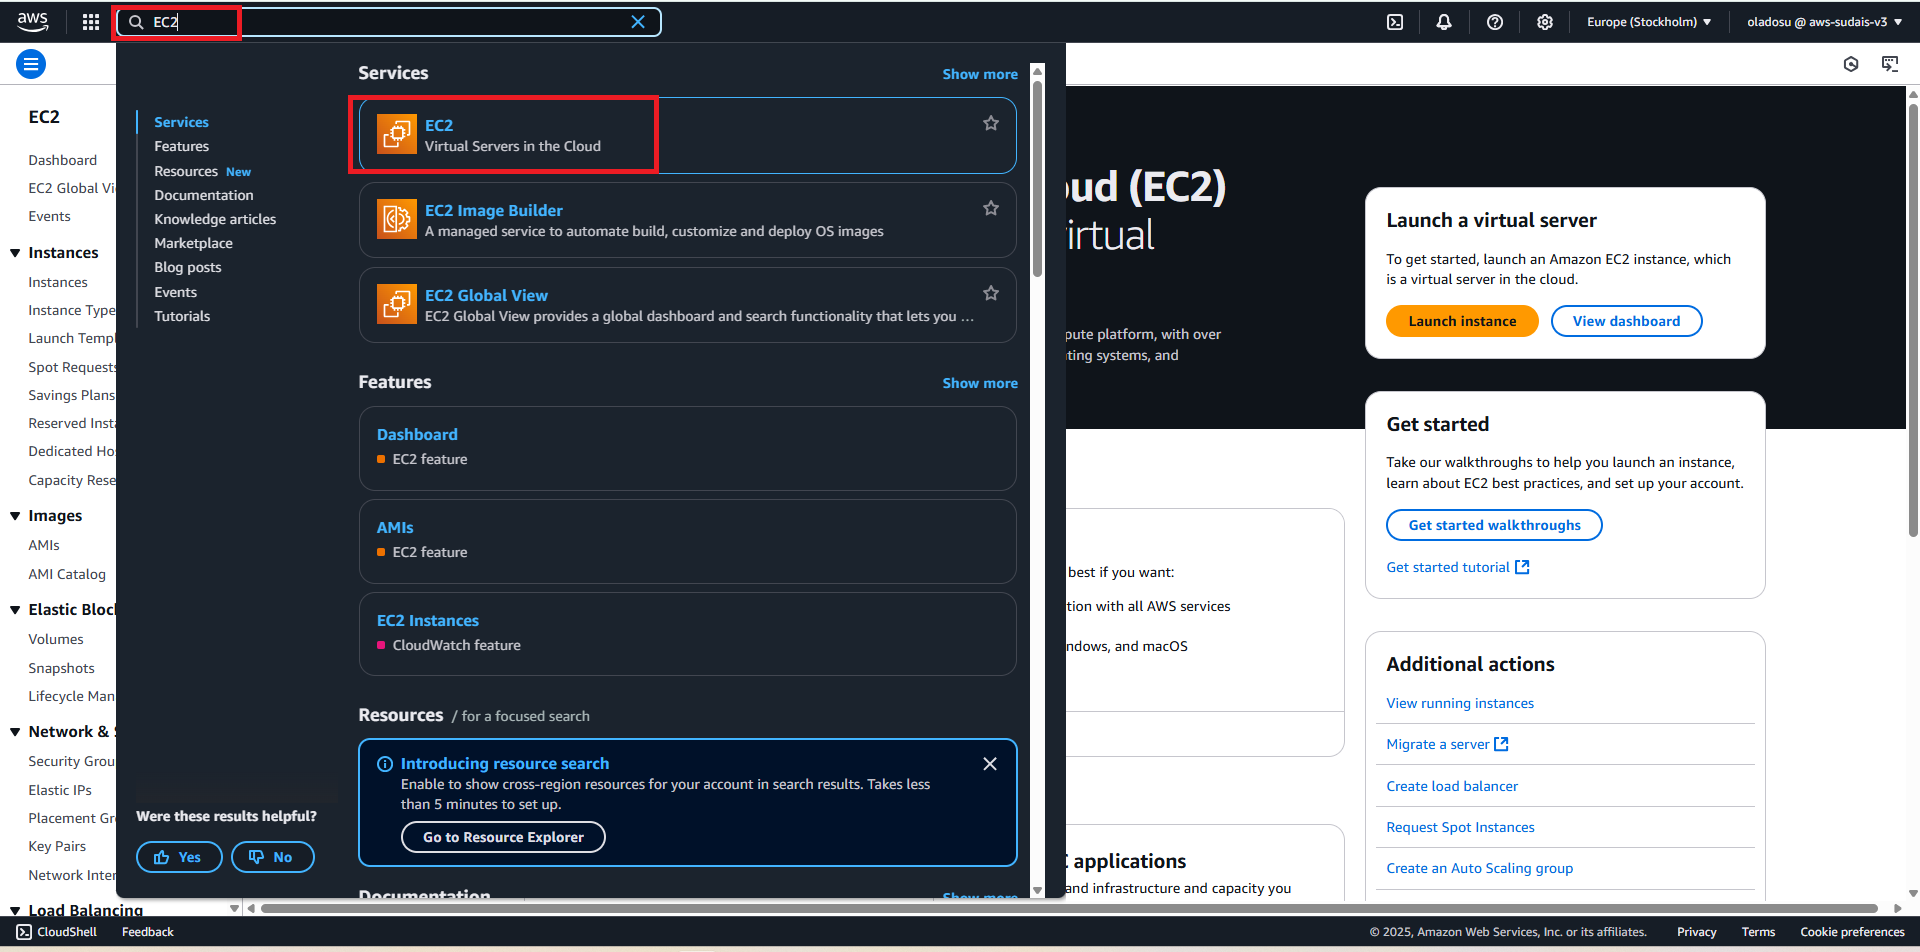
In the AWS Management Console, search for "EC2" in the services search bar.
Click on EC2 to open the EC2 Dashboard.
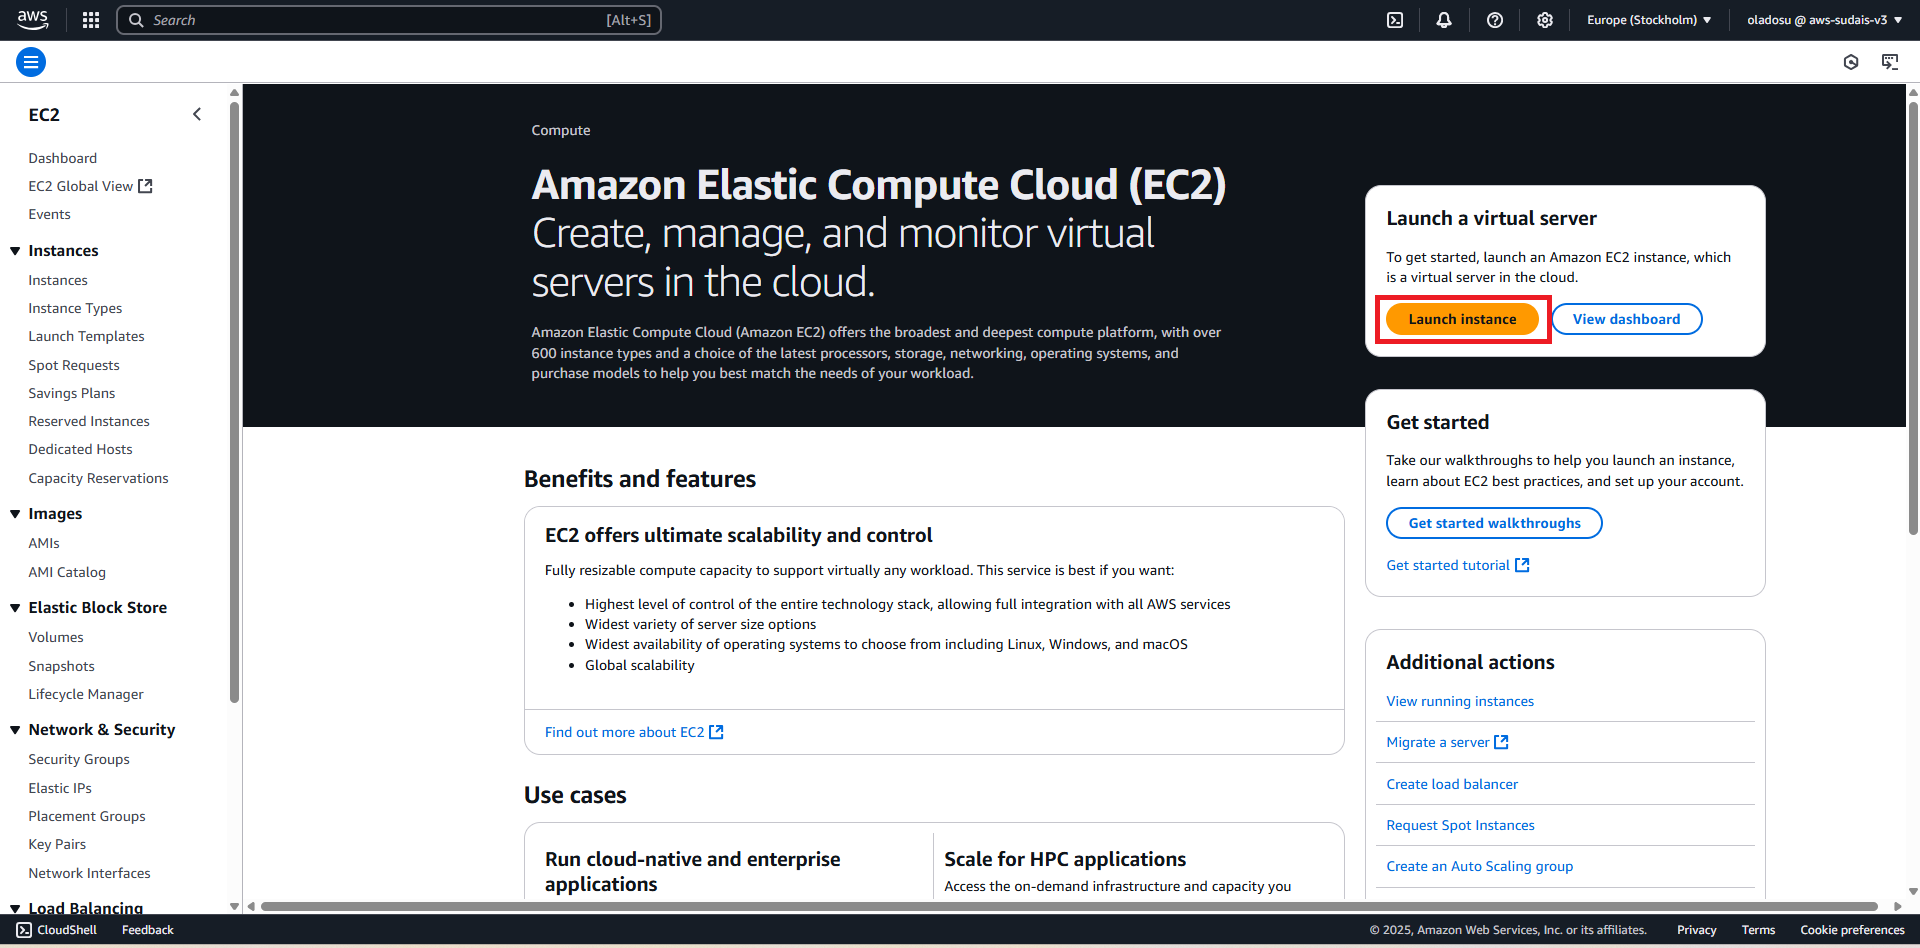
Step 2: Launch a New EC2 Instance
- Click on the "Launch Instance" button. This will take you to the instance configuration page.
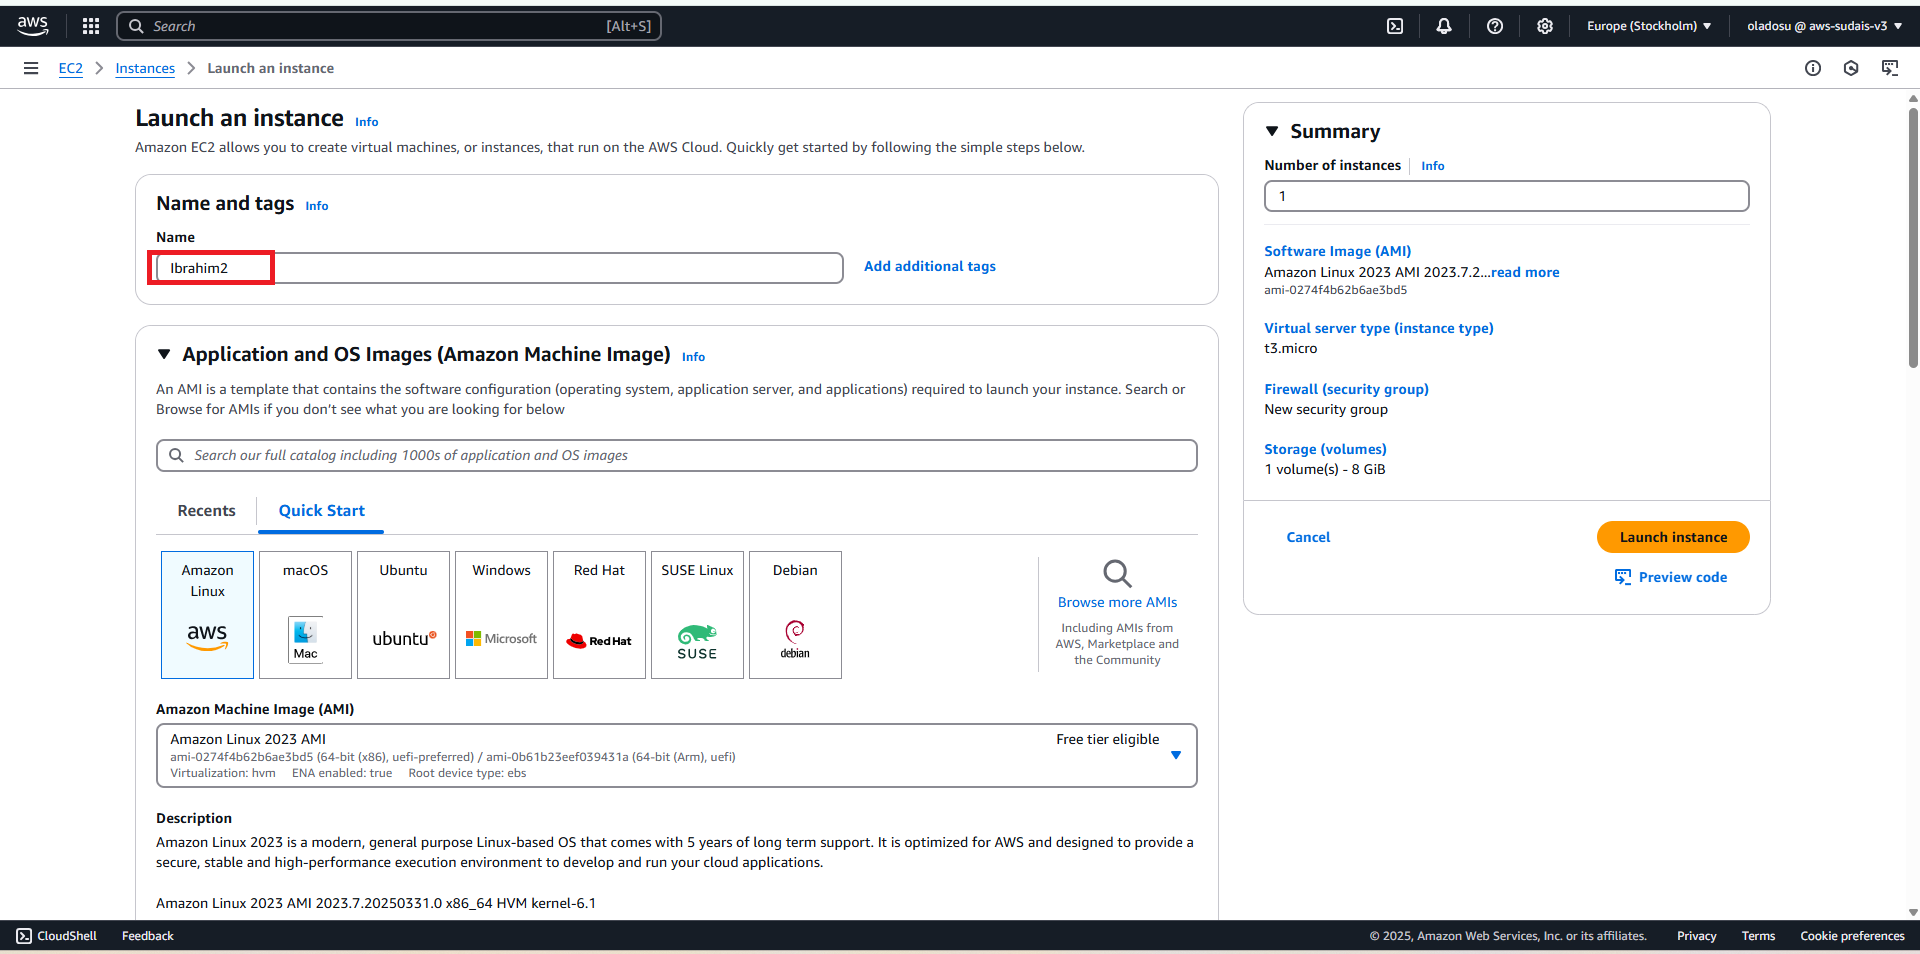
Step 3: Name the Instance
In the "Name and Tags" section, provide a name for the instance, such as:
Naming helps in easy identification, especially when managing multiple instances.
Step 4: Choose an Amazon Machine Image (AMI)
In the "Application and OS Images (Amazon Machine Image - AMI)" section, choose:
Amazon Linux 2023 (or Amazon Linux 2 for better compatibility).
This is the official AWS-supported Linux distribution, optimized for AWS workloads.
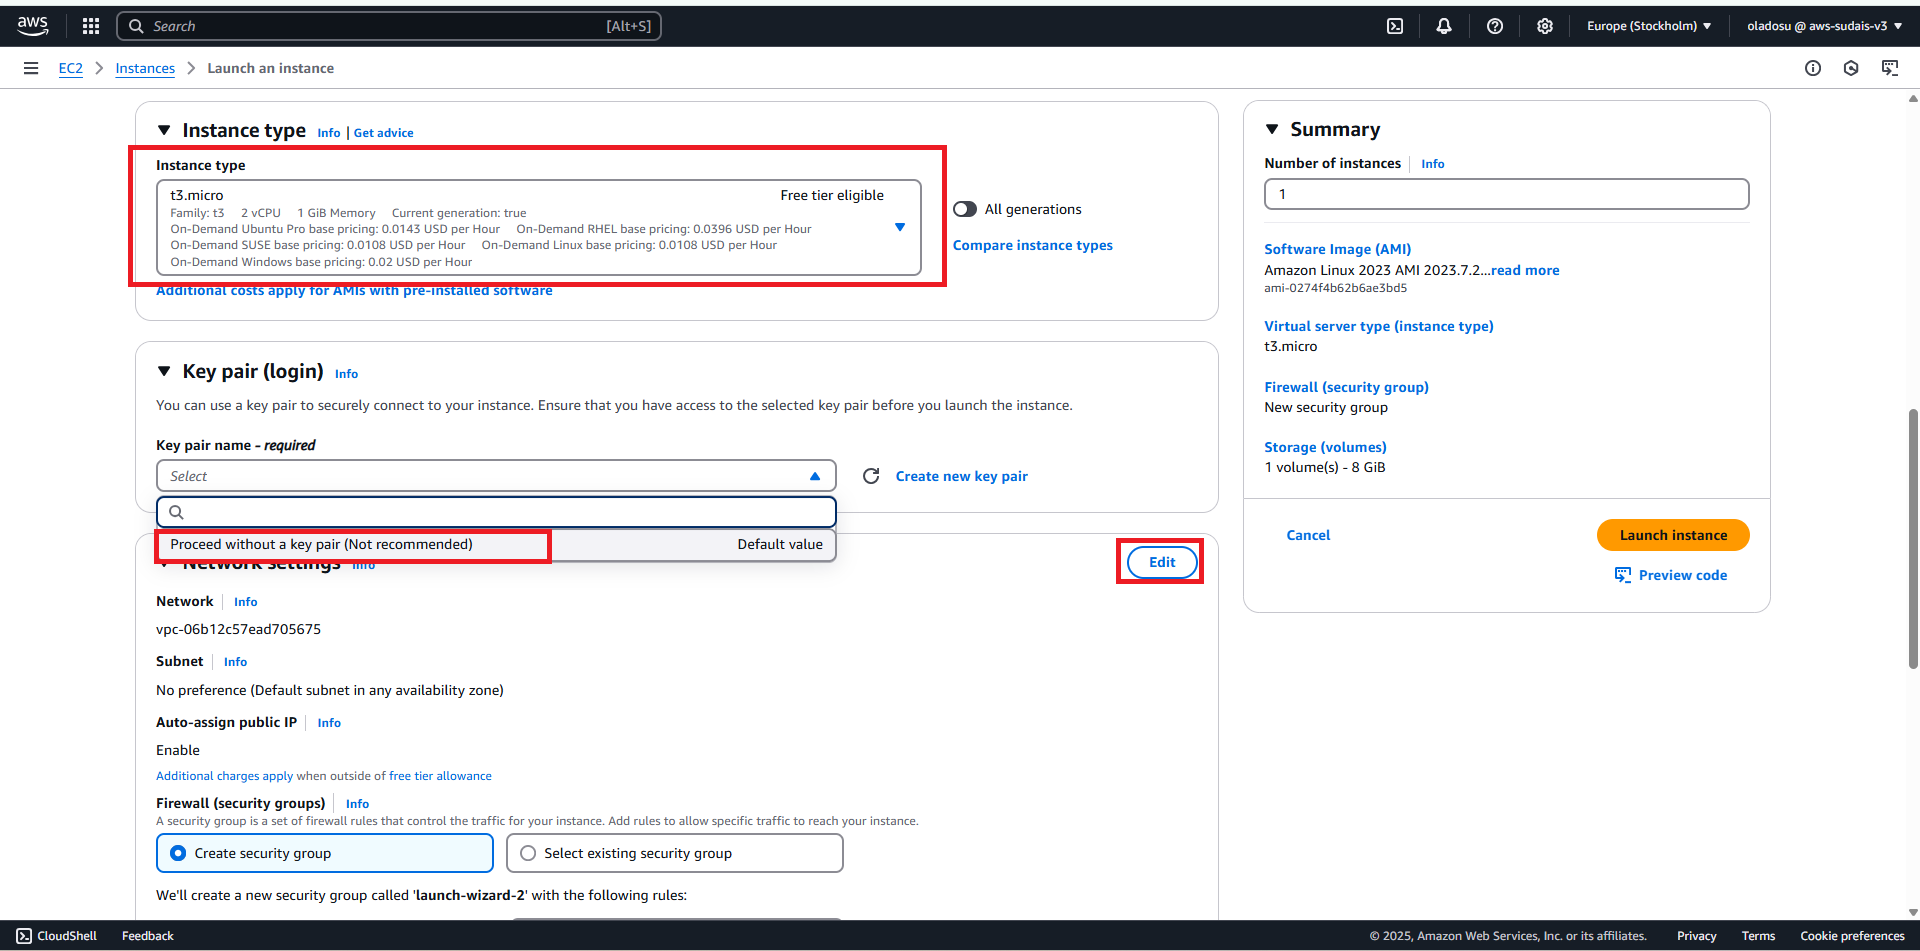
5. Select an Instance Type
Choose an instance type based on your computing needs.
For free-tier users, select:
- t3.micro provides 1 vCPU and 1 GB RAM, which is sufficient for small applications and testing.
6. Proceed Without a Key Pair
When prompted for an SSH Key Pair, select:
- AWS normally recommends a key pair for SSH access, but for this setup (especially when using EC2 Instance Connect), you can proceed without it.
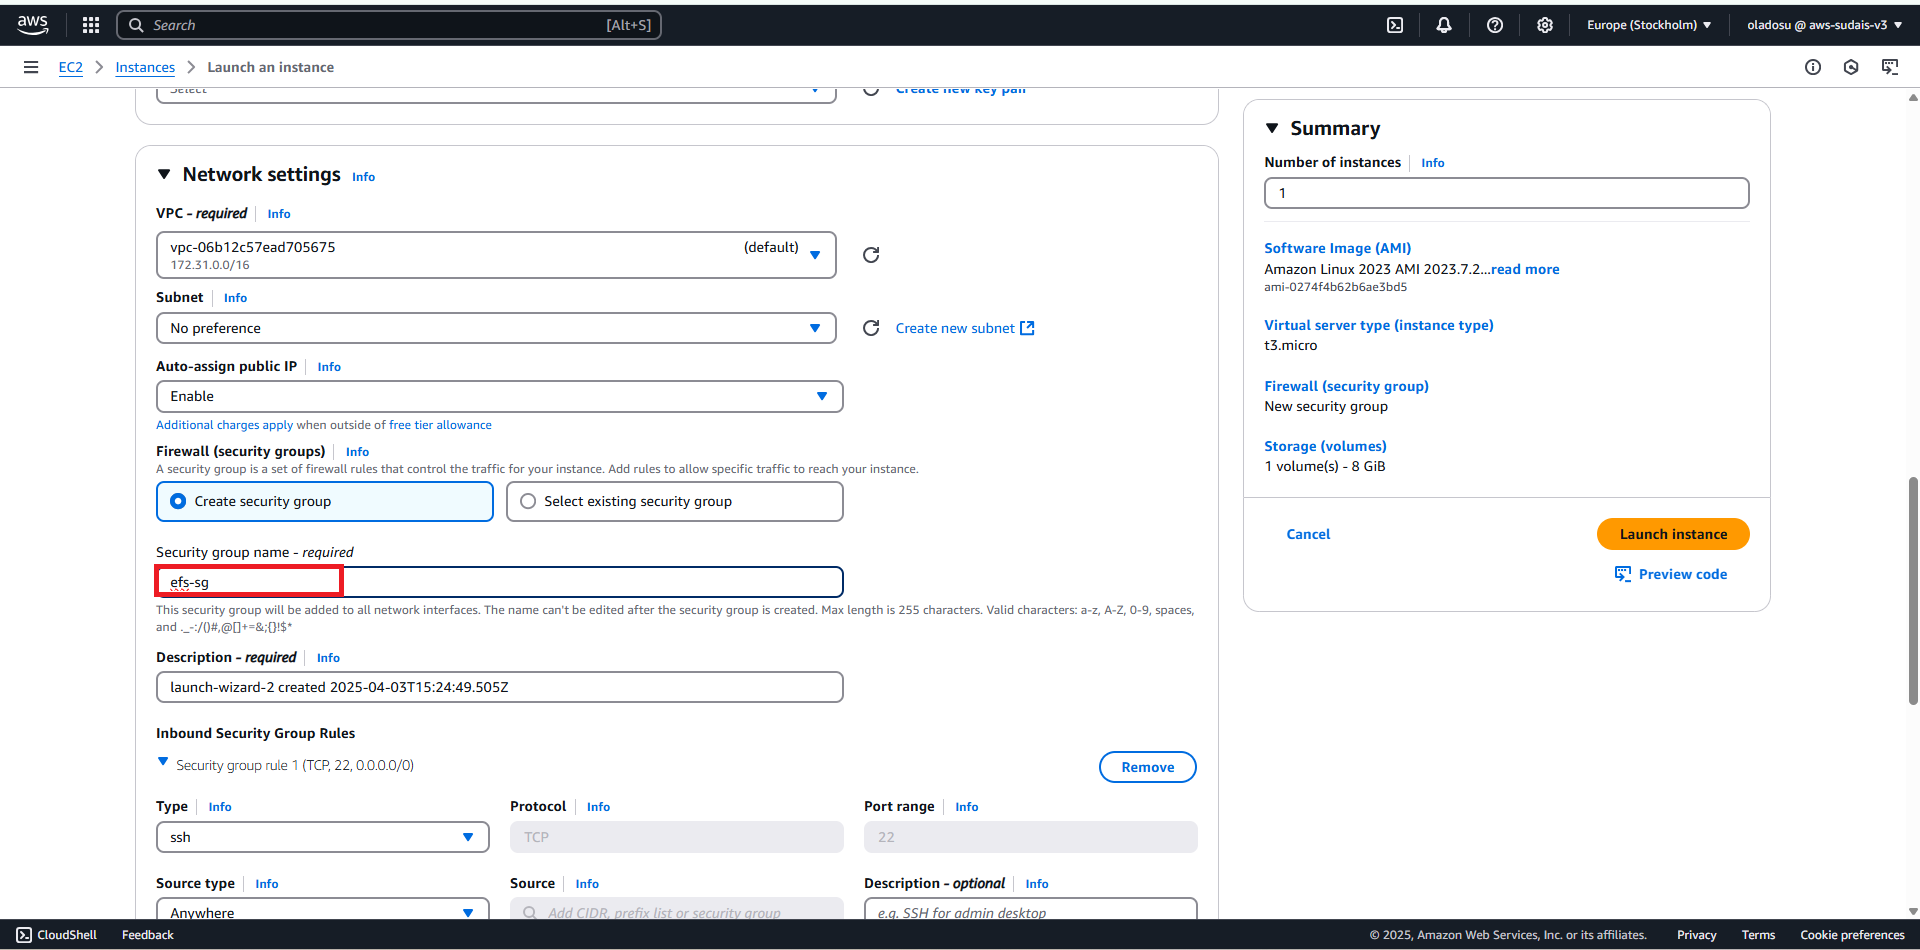
7. Edit the Network Settings
Under "Network Settings", make sure:
The VPC is correctly set to match your AWS infrastructure.
The Subnet is selected based on your region availability.
8. Rename the Security Group
Under "Firewall (Security Groups)", click Edit.
Rename the Security Group to something relevant, such as:
Security Groups act as virtual firewalls controlling inbound and outbound traffic.
Naming it properly (e.g.,
efs-sg) helps in organizing and managing AWS resources efficiently.
9. Launch and Connect to the Instance
Click the Launch Instance button.
Wait for AWS to initialize the instance.
Once the instance is in Running state, you can connect using EC2 Instance Connect (browser-based SSH).
Editing the EC2 Security Group for EFS Access
To allow your EC2 instance to communicate with Amazon EFS, you need to modify the Security Group settings. Specifically, you must add an inbound rule to allow Network File System (NFS) traffic (TCP port 2049) between the EC2 instance and EFS.
Follow these steps to edit the Security Group and enable EFS access:
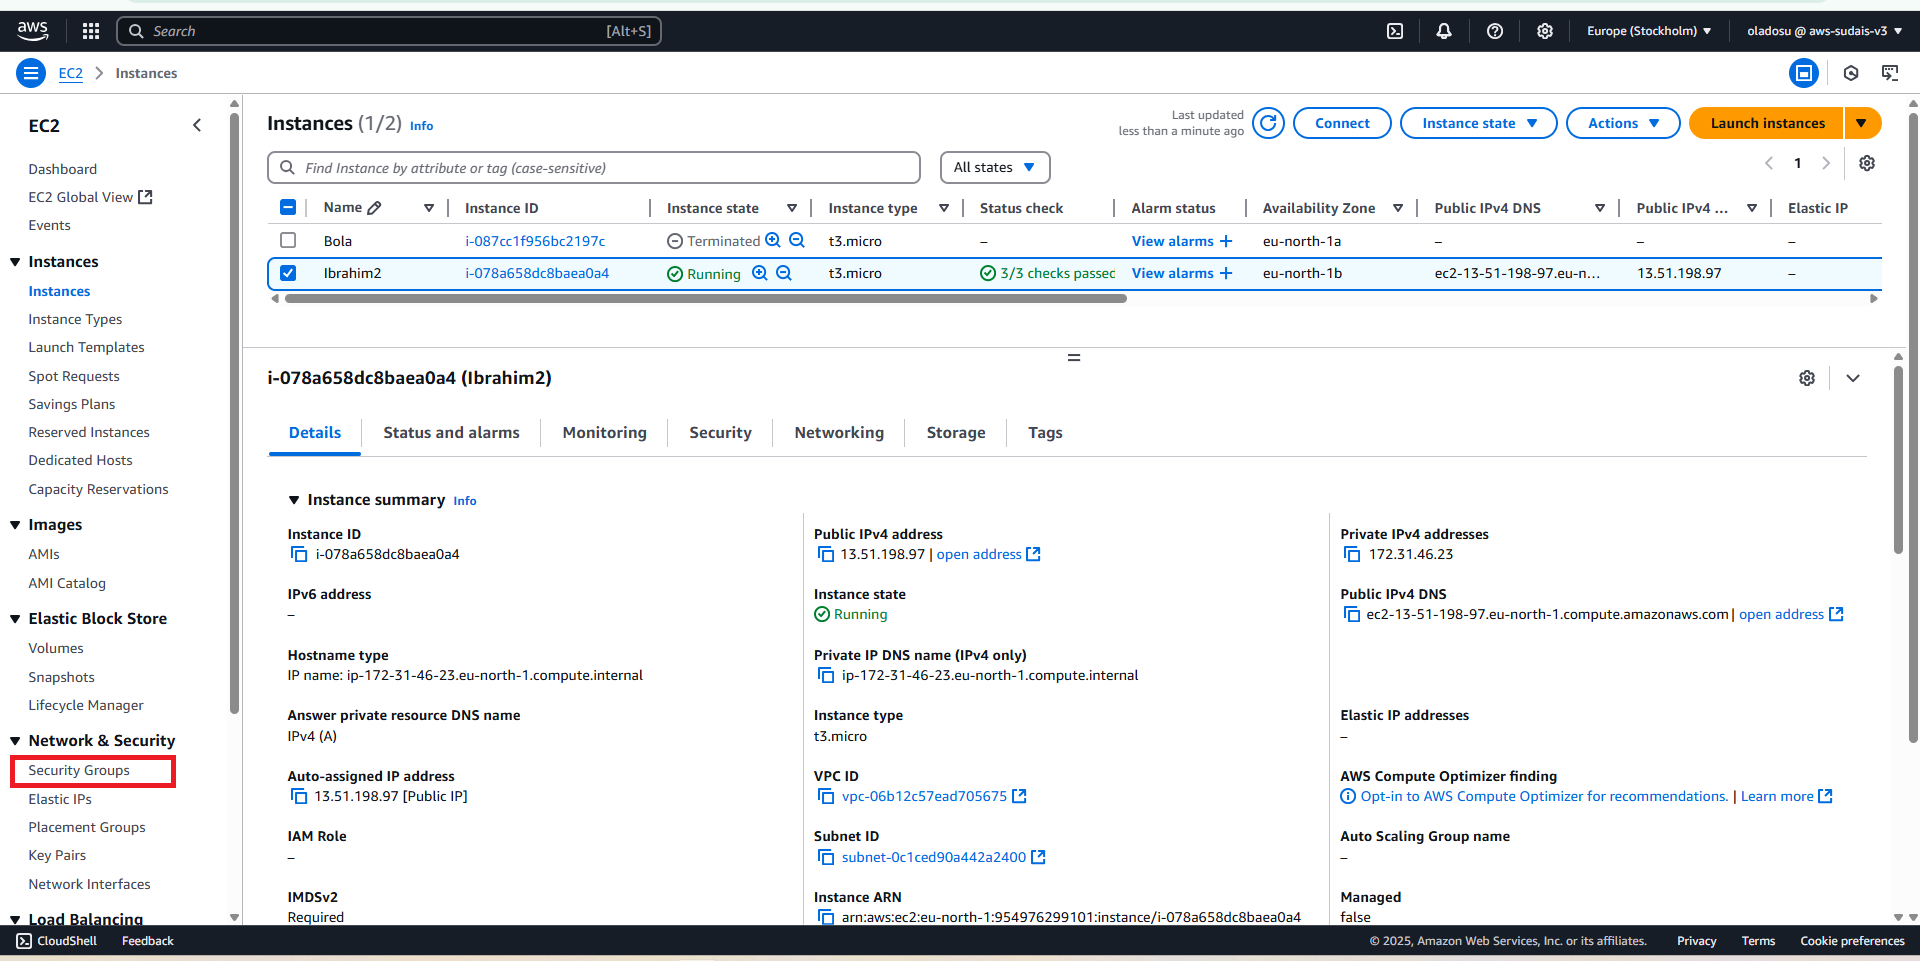
Step 1. Navigate to EC2 Security Groups
Open the EC2 Dashboard.
In the left navigation pane, click Security Groups.
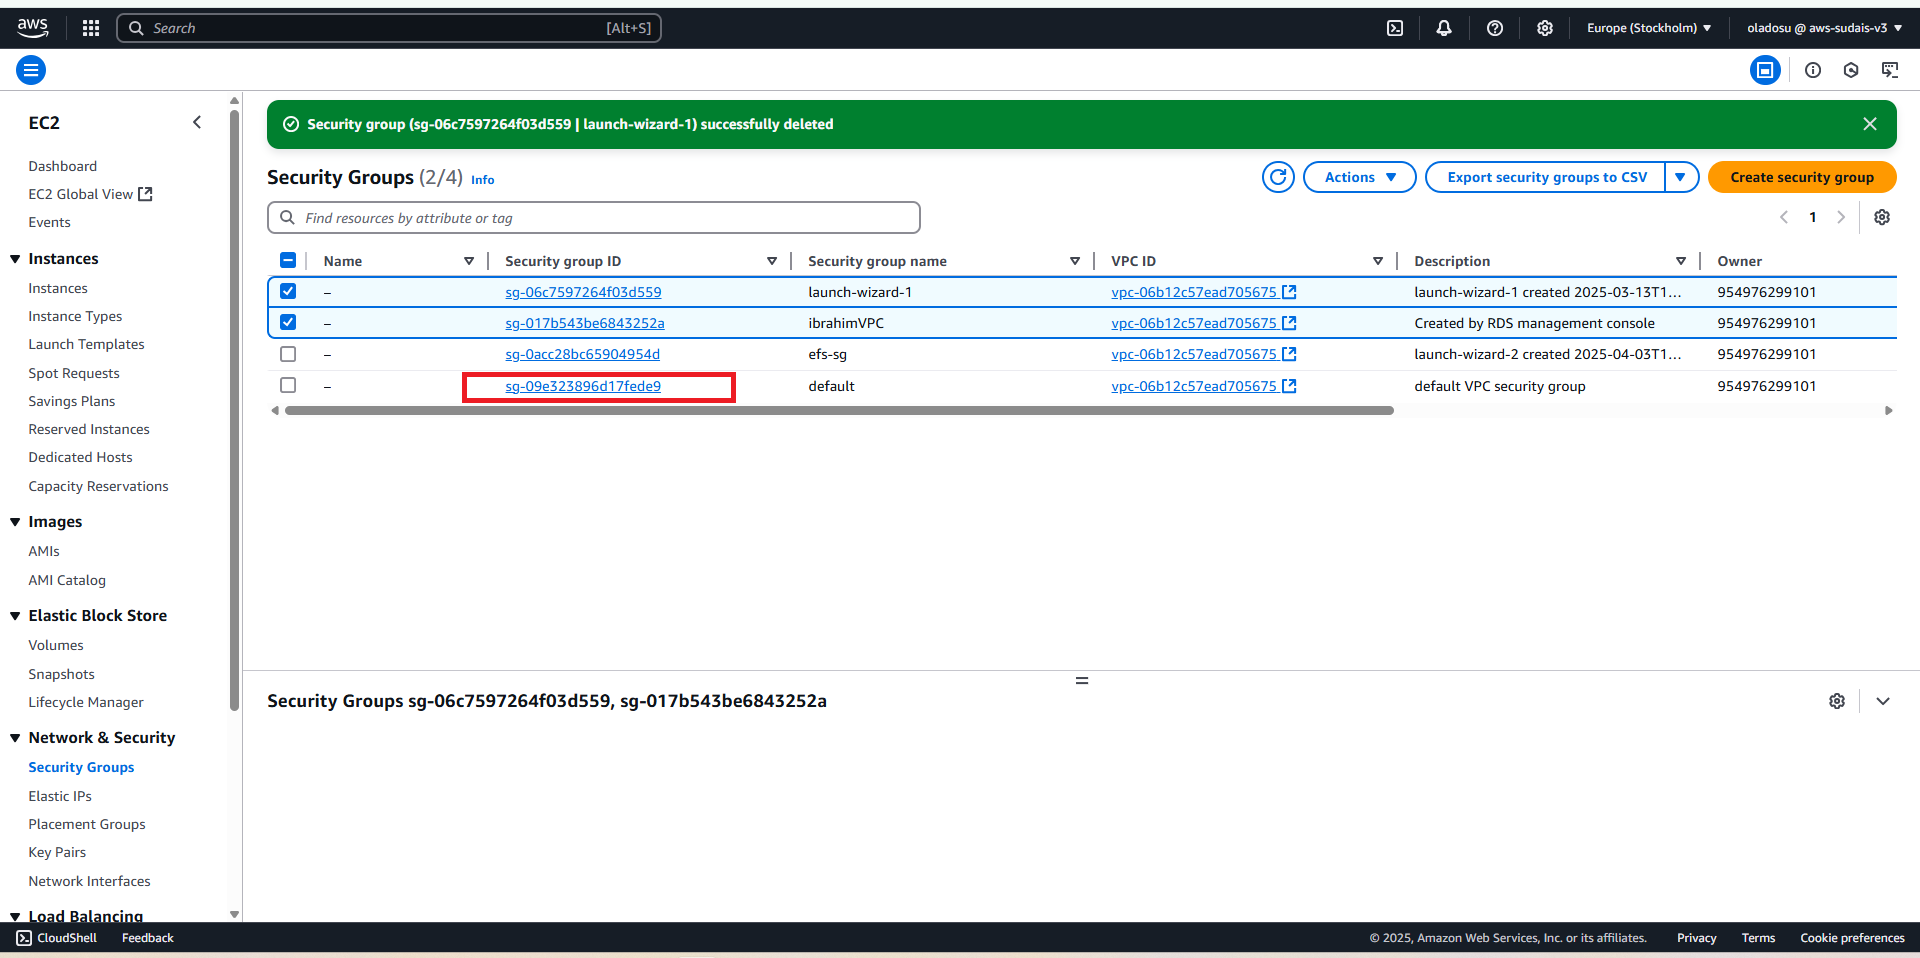
2. Select Security Group for Your EC2 Instance
Find and select the Security Group associated with your EC2 instance.
Click on the default Security Group ID to open its details.
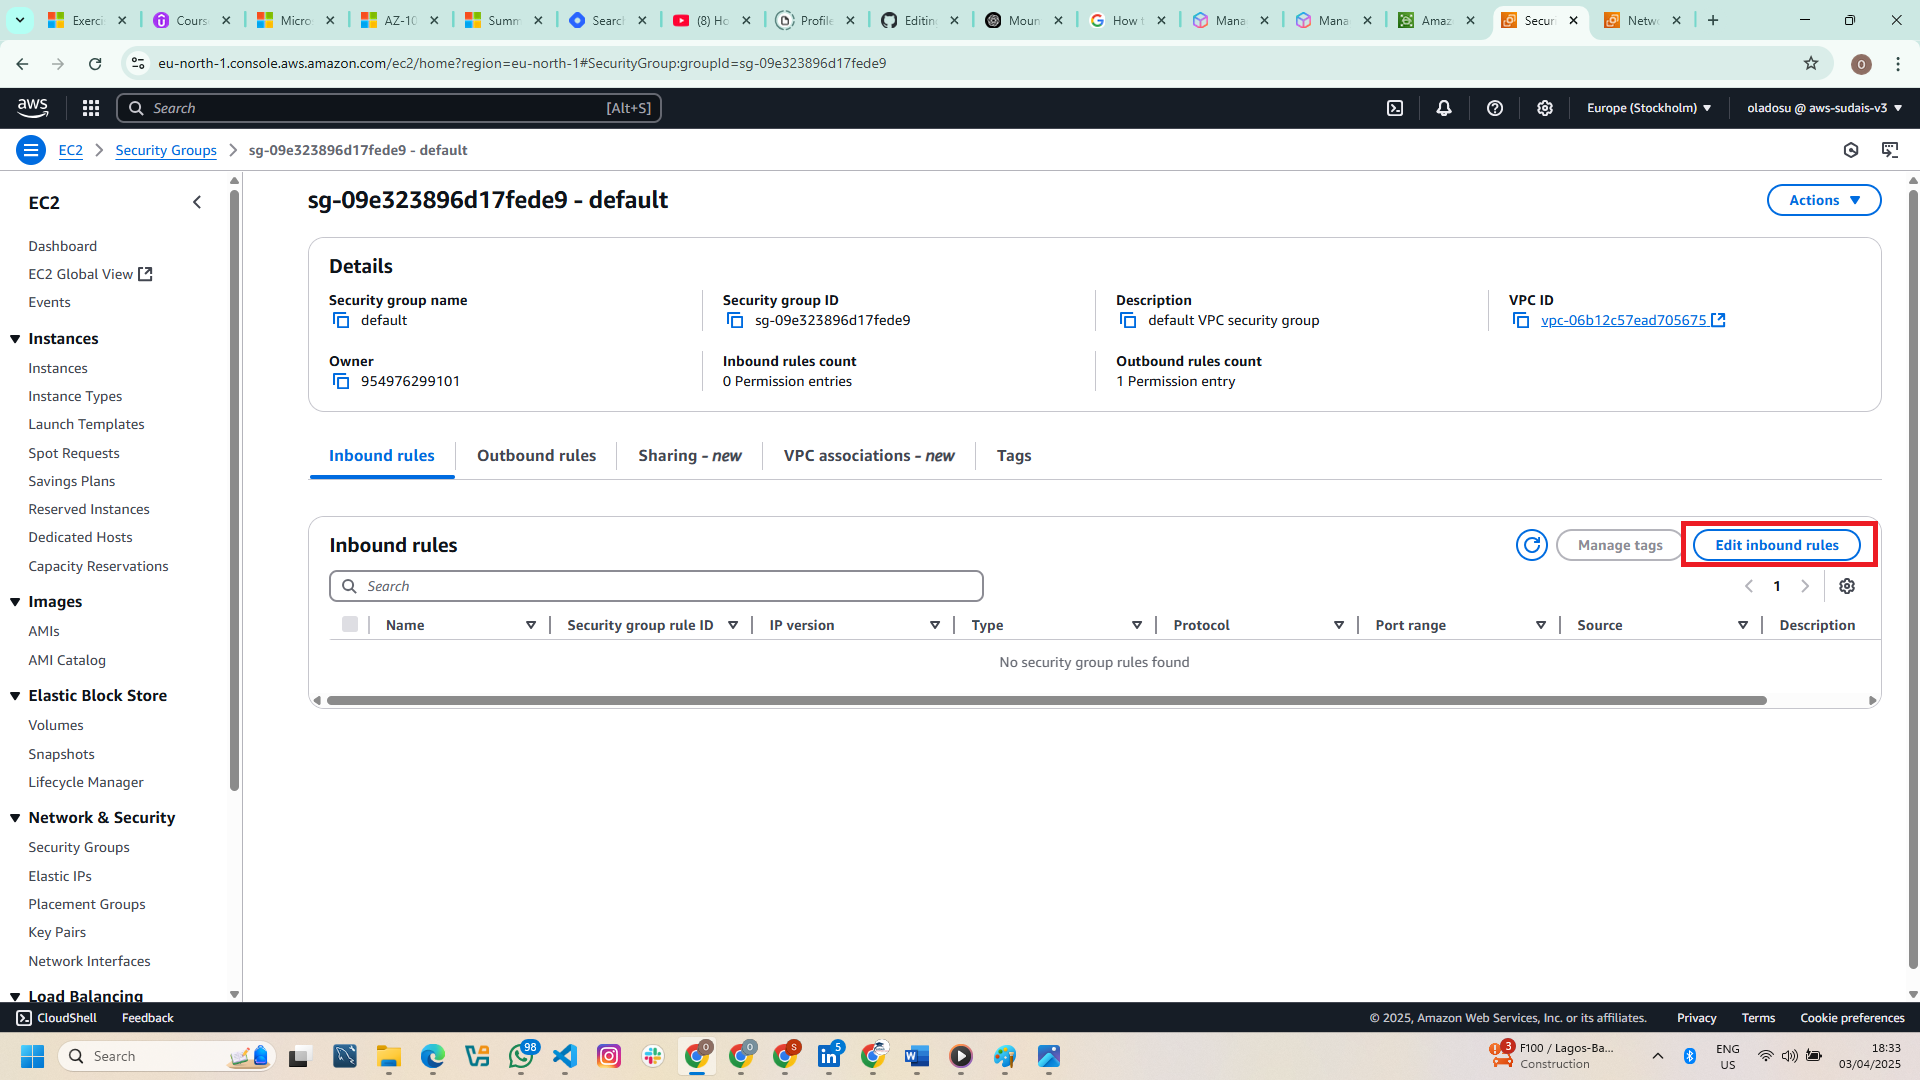
3. Edit the Inbound Rules
In the Security Group details page, go to the Inbound rules tab.
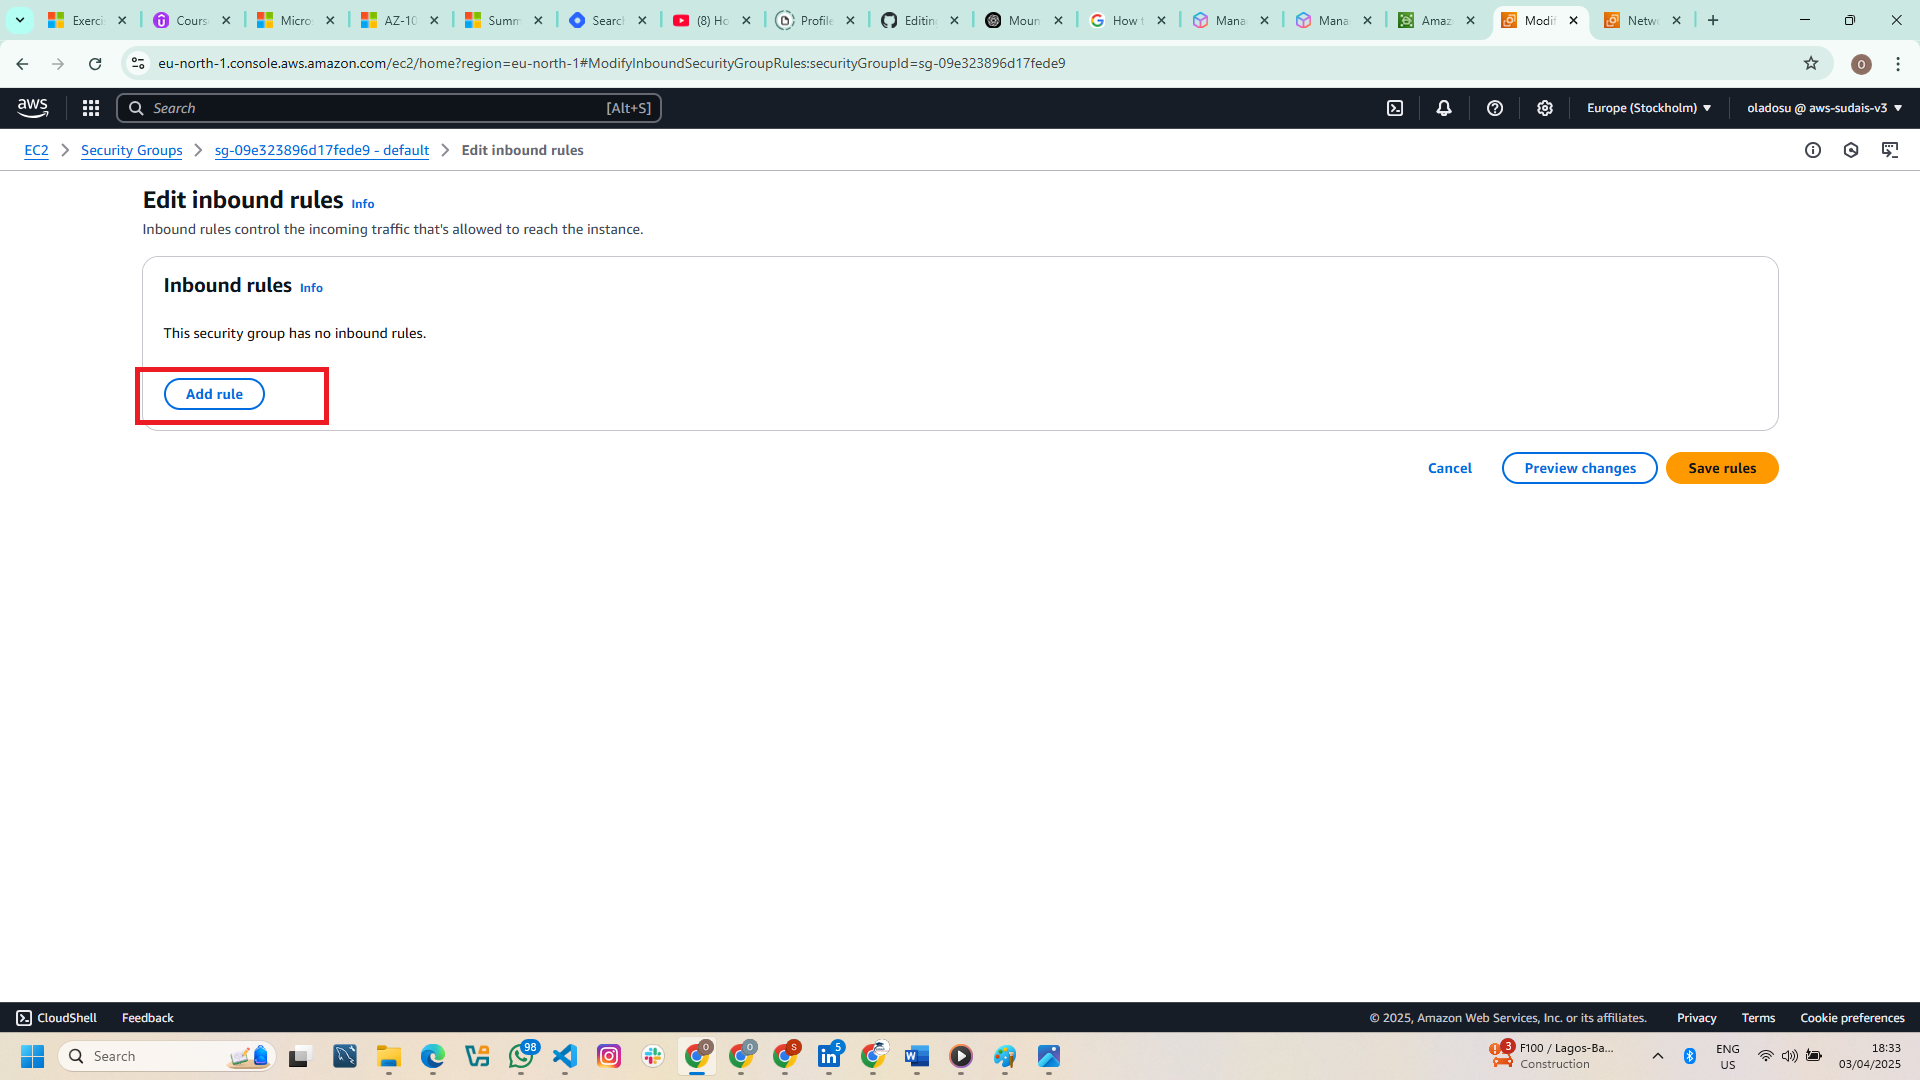
Click Edit inbound rules.
4. Add a New Rule for EFS Access
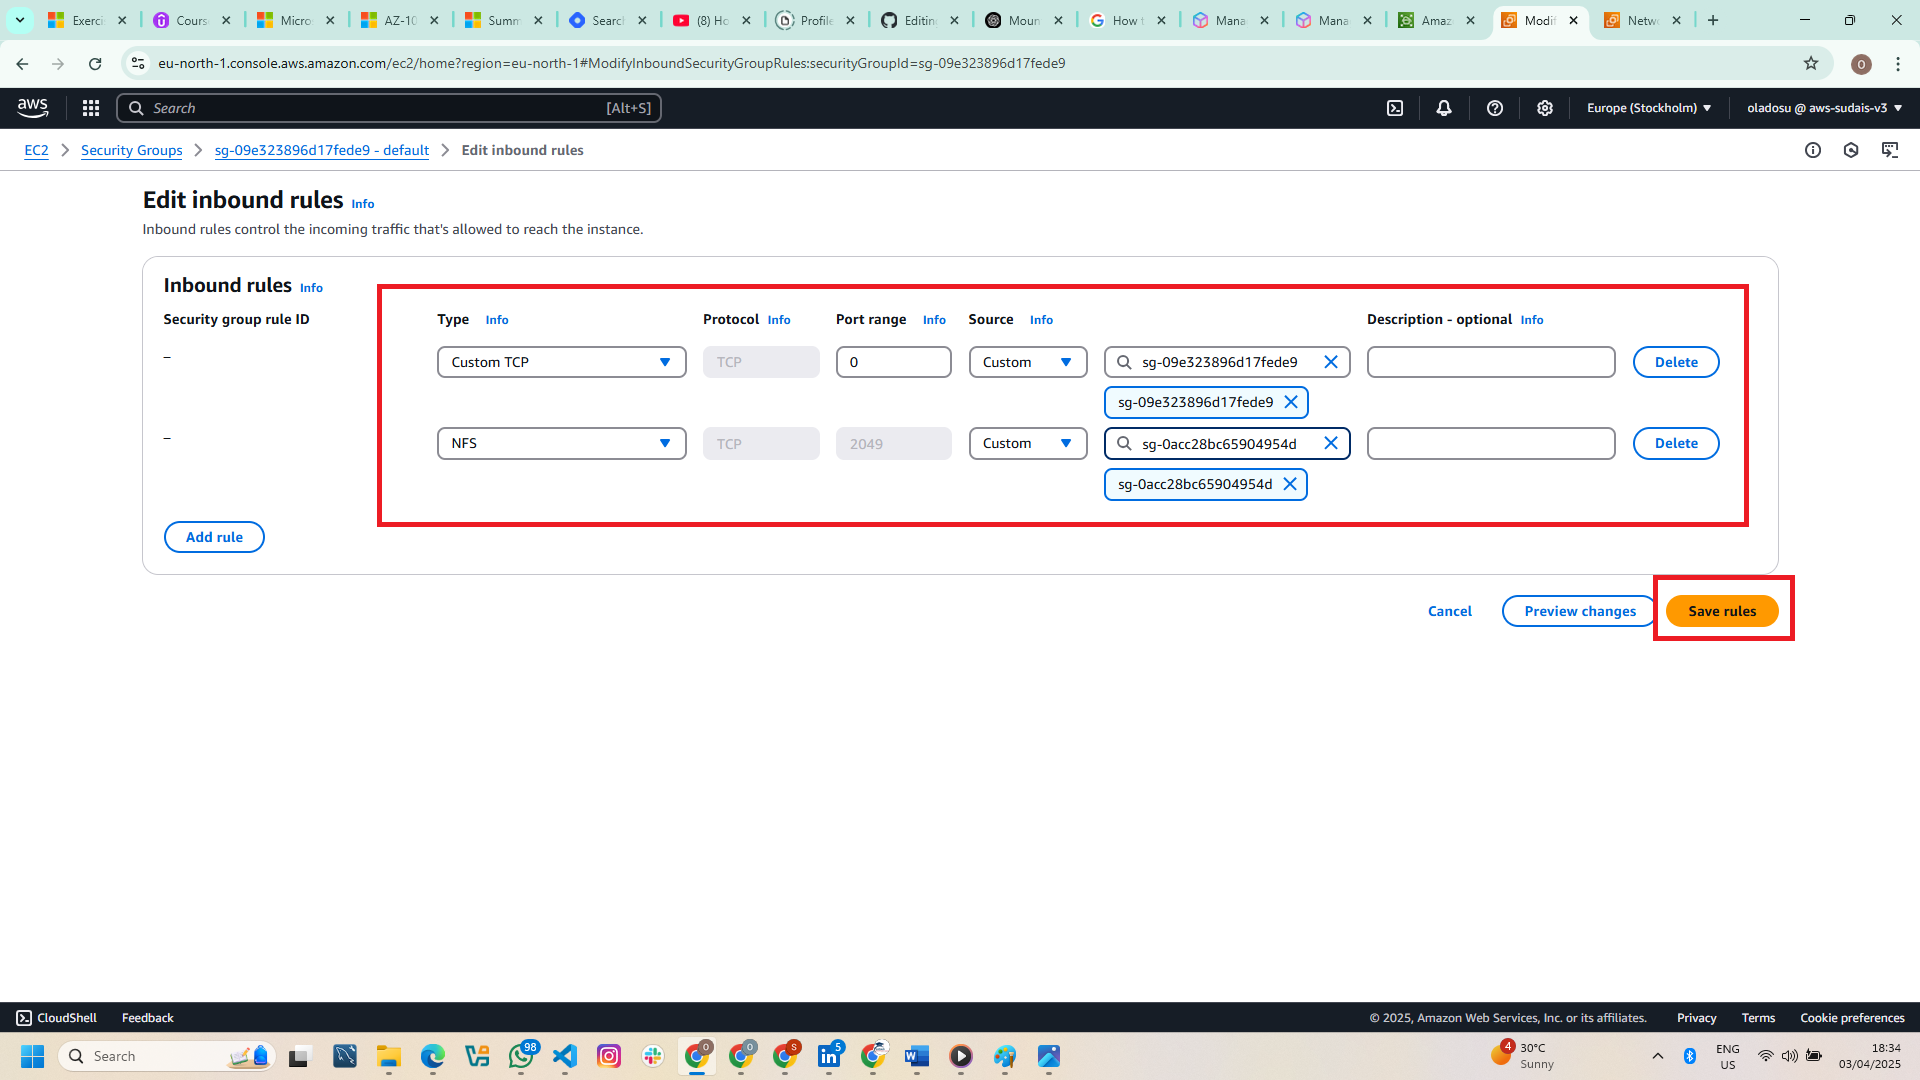
Click Add Rule.
Configure the rule with the following settings:
| Field | Value | | --- | --- | | Type | NFS | | Protocol | TCP (default for NFS) | | Port Range | 2049 (default NFS port) | | Source | Custom | | Select Custom Source | Choose the renamed security group (e.g., efs-sg) that allows EFS access |
5. Save the Rule
- Click Save Rules to apply the changes.
Why is This Step Important?
EFS relies on NFS (port 2049) for communication.
If the Security Group does not allow NFS traffic, the EC2 instance cannot mount the EFS file system.
Using a Security Group reference (efs-sg) ensures that only allowed instances can access the file system.
After saving the rule, your EC2 instance is now properly configured to access EFS. You can proceed to mount the EFS file system on your EC2 instance.
Connecting to the EC2 Instance
What is EC2 Instance Connect?
EC2 Instance Connect is a browser-based SSH terminal that allows you to securely connect to your EC2 instance without needing an SSH client. It is especially useful if you don’t have access to PuTTY or terminal-based SSH.
How to Connect Using EC2 Instance Connect
Navigate to EC2 Dashboard > Instances.
Select your EC2 instance.
Click Connect at the top.
Choose EC2 Instance Connect and click Connect to open a web terminal.
Installing and Mounting EFS on EC2
Once connected to your EC2 instance, follow these steps to install required packages and mount the EFS file system.
1. Install Amazon EFS Utilities
Amazon EFS provides a mount helper utility to simplify the process of mounting the file system. Install it using:
sudo dnf install -y amazon-efs-utils
This installs the necessary utilities to work with EFS.
2. Create a Directory for Mounting EFS
Create a directory where EFS will be mounted:
sudo mkdir efs
3. Mount the EFS File System
Use the following command to mount EFS (replace <file-system-id> with your actual EFS ID):
sudo mount -t efs <file-system-id>:/ efs
This links your EFS storage to the /efs directory.
4. Verify the Mount Status
Check if EFS is successfully mounted:
df -T
You should see efs listed as the file system type for the mounted directory.
5. Set Permissions for the EC2 User
Change ownership of the mounted directory to allow access:
sudo chown ec2-user efs/
6. Navigate into the Mounted Directory
Switch to the mounted EFS directory:
cd efs
7. Verify the Directory Contents
List the files in the mounted directory:
ls
ls -l
8. Create a Test File
To confirm that the EFS mount is writable, create a test file:
sudo touch efs.txt
Verify the file creation:
ls
ls -l
9. Create an HTML File for Testing
You can also create a sample index.html file:
touch index.html
10. Check Storage Usage
To check the storage usage of EFS, run:
du -h
11. List and Verify Files Again
ls
ls -l
Conclusion
Amazon EFS is an essential storage solution for applications that require shared file access across multiple EC2 instances. By following this guide, you can successfully integrate EFS into your AWS cloud infrastructure.
Would you like me to add troubleshooting steps or automate this process using AWS CLI? 🚀
Subscribe to my newsletter
Read articles from Oladosu Ibrahim Adeniyi directly inside your inbox. Subscribe to the newsletter, and don't miss out.
Written by

Oladosu Ibrahim Adeniyi
Oladosu Ibrahim Adeniyi
✨ I’m a versatile tech professional with expertise in Data Analysis, Data Engineering, Cloud Solution Architecture, Cloud/DevOps Engineering, and UI/UX Design. 🌟 My journey is fueled by a passion for: 📊 Transforming raw data into actionable insights 🔗 Designing scalable pipelines ☁️ Streamlining cloud infrastructures to drive business innovation 💡 As a Data Analyst, I excel in uncovering patterns and trends, enabling informed decision-making through visualizations and reporting. 🚀 As a Data Engineer, I architect robust data pipelines that handle complex transformations and ensure data integrity. 🏗️ As a Cloud Solution Architect, I design and implement scalable, secure, and efficient cloud solutions tailored to meet business needs. ⚙️ As a Cloud/DevOps Engineer, I specialize in automating deployments, optimizing workflows, and building resilient cloud-based systems. 🎓 With certifications in Microsoft Azure, AWS, and other cutting-edge technologies, I bring technical precision and a problem-solving mindset to every project. 📚 Beyond my technical work, I’m committed to lifelong learning and sharing knowledge through writing, mentoring, and collaboration. 🌍 Let’s connect to explore how data, cloud, DevOps, and design can drive innovation and efficiency in today’s digital world! 🚀