Creating Breadcrumbs in Flutter Using GoRouter: A Step-by-Step Guide
 NonStop io Technologies
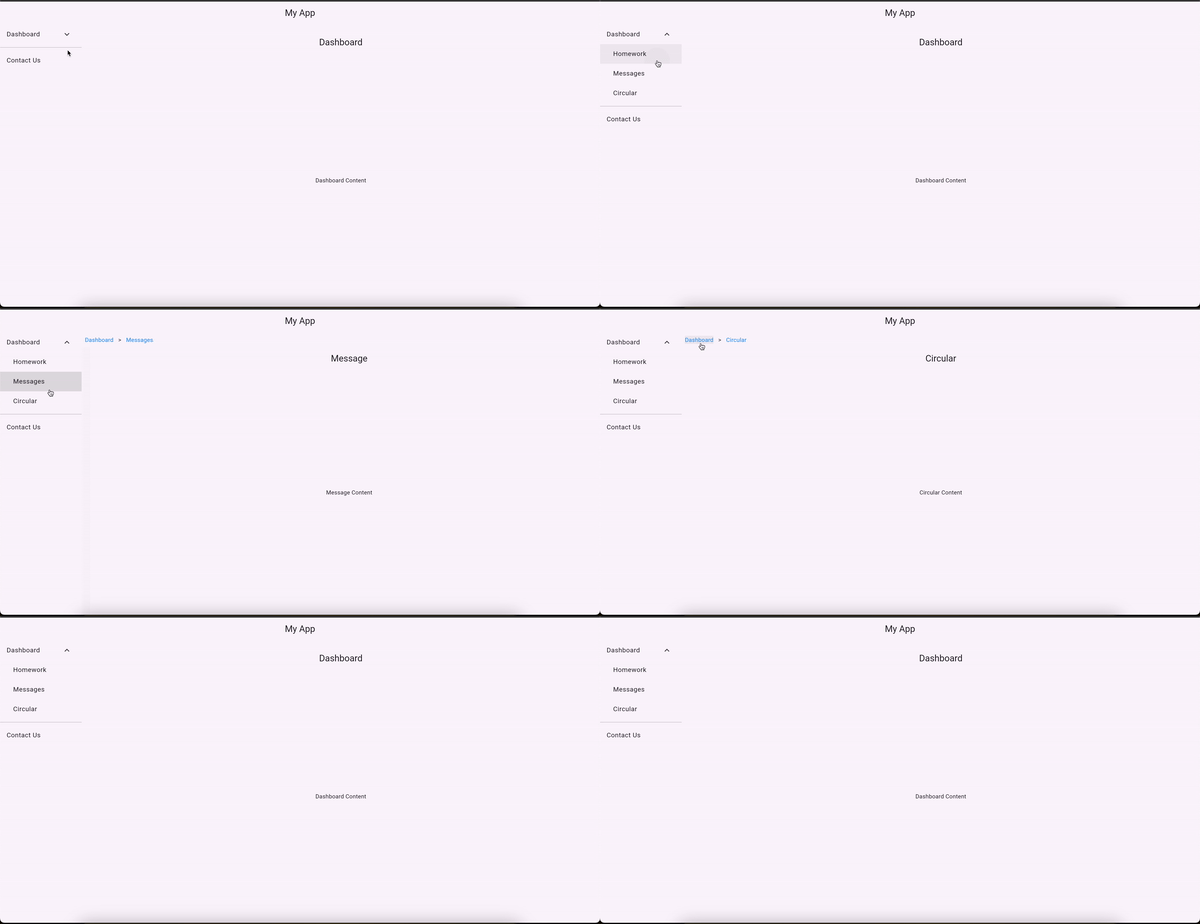
Breadcrumbs are an essential UI element for enhancing app navigation, especially for hierarchical or multi-level applications. This blog demonstrates creating breadcrumbs in a Flutter app using the GoRouter package. Additionally, it will showcase a complete navigation system that adapts to mobile and web layouts.
What We’ll Build
We’ll create a Flutter app with the following:
Navigation Drawer: For smaller screens (mobile).
Sidebar Navigation: For larger screens (web).
Breadcrumbs: To display the current navigation path and allow users to navigate back to previous levels.
Step 1: Setting Up the Project
First, create a new Flutter project and add the go_router package to the pubspec.yaml file:
dependencies:
  flutter:
    sdk: flutter
  go_router: ^14.6.2
Install the package by running:
flutter pub get
Step 2: Define Pages
Define the main screens for the app. Each screen will have basic content and a Scaffold for consistency. Below are the screen implementations:
DashboardPage
import 'package:flutter/material.dart';
class DashboardPage extends StatelessWidget {
  const DashboardPage({super.key});
@override
  Widget build(BuildContext context) {
    return Scaffold(
      appBar: AppBar(title: const Text("Dashboard")),
      body: const Center(child: Text("Dashboard Content")),
    );
  }
}
Homework Page
import 'package:flutter/material.dart';
class Homework extends StatelessWidget {
  const Homework({super.key});
@override
  Widget build(BuildContext context) {
    return Scaffold(
      appBar: AppBar(title: const Text("Homework")),
      body: const Center(child: Text("Homework Content")),
    );
  }
}
Similarly, create the Message, Circular, and ContactUs pages.
Step 3: Create the App Layout
The AppLayout widget serves as a container for the app’s structure. It supports:
Drawer navigation for mobile devices.
Sidebar navigation for web layouts.
import 'package:flutter/material.dart';
import 'package:go_router/go_router.dart';
class AppLayout extends StatelessWidget {
  final Widget child;
const AppLayout({super.key, required this.child});
@override
  Widget build(BuildContext context) {
    return Scaffold(
      appBar: AppBar(title: const Text("My App")),
      drawer: MediaQuery.of(context).size.width < 600
          ? Drawer(
              child: NavigationMenu(
                onTap: (route) => context.go(route),
              ),
            )
          : null,
      body: Row(
        children: [
          if (MediaQuery.of(context).size.width >= 600)
            SizedBox(
              width: 200,
              child: NavigationMenu(
                onTap: (route) => context.go(route),
              ),
            ),
          Expanded(
            child: Column(
              crossAxisAlignment: CrossAxisAlignment.start,
              children: [
                if (MediaQuery.of(context).size.width >= 600) const Breadcrumbs(),
                Expanded(child: child),
              ],
            ),
          ),
        ],
      ),
    );
  }
}
Step 4: Build the Navigation Menu
The NavigationMenu widget is a reusable menu that supports:
Collapsible submenus for items like “Dashboard.”
Drawer closing behavior on mobile.
class NavigationMenu extends StatefulWidget {
  final Function(String route) onTap;
const NavigationMenu({super.key, required this.onTap});
@override
  State<NavigationMenu> createState() => _NavigationMenuState();
}
class _NavigationMenuState extends State<NavigationMenu> {
  bool isDashboardExpanded = false;
@override
  Widget build(BuildContext context) {
    return ListView(
      children: [
        ListTile(
          title: const Text("Dashboard"),
          trailing: Icon(isDashboardExpanded ? Icons.expand_less : Icons.expand_more),
          onTap: () {
            setState(() {
              isDashboardExpanded = !isDashboardExpanded;
            });
          },
        ),
        if (isDashboardExpanded) ...[
          _buildSubmenuItem("Homework", "/dashboard/homework"),
          _buildSubmenuItem("Messages", "/dashboard/messages"),
          _buildSubmenuItem("Circular", "/dashboard/circular"),
        ],
        const Divider(),
        ListTile(
          title: const Text("Contact Us"),
          onTap: () {
            widget.onTap('/contactus');
            _closeDrawer(context);
          },
        ),
      ],
    );
  }
Widget _buildSubmenuItem(String title, String route) {
    return ListTile(
      title: Padding(
        padding: const EdgeInsets.only(left: 16.0),
        child: Text(title),
      ),
      onTap: () {
        widget.onTap(route);
        _closeDrawer(context);
      },
    );
  }
void _closeDrawer(BuildContext context) {
    if (MediaQuery.of(context).size.width < 600) {
      Navigator.of(context).pop();
    }
  }
}
Step 5: Add Breadcrumbs
The Breadcrumbs widget dynamically displays the current path and allows navigation to previous levels:
class Breadcrumbs extends StatelessWidget {
  const Breadcrumbs({super.key});
@override
  Widget build(BuildContext context) {
    final currentLocation = GoRouter.of(context).routerDelegate.currentConfiguration.fullPath;
    final segments = currentLocation.split('/').where((s) => s.isNotEmpty).toList();
return Padding(
      padding: const EdgeInsets.all(8.0),
      child: Wrap(
        spacing: 8.0,
        children: [
          if (segments.isNotEmpty && segments.first == 'dashboard') ...[
            InkWell(
              onTap: () => context.go('/'),
              child: const Text(
                'Dashboard',
                style: TextStyle(color: Colors.blue),
              ),
            ),
          ],
          for (int i = 1; i < segments.length; i++) ...[
            const Text(' > '),
            InkWell(
              onTap: () {
                final path = '/' + segments.sublist(0, i + 1).join('/');
                context.go(path);
              },
              child: Text(
                segments[i].capitalize(),
                style: const TextStyle(color: Colors.blue),
              ),
            ),
          ],
        ],
      ),
    );
  }
}

extension StringExtension on String {
  String capitalize() => '${this[0].toUpperCase()}${substring(1)}';
Step 6: Define Routes Using GoRouter
Now define the routes for the application using GoRouter.
final GoRouter router = GoRouter(
  routes: [
    ShellRoute(
      builder: (context, state, child) => AppLayout(child: child),
      routes: [
        GoRoute(
          path: '/',
          builder: (context, state) => const DashboardPage(),
        ),
        GoRoute(
          path: '/dashboard/homework',
          builder: (context, state) => const Homework(),
        ),
        GoRoute(
          path: '/dashboard/messages',
          builder: (context, state) => const Message(),
        ),
        GoRoute(
          path: '/dashboard/circular',
          builder: (context, state) => const Circular(),
        ),
      ],
    ),
    GoRoute(
      path: '/contactus',
      builder: (context, state) => const AppLayout(child: ContactUs()),
    ),
  ],
);
Step 7: Run the Application
Finally, configure the MaterialApp.router to use the GoRouter.
void main() {
  runApp(const MyApp());
}
class MyApp extends StatelessWidget {
  const MyApp({super.key});
@override
  Widget build(BuildContext context) {
    return MaterialApp.router(
      debugShowCheckedModeBanner: false,
      routerConfig: router,
    );
  }
}

Conclusion
In this blog, we built a Flutter app with breadcrumbs and responsive navigation using GoRouter. The complete code is available on GitHub. Clone it to explore further!
Hope you enjoyed this article!
Subscribe to my newsletter
Read articles from NonStop io Technologies directly inside your inbox. Subscribe to the newsletter, and don't miss out.
Written by

NonStop io Technologies
NonStop io Technologies
Product Development as an Expertise Since 2015 Founded in August 2015, we are a USA-based Bespoke Engineering Studio providing Product Development as an Expertise. With 80+ satisfied clients worldwide, we serve startups and enterprises across San Francisco, Seattle, New York, London, Pune, Bangalore, Tokyo and other prominent technology hubs.