Setting Up Your First Backend Like a Pro (But Easier)
 NonStop io Technologies
Welcome, aspiring backend developers! Today’s mission is to demystify backend application setup. Think of it as assembling a LEGO set, where each piece has its place and purpose. We’ll go step-by-step, and I’ll throw in some light-hearted commentary to keep things fun!*
We will cover :
Node / Git / Structuring Project Files / Package.json / .env*
Hey there! I’m just a student diving into the fascinating world of tech, eager to learn and grow. Initially, I started this journey to create something meaningful for myself — a sort of personal tech playground where I could revisit and keep learning. But then I thought, why not share this adventure with you all? After all, the best part of learning is sharing the experience, right? So, here I am, excited to explore this tech universe and super thrilled to have you join me on this journey. Let’s learn and have fun together!
Becoming Friends with Node.js
First things first, let’s get Node.js on your system. It’s like inviting the smartest kid in class to your project group. Once installed, check its version to ensure it’s ready to party.
node -v
This command checks your Node.js version. It’s like asking Node.js, “Hey, are you awake?” You will get back the version of node and also checks if node is installed in your system.

Next, initialize your Node project:
npm init
Then, run npm init to start your project. Don't worry about the details for now; just keep the entry point default. It's like saying "Hi" to Node.js.
The README.md — Your Project’s Storyteller
Now, create a file named readme.md. Think of it as your project's diary where it tells all its secrets. Write down what your project is about and the cool features you're planning to implement. Be creative! This file is the first thing people see, so make it interesting.
Write your project details and planned features here. No specific commands needed, just a good old text editor.
Get Git Going and Connect with GitHub
Time to initiate Git with git init. It's like giving your project a memory. Change the default branch from 'master' to 'main' because we're all about being current. Then, add your files with git add . and commit them. It's like taking a snapshot of your project.
Next, create a repository on GitHub and connect it with your local project. Don't forget to add a .gitignore file and exclude those pesky node modules. If you're lost, git ignore generators online are your best friends.
Those Git ignore are just a google away,
I use https://mrkandreev.name/snippets/gitignore-generator/ in which select node as package and just copy paste them
git branch -M main  // It's like renaming a folder to something cooler.

git add .  //Adding our files to staging area ready to push (takeoff)

git commit -m "Initial commit" //Think of this as taking a snapshot of
your project's current state and labeling it.

git remote add origin [your-repository-link] //This connects your local
project to its online backup on GitHub.

git push -u origin main // Main Command to push the code to github repo
Handling Images and Docs Like a Boss
Dealing with images and documents? We usually let servers and third-party services handle them, but for development, let’s keep copies in our system. Create a folder named public/temp for this. Remember, this setup might change based on the project or company.
Quick tip: Git doesn’t care about empty folders, but you can make it notice by adding a .gitkeep file. It's like leaving breadcrumbs for Git.”
This is like saying, “Hey Git, please remember this place even though it’s empty.”
Structuring Your Project with Folders and Files
Now, the fun part: setting up your project structure. Create a src folder and within it, add app.js, index.js, constants.js, and folders like controllers, models, utils, routes, db, and middlewares. Think of these as different departments in a company, each with its own job. Use mkdir and touch commands to create these. It's like playing architect with your project.
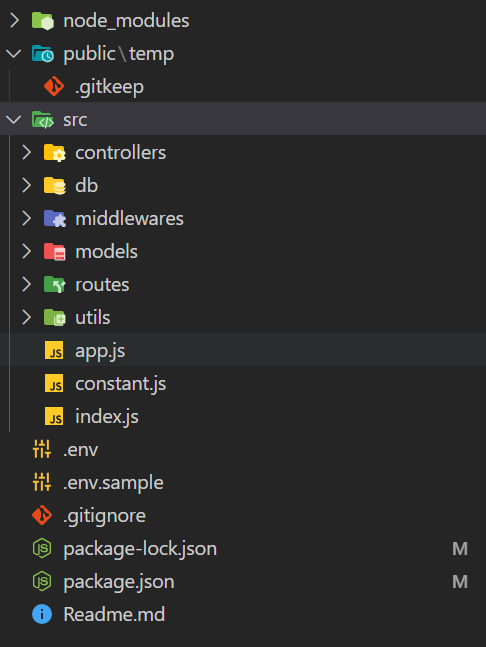
app.js: This is like the main control room of your application. It’s where you set up your server, add middleware (those are like helpers that process requests), and connect routes (which are like paths your app can take).
index.js: Think of this as the front door of your application. It’s usually where your application starts running. It calls app.js and tells your server to start listening for requests.
constants.js: This file is like a sticky note board where you keep important, unchanging information, like configuration values or magic numbers. It helps to have them in one place so you can easily find and change them if needed.
controllers: Controllers are like managers in a store. Each controller manages a specific part of your application, handling user requests, making decisions, and sending back responses.
models: Models are the blueprints for your data. They define the structure of the data your application will use, like the design of a form. They often correspond to tables in your database.
utils: Think of the utils folder as your toolbox. It contains useful functions and helpers that you can use throughout your application. These tools can do anything from formatting data to handling errors.
routes: Routes are the paths that requests take through your app. They define how your app responds to different URLs. It’s like a map of your application, showing what it does when users visit different pages.
db: This is where you set up and manage your database connections. It’s like the wire that connects your app to its data storage. You might write code here to connect to a database and define how to interact with it.
middlewares: Middlewares are like checkpoints in your application. They can check requests, process data, handle errors, or do other tasks before your main controllers handle the request. They’re versatile and can be used for a variety of purposes like logging, authentication, and more.
If want to know more everything is just a google away.
By understanding these components, you’re getting a good grasp of the basic structure of a backend application. Each part plays a specific role, and together, they help your application function smoothly!
After looking carefully above image you must be seeing few files which are you might be aware about but not know there purpose lets discuss them more in details
Package.json
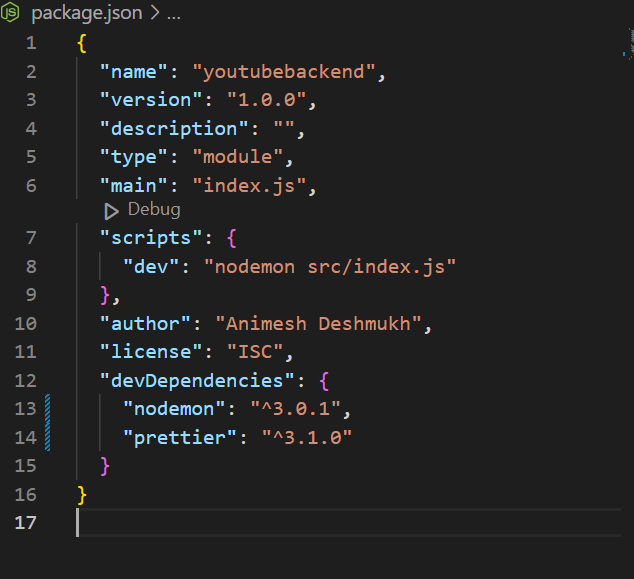
The package.json file in a Node.js project is like the identity card and instruction manual for your application. Here's a short breakdown:
Project Metadata: It includes basic info like your project’s name, version, description, and author details. Think of it as your app’s introduction to the world.
Script Commands: These are custom shortcuts you can set up to run specific tasks, like starting your server or running tests. It’s like having a set of quick-dial buttons for important actions.
Dependencies: This section lists other packages your project needs to run. Whenever you install a package using NPM (Node Package Manager), it gets listed here. It’s like a shopping list for your app to work properly.
DevDependencies: Similar to dependencies, but these are only needed for development, like testing tools. They’re not used in the production version of your app.
Other Configurations: You might also find configurations for various tools and environments. This is where your app’s preferences and settings are stored.

Quick Question What is difference between above two? you might get this question in interviews.
Purpose: package.json lists the dependencies and scripts for your project, while package-lock.json captures the exact version of each installed package.
Versioning: package.json can specify ranges for dependencies, allowing updates. package-lock.json locks the versions, ensuring consistency across installations.
Usage: package.json is manually edited and updated by the developer, whereas package-lock.json is automatically generated and updated by npm.
.ENV

The .env file is like a secret diary for your application, storing sensitive information such as passwords, API keys, and configuration settings. It’s where you keep things that should not be shared publicly, like your personal secrets. Each entry in a .env file is a hidden environment variable that your application can access, but outsiders can’t see.
On the other hand, .env.sample is like the public version of your diary. It doesn’t contain the actual secrets but shows the structure and the type of information that should be there. It’s like a template to guide other developers on what variables they need to set in their own .env file. This way, you can share the necessary format of your secret settings without revealing the actual confidential details. The .env.sample is especially useful in collaborative projects, as it ensures everyone sets up their environment variables correctly without compromising security.
And there you have it! You’re now on your way to becoming a backend pro. Remember, every great developer started from scratch, and with a pinch of humor and a lot of learning, you’ll get there too. Happy coding!
Subscribe to my newsletter
Read articles from NonStop io Technologies directly inside your inbox. Subscribe to the newsletter, and don't miss out.
Written by
NonStop io Technologies
NonStop io Technologies
Product Development as an Expertise Since 2015 Founded in August 2015, we are a USA-based Bespoke Engineering Studio providing Product Development as an Expertise. With 80+ satisfied clients worldwide, we serve startups and enterprises across San Francisco, Seattle, New York, London, Pune, Bangalore, Tokyo and other prominent technology hubs.