The Art of Mobile Automation: Appium, Python, and Beyond (BrowserStack, CI/CD)
 arya bhattathiri
Hey folks! If you’re like me, you probably know how crucial mobile testing is these days. Apps are everywhere, and making sure they work smoothly is a big deal. Recently I had to dive into automating tests for a mobile app project, and I decided to use Appium with Python. In this blog, I’ll walk you through the basic setup and test case creation using Appium with Python. I recently worked on this for a mobile app testing project, and thought sharing it would help others start the same journey. We’ll also go into
Setting up Appium with Python
Android and iOS automation
Using BrowserStack for real/simulated devices & Appium Inspector for Element Locators ( with BrowserStack) & Tests Without BrowserStack (Local Setup) & Tests Without BrowserStack (Appium Inspector with Real Device)
Integrating CI/CD pipelines with App Center/TestFlight
And a bit of troubleshooting too!
2. What is Appium?
Simply put, Appium is a cross-platform tool that allows you to automate mobile app testing. It works on both Android and iOS, which is very convenient. It’s language-independent, meaning you can use languages like Python, which is what we’re going to do.
It uses platform-specific automation engines like:
UIAutomator2 for Android
XCUITest for iOS
3. Pre-requisites (Android vs. iOS Confusion Clarified!)
Here, where things can get a little complicated, especially when working on Android and iOS. Let’s break it down: Let’s break it down:
Common:
Python: You’ll need Python installed on your machine(Python 3.x).
Node.js and npm: Appium runs on Node.js. Install Node.js, and npm comes bundled with it.
Appium: Install Appium globally using npm:
$ npm install -g appiumAppium-Python-Client: This is the Python library we’ll use to interact with Appium:
$ pip install Appium-Python-ClientAppium Desktop (Optional): This is a GUI tool that includes the Appium Inspector, But I suggest it.
Android Specific:
Install Android Studio
Set up emulator + Android SDK
UIAutomator2 comes bundled with Appium
Installation:
- UIAutomator2 comes bundled with Appium, but you may need to ensure it’s properly configured.
2. Ensure that android sdk tools are installed.
3. When you set the automationName to UiAutomator2 in your desired capabilities, Appium will handle the setup.
4. If you encounter issues, ensure you have the latest Android SDK build tools and platform tools.
iOS Specific:
Install Xcode
Setup WebDriverAgent through Xcode
Configure signing certificates for your device
Installation:
- XCUITest is integrated with Xcode.
2. WebDriverAgent is a WebDriver server that Appium uses to interact with iOS apps. You’ll need to set this up correctly in Xcode.
3. Open Xcode, go to “Xcode” -> “Preferences” -> “Components” and download the latest simulator tools.
4. Clone the WebDriverAgent repository from GitHub.
5. Open WebDriverAgent.xcodeproj in Xcode.
6. Configure the signing certificate for the WebDriverAgentLib and WebDriverAgentRunner targets.
7. Build the WebDriverAgentRunner target on a real device or simulator.
8. Ensure that the WebDriverAgent is running correctly.
4. Setting Up the Project
I like to keep my projects organized, so here’s how I structured my folders:
mobile-testing/
├── tests/
│   ├── ios_test_app.py
│   └── android_test_app.py
├── ci-cd/
│   ├── azure-pipelines.yml         # Azure DevOps pipeline definition
│   └── browserstack-config.json   # BrowserStack test config
├── app/
│   ├── build/                      # APK or IPA builds (optional)
├── requirements.txt
└── README.md
In requirements.txt, I listed all the dependencies:
Appium-Python-Client
pytest
You can install them using: $ pip install -r requirements.txt
If you’re using pytest, you might want a conftest.py for setup and teardown, but we'll keep it simple for now.
4. What is BrowserStack and Why Use It? (Including Simulator/Emulator Selection)
BrowserStack is a cloud-based mobile and web testing platform, providing access to a wide range of real devices and simulators/emulators. Why use it?
Real Device Testing: Test on actual devices with different OS versions and configurations.
Scalability: Run tests in parallel to reduce testing time.
Accessibility: Access devices without needing to maintain your own device lab.
Integration: Easily integrate with CI/CD pipelines.
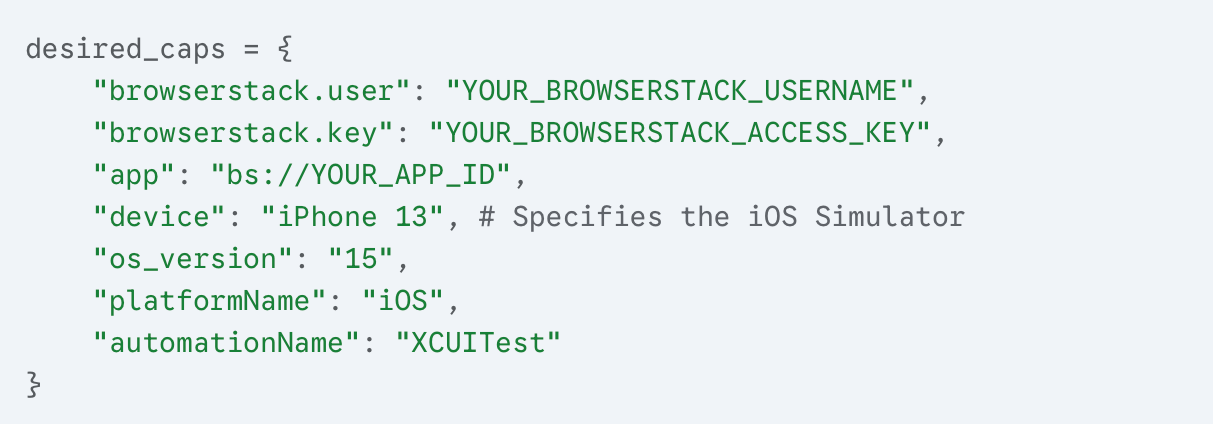
Simulator/Emulator Selection: When using BrowserStack, you have fine-grained control over which simulators/emulators to use. You specify the desired device, OS version, and other capabilities in your
desired_caps. For example of use an Android emulator:
For example of use an iOS simulator:
BrowserStack provides a device list on their website, showing all available devices and simulators, and their OS versions.
Setting Up the Project (BrowserStack and Local)
When using BrowserStack, your desired_caps will change to include authentication and device details:
from appium import webdriver
desired_caps = {
    "browserstack.user": "YOUR_BROWSERSTACK_USERNAME",
    "browserstack.key": "YOUR_BROWSERSTACK_ACCESS_KEY",
    "app": "bs://YOUR_APP_ID", # App ID from BrowserStack
    "device": "Samsung Galaxy S21", # Device name from BrowserStack
    "os_version": "11.0",
    "platformName": "Android",
    "automationName": "UiAutomator2"
}
driver = webdriver.Remote("http://hub.browserstack.com/wd/hub", desired_caps)
print(driver.current_activity)
driver.quit()
For iOS, the desired_caps will be similar, but with iOS-specific details.
5. Real Device Testing Steps (Local and BrowserStack)
Testing on real devices is crucial to ensure your app behaves as expected in real-world scenarios. Here’s how you can approach it:
- Local Real Device Setup (Android):
Enable Developer Options: On your Android device, go to “Settings” > “About Phone” and tap “Build Number” seven times to enable “Developer Options.”
Enable USB Debugging: In “Developer Options,” enable “USB Debugging.”
Install ADB Drivers: Ensure you have the Android Debug Bridge (ADB) drivers installed on your computer. Android Studio typically installs these.
Connect Your Device: Connect your Android device to your computer via USB.
Verify Connection: Open a terminal and run
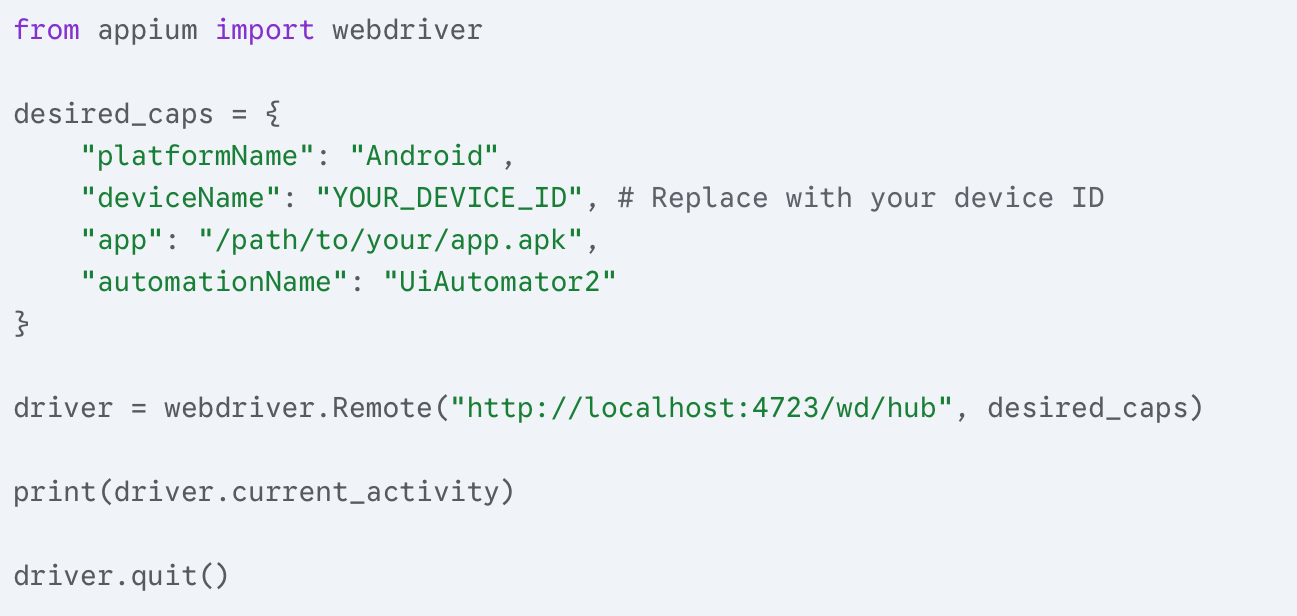
$ adb devices. You should see your device listed.Configure Desired Capabilities: In your Python script, set the
deviceNamecapability to your device's ID (which you got from$ adb devices).Run Your Test: Run your Appium test script.
- Local Real Device Setup (iOS):
Xcode Setup: You will need a Mac computer, and Xcode installed.
Enable UI Automation: On your iOS device, go to “Settings” > “Developer” and enable “UI Automation.”
Register Device with Xcode: Connect your iOS device to your Mac and register it with Xcode.
Install WebDriverAgent: WebDriverAgent needs to be installed and configured on your device. This involves Xcode configuration and signing.
Configure Desired Capabilities: In your Python script, set the
deviceNameandudidcapabilities. Theudidis the unique identifier of your device.Run Your Test: Run your Appium test script.

- BrowserStack Real Device Testing:
Configure Desired Capabilities: In your Python script, specify the
deviceandos_versioncapabilities. BrowserStack will handle device provisioning.Run Your Test: Run your Appium test script. BrowserStack will execute the test on the specified real device.

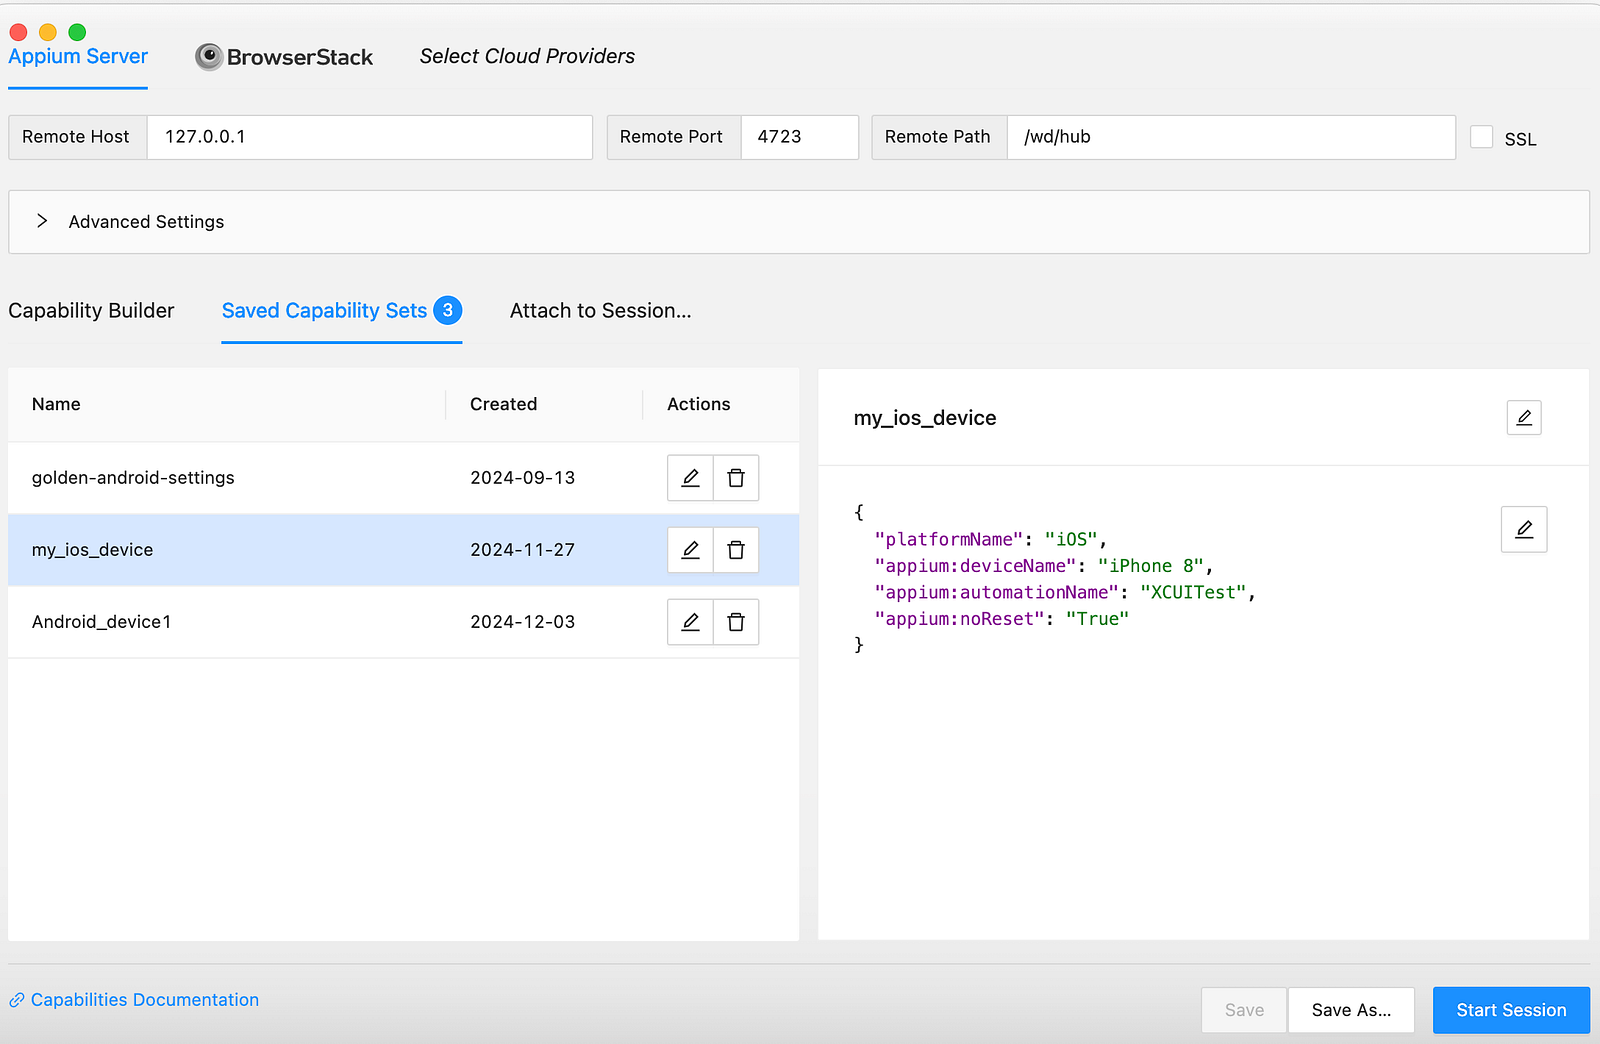
6. Setting Up Appium Inspector for Element Locators ( with BrowserStack)
Appium Inspector is a powerful tool for inspecting the UI hierarchy of your mobile app and finding element locators.Here’s how to set it up for different scenarios:
- Emulator/Simulator Setup:
Start Appium Server: Open a terminal and start the Appium server:
$ appiumOpen Appium Desktop: Launch Appium Desktop.
Start Inspector Session:
Click the “Start Inspector Session” button.
Enter your desired capabilities in the “Desired Capabilities” section. These should match the capabilities you use in your Python script.
Ensure the Appium Server address is set to
http://127.0.0.1:4723/wd/hub.Click “Start Session.”
- Inspect Elements: The Inspector will display the UI hierarchy of your app. You can click on elements to see their properties and generate locators.
- Real Device Setup (Local):
Connect Device and Enable Debugging: Ensure your real device is connected and USB debugging (Android) or UI Automation (iOS) is enabled.
Start Appium Server: Start the Appium server as usual.
Open Appium Desktop and Start Session: Follow the same steps as for emulator/simulator setup, ensuring your desired capabilities match your device.
Inspect Elements: The Inspector will display the UI hierarchy of your app on the real device.
- BrowserStack Real Device/Simulator Setup:
BrowserStack Appium Setup: You will not use the Appium Desktop Application, but rather the browserstack website, and the browserstack inspector.
Browserstack website: login to your browserstack account.
Upload the app: upload the app you want to test.
Start new Appium session: In the website, start a new appium session, and choose the device or simulator you want to test.
Use the Browserstack inspector: the website will automatically give you access to the inspector.
Inspect element: The inspector will display the UI hierarchy of your app on the real device or emulator.
Copy locators: copy the locators that will work for your test.
Important: Browserstack handles the device connections, so you do not need to connect devices to your local machine.
7. Running Tests Without BrowserStack (Local Setup)
If you prefer to run tests locally, you’ll need to set up your own emulators/simulators.
Android:
Use Android Studio to create and manage Android emulators.
Ensure your emulator is running before starting your Appium tests.
In your desired capabilities, the deviceName will be the name of your emulator.
iOS:
Use Xcode to create and manage iOS simulators.
Ensure your simulator is running before starting your Appium tests.
In your desired capabilities, the deviceName will be the name of your simulator.
8. Running Tests Without BrowserStack (Appium Inspector with Real Device)
If you are running tests locally with a real device, you can use Appium Inspector to identify elements and create your test scripts. Here’s how:
Connect Real Device and Enable Debugging:
Ensure your Android or iOS device is connected to your computer.
Enable USB Debugging (Android) or UI Automation (iOS) on your device.
Start Appium Server:
- Open a terminal and start the Appium server:
$ appium
Open Appium Desktop and Start Session:
Launch Appium Desktop.
Click the “Start Inspector Session” button.
Enter your desired capabilities in the “Desired Capabilities” section. These should match the capabilities you intend to use in your Python script for the real device. Ensure your device name and UDID (for iOS) are correctly entered.
Ensure the Appium Server address is set to
http://127.0.0.1:4723/wd/hub.Click “Start Session.”
Example for iOS tesing and
Inspect Elements and Create Locators:
Use Appium Inspector to inspect the UI hierarchy of your app on the real device.
Identify the elements you want to interact with and create locators (e.g.,
accessibility_id,xpath,resource-id).Copy the locators, and paste them into your Python code.
Write Your Test Script:
- Use the locators you created in your Appium Python script to interact with the app elements.
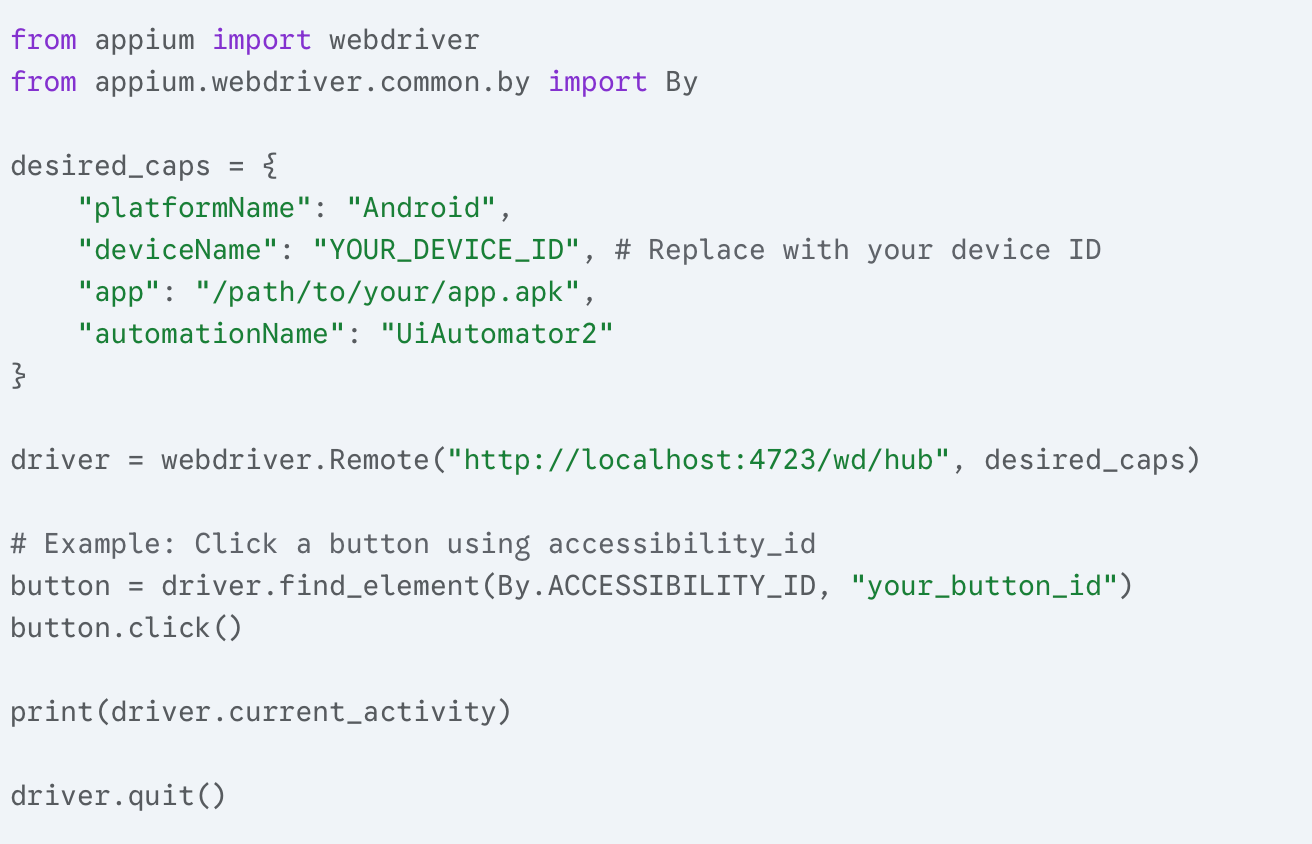
Example Android Testing
Run Your Test:
Execute your Python test script.
Observe the test running on your connected real device.
9. App Center/Flight App and CI/CD Flow
App Center/Flight App: These platforms (Microsoft App Center for Android/iOS, and Apple’s TestFlight for iOS) are used for distributing beta versions of your app to testers.
Flow:
Distribution: The built app is uploaded to App Center/Flight App.
Testing: From App Center or Flight app, the app is installed onto devices. Then automated tests are ran on BrowserStack.
Reporting: Test results are collected and reported back to Azure DevOps.
Deployment: If tests pass, the app is deployed to the app store.
10. Integrating with Azure DevOps
To automate this flow, you can use Azure DevOps pipelines:
Use Azure DevOps tasks to build your Android/iOS app.
Use the App Center/Flight App tasks to distribute your app.
Use scripting tasks to trigger your Appium tests on BrowserStack.
Use test result publishing tasks to publish the results.
Sample snippet(azure-pipelines.yml):
   trigger:
     branches:
       include:
         - main

   pool:
     vmImage: 'ubuntu-latest'

   steps:
   - task: UsePythonVersion@0
     inputs:
       versionSpec: '3.x'

   - script: |
       pip install -r requirements.txt
       pytest tests/
     displayName: 'Run Appium Tests'
. App Upload (Optional)
You can upload your
.apkor.ipato:App Center
BrowserStack
        curl -u "user:key" \
          -X POST "https://api-cloud.browserstack.com/app-automate/upload" \
          -F "file=@app/build/app-debug.apk"
11. Running the Test (BrowserStack and Local)
Local: Start Appium server and run your Python script.
BrowserStack: Ensure you have your BrowserStack credentials configured, and then run your Python script. BrowserStack handles the device management.
12. Common Issues Faced (BrowserStack and Local)
BrowserStack Authentication: Double-check your username and access key.
BrowserStack Device Availability: Ensure the device you’re requesting is available.
App Center/Flight App Distribution Errors: Verify your app build and distribution settings.
CI/CD Pipeline Errors: Check your Azure DevOps pipeline configuration for errors.
Local Emulator/Simulator issues. Same as before.
13. Conclusion
Automating mobile testing with Appium and Python, especially with tools like BrowserStack and App Center/Flight App, streamlines the testing process. Integrating these tools into a CI/CD pipeline with Azure DevOps further enhances efficiency.
Bonus Tips:
Leverage BrowserStack’s parallel testing capabilities to speed up testing.
Use App Center/Flight App to gather feedback from testers.
Keep your CI/CD pipeline modular and maintainable.
Always test on real devices to catch device-specific issues.
Subscribe to my newsletter
Read articles from arya bhattathiri directly inside your inbox. Subscribe to the newsletter, and don't miss out.
Written by