Learning Git and GitHub
 Aditya Dev Shrivastava
Table of contents
- Introduction
- Installation of Git
- Hands-On 1: Init, Add, Status, Commit, Restored, Log Commands
- Hands-On 2: Reset Command
- Hands-On 3: Stash, Stash Pop, Stash Clear Commands
- Hands-On 4: Accessing GitHub (Push)
- Learn Git Branching
- Fork in Git
- Hands-On 5: Working with Existing Projects on GitHub
- Force Push in Git
- Making forked project even with main project
- Hands-On 6: Squashing Commits
- Merge Conflicts
- 🔚 Closing Thoughts
Introduction
Git
Git is a distributed version control system used to track changes in source code during software development. It allows multiple developers to work on the same project simultaneously without overwriting each other’s changes.
🔑 Key Features of Git:
Distributed: Every developer has a full copy of the codebase, including its history.
Version Control: Keeps track of every change made, so you can revert to previous versions easily.
Branching & Merging: You can create separate branches for features or fixes and merge them back into the main project once complete.
Collaboration: Enables smooth collaboration through platforms like GitHub, GitLab, and Bitbucket.
💬 In Simple Terms:
Git helps you save versions of your code, work on multiple things at once, and collaborate with others without chaos.
GitHub
GitHub is a web-based platform that provides hosting for software development projects using Git. It offers a user-friendly interface to manage Git repositories and collaborate with others on code.
🔑 Key Features of GitHub:
Repository Hosting: Store and manage your Git repositories online.
Collaboration: Work with teams using features like Pull Requests, Issues, and Code Reviews.
Version Control: Built on Git, so you get all of Git’s version tracking benefits.
Actions & CI/CD: Automate testing and deployments using GitHub Actions.
Open Source Projects: Explore and contribute to millions of public repositories.
💬 In Simple Terms:
Git is the engine, and GitHub is the garage where you store, showcase, and work on your code with others.
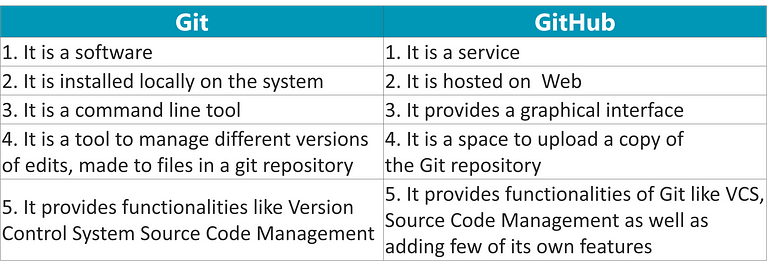
Git vs GitHub
Installation of Git
For installation of Git in Windows, MacOS, Unix/Linux use- “https://git-scm.com/downloads“
NOTE:
Windows users can use git bash, all the commands will work.
When using git for the first time, set the global configs using the commands:
$ git config --global user.name "your_name"
$ git config --global user.email your_email
Hands-On 1: Init, Add, Status, Commit, Restored, Log Commands
Make a folder on your desktop-
mkdir project
Let’s go inside this folder-
cd project
Now, we need to see, where all the history is getting captured. To check this, first we need to initialize the git using
git initSince, the git folder is hidden, we need to use
-aoption withlsls -a
Let’s make a chance in the folder by creating a text file using
touch names.txt
But, now the question raised over here is that, does this history maintained anywhere in the git ??
Answer is simple, “NO“.
We can easily see the untrack status of that file using
git status
So, currently, if you share this project with someone, it will not get included.
To maintain these changes in the history use-
git add .
Now, the changes are staged.
Second thing that need to be done is commit, use-
git commit -m “names.txt file added“
Okay, now let’s go little deep inside this by making changes in the names.txt file and let’s commit it-

Suppose, you have made changes to a file and then you have transferred them to a staged section, now you want to unstage them, then use-
git restore --staged names.txt
To check the log of all the commit’s use-
git log
Hands-On 2: Reset Command
In this section, we will perform few operations based on deletion of a file and then restoring. For this, first delete the file and commit it-

Imagine, you did this by mistake, now you want to restore this file, means you just want to delete the “deleted“ commit. For this, you can copy the commit-id of the previous commit and use-
git reset <commit-id>
See, by this, last 2 commit messages got removed from the log. Now, they are present in the unstage location and also, add those changes in the staged area-

Hands-On 3: Stash, Stash Pop, Stash Clear Commands
Now, just create few commits-

Let’s say, we don’t want to lose those changes and also we don’t want to commit these changes. At this point of time, we will use the stashing changes concept. Use command-
git stash
Here, we’ve stashed the files and brought back the names.txt file in a stage, when it was created i.e., a blank file.
This time, we need all those changes, which we’ve sent earlier in the stash. Use-
git stash pop
Actually, I’ve changed my mind, I don’t want to pop them, I just need to delete these changes from the stash area. Use-
git stash clear
This will permanently remove the changes.
Hands-On 4: Accessing GitHub (Push)
Create a repo in the GitHub as below-

Now, add this repo in our Git using-
git remote add origin <URL>
Also, to check the URL’s use-
git remote -vNow, we need to add all the changes that we’ve done in our Git into the GitHub, for this we will use-
git push origin main
After this, we will be able to see all the desired files in the GitHub-

Learn Git Branching

In this web tool, as you can see that-
C0, C1, C2, C3, C4 we’ve made 5 commits using “
git commit“After that we’ve created one more branch using “
git branch feature“.Using “
git checkout feature“ we’ve bring the head to a feature branch. It was denoted by the*.In the feature branch, we’ve again made 2 more commits i.e., C5, C6 using “
git commit“.Till here, we can assume that, we’ve created one branch locally and we’ve made the commit’s in our local branch i.e., feature branch. Now, we will merge it to the main branch.
To bring back the head to the main branch, we will use “
git checkout main“In the main branch, we’ve made one more commit i.e., C7 using “
git commit“Now, let’s merge the feature branch into a main branch using- “
git merge feature“
Using this, we can easily understand the concept of branches, head & merge.
Fork in Git
What is a Fork in Git?
A fork is a copy of a repository that lives in your own GitHub account, separate from the original (also known as the "upstream") repository.
Forking a repository allows you to freely experiment with changes without affecting the original project. It’s a key part of open-source collaboration.
Why and When to Use a Fork?
You typically fork a repository when:
You want to contribute to someone else’s project.
You want to experiment or build on top of a project independently.
You don’t have write access to the original repo but still want to work on it.
Fork vs Clone
| Feature | Fork | Clone |
| Purpose | To contribute to someone else’s project | To work on your own or existing repo |
| Ownership | New repo under your GitHub profile | No new repo created |
| Remote link | Links to your forked repo | Links to the original repo |
| Collaboration | Used for contribution workflows | Used for direct repo access |
Hands-On 5: Working with Existing Projects on GitHub
We are having one repo with “commclassroom/commclassroomOP“ and we want to make some changes in it. Directly, it’s not possible to add some changes in this repo. To do that, we need to do a fork, so that the copy will be created in our Git account-

Just after fork, we can see this repo in our Git account-


Now, we will clone this repo to our local desktop drive using- “git clone https://github.com/AdityaGITSession/commclassroomOP.git“


See, now we are able to see the commclassroomOP folder over the desktop. Now, we can do anything in this folder.
Hope you remember that, we are having our account URL linked with the Git as “origin“, same we want to add “commclassroom“ URL as a “upstream URL“. For that, copy the URL from actual account and use remote add command-

Now, for more hands-on, let’s make some changes in the readme file

In between, we’ve learned that, never ever commit on a main branch, so let’s create a new branch for this-

After branch creation, we’ve done staging and commit. Details can be checked using log command.
This time, we will learn about “PULL Request”.
Firstly, push the changes to the origin URL i.e., in our account, so that we can see the changes which was made in the local folder-


Note: tried from the Git, due to some issue, the changes were not getting reflected into the GitHub. So, I’ve done it using the portal. But the visualization will be same.
Tried one more time-


Now, able to see the changes in the aditya-branch.


Here, now the owner can check this request and take a proper action to merge the changes in the desired location.
Key Point: For every bug/feature always create a new pull request. And if a branch is having already opened one pull-request then it will not open another pull-request, all the commits will go into that pull-request and it will become harder during the discussions.
In short, One Pull-Request means One Branch.
Force Push in Git
What is Force Push in Git?
git push --force (or git push -f) overwrites the remote branch with your local branch’s state — even if it rewrites history.
It’s used when your local branch has diverged from the remote and you want to push your version regardless of what’s on the remote.
When Do You Use Force Push?
Here are some common use cases:
After Rewriting History (like using
git rebase,git commit --amend, orgit reset):- These change your commit history, which Git normally won’t allow you to push without force.
git push --force
To Undo Mistakes:
- If you accidentally pushed sensitive data or a broken commit, you can reset your branch and force push a corrected version.
Making forked project even with main project
Till now, what we’ve done is-
Forked the project into our account.
Created a branch and made the changes.
Created a pull-request, so that the changes can be merged to the original project.
But, currently those changes are not in-sync with the main branch of our Repo. To do that, we have 2 options-
Use the sync fork button.
Manually-
git checkout maingit statusgit loggit fetch --all --prunegit reset --hard upstream /maingit loggit push origin mainOR (instead of fetch and reset we can use below method)
git pull upstream main
PULL vs Fetch
🔁 git fetch vs git pull
| Feature | git fetch | git pull |
| Definition | Downloads commits, branches, and tags from a remote repository | Downloads and merges changes from the remote repository into your current branch |
| Merging | ❌ No merge happens automatically | ✅ Automatically tries to merge after fetching |
| Safe? | ✅ Safe — doesn’t affect your working branch | ⚠️ Risky — may cause merge conflicts |
| Best For | Reviewing changes before applying them | Quickly syncing local branch with remote |
Hands-On 6: Squashing Commits
Squashing commits is a Git technique used to combine multiple commits into a single, clean commit. It's super helpful when cleaning up your commit history before merging a feature branch into main or master.
Squashing means taking a bunch of commits and compressing them into one.
Let’s create new branch-

Create few commits-


Now, we’ll use the rebase command-


Here, I just want to merge touch 1 and rest as squash-


This is how, we can use this squashing method.
Merge Conflicts
Merge Conflicts in Git
A merge conflict happens in Git when two branches have changes to the same line of a file or when one branch deletes a file that the other branch modifies. Git doesn’t know which version to keep, so it asks you to resolve it manually.
When Do Merge Conflicts Happen?
Common scenarios:
Two people edit the same lines in the same file.
One person deletes a file that someone else edits.
Changes are made on both
mainand your feature branch and then you try to merge.
What Does a Conflict Look Like?
If you run:
git merge feature-branch
and there's a conflict, Git will show this inside the file:
<<<<<<< HEAD
This is your change on the current branch.
=======
This is the change coming from the feature branch.
>>>>>>> feature-branch
You must decide which version to keep or merge both manually.
How to Avoid Merge Conflicts
Communicate often with your team.
Pull latest changes before you start working:
git pull origin mainKeep branches short-lived.
Use feature flags to avoid huge merges.
🔚 Closing Thoughts
Thank you for taking the time to explore this blog on Git! Whether you're just beginning your journey into version control or brushing up on advanced Git concepts, I hope this guide has given you clarity, confidence, and a deeper understanding of how Git empowers collaborative development. Remember — Git isn’t just a tool; it’s a skill that grows with practice. So go ahead, experiment with branches, commits, and merges — and don’t fear conflicts, they’re just learning opportunities in disguise! 💻🚀
If you found this helpful, feel free to connect, share, or drop your thoughts in the comments.
Happy coding! 🙌✨
#Git #VersionControl #DeveloperTools #TechBlog
Subscribe to my newsletter
Read articles from Aditya Dev Shrivastava directly inside your inbox. Subscribe to the newsletter, and don't miss out.
Written by